UNIVERSITI TEKNIKAL MALAYSIA MELAKA
DEVELOPMENT OF PORTABLE AIR CONDITIONING USING
PELTIER EFFECT FOR SMALL AREA USES
This report is submitted in accordance with the requirement of the Universiti Teknikal Malaysia Melaka (UTeM) for the Bachelor of Electronics Engineering
Technology (Industrial Electronics) with Honours
by
TAN SZE YING B071310496 930427-08-6554
UNIVERSITI TEKNIKAL MALAYSIA MELAKA
BORANG PENGESAHAN STATUS LAPORAN PROJEK SARJANA MUDA
TAJUK: Development of Portable Air Conditioning Using Peltier Effect For Small Area Uses
SESI PENGAJIAN: 2016/17 Semester 1
Saya TAN SZE YING
Mengaku membenarkan Laporan PSM ini disimpan di Perpustakaan Universiti Teknikal Malaysia Melaka (UTeM) dengan syarat-syarat kegunaan seperti berikut:
1. Laporan PSM adalah hak milik Universiti Teknikal Malaysia Melaka dan penulis. 2. Perpustakaan Universiti Teknikal Malaysia Melaka dibenarkan membuat salinan
untuk tujuan pengajian sahaja dengan izin penulis.
3. Perpustakaan dibenarkan membuat salinan laporan PSM ini sebagai bahan pertukaran antara institusi pengajian tinggi.
4. **Silatandakan ( )
SULIT
TERHAD
TIDAK TERHAD
(Mengandungi maklumat yang berdarjah keselamatan atau kepentingan Malaysia sebagaimana yang termaktub dalam AKTA RAHSIA RASMI 1972)
(Mengandungi maklumat TERHAD yang telah ditentukan oleh organisasi/badan di mana penyelidikan dijalankan)
Alamat Tetap:
5, Lorong Makmur 2, Taman Makmur,
Jalan Manggis.
36000 Teluk Intan, Perak.
Tarikh: __9/12/2016___________
Disahkan oleh:
Cop Rasmi:
i
DECLARATION
I hereby, declared this report entitled “Development of Portable Air Conditioning Using Peltier Effect for Small Area Uses” is the results of my own research except
as cited in references.
Signature : ……….
Author’s Name : TAN SZE YING
ii
APPROVAL
This report is submitted to the Faculty of Engineering Technology of UTeM as a partial fulfillment of the requirements for the degree of Bachelor of Electronics Engineering Technology (Industrial Electronics) with Honours. The member of the supervisory is as follow:
iii
ABSTRAK
iv
ABSTRACT
v
DEDICATION
vi
ACKNOWLEDGEMENT
vii
TABLE OF CONTENT
DECLARATION ... i
APPROVAL... ii
ABSTRAK ... iii
ABSTRACT ... iv
DEDICATION ... v
ACKNOWLEDGEMENT ... vi
TABLE OF CONTENT ... vii
LIST OF TABLES ... x
LIST OF FIGURES... xi
LIST OF ABBREVIATIONS, SYMBOLS AND NOMENCLATURE ... xiv
CHAPTER 1: INTRODUCTION ... 1
1.0 Introduction ... 1
1.1 Problem Statement... 9
1.2 Objectives ... 10
1.3 Scope ... 10
CHAPTER 2: LITERATURE REVIEW ... 11
2.0 Introduction ... 11
2.1 Peltier Effect ... 11
2.2 Seebeck Effect ... 13
2.3 Peltier Module ... 15
2.4 Application of Peltier Module ... 18
viii
2.6 Disadvantages of Peltier Module... 20
2.7 Heat Sink ... 20
2.8 Boost Converter ... 22
2.9 Voltage Regulator... 29
2.10 Boost Converter Using ATtiny85... 31
2.11 Current Gain ... 33
2.12 Research Related Previous Work ... 34
2.13 Conclusion ... 37
CHAPTER 3: METHODOLOGY ... 38
3.0 Introduction ... 38
3.1 Overview of Project... 38
3.1.1 Project Planning ... 39
3.1.2 Flowchart of Overall Project ... 41
3.1.3 Flowchart of Boost Converter ... 42
3.1.4 Flowchart of PWM Pulse from Arduino UNO R3 ... 44
3.2 Software Development ... 45
3.2.1 Proteus Software ... 45
3.3 Hardware Development ... 46
3.3.1 Calculation for the Value of the Components ... 46
3.3.2 PWM Pulse from Arduino Uno R3 ... 48
3.4 Alternative Ways for Boost Converter Design ... 49
3.5 Module Boost Converter As Control And References For Result ... 52
CHAPTER 4: RESULTS & DISCUSSION ... 53
4.0 Introduction ... 53
ix
4.2 Boost Converter ... 57
4.2.1 Basic Boost Converter... 57
4.2.2 Boost Converter Using ATtiny85 ... 58
4.2.3 Current Gain Circuit ... 64
4.2.4 Current Gain Circuit Using Darlington Pair ... 66
4.2.5 Summary of the Data Obtained ... 68
4.2.5 Boost Converter Module ... 68
CHAPTER 5: CONCLUSION AND RECOMMENDATIONS ... 73
5.0 Introduction ... 73
5.1 Summary of Research... 73
5.2 Recommendations for Future Works... 75
x
LIST OF TABLES
Table 2. 1: Specifications of the Performance of TEC1-12706 ... 17
Table 2. 2: Advantages of Peltier Module... 19
Table 2. 3: Disadvantages of Peltier Module ... 20
Table 2. 4: Pins Configuration of ATtiny85 for Arduino IDE... 32
Table 3. 1: Gantt Chart of Project Plan ... 40
Table 3. 2: Summary of the Basic Boost Converter Parameter ... 48
Table 4. 1: Summary of the Values of Voltage and Current... 68
Table 4. 2: The Data of the Hot Temperature Against Time ... 70
xi
LIST OF FIGURES
Figure 1. 1: Peltier Circuit... 1
Figure 1. 2: Seebeck Circuit ... 3
Figure 1. 3: Construction of the Peltier Air Conditioner... 4
Figure 1. 4: Boost Converter ... 5
Figure 1. 5: Variation of Duty Cycle... 6
Figure 1. 6: Arduino Uno R3 ... 6
Figure 1. 7: ATtiny85... 7
Figure 1. 8: Pin Configuration of an ATtiny85 ... 8
Figure 1. 9: Voltage Regulator (L7805CV) ... 8
Figure 1. 10: Pins Configuration of Voltage Regulator (L7805CV)... 8
Figure 2. 1: Working Principles of a Thermocouple Cooler/Heater ... 12
Figure 2. 2: Thomas Johann Seebeck ... 13
Figure 2. 3: Illustration of the Seebeck effect of a Single Wire With a Temperature Difference Between the Two Ends... 14
Figure 2. 4: Illustration of the Seebeck Effect of a Thermocouple Made of Two Different Material... 14
Figure 2. 5: Peltier module ... 16
Figure 2. 6: Performance Curve ... 17
Figure 2. 7: Conventional Arrangement for Thermoelectric Cooler ... 18
Figure 2. 8: The Arrangement of a TEC Thermoelectric Cooler Improved System.. 21
Figure 2. 9: Corresponding Circuit of a Boost Converter When the Switch is Closed ... 22
Figure 2. 10: The Inductor Voltage Waveform of a Boost Converter When the Switch is Closed. ... 23
Figure 2. 11: The Inductor Current Waveform of a Boost Converter When the Switch is Closed ... 24
xii Figure 2. 13: The Capacitor Current Waveform of a Boost Converter When the
Switch is Closed ... 24
Figure 2. 14: Equivalent Circuit of a Boost Converter When the Switch is Opened . 25 Figure 2. 15: Pin of IC7805... 30
Figure 2. 16: Block Diagram of Voltage Regulator ... 30
Figure 2. 17: Circuit Connection of Voltage Regulator ... 31
Figure 2. 18: Boost Converter Using ATtiny85 ... 31
Figure 2. 19: Pin Configuration of ATtiny85 ... 32
Figure 2. 20: Current Gain Circuit ... 33
Figure 3. 1: Block Diagram for Portable Air Conditioner ... 38
Figure 3. 2: Flowchart of Overall Project ... 42
Figure 3. 3: Flowchart of Boost Converter ... 43
Figure 3. 4: Flowchart of the PWM pulse of Arduino UNO R3 ... 44
Figure 3. 5: Schematic of the Arduino Uno R3 Produces PWM pulse ... 48
Figure 3. 6: Code That Produces PWM Pulse Using Arduino Uno R3 ... 49
Figure 3. 7: The Schematic of the Boost Converter That Using ATtiny85 as a Microcontroller to Boost the Voltage And Current ... 50
Figure 3. 8: The Code Programmed to the Microcontroller, ATtiny85 Using Arduino Uno R3 ... 51
Figure 3. 9: The module of boost converter ... 52
Figure 4. 1: Accessories of Air Conditioner Prototype ... 54
Figure 4. 2: Accessories of Peltier Module, Insulation Pad, Heat Sink and Thermal Grease ... 54
Figure 4. 3: Different Categories of Screws... 54
Figure 4. 4: Steps for Applied the Thermal Grease on the Peltier Module ... 55
Figure 4. 5: Heat Pad Pasted on Top of the Center of the Heat Sink ... 55
Figure 4. 6: Paste the Peltier Module on Top of the Heat Sink ... 55
Figure 4. 7: Suppress the Peltier Module ... 56
Figure 4. 8: Coated a Layer of Thermal Grease at the Cold Surface. ... 56
Figure 4. 9: Screw the Conduction-Cooled Block with the Peltier Module ... 56
xiii
Figure 4. 11: The Waveform of the Input Voltage ... 61
Figure 4. 12: The Waveform of the Regulated Output Voltage of the Voltage Regulator ... 61
Figure 4. 13: The Waveform of the Voltage Across the Shunt Resistor for the Input Voltage ... 62
Figure 4. 14: The Waveform of the Voltage Across the Shunt Resistor for the Output of the Voltage Regulator ... 62
Figure 4. 15: The Waveform of the Output Voltage of the Boost Converter Using ATtiny85. ... 63
Figure 4. 16: The Waveform of the Voltage Across the Shunt Resistor for the Output of the Boost Converter Using ATtiny85. ... 63
Figure 4. 17: The Hardware Circuit of the Voltage Regulator and Boost Converter Using ATtiny85 ... 64
Figure 4. 18: The Waveform of the Output Voltage of the Current Gain Circuit ... 65
Figure 4. 19: The Waveform of the Voltage Across the Shunt Resistor for the Current Gain Circuit ... 65
Figure 4. 20: The Hardware Circuit of the Current Gain ... 66
Figure 4. 21: The Current Gain Circuit Using Darlington Pair ... 66
Figure 4. 22: The Waveform of the Outp ut Voltage of the Current Gain Circuit Using Darlington Pair ... 67
Figure 4. 23: The Waveform of the Voltage Scross the Shunt Resistor for the Current Gain Circuit Using Darlington Pair... 67
Figure 4. 24: The Hardware of Current Gain Circuit Using Darlinton Pair ... 67
Figure 4. 25: The Hardware of the Prototype of Portable Air Conditioner ... 69
Figure 4. 26: Graph of Hot Temperature (°C) Against Time (s) ... 70
Figure 4. 27: Graph of Cold Temperature (°C) Against Time (s) ... 71
xiv
LIST OF ABBREVIATIONS, SYMBOLS AND
NOMENCLATURE
A - Ampere
AC - Alternating Current
C - Capacitance
°C - Degree Celcius
D - Duty Cycle
DC - Direct Current
f - Frequency
I - Current
IC - Integrated Circuit
I/O - Input / Output
kW - Kilowatt
L - Inductance
mW - Milliwatt
P - Electrical Power Supplied
PCB - Printed Circuit Board
psi - Pounds Per Square Inch
PWM - Pulse Width Modulation
Q - Heat Absorption Per Unit Time
Q1 - Heat to be Pumped
Q2 - Heat Dissipated to the Ambient
R - Resistance
r - Voltage Ripple
S - Seebeck Coefficient
s - Seconds
SMPS - Switched-mode Power Supply
T - Temperature
TEC - Thermoelectric Cooler
xv
V - Voltage Difference
- Pie% - Percentage
τ - Torque
1
CHAP TER 1
INTRODUCTION
1.0 Introduction
Recently, the weather seemed to be hotter and hotter compared to previous. Thus, everyone is feeling hot and have a great concern on the development of a portable air conditioner. Hence, in order to solve the problem, many researchers are trying to find an alternative air conditioner technology in order to replace an inconvenient air conditioner. But nowadays, many of the air conditioners are using AC power supply to power up the air conditioner. Instead, a system of using the Peltier effect is needed for the air conditioner to be functioning.
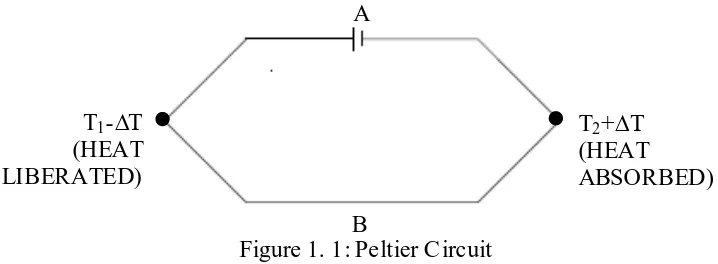
[image:18.612.144.503.496.628.2]The Peltier effect is where heat is liberated or absorbed when an electric current flows through the junction of two different metals. The heat is absorbed in the hotter intersection point while the heat is liberated at the colder intersection point when the electric current is flowing in the same direction. The Peltier circuit is as shown in the Figure 1.1.
Figure 1. 1: Peltier Circuit
This impact is unique in relation to the development of heat depicted toward Ohmic (𝐼2𝑅) losses. This impact will be reversible, high temperature constantly
advanced as current flows in a direction across the intersection point, and absorbed when A
B T1-∆T
(HEAT LIBERATED)
2 the current in the reverse direction. The junction or also known as the intersection point is the origin of a Peltier voltage. When current is flows across the junction which in the opposite direction of the voltage, a heating action happens. The intersection point is cooled, if the current is flows in the direction of the Peltier voltage,
The Peltier effect is defined by:
QAB I (1) Where 𝑄 is the heat absorption per unit time, AB is the Peltier coefficient, and 𝐼 is the
current.
While the two dissimilar metals are in contact with electrical, the electrons of a metal with fewer electrons bound flow out to the higher number of electrons bound's metals. This phenomenon known as Fermi level among the two dissimilar metals. The Fermi level represents the differentiation in energy within the conduction band of a metal. The conduction band is the band among the two energy levels which in use by electrons and those that are not occupied.
When the two dissimilar metals which have different Fermi levels are place in contact, the electrons flow from the metals that have a higher altitude to a lower altitude until the electrostatic potential changes and brings the two Fermi levels to the same value. This electrostatic potential can also be known as the contact potential.
With this, when the current flows through the intersection point of the two dissimilar metals or also known as the junction of the two dissimilar metals, it causes in either a forward or reverse bias which also cause the temperature to be changed which results in a temperature gradient. The cold plate’s temperature can be cooled by tens of degrees if the temperature of the hotter intersection point is maintains low by dissipating the generated heat.
3 kept in a hot region, current flows from copper to iron across the hot junction. The Seebeck circuit is as shown in the Figure 1.2.
Figure 1. 2: Seebeck C ircuit The Seebeck effect is defined by:
2 1 ) ( ) ( T T A B T S T dT SV
(2) Where 𝑉 is the voltage difference, 𝑆 is the Seebeck coefficient, and 𝑇 is the temperature at the junction.
The Peltier module, also known as the thermoelectric module is an energy converter in solid state that consists of a cluster of the thermocouple that connects in series and thermally in parallel in an electrical circuit. A Peltier module is also able to transfer heat from one region to the other region using the Peltier effect. It functions when two heat sinks are pasted to its hot and cold parts for the heat transfer.
A Peltier TEC also acts as a temperature control with high efficiency. An active heat transport is produced when an electrical current flows through the Peltier TEC. The cooling effect of a Peltier TEC is proportional to current, but the internal heating due to
𝐼2𝑅 losses is proportional to the square of the current. When current increases, the
efficiency decreases while maximum cooling occurs at some specific current. The PWM produced by the regulated temperature of the microcontroller needed to be filtered so that the Peltier TEC sees relatively smooth current.
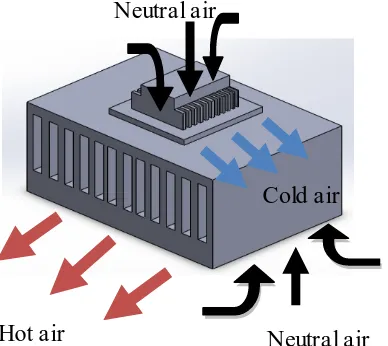
With this, a product that is small, portable and lightweight compared to the other products that we review was highlighted. In order to archive this target, the mechanism of the air flow through the air conditioner module and also the basic construction of the
4 air conditioner module should be studied. The air conditioner module used the Peltier TEC module which using Peltier effect as the heat is liberated or absorbed when an electric current flows across a intersection point of two different metals. The construction of the Peltier air conditioner was as shown in Figure 1.3.
Figure 1. 3: Construction of the Peltier Air Conditioner
In order to fulfill the condition of a portable air conditioner, a boost converter needed to be designed to supply the voltage source to the air conditioner to be functioning well. Most of the air conditioners nowadays are still using the AC power supply but in this case, a design of DC to DC boost converter was used to provide a DC voltage source to the air conditioner to be functioning.
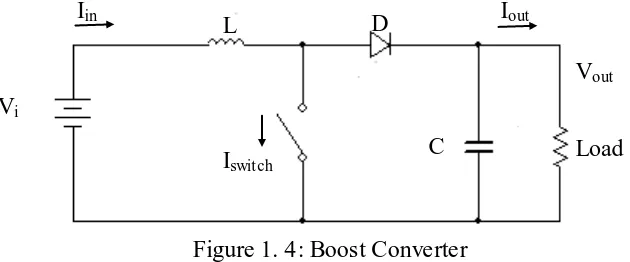
A boost converter is a DC to DC converter that boosts a lower DC voltage to a higher DC output voltage. It is also known as a step- up converter. A DC boost converter is also one of the classes of a switched-mode power supply (SMPS) which contain minimum of two semiconductors which are a diode and a transistor and at least one energy storage space element which are a inductor, capacitor, or both. To reduce the voltage ripple, r, filters made of capacitors are usually connected to a converter's output and input.
By using a boost converter in any application, it can increase the voltage value and reduce the cells that normally needed. Thus, it is more portable because by decreasing the number of cells, the weight of the cells can also be decreased and thus it is more convenient to bring anywhere. For example, a boost converter can step up an
Neutral air
Neutral air Hot air
5 input voltage of 6V to an output voltage of 12V which means that we can obtain a higher output voltage by using a lower input voltage which passes through a boost converter. Below is the basic schematic of a boost converter:
Figure 1. 4: Boost Converter
To drive a DC boost converter, the tendency of an inductor is the main principle to oppose the changes in current by providing and destroying a magnetic field.
Boost converter can function in two modes which are continuous mode and discontinuous mode. For the continuous mode, the current that flows through the inductor will not equal to zero. While for the discontinuous mode, at one point of time, the current that flows through the inductor become zero due to the using up of energy by the load.
Besides, the switch of the DC boost converter is normally connected to a MOSFET which receive the Pulse Width Modulation (PWM). PWM is a manner to send signal which is in varies from a given set signal. PWM can change the duty cycle of a square wave to vary the power supplied. PWM varies due to the signal that gets the duty cycle and averages of the power signal as output. The bigger is the duty cycle that produced by the PWM, the bigger is the output signal. This can be seen in Figure 1.5.
Vi n
L Iin
D Iout
Vout
C Load
6 Figure 1. 5: Variation of Duty Cycle
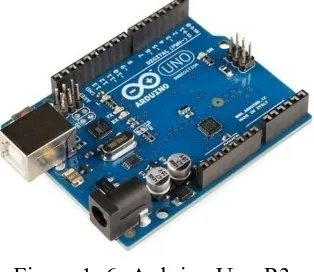
In this project, an Arduino Uno will be used to generate the PWM. An Arduino is a software company where this software is in open-source which can get the sources from internet. An Arduino is a microcontroller board designs, produced by several vendors and used different types of microcontrollers. This system provides sets of digital and analog I/O pins that can interface to various development boards and other circuit. The Figure 1.6 shows the hardware of an Arduino Uno R3.
Figure 1. 6: Arduino Uno R3
An Arduino Uno R5 has 14 digital input or output pins. There are six pins have built in PWM function. The pins that do not have built in PWM function can still be used for PWM but must used in another way.
[image:23.612.251.408.403.539.2]7 already set for the pin. In other way, the DigitalWrite needs to calculate the required duty cycle but it lets for the changes of frequency.
The programming that used in an Arduino is C language which is a basic language that normally used in programming field. C language is a standard programming used for compiler and a boot loader that perform on the microcontroller.
[image:24.612.272.381.533.636.2]In addition, there is an alternative way of designing a boost converter which use microcontroller ATtiny85 as a switch control. The circuit design of boost converter using the microcontroller ATtiny85 follows the topology of the basic boost converter. ATtiny85 is a microcontroller that can be program by using the Arduino Uno. By using the ATtiny85, it can provide a faster pulse width modulation (PWM) compare to power Mosfet or BJT. Besides, ATtiny85 can save a few changes and make a smaller design. The most excellent order for setting up the chip to be used with the Arduino IDE is on the MIT, High Low Tech. The chips work alike to the Arduino Uno with some restrictions. When using an ATtiny85, a breadboard or circuit of a design is used. Different with an Arduino Uno, which has the pins at the headers numbered to go with the pin numbers in the Arduino IDE, then the ATtiny85 is wires to the actual physical pins. The numbers of analog pins are different with the digital pins at the same physical location. For example, both of the digital pin 2 and the analog pin 1 are the physical pin 7 while the physical pin 6 is also same as the Digital pin 1 and it has no analog input. This is due to the design of the chip and not caused by the Arduino software. The pin numbers are based on how port B and the ADC is mapped. Pin 7 is PB2 (digital pin 2) and ADC1 (analog pin 1).