Rochester Institute of Technology
RIT Scholar Works
Theses
Thesis/Dissertation Collections
5-1-1999
Dance as medicine
Eileen D'Esterno
Follow this and additional works at:
http://scholarworks.rit.edu/theses
This Thesis is brought to you for free and open access by the Thesis/Dissertation Collections at RIT Scholar Works. It has been accepted for inclusion
in Theses by an authorized administrator of RIT Scholar Works. For more information, please contact
Recommended Citation
ROCHESTER INSTITUTE OF TECHNOLOGY
A THESIS SUBMITTED TO THE FACULTY OF THE
COLLEGE OF IMAGING
ARTS
AND SCIENCES
IN
CANDIDACY FOR THE DEGREE OF
MASTER OF FINE ARTS
DANCE
AS MEDICINE
BY
EILEEN DTSTERNO
APPROVALS
Chief Advisor: Professor Glen Hintze
Date:
/ I
Chief Advisor: Professor Alan Singer
Date:
I /
Chief Advisor: Professor Luvon Sheppard
Chairperson: Dr. Thomas Lightfoot
Date:
_-I-I!H/~R:J+ICi~/q~·
_
vi""!
=-r
t T
I
/
I.
Eileen d'Estemo, hereby grant permission
to the Wallace Memorial Library
of Rochester Institute of Technology
to reproduce my thesis in whole or in part.
Any reproduction will not be for commercial use or profit.
IJAKI
1
K3DANCE
AS
MEDICINE
THE INTRODUCTION
The
purpose ofthis thesis
projecthas been
to
expressin
asculpturaldimension
the
joy
andhealing
qualities of movement.Movement
is
ourprimallanguage.
The very first
thing
wedo
uponleaving
the
wombis
to
move,
to
reach
for
our mother.Movement
allows usto
express ourfeelings
regardless ofthe
ability
to
makesound.Infants
andtoddlers
explorethe three
dimensional
world as
they
reach outto
touch,
to
feel,
to
experiencetextures
and shapes.They
gain confidence as physicalbeings
through
everincreasing
skillsandmobility
ofthe
body.
THE JOURNEY
Having
spent several yearsworking
withdeaf
children,
whoseprimary
means of communicationis
through
physicalsigning, I
know
how
powerful a simple gesture canbe. One
needs nolessons
to
interpret
the
language
ofthe
body,
we canperceive on alevel
much more expansivethan
common speech.Dance
as a medium of expression canbe
usedto
communicatejoy,
freedom,
sorrow,
even anger.In
culturalexchange,
dance
tells
stories,
invites
the spirits,
unites a
gathering,
dispels differences.
When
one can can mirror another'smovement,
a rapport andunderstanding
create a connection on a subconsciouslevel.
Whether
speaking
about a roomfull
of preschool childrenskipping
to
aphonograph,
a circle of strangersholding
hands
at aGreek
festival,
or aprofes sionalperforming
dance
corps,
there
is
nodoubt
that
dance
imparts
health,
healing,
and an expanded sense ofthe
beauty
oflife
to the
participants.I
began studying dance
as an undergraduatedue
to
aliberal
arts requirement and
became
addictedto the
sense ofjoy
it
gave me.I
took
electivesin
modern,
ballet,
jazz,
african and socialdance,
eventually
taking
moderntech
nique classfive days
aweek,
because
it
made mefeel
wonderfulinside
and out.After
graduating
with a majorin
Biological Sciences
and a minorin
Dance,
I
continued
my
studiesby
taking
classes withGarth Fagan Dance Theater
in
Rochester, NY,
untilit
grewinto
something
I
wasintent
uponpursuing
as acareer.
When
knee injuries deemed
it
necessary
that
I
follow
adifferent
path,
ajob
with a glass sculptor and some graphics projectsatmy
job
with an engineering
firm led
meto
considertravelling
into
the
field
of visual arts.The
biology
degree,
coupled withinterest in
the
healing
artsnaturally
pointed
to
medicalillustration,
andI
began
taking
part-timeillustration
anddesign
classesto
fulfill
the
requirementsfor
acceptanceto
the
Medical
Illustration
program.It
wasduring
this time that
I
began
to
experiencedance
in
a
different
vein,
alearning
that there
was adeeper
experienceto
be had from
movement.I
wasblessed
to
have
ateacher
ofAfrican
dance
whoimparted
notonly
movements,
but
alsotheir
meanings.In
earliertimes
in
Africa,
whenlan
guageswerediverse
andvaried,
atravelling
tribe
would announcetheir
pres encein
anotherpeoples'
Movements
low
to
the
ground with open arms andhands
showedhumil
ity,
andthe
absence ofweapons.Arms
raisedalternately
overheadandtoward
the
ground showed praise and reverencefor
the
sky
andearth,
and open gestures
from
the
heart
indicated
generosity
ofspirit, peacefulness,
andgiving.My
teacher
stressedthat these
movements were morethan
just
movements, that
onthat
continentprescriptivesfor
those
ailing
in
body
oremotionalso
included
the
making
ofmusic,
anddancing. She
encouraged allof our classto
practicethese
movements athome,
i.e.
when you werefeeling
low,
youcould use
these
gesturesto throw
offthe
beginnings
of aheadache,
or aheartache,
orany
sense ofbeing
stuck.You
could remindyourself, through
yourbody,
ofyourfreedom
and yourdivinity.
You
wouldremember, through
the
prayer ofthe movements, that
your presenceonthis
planetis
agift.This
experience,
morethan
any
other,
has
changedthe
way
I
viewliving,
moving,
andhealing.
Whether I
amtaking
anaerobics, yoga,
ballet,
or otherdance
class,
ormerely greeting
afriend,
opening my
arms still reminds methat
I
amopening my
heart,
both
to
give and receive.Dance
has been my
antidepressant,
my
antidote,
my
ally.THE THESIS WORK
I
did
have inclinations
to
do
my
thesis
work aroundthe
idea
ofaninteractive
teaching
programfor
visionimprovement,
but found
that
it
was abigger
projectthan
I
had
the
time
orknowledge
to
implement. And in
exploring
the
many
avenues
for
artmaking
atRTT
(due
to the
presence oftalented illustration
and craftsprofessors)
I
oversteppedthe timetable
for
finishing
the thesis
during
the
allottedtime
for
the
program.I
didn't know
whenI
wouldhave
the
opportunity
to
be
in
such afertile
ground ofart andcraft,
or whenI
mightbe
ableto
learn
all
these things
in
the
future.
I
wantedto take
advantage ofthe
present.After
all,
yourthesis
shouldbe something
youare movedby,
andsomething
youheartily
wantto
pursue.Once
I
had finished
the
required classworkfor
the
degree,
I
accepted aninternship
in Georgia
as amedical/legal
illustrator,
planning
to
work on paintings
for
my
thesis
on nights andweekends,
but
I
found
that
the
move andthe
9
to
5
took
up
more ofmy energy
than
I
had
imagined.
I
put offworking
onthesis
paintings.And
putthem
off some more.It
camedown
to
asking
myself,
"What
do I love
the
most and what wouldI
chooseto
communicate?"The
answerwas,
ofcourse,
dance
asahealing
art.Since
you can'tdance
your
thesis
(unless
you'rein
aperforming
artsprogram), I
chosethe
nextbest
thing,
which wasportraying
through
sculpturethe
joy
of movement.I
hadn't
actually done any
sculpture at all priorto
this,
andessentially
educatedmyself,
whichis
whatone would aspireto
continueto
do
throughout
alifetime.
I found
that
my
background
in
dance
gavethe
figures
ananimationthat
pureacademic
rendering
would notachieve...they
seemedto
speakto
me asI
madethem,
andit
felt
morelike
being
a choreographerthan
a sculptor.At
this
pointin
time,
those
workshave
already
been
sold,
whichencourages meto
pursuePART
TWO
IOMETHODS
AND
MATERIALS
The
Baby
Steps
I
wantedto
learn
the
process,
andto
usethe
most
consistent,
easiest,
and costeffective material.I
calledaplethoraofmolding/
casting
materialscompanies and
had
them
allsend mesamplesandprice
lists
and whatnot.A
numberof companiesalso sent
booklets
withplenty
of educationaldirec
tion
for moldmaking
and casting.Information
about
these
companiesis
listed
atthe
end ofthis
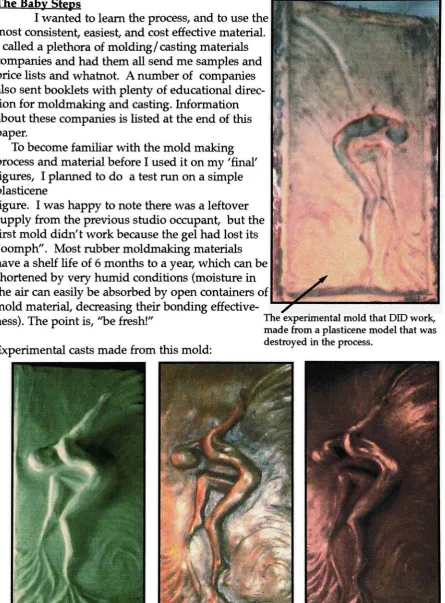
paper.To
become familiar
withthe
moldmaking
[image:6.566.64.510.68.672.2]processandmaterial
before
I
usedit
onmy
'final'figures,
I
plannedto
do
atest
run on a simple plasticenefigure.
I
washappy
to
notethere
wasaleftover
supply from
the
previous studiooccupant,
but
the
first
molddidn't
workbecause
the
gelhad lost
its
"oomph". Most
rubbermoldmaking
materialshave
a shelflife
of6
monthsto
ayear,
which canbe
shortened
by
very humid
conditions(moisture
in
the
aircaneasily be
absorbedby
opencontainers ofmold
material,
decreasing
their
bonding
effectiveness).
The
pointis,
"be
fresh!"The
experimental moldthatDID
work, madefrom
aplasticene modelthatwas, , , , . , ,
destroyed in
theprocess.Experimental
casts madefrom
this
mold:Plain PlasterCast Plain Polyester
Resin,
with "hammeredtexture"spray
paint and oil paintpatinaPolyester
Resin (withface
coatA. inc WIXJUEL, K.O
1.
PRELIMINARIES
My
first
models were made withplasticene,
which allowed meto
quickly
createforms,
in the
manner of gesture sketches.I
found
that
was notgetting
the
level
ofdetail
I
desired
and experimented withdifferent brands (and
grades ofhardness)
of plasticene.I had
alsodecided
by
this
pointthat
it
wouldbe
a more effectiveuse ofmy
time
to
createthe
figures separately from
the
horizontal
planes whichI
wantedthem to
be extruding from.
(A
note onplasticene,
should you chooseto
usethis
as yourmodeling
material...
moredetails
canbe
derived
by
applying
isopropyl
alcoholto the
surface-withfinger
orq-tip-because
it
temporarily
dries
outthe
surfaceoils.)
I
finally
settled onusing
"Sculpey,"
a non-organic polymer
clay
that
hardens
whenbaked
in
aconventional oven.Sculpey
allowedmeto
create moredetail
than
the
plasticenedid,
andthe
baking
only
involves 15
minutesfor
each1/4
inch
ofmodel
thickness
at275
degrees. I
used18
gauge wireto
makevery
simple armatures
andbuilt up
the
body
figure
aroundthe
wire.You
willfind
that the thinner
parts of
the
model getdarker in
colorbecause
they
are moreTjaked',
some ofthe
modelslooked like
they
were coal miners who workedbarefoot.
As far
astools go,
I
had
an assortment of wooden and metalsculpting
tools
left
overfrom
ceramicsclass,
but
honestly,
the
mostfrequently
useditems
were apaper
clip,
anExacto
knife,
andmy
fingers.
Here
aretwo
views ofthe
model used asthe
examplein
this
paper:V.l
A. THE
MODEL
1.
PRELIMINARIES
The
material your original modelis
made of willdetermine
what preliminary
steps you musttake
before making
arubber mold.If
the
materialis
porous,
(ie,
plaster orceramic)
you must sealthe
model sothat the
rubber cannot penetratethe
pores.Several
coats of pastewax,
allowedto
dry
andthen
polished will workwell.
Plasticene
has
ahigh
oil content and should not presentany
problems withmolding,
but
a release agentis
still recommended.Sculpey
is
a non organic plastic polymer andtends
to
be
avery
goodsurfacefor
molding.It
costs about$5.00 for
two
pounds,
less
if
youbuy
it in
quantity.2.
DIVINING
DIVISIONS
If
youhave
a simpleshape,
youcan make a one piece model andthings
willbe
fairly
easy for
you.I had
somewhat complexshapes withdeep
undercuts,
soaone-piecemold was out ofthequestion.
You
needto
choose apouring
pointthat
will allow your
casting
materialto
reach allareas,
andthen
createdivisions
that
will allow youto
removethe
mold asif
you aretaking
off a coat.Since I
wantedmy
piecesto
be
mounted onplaques,
I
decided
that
it
wouldbe
easierto
createthe
pieces and
the
bases
separately,
eventhough
my
experimentalmodelhad been
castin
one solid shape.I
chose a planefrom
whichto
mountthe
figure
anddecided
uponthe
mosteffective
parting
lines,
shownhere
by
the
blue
planes:Mold parting
line,
s shownby
blue
plane,bottom
viewP.8
A. THE MODEL
3.
SHAPING SHIMS
The
shims willform
the
parting
line
wherethe
brushed-on blanket
mold willopen.
I
created mineusing
thin
(1/2")
slabs ofplasticene,
extending
about 1"away from
the
model.If
simportant
to
create a smooth uninterrupted
line along
the
uneven surface ofthe model,
andto
have the
shim surface perpendicularto the
modelsurface.
Spending
quality
time
onthis
step
creates abetter
moldlater,
sobe
diligent.
(Note:
if
yourmodelis
made of soft
clay,
you can usedouble-folded
strips oftinfoil
as shims.Just
make sure
they
extend atleast
1" perpendicularly away from
the
model.Attaching
andsealing clay
shims.A. THE MODEL
4.
THE KEY TO KEY INDENTS
Because
youwill wantthe
separate mold pieces
to
matchexactly,
you need
to
create'snaps' orkeys
to
orientthe
soft mold piecesto
oneanother.
Making
indentations in
the
clay
withsomething
as simpleasthe
handle
of yourexactoknife
will createa reservoir
for
the
first
moldhalf
to
form
abutton,
whichthe
secondmoldhalf
willbuild
itself
upon.\J.9
A. THE MODEL
4.
SEALING THE
EDGES
Using
plasticene,
make surethat thereare no spacesbetween
the
edge ofthe
modeland
the
mounting
surface.Think
ofthe
caulking
around abathtub
or windowpane.Without
this
step,
rubber willfind its
way
underthe
modeland make
for
aconfusing
demolding
process.Here
the
modelis
ready
for
molding.
Note
that the
shimshave
key
indents,
are cleanand
smooth,
perpendicularto
KIU
A. THE MODEL
5.
A MOLD'S BEST FRIEND
:SPRAY
RELEASE
Since
the
rubberlikes
to
getinto
every
little
spaceit
can,
youwantto
makesure you will
be
ableto
removeit
from
the
model.With
a materiallike
Sculpey
(which
is
a plasticpolymer) there
is
very
little
'sticking',
but
aspray
release willensure
easy
de-molding.
If
youareusing any
kind
of porous material(like clay
models)
you will needto
giveit
several coats of paste wax orshellac,
letting
it
dry
thoroughly
between
coats,
andfinally
acoat ortwo
ofspray
release.I
used a release madespecifically
for
the
rubberI
wasusing,
"Polytek
2300",
it
costs about$8 for
a12
ozspray
canthat
willlast
through
many
molds.Spraying
release agent ontothemodel and shims.Once
youspray
it
on,
youcan workit into
the
crevices with a clean chinabristle
brush.
I kept
a small1/2
in.
brush
taped to the
can and usedit
only for
therelease agent.
It is
important to
givethe
release atleast
15-20
minutesto
dry
Kl I
B.
THE
SOFT MOLD
2. Part
One
of aTwo Part Mold
1.
MATERIALS
Standard
polyurethane rubber
comesin
two
partsthat
react with oneanotherupon mixing.You'll
wantto
have
your part'A'
andpart'B' pre-measured
in
equal volumes ahead oftime.
It is impera
tive that
youkeep
the
measuring
cups
for
the
two
partsseparate,
because just
alittle
bit
of one will makethe
entire container ofthe
other
ineffective.
Plastic
cupsdon't
cost
much,
better
to toss
yourcupsafter you use
them.
I
usedtranslucent
plasticcups
that
had
indented
lines
as apartof
their manufacture,
soit
waseasy
to
get exact amounts.Rubber
A
oneounce measure ofPart A
andPart B.
gloves,
astirring
stick,
and adisposable
chinabristle brush
shouldbe
onhand,
and rememberto
wear'work' clothes...that
rubber stuffdoesn't
comeoff!2. Part
One
of aTwo Part Mold
2. MIXING THE RUBBER
The
most effective mix of rubber componentsis
adding
THICK
to
thin,
in
this case,
Part
"A"to
Part
"B". Be
sureto
scrape out as muchofA
as possibleto
retain your volume ratio.
Stir
gently
so as notto
get
too
many
airbubbles
in
the mix,
and scrapethe
sidesof
the
cup
as you stir.Unmixed
componentwill make a weak spotin
the
mold,
andit
caneasily
tear
there.
The
material starts outlooking
like dark
honey,
and within a minutebegins
to
attainamilky
quality.You
don't
wantto
spendtoo
much
time mixing,
because
oncethe
color changestarts,
it
getsthick
very
quickly.P.
12B. THE
SOFT MOLD
2.
Part One
of aTwo Part Mold
3.
SMOOTH AND THIN
-THEFIRST
COAT-Using
adisposable
chinabristle
brush,
coverthe
entireexposed
model,
working
the
airbubbles
out ofthe
rubber
by
going
overthem
with
the
brush.
Since
this
is
athin coat,
it
willbe
fairly
easy
to
see wherethe
bubbles
are.Your
goalis
to
create asmooth,
continuous surface coat.Be
certainthat
youwork
the
rubberinto
the
key
indents
that
you madein
the
shims,
asthey
willhelp
'lock'the
separatemoldhalves
together
later. Work
quickly
and
steadily,
asthe
materialthickens
within a5-minute
period.
Applying
thefirst
coatof rubber.NOTE:
Allow 90
minutesfor
the
first
coatto cure,
before
youapply
the
second coat!!!It
is
possibleto
allow2
or3
days in between
coatsif
time
is
aproblem,
but if
s\J.\i
B.
THE
SOFT
MOLD
2. Part
One
of aTwo Part Mold
4.
COURTTNG
CABOSIL
-THESECOND
COAT-"Cabosil"
is
abrand
namefor
anhydrousfumed
silica.Also known
as'Aerosil',
it is
used as athickening
agentfor
the
rubber.(Think
ofcornstarchandgravy) I
mademy
first
couple of molds withoutit,
andthey
were notvery
effective,
because
the thinner
rubber willdrip,
andit is
difficult
to
have
aconsistently strong
mold.
The
Cabosil is very light
andvery
fluffy,
andyouwill wantto
wearadust
mask whilemixing
it
in,
asit
liberates itself into
the
airvery
easily.WHEN YOU ARE READY TO APPLY THE SECOND COAT...
Follow
the
same rulesfor
the
first
coat(equal
volumes,
cleantools,
gloves...)
AND
THEN....
Once
youhave
mixedA
andB
together
thoroughly,
youshould add a volume of
Cabosil
equal or greaterthan the total
volume ofthe
mix.(i.e.
3
ozA
+3
ozB
=6oz
total
mix.Therefore
use6
oz volumeofCabosil.)
Use
a containerthat
allows youto
mixvigorously
.I
used a16
ozcup
to
mixup
a6
ozbatch.
The
Cabosil
willfluff
around alot,
andit
will appearthat
nothing
is
happening,
but
keep
stirring.At
this
point,
airbubbles don't
matter muchbecause
the
density
ofthe
mix will either squashthem
out,
orhold
them in
place,
andif
you made yourfirst
coatcorrectly,
bubbles in any
additional coats will not affectthe
integrity
ofthe
mold surface.Mixing
partsA
andB
Adding
Cabosil
Most
of
the
Cabosil
is
When its
the
consistency
mixed
in,
andthe
mixture of sourcream,
if
sready
P. 14
B. THE SOFT MOLD
2.
Part One
ofaTwo Part Mold
5.
EXTRA
STRENGTH
-ADDITIONAL COATS
Three
coats willensure along-lasting
and stable mold.For
larger
molds,
four may
occasionally be
necessary.Follow
the
same procedurefor
mixing
the
Cabosil into
the
rubber andapply
to
the model,
being
sureto
coatevenly
andfill
key
indents.
DON'T RUSH! Allow 90
minutesbetween
coats.This is
actually
the thirdcoat oftheSECONDhalf
ofthe mold,(youare
viewing
themodelfrom
thetop/
chestarea)Yougetthe idea.
NOTE: Before
youactually
APPLY
the
LASTcoat,
make sureyouread
step
B.2.6.,
below.
2.
Part One
of aTwo Part Mold
6.
KEYS
FOR
ORIENTATION
TO
MOTHER
MOLD
One
step
I learned
about afterdoing
allthese
models wasthat
a much moreeffective cast
is
createdif
the
softmold can'lock
into'the
harder "mother
mold".You
can achievethis
by
adding
'buttons'to
yourmodel priorto
yourlast
coat ofthickened
rubber.These may be
castvery
simply
atthe
sametime
asthe
first
coat,
using
the
excess rubber.Plasticene
withindents
makes afine form for
these
simplebuttons.
While the
second coatis
setting,
attachthe
buttons.
The
third
coat willr.n
B.
THE
SOFT
MOLD
3.
Part Two
of aTwo Part Mold
1.
REMOVING
THE
SHIMS
2.
REPEAT
STEPS
2.1-2.5
AS ABOVE.
(MODEL
PREP: Clean
away
all residualplasticene.SPRAY
RELEASE: Be
sureto
coatremainderof exposedmodel,
(including
newly
createdrubberflanges)
withspray
release.Allow
atleast
15
minutesto
dry
before
application offirst
coat ofrubber.)
Applying
spray
releasetomodel and rubberflanges
(afterremoval of
clay
shims.)3.
FIRST
COAT,
SECOND SIDE
Follow
the
same guidelines asin
B.l-3,
above.4.
ADDITIONAL
STRENGTHENING
COATS USING CABOSIL
Follow
guidelines outlinedin
B 4-5.
v.\b
C.
MAKING THE MOTHER MOLD
The
hard
outer shellthat
will supportthe
rubber mold whilethe
casting
material
is
hardening
is
calledthe
'mother'mold,
because it
cradles andholds
the
soft mold.
The
amount of material you will needdepends
uponthe
size ofthe
softmolds you
have
made.One
gallon offiberglass
resin madeten
2-part
mothermolds.
1. MATERIALS:
THICK PAPER
MIX
CUPS
(or
tin
cans.)
Don't
usethe
small plastic
mixing
cups!They
willbe dissolved
by
the
resin after5
minutes orso,
and willleak
all over your work surface!STANDARD FIBERGLASS
RESFN AND
HARDENER
a product used
for boat
repair,
purchased at
hardware
stores atapproximately
$20-25
/gallon.
(the
hardener
is included
withthe resin)
FIBERGLASS MAT
(available
from
Polytek,
~$23.00
for 3
squareyds)A.
DISPOSABLE MEASURING
CUPS...
created
by
using
anaccurate ouncemeasurewith water.
Transfer
waterto
clearor
translucent
plastic cups oneounce at a
time,
and mark volumeamountswith permanent
ink.
Be
sureto
dry
newly-createdmeasurethoroughly!!!
HEAVY DUTY
SCISSORS
(to
cutfiberglass
mat)
DISPOSABLE
CHINA BRISTLE
BRUSHES
(at
least
onefor
each pieceofmothermold)
NOT
PICTURED:
(but
very important!)
C.
MAKING THE MOTHER MOLD
There
are a number of materials you can useto
makea solid mold shellthat
willhelp
the
soft rubberpeel-away
moldkeep
its
shape.Plaster,
plasticpolymers,
andfiberglass
resin are all options.I
chosethe
fiberglass
resinbecause
it's
not asmessy
orspace-consuming
asplaster,
it
setsup
very quickly
and
it's
available atany
local
hardware
store.2.
SETUP:
You
might wantto
performthis
step
outdoors,
weatherpermitting,
asthe
fumes
generated are notespecially
healthy. If
you can'tdo
this,
be
sure youhave
adequate ventilation.Since
the
fiberglass
resinWILL
dis
tort the
moldif
allowed prolongeddirect
interaction
whilecuring,
it
is impor
tant
to
protectthe
rubber.I
usedordinary cooking
oilspray
to
liberally
coatthe
outside of
the
soft moldbefore
applying
the
mother mold materials.Create
adisposable
working
surfaceby
covering
areawith plastic ornewspaper.
That
fiberglass
resinis impossible
to
clean off!!!Imagine
youaremaking
acoat,
and cutthe
fiberglass
matinto
manageable
pieces,
arranging
them
on onehalf
ofthe
model.Leave
a'seam
allowance'
of at
least
3/4"beyond
the
rubberflanges
ofthe
soft mold.You
will wantto
make surethere
is
atleast
2" ofhard
mother mold around your'pour
ing'surface,
asthis
willsupportthe
mold.P.18
C. MAKING
THE MOTHER MOLD
3.
PROCESS
The
directions
on most cans willtell
youto
spread some onthe
mat(or
cloth)
first
andthen
apply
the
cloth,
but if
youfollow
this
procedure,
it
willbe
setting
up
by
the time
you getit
allcoated.The
most effectivemethodis
to
have
the
mat
fixed
into
place ahead oftime.
A helpful
tip
is
to
mixup
a small amount(say,
one
ounce)
ofthe
resin and usethis to
'tack
down'the
pieces offiberglass
mat priorto
final
application ofthe
hardening
resin.SHOE ONE:
Most
resins willhave
specificinstructions
onthe
package,
asfar
as
the
ratio ofhardener/
resin.It
is
best
to
use smallamounts,
asit
does
tend to
setup
quickly.If
youdo
not getthe
entire side coated withthe
first
batch,
don't worry
because
it
bonds
to
itself
quite well.The
brand
I
used specified a ratio of12
drops
ofhardener
per ounce of resin.I
worked with3
ouncebatches
at atime,
and2
batches
were neededfor
each sideof
the
model.After
donning
my
rubbergloves,
I
measured out3
ounces andtransferred
it
to
athicker
cup.(This
is
animportant
thing
to
do!
Thinking
I
would savetime,
I
measured out
4
batches
of3
ounceseach,
andby
the
time
I
washalfway
through
applying
the
first
batch,
the
others wereleaking
all overthe
place.Much
to
my dis
may, the
resinhad
eaten ahole
in the
bottom
of eachcup!)
I
carefully
counted out36
drops
directly
into the
measuredresin,
stirredfor
aboutone
minute,
andbegan applying
the
resinmixtureto the
mat with adispos
ablebrush.
You
only
have
about5 to 7
minutesworking
time
before
the
resinbegins
to
setup,
sodon't
gettoo
persnickety:Just
apply
an even coatto the
mat,
(it
does
soakin
nicely)
being
surethat the
3/4"
overlap
remainsdry
as much as possible.
This
willbe
trimmed
later
so you can avoidsharp
edgesthat
mightdamage
the
mold
(or
your skin!Remember,
the
strandsin
that
fiberGLASS
mat areGLASS!).
The fiberglass
mat mothermoldshouldbe
setup
in
anhour,
but
wait atleast
two
hours before
youbegin
to
form
the
otherhalf
ofthe
mold.It
does
generate someK.iy
C. MAKING
THE
MOTHER
MOLD
SIDE
TWO
Leaving
the
first
sidein place,
spray
the
remainder of
the
softrubber mold and
the
exposed edge of
the
hard
mother mold withcooking
oil andfollow
the
same stepsto
createthe
second side.Here
arethe twosides ofthemother mold(looking
not unlike artistictacoshells!)The
pouring
surfaceis
againstthe tinfoil.(Unevenedges ofthemother mold are
due
to thevariationsin thicknessofthesoft mold'sflanges.)
C. MAKING
THE
MOTHER MOLD
PROVIDING STABILITY
Since
yourmother moldis
madeto
support your soft rubbermold,
it
needsto
hold
together
while youpourthe
casting
material.Having
observedthe
methods of afew local
moldmakers,
I
drilled holes
in
the
flanges
andthen
used screws andwing
nutsto
securethe two
halves
ofthe
moldtogether.
A.
Drilling
holes
in
mothermold
flanges:
B.
Securing
flanges
withmachine
screwsand
P.20
E. PREPARING TO CAST
1.
DEMOLDPNG
:Remove
the two
halves
of
the
mother moldand
carefully
separatethe
soft rubber moldfrom
the
model.E. PREPARING TO CAST
Removing
thesoft rubber moldfrom
theoriginal model.2.
CLEANING
AND CARE OF
RUBBER
MOLD
Your
rubber moldmay be
used overagain a number oftimes,
especially
if
you
take
good care ofit. Wash it
withlukewarm
soapy
water andbe
surethat
all plasticene residueis
cleaned away.Depending
uponwhat you useto
cast,
youmay
ormay
not need a release agent(for
the
INSIDE
ofthe
mold).Plaster
and similar
materials(including
the
Forton
MG
that
I
used)
don't
requireany
specialrelease, though
a rinse with1%
Ivory
Liquid
detergent
and wateris
saidto
makethings
easier.I
tried
it,
both
with and withouthaving
the
moldwet,
andit
didn't
seem
to
makemuch of adifference. Of
course,
if
yougetinto
using
plastics andresins,
you willdefinitely
wantto
askthe
manufacturers about release agents.3. REASSEMBLY
Join
the
softmold partstogether
so
that
the
keys
andindents
created'snap'
together.
Assemble
the
hard
mother mold shell on
the
outsideofthis
andfasten
with screws andwingnuts
(or
rubberbands)
and createa stable arrangement
for
pouring.I
was able
to
useempty
milk cratesto
support
the
moldsby
the
2" marginaround
the
pouring
plane,
but
in
afew
casesI had
to
usel"xl" wood strips proppedbetween
the
boxes.
E. PREPARING
TO CAST
4.
CASTING
:VOLUMETRIC
MEASUREMENTS
It
wasnecessary
to
estimatethe
amountof volume ofcasting
slurry
that
would
be
usedfor
eachfigure
to
be
cast,
in
orderto
purchasethe
proper amountofraw materials
necessary
for
this
project.The
FortonMG literature
estimatesthat
3
pounds ofslurry (the completely
mixedcasting
material)
would cover one squarefoot
at adepth
of3/8".
This
translates to
12"xl2"x3/8"=
54"3
per
(3
lbs)
slurry.I
calculatedthe
volume ofslurry
neededfor
eachfigure
by determining
the
volumeof each piece.
Each
figure had
started as1.5
one poundblocks
ofSculpey,
whose
dimensions
were1.5"x3"x6"
= 27"3x
1.5
= 41"3(~2
lbs
perfigure)
Each
base
wasto
be
13"xl3"x3/4",
= 126"3Figure
+Base
=167"
(~10
lbs.
slurry
perfigure
+base)
10 Figures
+10
Bases
= ~100lbs
slurry
necessary.I
originally
plannedto
cast10
figures,
and10
bases
to
attachthe
figures
to.
During
the
process ofcasting
my
experimentalpiece,
I
decided
againstcasting
the
bases
due
to
time,
space,
andlogistics.
I
addthis
commentbecause
these
calculations
determined how
much materialI
neededto
buy.
The
FortonMG is
soldin
asmall starter
kit
($49.00,)
which makes about33 lbs.
ofbronze
slurry,
and alarger
'sculptor's
kif
($116.00,)
which makesup
to
190
lbs.
ofbronze
slurry.The
pricebreak for
the
larger kit
madethe
wisest economicchoice,
and provided me withraw materials
for future
work.The FortonMG
casting
methodis
usedfor
architectural and art castings andproduces
strong
andlong lasting
castsif
youfollow
the
methods outlinedin
their
publications.
It
is
necessary
to
have
atriple
beam
gramscale,
asthe
proportionsare
very
exacting
and needto
be figured
in
gram ratios.I
determined
that
I
neededto
purchase enoughbronze
to
make atleast
20
pounds of
slurry,
using
the FortonMG recipe,
and sincebronze
powderis
soldin
2,
10,
or20
lb
cans,
I
wentfor
the
10
pound can.$57.00 from
Polytek.
Powdered Bronze
15
lbs.
10
lbs.
VF812
7
lbs.
4.66
lbs.
Resin
lib.
.66lb.
Hardener
22
grams22
gramsFGR95
(an
additionalingredient,
purchasedfrom
alocal
ceramicssupply
company)10
lbs.
6.67
lbs.
\Jil
E.
PREPARING
TO CAST
5.
WEIGHING
OUT INGREDIENTS
I
don't have
picturesfor
this
part ofthe
paperbecause I
did
the
castingswI
did decide
to
invest
somemoney
in
aninstructional
videomanufacturedby
the
company
that
makesFortonMG,
which was awise move.The
videogave metips
that
weren'tin
the
literature,
andit
wasextremely
helpful
to
watchthe
processfrom
beginning
to
end.I
premeasuredthe
dry
mixcontaining
the
bronze
powder,
resin,
FGR95,
andhardener using
the
gram scale.In
a separatecontainer,
I
weighed outthe
proper ratio ofthe
VF812
(a milky
liquid.)
Gram
amounts weredetermined
by
multiply
ing
the
number of ouncesby
28.35.
MATERIAL
LBS.
OUNCES
GRAMS
Bronze
FGR95
Resin
Hardener
15.0
10.0
1.0
(22g)
240.0
160.0
16.0
(22g)
6,804.0
4,536.0
453.6
22.0
Dry
Mix
weight -26.0 -416.011,815.6
VF812
7.0
112.0
3,175.2
Total
weightof
slurry
-33.0 -528.014,990.8
Therefore,
11,815.6
g
the
ratio ofdry
mixto VF812
=3,175.2
g
=3.7212This
means,
for every
unitofVF812,
1
would add3.7212
times that
amountto
obtainthe
proper mix ofFortonMG for
casting.Since I'd
estimatedthat
I
woulduse about2
pounds ofslurry
persculpture,
I
would need(32
oz*28.35)
g
or907.2
g
total
slurry
mix,
to
cast one sculpture.Harkening
back
to
9th
gradealgebra,
we get:907.2
g
desired
amt.slurry
14,990.8g
actualtotal
slurry
(?)g
needed amt.VF81
2
3,175.2g
actualtotal
VF812
...
(907.2)*(3,175.2)
=(14,990.8)*(?)
(2880541.4)
=(14,990.8)*(?)
(192.15g)
=?
= amountofVF812
necessary for
~2lbs
slurry.Therefore,
(192.15)*(3.72)
=715g Dry
Mix
necessary for
~2lbs
slurry.C.riVCl-AIMlMj 1UV.AJ1 v:n
6.
CASTING
This is
really
almostthe
easiest partofthe
process.Think
ofmaking
jello
molds.
Then
add afew necessary
steps.You
can also usethe
Forton
mix withaggregates
(i.e.
sand) to
produce stone-likecastings,
or plain gysum(the
FGR95)
to
producepaintable castings.
I
used16
ounceyogurtcontainersto
combinethe
materials,
with ahand held
drill
andthe turbomixer
attachment.A less
expensivemixing
attachmentcanbe
obtainedfrom hardware
stores or ceramicsupply
houses.
The ingredients
shouldbe
mixedthoroughly
for
atleast
afull
minute,
andthen
pouredthrough
astraining
device.
I
used a12"diameter
plasticflower
potthat
I
cutthe
bottom
out of and stapled a circular piece of window screento
it.
Straining
the
mixture will reducethe
airbubbles
that
have been
mixedin.
I
poured
the
mixturefrom
a6-12"
distance
to
further break down
suspended airbubbles,
andfilled
the
mold.(A
more economical method whenfilling
alarger
mold would
involve
creating
a'face
coat'
of
approximately
l/16"-l/8"
depth
ofthe
bronze
mixture andreinforcing
this
with aslurry containing
choppedglassfiber
without
bronze
powder.Information
aboutthis
processis included
in
the
FortonMG
literature,
but my figures
weretoo
smallto
implement
this process.)
Once
the
casthad
curedto
a'green' stage(between
30-45
minutes-whenit is
the
consistency
offrozen
butter,
wherepushing
in
with afingernail
willleave
aslight
dent)
I
used anExacto
knife
to
trim
excess materialfrom
the
outer edges ofthe
mold,
drawing
the
knife blade
toward
the casting,
ratherthan
outwardtoward
the
mold edges.I
removedthe
outer andinner
molds after onehour,
whentesting
with a
fingernail did
notleave
animpression. It is
very important
to
be
gentle atthis
stage,
asthe
castis
stilldelicate
andbreakable.
It
willhave
the
appearance ofaged chocolate.
r.riiMsniiNHo \j:2A
At
this point,
flashing
(the
excess materialthat
may
have
seepedthrough the
parting lines
ofthe mold)
may be
removed with anExacto
knife. Some
moldshad
more
leakage
than others,
probably due
to
tightening
the
mothermold screwstoo
much,
whichdistorted
the
parting
lines
ofthe
soft mold.The
piece willcontinueto
dry
andharden
once removedfrom
the
mold,
and willlighten
in
colorsomewhat.It
becomes
increasingly
moredifficult
to trim
larger
flashings,
sodo
as muchtrim
ming
as you can as soon afterdemolding
as possible.There
were afew
piecesthat
broke
coming
out ofthe
mold(the
thinner
areaslike
the
wrists andankles)
but Forton
binds
to
itself
easily,
and repairs are possiblewhen you mix a small paste of
the
dry
mix with afew drops
ofVF812.
Apply
the
paste
to
both
ofthe
broken
surfaces andbuild
it
up
aroundthe
outside ofthe
break,
as you can sand
it
down
later
without a problem.You
can also usethe
pasteto
fill
in
irregularities
in
the
surfacethat
may have
resultedfrom
airbubbles in
the
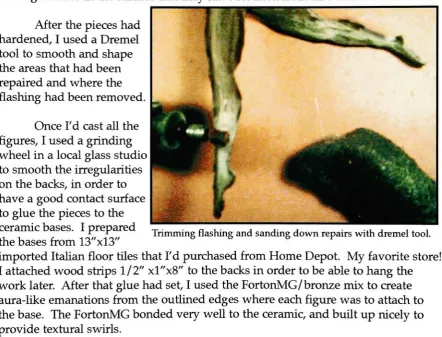
mix.After
the
pieceshad
hardened,
I
used aDremel
tool to
smooth and shapethe
areasthat
had been
repaired and where
the
flashing
had been
removed. [image:25.566.63.506.235.572.2]Once
I'd
cast allthe
figures,
I
used agrinding
wheel
in
alocal
glass studioto
smooththe
irregularities
on
the
backs,
in
orderto
have
a good contact surfaceto
gluethe
piecesto
the
ceramic
bases.
I
preparedthe
bases from
13"xl3"imported
Italian
floor
tiles that
I'd
purchasedfrom Home Depot.
My
favorite
store!I
attached wood strips 1/2"xl"x8"
to
the
backs in
orderto
be
ableto
hang
the
work
later. After
that
gluehad
set,
I
usedthe
FortonMG/
bronze
mixto
createaura-like emanations
from
the
outlined edges where eachfigure
wasto
attachto
the
base. The FortonMG bonded very
wellto the ceramic,
andbuilt up nicely
to
provide
textural
swirls.After gluing
the
figures
to
the
bases,
I
used more ofthe
FortonMG
/bronze
mix
to
fill
the
spaces wherethe
edgeofthe
figure
metthe
tile,
in
orderto
givethe
impression that the
figure
wasemerging
from
the tile.
Metaphorically
leaping
from
two
dimensions into
three,
academically
liberating
themselves.
At
this
pointI
applied a mixture of oil paint
to
serve as apatina,
bringing
outthe
details
ofthe
surfaces and
adding
depth
to the
overall visual effect ofthe
pieces.Once
the
oil paint wasdry,
I
used steel woolto
buff
the
bronze
surfaces,
bringing
outthe
metallic
highlights,
anddid
afinal
finish
with abuffing
wheel attachedto
ahand drill
to
achieve maximum shine on
the
high
points.\JMS
wn a ruuu
iune,
i uiougiu n wouiu uehelpful
to
include
someinformations
about...
COSTS:
PLASTIC
CUPS,
PAPER
TOWELS,
ALUMINUM
FOIL,
MISCELLANEOUS
RUBBER
GLOVES (BOX
OF
100)
CHINA BRISTLE
BRUSHES
PLASTICENE
SCULPEY
(24
lbs.)
PLASTER
POL-EASE 2300
SPRAY,
12
OZ
CAN*POLYTEK
40
,16
LBS
AEROSIL,
10
LBS.*FIBERGLASS
MAT,
3 SQ. YDS
FIBERGLASS
RESIN/
HARDENER
BALL
CONSULTING
VIDEO*TURBO
MIXER*FORTON
MG*FGR
95 50
LBS*BRONZE POWDER
OIL FAINT
FOR
PATINA
CERAMIC
TILES FOR BASES
EPOXY, WIRE, SCREWS,
WTNGNUTS
15.00
10.00
20.00
12.00
75.00*10.00
8.25*80.00
56.18*23.00
25.00
44.00* 41.00* 116.00* 35.31*78.50
10.00
30.00
20.00
-$710.00Itemsmarkedwith an asterisk arethosewhichIwill use
in
the
future,
thematerialsbought
inbulk for
economy's sake.The
turbomixer was aninvestment thatwill
last
aslong
asI
owntheheavy
duty
Much
gratitudeto
my
studioassistant,
Booboo.
A
joyful
peeping
deconstructionist
atheart,
\J.5V
RESOURCES:
Almost
allthe
information
neededto
completethis
project waslearned
from
the
informational
brochures
sentby
the
materialssuppliers.Since
I
wantedto
getinput
from
professional sculptors andmoldmakers,
I looked
up
"Bronze"in
the
yellow
pages,
and wentto
visit amoldmaker, David
Johnson,
who wasin
the
busi
ness ofmaking
molds and castsfor
otherartists'
original works.
He
invited
meto
the
studio and answered alot
ofquestions, in
additionto
selling
me3
pounds ofbronze
powderto
do
my
expermentalpieces,
whilewaiting for
the
larger
shipment.He
also referred meto
his
mentor/
prioremployer,
Martin
Dawe,
whois
a professionalworking
sculptor with a number of prominent public and corporate worksin
the
Atlanta
area.Martin
does his
own work as well asaccepting
commis sionsfrom
both
the
private and publicsector,
andhas
abeautiful
working
studio withseveral employees and studentinterns.
He
alsoteaches
sculptureclassesin
his
studiotwice
a year.Other
helpful
tips
camefrom
Bruce
Weinkle,
the
previousoccupantofmy
studio
/living
space.Bruce
has
been working
in
the
animation/
claymationfield
in
Oregon
withWill
Vinton Studios
for
several yearsnow,
andhonestly,
it
washis
left-behind
unfinished worksthat
inspired
meto
workin
three
dimensions.
David Johnson Studios
660
Langford Drive
NW
Norcross,
GA 30071
404-424-6090
Martin
Dawe
Cherry
Lion Studios
933AWatkinsSt.NW
Atlanta,
GA
30318
404-607-9602
Bruce E.Weinkle
The Victorian
#307
2255
W
Burnside
Portland,
OR 97210
503-464-0203
Materials for
Molding/
Casting
(I
would suggestcalling
allthese
companies andrequesting
asmany
goodies asthey
can send!)
Polytek Development
Corp
55 Hilton St.
Easton,
PA
18042
610-559-8620
Ball
Consulting,
Limited
Suite
201,
338
14th St.
Ambridge,
PA 15003
800-225-2673
Synair Corporation
2003 Amnicola
Hwy.
Chattanooga,
TN 37406
800-251-7642
Johnson
Atelier
50
Princeton-Hightstown Rd.
Suite L
Princeton
Junction,
NJ
08550
800-732-7203
Polytek
has
alarge
and variedline
of materialsfor both
moldmaking
and casting. Alsosell powderedbronze.
Special pricing for
educationalinstitutions
andfirst
timebuy
ers.
The 60
pagecatalog has
accurateandeasily
understood processinformation.They
will alsosend,free
ofcharge,aquarterly
newsletter with newinformation,
techniques,
and specialintereststories.Will
sendcuredsamplesuponrequest.Ball
Consulting
is
thesource supplierofFortonMG
and necessary
materialstoimplement
thissystem. Alsosupply
copper,bronze,
nickel,andsilver powderedmetals.Instructional
infosent withinquiries.
Will
send cured samplesupon request.No
discounts.
Synair is
another goodsourceofrubbermoldmaking
materials andcasting
materials.They
alsoselllight
anddark bronze
powder,and
include
some'how
to'info
with sales material.They
will send curedsamplesif
you requestthem.A
sculpture&
casting supply
company,withadizzying
array
ofthings
for
sale.Some
helpful
information included in
hand