I Creating Forms
1 Creating and Using a Form . . . 7
2 Working with Form Controls . . . 29
3 Designing Forms for Efficient and Accurate Data Entry . . . 49
4 Designing Forms for Business Use . . . 77
5 Creating Specialized Forms . . . 95
II Designing and Customizing Reports 6 Creating and Publishing a Report . . . 113
7 Designing Effective Business Reports . . . 141
8 Designing Advanced Reports . . . 157
9 Creating Specialized Reports . . . 177
III Creating Powerful Queries 10 Creating a Basic Query . . . 199
11 Building Criteria Expressions . . . 231
12 Working with Multiple-Table Queries . . . 259
13 Creating Advanced Queries . . . 287
14 Creating PivotTable Queries . . . 311
15 Querying with SQL Statements . . . 341
Index . . . 361
Paul McFedries
800 E. 96th Street Indianapolis, Indiana 46240
Microsoft
®
Office
Access 2007 Forms,
Reports,and
Queries
usiness
solutions
Copyright © 2007 by Que Publishing
All rights reserved. No part of this book shall be reproduced, stored in a retrieval system, or transmitted by any means, electronic, mechanical, photo-copying, recording, or otherwise, without written permission from the pub-lisher. No patent liability is assumed with respect to the use of the information contained herein. Although every precaution has been taken in the preparation of this book, the publisher and author assume no responsibility for errors or omissions. Nor is any liability assumed for damages resulting from the use of the information contained herein.
International Standard Book Number: 0-7897-3669-1 Library of Congress Cataloging-in-Publication Data McFedries, Paul.
Microsoft Office Access 2007 : forms, reports, and queries / Paul McFedries. p. cm.
Includes index. ISBN 0-7897-3669-1
1. Database management. 2. Microsoft Access. I. Title. QA76.9.D3M395252 2007
005.75'65—dc22
2007010362 Printed in the United States of America
First Printing: May 2007
10 09 08 07 4 3 2 1
Trademarks
All terms mentioned in this book that are known to be trademarks or service marks have been appropriately capitalized. Que Publishing cannot attest to the accuracy of this information. Use of a term in this book should not be regarded as affecting the validity of any trademark or service mark.
Warning and Disclaimer
Associate Publisher Greg Wiegand Acquisitions Editor Loretta Yates Development Editor Todd Brakke Managing Editor Gina Kanouse
Senior Project Editor
Kristy Hart Copy Editor Chuck Hutchinson Indexer Erika Millen Proofreader
Water Crest Publishing
Technical Editor Scott Diamond Publishing Coordinator Cindy Teeters Book Designer Anne Jones Compositor Nonie Ratcliff
Every effort has been made to make this book as complete and as accurate as possible, but no warranty or fitness is implied. The information provided is on an “as is” basis. The author and the publisher shall have neither liability nor responsibility to any person or entity with respect to any loss or damages arising from the information contained in this book or from the use programs accompanying it.
Bulk Sales
Que Publishing offers excellent discounts on this book when ordered in quantity for bulk purchases or special sales. For more information, please contact:
U.S. Corporate and Government Sales 1-800-382-3419
For sales outside of the U.S., please contact:
International Sales
Introduction
. . . .1
What’s in the Book . . . .2
This Book’s Special Features . . . .2
The Examples Used in the Book . . . .3
I
CREATING FORMS
1 Creating and Using a Form
. . . .7
Building a Basic Form . . . .9
Building a Standard Form . . . .9
Building a Split Form . . . .11
Building a Multiple Items Form . . . .11
Creating Simple Forms with the Form Wizard . . . .12
Navigating a Form . . . .14
Creating a Form in Design View . . . .15
Displaying the Design View . . . .15
Changing the Record Source . . . .15
Understanding Form Controls . . . .16
Adding Fields to the Form . . . .17
Changing the Size of the Form . . . .18
Viewing the Form . . . .18
Assigning an AutoFormat in Design View . . . .19
Working with Form Properties . . . .20
Working with the Form Header and Footer . . . .20
Adding a Logo . . . .22
Adding a Title . . . .23
Formatting the Background . . . .23
Creating a Form Interactively in Layout View . . . .25
Case Study: Protecting the Form and Data from Other Users . . . .26
From Here . . . .27
2 Working with Form Controls
. . . .29
Manipulating Form Controls . . . .29
Inserting Controls on a Form . . . .30
Selecting Controls . . . .30
Formatting Controls . . . .31
Adding Conditional Formatting . . . .31
Sizing Controls . . . .33
Moving Controls . . . .34
Working with Control Margins . . . .38
Grouping Controls . . . .38
Ordering Overlapped Controls . . . .39
Converting an Unbound Control to a Bound Control . . . .39
Changing a Control’s Type . . . .40
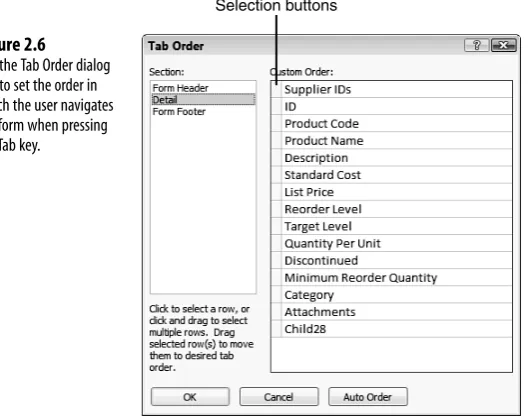
Setting the Tab Order . . . .40
Adding Labels to the Form . . . .41
Inserting a Label . . . .41
Editing the Label Caption . . . .42
Using Labels to Create Keyboard Shortcuts for Controls . . . .42
Adding Text Boxes to the Form . . . .43
Inserting a Text Box . . . .43
Using Text Boxes as Calculated Controls . . . .44
Case Study: Creating a Mortgage Calculator . . . .46
From Here . . . .48
3 Designing Forms for Efficient and Accurate Data Entry
. . . .49
Preventing Errors by Validating Data . . . .50
Helping Users with Text Prompts . . . .50
Preventing Errors with Data Validation Expressions . . . .51
Using Input Masks for Consistent and Accurate Data Entry . . . .52
Using Controls to Limit Data Entry Choices . . . .55
Working with Yes/No Fields . . . .56
Using Option Buttons to Present a Limited Number of Choices . . . .59
Case Study: Using an Option Group to Select the Shipper . . . .61
Using Lists to Present a Large Number of Choices . . . .62
Entering Data with ActiveX Controls . . . .67
Entering Numbers Using a Spin Button . . . .68
Entering Numbers Using a Scrollbar . . . .69
Entering Dates Using a Calendar . . . .71
Collecting Form Data via Email . . . .72
Sending the Access Data Collection Email Message . . . .72
Replying to an Access Data Collection Email Message . . . .74
Managing the Access Data Collection Replies . . . .75
From Here . . . .75
4 Designing Forms for Business Use
. . . .77
Using Forms in a Business Context . . . .77
Why Collect the Data? . . . .78
What Is the Data? . . . .78
Ten Design Guidelines for Business Forms . . . .79
1. Make Forms Fast . . . .79
2. Make Forms Foolproof . . . .79
3. Mimic Paper Forms When Practical . . . .79
4. Give Users What They Need and Then Stop . . . .79
5. Don’t Neglect the Keyboard . . . .80
6.Watch the Field Order (and the Tab Order,Too) . . . .80
7.Watch Your Screen Resolution . . . .80
8. Make Form Text Readable . . . .80
9. Go Easy on the Extras . . . .81
10. Organize Your Form Controls . . . .81
Organizing Controls on the Form . . . .81
Making Good Use of Lines and Rectangles . . . .82
Organizing with Option Groups . . . .83
Organizing with a Tab Control . . . .84
Enhancing Form Text . . . .86
Formatting Text . . . .87
Text Formatting Tips and Guidelines . . . .87
Applying Fancier Form Formatting . . . .88
Working with Colors . . . .88
Adding Images to Your Forms . . . .91
Creating a Shadow Effect for Text . . . .92
From Here . . . .93
5 Creating Specialized Forms
. . . .95
Creating a Multiple-Table Form . . . .95
Understanding Subforms . . . .95
Creating a Form and Subform with the Form Wizard . . . .96
Creating a Subform in the Form Design View . . . .98
Working with Form Command Buttons . . . .99
Case Study: Creating a Switchboard Form . . . .102
Creating a Form Pop-Up Box or Dialog Box . . . .103
Creating a Pop-Up Form . . . .103
Creating a Modal Form . . . .104
Using a Custom Form with a Parameter Query . . . .105
Creating the Custom Form . . . .105
Adjusting the Parameter Query . . . .106
Using the Custom Form and Parameter Query . . . .107
Creating a Startup Form . . . .107
Creating a PivotChart Form . . . .108
II
DESIGNING AND CUSTOMIZING REPORTS
6 Creating and Publishing a Report
. . . .113
Creating a Basic Report . . . .113
Creating Simple Reports with the Report Wizard . . . .114
Creating a Report in Design View . . . .116
Displaying the Design View . . . .116
Changing the Record Source . . . .117
Understanding the Architecture of Access Reports . . . .118
Understanding Report Controls . . . .119
Adding Fields to the Report . . . .120
Adding Labels to the Report . . . .120
Adding a Logo . . . .121
Adding a Title . . . .122
Adding Page Numbers to the Report . . . .122
Adding the Date and Time to the Report . . . .123
Changing the Size of a Report Section . . . .124
Previewing the Report . . . .124
Assigning an AutoFormat in Design View . . . .125
Working with Report Properties . . . .126
Formatting the Background . . . .126
Manipulating Report Controls . . . .128
Creating a Report Interactively in Layout View . . . .136
Publishing a Report . . . .137
Publishing on Paper . . . .137
Publishing to Email . . . .138
Exporting to Word . . . .138
Exporting to PDF or XPS . . . .139
From Here . . . .140
7 Designing Effective Business Reports
. . . .141
Using Reports in Business . . . .141
What’s in the Report? . . . .142
What Is the Goal of the Report? . . . .142
Who Are Your Readers? . . . .144
Ten Design Guidelines for Business Reports . . . .145
1. Copy Legacy Reports When Practical . . . .145
2. Give Users What They Need,Then Stop: Part 1 . . . .145
3. Give Users What They Need,Then Stop: Part 2 . . . .145
4. Use Page Numbers . . . .146
5. Use Dates and Times . . . .146
6.Watch the Field Order . . . .146
7.Watch Your Screen Resolution . . . .146
9. Always Sort and/or Group Data . . . .147
10. Organize the Report Layout . . . .147
Organizing Controls on the Report . . . .147
Making Good Use of Lines and Rectangles . . . .148
Creating Page Breaks . . . .149
Enhancing Report Text . . . .150
Formatting Text . . . .150
Text Formatting Tips and Guidelines . . . .151
Applying Fancier Report Formatting . . . .152
Working with Colors . . . .152
Adding Images to Your Reports . . . .153
Adding Special Effects . . . .154
Creating a Shadow Effect for Text . . . .154
From Here . . . .155
8 Designing Advanced Reports
. . . .157
Sorting and Grouping a Report . . . .157
Setting Up Sorting Options . . . .158
Setting Up Grouping Options . . . .158
Sorting and Grouping Using an Expression . . . .161
Adding Calculations to a Report . . . .161
Using the Totals List . . . .162
Inserting a Text Box . . . .162
Using Text Boxes as Calculated Controls . . . .163
Case Study: Creating an Invoice Report . . . .165
Using Advanced Methods to Launching a Report . . . .167
Launching a Report with a Command Button . . . .167
Launching a Report with a Macro . . . .169
Controlling Report Output . . . .174
Adding Page Breaks After Sections . . . .174
Starting Sections at the Top of a Row or Column . . . .174
Avoiding Widowed Records . . . .175
From Here . . . .175
9 Creating Specialized Reports
. . . .177
Creating a Multiple-Column Report . . . .177
Setting Up the Report . . . .178
Tweaking the Page Setup . . . .178
Troubleshooting Multiple Columns . . . .180
Case Study: Using Multiple Columns to Reduce Report Page Count . . . .181
Creating Mailing Labels . . . .184
Running the Label Wizard . . . .185
Creating a Mail Merge Report . . . .187
Creating a Multiple-Table Report . . . .189
Understanding Subreports . . . .190
Creating a Report and Subreport with the Report Wizard . . . .191
Creating a Subreport in the Report Design View . . . .192
Creating a PivotChart Report . . . .194
From Here . . . .195
III
CREATING POWERFUL QUERIES
10 Creating a Basic Query
. . . .199
Sorting Records . . . .199
Sorting on a Single Field . . . .200
Sorting on Multiple Fields . . . .200
Filtering Table Data . . . .201
Filtering by Selection . . . .203
Filtering Excluding Selection . . . .203
Filtering in Place . . . .204
Applying Text, Numeric, and Date Filters . . . .204
Filtering by Form . . . .206
Learning About Filter Criteria . . . .207
Creating a Filter . . . .208
Working with Queries . . . .210
Creating a Query . . . .210
Creating a New Query Object . . . .211
Selecting the Fields to Include in the Query . . . .212
Entering the Query Criteria . . . .213
Excluding a Field from the Query Results . . . .213
Returning Only the Top N Values . . . .213
Setting Field Properties . . . .214
Running the Query . . . .215
Querying Notes for Business Users . . . .216
Case Study: Querying for a Mail Merge . . . .217
Querying the Customers Table . . . .218
Running the Mail Merge . . . .219
Creating Queries with the Query Wizards . . . .220
Creating Crosstab Queries . . . .220
Creating Find Duplicates Queries . . . .222
Setting Up a Find Unmatched Query . . . .222
Working with a Query Dynaset . . . .223
Understanding the Datasheet View . . . .223
Entering Data . . . .224
Adding More Records . . . .225
Navigating Records . . . .225
Selecting a Record . . . .226
Copying a Record . . . .226
Deleting a Record . . . .227
Formatting the Datasheet . . . .227
Working with Query Properties . . . .228
From Here . . . .229
11 Building Criteria Expressions
. . . .231
Using Operands in Criteria Expressions . . . .232
Literals . . . .232
Identifiers . . . .232
Functions . . . .233
Using Operators in Criteria Expressions . . . .233
Comparison Operators . . . .233
Arithmetic Operators . . . .234
The Like Operator . . . .235
The Between...And Operator . . . .235
The In Operator . . . .235
The Is Null Operator . . . .235
Compound Criteria and the Logical Operators . . . .236
Using the Logical Operators . . . .237
Understanding Operator Precedence . . . .238
Setting Up a Calculated Column . . . .239
Calculating Inventory Value . . . .240
Calculating Discounted Product Totals . . . .241
Using the Built-In Functions . . . .241
Using Text Functions . . . .243
Using Date and Time Functions . . . .246
Using Math Functions . . . .251
Using Financial Functions . . . .253
Working with the Expression Builder . . . .256
From Here . . . .257
12 Working with Multiple-Table Queries
. . . .259
Relational Database Fundamentals . . . .259
The Pitfalls of a Nonrelational Design . . . .259
How a Relational Design Can Help . . . .262
Types of Relational Models . . . .264
The One-to-Many Model . . . .264
The One-to-One Model . . . .265
Enforcing Referential Integrity . . . .266
Establishing Table Relationships . . . .267
Understanding Join Lines . . . .267
Identifying Join Types . . . .268
Adding Tables to the Relationships Window . . . .269
Joining Tables . . . .269
Editing a Relationship . . . .271
Removing a Join . . . .271
Working with Multiple Tables in a Query . . . .271
Adding Multiple Tables to a Query . . . .271
Adding Fields from Multiple Tables . . . .272
Nesting Queries Within Queries . . . .273
Joining Tables Within the Query Design Window . . . .274
Creating Other Types of Joins . . . .275
Creating Outer Joins . . . .275
Creating Self-Joins . . . .278
Creating Theta Joins . . . .279
Creating a Unique Values Query . . . .280
Case Study: Drilling Down to the Order Details . . . .282
Adding a Subdatasheet to a Query . . . .284
Working with Query Subdatasheets . . . .284
From Here . . . .286
13 Creating Advanced Queries
. . . .287
Creating a Totals Query . . . .287
Displaying the Total Row in the Design Grid . . . .288
Setting Up a Totals Query on a Single Field . . . .289
Setting Up a Totals Query on Multiple Fields . . . .289
Filtering the Records Before Calculating Totals . . . .290
Creating a Totals Query for Groups of Records . . . .291
Grouping on Multiple Fields . . . .291
Creating a Totals Query Using a Calculated Field . . . .293
Creating a Totals Query Using Aggregate Functions . . . .294
Combining Aggregate Functions and Totals . . . .295
Creating Queries That Make Decisions . . . .296
Making Decisions with the IIf Function . . . .297
Making Decisions with the Switch Function . . . .299
Case Study: Calculating a Customer Discount Rate . . . .300
Calculating a Simple Discount Rate . . . .300
Calculating a Complex Discount Rate . . . .301
Running Parameter Queries . . . .302
Creating a Simple Query Parameter . . . .302
Running Action Queries . . . .304
Modifying Table Data with an Update Query . . . .304
Removing Records from a Table with a Delete Query . . . .306
Creating New Tables with Make-Table Queries . . . .307
Adding Records to a Table with an Append Query . . . .309
From Here . . . .309
14 Creating PivotTable Queries
. . . .311
What Is a PivotTable? . . . .311
How PivotTables Work . . . .312
Some PivotTable Terms . . . .313
Creating a One-Dimensional PivotTable . . . .314
Display Data Field Details . . . .314
Displaying the Sum of the Data Field Values . . . .316
Hiding and Showing the Data Details . . . .318
Inserting an AutoCalc Data Field Summary Calculation . . . .318
Changing the AutoCalc Calculation Type . . . .320
Creating a Calculated Field . . . .321
Removing a PivotTable Field . . . .322
Creating a Multiple-Field One-Dimensional PivotTable . . . .322
Creating a Two-Dimensional PivotTable . . . .323
Analyzing Customer Orders by Product Category . . . .324
Adding a Temporal Dimension to the PivotTable . . . .326
Filtering a PivotTable . . . .332
Using the PivotTable AutoFilters . . . .332
Displaying Only the Top or Bottom Items . . . .333
Grouping Field Items . . . .335
Adding a Filter Field . . . .335
Pivoting a PivotTable . . . .336
Moving a Field to a Different Area . . . .337
Changing the Field Order . . . .338
Formatting a PivotTable . . . .339
From Here . . . .339
15 Querying with SQL Statements
. . . .341
Viewing the SQL Statement . . . .341
Using SQL to Perform a Select Query . . . .342
Understanding the SELECT Statement . . . .343
Using SQL with Multiple-Table Queries . . . .346
Adding a Calculated Column to the SELECT Statement . . . .349
Using SQL to Total and Group Records . . . .350
Using SQL to Set Up a Parameter Query . . . .350
Using SQL to Perform Action Queries . . . .351
Using SQL to Perform an Update Query . . . .352
Using SQL to Perform a Delete Query . . . .352
Using SQL to Perform a Make-Table Query . . . .353
Using SQL to Perform an Append Query . . . .353
Using SQL to Create Subqueries . . . .354
Using a Subquery to Define a Field . . . .355
Determining Whether a Unit Price Is Greater Than the Average . . . .355
Using a Subquery to Define Criteria for a Field . . . .356
Using Subqueries That Return Dynasets . . . .356
In Predicate: Customers Who Have Placed Orders . . . .357
All Predicate: Products Cheaper Than All the Condiments . . . .358
Using SQL to Create Union Queries . . . .359
From Here . . . .360
About the Author
Paul McFedries is the president of Logophilia Limited, a technical writing company. Now primarily a writer, Paul is well known as a teacher of Microsoft Office and Microsoft Windows, and has worked as a programmer, consultant, database developer, and website developer. He has written more than 50 books that have sold more than three million copies worldwide. These books include Tricks of the Microsoft Office 2007 Gurus (Que, 2007),
Formulas and Functions with Microsoft Excel 2007(Que, 2007), VBA for the 2007 Microsoft Office System (Que, 2007), and Windows Vista Unleashed(Sams, 2006).
Dedication
Acknowledgments
When people ask me what I do for a living, I tell them that I write technical books.
We Want to Hear from You!
As the reader of this book, youare our most important critic and commentator. We value your opinion and want to know what we’re doing right, what we could do better, what areas you’d like to see us publish in, and any other words of wisdom you’re willing to pass our way.
As an associate publisher for Que Publishing, I welcome your comments. You can email or write me directly to let me know what you did or didn’t like about this book—as well as what we can do to make our books better.
Please note that I cannot help you with technical problems related to the topic of this book. We do have a User Services group, however, where I will forward specific technical questions related to the book.
When you write, please be sure to include this book’s title and author as well as your name, email address, and phone number. I will carefully review your comments and share them with the author and editors who worked on the book.
Email: [email protected] Mail: Greg Wiegand
Associate Publisher Que Publishing 800 East 96th Street Indianapolis, IN 46240 USA
Reader Services
I N T H I S I N T R O D U C T I O N
I N T R O D U C T I O N
Microsoft Access is a large, intimidating program. Unlike Word or Excel, where you can perform basic tasks without much in the way of training, Access presents challenges from the outset. Most users never progress beyond creating simple tables and using wizards to create basic forms and reports. At the same time, all users—from managers to researchers to administrative assistants—need infor-mation and know that what they seek is embedded
somewherein their Access tables. Without a more sophisticated knowledge of how to extract and pre-sent that data, they are forced to rely on office gurus and overworked IT people to provide canned reports or one-size-fits-all solutions.
This book will change all that by giving you the skills required to extract the data you need (queries), build efficient front ends for that data (forms), and publish the results in an attractive and easy-to-read format (reports). To that end, this book shuns the big Access picture and instead focuses intently on queries, forms, and reports. This in-depth approach gives you the skills and under-standing you need to get at the data and prove the old saying that knowledge is indeed power. And this book does all that with no-nonsense, step-by-step tutorials and lots of practical, useful examples aimed directly at business users.
Even if you’ve never been able to get Access to do much beyond storing data in simple tables, you’ll still find this book to your liking. I show you how to build useful, powerful queries, forms, and reports from the ground up, so no experience with these aspects of Access is necessary.
What’s in the Book . . . 2
This Book’s Special Features . . . 2
What’s in the Book
This book isn’t meant to be read from cover to cover, although you’re certainly free to do just that if the mood strikes you. Instead, most of the chapters are set up as self-contained units that you can dip into at will to extract whatever nuggets of information you need. However, if you’re a relatively new Access user, I suggest starting the first one or two chap-ters in each of the book’s three main sections to ensure you have a thorough grounding in the fundamentals of Access queries, forms, and reports.
The book is divided into three main parts. To give you the big picture before diving in, here’s a summary of what you’ll find in each part:
Part I, Creating Forms:The five chapters in Part I show you how to build efficient and useful forms for inputting and editing data. Chapter 1, “Creating and Using a Form,” and Chapter 2, “Working with Form Controls,” give you the basic form know-how you need. From there, you learn about using data validation to ensure data entry accuracy, learn how to design forms for the business environment, and learn how to create specialized forms such as switchboards, dialog boxes, and startup screens.
Part II, Designing and Customizing Reports:The four chapters in Part II tell you everything you need to know to create attractive and practical reports. Chapter 6, “Creating and Publishing a Report,” gives you the basics, and the subsequent chap-ters add to your knowledge by showing you the fundamentals of good report design and how to build advanced reports.
Part III, Creating Powerful Queries: The six chapters in Part III give you a thor-ough grounding in the features and uses of Access queries. After learning some query fundamentals in Chapter 10, “Creating a Basic Query,” you move on to understand-ing criteria expressions; multiple-table queries; totals, parameter, and action queries; PivotTable queries; and SQL statements.
This Book’s Special Features
Microsoft Office Access 2007 Forms, Reports, and Queriesis designed to give you the informa-tion you need without making you wade through ponderous explanainforma-tions and interminable technical background. To make your life easier, this book includes various features and con-ventions that help you get the most out of the book and Access itself.
Steps—Throughout the book, each Access task is summarized in step-by-step procedures.
Commands—I use the following style for Access Ribbon commands: Create, Form. This means that you click the Ribbon’s Create tab and then click the Form button. For the Office menu, I use the form Office, Open. This means that you pull down the Office menu and select the Open command.
Dialog box controls—Dialog box controls have underlined accelerator keys: Close. This book also uses the following boxes to draw your attention to important (or merely interesting) information.
The Note box presents asides that give you more information about the topic under discussion. These tidbits provide extra insights that give you a better understanding of the task at hand.
NO
TE
➔
These cross-reference elements point you to related material elsewhere in the book.The Tip box tells you about Access methods that are easier, faster, or more efficient than the stan-dard methods.
TIP
The all-important Caution box tells you about potential accidents waiting to happen.There are always ways to mess things up when you’re working with computers.These boxes help you avoid at least some of the pitfalls.
C A U T I O N
C A S E
S T U DY
You’ll find these case studies throughout the book, and they’re designed to take what you’ve learned and apply it to projects and real-world examples.
The Examples Used in the Book
from Northwind Traders, a fictitious food company. If you want to use this database while learning about Access forms, reports, and queries, here’s how to load it:
1. Launch Access 2007 and, in the list of template categories that appears, click Sample. (If you already have Access 2007 started, choose Office, New to see the list of template categories.)
2. Click the Northwind 2007 icon.
3. Adjust the File Name, if desired.
4. Click Download.
5. If you see the Microsoft Office Genuine Advantage dialog box, click Continue. Access 2007 downloads and installs the database.
6. If you see the Security Warning message bar, click Options, click Enable This Content, and then click OK.
I
Creating Forms
IN THIS
P
ART
1
Creating and Using a Form . . . 7
2
Working with Form Controls . . . 29
3
Designing Forms for Efficient and Accurate Data Entry . . . 49
4
Designing Forms for Business Use . . . 77
I N T H I S C H A P T E R
1
Data entry is the unglamorous side of Access. Sure, entering a record or two isn’t so bad, but entering dozens of records quickly becomes a chore you might do anything to avoid. The datasheet tech-niques presented later in this book in Chapter 10, “Creating a Basic Query,” can help, but the datasheet isn’t the most attractive way to get infor-mation into a table. You can take some of the drudgery out of data entry by using forms. In the real world, we deal with forms of various descriptions all the time—application forms, regis-tration forms, license renewals, deposit slips, and traffic tickets (one of my specialties, unfortunately). It’s a rare day that goes by without some officious person tossing a form our way and telling us to fill it out in triplicate.
Paper forms, then, are documents with blank boxes that you use to fill in the required information. Each box usually has a label beside it to let you know what kind of information to enter. Access forms are basically the same as their paper counter-parts. For example, compare the datasheet view of Northwind’s Products table in Figure 1.1 with the same table displayed in a form in Figure 1.2. As you can see, a form is a window that displays, for each field in the table, a control such as a text box, drop-down list, or check box.
Building a Basic Form . . . 9
Creating Simple Forms with the
Form Wizard . . . 13
Navigating a Form . . . 14
Creating a Form in Design View . . . 15
Creating a Form Interactively in
Layout View . . . 25
Case Study: Protecting the Form and
Data from Other Users . . . 26
Forms bring a number of advantages to the data entry table:
■ Because the form shows only one record at a time, you can almost always see all the table fields at once. In contrast, you can usually see only four or five columns at a time in a datasheet.
■ Controls such as drop-down lists reduce the possibility of data entry errors by giving the users a limited set of choices for a field.
■ Access gives you a number of customization options. These features let you create Access forms that look exactly like paper forms, and you can add graphics and other objects to make the forms more interesting.
■ You aren’t distracted by other data in the table, so you can give your full attention to the task at hand.
1
Figure 1.1
[image:25.485.125.422.165.391.2]The datasheet view of the Products table.
Figure 1.2
This isn’t to say that you must always use a form whenever you want to enter data into an Access table. The datasheet is probably faster if you have just a few fields to fill in, and the datasheet is definitely the way to go if you want to refer to as many other records as possi-ble when entering your data.
When you do need a form, however, this chapter gives you the basics for building forms and then for using them to navigate and edit data.
Building a Basic Form
Form building in Access 2007 is easier than it has ever been. Yes, you can still access the Design view (as described later in this chapter) to build your forms. However, if your needs are simple or time is short, then you can build a great-looking form with just a few mouse clicks. The secret is that Access 2007 comes with three basic form layouts that you can apply to an existing table or query:
■ Form—This standard form layout shows the data from one record at a time, as well as records from another table that are related. See “Building a Standard Form,” next.
■ Split Form—This layout has two sections: a form on top and a datasheet below. When you select a record in the datasheet, the record data appears in the form. See “Building a Split Form,” later in this chapter.
■ Multiple Items—This tabular form layout shows the records in rows with the field names at the top. See “Building a Multiple Items Form,” later in this chapter.
➔
To learn how to build a PivotChart form,see“Creating a PivotChart Form,”p.108. (Chapter 5)➔
To learn how to build a modal dialog box,see“Creating a Form Pop-Up Box or Dialog Box,”p. 103. (Chapter 5)Note that in all three form layouts, Access displays most text and numeric fields using a simple text box, and it displays Yes/Nofields with a check box.
Building a Standard Form
Running the Form command to build a standard form requires just two steps:
1
Before you can follow the steps in this section, you need to have a database open. If you want to use the sample Northwind database, choose Office, New, click the Sample category, click the Northwind 2007 icon, and then click Download.
NO
TE
1. In the Navigation pane, click the table or query you want to use as the form record source.
Figure 1.3 shows a form created from the Northwind Employees table.
1 Figure 1.3A standard form built on
the Northwind data-base’s Employees table.
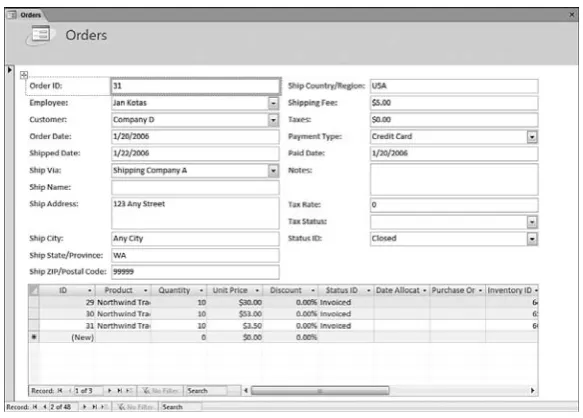
[image:27.485.132.424.318.527.2]Sometimes when you run the Form command, the resulting form will be a bit more com-plex. For example, take a look at the form in Figure 1.4, which I built using the Orders table as the record source.
Figure 1.4
A more complex form built on the Northwind database’s Orders table.
another table and the current table is the “one” side of that relationship, the “many” table’s related records are displayed in a subform.
Also notice in Figure 1.4 that some of the fields are displayed as drop-down lists instead of text boxes. In general, if the table has a field that is used as the basis of a one-to-many rela-tionship with another table and the current table is the “many” side of that relarela-tionship, that field is displayed as a drop-down list that contains the values from the related table. For example, the Orders table is related to the Employees table, so the Employee drop-down list contains the names of all the people in the Employees table.
If you’ve never used multiple, related tables before, don’t worry if the preceding two para-graphs don’t make much sense right now. I’ll explain everything in much more detail later.
➔
For the details on building a form from multiple, related tables,see“Creating a Multiple-Table Form,”p. 95. (Chapter 5)Building a Split Form
One of the advantages of viewing a table or query in a datasheet is that you can quickly navi-gate among the records by using the scrollbars or navigation keys such as Page Down and Page Up. A standard form shows just one record at a time, so getting to the record you want (particularly if the underlying table or query has many records) can be time-consuming. The advantage of a split form is that it combines the best of both worlds—the nicer layout of a form and the navigation speed of a datasheet. The split form accomplishes this by cre-ating a form that’s split in two: The top half is a standard form and the bottom half is a datasheet. The idea is that you use the datasheet to find the record you want, and when you click anywhere inside the record, the record’s data appears in the form.
As with the Form command, wielding the Split Form command takes but two steps:
1. In the Navigation pane, click the table or query you want to use as the form record source.
2. Choose Create, Split Form.
Figure 1.5 shows a split form created from the Northwind Orders table.
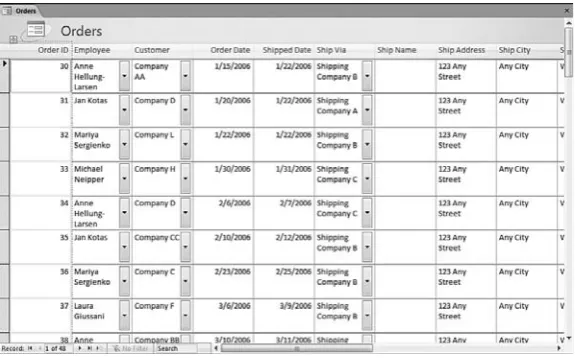
Building a Multiple Items Form
The multiple items form is another form/datasheet hybrid. In this case, the form is laid out using the same tabular layout as a datasheet, with the records in rows and the fields in columns, with the field headings along the top of the form. However, unlike a datasheet, which displays only a single line of data for each record, the multiple items form displays up to three lines of data.
Here are the steps to follow to create a multiple items form:
1. In the Navigation pane, click the table or query you want to use as the form record source.
2. Choose Create, Multiple Items.
Figure 1.6 shows the multiple items layout built from the Northwind Orders table.
[image:29.485.136.422.70.274.2]1
Figure 1.5
[image:29.485.135.423.323.502.2]A split form built on the Northwind database’s Orders table.
Figure 1.6
A multiple items form built on the Northwind database’s Orders table.
Creating Simple Forms with the Form Wizard
Office wizard: It displays a series of dialog boxes that take you step by step through the entire form-creation process, as described here:
➔
The Form Wizard even lets you select fields from multiple tables;see“Creating a Form and Subform with the Form Wizard,”p. 96.(Chapter 5)
1. In the Navigation pane, click the table or query you want to use as the form record source.
2. Choose Create, More Forms, Form Wizard. Access displays the first Form Wizard dialog box, shown in Figure 1.7.
[image:30.485.122.343.189.354.2]1
Figure 1.7
Use this Form Wizard dialog box to select the fields you want in your form.
3. For each field you want to include in the form, click the field in the Available Fields list and click the > button. (If you want to select all the fields, click the >> button.) When you’re done, click Next.
4. The next Form Wizard dialog box asks you to choose the layout of the fields. You have four choices (click Next after you’ve made your selection):
• Columnar—The fields are arranged in columns, and only one record is shown at a time.
• Tabular—The fields are arranged in a table, with the field names at the top and the records in rows.
• Datasheet—The fields are arranged in a datasheet layout.
• Justified—The fields are arranged across and down the form with the field names above their respective controls.
5. The next wizard dialog box asks you to select one of the predefined AutoFormat styles. Click the style you want to use and then click Next.
7. If you want to use the form right away, leave the Open the Form to View or Enter Information option activated. Alternatively, click Modify the Form’s Design to open the form in Design view (see “Creating a Form in Design View,” later in this chapter).
8. Click Finish to complete the form.
This is the end of the Form Wizard. You can create a sophisticated and professional data entry form in a fraction of the time needed to create the form from scratch. The wizard isn’t as fast as the Form, Split Form, and Multiple Items commands, but it does allow a bit more flexibility in the customization.
Navigating a Form
Navigation in a form refers not just to the fields that appear on the form but also to the records within the form. When you’re working on a form, you can navigate the form using several methods. The first is to use the Enter key. The Enter key accepts the data that the user entered into the field and moves the focus to the next field. The Tab key performs the same action, but the user doesn’t need to enter any data. If shortcut keys are associated with buttons on the form, the user can hold down the Alt key and press the corresponding underlined letter. For moving between records, the easiest technique is to use the record navigation buttons that appear at the bottom of the form.
➔
To learn how to specify shortcut keys for form controls,see“Using Labels to Create Keyboard Shortcuts for Controls,”p. 42. (Chapter 2)Otherwise, to navigate fields and records in a form, you can use the keys outlined in Table 1.1.
Table 1.1 Keys to Use When Navigating Fields and Records in a Form
Key Description
Tab or right arrow Moves to the next field to the right; from the last field, moves down to the first field in the next record.
Shift+Tab or left arrow Moves to the previous field to the left; from the last field, moves up to the first field in the previous record.
Home Moves to the first field.
End Moves to the last field.
Page Down Moves to the same field in the next record.
Page Up Moves to the same field in the previous record.
Ctrl+Home Moves to the first field of the first record.
Ctrl+End Moves to the last field of the last record.
Creating a Form in Design View
Although the Form Wizard is a step up from the Form, Split Form, and Multiple Items commands in terms of control, the resulting forms still might not satisfy your needs. For example, you might want to build a custom form that mirrors as closely as possible an equivalent paper form. If the Access form resembles the paper form, the person using the form to enter data will feel more comfortable with it and will be less likely to make mis-takes.
For maximum form flexibility, you need to use the form design window, which gives you total control over the form, including the positioning of the controls, the formatting of the text, the colors, and much more.
Displaying the Design View
Access forms have a Design view that you can use for your customization chores. How you display this view depends on whether you’re dealing with an existing form or a new one. To open an existing form in Design view, you have two choices:
■ If the form isn’t open, right-click the form in the Navigation pane and then click Design View.
■ If the form is already open, choose Home, click the lower half of the View split button, and then click Design View. (Alternatively, click the Design View button on the status bar; see Figure 1.8.)
To start a new form, you have two choices:
■ Choose Create, Blank Form. Then choose Format, click the lower half of the View split button, and then click Design View.
■ Choose Create, Form Design.
When you create a new form, it isn’t associated with a table or query, so you need to set the record source by hand. See “Changing the Record Source,” next.
Figure 1.8 shows a new, blank form in Design view. Note that you place the form controls, including the table’s fields and their labels, in the Detail area.
Changing the Record Source
The fields available to the form depend on the table or query that you’ve defined as the form’s record source. If you’ve created a blank form, you need to specify the record source yourself. For an existing form, you might want to change the record source to a different table or query. Either way, you follow these steps to change the record source while you’re in Design view:
1. Select the form by clicking the form selector button (pointed out in Figure 1.8).
2. Choose Design, Property Sheet. The Property Sheet pane appears.
3. Click the Data tab.
4. Pull down the Record Source list and then click the table or query you want to associ-ate with the form.
5. Choose Design, Property Sheet. The Property Sheet pane disappears.
[image:33.485.135.432.169.414.2]1
Figure 1.8
Use the Design view to design and customize all aspects of your form.
Understanding Form Controls
An Access form can contain one of three types of controls: bound, unbound, or calculated. The following sections discuss the differences between these types.
Bound Controls (Fields)
You use bound controls to display and edit data from the form’s underlying record source. The term boundrefers to the fact that the control is tied to a field of a table, query, or SQL
SELECTstatement. The most common type of bound control is the text box, but many other
types of controls can operate as bound controls.
change these properties on the form by using the control’s property sheet, which you dis-play as follows:
■ Click the control (the data control, not the associated label) and then choose Design, Property Sheet (or press Alt+Enter).
■ Right-click the control and then click Properties.
See “Adding Fields to the Form,” later in this chapter, to learn how to add a bound control to the form.
Unbound Controls
An unbound control is used to convey information to the user or to receive from the user input that won’t be stored in the underlying record source. In other words, unboundmeans that the control isn’t associated with (bound to) any field.
Here are some examples of using unbound controls:
■ A label for a text box that describes what the text box represents.
■ Text boxes or drop-down list boxes that can be used to select different scenarios on a what-if form.
■ A line used to separate different sections of the form.
■ A company logo or other graphical effects.
When you add a control to a form when the Control Wizard is activated, the control is automatically unbound.
➔
To learn about adding unbound controls and using the Control Wizard,see“Inserting Controls on a Form,”p. 30. (Chapter 2)Calculated Controls
Calculated controls use expressions to derive their data. Expressions are combinations of operators, fields, control names, functions, and constants. Although text boxes are the most common form of calculated controls, any control having the Control Sourceproperty can
be a calculated control. A calculated control can be used to compute sales tax on an order entry form, for example.
➔
To learn how to build calculated controls,see“Using Text Boxes as Calculated Controls,”p. 44. (Chapter 2)Adding Fields to the Form
Here are the steps to follow to add a field (that is, a bound control) to your form:
1. Choose Design, Add Existing Fields. Access displays the Field List pane.
2. Double-click the field you want to add to the form.
3. Repeat step 2 until you have added all the fields you need.
When you add a field, Access creates a control for the field as follows (see Figure 1.9):
■ Most text or numeric fields use a text box.
■ If the field is used as the basis of a one-to-many relationship with another table and the current table is the “many” side of that relationship, the field is displayed as a drop-down list that contains the values from the related table.
■ Yes/Nofields use a check box.
Also, a label control is placed beside each field. The text of the label is the Caption
prop-erty for the field to which the control is bound.
1
Figure 1.9
Some fields from the Products table added to the form.
Fields
Form View Labels
Changing the Size of the Form
If you find that your form is either too small to hold all the fields or has too much empty space, you can change the size of the form as follows:
■ To adjust the form’s height, move the mouse pointer to the bottom edge of the Detail area. Click and drag the edge of the form down (to make the form bigger) or up (to make the form smaller).
■ To adjust the form’s width, move the mouse pointer to the right edge of the Detail area. Click and drag the edge of the form right (to make the form wider) or left (to make the form thinner).
Viewing the Form
■ Choose Design and then click the top half of the View split button.
■ In the status bar, click Form View (see Figure 1.9).
Figure 1.10 shows the Form view of the design displayed in Figure 1.9. 1
Figure 1.10
The Form view of the form design shown in Figure 1.9.
Assigning an AutoFormat in Design View
You learn how to change control fonts, colors, borders, and other formatting in Chapter 2, “Working with Form Controls.” For now, you can do some quick formatting by applying one of the 20 predefined form looks, called AutoFormats. Choose the Arrange tab (not, sur-prisingly, the Design tab), click AutoFormat to display the AutoFormat gallery, and then click the look you prefer.
➔
For the specifics of form formatting,see“Formatting Controls,”p. 31. (Chapter 2)For a bit more control, you can use the AutoFormat Wizard:
1. Choose Arrange, AutoFormat, AutoFormat Windows to display the AutoFormat dia-log box.
2. In the Form AutoFormats list, click the AutoFormat you want to use.
3. To control which layout attributes Access applies to the form, click Options to display the Attributes to Apply group and then activate or deactivate the following check boxes: Font, Color, and Border.
4. Click OK.
The default layout used by the Form Wizard is always the most recent layout that you selected in the AutoFormat dialog box.
NO
TE
■ Create a New AutoFormat Based on the Form ‘Form’—Choose this option to cre-ate a new AutoFormat templcre-ate based on the formatting used in the current form.
■ UpdateAutoFormatwith Values from the Form ‘Form’—Choose this option to change the currently selected AutoFormattemplate based on the formatting used in the current form.
■ DeleteAutoFormat—Choose this option to delete the currently selected AutoFormat
template.
Working with Form Properties
Any form object comes with a large number of properties that you can work with. Many of these are obscure and can be safely ignored, but there are a few that you might find useful. To work with the form properties, follow these steps:
1. Select the form by clicking the form selector button, pointed out earlier in Figure 1.8.
2. Choose Design, Property Sheet (or press Alt+Enter) to display the Property Sheet pane.
3. Modify the properties you want to work with.
1
If you’re not sure what a property does, click inside the property and then press F1. Access loads the Help window and displays the Help topic for that property.
TIP
4. Click the Close button (X) to activate the new settings.
Working with the Form Header and Footer
The Detail section of a form is supposed to be a data-only area. That is, it’s supposed to contain only controls that are directly or indirectly related to the form’s underlying record source. What if you want to display a form title or the current date or some other informa-tion not related to the data? Although it’s possible to put such things in the Detail area, a better choice is to take advantage of the following sections:
■ Form Footer—This section appears below and separate from the Detail area. It’s a good place to add nondata items such as the current date or instructions on how to fill in the form. When you print the form, the Form Header only appears below the Detail section on the last page.
To display the Form Header and Form Footer, choose the Arrange tab and then click the Form Header/Footer button in the Show/Hide group.
Besides the Form Header and Form Footer, Access also defines separate Page Header and Page Footer sections, both of which appear only when you print the form:
■ Page Header—This section appears at the top of each printed page (except for the first printed page, where it appears below the Form Header).
■ Page Footer—This section appears at the bottom of each printed page.
To display the Page Header and Page Footer, choose the Arrange tab and then click the Page Header/Footer button in the Show/Hide group.
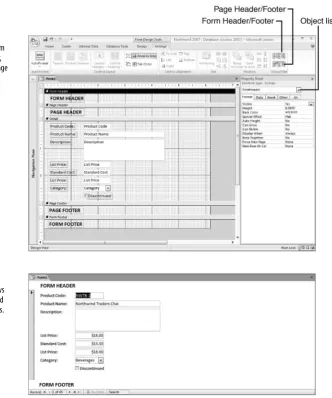
Figure 1.11 shows a form with the four header and footer sections added. Note that if you need to select a section (to format it, for example), you can do so by using either of the fol-lowing techniques:
■ Click the separator bar above the section you want to work with.
■ Choose Design, Property Sheet and then use the Object list in the Property Sheet pane (pointed out in Figure 1.11) to choose the section you want.
Figure 1.12 shows the Form view, which displays the Form Header and Form Footer sections.
1
To change the height of any section, move the mouse pointer to the bottom edge of the section. Then click and drag up or down to resize the section.
NO
Adding a Logo
You can add visual appeal to a form by adding a logo to the form header. This will most often be a company logo, but you might also want to use different logos for different pro-jects, teams, or departments. In previous versions of Access, you could insert a logo using the Imagecontrol, but you usually had to spend time resizing the resulting image. Access
2007 comes with a separate Logo command that automatically inserts the image into the Form Header section and adjusts the image’s dimensions to logo size (usually 0.6 inch square). The resulting image is an Auto_Logo object.
1 Figure 1.11
[image:39.485.106.439.66.465.2]A form with the Form Header, Form Footer, Page Header, and Page Footer.
Figure 1.12
Here are the steps to follow to insert a logo:
1. Choose Design, Logo. Access displays the Insert Picture dialog box.
2. Navigate to the folder that contains the image you want to use as a logo.
3. Click the image.
4. Click OK. Access resizes the image and inserts it in the Form Header section.
Adding a Title
Adding a title to your form is usually a good idea so that users have some idea what the form is used for. You can use a Labelcontrol to add a title, but Access 2007 comes with a
new Title command that automatically inserts an Auto_Title object in the Form Header section.
Here are the steps to follow to insert a title:
1. Choose Design, Title (just to the right of the Logo button). Access adds the Auto_Title object to the Form Header.
2. Type your title. (Note that the Auto_Title box expands automatically as you type your text.)
3. Click outside the title.
4. Move the title to the position you want.
➔
For information on moving controls,see“Moving Controls,”p. 34. (Chapter 2)Formatting the Background
Most of the formatting options apply to the controls, as you’ll see in Chapter 2. For the form itself, about the only thing you can do is change the look of the background for each section: You can change the background color, or you can display an image as the back-ground, as described in the next two sections.
Setting the Background Color
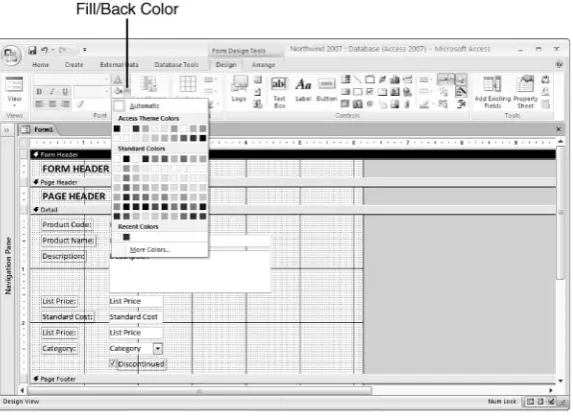
To change the background color of a form section, follow these steps:
1. Click the section’s separator bar to select the section.
2. On the Design tab, click the Fill/Back Color palette (see Figure 1.13) so that it drops down.
3. Click the background color you want.
Setting the Background Picture
A simple, solid-color background that contrasts well with the form text (for example, a white or light-colored background with black or dark-colored text) is often the safest bet in a business environment. However, you might feel the need to spice up your form a bit with a more interesting background treatment: an image. Access enables you to use either a sin-gle, large image as the background or smaller images that are stretched or tiled to cover the entire form.
Follow these steps to set an image as a form’s background:
1. Select the form.
2. Choose Design, Property Sheet to open the Property Sheet pane.
3. Click the Format tab.
4. Click inside the Pictureproperty and then click the ellipsis … button. Access displays
the Insert Picture dialog box.
5. Find the file you want to use, click it, and then click OK.
1
When choosing a background, make sure the color doesn’t clash with the color of the field label text. For example, the default label text color is black, so any dark background will cause a problem. Either use a light color for the background or change the color of the label text (as described in Chapter 2).
[image:41.485.136.423.168.376.2]C A U T I O N
Figure 1.13
6. Use the Picture Size Modeproperty to choose one of the following settings:
• Clip—The image is displayed using its actual dimensions. If the image is larger
than the form, the edges of the image are clipped to fit.
• Stretch—The image is stretched or shrunk vertically and horizontally so that it
fills the entire form.
• Zoom—The image is enlarged or reduced until it fills the form either vertically or
horizontally; the image’s original proportions are maintained.
• Stretch Horizontal—The image is stretched or reduced horizontally so that it
fills the entire form width.
• Stretch Vertical—The image is stretched or reduced vertically so that it fills
the entire form height.
7. Use the Picture Alignmentproperty to specify how you want the image aligned within
the form.
8. If you selected either Clipor Zoomas the Picture Size Mode, use the Picture Tiling
property to determine whether you want the image repeated (tiled) across the back-ground so that it fills the entire form; select Yesfor tiling; select Noto display just a
single image.
9. Close the property sheet.
1
As with the background color, be careful which image you choose for the background. A “busy” background can render label text unreadable.
C A U T I O N
Creating a Form Interactively in Layout View
The major problem with creating a form in Design view is that you don’t see data from the form’s record source until you switch to Form view. This means that you often have to switch back and forth to get the layout you prefer and to size the controls properly. Access 2007 helps you reduce much of this design drudgery by offering a new form view called Layout. This hybrid view shows you the data from the record source but also enables you to change many aspects of the form design. To switch to this view from Design view, choose Design, click the lower half of the View split button, and then click Layout View. (You can also click the Layout View button in the status bar.)
1
Figure 1.14
Use Access 2007’s new Layout View to modify the form and see its data at the same time.
C A S E
S T U DY
Protecting the Form and Data from Other Users
In a business environment, it’s common to build forms as front ends for other users. A properly designed form gives users easier access to the data and keeps them away from fields they don’t need to see (such as primary key fields and sensi-tive data). As you’ll see in the next few chapters, building good business forms takes a bit of extra work on your part. So if you go to all that trouble, the last thing you want is for the users to either change the form design (on purpose or inad-vertently) or alter the data in some unacceptable way (such as deleting records).
Access can help you protect both the form and the underlying data.The property sheet for a form contains a number of properties that enable you to restrict the actions that users can take with your form.
You can protect the form design in the following ways:
■ Preventing the form from being resized—In the form property sheet, click the Format tab and choose any
Border Stylesetting other than Sizable(that is,None,Thin, or Dialog).
■ Preventing the form from being maximized or minimized—In the Format tab, go to the Min Max Buttonsproperty and choose None. If you want to prevent the form only from being maximized, chooseMin Enabled; if you want to prevent the form only from being minimized, choose Max Enabled.
■ Preventing the form from being moved—In the Format tab, choose Nofor the Moveableproperty.
■ Disabling other form views—In the Format tab, choose Nofor each of the following views you want to disable: Allow Datasheet View,Allow PivotTable View,Allow PivotChart View, and Allow Layout View.
You can protect the form data in the following ways:
From Here
➔ Unbound controls are the subject of Chapter 2,“Working with Form Controls.”See p. 29. (Chapter 2)
➔ For the specifics of form formatting,see“Formatting Controls,”p. 31. (Chapter 2)
➔ To learn how to specify shortcut keys for form controls,see“Using Labels to Create Keyboard Shortcuts for Controls,”p. 42. (Chapter 2)
➔ To learn how to build calculated controls,see“Using Text Boxes as Calculated Controls,”p. 44. (Chapter 2)
➔ To learn how to set up validation rules to ensure data integrity,see“Preventing Errors by Validating Data,”p. 50. (Chapter 3)
➔ The Form Wizard even lets you select fields from multiple tables;see“Creating a Form and Subform with the Form Wizard,”p. 96.
(Chapter 5)
➔ To learn how to build a PivotChart form,see“Creating a PivotChart Form,”p. 108. (Chapter 5)
➔ To learn how to build a modal dialog box,see“Creating a Form Pop-Up Box or Dialog Box,”p. 103. (Chapter 5)
➔ For the specifics of working with the PivotTable view fields,see“Creating PivotTable Queries,”p. 311. (Chapter 14)
■ Preventing the user from editing data—In the form property sheet, display the Data tab and set the Allow Editsproperty to No.
■ Preventing the user from deleting data—In the Data tab, set the Allow Deletionsproperty to No. ■ Preventing the user from adding records—In the Data tab, set the Allow Additionsproperty to No.
■ Preventing the user from seeing other data—In the Data tab, set the Data Entryproperty to Yes.This is
different from Allow Additionsin that when this feature is turned on, the form automatically opens to a
new, blank record.The user doesn’t have the capability to view existing records. Note that the users cannot see
existing records or add new data (in other words, they won’t be able to do anythingwith the form data) if
Allow Additionsis set to NoandData Entryis set to Yes.
■ Making form data read-only—In the Data tab, set the Recordset Typeproperty to Snapshot.This is the
same as setting the Allow Edits,Allow Deletions, and Allow Additionsproperties to No.
■ Preventing multiple users from editing the same record simultaneously—In the Data tab, set the
Record Locksproperty to Edited Record. (If you prefer that other users can’t edit anyrecord while one
user has the form open, set Record Locksto All Records, instead.)
I N T H I S C H A P T E R
Controls
2
If you want a form laid out in a certain way that either mimics the arrangement of a paper form or gives the form a design that you think will make sense for the users, the techniques you’ve seen so far haven’t given you the tools to do the job. For example, pre-fab form layouts and the Form Wizard, although easy and fast, arrange form con-trols in only a few basic designs. Using the Design view is better because you can at least click and drag the table fields and drop them anywhere you want on the form. However, if you’ve tried this, you’ve certainly noticed that the results are seldom perfect. The reason is that you still need to “fine-tune” the controls by moving them, sizing them, formatting them, and so on.
These fine-tuning techniques are the subject of this chapter. You learn not only how to insert and manipulate form controls, but also how to get the most out of the two most common control types: labels and text boxes.
Manipulating Form Controls
You saw in Chapter 1, “Creating and Using a Form,” that when you add a field to a form, Access mostly uses text boxes, combo boxes, and check boxes to enable the user to insert and edit field data. Whether you stick with the controls that Access suggests, or you branch out to use other types of controls on your forms, your form-building duties will be much quicker and of higher quality if you get comfortable manipulating the controls to get them exactly the way you want them. To that end, in the following sections you learn quite a few useful techniques that you can apply to any control.
Manipulating Form Controls . . . 29
Adding Labels to the Form . . . 41
Adding Text Boxes to the Form . . . 43
Case Study: Creating a Mortgage
Calculator . . . 46
Inserting Controls on a Form
As you learned in Chapter 1, you add bound controls to the form by double-clicking fields in the Field List pane. For unbound controls (or controls that you want to bind to a field later), you need to use the Design tab’s Controls group, which contains buttons for all the controls you can add to a form. Some of these controls—specifically, Option Group, Combo Box, List Box, Command Button, and Subform—also come with their own Control Wizard
that takes you step by step through the process of creating and setting up the control. (For example, the Combo Boxand List Boxcontrols have wizards that help you define, among
other things, the items that appear in each list.)
Here are the basic steps to follow to add any control to the form:
1. In the Design tab, use the Controls group to click the button you want to use.
2. If the control type has an associated wizard, click the Use Control Wizards button (pointed out later, in Figure 2.1) to toggle the wizard on or off, as preferred.
3. Move the mouse pointer into the form and position it where you want the top-left corner of the control to appear.
4. Click and drag the mouse pointer. Access displays a dashed border indicating the outline of the control.
5. When the control is the size and shape you want, release the mouse button. Access creates the control and gives it a default name (such as CheckBoxn,where nsignifies
that this is the nth check box you’ve created on this form).
6. If the control has a wizard and you activated the Use Control Wizards button, the first wizard dialog box appears. Follow the wizard’s steps. (You learn the control wizards later in this chapter when I take you through the specifics of each control.)
Note that sometimes Access also includes a label beside the control you insert. For example, when you add a text box, Access also inserts a label to the left of the text box.
2
If you want to add multiple instances of the same type of control, double-click the appropriate but-ton in the Controls group.The butbut-ton remains pressed, and you can draw as many instances of the control as you need.When you’re done, click the control’s button to reset the control.
TIP
Selecting Controls
Before you can work with a control, you must select it. For a single control, you select it simply by clicking it. If you prefer to work with multiple controls, Access gives you a number of techniques:
■ Hold down the Ctrl key and click each control.