Mardan
US $49.99
Shelve in Web Development /JavaScript
User level: Intermediate–Advanced
SOURCE CODE ONLINE
RELATED
Practical Node.js
Practical Node.js is your step-by-step guide to learning how to build a wide range of Node.js web applications using a professional development toolkit. Node.js is an innovative and highly efficient platform for creating web services. But Node.js doesn’t live in a vacuum! In modern web development, many different components need to be put together—routing, database driver, ORM, session management, OAuth, HTML template engine, CSS compiler, testing, deployment, and many more. If you already know the basics of Node.js, now is the time to discover how to bring it to the production level by leveraging its vast ecosystem of packages. As a web developer, you’ll work with a varied collection of standards and frameworks and learn how all those pieces fit together.
Practical Node.js takes you from the overview of JavaScript and Node.js basics and installing all the necessary modules, to writing and deploying web applications, and everything in between. We’ll cover libraries including, but not limited to, Express.js 4 and Hapi.js frameworks, Mongoskin and Mongoose ORM for the MongoDB database, Jade and Handlebars template engines, OAuth and Everyauth libraries for OAuth integrations, Mocha testing framework and Expect TDD/BDD language, and the Socket.IO and DerbyJS libraries for WebSocket real-time communication
The hands-on approach of Practical Node.js walks readers through iterating on the Blog project in addition to many other smaller examples. You’ll build database scripts, RESTful APIs, tests, and full-stack apps all from scratch. This book covers how to use Git and deploy to Heroku, as well as examples of how to deploy to Amazon Web Services, daemonize apps, and get started with Nginx, Varnish Cache, Upstart, init.d, and the forever module. You’ll also discover how to write your own Node.js modules and publish them on NPM.
Practical Node.js will show you how to:
• Build web apps with Express.js 4, MongoDB, and Jade template engine • Manipulate data from the MongoDB console
• Test Node.js web services with Mocha, Expect and TravisCI • Utilize token and session-based authentication
• Implement a third-party (Twitter) OAuth strategy with Everyauth
• Prepare code for production with Redis, Node.js domains, and the cluster library,
among other tips and the best practices
• Install necessary Node.js components on an Amazon Web Services (AWS) instance
For your convenience Apress has placed some of the front
matter material after the index. Please use the Bookmarks
v
Contents at a Glance
About the Author ����������������������������������������������������������������������������������������������������������������
xv
About the Technical Reviewer ������������������������������������������������������������������������������������������
xvii
Acknowledgments �������������������������������������������������������������������������������������������������������������
xix
Introduction �����������������������������������������������������������������������������������������������������������������������
xxi
Chapter 1: Setting up Node�js and Other Essentials
■
����������������������������������������������������������
1
Chapter 2: Using Express�js 4 to Create Node�js Web Apps
■
���������������������������������������������
33
Chapter 3: TDD and BDD for Node�js with Mocha
■
������������������������������������������������������������
57
Chapter 4: Template Engines: Jade and Handlebars
■
�������������������������������������������������������
71
Chapter 5: Persistence with MongoDB and Mongoskin
■
�������������������������������������������������
103
Chapter 6: Using Sessions and OAuth to Authorize and Authenticate
■
Users in Node�js Apps ����������������������������������������������������������������������������������������������������
129
Chapter 7: Boosting Your Node�js Data with the Mongoose ORM Library
■
���������������������
149
Chapter 8: Building Node�js REST API Servers with Express�js and Hapi
■
����������������������
173
Chapter 9: Real-Time Apps with WebSocket, Socket�IO, and DerbyJS
■
��������������������������
195
Chapter 10: Getting Node�js Apps Production Ready
■
�����������������������������������������������������
215
Chapter 11: Deploying Node�js Apps
■
�����������������������������������������������������������������������������
243
Chapter 12: Publishing Node�js Modules and Contributing to Open Source
■
������������������
261
xxi
Introduction
There are more and more books and online resources being published that cover Node.js basics (e.g., how-to’s of Hello World and simple apps). For the most part, these tutorials rely on core modules only or maybe one or two Node Package Manager (NPM) packages. This “sandbox” approach of tutorials is easy and doesn’t require many dependencies, but it can’t be further from the actual Node.js stack. This is especially true with Node.js, the core of which—by design—is kept lean and minimal. At the same time, the vast “userland” (i.e., NPM) provides an ecosystem of packages/modules to serve specific granular purposes. Therefore, there is a need to show effectively how Node.js is used in the industry and to have it all in one place—the all-encompassing practical resource that can be used as a learning tool, a code cookbook, and a reference.
What This Book Is
Practical Node.js: Building Real-World Scalable Web Apps is a hands-on manual for developing production-ready
web applications and services by leveraging the rich ecosystem of Node.js packages. This is important because real applications require many components, such as security, deployment, code organization, database drivers, template engines, and more. This is why we include extensive 12-chapter coverage of third-party services, command-line tools, NPM modules, frameworks, and libraries.
Just to give you some idea, Practical Node.js is a one-stop place for getting started with Express.js 4, Hapi.js, DerbyJS, Mongoskin, Mongoose, Everyauth, Mocha, Jade, Socket.IO, TravisCI, Heroku, Amazon Web Services (AWS), and many others. Most of these items are vital for any serious project.
In addition, we create a few projects by building, step by step, from a straightforward concept to a more complicated application. These projects can also serve as a boilerplate for jump-starting your own development efforts. Also, the examples show industry best practices to help you avoid costly mistakes.
Last but not least, many topics and chapters serve as a reference to which you can always return later when you’re faced with a challenging problem.
Practical Node.js aims to save you time and make you a more productive Node.js programmer!
What You’ll Learn
Practical Node.js takes you from an overview of JavaScript and Node.js basics, installing all the necessary modules to
xxii
In the deployment chapters (10 and 11), the book covers how to use Git and deploy to Heroku, as well as examples of how to deploy to AWS, daemonize apps, and use Nginx, Varnish Cache, Upstart, init.d, and the forever module.
The hands-on approach of this book walks you through iterating on the Blog project in addition to many other smaller examples. You’ll build database scripts, representational state transfer (RESTful) application programming interfaces (APIs), tests, and full-stack apps all from scratch. You’ll also discover how to write your own Node.js modules and publish them on NPM.
Practical Node.js will show you how to do the following:
Build web apps with Express.js 4, MongoDB, and the Jade template engine •
Use various features of Jade and Handlebars •
Manipulate data from the MongoDB console •
Use the Mongoskin and Mongoose ORM libraries for MongoDB •
Build REST API servers with Express.js 4 and Hapi.js •
Test Node.js web services with Mocha, Expect, and TravisCI •
Use token and session-based authentication •
Implement a third-party (Twitter) OAuth strategy with Everyauth •
Build WebSocket apps using Socket.IO and DerbyJS libraries •
Prepare code for production with Redis, Node.js domains, and the cluster library using tips •
and best practices
Deploy apps to Heroku using Git •
Install necessary Node.js components on an AWS instance •
Configure Nginx, Upstart, Varnish, and other tools on an AWS instance •
Write your own Node.js module and publish it on NPM •
You already know what Node.js is; now, learn what you can do with it and how far you can take it.
What This Book Is Not
Although the entire first chapter is dedicated to installations and a few important differences between Node.js and browser JavaScript, we didn’t want to dilute the core message of making production-ready apps, or make
Practical Node.js even larger and more convoluted. Therefore, the book is not a beginner’s guide and there is no extensive immersion into the inner workings of the Node.js platform and its core modules.
We also can’t guarantee that each component and topic are explained to the extent you need, because the nature of your project might be very specific. Most chapters in the book help you to get started with the stack. There is simply no realistic way to fit so many topics in one book and cover them comprehensively.
Another caveat of this book (or virtually any other programming book) is that the versions of the packages we use will eventually become obsolete. Often, this isn’t an issue because, in this book, versions are stated and locked explicitly. So no matter what, the examples will continue to work with our versions.
xxiii
Who Can Benefit from This Book
Practical Node.js is an intermediate- to advanced-level book on programming with Node.js. Consequently, to get the
most out of it, you need to have prior programming experience and some exposure to Node.js. We assume readers’ prior knowledge of computer science, programming concepts, web development, Node.js core modules, and the inner workings of HTTP and the Internet.
However, depending on your programming level and ability to learn, you can fill in any knowledge gaps very quickly by visiting links to official online documentations and reading external resources referenced in this book. Also, if you have a strong programming background in some other programming language, it would be relatively easy for you to start Node.js development with Practical Node.js.
As mentioned earlier, Practical Node.js is written for intermediate and advanced software engineers. For this reason, there are three categories of programmers who can benefit from it the most:
1. Generalist or full-stack developers including development operation (DevOps) and quality assurance (QA) automation engineers
2. Experienced front-end web developers with a strong background and understanding of browser JavaScript
3. Skilled back-end software engineers coming from other languages such as Java, PHP, and Ruby, who don’t mind doing some extra work get up to speed with the JavaScript language
Source Code
Learning is more effective when we apply our knowledge right away. For this reason, virtually every chapter in
Practical Node.js ends with a hands-on exercise. For your convenience, and because we believe in open source and
transparency, all the book’s examples are available publicly (i.e., free of charge) for exploration and execution on GitHub at https://github.com/azat-co/practicalnode.
Errata and Contacts
If you spot any mistakes or typos (and I’m sure you will), please open an issue or, even better, fix it and make a pull request to the GitHub repository of the book’s examples at https://github.com/azat-co/practicalnode. For all other updates and contact information, the canonical home of Practical Node.js on the Internet is
http://practicalnodebook.com.
Notation
xxiv
Why You Should Read This Book
Practical Node.js was designed to be one stop for going from Hello World examples to building apps in a professional
manner. You get a taste of the most widely used Node.js libraries in one place, along with best practices and recommendations based on years of building and running Node.js apps in production. The libraries covered in
Practical Node.js greatly enhance the quality of code and make you more productive. Also, although the material in
1
Setting up Node.js and Other
Essentials
As with many technologies, it’s vital to have the proper foundation set up first, before moving on to solving more complex problems. In this chapter, we cover the following:
Node.js and (NPM) Node Package Manager installation •
Node.js script launches •
Node.js syntax and basics •
Node.js integrated development environments (IDEs) and code editors •
Awareness of file changes •
Node.js program debugging •
Installing Node.js and NPM
Although your operating system (OS) might have Node.js installed on it already, you should update to at least 0.10.x. In the following subsection, we examine a few different approaches to installing Node.js:
• One-click installers: probably the easiest and fastest way to get started with the platform
• Installing with HomeBrew or MacPorts: straightforward installation for Max OS X users
• Installing from a tar file: an alternative installation from an archive file
• Installing without sudo: the best way to avoid needing sudo (admin rights) when using the
node and npm commands
• Installing from a Git repo: an option for advanced developers who need the latest version
and/or contribute to the project
• Multiversion setup with Nave: a must-have for developers contributing to projects that use
different Node.js versions
2
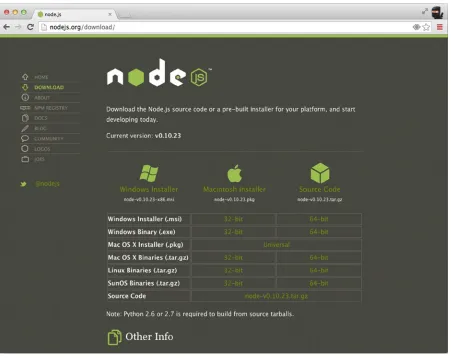
One-Click Installers
First, let’s go to http://nodejs.org and download a one-click installer for your OS (Figure 1-1) by clicking on the Install button. Don’t choose binaries or source code unless you know what to do with them or your OS is not present there (i.e., not Windows or Mac).
Figure 1-1. One-click installers for Node.js
3
Note
■
For older Mac oS X machines, you can pick 32-bit versions.
Installing with HomeBrew or MacPorts
If you already have HomeBrew (brew) installed, run the following in a straightforward manner:
$ brew install node $ brew install npm
Similarly, for MacPorts, run
[image:10.540.56.507.47.405.2]$ sudo port install nodejs
4
If your Mac OS X does not have HomeBrew, go to http://brew.sh/ or install it with the following command:
$ ruby -e "$(curl -fsSL https://raw.github.com/Homebrew/homebrew/go/install)"
Installing from a Tar File
To install from a tar file (which is type of archive), set up a folder for the latest Node.js as follows:
$ echo 'export PATH=$HOME/local/bin:$PATH' >> ~/.bashrc $ . ~/.bashrc
$ mkdir ~/local
$ mkdir ~/node-latest-install $ cd ~/node-latest-install
Note
■
advanced users who choose to make their own node.js builds need to have certain compilers installed first. For
more information, refer to the official documentation
(https://github.com/joyent/node/wiki/Installation).
Download the tar file with CURL and unpack it:
$ curl http://nodejs.org/dist/node-latest.tar.gz | tar xz --strip-components=1 $ ./configure --prefix=~/local
Build Node.js and install it:
$ make install
$ curl https://npmjs.org/install.sh | sh
Tip
■
if you find yourself getting errors when trying to install the module globally via npM (
$ npm install -g <packagename>), reinstall node.js and npM with the “installing Without sudo” solution below to eliminate the need
to use
sudowith the installation command. For more solutions for advanced users, there’s a gist from isaac Z. Schlueter:
https://gist.github.com/isaacs/579814
.
Installing Without sudo
Sometimes, depending on your configuration, NPM asks users for sudo— root user permissions. To avoid using sudo, advanced developers can use the following::
$ sudo mkdir -p /usr/local/{share/man,bin,lib/node,include/node} $ sudo chown -R $USER /usr/local/{share/man,bin,lib/node,include/node}
Note
5
Then, proceed with a normal installation:
$ mkdir node-install
$ curl http://nodejs.org/dist/node-v0.4.3.tar.gz | tar -xzf - -C node-install $ cd node-install/*
$ ./configure $ make install
$ curl https://npmjs.org/install.sh | sh
Installing from a Git Repo
If you want to use the latest core Node.js code, and maybe even contribute to the Node.js and NPM projects, it’s possible to build the installation from the cloned Git repo. (This step requires Git. To install it, go to http://git-scm.com/ and click Download.) For basic Git commands, refer to Chapter 11, where we explore deployment; otherwise, do the following:
1. Make the folders and add the path:
$ mkdir ~/local
$ echo 'export PATH=$HOME/local/bin:$PATH' >> ~/.bashrc $ . ~/.bashrc
To clone the original Node.js repo from Joyent (alternatively, you can fork it and clone your own repository), do the following:
$ git clone git://github.com/joyent/node.git $ cd node
$ ./configure --prefix=~/local
2. Make the build:
$ make install $ cd ..
3. Repeat for NPM:
$ git clone git://github.com/isaacs/npm.git $ cd npm
$ make install
For a more cutting-edge NPM version, use
$ make link
Multiversion Setup with Nave
If you plan to run multiple versions of Node.js, use Nave (https://github.com/isaacs/nave), which is a virtual environment for Node.js. First, make a folder:
6
Then, download Nave and set the link to the PATH-ed folder:
$ wget http://github.com/isaacs/nave/raw/master/nave.sh
$ sudo ln -s $PWD/nave.sh /usr/local/bin/nave
An example of switching to Node.js version 0.4.8 with Nave in a virtual environment is as follows:
$ nave use 0.4.8
To use NPM in this particular virtual environment, use
$ curl https://npmjs.org/install.sh | sh
It is now possible to install something via NPM:
$ npm install express
Last, exit the virtual environment with
exit
More approaches to install Node.js and NPM are in gist (https://gist.github.com/isaacs/579814).
Multiversion Setup with NVM
Another option to Nave is NVM—Node Version Manager (GitHub, https://github.com/creationix/nvm). Install NVM as follows:
$ curl https://raw.github.com/creationix/nvm/master/install.sh | sh
or
$ wget -qO- https://raw.github.com/creationix/nvm/master/install.sh | sh
Then, harness NVM’s install:
$ nvm install 0.10
To switch to the 0.10 version, apply the use command. For example:
$ nvm use 0.10
Alternative Multiversion Systems
Alternatives to Nave and NVM include the following:
neco
• (https://github.com/kuno/neco)
n
7
Checking the Installation
To test your installation, run the following commands in your Terminal app (command line cmd.exe in Windows):
$ node -v $ npm -v
You should see the latest versions of Node.js and NPM that you just downloaded and installed, as shown in Figure 1-3.
Figure 1-3. Checking Node.js and NPM installations
That’s it! You now have Node.js and NPM installed, and you should be ready to dig deeper into using the platform. The simplest way to run Node.js is through its virtual environment, which is often called read–eval–print–loop, or REPL.
Node.js Console (REPL)
Like most platforms/languages (e.g., Java, Python, Ruby, and PHP), Node.js comes with a virtual environment: REPL. Using this shell program, we can execute pretty much any Node.js/JavaScript code. It’s even possible to include modules and work with the file system! Other REPL use cases involve controlling nodecopters (http://nodecopter.com/) and debugging remote servers (more about this in Chapter 10). To start the console, run the following command in your terminal:
[image:14.540.54.368.157.396.2]8
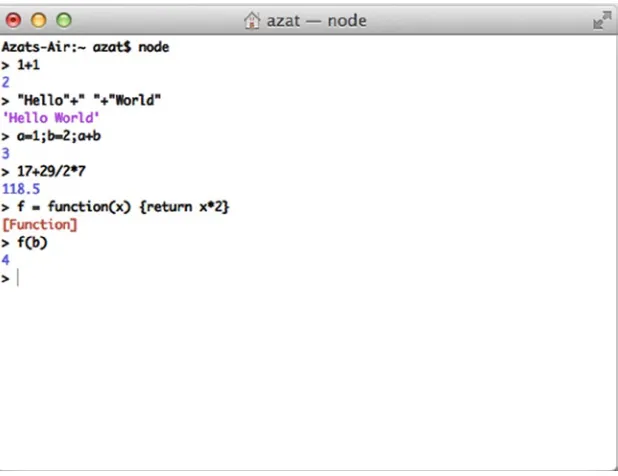
The prompt should change from $ to > (or something else, depending on your shell). From this prompt, we can run any JavaScript/Node.js (akin to the Chrome Developer Tools console) we want. For example:
> 1+1
> "Hello"+" "+"World" > a=1;b=2;a+b
> 17+29/2*7
> f = function(x) {return x*2} > f(b)
[image:15.540.39.348.184.422.2]The result of the previous snippet is shown in Figure 1-4.
Figure 1-4. Executing JavaScript in Node.js REPL
There are slight deviations in ECMAScript implementations in Node.js and browsers such as the Chrome Developer Tools console. For example, {}+{} is '[object Object][object Object]' in Node.js REPL, whereas the same code is NaN in the Chrome console because of the automatic semicolon insertion (ASI) feature. However, for the most part, Node.js REPL and the Chrome/Firefox consoles are similar.
Launching Node.js Scripts
9
If the Node.js program uses environmental variables, it’s possible to set them right before the node command. For example:
$ NODE_ENV=production API_KEY=442CC1FE-4333-46CE-80EE-6705A1896832 node server.js
Preparing your code for production is discussed later in Chapter 10.
Node.js Basics and Syntax
Node.js was built on top of the Google Chrome V8 engine and its ECMAScript, which means most of the Node.js syntax is similar to front-end JavaScript (another implementation of ECMAScript), including objects, functions, and methods. In this section, we look at some of the most important aspects; let’s call them Node.js/JavaScript
fundamentals:
Loose typing •
Buffer—Node.js super data type •
Object literal notation •
Functions •
Arrays •
Prototypal nature •
Conventions •
Loose Typing
Automatic typecasting works well most of the time. It’s a great feature that saves a lot of time and mental energy! There are only a few types of primitives:
String •
Number (both integer and real) •
Boolean •
Undefined •
Null •
RegExp •
Everything else is an object (i.e., mutable keyed collections, read Stackoverflow on “What does immutable mean?”,1 if in doubt).
Also, in JavaScript, there are String, Number, and Boolean objects that contain helpers for the primitives, as follows:
'a' === new String('a') //false
but
10
'a' === new String('a').toString() //true
or
'a' == new String('a') //true
By the way, == performs automatic typecasting whereas === does not.
Buffer—Node.js Super Data Type
Buffer is a Node.js addition to four primitives (boolean, string, number, and RegExp) and all-encompassing objects (array and functions are also objects) in front-end JavaScript. Think of buffers as extremely efficient data stores. In fact, Node.js tries to use buffers any time it can, such as when reading from file systems and when receiving packets over the network.
Object Literal Notation
Object notation is super readable and compact:
var obj = { color: "green", type: "suv", owner: { ... } }
Remember, functions are objects:
var obj = function () { this.color: "green", this.type: "suv", this.owner: { ... } }
Functions
In Node.js (as well as in JavaScript), functions are first-class citizens, and we treat them as variables, because they are objects! Yes, functions can even have properties/attributes. First, let’s learn how to define a function.
Define/Create a Function
The three most common ways to define/create a function are to use a named expression, an anonymous expression assigned to a variable, or both. The following is an example of a named expression:
11
An anonymous function expression assigned to a variable looks as follows (note that it must precede the invocation, because the function is not hoisted, unlike the previous example):
var f = function () { console.log('Hi'); return true; }
The following is an example of both approaches:
var f = function f () { console.log('Hi'); return true; }
A function with a property (remember, functions are just objects that can be invoked/initialized) is as follows:
var f = function () {console.log('Boo');} f.boo = 1;
f(); //outputs Boo
console.log(f.boo); //outputs 1
Note
■
the return keyword is optional. When it is omitted, the function returns
undefinedon invocation.
Pass Functions as Parameters
JavaScript treats functions like any other objects, so we can pass them to other functions as parameters (usually, callbacks in Node.js):
var convertNum = function (num) { return num + 10;
}
var processNum = function (num, fn) { return fn(num);
}
processNum(10, convertNum);
Function Invocation vs. Expression
The function definition is as follows:12
On the other hand, the function invocation looks like
f();
Expression, because it resolves to some value (which could be a number, string, object, or boolean), is as follows:
function f() {return false;} f();
A statement looks like
function f(a) {console.log(a);}
Arrays
Arrays are also objects that have some special methods inherited from the Array.prototype2 global object.
Nevertheless, JavaScript arrays are not real arrays; instead, they are objects with unique integer (usually 0 based) keys.
var arr = [];
var arr2 = [1, "Hi", {a:2}, function () {console.log('boo');}]; var arr3 = new Array();
var arr4 = new Array(1,"Hi", {a:2}, function () {console.log('boo');});
Prototypal Nature
There are no classes in JavaScript because objects inherit directly from other objects, which is called prototypal
inheritance. There are a few types of inheritance patterns in JavaScript:
Classical •
Pseudoclassical •
Functional •
This is an example of the functional inheritance pattern:
var user = function (ops) {
return { firstName: ops.name || 'John' , lastName: ops.name || 'Doe'
, email: ops.email || '[email protected]'
, name: function() { return this.firstName + this.lastName} }
}
var agency = function(ops) { ops = ops || {}
var agency = user(ops)
agency.customers = ops.customers || 0 agency.isAgency = true
return agency }
13
Conventions
It’s important to follow the most common language conventions. Some of them are listed here:
Semicolons •
camelCase •
Naming •
Commas •
Indentations •
Whitespace •
These JavaScript/Node.js conventions (with semicolons being an exception) are stylistic and highly preferential. They don’t impact the execution; however, it’s strongly suggested that you follow one style consistently, especially if you are a developer working in teams and/or on open-source projects. Some open-source projects might not accept pull requests if they contain semicolons (e.g., NPM) or if they don’t use comma-first style (e.g., request).
Semicolons
The use of semicolons is optional, except for two cases:
1. In for loop construction: for (var i=0; i++; i<n)
2. When a new line starts with parentheses, such as when using an immediately invoked function expression (IIFE): ;(function(){...}())
camelCase
camelCase is the main naming pattern in JavaScript, except for class names, which are CapitalCamelCase. An example follows:
var MainView = Backbone.View.extend({...}) var mainView = new MainView()
Naming
_ and $ are perfectly legitimate characters for literals (jQuery and Underscore libraries use them a lot). Private methods and attributes start with _ (and it does nothing by itself!).
Commas
An example of a comma-first approach is as follows:
var obj = { firstName: "John" , lastName: "Smith"
14
Indentation
Indentation is usually done using either a tab, or four- or two-space indentation, with supporting camps split almost religiously between the two options.
Whitespace
Usually, there is a space before and after the =, +, {, and } symbols. There is no space on invocation (e.g., arr.push(1);), but there’s a space when we define an anonymous function: function () {}.
Node.js Globals and Reserved Keywords
Despite being modeled after one standard, Node.js and browser JavaScript differ when it comes to globals. This was done intentionally because when var is omitted, browser JavaScript leaks variables infamously to the global space, thus polluting it. This has been dubbed as one of the bad parts of JavaScript in the canonical book JavaScript: The
Good Parts by Douglas Crockford (2008 O’Reilly).
As you might know, in browser JavaScript we have a window object. However, in Node.js, it is absent (obviously we don’t deal with a browser window), but developers are provided with new objects/keywords:
• process
• global
• module.exports and exports
So, let’s take a look at the main differences between Node.js and JavaScript.
Node.js Process Information
Each Node.js script that runs is, in essence, a process. For example, ps aux | grep 'node' outputs all Node.js programs running on a machine. Conveniently, developers can access useful process information in code with the
15
Accessing Global Scope in Node.js
As you know, browser JavaScript, by default, puts everything into its global scope. On the other hand, Node.js was designed to behave differently, with everything being local by default. In case we need to access globals, there is a
global object. And, when we need to export something, we should do so explicitly.
In a sense, the window object from front-end/browser JavaScript metamorphosed into a combination of global
and process objects. Needless to say, the document object, which represents the DOM (Document Object Model) of the web page, is nonexistent in Node.js.
Exporting and Importing Modules
Another bad part in browser JavaScript is that there is no way to include modules. Scripts are supposed to be linked together using a different language (HTML), but dependency management is lacking. CommonJS
(http://www.commonjs.org/) and RequireJS (http://requirejs.org/) solve this problem with the AJAX-y approach. Node.js borrowed many things from the CommonJS concept.
To export an object in Node.js, use exports.name = object;. An example follows:
var messages = {
find: function(req, res, next) { ...
},
add: function(req, res, next) { ...
},
format: 'title | date | author' }
[image:22.540.53.368.48.295.2]exports.messages = messages;
16
While in the file where we import the aforementioned script (assuming the path and the file name is
route/messages.js), write the following:
var messages = require('./routes/messages.js');
However, sometimes it’s more fitting to invoke a constructor, such as when we attach properties to the Express.js app (which is explained in detail in Express.js FUNdamentals: An Essential Overview of Express.js [2013],
http://webapplog.com/express-js-fundamentals/). In this case, module.exports is needed:
module.exports = function(app) {
app.set('port', process.env.PORT || 3000); app.set('views', __dirname + '/views'); app.set('view engine', 'jade');
return app; }
In the file that includes the previous sample module, write
...
var app = express();
var config = require('./config/index.js'); app = config(app);
...
The more succinct code is var = express(); require('./config/index.js')(app);.
The most common mistake when including modules is creating a wrong path to the file. For core Node.js modules, use the name without any path—for example, require('name'). The same goes for modules in the
node_modules folder (more on this when we examine NPM later in the chapter).
For all other files (i.e., not modules), use . with or without a file extension. An example follows:
var keys = require('./keys.js'),
messages = require('./routes/messages.js');
In addition, for including files, it’s possible to use longer statements with __dirname and path.join()—for example, require(path.join(__dirname, ,'routes', 'messages'));. This is a recommended approach, because
path.join() will produce a path with valid slashes (forward or backward depending on your OS). If require() points to a folder, Node.js attempts to read the index.js file in that folder.
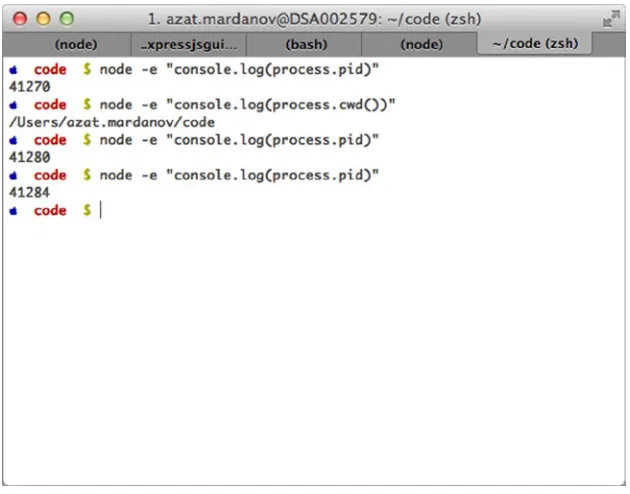
__dirname vs. process.cwd
17
Browser Application Programming Interface Helpers
There are myriad helper functions in Node.js from the browser JavaScript application programming interface (API). The most useful come from String, Array, and Math objects. To make you aware of their existence, or to remind you, here is a list of the most common functions and their meanings:
• Array
• some() and every(): assertions for array items • join() and concat(): convertion to a string
• pop(), push(), shift(), and unshift(): working with stacks and queues • map(): model mapping for array items
• filter(): querying array items • sort(): ordering items
• reduce(), reduceRight(): computing • slice(): copying
• splice(): removing
• indexOf(): lookups of finding the value in the array • reverse(): reversing the order
The
• in operator: iteration over array items
• Math
• random(): random real number less than one • String
• substr() and substring(): extracting substrings • length: length of the string
• indexOf(): index of finding the value in the string • split(): converting the string to an array
In addition, we have setInterval(), setTimeout(), forEach(), and console methods in Node.js. For the complete list of methods and examples, visit the following sites:
• String (https://developer.mozilla.org/en-US/docs/Web/JavaScript/Reference/ Global_Objects/String)
• Array (https://developer.mozilla.org/en-US/docs/Web/JavaScript/Reference/ Global_Objects/Array)
18
Node.js Core Modules
Unlike other programming technologies, Node.js doesn’t come with a heavy standard library. The core modules of node.js are a bare minimum, and the rest can be cherry-picked via the NPM registry. The main core modules, classes, methods, and events include the following:
• http (http://nodejs.org/api/http.html#http_http) • util (http://nodejs.org/api/util.html)
• querystring (http://nodejs.org/api/querystring.html) • url (http://nodejs.org/api/url.html)
• fs (http://nodejs.org/api/fs.html)
http
(
http://nodejs.org/api/http.html
)
http is the main module responsible for the Node.js HTTP server. The main methods are as follows: • http.createServer(): returns a new web server object
• http.listen(): begins accepting connections on the specified port and hostname • http.createClient(): is a client and makes requests to other servers
• http.ServerRequest(): passes incoming requests to request handlers • data: emitted when a part of the message body is received • end: emitted exactly once for each request
• request.method(): the request method as a string • request.url(): request URL string
• http.ServerResponse(): creates this object internally by an HTTP server — not by the user— and is used as an output of request handlers
• response.writeHead(): sends a response header to the request • response.write(): sends a response body
• response.end(): sends and ends a response body
util
(
http://nodejs.org/api/util.html
)
The util module provides utilities for debugging. One method is as follows:• util.inspect(): returns a string representation of an object, which is useful for debugging
querystring
(
http://nodejs.org/api/querystring.html
)
The querystring module provides utilities for dealing with query strings. Some of the methods include the following: • querystring.stringify(): serializes an object to a query string
19
url
(
http://nodejs.org/api/url.html
)
The url module has utilities for URL resolution and parsing. One method is as follows: • parse(): takes a URL string and returns an object
fs
(
http://nodejs.org/api/fs.html
)
fs handles file system operations such as reading to and writing from files. There are synchronous and asynchronous methods in the library. Some of the methods include the following:
• fs.readFile(): reads files asynchronously
• fs.writeFile(): writes data to files asynchronously
There is no need to install or download core modules. To include them in your application, all you need is to use the following syntax:
var http = require('http');
A list of noncore modules is found at the following locations:
npmjs.org
• (https://npmjs.org): for the NPM registry GitHub hosted list
• (https://github.com/joyent/node/wiki/Modules): for Node.js modules maintained by Joyent
nodetoolbox.com
• (http://nodetoolbox.com/): for a registry based on stats Nipster
• (http://eirikb.github.com/nipster/): for NPM search tools for Node.js Node tracking (
• http://nodejsmodules.org): for a registry based on GitHub stats
If you want to know how to code your own modules, take a look at the article “Your First Node.js Module3.”
Handy Node.js Utilities
Although the core of the Node.js platform was, intentionally, kept small, it has some essential utilities, including the following:
• Crypto(http://nodejs.org/api/crypto.html): has randomizer, MD5, HMAC-SHA1, and other algorithms
• Path(http://nodejs.org/api/path.html): handles system paths
• String decoder(http://nodejs.org/api/string_decoder.html): decodes to and from buffer and string types
The method we use throughout is path.join and it concatenates the path using an appropriate folder separator (/ or \\).
20
Reading to and Writing from the File System in Node.js
Reading from files is done via the core fs module (http://nodejs.org/api/fs.html). There are two sets of reading methods: async and sync. In most cases, developers should use async methods, such as fs.readFile:
var fs = require('fs'); var path = require('path');
fs.readFile(path.join(__dirname, '/data/customers.csv'), {encoding: 'utf-8'}, function (err, data) { if (err) throw err;
console.log(data); });
To write to the file, execute the following:
var fs = require('fs');
fs.writeFile('message.txt', 'Hello World!', function (err) { if (err) throw err;
console.log('Writing is done.'); });
Streaming Data in Node.js
Streaming data is a phrase that means an application processes the data while it’s still receiving it. This feature is
useful for extra large datasets such as video or database migrations.
Here’s a basic example of using streams that output the binary file content back:
var fs = require('fs');
fs.createReadStream('./data/customers.csv').pipe(process.stdout);
By default, Node.js uses buffers for streams. For more immersive instruction, take a look at stream-adventure
(http://npmjs.org/stream-adventure) and Stream Handbook (https://github.com/substack/stream-handbook).
Installing Node.js Modules with NPM
NPM comes with the Node.js platform and allows for seamless Node.js package management. The way npm install
works is similar to Git in the way it traverses the working tree to find a current project (https://npmjs.org/doc/ files/npm-folders.html). For starters, keep in mind that we need either the package.json file or the node_modules
folder to install modules locally with $ npm install name. For example, $ npm install superagent; in the program. js write: var superagent = require('superagent');.
The best thing about NPM is that it keeps all the dependencies local, so if module A uses module B v1.3, and module C uses module B v2.0 (with breaking changes compared with v1.3), both A and C will have their own localized copies of different versions of B. This proves to be a more superior strategy than that of Ruby and other platforms that use global installations by default.
The best practice is not to include a node_modules folder in the Git repository when the project is a module that is supposed to be used in other applications. However, it’s recommended to include node_modules for deployable applications to prevent breakage caused by unfortunate dependency updates.
Note
21
Taming Callbacks in Node.js
Callbacks (https://github.com/maxogden/art-of-node) are able to make Node.js code asynchronous, yet
programmers unfamiliar with JavaScript, who work with Java or PHP, might be surprised when they see Node.js code described on Callback Hell (http://callbackhell.com/):
fs.readdir(source, function(err, files) { if (err) {
console.log('Error finding files: ' + err) } else {
files.forEach(function(filename, fileIndex) { console.log(filename)
gm(source + filename).size(function(err, values) { if (err) {
console.log('Error identifying file size: ' + err) } else {
console.log(filename + ' : ' + values) aspect = (values.width / values.height) widths.forEach(function(width, widthIndex) { height = Math.round(width / aspect)
console.log('resizing ' + filename + 'to ' + height + 'x' + height)
this.resize(width, height).write(destination + 'w' + width + '_' + filename, function(err) { if (err) console.log('Error writing file: ' + err)
})
}.bind(this)) }
}) }) } })
There’s nothing to be afraid of here as long as two-space indentation is used. ;-) However, callback code can be rewritten with the use of event emitters or promises, or by using the async library.
Hello World Server with HTTP Node.js Module
Although, Node.js can be used for a wide variety of tasks, it’s used primarily for building web applications. Node.js thrives in the network as a result of its asynchronous nature and built-in modules such as net and http.
Here’s a quintessential Hello World example in which we create a server object, define the request handler (function with req and res arguments), pass some data back to the recipient, and start up the whole thing (hello.js):
var http = require('http');
http.createServer(function (req, res) {
res.writeHead(200, {'Content-Type': 'text/plain'}); res.end('Hello World\n');
}).listen(1337, '127.0.0.1');
console.log('Server running at http://127.0.0.1:1337/');
Let’s break it down a bit (if you know this already, skip to the next section). The following loads the core http
module for the server (more on the modules later):
22
This snippet below creates a server with a callback function which contains the response handler code:
var server = http.createServer(function (req, res) {
To set the right header and status code, use the following:
res.writeHead(200, {'Content-Type': 'text/plain'});
To output Hello World with the line end symbol, use
res.end('Hello World\n'); });
The req and res arguments have all the information about a given HTTP request and response correspondingly. In addition, req and res can be used as streams (see previous section).
To make the server accept requests, use the following:
... listen(1337, '127.0.0.1');
From the folder in which you have server.js, launch in your terminal the following command:
$ node server.js
Open localhost:1337 or 127.0.0.1:1337 or any other address you see in the terminal as a result of the console.log()
function and you should see Hello World in a browser. To shut down the server, press Control + c (on Mac OS X).
Note
■
the name of the main file could be different from server.js (e.g., index.js or app.js). in case you need to launch
the app.js file, just use
$ node app.js.
Debugging Node.js Programs
Modern-day software developers, especially those who use compiled languages such as Java, get accustomed to rich tool sets for debugging purposes. Back in the day, before JavaScript and AJAX apps were starting to gain momentum (~2005–2007), the only way to debug was to put a bunch of alert() statements everywhere. Now, there are amazing environments such as Chrome Developer Tools and Firefox Firebug! Also, because Node.js has a lot of things in common with the browser JavaScript environment, we have plenty of options for debugging in Node.js, including the following:
• Core Node.js Debugger: a nongraphic user interface (non-GUI) minimalistic tool that works
everywhere
• Node Inspector: port of Google Chrome Developer Tools
WebStorm and other IDEs (covered in the next section) •
Core Node.js Debugger
23
For example, the Hello World from the previous section can be enhanced with debugger in two places: when an instance is created and when a request is made (hello-debug.js):
var http = require('http'); debugger;
http.createServer(function (req, res) {
res.writeHead(200, {'Content-Type': 'text/plain'}); debugger;
res.end('Hello World\n'); }).listen(1337, '127.0.0.1');
console.log('Server running at http://127.0.0.1:1337/');
Now, if we run the previous snippet (hello-debug.js), just like we did earlier ($ node hello-debug.js), nothing changes, because we need to use $ node debug hello-debug.js. And only then, the execution halts at the first line, and then again on the next debugger statement if we use the cont command.
The main node debug commands are as follows: • next, n: step to the next statement
• cont, c: continue until the next debugger/break point • step, s: step inside the function call
• out, o: step outside the function call • watch(expression): watch the expression
The full list of commands is available through the help command or on the official web site (http://nodejs.org/api/debugger.html).
So, in our example (hello-debug.js), after we start the debugger client and execute cont or c twice (first for the first line and second for our debugger on the second line), the server will be up and running. After that, we can open the browser at (http://localhost:1337/) or execute $ curl "(http://localhost:1337/)" in the Terminal/ Command line, and the debugger client stops inside the request handler (line 5). Now we can use repl and console. log(req) to inspect the HTTP response object dynamically.
Debugging with Node Inspector
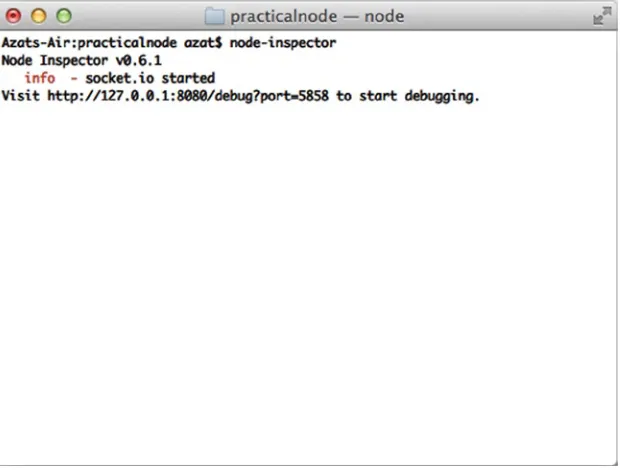
The built-in Node.js debugger client is extensive, but it’s not intuitive because of the lack of a GUI. Therefore, for a more developer-friendly interface than the core Node.js debugger provides, node-inspector (https://github.com/ node-inspector/node-inspector) comes to the rescue!
To download and install Node Inspector, we use our beloved NPM in the global mode (-g or --global):
$ npm install -g node-inspector
Then, we start Node Inspector with the following (Figure 1-6):
24
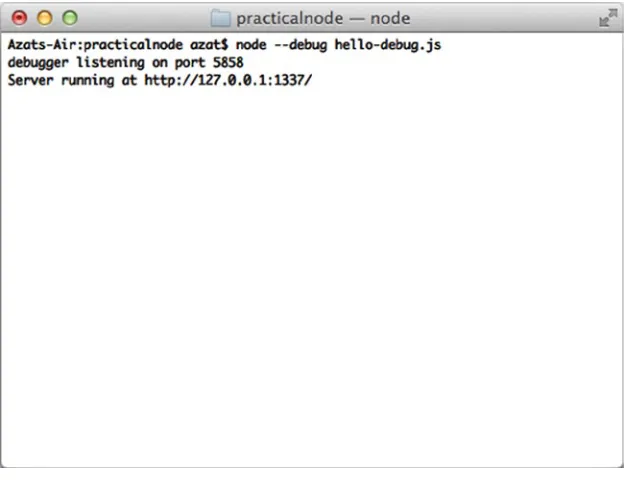
Now start the program in a new terminal window/tab/session with --debug or --debug-brk flags (not just debug; Figure 1-7). For example:
$ node --debug-brk hello-debug.js
or
[image:31.540.39.349.50.285.2]$ node --debug hello-debug.js
25
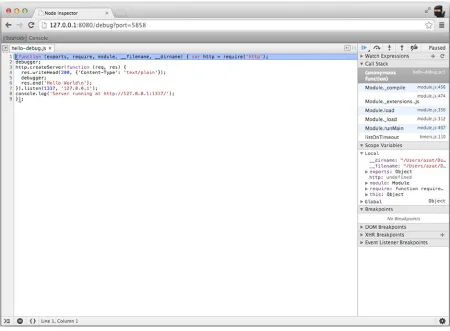
[image:32.540.54.368.49.289.2]Open http://127.0.0.1:8080/debug?port=5858 or http://localhost:8080/debug?port=5858 in Chrome (it must be Chrome and not another browser because Node Inspector uses the Web Developer Tools interface). You should be able to see the program halted at a break point. Clicking the blue play button resumes the execution, as shown in Figure 1-8.
26
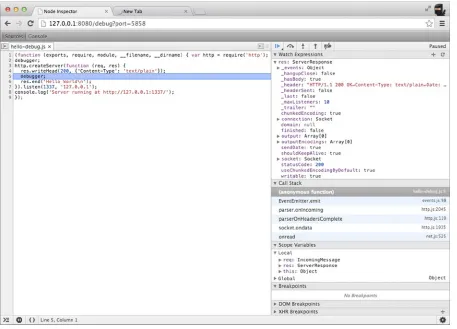
[image:33.540.36.486.49.380.2]If we let the server run and open http://localhost:1337/ in a new browser tab, this action pauses the execution on the second break point, which is inside the request handler. From here, we can use Node Inspector’s right GUI and add a res watcher (Figure 1-9), which is way better than the terminal window output!
27
[image:34.540.54.511.49.378.2]In addition, we can follow the call stack, explore scope variables, and execute any Node.js command in the console tab (Figure 1-10)!
28
Node.js IDEs and Code Editors
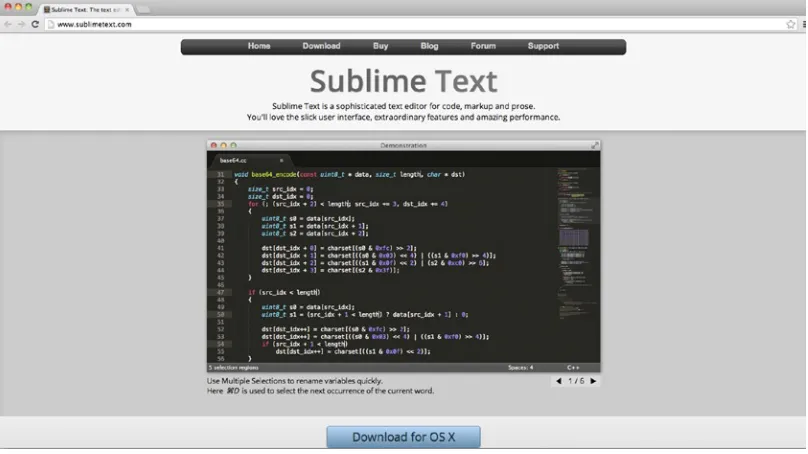
[image:35.540.38.442.373.600.2]One of the best things about Node.js is that you don’t need to compile the code, because it’s loaded into memory and interpreted by the platform! Therefore, a lightweight text editor is highly recommended, such as Sublime Text (Figure 1-11), vs. a full-blown IDE. However, if you are already familiar and comfortable with the IDE of your choice, such as Eclipse (http://www.eclipse.org/), NetBeans (http://netbeans.org/), or Aptana (http://aptana.com/), feel free to stick with it.
Figure 1-10. Writing to response (i.e., the res object) from the Node Inspector console
29
The following is a list of the most popular text editors and IDEs used in web development:
• TextMate (http://macromates.com/): Mac OS X version only, free 30-day trial for v1.5, dubbed
The Missing Editor for Mac OS X
• Sublime Text (http://www.sublimetext.com/): Mac OS X and Windows versions are available, an even better alternative to TextMate, with an unlimited evaluation period
• Coda (http://panic.com/coda/): an all-in-one editor with an FTP browser and preview, has support for development with an iPad
• Aptana Studio (http://aptana.com/): a full-size IDE with a built-in terminal and many other tools • Notepad ++ (http://notepad-plus-plus.org/): a free, Windows-only lightweight text editor
with the support of many languages
• WebStorm IDE (http://www.jetbrains.com/webstorm/): a feature-rich IDE that allows for Node.js debugging, developed by JetBrains and marketed as “the smartest JavaScript IDE” (Figure 1-12)
Figure 1-12. WebStorm IDE home page
30
Watching for File Changes
If you are familiar with watching for file changes or it’s not an issue for you, feel free to skip this section.
Node.js applications are stored in memory, and if we make changes to the source code, we need to restart the process (i.e., node). We do this manually by killing the process and starting a new one (Control + c on Macs and Ctrl + c on Windows). However, it’s faster for development if this constant sequence of restarts is automated. There are brilliant tools that leverage the watch method from the core Node.js fs module and restart servers when we save changes from an editor:
forever (
• http://npmjs.org/forever) (GitHub, http://github.com/nodejitsu/forever) usually used in production (we examine this topic in Chapter 11)
node-dev (
• https://npmjs.org/package/node-dev) (GitHub, https://github.com/fgnass/node-dev)
31
nodemon (
• https://npmjs.org/package/nodemon) (GitHub, https://github.com/remy/nodemon) supervisor (
• https://npmjs.org/package/supervisor) (GitHub, https://github.com/ isaacs/node-supervisor)
up (
• https://npmjs.org/package/up) (GitHub, https://github.com/LearnBoost/up), now a deprecated module
Any one of these tools is as easy to use as installing globally with $ npm install -g node-dev, then running the Node.js script with $ node-dev program.js. Just replace node-dev with another module name.☺
For a comparison between these tools, refer to Comparison: Tools to Automate Restarting Node.js Server After Code Changes (http://strongloop.com/strongblog/comparison-tools-to-automate-restarting-node-js-server-after-code-changes-forever-nodemon-nodesupervisor-nodedev/).
Tip
■
it’s good to know that express.js reloads a template file for every new request by default. So, no server restart
is necessary. however, we can cache templates by enabling the
view cachesetting. For more express.js setting, take a
look at pro express.js 4 [2014, apress].
Summary
In this chapter, we explored Installing Node.js and NPM, and launching Node.js scripts from the command line. We also looked at the essential concepts of Node.js syntax and the platform. Last, lists of Node.js IDEs and libraries for development were provided.
33
Using Express.js 4 to Create Node.js
Web Apps
It’s only logical that, by using frameworks, software engineers become more productive and can achieve results faster. Often, the results are of a better quality because the frameworks are used and maintained by many other developers and contributors. Even if developers build everything from scratch, they end up with their own framework in the end. It’s just a very customized one!
Node.js is a relatively young platform when it comes to frameworks (unlike Ruby or Java), but there’s already a leader that has become a de facto standard used in the majority of Node.js projects: Express.js.
Express.js is an amazing framework for Node.js projects, and it’s used in the majority of web apps, which is why this second chapter is dedicated to getting started with this framework.
In this chapter we cover the following topics, which serve as an introduction to Express.js:
What Express.js is
•
How Express.js works
•
Express.js Installation
•
Express.js scaffolding (command-line tool)
•
The Blog Project overview
•
Express.js 4 Hello World example
•
What Is Express.js?
Express.js is a web framework based on the core Node.js http module and Connect (http://www.senchalabs.org/ connect/) components. The components are called middleware and they are the cornerstones of the framework philosophy configuration over convention. In other words, Express.js systems are highly configurable, which allows developers to pick freely whatever libraries they need for a particular project. For these reasons, the Express.js framework leads to flexibility and high customization in the development of web applications.
If you write serious apps using only core Node.js modules (refer to the following snippet for an example), you most likely find yourself reinventing the wheel by writing the same code continually for similar tasks, such as the following:
Parsing of HTTP request bodies
•
Parsing of cookies
•
Managing sessions
34
Organizing routes with a chain of
• if conditions based on URL paths and HTTP methods of
the requests
Determining proper response headers based on data types
•
To illustrate my point, here is an example of a two-route representational state transfer: http://en.wikipedia.org/wiki/Representational_state_transfer.
(REST) API server, i.e., we have only two end points and they are also called routes. In this application, we use only core Node.js modules for server functions. A single “userland”/external native MongoDB driver module is used for persistence. This example is taken from beginner-friendly Rapid Prototyping with JS (http://rpjs.co/): Agile JavaScript Development by Azat Mardan [2013]:
var http = require('http'); var util = require('util');
var querystring = require('querystring'); var mongo = require('mongodb');
var host = process.env.MONGOHQ_URL || 'mongodb://@127.0.0.1:27017';
//MONGOHQ_URL=mongodb://user:[email protected]/db_name mongo.Db.connect(host, function(error, client) {
if (error) throw error;
var collection = new mongo.Collection( client,
'test_collection' );
var app = http.createServer( function (request, response) { if (
request.method === 'GET' &&
request.url === '/messages/list.json' ) {
collection.find().toArray(function(error, results) { response.writeHead( 200, {'Content-Type': 'text/plain'} ); console.dir(results); response.end(JSON.stringify(results)); }); }; if (
request.method === "POST" &&
request.url === "/messages/create.json" ) {
request.on('data', function(data) { collection.insert(
querystring.parse(data.toString('utf-8')), {safe: true},
function(error, obj) { if (error) throw error;
35
); }); }; });
var port = process.env.PORT || 5000; app.listen(port);
})
As you can see, developers have to do a lot of manual work themselves, such as interpreting HTTP methods and URLs into routes, and parsing input and output data.
Express.js solves these and many other problems as abstraction and code organization. The framework provides a model-view-controller-like (MVC-like) structure for your web apps with a clear separation of concerns (views, routes, models).
For the models (M in MVC), we need to use Mongoose (http://mongoosejs.com/) or Sequelize
(http://sequelizejs.com/) libraries in addition to Express.js— more on this later in the book in Chapter 7. In this chapter we’ll cover the basics of Express.js. Built on top this framework, Express.js applications can vary from bare-bones, back-end-only REST APIs to full-blown, highly scalable, full-stack with jade-browser (https://npmjs.org/package/ jade-browser) and Socket.IO (http://socket.io/), real-time web apps. To give some analogies to developers who are familiar with Ruby—Express.js is often seen as Sinatra, which has a very different approach to the Ruby on Rails framework. Express.js and Sinatra promote the configurability while Ruby on Rails convention over configuration.
Although Express.js is the most starred library on NPM (as of May 2014), and the most mature and used Node. js framework, the playing field is still relatively level with many different frameworks, and new ones are released every month. Some of them, such as Meteor (http://meteor.com/) and DerbyJS (http://derbyjs.com/), show an interesting trend in attempts to merge front-end and back-end code bases. For a handpicked list of Node.js frameworks, refer to the Node Framework (http://nodeframework.com/) resource.
When evaluating a Node.js framework for your project, use these easy steps to guide you:
Build a sample app which is usually provided by the creators of frameworks on GitHub or
•
official web sites. See how the app feels in terms of styles and patterns.
Consider the type of application you’re building: prototype, production app, minimum viable
•
product (MVP), small scale, large scale, and so on.
Consider the libraries already familiar to you and determine whether you can or plan to reuse
•
them, and whether your framework plays nicely with them. Provide out-of-the-box solutions: template engines, database object-relational mapping (http://en.wikipedia.org/wiki/ Object-relational_mapping) libraries (ORMs) / drivers, cascading style sheets
(http://en.wikipedia.org/wiki/Cascading_Style_Sheets) (CSS) frameworks.
Consider the nature of your application: REST API (with a separate front-end client), a
•
traditional web app, or a traditional web app with REST API end points (such as Blog).
Consider whether you need the support of reactive templates with WebSocket from the
•
get-go. (the Meteor framework, anyone?)
Evaluate the number of stars and follows on NPM and GitHub to judge the popularity of the
•
framework. More popular typically means more blog posts, books, screencasts, tutorials, and programmers exist; less popular means this is a newer framework, a niche/custom choice, or a poor choice. With newer frameworks, there is a greater chance that contributing back to them will be valued, so pick your comfortable spot.
Evaluate NPM, GitHub pages, and a framework’s website for the presence of good API
•
36
How Express.js Works
Express.js usually has an entry point—aka, a main file. Most of the time, this is the file that we start with the node command; or export as a module, in some cases. And in this file, we do the following:
1. Include third-party dependencies as well as our own modules, such as controllers, utilities, helpers, and models
2. Configure Express.js app settings such as template engine and its file extensions 3. Connect to databases such as MongoDB, Redis, or MySQL (optional)
4. Define middleware such as error handlers, static files folder, cookies, and other parsers 5. Define routes
6. Start the app
7. Export the app as a module (optional)
When the Express.js app is running, it’s listening to requests. Each incoming request is processed according to a defined chain of middleware and routes, starting from top to bottom. This aspect is important in controlling the execution flow. For example, routes/middleware that are higher in the file have precedence over the lower definitions.
Because we can have multiple middleware functions processing each HTTP request, some of the functions are in the middle (hence the name middleware). Here are some examples of middleware purposes:
1. Parse cookie information and put it in req object for following middleware/routes 2. Parse parameters from the URL and put it in req object for following middleware/routes 3. Get the information from the database based on the value of the parameter if the user is
authorized (cookie/session) and put it in req object for following middleware/routes 4. Authorize users/requests, or not.
5. Display the data and end the response
Express.js Installation
The Express.js package comes in two flavors:1. express-generator: a global NPM package that provides the command-line tool for rapid app creation (scaffolding)
2. express: a local package module in your Node.js app’s node_modules folder
Express.js Version
Before we proceed with installations, let’s check the Express.js versions. We’ll use an exact version 4.1.2 to avoid confusion resulting from potential future changes to the Express.js skeleton-generating mechanism and the module API.
37
Express.js Generator
To install the Express.js Generator as global package, run $ npm install -g [email protected] from anywhere on your computer. This downloads and links the $ express terminal command to the proper path, so that later we can access its command-line interface (CLI) for the creation of new apps.
Note
■
For Max os x and Linux users, if there is an error installing globally, most likely your system requires root/
administrator rights to write to the folder. in this case,
$ sudo npm install -g [email protected]might be
needed. refer to Chapter 1 for more information on changing npM ownership.
Of course, we can be more vague and tell NPM to install the latest version of express-generator: $ npm install –g express-generator. But in this case your results might be inconsistent with the book’s examples.
The Figure 2-1 shows us results of running the aforementioned command. Please notice the path in Figure 2-1:
/usr/local/lib/node_modules/express-generator. This is where, on Max OS X / Linux systems, NPM puts global modules by default. We verify the availability of Express.js CLI by running $ express –V.
Figure 2-1. The result of running NPM with -g and $ express -V
Local Express.js
For the local Express.js 4.1.2 module installation, let’s create a new folder express-cli somewhere on your computer:
$ mkdir express-cli. This will be our project folder for the chapter. Now we can open it with $ cd express-cli. When we are inside the project folder, we can create package.json manually in a text editor or with the $ npm init
38
The following is an example of the package.json file with vanilla $ npm init options:
{
"name": "express-cli", "version": "0.0.1", "description": "", "main": "index.js", "scripts": {
"test": "echo \"Error: no test specified\" && exit 1" },
"author": "", "license": "BSD" }
Lastly, we install the module using NPM:
$ npm install [email protected] --save
Or, if we want to be less specific, which is not recommended for this example, use:
$ npm install express
Note
■
if you attempt to run the aforementioned
$ npm install expresscommand without the
package.jsonfile
or the
node_modulesfolder, the
smart
npM will traverse up the directory tree to the folder that has either of these two
things. this behavior mimics git’s logic somewhat. For more information on the npM installation algorithm, please refer to
the official documentation at
https://npmjs.org/doc/folders.html.
39
Alternatively, we can update the package.json file by specifying the dependency ("express": "4.1.2" or
"express": "4.x") and run $ npm install.
The following is the package.json file with an added Express.js v4.1.2 dependency (the latest as of May 2014):
{
"name": "expressjsguide", "version": "0.0.1", "description": "", "main": "index.js", "scripts": {
"test": "echo \"Error: no test specified\" && exit 1" },
"dependencies": { "express": "4.1.2" },
"author": "", "license": "BSD" }
$ npm install
In Figure 2-3, we show the result of install Express.js v4.1.2 locally, into the node_modules folder. Please notice the path after the [email protected] string in Figure 2-3 is now local and not global, as in the case of express-generator.
Figure 2-3. The result of running $ npm install
If you want to install Express.js to an existing project and save the dependency (smart thing to do!) into the