011023
4
567
!
"#
$%&
Android Programming Tutorials by Mark L. Murphy
Copyright © 2009-2011 CommonsWare, LLC. All Rights Reserved. Printed in the United States of America.
CommonsWare books may be purchased in printed (bulk) or digital form for educational or business use. For more information, contact [email protected].
Printing History:
Mar 2011:Version 3.2 ISBN: 978-0-9816780-4-7
The CommonsWare name and logo, “Busy Coder's Guide”, and related trade dress are trademarks of CommonsWare, LLC.
All other trademarks referenced in this book are trademarks of their respective firms.
Welcome to the Warescription!. ...xiii
Preface. ...xv
Welcome to the Book!...xv
Prerequisites...xv
Using the Tutorials...xvi
Warescription...xviii
What's New...xviii
About the "Further Reading" Sections...xix
Errata and Book Bug Bounty. ...xix
Source Code License...xx
Creative Commons and the Four-to-Free (42F) Guarantee...xxi
Lifecycle of a CommonsWare Book. ...xxi
Roster of Tutorials...xxii
Your First Android Project. ...1
Step #1: Create the New Project. ...1
Step #1: Eclipse. ...2
Step #2: Command Line. ...5
Step #1: Eclipse. ...6
Step #2: Command Line. ...7
A Simple Form. ...11
Step-By-Step Instructions. ...11
Step #1: Generate the Application Skeleton. ...11
Step #2: Modify the Layout. ...12
Step #3: Support All Screen Sizes. ...14
Step #4: Compile and Install the Application...15
Step #5: Run the Application in the Emulator. ...15
Step #6: Create a Model Class. ...16
Step #7: Save the Form to the Model. ...16
Extra Credit...18
Further Reading. ...18
A Fancier Form...19
Step-By-Step Instructions...19
Step #1: Switch to a TableLayout...19
Step #2: Add a RadioGroup...21
Step #3: Update the Model. ...23
Step #4: Save the Type to the Model. ...24
Extra Credit...26
Further Reading...27
Adding a List...29
Step-By-Step Instructions...29
Step #1: Hold a List of Restaurants. ...29
Step #2: Save Adds to List...30
Step #3: Implement toString(). ...31
Step #4: Add a ListView Widget. ...31
Extra Credit. ...35
Further Reading...36
Making Our List Be Fancy. ...37
Step-By-Step Instructions. ...37
Step #1: Create a Stub Custom Adapter...38
Step #2: Design Our Row...38
Step #3: Override getView(): The Simple Way...40
Step #4: Create a RestaurantHolder...41
Step #5: Recycle Rows via RestaurantHolder. ...42
Extra Credit...45
Further Reading...45
Splitting the Tab...47
Step-By-Step Instructions...47
Step #1: Rework the Layout. ...47
Step #2: Wire In the Tabs...49
Step #3: Get Control On List Events...51
Step #4: Update Our Restaurant Form On Clicks...51
Step #5: Switch Tabs On Clicks...52
Extra Credit...56
Further Reading...56
Menus and Messages. ...57
Step-By-Step Instructions. ...57
Step #1: Add Notes to the Restaurant. ...57
Step #2: Add Notes to the Detail Form. ...58
Step #3: Define the Option Menu. ...60
Extra Credit...67
Further Reading...67
Sitting in the Background...69
Step-By-Step Instructions...69
Step #1: Initialize the Progress Bar. ...69
Step #2: Create the Work Method...70
Step #3: Fork the Thread from the Menu. ...71
Step #4: Manage the Progress Bar...73
Extra Credit. ...75
Further Reading...76
Life and Times. ...77
Step-By-Step Instructions. ...77
Step #1: Lengthen the Background Work...77
Step #2: Pause in onPause(). ...78
Step #3: Resume in onResume(). ...79
Extra Credit...86
Further Reading...86
A Few Good Resources. ...87
Step-By-Step Instructions...87
Step #1: Review our Current Resources...87
Step #2: Create a Landscape Layout...88
Extra Credit...91
Further Reading...92
The Restaurant Store...93
Step-By-Step Instructions...93
Step #1: Create a Stub SQLiteOpenHelper...93
Step #2: Manage our Schema...94
Step #4: Get Access to the Helper. ...95
Step #5: Save a Restaurant to the Database...96
Step #6: Get the List of Restaurants from the Database...97
Step #7: Change our Adapter and Wrapper. ...98
Step #8: Clean Up Lingering ArrayList References...100
Step #9: Refresh Our List...101
Extra Credit. ...106
Further Reading. ...107
Getting More Active...109
Step-By-Step Instructions. ...109
Step #1: Create a Stub Activity...109
Step #2: Launch the Stub Activity on List Click...110
Step #3: Move the Detail Form UI. ...111
Step #4: Clean Up the Original UI. ...115
Step #5: Pass the Restaurant _ID. ...116
Step #6: Load the Restaurant Into the Form...117
Step #7: Add an "Add" Menu Option...118
Step #8: Detail Form Supports Add and Edit...119
Extra Credit...132
Further Reading...133
What's Your Preference?. ...135
Step-By-Step Instructions. ...135
Step #1: Define the Preference XML. ...135
Step #2: Create the Preference Activity...136
Step #3: Connect the Preference Activity to the Option Menu. ...137
Step #5: Listen for Preference Changes...142
Step #6: Re-Apply the Sort Order on Changes...143
Extra Credit...144
Further Reading...145
Turn, Turn, Turn. ...147
Step-By-Step Instructions...147
Step #1: Add a Stub onSaveInstanceState(). ...147
Step #2: Pour the Form Into the Bundle...148
Step #3: Repopulate the Form. ...148
Step #4: Fix Up the Landscape Detail Form...148
Extra Credit...150
Further Reading. ...151
Feeding at Lunch. ...153
Step-By-Step Instructions. ...153
Step #1: Add a Feed URL to the Data Model...153
Step #2: Update the Detail Form. ...157
Step #3: Add a Feed Options Menu Item. ...161
Step #4: Add Permissions and Check Connectivity...162
Step #5: Install the RSS Library. ...166
Step #6: Fetch and Parse the Feed...167
Step #7: Display the Feed Items. ...170
Extra Credit...179
Further Reading. ...180
Serving Up Lunch. ...181
Step-By-Step Instructions. ...181
Step #1: Create an Register a Stub IntentService. ...181
Step #2: Move Feed Fetching and Parsing to the Service. ...183
Step #4: Display the Feed Items, Redux. ...186
Extra Credit...192
Further Reading...193
Locating Lunch...195
Step-By-Step Instructions...195
Step #1: Add Latitude and Longitude to the Data Model...195
Step #2: Save the Restaurant in onPause(). ...200
Step #3: Add a TextView and Options Menu Item for Location...201
Step #4: Update the Permissions. ...205
Step #5: Find Our Location Using GPS. ...206
Step #6: Only Enable Options Menu Item If Saved. ...209
Extra Credit...215
Further Reading. ...216
Putting Lunch on the Map. ...217
Step-By-Step Instructions...217
Step #1: Add an Options Menu Item for Map...218
Step #2: Create and Use a MapActivity...218
Step #3: Create an ItemizedOverlay. ...221
Step #4: Handle Marker Taps...230
Extra Credit. ...235
Further Reading...236
Is It Lunchtime Yet?...237
Step-By-Step Instructions. ...237
Step #1: Create a TimePreference...238
Step #2: Collect Alarm Preferences. ...241
Step #4: Manage Preference Changes. ...244
Step #5: Display the Alarm...251
Extra Credit. ...257
Further Reading...258
More Subtle Lunch Alarms...259
Step-By-Step Instructions. ...259
Step #1: Collect Alarm Style Preference. ...260
Step #2: Display the Alarm, Redux...260
Extra Credit...268
Further Reading...268
How To Get Started. ...269
Java...270
Step #1: Install the JDK. ...270
Step #2: Learn Java. ...270
Install the Android SDK...271
Step #1: Install the Base Tools. ...271
Step #2: Install the SDKs and Add-Ons...272
Install the ADT for Eclipse...276
Install Apache Ant...278
Set Up the Emulator...279
Set Up the Device...286
Step #1: Windows. ...287
Step #2: OS X and Linux...288
Coping with Eclipse. ...291
How to Import a Non-Eclipse Project. ...291
How to Get To DDMS...296
How to Create an Emulator...298
How Not to Run Your Project. ...300
We hope you enjoy this ebook and its updates – subscribe to the Warescription newsletter on the Warescription site to learn when new editions of this book, or other books, are available.
All editions of CommonsWare titles, print and ebook, follow a software-style numbering system. Major releases (1.0, 2.0, etc.) are available in both print and ebook; minor releases (0.1, 0.9, etc.) are available in ebook form for Warescription subscribers only. Releases ending in .9 are "release candidates" for the next major release, lacking perhaps an index but otherwise being complete.
Each Warescription ebook is licensed for the exclusive use of its subscriber and is tagged with the subscriber's name. We ask that you not distribute these books. If you work for a firm and wish to have several employees have access, enterprise Warescriptions are available. Just contact us at
Also, bear in mind that eventually this edition of this title will be released under a Creative Commons license – more on this in the preface.
Remember that the CommonsWare Web site has errata and resources (e.g., source code) for each of our titles. Just visit the Web page for the book you are interested in and follow the links.
your operating system does not support that directly, you can always combine the PDFs into one, using tools like PDF Split-And-Merge or the Linux command pdftk *.pdf cat output combined.pdf.
Welcome to the Book!
If you come to this book after having read its companion volumes, The Busy Coder's Guide to Android Developmentand The Busy Coder's Guide to Advanced Android Development, thanks for sticking with the series! CommonsWare aims to have the most comprehensive set of Android development resources (outside of the Open Handset Alliance itself), and we appreciate your interest.
If you come to this book having learned about Android from other sources, thanks for joining the CommonsWare community!
Prerequisites
This book is a collection of tutorials, walking you through developing Android applications, from the simplest "Hello, world!" to applications using many advanced Android APIs.
attempt to learn all of Android solely from these tutorials, as they will demonstrate the breadth of the Android API but not its depth.
Also, the tutorials themselves have varying depth. Early on, there is more "hand-holding" to explain every bit of what needs to be done (e.g., classes to import). As the tutorials progress, some of the simpler Java bookkeeping steps are left out of the instructions – such as exhaustive lists of import statements – so the tutorials can focus on the Android aspects of the code.
You can find out when new releases of this book are available via:
• The cw-android Google Group, which is also a great place to ask
questions about the book and its examples
• The commonsguy Twitter feed
• The CommonsBlog
• The Warescription newsletter, which you can subscribe to off of
your Warescription page
Using the Tutorials
Each tutorial has a main set of step-by-step instructions, plus an "Extra Credit" section. The step-by-step instructions are intended to guide you through creating or extending Android applications, including all code you need to enter and all commands you need to run. The "Extra Credit" sections, on the other hand, provide some suggested areas for experimentation beyond the base tutorial, without step-by-step instructions.
If you wish to start somewhere in the middle of the book, or if you only wish to do the "Extra Credit" work, or if you just want to examine the results without doing the tutorials directly yourself, you can download the results of each tutorial's step-by-step instructions from the book's github repository. You can either clone the repository, or click the Download Source button in the upper-right to get the source as a ZIP file. The source code is organized by tutorial number, so you can readily find the project(s) associated with a particular tutorial from the book.
way the source code listings are put into this book makes them difficult to copy from some PDF viewers, for example.
The tutorials do not assume you are using Eclipse, let alone any other specific editor or debugger. The instructions included in the tutorials will speak in general terms when it comes to tools outside of those supplied by the Android SDK itself.
The code for the tutorials has been tested most recently on Android 2.2. It should work on older versions as well, on the whole.
The tutorials include instructions for both Linux and Windows XP. OS X developers should be able to follow the Linux instructions in general, making slight alterations as needed for your platform. Windows Vista users should be able to follow the Windows XP instructions in general, tweaking the steps to deal with Vista's directory structure and revised Start menu.
If you wish to use the source code from the CommonsWare Web site, bear in mind a few things:
1. The projects are set up to be built by Ant, not by Eclipse. If you wish to use the code with Eclipse, you will need to create a suitable Android Eclipse project and import the code and other assets.
2. You should delete build.xml, then run android update project -p ... (where ... is the path to a project of interest) on those
projects you wish to use, so the build files are updated for your Android SDK version.
Warescription
This book will be published both in print and in digital form. The digital versions of all CommonsWare titles are available via an annual subscription – the Warescription.
The Warescription entitles you, for the duration of your subscription, to digital forms of all CommonsWare titles, not just the one you are reading. Presently, CommonsWare offers PDF and Kindle; other digital formats will be added based on interest and the openness of the format.
Each subscriber gets personalized editions of all editions of each title: both those mirroring printed editions and in-between updates that are only available in digital form. That way, your digital books are never out of date for long, and you can take advantage of new material as it is made available instead of having to wait for a whole new print edition. For example, when new releases of the Android SDK are made available, this book will be quickly updated to be accurate with changes in the APIs.
From time to time, subscribers will also receive access to subscriber-only online material, including not-yet-published new titles.
Also, if you own a print copy of a CommonsWare book, and it is in good clean condition with no marks or stickers, you can exchange that copy for a free four-month Warescription.
If you are interested in a Warescription, visit the Warescription section of the CommonsWare Web site.
What's New
For those of you who have a Warescription, or otherwise have been keeping up with this book, here is what is new in this version:
• The Patchy examples were removed en masse
• New tutorials (15-20) were added, continuing the LunchList sample
work
• The tutorials were tested on Android 3.0
About the "Further Reading" Sections
Each tutorial has, at the end, a section named "Further Reading". Here, we list places to go learn more about the theory behind the techniques illustrated in the preceding tutorial. Bear in mind, however, that the Internet is fluid, so links may not necessarily work. And, of course, there is no good way to link to other books. Hence, the "Further Reading" section describes where you can find material, but actually getting there may require a few additional clicks on your part. We apologize for the inconvenience.
Errata and Book Bug Bounty
Books updated as frequently as CommonsWare's inevitably have bugs. Flaws. Errors. Even the occasional gaffe, just to keep things interesting. You will find a list of the known bugs on the errata page on the CommonsWare Web site.
But, there are probably even more problems. If you find one, please let us know!
Be the first to report a unique concrete problem in the current digital edition, and we'll give you a coupon for a six-month Warescription as a bounty for helping us deliver a better product. You can use that coupon to get a new Warescription, renew an existing Warescription, or give the coupon to a friend, colleague, or some random person you meet on the subway.
By "concrete" problem, we mean things like:
• Sample applications that do not work as advertised, in the
environment described in the book
• Factual errors that cannot be open to interpretation
By "unique", we mean ones not yet reported. Each book has an errata page on the CommonsWare Web site; most known problems will be listed there. One coupon is given per email containing valid bug reports.
NOTE: Books with version numbers lower than 0.9 are ineligible for the bounty program, as they are in various stages of completion. We appreciate bug reports, though, if you choose to share them with us.
We appreciate hearing about "softer" issues as well, such as:
• Places where you think we are in error, but where we feel our
interpretation is reasonable
• Places where you think we could add sample applications, or
expand upon the existing material
• Samples that do not work due to "shifting sands" of the underlying
environment (e.g., changed APIs with new releases of an SDK)
However, those "softer" issues do not qualify for the formal bounty program.
Be sure to check the book's errata page, though, to see if your issue has already been reported.
Questions about the bug bounty, or problems you wish to report for bounty consideration, should be sent to CommonsWare.
Source Code License
The source code samples shown in this book are available for download from the book's GitHub repository. All of the Android projects are licensed under the Apache 2.0 License, in case you have the desire to reuse any of it.
(42F) Guarantee
Each CommonsWare book edition will be available for use under the
Creative Commons Attribution-Noncommercial-ShareAlike 3.0 license as of the fourth anniversary of its publication date, or when 4,000 copies of the edition have been sold, whichever comes first. That means that, once four years have elapsed (perhaps sooner!), you can use this prose for non-commercial purposes. That is our Four-to-Free Guarantee to our readers and the broader community. For the purposes of this guarantee, new Warescriptions and renewals will be counted as sales of this edition, starting from the time the edition is published.
This edition of this book will be available under the aforementioned Creative Commons license on March 1, 2015. Of course, watch the CommonsWare Web site, as this edition might be relicensed sooner based on sales.
For more details on the Creative Commons Attribution-Noncommercial-ShareAlike 3.0 license, visit the Creative Commons Web site.
Note that future editions of this book will become free on later dates, each four years from the publication of that edition or based on sales of that specific edition. Releasing one edition under the Creative Commons license does not automatically release all editions under that license.
Lifecycle of a CommonsWare Book
CommonsWare books generally go through a series of stages.
Release candidates are editions with version numbers ending in ".9" (0.9, 1.9, etc.). These editions should be complete. Once again, they are made available to those on the Warescription so they get early access to the material and can file bug reports (and receive bounties in return!).
Major editions are those with version numbers ending in ".0" (1.0, 2.0, etc.). These will be first published digitally for the Warescription members, but will shortly thereafter be available in print from booksellers worldwide.
Versions between a major edition and the next release candidate (e.g., 1.1, 1.2) will contain bug fixes plus new material. Each of these editions should also be complete, in that you will not see any "TBD" (to be done) markers or the like. However, these editions may have bugs, and so bug reports are eligible for the bounty program, as with release candidates and major releases.
A book usually will progress fairly rapidly through the pre-release editions to the first release candidate and Version 1.0 – often times, only a few months. Depending on the book's scope, it may go through another cycle of significant improvement (versions 1.1 through 2.0), though this may take several months to a year or more. Eventually, though, the book will go into more of a "maintenance mode", only getting updates to fix bugs and deal with major ecosystem events – for example, a new release of the Android SDK will necessitate an update to all Android books.
Roster of Tutorials
Here is what you can expect in going through the tutorials in this book:
1. We start off with a simple throwaway project, just to make sure you have the development tools all set up properly.
2. We then begin creating LunchList, an application to track
restaurants where you might wish to go for lunch. In this tutorial, we set up a simple form to collect basic information about a restaurant, such as a name and address.
3. We expand the form to add radio buttons for the type of restaurant (e.g., takeout).
showing its name.
5. We extend the list to show the name and address of each restaurant, plus an icon for the restaurant type.
6. To give us more room, we split the UI into two tabs, one for the list of restaurants, and one for the detail form for a restaurant.
7. We experiment with an options menu (the kind that appears when you press the MENU button on a phone) and display a pop-up message.
8. We learn how to start a background thread and coordinate communications between the background thread and the main ("UI") thread.
9. We learn how to find out when the activity is going off-screen, stopping and restarting our background thread as needed.
10. We create a separate UI description for what the tabs should look like when the phone is held in a landscape orientation.
11. We finally add database support, so your restaurant data persists from run to run of the application.
12. We eliminate the tabs and split the UI into two separate screens ("activities"), one for the list of restaurants, and one for the detail form to add or edit a restaurant.
13. We establish a shared preference – and an activity to configure it – to allow the user to specify the sort order of the restaurants in the list.
14. We re-establish the landscape version of our UI (lost when we eliminated the tabs in Tutorial 12) and experiment with how to handle the orientation changing during execution of our application.
15. We retrieve an RSS feed for our restaurant and display its results in a separate activity
16. We move the RSS fetch-and-parse logic to a service
18. Given those GPS coordinates, we give the user the ability to display where the restaurant is on a map
19. We add an option for the user to have a "lunchtime alarm" that will let them know when it is time for lunch
20. We extend the alarm to either pop up an activity (as before) or display a status bar icon
TUTORIAL 1
Your First Android Project
There are two major steps for getting started with Android:
1. You need to install the Android SDK and developer tools
2. You should build a test project to confirm that those tools are properly installed and configured
If you have already done some form of "hello, world" project with the development tools on your development machine, you can skip this tutorial.
If you have not yet installed the Android SDK and related tools, there is an
appendix that covers this process. Once you have the Android SDK, it is time to make your first Android project. The good news is that this requires zero lines of code – Android's tools create a "Hello, world!" application for you as part of creating a new project. All you need to do is build it, install it, and see it come up on your emulator or device. That is what this tutorial is for.
Step #1: Create the New Project
Your First Android Project
The only real difference comes from whether you are using Eclipse or the command line.
Step #1: Eclipse
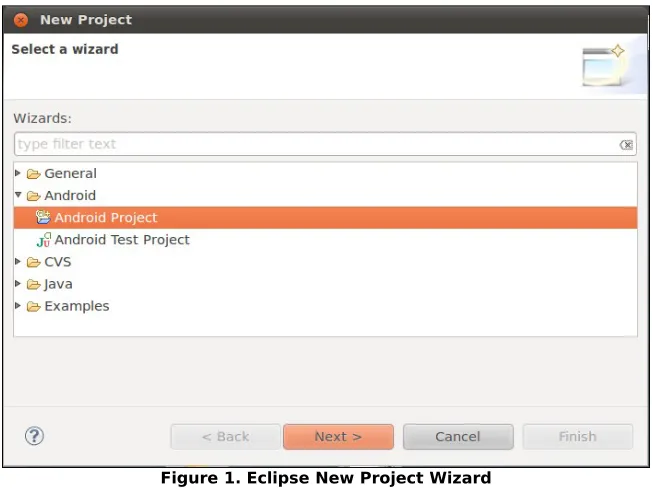
[image:29.504.89.415.194.439.2]From the Eclipse main menu, choose File | New | Project..., and this will bring up a list of project types to choose from. Fold open the Android option and click on Android Project:
Figure 1. Eclipse New Project Wizard
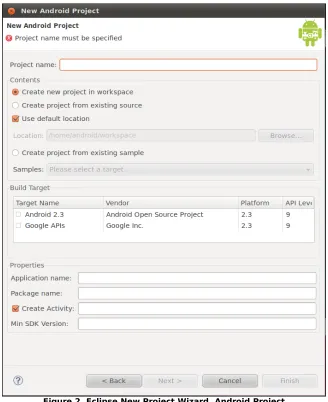
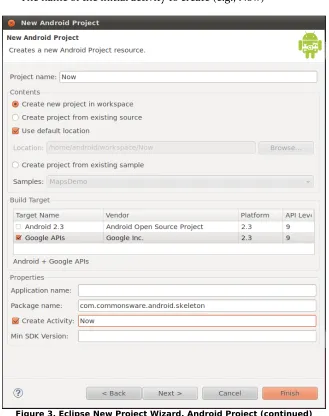
Press Next to advance the wizard to the main Android project page:
Figure 2. Eclipse New Project Wizard, Android Project
Fill in the following:
• The name of the project (e.g., Now)
• The Android SDK you wish to compile against (e.g., Google APIs for
Android 2.3)
• The name of the Java package in which this project goes (e.g.,
Your First Android Project
[image:31.504.88.417.74.490.2]• The name of the initial activity to create (e.g., Now)
Figure 3. Eclipse New Project Wizard, Android Project (continued)
At this point, clicking Finish will create your Eclipse project.
Step #2: Command Line
Here is a sample command that creates an Android project from the command line:
android create project --target "Google Inc.:Google APIs:7" --path Skeleton/Now --activity Now --package com.commonsware.android.skeleton
This will create an application skeleton for you, complete with everything you need to build your first Android application: Java source code, build instructions, etc. However, you are probably going to need to customize this somewhat. Here are what those command-line switches mean:
• --target indicates what version of Android you are "targeting" in
terms of your build process. You need to supply the ID of a target that is installed on your development machine, one you downloaded via the SDK and AVD Manager. You can find out what targets are available via the android list targets command.
Typically, your build process will target the newest version of Android that you have available.
• --path indicates where you want the project files to be generated.
Android will create a directory if the one you name does not exist. For example, in the command shown above, a Skeleton/Now/
directory will be created (or used if it exists) underneath the current working directory, and the project files will be stored there.
• --activity indicates the Java class name of your first activity for this
project. Do not include a package name, and the name has to meet Java class naming conventions.
• --package indicates the Java package in which your first activity will
be located. This package also uniquely identifies your project on any device on which you install it, and this package also needs to be unique on the Android Market if you plan on distributing your application there. Hence, typically, you construct your package based on a domain name you own (e.g.,
com.commonsware.android.skeleton), to reduce the odds of an
Your First Android Project
For your development machine, you will need to pick a suitable target, and you may wish to change the path. The activity and package you can leave alone for now.
Step #2: Build, Install, and Run the
Application in Your Emulator or Device
Having a project is nice and all, but it would be even better if we could build and run it, whether on the Android emulator or your Android device. Once again, the process differs somewhat depending on whether you are using Eclipse or not.
Step #1: Eclipse
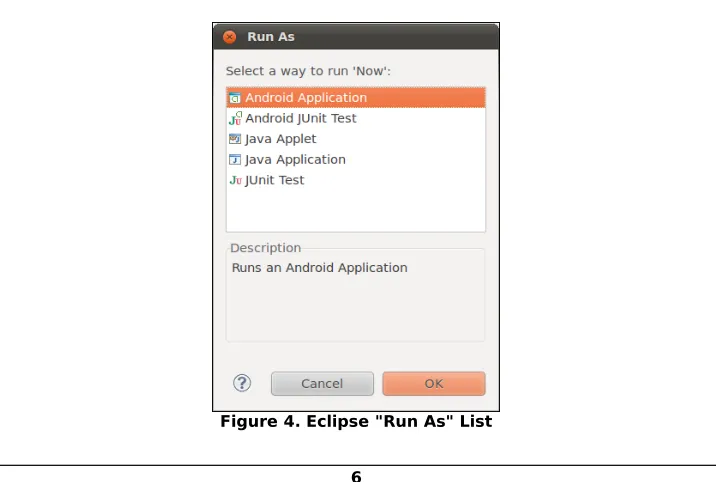
With your project selected in the Package Explorer pane, click the green "play" button in the Eclipse toolbar to run your project. The first time you do this, you will have to go through a few steps to set up a "run configuration", so Eclipse knows what you want to do.
[image:33.504.74.432.365.606.2]First, in the "Run As" list, choose "Android Application":
Figure 4. Eclipse "Run As" List
If you have more than one emulator AVD or device available, you will then get an option to choose which you wish to run the application on. Otherwise, if you do not have a device plugged in, the emulator will start up with the AVD you created earlier. Then, Eclipse will install the application on your device or emulator and start it up.
Step #2: Command Line
For developers not using Eclipse, in your terminal, change into the
Skeleton/Now directory, then run the following command:
ant clean install
The Ant-based build should emit a list of steps involved in the installation process, which look like this:
Buildfile: /home/some-balding-guy/projects/Skeleton/Now/build.xml [setup] Android SDK Tools Revision 8
[setup] Project Target: Google APIs [setup] Vendor: Google Inc.
[setup] Platform Version: 2.1-update1 [setup] API level: 7
[setup]
[setup]
[setup] Resolving library dependencies: [setup] No library dependencies. [setup]
[setup] [setup]
[setup] WARNING: No minSdkVersion value set. Application will install on all Android versions.
[setup]
[setup] Importing rules file: tools/ant/main_rules.xml
clean:
[delete] Deleting directory /home/some-balding-guy/projects/Skeleton/Now/bin
-debug-obfuscation-check:
-set-debug-mode:
-compile-tested-if-test:
-dirs:
[echo] Creating output directories if needed...
Your First Android Project
[mkdir] Created dir: /home/some-balding-guy/projects/Skeleton/Now/gen
[mkdir] Created dir: /home/some-balding-guy/projects/Skeleton/Now/bin/classes
-pre-build:
-resource-src:
[echo] Generating R.java / Manifest.java from the resources...
-aidl:
[echo] Compiling aidl files into Java classes...
-pre-compile:
compile:
[javac] /opt/android-sdk-linux/tools/ant/main_rules.xml:361: warning:
'includeantruntime' was not set, defaulting to build.sysclasspath=last; set to false for repeatable builds
[javac] Compiling 2 source files to /home/some-balding-guy/projects/Skeleton/Now/bin/classes
-post-compile:
-obfuscate:
-dex:
[echo] Converting compiled files and external libraries into /home/some-balding-guy/projects/Skeleton/Now/bin/classes.dex...
-package-resources:
[echo] Packaging resources
[aapt] Creating full resource package...
-package-debug-sign:
[apkbuilder] Creating Now-debug-unaligned.apk and signing it with a debug key...
debug:
[echo] Running zip align on final apk...
[echo] Debug Package: /home/some-balding-guy/projects/Skeleton/Now/bin/Now-debug.apk
BUILD SUCCESSFUL Total time: 4 seconds
Note the BUILD SUCCESSFUL at the bottom – that is how you know the
application compiled successfully.
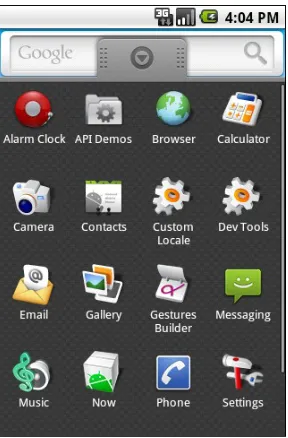
When you have a clean build, in your emulator or device, open up the application launcher, typically found at the bottom of the home screen:
Figure 5. Android emulator application launcher
Notice there is an icon for your Now application. Click on it to open it and
A Simple Form
This tutorial is the first of several that will build up a "lunch list" application, where you can track various likely places to go to lunch. While this application may seem silly, it will give you a chance to exercise many features of the Android platform. Besides, perhaps you may even find the application to be useful someday.
Step-By-Step Instructions
Here is how you can create this application:
Step #1: Generate the Application Skeleton
First, we need to create a new project.
Eclipse
Use the new-project wizard to create an empty Android project named
LunchList, as described in the Android developer documentation. This will
create an application skeleton for you, complete with everything you need to build your first Android application: Java source code, build instructions, etc.
A Simple Form
• Choose a build target that is API Level 9 or higher and has the
Google APIs, so you can add a map to the application later in this book
• Name the project LunchList, with an initial activity also named LunchList
• Use apt.tutorial for the package name
Outside of Eclipse
Inside your terminal (e.g., Command Prompt for Windows), switch to some directory where you would like the project to be created . Then, run the following command:
android create project --target "Google Inc.:Google APIs:9" --path ./LunchList --activity LunchList --package apt.tutorial
This will create an application skeleton for you, complete with everything you need to start building the LunchList application.
Step #2: Modify the Layout
Using your text editor, open the LunchList/res/layout/main.xml file.
Initially, that file will look like this:
<?xml version="1.0" encoding="utf-8"?>
<LinearLayout xmlns:android="http://schemas.android.com/apk/res/android" android:orientation="vertical"
android:layout_width="fill_parent" android:layout_height="fill_parent" >
<TextView
android:layout_width="fill_parent" android:layout_height="wrap_content" android:text="Hello World, LunchList" />
</LinearLayout>
Change that layout to look like this:
<?xml version="1.0" encoding="utf-8"?> <LinearLayout xmlns:android="http://schemas.android.com/apk/res/android" android:orientation="vertical" android:layout_width="fill_parent" android:layout_height="fill_parent" > <LinearLayout android:orientation="horizontal" android:layout_width="fill_parent" android:layout_height="wrap_content" > <TextView android:layout_width="wrap_content" android:layout_height="wrap_content" android:text="Name:" /> <EditText android:id="@+id/name" android:layout_width="fill_parent" android:layout_height="wrap_content" /> </LinearLayout> <LinearLayout android:orientation="horizontal" android:layout_width="fill_parent" android:layout_height="wrap_content" > <TextView android:layout_width="wrap_content" android:layout_height="wrap_content" android:text="Address:" /> <EditText android:id="@+id/addr" android:layout_width="fill_parent" android:layout_height="wrap_content" /> </LinearLayout> <Button android:id="@+id/save" android:layout_width="fill_parent" android:layout_height="wrap_content" android:text="Save" /> </LinearLayout>
A Simple Form
Step #3: Support All Screen Sizes
You may want to test this application on an emulator. You may want to test it on a phone. You may want to test it on a tablet.
The layouts we use in these tutorials will work on a variety of screen sizes, but they will work better if we tell Android that we do indeed those screen sizes. To that end, we need to modify the manifest for our project, to add a <supports-screens> element, declaring what sizes we support and do not.
Open the AndroidManifest.xml file in the root of your project tree, and add in a <supports-screens> element. The resulting file should resemble:
<?xml version="1.0" encoding="utf-8"?>
<manifest xmlns:android="http://schemas.android.com/apk/res/android" package="apt.tutorial"
android:versionCode="1" android:versionName="1.0"> <supports-screens
android:xlargeScreens="true" android:largeScreens="true" android:normalScreens="true" android:smallScreens="false" />
<application android:label="@string/app_name"> <activity android:name=".LunchList"
android:label="@string/app_name"> <intent-filter>
<action android:name="android.intent.action.MAIN" />
<category android:name="android.intent.category.LAUNCHER" /> </intent-filter>
</activity> </application> </manifest>
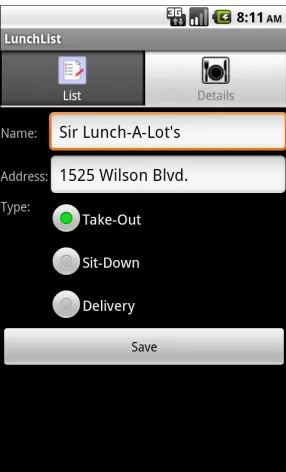
Here, we are declaring that we support normal, large, and extra-large screens, but not small screens. Android will not automatically scale down our UI, so our application will not run on a small-screen device (typically under 3" diagonal screen size). However, it will run well on everything bigger than that.
Step #4: Compile and Install the Application
Compile and install the application in the emulator by running the following commands in your terminal:
ant clean install
Or, from Eclipse, just run the project.
Step #5: Run the Application in the Emulator
In your emulator, in the application launcher, you will see an icon for your
[image:42.504.87.420.264.487.2]LunchList application. Click it to bring up your form:
Figure 6. The first edition of LunchList
A Simple Form
Step #6: Create a Model Class
Now, we want to add a class to the project that will hold onto individual restaurants that will appear in the LunchList. Right now, we can only really
work with one restaurant, but that will change in a future tutorial.
So, using your text editor, create a new file named
LunchList/src/apt/tutorial/Restaurant.java with the following contents:
package apt.tutorial;
public class Restaurant {
private String name="";
private String address="";
public String getName() {
return(name);
}
public void setName(String name) {
this.name=name;
}
public String getAddress() {
return(address);
}
public void setAddress(String address) {
this.address=address;
} }
This is simply a rudimentary model, with private data members for the name and address, and getters and setters for each of those.
Of course, don't forget to save your changes!
Step #7: Save the Form to the Model
Finally, we want to hook up the Save button, such that when it is pressed, we update a restaurant object based on the two EditText fields. To do this,
open up the LunchList/src/apt/tutorial/LunchList.java file and replace the
generated Activity implementation with the one shown below:
package apt.tutorial;
import android.app.Activity;
import android.os.Bundle;
import android.view.View;
import android.widget.Button;
import android.widget.EditText;
public class LunchList extends Activity {
Restaurant r=new Restaurant();
@Override
public void onCreate(Bundle savedInstanceState) {
super.onCreate(savedInstanceState);
setContentView(R.layout.main);
Button save=(Button)findViewById(R.id.save);
save.setOnClickListener(onSave);
}
private View.OnClickListener onSave=new View.OnClickListener() {
public void onClick(View v) {
EditText name=(EditText)findViewById(R.id.name);
EditText address=(EditText)findViewById(R.id.addr);
r.setName(name.getText().toString());
r.setAddress(address.getText().toString());
}
};
}
Here, we:
• Create a single local restaurant instance when the activity is
instantiated
• Get our Button from the Activity via findViewById(), then connect it
to a listener to be notified when the button is clicked
• In the listener, we get our two EditText widgets via findViewById(),
then retrieve their contents and put them in the restaurant
This code sample shows the use of an anonymous inner class implementation of a View.OnClickListener, named onSave. This technique is
A Simple Form
Then, run the ant install command to compile and update the emulator.
Run the application to make sure it seems like it runs without errors, though at this point we are not really using the data saved in the restaurant object just yet.
Extra Credit
Here are some things you can try beyond those step-by-step instructions:
• Instead of using the console tools as documented above, try using
Eclipse. You will need to download Eclipse, install the Android plug-in, and use it to create your first project.
• Try replacing the icon for your application. To do this, you will need
to find a suitable 48x48 pixel image, create a drawable/ directory
inside your res/ directory in the project, and adjust the AndroidManifest.xml file to contain an android:icon = "@drawable/my_icon" attribute in the application element, where my_icon is replaced by the base name of your image file.
• Try playing with the fonts for use in both the TextView and EditText
widgets. The Android SDK documentation will show a number of XML attributes you can manipulate to change the color, make the text boldface, etc.
Further Reading
You can learn more about XML layouts in the "Using XML-Based Layouts" chapter of The Busy Coder's Guide to Android Development. Similarly, you can learn more about simple widgets, like fields and buttons, in the "Employing Basic Widgets" chapter of the same book, where you will also find "Working with Containers" for container classes like LinearLayout.
A Fancier Form
In this tutorial, we will switch to using a TableLayout for our restaurant data
entry form, plus add a set of radio buttons to represent the type of restaurant.
Step-By-Step Instructions
First, you need to have completed the previous tutorial. If you are beginning the tutorials here, or if you wish to not use your existing work, you can download a ZIP file with all of the tutorial results, and you can copy the 02-SimpleForm edition of LunchList to use as a starting point.
Step #1: Switch to a TableLayout
First, open LunchList/res/layout/main.xml and modify its contents to look
like the following:
<?xml version="1.0" encoding="utf-8"?>
<TableLayout xmlns:android="http://schemas.android.com/apk/res/android" android:layout_width="fill_parent"
android:layout_height="fill_parent" android:stretchColumns="1"
>
<TableRow>
<TextView android:text="Name:" /> <EditText android:id="@+id/name" /> </TableRow>
A Fancier Form
<TextView android:text="Address:" /> <EditText android:id="@+id/addr" /> </TableRow>
<Button android:id="@+id/save" android:layout_width="fill_parent" android:layout_height="wrap_content" android:text="Save"
/>
</TableLayout>
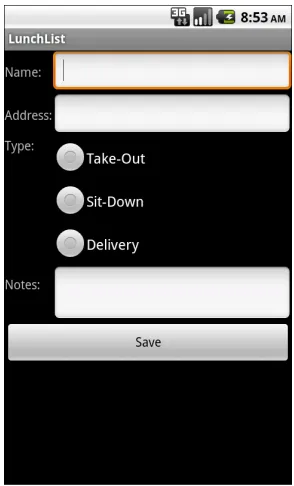
Notice that we replaced the three LinearLayout containers with a TableLayout and two TableRow containers. We also set up the EditText
column to be stretchable.
Recompile and reinstall the application, then run it in the emulator. You should see something like this:
Figure 7. Using a TableLayout
Notice how the two EditText fields line up, whereas before, they appeared
immediately after each label.
NOTE: At this step, or any other, when you try to run your application, you may get the following screen:
Figure 8. A "force-close" dialog
If you encounter this, first try to do a full rebuild of the project. In Eclipse, this would involve doing Project > Force Clean. At the command line, use
ant clean or delete the contents of your bin/ and gen/ directories, then ant install. If the problem persists after this, then there is a bug in your code
somewhere. You can use adb logcat, DDMS, or the DDMS perspective in
Eclipse to see the Java stack trace associated with this crash, to help you perhaps diagnose what is going on.
Step #2: Add a RadioGroup
Next, we should add some RadioButton widgets to indicate the type of
restaurant this is: one that offers take-out, one where we can sit down, or one that is only a delivery service.
To do this, modify LunchList/res/layout/main.xml once again, this time to
A Fancier Form
<?xml version="1.0" encoding="utf-8"?>
<TableLayout xmlns:android="http://schemas.android.com/apk/res/android" android:layout_width="fill_parent"
android:layout_height="fill_parent" android:stretchColumns="1"
>
<TableRow>
<TextView android:text="Name:" /> <EditText android:id="@+id/name" /> </TableRow>
<TableRow>
<TextView android:text="Address:" /> <EditText android:id="@+id/addr" /> </TableRow>
<TableRow>
<TextView android:text="Type:" /> <RadioGroup android:id="@+id/types"> <RadioButton android:id="@+id/take_out" android:text="Take-Out"
/>
<RadioButton android:id="@+id/sit_down" android:text="Sit-Down"
/>
<RadioButton android:id="@+id/delivery" android:text="Delivery"
/>
</RadioGroup> </TableRow>
<Button android:id="@+id/save" android:layout_width="fill_parent" android:layout_height="wrap_content" android:text="Save"
/>
</TableLayout>
Our RadioGroup and RadioButton widgets go inside the TableLayout, so they
will line up with the rest of table – you can see this once you recompile, reinstall, and run the application:
Figure 9. Adding radio buttons
Step #3: Update the Model
Right now, our model class has no place to hold the restaurant type. To change that, modify LunchList/src/apt/tutorial/Restaurant.java to add in a
new private String type data member and a getter/setter pair, like these:
public String getType() {
return(type);
}
public void setType(String type) {
this.type=type;
}
When you are done, your restaurant class should look something like this:
package apt.tutorial;
public class Restaurant {
private String name="";
A Fancier Form
private String type="";
public String getName() {
return(name);
}
public void setName(String name) {
this.name=name;
}
public String getAddress() {
return(address);
}
public void setAddress(String address) {
this.address=address;
}
public String getType() {
return(type);
}
public void setType(String type) {
this.type=type;
} }
Step #4: Save the Type to the Model
Finally, we need to wire our RadioButton widgets to the model, such that
when the user clicks the Save button, the type is saved as well. To do this, modify the onSave listener object to look like this:
private View.OnClickListener onSave=new View.OnClickListener() {
public void onClick(View v) {
EditText name=(EditText)findViewById(R.id.name);
EditText address=(EditText)findViewById(R.id.addr);
r.setName(name.getText().toString());
r.setAddress(address.getText().toString());
RadioGroup types=(RadioGroup)findViewById(R.id.types);
switch (types.getCheckedRadioButtonId()) {
case R.id.sit_down:
r.setType("sit_down");
break;
case R.id.take_out:
r.setType("take_out");
break;
case R.id.delivery:
r.setType("delivery");
break;
}
} };
Note that you will also need to import android.widget.RadioGroup for this to
compile. The full activity will then look like this:
package apt.tutorial;
import android.app.Activity;
import android.os.Bundle;
import android.view.View;
import android.widget.Button;
import android.widget.EditText;
import android.widget.RadioGroup;
public class LunchList extends Activity {
Restaurant r=new Restaurant();
@Override
public void onCreate(Bundle savedInstanceState) {
super.onCreate(savedInstanceState);
setContentView(R.layout.main);
Button save=(Button)findViewById(R.id.save);
save.setOnClickListener(onSave);
}
private View.OnClickListener onSave=new View.OnClickListener() {
public void onClick(View v) {
EditText name=(EditText)findViewById(R.id.name);
EditText address=(EditText)findViewById(R.id.addr);
r.setName(name.getText().toString());
r.setAddress(address.getText().toString());
RadioGroup types=(RadioGroup)findViewById(R.id.types);
switch (types.getCheckedRadioButtonId()) {
case R.id.sit_down:
r.setType("sit_down");
break;
case R.id.take_out:
r.setType("take_out");
break;
A Fancier Form
case R.id.delivery:
r.setType("delivery");
break;
}
}
};
}
Recompile, reinstall, and run the application. Confirm that you can save the restaurant data without errors.
If you are wondering what will happen if there is no selected RadioButton,
the RadioGroup call to getCheckedRadioButtonId() will return -1, which will
not match anything in our switch statement, and so the model will not be
modified.
Extra Credit
Here are some things you can try beyond those step-by-step instructions:
• If you have an Android device, try installing the app on the device
and running it there. The easiest way to do this is to shut down your emulator, plug in your device, and run ant reinstall.
• Set one of the three radio buttons to be selected by default, using
android:checked = "true".
• Try creating the RadioButton widgets in Java code, instead of in the
layout. To do this, you will need to create the RadioButton objects
themselves, configure them (e.g., supply them with text to display), then add them to the RadioGroup via addView().
• Try adding more RadioButton widgets than there are room to display
on the screen. Note how the screen does not automatically scroll to show them. Then, wrap your entire layout in a ScrollView container,
and see how the form can now scroll to accommodate all of your widgets.
Further Reading
You can learn more about radio buttons in the "Employing Basic Widgets" chapter of The Busy Coder's Guide to Android Development. Also, you will find material on TableLayout in the "Working with Containers" chapter of
Adding a List
In this tutorial, we will change our model to be a list of restaurants, rather than just one. Then, we will add a ListView to view the available restaurants.
This will be rather incomplete, in that we can only add a new restaurant, not edit or delete an existing one, but we will cover those steps too in a later tutorial.
Step-By-Step Instructions
First, you need to have completed the previous tutorial. If you are beginning the tutorials here, or if you wish to not use your existing work, you can download a ZIP file with all of the tutorial results, and you can copy the 03-FancierForm edition of LunchList to use as a starting point.
Step #1: Hold a List of Restaurants
First, if we are going to have a list of restaurants in the UI, we need a list of restaurants as our model. So, in LunchList, change:
Restaurant r=new Restaurant();
to:
Adding a List
Note that you will need to import java.util.List and java.util.ArrayList
as well.
Step #2: Save Adds to List
Note that the above code will not compile, because our onSaveButton click
handler is still set up to reference the old single restaurant model. For the time being, we will have onSave simply add a new restaurant.
All we need to do is add a local restaurant r variable, populate it, and add it
to the list:
private View.OnClickListener onSave=new View.OnClickListener() {
public void onClick(View v) {
Restaurant r=new Restaurant();
EditText name=(EditText)findViewById(R.id.name);
EditText address=(EditText)findViewById(R.id.addr);
r.setName(name.getText().toString());
r.setAddress(address.getText().toString());
RadioGroup types=(RadioGroup)findViewById(R.id.types);
switch (types.getCheckedRadioButtonId()) {
case R.id.sit_down:
r.setType("sit_down");
break;
case R.id.take_out:
r.setType("take_out");
break;
case R.id.delivery:
r.setType("delivery");
break;
}
} };
At this point, you should be able to rebuild and reinstall the application. Test it out to make sure that clicking the button does not cause any unexpected errors.
You will note that we are not adding the actual restaurant to anything – r is
a local variable and so goes out of scope after onClick() returns. We will
address this shortcoming later in this exercise.
Step #3: Implement toString()
To simplify the creation of our ListView, we need to have our restaurant
class respond intelligently to toString(). That will be called on each
restaurant as it is displayed in our list.
For the purposes of this tutorial, we will simply use the name – later tutorials will make the rows much more interesting and complex.
So, add a toString() implementation on restaurant like this:
public String toString() {
return(getName());
}
Recompile and ensure your application still builds.
Step #4: Add a ListView Widget
Now comes the challenging part – adding the ListView to the layout.
The challenge is in getting the layout right. Right now, while we have only the one screen to work with, we need to somehow squeeze in the list without eliminating space for anything else. In fact, ideally, the list takes up all the available space that is not being used by our current detail form.
One way to achieve that is to use a RelativeLayout as the over-arching
Adding a List
To make this change, replace your current LunchList/res/layout/main.xml
with the following:
<?xml version="1.0" encoding="utf-8"?>
<RelativeLayout xmlns:android="http://schemas.android.com/apk/res/android" android:layout_width="fill_parent" android:layout_height="fill_parent" > <TableLayout android:id="@+id/details" android:layout_width="fill_parent" android:layout_height="wrap_content" android:layout_alignParentBottom="true" android:stretchColumns="1" > <TableRow>
<TextView android:text="Name:" /> <EditText android:id="@+id/name" /> </TableRow>
<TableRow>
<TextView android:text="Address:" /> <EditText android:id="@+id/addr" /> </TableRow>
<TableRow>
<TextView android:text="Type:" /> <RadioGroup android:id="@+id/types"> <RadioButton android:id="@+id/take_out" android:text="Take-Out" /> <RadioButton android:id="@+id/sit_down" android:text="Sit-Down" /> <RadioButton android:id="@+id/delivery" android:text="Delivery" /> </RadioGroup> </TableRow> <Button android:id="@+id/save" android:layout_width="fill_parent" android:layout_height="wrap_content" android:text="Save" /> </TableLayout> <ListView android:id="@+id/restaurants" android:layout_width="fill_parent" android:layout_height="wrap_content" android:layout_alignParentTop="true" android:layout_above="@id/details" /> </RelativeLayout>
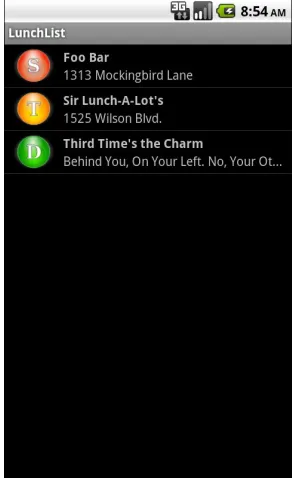
If you recompile and rebuild the application, then run it, you will see our form slid to the bottom, with empty space at the top:
Figure 10. Adding a list to the top and sliding the form to the bottom
Step #5: Build and Attach the Adapter
The ListView will remain empty, of course, until we do something to
populate it. What we want is for the list to show our running lineup of restaurant objects.
Since we have our ArrayList<Restaurant>, we can easily wrap it in an ArrayAdapter<Restaurant>. This also means, though, that when we add a
restaurant, we need to add it to the ArrayAdapter via add() – the adapter
will, in turn, put it in the ArrayList. Otherwise, if we add it straight to the ArrayList, the adapter will not know about the added restaurant and
therefore will not display it.
Here is the new implementation of the LunchList class:
package apt.tutorial;
Adding a List
import android.os.Bundle;
import android.view.View;
import android.widget.ArrayAdapter;
import android.widget.Button;
import android.widget.EditText;
import android.widget.ListView;
import android.widget.RadioGroup;
import java.util.ArrayList;
import java.util.List;
public class LunchList extends Activity {
List<Restaurant> model=new ArrayList<Restaurant>();
ArrayAdapter<Restaurant> adapter=null;
@Override
public void onCreate(Bundle savedInstanceState) {
super.onCreate(savedInstanceState);
setContentView(R.layout.main);
Button save=(Button)findViewById(R.id.save);
save.setOnClickListener(onSave);
ListView list=(ListView)findViewById(R.id.restaurants);
adapter=new ArrayAdapter<Restaurant>(this,
android.R.layout.simple_list_item_1,
model);
list.setAdapter(adapter);
}
private View.OnClickListener onSave=new View.OnClickListener() {
public void onClick(View v) {
Restaurant r=new Restaurant();
EditText name=(EditText)findViewById(R.id.name);
EditText address=(EditText)findViewById(R.id.addr);
r.setName(name.getText().toString());
r.setAddress(address.getText().toString());
RadioGroup types=(RadioGroup)findViewById(R.id.types);
switch (types.getCheckedRadioButtonId()) {
case R.id.sit_down:
r.setType("sit_down");
break;
case R.id.take_out:
r.setType("take_out");
break;
case R.id.delivery:
r.setType("delivery");
break;
}
adapter.add(r);
}
};
}
The magic value android.R.layout.simple_list_item_1 is a stock layout for a
list row, just displaying the text of the object in white on a black background with a reasonably large font. In later tutorials, we will change the look of our rows to suit our own designs.
If you then add a few restaurants via the form, it will look something like this:
Figure 11. Our LunchList with a few fake restaurants added
Extra Credit
Adding a List
• See what the activity looks like if you use a Spinner instead of a ListView.
• Make the address field, presently an EditText widget, into an AutoCompleteTextView, using the other addresses as values to possibly
reuse (e.g., for multiple restaurants in one place, such as a food court or mall).
Further Reading
Information on ListView and other selection widgets can be found in the
"Using Selection Widgets" chapter of The Busy Coder's Guide to Android Development.
Making Our List Be Fancy
In this tutorial, we will update the layout of our ListView rows, so they show
both the name and address of the restaurant, plus an icon indicating the type. Along the way, we will need to create our own custom ListAdapter to
handle our row views and a RestaurantHolder to populate a row from a
restaurant.
Regarding the notion of adapters and ListAdapter, to quote from The Busy
Coder's Guide to Android Development:
In the abstract, adapters provide a common interface to multiple disparate APIs. More specifically, in Android's case, adapters provide a common interface to the data model behind a selection-style widget, such as a listbox...Android's adapters are responsible for providing the roster of data for a selection widget plus converting individual elements of data into specific views to be displayed inside the selection widget.
Step-By-Step Instructions
Making Our List Be Fancy
Step #1: Create a Stub Custom Adapter
First, let us create a stub implementation of a RestaurantAdapter that will be
where we put our logic for creating our own custom rows. That can look like this, implemented as an inner class of LunchList:
class RestaurantAdapter extends ArrayAdapter<Restaurant> {
RestaurantAdapter() {
super(LunchList.this,
android.R.layout.simple_list_item_1,
model);
} }
We hard-wire in the android.R.layout.simple_list_item_1 layout for now,
and we get our Activity and model from LunchList itself.
We also need to change our adapter data member to be a RestaurantAdapter,
both where it is declared and where it is instantiated in onCreate(). Make
these changes, then rebuild and reinstall the application and confirm it works as it did at the end of the previous tutorial.
Step #2: Design Our Row
Next, we want to design a row that incorporates all three of our model elements: name, address, and type. For the type, we will use three icons, one for each specific type (sit down, take-out, delivery). You can use whatever icons you wish, or you can get the icons used in this tutorial from the tutorial ZIP file that you can download. They need to be named
ball_red.png, ball_yellow.png, and ball_green.png, all located in res/drawable/ in your project.
NOTE: If your project has no res/drawable/ directory, but does have res/drawable-ldpi/ and others with similar suffixes, rename res/drawable-mdpi/ to res/drawable/ directory for use in this project, and delete the other res/drawable-* directories.