RIT Scholar Works
Theses Thesis/Dissertation Collections
5-16-2017
fixino 1.0
Sultan Alshehri [email protected]Follow this and additional works at:http://scholarworks.rit.edu/theses
This Thesis is brought to you for free and open access by the Thesis/Dissertation Collections at RIT Scholar Works. It has been accepted for inclusion in Theses by an authorized administrator of RIT Scholar Works. For more information, please [email protected].
Recommended Citation
Fixino 1.0
By:
Sultan Alshehri
A Thesis Submitted in Partial Fulfillment of the Requirements for the Degree of Master of Fine
Arts in Film and animation
School of Film and Animation College of Imaging Arts and Sciences
Rochester Institute of Technology Rochester, NY
Committee Approval:
____________________________________________________________________________________ Peter Murphy | [Thesis Chair]
Assistant Professor
School of Film and Animation
_____________________________________________________________________________________ Marla Schweppe | [Thesis committee]
Professor
Visual Communication Design | Chair – 3D Digital Design School of Design
_____________________________________________________________________________________ Mark Reisch | [Thesis committee]
Assistant Professor
Table of Contents
Abstract ... 3
Introduction ... 4
Review of Research ... 5
L3.0: The First Inspiration ... 5
Panic in the Mailroom ... 7
The Process ... 8
1‐ Pre‐Production ... 8
Story ... 8
Character design ... 8
Story boards and Animatics ... 11
2‐ Production ... 16
Modelling ... 18
Rigging ... 20
Animation ... 26
Lighting and Texturing ... 28
Rendering ... 31
3‐ Post‐Production ... 33
Music Composition and sound effects ... 33
Compositing ... 35
Screening and Audience Feedback ... 36
Conclusion ... 38
Appendix A: Thesis Proposal document ... 41
Appendix B: Fixino 1.0: Movie Screenshots ... 50
Abstract
Fixino 1.0 is 3D short film that explores the contrast between a lazy human and an efficient
robot in a comedic visual-gag style narrative. Produced at the Rochester Institute of
Technology, this 3D short attempts to take the audience on a journey of contrasting spaces
and characters. On one side, we have the efficient robot, Fixino and his well-kept operation
space. On the other, we have the careless and lazy human, Charlie, and his disorderly
environment.
I wanted this story to comment on our current world state, as well as the near future, where
humans become a liability in the work pipeline as robots’ AI becomes more and more
advanced. Already, we see this happening in factories like Elon Musk’s Gigafactory that is
responsible for building Tesla cars. It’s a factory where machines (robots) are used to build
the machine. I tried to take this core idea and tackle it in a comedic and light-hearted
narrative.
Another goal I tried to accomplish with this film is using the environment as a visual tool
that reflects the distinct contrast between the characters inhabiting this environment, their
inherent features and their role in the story.
I was interested in taking advantage of the 3D animation format to allow for as many
exaggerations as possible in the visual gags between characters and in the aesthetics of the
environment design. I also wanted to maximize the freedom of design and control within the
Introduction
The idea for Fixino started from a simple question I had in my head, “how would a robot fix
a human problem?” I thought tackling the answer in a 3D short would make an interesting
piece. The contrast between an efficient robot and an inefficient human posed many visual
possibilities to explore. In a way, I felt flipping the roles of the traditional robot/human story
by making the human the problem and the robot (the product of human) the solution was an
appealing starting point for a story. Another aspect that was interesting to me was to tackle
the sense of automation through the display of an assembly line. I had a sense that creating a
problem that would disrupt the robot’s familiar mechanical rhythms would be a good
conflict starter for this story. From an aesthetic point of view, I wanted to take on the
challenge of modeling two different characters with different inherent features (robotic and
human). The contrast in features and manners was challenging for me to design, model and
Review of Research
L3.0 (2014)
1: The First Inspiration!
The genesis of the inspiration for my story came about when I watched this award-winning short by a group of students at the ISART DIGITAL school in Paris. The film describes a day of the life of a bored and lonely robot in a post-apocalyptic setting of Paris. After watching that piece, tackling a movie subject about robots became something I was fascinated with. What was most inspiring to me was the successful treatment of the L3.0 robot not just the visual
aesthetics but also, the ability to maximize performance from a robot to connect with a human
audience.
Aesthetically, L3.0’s character design was full of roundness, which indicated likability
and goodness of this character. His big round eyes emote curiosity and innocence. His small
fingers and hand movement which again expresses innocence and youth. This allowed the
animators to communicate so much about this character within the first fifteen seconds of the
film which is so crucial in a short film format.
The second aspect, performance, was inspiring to me especially with how the creators of this
film managed tackle the main challenge of a film like this. The challenge is humanizing a
robot character, without any traditional facial expressions that humans have, and making it
connect with the audience.
They overcame this challenge through controlling certain things in the robot’s character.
Things like the tempo of his emotions and the pace of his movement were managed to depict
the desired human feelings that would connect with the audience. So, with the slow
movement of the robot, for example, we get his inner feeling of boredom. This boredom is
communicated again when we see L3.0 taps his fingers on the table slowly in one shot. And
through L3.0’s sudden jumps in his movements tempo, we get his excitement. Also, as the
robot’s round pupils widen and narrow, when he investigates things around him, we sense his
curiosity.
Finally, what truly elevated this film’s artistic impact is how all the aesthetic elements,
discussed above, that indicated a loveable and friendly robot were turned on their heads with
the final twist (revelation) at the end. The revelation begins with him locking a butterfly inside
a jar while he watches it dies. Then, as he crosses a hallway in his house, we see that the
butterfly was not his only victim as many bodies are seen laid on top of each other in the
background. So, all the “good guy” visual hints for the robot were used by the creators of this
film to successfully trick the robot’s victims, including us viewers as we realize in the end,
Panic in the Mailroom
2(2013):
Another short that really inspired the look and tone of my story was the Minions’ Panic in
The Mailroom piece. It inspired me to have the conveyor belt to be the center story driver
that the entire narrative moves along (so to speak). This short film was a starting point for
how I wanted the environment to look and feel. The film’s overall genre was comedy and
I felt the assembly-line/comedy style combination was a very good approach to the story
narrative in my own film as well. I thought the sense of repetition and automation would
give me a good platform to build the pacing of the story and infuse it with comedic gags.
The Process
1.
Pre-Production:
-
Story:
The earliest premise for the story of Fixino 1.0 was this “An efficient robot named Fixino is
following his daily routine of fixing damaged items that come through the conveyor belt. His
routine is suddenly interrupted when no more items come through despite the maintenance
tally board suggesting otherwise. Fixino goes to the other room to find a human sitting
hunched over looking sad and looking at a picture. Fixino goes through “robotic” attempts to
get this man to work. None of them work. But through his attempts Charlie the human starts
to develop an unexpected liking and appreciation for the robot’s futile attempts. Finally, he
gets back to his feet determined to get his life back on track. He gets back to work. And
Fixino goes back to his room, with a smile, having solved the “human” problem indirectly
and having learned a new human trick.”
This story significantly changed as more versions of the animatics were fleshed out as I will
be detailing in the storyboard and animatics section later. However, the main premise of the
story, the idea of a robot fixing a human problem, was kept intact.
For the character designs, I worked with Airin Ingerick, a first-year visual communication
student, specialized in storyboarding and 2d concept art to help me with drawing the
characters for the movie.
We had two characters with distinct features and energy. Fixino, a robot who is efficient,
precise and accurate, and Charlie, a failed human who has stopped doing his job due to the
sadness he feels over a failed relationship. I later changed his problem to “sleepiness and
laziness” as it was a more workable fit for the story I wanted to tell.
Fixino loves what he does, which is fixing damaged items. His movement is proper, rigid
and specific. And, being a robot, he gets the items fixed quickly and clearly through a
defined sequence of steps.
[image:11.612.152.462.369.603.2]
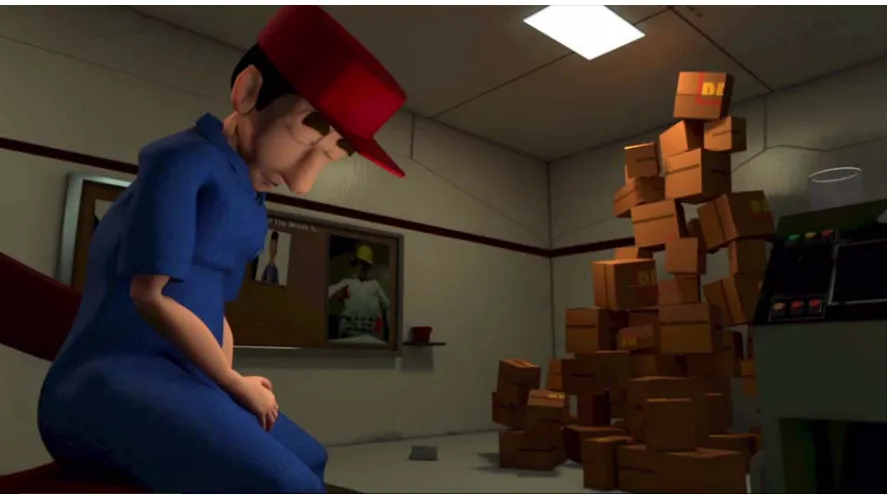
Charlie, on other hand is a careless and lazy worker. He does not keep his operation room
tidy. Certain facial features in his character design were a bit exaggerated like the nose and
eyes. I wanted to move away from the hyper realistic style for his look. I felt stylizing his
look a bit would lend a hand to the visual gags and their effectiveness.
The garment design was inspired by factory workers in the real world. I was going for a
standard-looking factory outfit that would be quickly and easily identifiable as such to the
viewers. I picked a blue color for Charlie’s outfit to easily separate him from the background
in his room as it was mostly yellow and greenish in tone. I added a hat for Charlie as I felt it
adds more to the labor feel of this factory instead of a plain head and hair option. I also used
the hat as a tool to emphasize Charlie’s sleepiness
problem. The hat was also useful in pushing the secondary animation in many shots where
Charlie does extreme motion (i.e. the electrocution shot).
As for the manger’s outfit, and since he is on for only a few seconds in the film, I had to go
for a look that instantly reads as superior to the lower-ranked Charlie. So, I went for a formal
plain white shirt and black pants. I felt putting sunglasses on him would add a little more
authority to him. This helped in making him look more like the higher-status character that I
Figure 2: Charlie character turaround sketches
-
Storyboard and Animatics:
As is the challenge with any early story concept, my biggest challenge during the storyboard
stage was, simplifying my story in such a way that it can be told in a five-minute format.
The initial feedback from my thesis chair centered on clarifying and shortening Fixino’s
introduction by what I showed through his routine and making sure that Charlie wasn’t too
passive as a character and had more engagement with Fixino.
Charlie’s role in my story went through many changes all the way up to the initial stages of
production. Initially during 2D animatics, my conviction was that the human problem
was to mix comedic visual gags with dramatic undertone. I went with that throughout the
animatics stage.
[image:14.612.93.520.149.382.2]
Figure 3: early story version with Charlie's human problem being sadness
During that version of the story, I had to address few problems with my story. The introduction
of Fixino in the beginning was not effective according to feedback from my thesis chair. This
is because I had many shots in the beginning where we do not see proper shots of Fixino that
effectively introduce him and help the audience connect with him. I had many shots where we
see him from the back. There were many medium and wide shots for him from behind.
Another issue with Fixino’s introduction scene that has come up during my meetings with my
thesis committee members was Fixino’s “fixing” routine and the need to properly define it in
the first act before moving to Charlie’s room. The reason for some of these issues was that I
was trying to get to the conflict as quick as possible. Also, I thought the opening shots were
As for Charlie, the early problem with him was that he was too passive in the early versions
of the animatics. This was problematic because it made it difficult for the audience to connect
with him and sympathize. In my early story version, he would be hunched over in a corner in
his room disengaged with his surroundings. Fixino would attempt a few fixes that all go
nowhere except one last crazy attempt that electrocutes Charlie back into life! Beside the
early reasoning I had for mixing the comedy and drama genre and thus having Charlie appear
sad and disconnected all the time, I also wanted to keep the character animation for the
second character simple to manage production time. So, I continued with making just simple
tweaks to make Charlie more engaged especially towards the end of the story where he
decides to go back to work after Fixino, and his flashlight, points by mistake to his early
career accomplishments listed on the board.
As the production moved forward, the mixing of drama and comedy was becoming a
struggle. The switches from a quick visual gag tempo (Fixino’s fixing attempts) to the more
dramatic and mellow tempo of a sad human (Charlie’s mind state) were not flowing well and
causing some confusion. This became even more apparent to me during a meeting with my
thesis committee member, Marla Schweppe, who had not seen the film since a much earlier
cut. She was able to observe the problem within the conflicting dynamics of the quick
comedic tempo and the slow sad rhythm of Charlie. Marla had a tough time understanding
the story, which was a big worry for me since it was in a more refined 3D animatics form.
She pointed to the sadness as a poor human problem to tackle in a short five-minute film
I had three possible adjustments to fix the ineffective sadness angle; I could bring Charlie to
the same room as Fixino. This way, we would get to the conflict more quickly and elaborate
on his feelings and situation. The second solution was to keep Charlie in the same location
but to add more shots to clear Charlie’s role and add shots to Fixino as he reacts to his
refusal to work. The third was to simply ditch the sadness angle and look for a human
problem that worked most effectively with the comedic tone of the film.
In deciding what human problem to replace the sadness issue, I went through a few options
but finally chose sleepiness as the human attribute that Fixino had to fix. Sleepiness is easily
readable by the audience, offers a contrast to Fixino’s energy, provides great possibilities for
gags and fits the space that I have modeled already (during early production stage) for
Charlie.
I felt this change would accomplish many things with the story. First, it simplified the story
arc for first-time viewers. Second, it fit well with the comedic direction of my film and,
finally, it fit better with the short film format where you need to have one clear conflict
instead of multiple that might confuse audiences.
[image:17.612.85.531.120.368.2]
Figure 4: Sleepiness as Charlie's human problem
The change to Charlie’s human problem forced me to make another adjustment as the
resolution to the conflict no longer worked as is. The previous version had Fixino pointing,
by accident, to the board that highlights Charlie’s past achievements, which led to Charlie’s
change of heart into a determined person wanting to overcome his sadness. The new
resolution, however, involved the abrupt entrance of the manager of the factory into Charlie’s
room. This happens as a result to the chaos that had ensued after Fixino electrocuted Charlie.
As Charlie tries to hit Fixino for electrocuting him, the manager shows up. This forces
Charlie to quickly get back to his calmness. His character status changes to a lower and more
obedient character as result of the introduction of the higher status character, the manager.
itself, after all Fixino’s attempts, through the manager. My logic to it was that I wanted the
sum of Fixino’s attempts to have generated enough momentum to create an opening in
which things could come to a resolution. Without Fixino trying all these fixes, the manager
wouldn’t have noticed Charlie laziness and lack of productivity. The second reason, which
was also important was the time constraint. I had to come up with a quick resolution due to
the time crunch I was under. So, I went with the one that I felt creates a sensible resolution
to the conflict with reasonable execution time.
Some other minor tweaks and additions that occurred during this stage included adding a
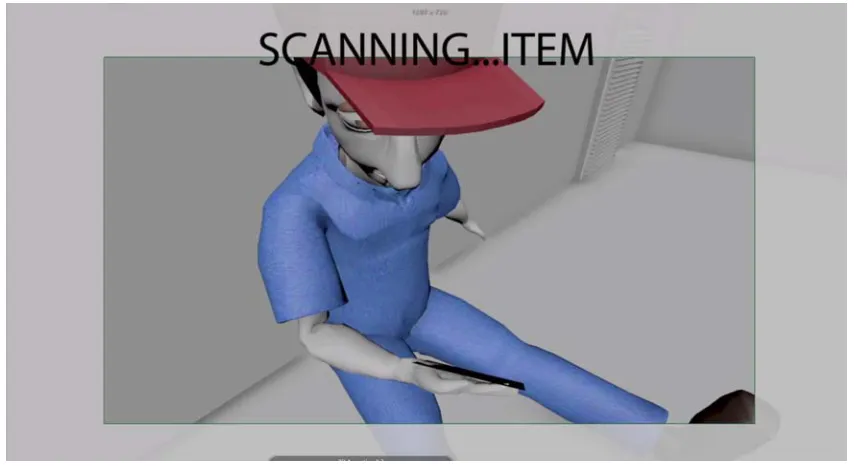
head-up display (HUD) motion graphics for the POV shots of Fixino as he examines items
and scan new areas. This motion graphics element helps to show the robot’s inner
calculation and examination process. Another had to do with changing the source of
electricity (for the electrocution shot) from an embedded device within Fixino’s storage
area to a more realistic source from the environment nearby. So, that led to the addition of
open damaged electric cables in Charlie’s room. This also added to the messiness and
disorderly space that I was going for in Charlie’s room.
2- Production:
During the production stage, I went back and forth between Maya, Mudbox and Photoshop.
Maya was used for modeling, rigging, animation, lighting, texturing and rendering. Mudbox
was used for creating the color maps for Charlie and most other assets in the film.
I followed a production line that would minimize time delays and time loss. To accomplish
these targets, I prioritized certain tasks and started working on them.
Here is the breakdown of the production workflow for Fixino 1.0:
- Modeling, rigging and texturing both Fixino and Charlie characters.
- Modeling all direct objects that Fixino and Charlie will interact with.
- Modeling background environment.
- Animation.
- Modeling and rigging the manager character.
- Texturing and lighting the environment.
- Rendering.
- Post production.
It’s worth noting that the animation stage and the texturing and lighting stage happened
simultaneously. I would finish animating a couple shots or so then I would go and spend
some time texturing and lighting the environment back and forth. Only towards the last
minutes or so of animation in the film, after the lighting setup was finalized, that the
-
Modeling:
The modeling stage started early while I was finishing the animatics phase. Right after he
character designs were finalized, I took them straight to Maya!
To minimize time delays and tackle any problems early, I started production with
developing the most important assets, the main characters. This process started
simultaneously while I was finalizing the animatics. After that, I developed the objects that
that characters will directly interact with. Examples of these objects in the film includes the
conveyor belt, damaged items, flashlight… etc. This is because I wanted to get a feel for
their size, the space they occupy in the scene and any issues that might arise when
characters interact with them.Modeling all background elements was the next step. This
included modeling both Fixino and Charlie’s rooms, storage racks, cardboard boxes… etc.
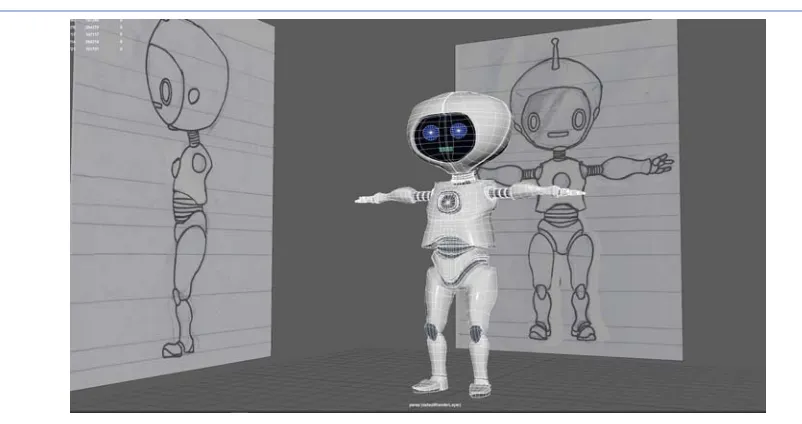
First, I modeled Fixino since he is the main character in the film. Fixino’s robotic nature
allowed for more freedom with the anatomy of the character model since aspects like
muscle weight and joint rotation restrictions do not apply. I followed the traditional
procedure in modeling low-poly characters starting with a primitive polygonal cylinder. I
tweak and add more edge loops as I work my way to complete the initial body of the
model. All these repetitive steps happen while keeping an eye on the reference images
added in the scene. As I was finalizing the model and smoothing it out to see the final look,
I went back and forth making sure to have the hard-surface feel to all Fixino’s body parts.
Figure 5: Fixino's model
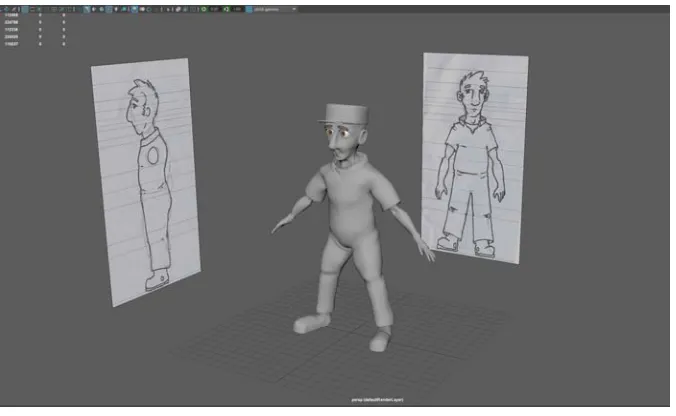
Charlie’s model was the next task after finishing Fixino’s model. Again, I followed a
traditional low-poly procedure in developing his character model. With Charlie, I had to
make sure to have enough edge loops around areas where most deformation would occur
during the animation stage. Areas like the face, hands and hips were give more edge loops
than the rest of the body to allow for smoother skin deformation.
One issue that I encountered, in the modeling stage of Charlie, was applying the “smooth”
operation (Mesh> smooth) to Charlie’s model to subdivide it even further. This was a big
mistake as it had subdivided the model to a very high number of polygons. The dense mesh
has made animating this character later impossible. So, I had to go back later in the pipeline
and manually reduce the polygons’ count down to a more reasonable number (~150k
polygons after switching to the smooth mesh preview). This polycount can be worked with
[image:22.612.139.477.120.328.2]
Figure 6: Charlie's model
As for the Manger character, and since this character was a secondary character with minimal
time in the movie, I used a free open source character in Adobe’s Maximo program to generate
both its model and the character rig. This was my last modeling requirement for this project.
-
Rigging:
The rigging stage in this film consisted from three steps:
1. Setting up the skeleton and joint structure for the model.
2. Creating animation control shapes to animate the rig.
For the first and second steps, I had some help by using Advanced Skeleton3. Advanced
Skeleton is a powerful MEL script (with a good GUI) that speeds up the process of
building a character rig in Maya. I had to spend two weeks to learn the workflow of this
tool and decide if it can fulfill the rigging needs of the two characters in my film. Advanced
Skeleton works best with low poly models, with correct topology, and has a built-in human
bipedal skeleton structure that can be applied to the model in the Maya scene. After
generating the bipedal skeleton, I had to match its size to that of the model using Advanced
Skeleton’s FitMode tool. Also, I had to match the limbs length and joints distance from
each other accordingly to match the model anatomy.
The second step of the rigging process, creating the animation control shapes and linking
them to the proper joints in the skeleton, I used Advanced Skeleton’s Build
AdvancedSkeleton tool to generate the shapes and complete the linking step. I had to go and
fix some minor issues with the scale of the control shapes themselves to match the model
size to make it more convenient to use in the animation stage. Once I was satisfied with the
control curves on one side , I used the Left>right mirror tool to adjust the right side
accordingly.
The last step, the skinning of the model, I mostly accomplished manually. This is because
Advanced Skeleton’s built-in skinning options did not yield satisfying results in terms of
proper weight distribution for the joints influence on both character models.
The weight painting process (on both characters) for the joints was divided into three steps:
- First, I had to go to root joint(Root_M) in the skeleton hierarchy, after “bind skin” the
model to it. Then, I flooded that joint with a value of 1. This means total influence for
this joint over the entire body. After that, I would go to just one other joint at a time
and unlock it. This means locking every other joint except this specific joint (i.e.
thumbFinger3_R) and the Root_M joint. I would then paint hard-edged weight for
this specific joint with a value of 1. This means that Root_M will no longer influence
the skin around that specific joint. I repeat this step for every single joint until
Root_M have zero influence on any part of the body, having relinquished it to all the
other joints in the skeleton.
- Second is the weight smoothing step. Here it was different from the human
character Charlie to Fixino. For Charlie, we needed a more natural and smoother
muscle influence for each joint in human body. This means smoother joint to joint
influence. On the other hand, Fixino’s robot body meant a more hard-surface
approach with skinning its body. So, I would keep the joint in-betweens influence
as minimal as possible. Each joint therefore has a clear hard-defined area of
influence. When I got to this step for Charlie’s character, I went to each joint in
skeleton hierarchy (after unlocking it) and unlocked the joint closest to it. For
example, I would to go to thumbFinger3_R and unlock the joint closest to it,
namely thumbFinger2_R. I then smooth the influence between the two joints using
the smooth paint operation with a value of approximately .5. After this is done, I
the second joint (thumbFinger2_R in this example) up in the skeleton hierarchy and
do the same smooth operation. This step is repeated on all the joints in the body.
- The last step in weight painting is to test the now-rigged character in some extreme
poses to see how the body parts move. This involves setting keyframes for some joint
and animate them (using their corresponding control curves). After that I fix any
anomalies that might arise. Frequently-occurring problems include vertices on the
mesh popping out to weird places that need bringing back and improper weights to
certain areas of the mesh that need some better weight redistribution.
[image:25.612.97.520.369.586.2]
Figure 7: Fixino weight‐painting. Notice the hard weight definition for each joint for a robot’s body
[image:26.612.92.515.128.382.2]
Figure 8: Advanced Skeleton’s graphical user interface (GUI)
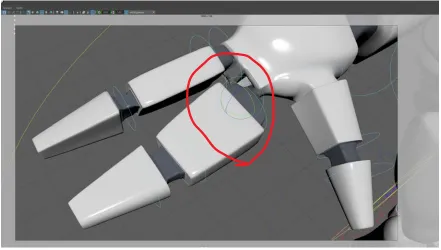
In rigging Fixino, I had to find a way to separate certain pieces of geometry to have more
sense of robotic mechanism. The fingers geometry, for example, are separate at the knuckle
area to allow for 360° spin as was required by the story. This ability would allow Fixino to
drill in screws after fixing items. Not only does this geo separation make the animation
possible, but it also serves to push the robotic nature of Fixino which makes for a great
[image:27.612.86.527.122.372.2]
Figure 9: A finger can rotate 360 degrees by separating the geo at the knuckle area
Other objects that needed to be separate from the main body geo was Fixino’s storage area
lid. This allowed for easier weight-painting during the skinning stage of the rigging process.
Dividing the character’s model into various parts allowed for clear “hard” weight transitions
Figure 10: Fixino weight‐painting used hard transitions between different parts of the robot's body
As for Charlie’s rig, since it is follows human anatomy, I had to pay attention to the muscles
influence over the skeleton. The hierarchy of the skeleton in this rig is more rigidly defined
as I had to follow human body’s joint structure as well as the rotation limits for the limbs.
-
Animation:
The animation was quite challenging for me since it’s the area where I’m least comfortable in
the 3D pipeline. But, one of the reasons in choosing this story for my thesis was my desire to
improve my skills in character animation. I had to figure out how to animate Fixino in such a
way that it reflects his robotic nature and animating Charlie in a style that reflects his human
nature and movement. To achieve this, I approached Fixino animation with the goal to have
less “ease ins” or “ease outs” in his movement. This abruptness in movement change I felt
would help distinguish him from the smoother human movement. I also depended on extreme
non-human animation possibilities that only a robot can do. Fixino’s ability to rotate fingers
capabilities. Aspects that I felt were important to communicate in Fixino’s animation are his
efficiency and sense of constant curiosity (especially when meeting the human Charlie).
Fixino’s facial expressions, though limited, were used to convey the curiosity vibe that he has.
The quick and repetitive fixing actions that we see in the first act are visual tools I used to
show Fixino’s efficiency.
Charlie’s animation was naturally harder from a technical aspect. I had to keep track of a lot
of control curves to accomplish every pose and make sure all his body emote the exact same
feeling. Charlie emotions’ arc change in this story from static, when he is safely asleep, to
defiant as he rejects Fixino’s fixing attempts and then finally to compliance, with the boss’s
orders, as he gets back to work with a lower character status.
As for the workflow for animating shots in this film, I animated the first minute of the film
first. After finishing the first minute of animation, I would animate the most important shots
first and the less important shots towards the end. This approach allowed me to gain
confidence by finishing the first, and relatively easier, minute of animation before tackling
the more difficult shots. Leaving the less important shots (not fundamentally key to the
story) towards the end allowed me some room to scrap or adjust them with more comfort, in
case animating the previous and more important shots took longer than expected to animate.
The most difficult shot to animate was the shot where Charlie gets electrocuted by Fixino.
That shot was particularly challenging because there was lots of movement changes that
happen so quickly. It was an approximately four-second-long shot that required me to create
many extreme poses, with quick transitions, for Charlie as he feels the full force of
another character, Fixino, which meant more time to complete it. I would, however, pick
this particular shot as the most fulfilling shot I had animated on this film as it came out
exactly the way I had imagined it and made the desired impact on the audience.
-
Lighting and Texturing:
Lighting in Fixino 1.0 was one of my favorite stages in the production pipeline. In Fixino
1.0, lighting is a critical asset that I used to amplify the sense of contrast between the two
spaces where the story takes place. The first environment in the story is Fixino’s operation
room. I wanted to have bright and evenly-lit environment that leans towards a monotonic
color tone. This helps in communicating the robotic nature of its inhabitant, Fixino.
Brightness and evenly-distributed light in this scene indicates efficiency and normalcy. It
also serves also as a reflection of Fixino’s process, routine and efficiency.
[image:30.612.150.462.416.594.2]
Figure 11: Lighting in Fixino's room
By contrast, Charlie’s lighting setup was approached to communicate the opposite feel to
Fixino’s room. Charlie’s control room lighting is used to highlight his human problem, in
dimmer and less bright than Fixino’s room. I also made sure to have uneven light
intensities, which will lead to irregular light distribution in the environment. For the color
tone of the light sources, I had the lights, on the side closest to Fixino’s room, be lit in a
greenish tone while the lights at the other side of the room lit in a yellowish color. This
variation in color also reflect the more organic nature of the human Charlie as opposed to
the monotonic robot Fixino. Another visual hint I used, to convey a sense of disorder, was
having one of the lights flickering on and off as Fixino slides along the conveyor belt into
the Charlie’s room. I hoped this will add more emphasis on the human character’s current
sleepy mind state. Another small visual addition that I put in this scene was putting a small
flickering red signal on top of the conveyor belt door in Charlie’s room.
[image:31.612.154.459.368.541.2]
Figure 12: Charlie's room lighting setup
For both rooms, the key lights that were used were Area Light type in Maya. Each room has a
total of six area light key lights. The six key lights are placed at the ceiling of each room.
Since the environment is factory-style rooms, the main light sources are placed at the ceiling
in light boxes. I used area lights for their ability to create more realistic light attenuation and
types). All shots also needed fill light to light areas where key lights either could not reach or
did not light well enough. Rim lights were used also to separate Fixino (and Charlie) from the
background environment.
The texturing stage involved, first, UV-unwrapping for all models that required a specific
bitmap and hand-tailored image maps for those models. For example, to get Charlie’s lab
outfit texture, I had to unwrap Charlie’s model UVs first. Then, I would go to Photoshop and
paint on the resulted unwrapped UV snapshot to get the factory outfit look. Finally, I would
export a jpeg file with new designed texture and applied it into the color information of
Charlie’s assigned material. This workflow is repeated for every object where a specific
texture maps where needed.
[image:32.612.134.482.398.569.2]
Figure 13: A model and its UVs layout (right)
Other objects that didn’t need that unique texture maps were much easier to texture. I just had
to assign that object in the scene a material that correctly communicates its appearance
reflectivity, specularity (shininess), eccentricity and bumpiness values to get the object to look
as realistic as possible. I also had to keep an eye and how the materials assigned to these
objects interact with light. Sometimes, I would need to change these values and/or others
until the objects’ material interact properly with the light sources in the environment.
-
Rendering:
All shots were rendered using Maya’s Mental Ray renderer with Final Gather turned on.
There were other options for the render engine like the now-standard Arnold renderer. It’s
widely believed that it does deliver faster render times with high quality renders. However,
since I had no prior knowledge with this renderer, I felt that sticking with Mental Ray would
save me the learning time needed to familiarize myself with Arnold.
To speed the process of compositing, I tried to combine as many passes together into one
global render pass as possible for rendering. This will cut the compositing time while still
maintaining the desired final look. So, for each chunk of shots rendered, I only created three
passes: the beauty pass (global pass), the ambient Occlusion pass and the depth pass. The
Figure 14: depth pass
Figure 15: Ambient Occlusion pass (same shot above)
Figure 16:Beauty pass (diffuse+ lighting+ indirect light+ specularity+ shadow+ reflection)
Figure 17: Final image.
3- Post-Production:
-
Music Composition/ Sound Effects:
I worked with Justin Jaramillo, a senior student at Eastman’s school of Music, for the
[image:35.612.151.464.333.511.2]short. I enjoyed working with him the first time and was glad to have him onboard again
for the thesis film. I tried to involve him as early in the process as possible. We first
discussed the idea for the film, and how I wanted Fixino 1.0 to sound like, during the
pre-production stage. At that stage, it was mostly brainstorming with nothing concrete yet.
Only when I got to the animation stage in production that Justin started to compose the
music that I can test with visuals to see if they work together or not. My vision for the
music mainly focused on amplifying the visuals, highlighting the contrast between the
robot vs human space and maintaining the overall comedic vibe to the film.
As for the sound design, I mainly did it myself. Few sound effects were embedded into the
music track that I had received from Justin (like Fixino’s scanning sound effect). The sounds
I collected though, were mostly from a website called soundsnap.com. I chose it because our
school had an active subscription to its sound library and, most importantly, their sound
effects were of high quality. My goal for the sound design, especially for Fixino’s first act,
was to have it create a sense of automation and repetitiveness. By syncing the angular sound
beats with Fixino’s movement as well as the camera movement, I managed to create that feel
for Fixino’s room. The only area where I would have preferred to redo, if given the chance,
was the sound effects for the second act of the story (Charlie’s room). I feel like that sense of
automation and process got lost a bit and the music started to have more natural (human) feel
and progression to it. I also would have liked to add more background sound effects which
-
Compositing:
All the compositing process was done using After effects. The compositing was divided
into two steps: a first pass compositing where I would work on a specific chunk of rendered
shot(s) put in a separate AE comp. Then, a second compositing step after the end of all the
comp-specific compositing. The goal of the second compositing step is to make sure that
all shots in the film look visually consistent in terms of color tone, brightness and contrast
values. This way, I make sure that all the rendered shots, despite being rendered separately,
Screening and Audience Feedback
Fixino 1.0 was screened on Monday December the 12th 2016 at the Carlson auditorium to a
moderate crowd size. I was worried about a few issues with the film and was interested to
see how the audience would respond to them. Mainly, I was interested to see if the audience
would get the twist in the end and if the visual gags would draw laughs from the crowd or
not. I had some worries about the music as we ran into syncing problems at the last minute
as I tried last-minute attempts to quick-fix the syncing issue. The film screening was smooth
and the sound worked fine which was a relief. As for the feedback, it was a mixed reaction.
The first comment was from one of the professors. She pointed to the introduction part of
Fixino and his routine being a little prolonged which might have resulted in the audience’s
mind being directed to a different direction than the actual story progression was. That
prolonged introduction, in her mind, might have resulted in making the introduction of the
second character, Charlie the human, less effective since it came after a very long
establishing scene of Fixino and his surroundings. About this comment, I must admit that,
“clearly” introducing Fixino and his routine in a way that would make the second act of the
story work was one of my biggest challenge. I didn’t want it to be too long which would, in
a way, make the film entirely about Fixino and his routine. Yet, I also felt that introducing
Fixino’s well defined steps and routine of fixing items was paramount to making these steps
making sense in the second act with Charlie. Overall, I believe I struck the right balance.
was well received by the audience. The contrast in color tone and environment design
between the two rooms, of Fixino and that of Charlie, came across nicely and was
highlighted by a few comments from the audience. Looking back, I would point to these
three aspects of production as my proudest achievement with this piece.
One other comment I remember was about the role of the Manager Character, who
intervenes to create a sudden twist for the heightened tension between Fixino and Charlie.
The commenter thought that the resolution of this conflict would have been better
accomplished through a more proactive Fixino rather by a sudden change and introduction
of a third character. My reasoning for using the third character, the manager, was to have a
story where the protagonist accidentally arrives at the solution rather intentionally. So,
introducing the manager I felt was a nice addition and twist to resolve the tension between
Fixino and Charlie near the end of the film.
Looking back in retrospect now, I would say that I would have done two major changes to
my approach to the story and its development. First, I would have adjusted the story arc to
introduce Charlie much earlier as I feel his introduction in the film came a little too late.
His belated introduction might have affected the impact and acceptance of Charlie as a
character, and as an obstacle, in the film by the audience. Second, I would rework the part
of the manger. I would try to have the conflict’s resolution come from within the
interaction between Fixino and Charlie instead of having the extra introduction of the
manger to force it as a resolution. These two changes, I believe, would elevate the impact
of the film’s story also provide a more creatively-satisfying resolution to the story’s main
Conclusion
With thesis films, many students tend to choose a project with a visual and narrative style
that they have already tried and explored in their previous two films at RIT. My approach
in choosing the narrative style was different. Having already completed a 3D experimental
short in my second year, I wanted to tackle a different challenge that I felt I needed to
explore before graduating. So, I chose a traditional narrative style for my thesis film.
Doing a narrative 3D short presents its own unique set of challenges that an experimental
animation work does not. Clearly defining the environment and its inhabitants(characters),
giving them weight, and the natural timing of character movement are amongst the many
challenges that I had to think about in my narrative-style 3D thesis short. An artist is
usually free from these types of constraints, when making an experimental film, yet they
are the basic metrics in judging the quality of an animated work in a narrative format.
Unsurprisingly, the experience of creating a thesis narrative, has been a great learning curve
that has taught many different lessons. Among the most prominent ones is to simplify,
simplify and simplify your story! In the pre-production stage of my film, I was still
struggling to grasp how to fit what I had in my mind, story-wise, into a five-minute short
film format.
The simplification process forced me to think of every single shot and how it moves the
story forward. I had to trim the fat when approaching my storyboards this way, by asking
being there, I had to cut. We tend think of this idea as simple but it really takes practice. The
more stories I will create in the future, the more my ability to simplify them will, with time,
become more streamlined and perfectly honed.
The simplification lesson I had learned throughout this project was not only related to the
number of shots I had to trim, but also, figuring out if I could introduce the conflict earlier,
and when was the best time to introduce my secondary characters.
Another lesson that I would say I learned the hard way was to not mix two genres, comedy
and drama, when making a five-minute-long short film. I would attribute the loss of
considerable time, that would have been better utilized in production, to this hard-learned
lesson.
Initially, I had in my mind the human problem of Charlie that Fixino had to fix being one of
sadness over a failed past relationship. This gave the middle part of the story a dramatic tone
to it that was framed with some comic visual gags growing from Fixino’s futile attempts at
fixing a human problem. So, I had two genres that I had to blend and make it work in a
five-minute short film.
As I put one animatic after another, certain story-structure problems persisted which made
the story clarity difficult for first-time viewers (when I showed it to them). The most
prominent one was the clarity and effectiveness of choosing sadness as the human problem
of Charlie that Fixino had to fix. I tried to eliminate some gags here and there to make more
time for shots that help the viewers understand the reason for Charlie’s sadness more. It still
for a very specific time frame I set for myself (five-minute film). So, after a meeting with
one of my thesis committee members, I decided to go with only one genre, comedy, instead
of continue trying to make the two genres fit seamlessly. I made some significant changes to
the story while maintaining the main core, a robot trying to fix a human problem, intact.
This refocus of mine on the main core of my story, coupled with the narrowing of the film
scope into one genre, allowed me to create a more solid piece and communicate it better to
the audience. The story arc become smoother because of that decision to narrow the story to
one genre(comedy). It also simplified the creative choices when approaching the dynamic
between Fixino and Charlie. So, instead of having a triangle of conflict points (Charlie
sadness, refusal to work and Fixino’s fixing attempts), I had only two to work on, namely,
Charlie’s refusal to work to sleepiness and Fixino’s fixing attempts. This made the dynamic
between them work better because of its simplicity and made the story clearer as well. Most
importantly I believe, it gave each character more time to develop and allowed them to be
clearly communicated to the audience in a short five-minute format.
Appendix A: Thesis Proposal
Logline:
In a futuristic automated world, a repair robot faces his biggest challenge yet, fixing a broken
human.
Treatment:
A relatively small robot sorts out his tools. One by one he makes sure they’re placed in the
right order and the right place on the table near the platform where he’s standing. He takes a
lingering look towards the conveyer belt stretching to his left, waiting..
He takes a look at an electronic sign board that shows the daily labor assignment. It’s still off..
After a few moments, the electronic board comes to life, it reads 21:0. 21 items to be fixed, 0
completed.
The sound of the conveyor belt gears comes to life. The robot takes a look towards the small
opening at the start of the conveyor belt. As it arrives near the platform where he stands, based
on its printed initials, he picks the manual and quickly fixes the first one.
(Quick shots with gradually elevated sound beats) He fixes the next three quickly in no time!
The board reads 17:4. After a little delay, the fifth item comes with no labels. He goes over the
He looks blankly at the item... The item has a non-stop bobbing movement to one side; the
robot mimics the same movement for a few seconds and then notices the item is missing a
piece, which was not plugged in the right slot. He snaps it back into the slot and it’s fixed.
The conveyor belt still rolls along, but no new items come through! The board reads 16:5
which means that there are 16 more to go. The robot tabs his fingers on the platform waiting
for the next one.
After long wait, the robot curiosity arises. He looks at the switch that controls the direction of
the belt.
He switches it to change the direction of the conveyor belt. It runs back in the same direction as
the source from where all the broken items are delivered. He gets on top of the belt as it slowly
goes back to explore the problem of why no more items are coming through.
The belt rolls through from darkness and the robot investigates the room. He looks at the pile
of broken items on top of each other in total disarray. The post at the platform in this room is
vacant; the human controlling this side of the station is not there.
As he looks around the room he notices a human at a corner hunched over. His name badge
says Charlie. Charlie’s hands rest on his legs. He seems to be holding something with his right
hand. The robot gets off the belt and walks slowly towards him. Charlie seems broken and sad.
The robot cannot read these emotions.
There are no initials on this item so he can't find the solution in a catalogue. The robot takes a
look at the vacant conveyor belt’s monitoring post and then back at the human.
In quick attempts, he tries to drag Charlie back to his post.
The last one, in particular, is a disaster; the robot falls flat on his head!
The human is just too heavy!
Confidently, he gathers himself back up. Humiliation or embarrassment just don’t register with
a robot.
Again the starting point is to look for initials on this item’s label. But there are none. He
quickly rummages with his fingers through the manuals one more time but there are no
matching criteria!
He still picks a tool from his toolset and get to work on this man in a systematic way. The man
shows no response to his attempts. The robot scans the room aimlessly and notices a portrait on
the wall of a younger Charlie standing, smiling.
He looks back and forth at the picture and Charlie. The robot tries adjusting Charlie’s arms and
legs as if he was about to stand up thinking it would be easier to pull him up this way.
First, he pulls Charlie’s mouth to make a smile just like the picture! The robot carefully pulls
his hands away. The smile on the man’s face quickly flips back into a frown!! (Sound effect
matching the transition)
The robot pauses for a second, looking blankly at him. He proceeds to set the Charlie’s arm to
support him standing. As he moves to set the other arm, Charlie’s leg is flung back down!!
(Sound effect matching the action)
The robot fails again!
After one wild attempt with two of his tools aimed at the man’s chest, the man’s body is
shaken and he releases his hands into the air in response and a photograph he’s holding flies
Suddenly, the man seems alert as his photograph is thrust into the air. The Robot stands still.
He looks at the human swiftly reaching for the photograph as he picks it up and goes back to
the corner.
The robot has run through all the usual tools at his disposal to fix this man! This is a
completely unfamiliar situation for him.
The robot sits next to the human. He now sees that Charlie is looking at the photo, which is of
himself and a beautiful girl. Charlie has a big smile in the picture, but his face now has a frown
and there are drops of water around his eyes. The robot doesn’t understand these expressions or
how the picture connects with Charlie.
Slowly he tries to takes the same posture as Charlie. Charlie lingers at the photo and shakes
slowly in sadness.
The robot doesn’t have a photo. Foolishly, he quickly reaches to his toolbox and picks up a
screwdriver from his toolbox. He holds it and starts slowly to shake his head as he aimlessly
looks at the screwdriver!! Nothing.
He throws it away and tries the same silly thing with a hammer… Then with a flashlight! And
again the robot cannot seem to build the connection.
Charlie starts to notice the robot next to him and slowly cracks a smile at the futile exertions.
The mere attempt by the robot to mechanically console him lifts his spirit up. He takes a deep
breath and looks up for a moment. He notices the robot again trying to mimic his action and
manages a bigger smile.
The robot doesn’t have a mouth! To simulate Charlie’s smile, he lifts his two hands and makes
Charlie starts laughing quietly.
Now the robot tries to pull him up again and the man responds! He manages to get Charlie up
again. The robot goes around Charlie and pushes him from his back slowly towards the belt’s
monitoring post.
Charlie is finally back to his post. The robot and the human exchange a look of appreciation as
a new unlikely friendship forms between them. No more are they co-workers! But more like
friends. The sound of the conveyor belt getting back to work as a new broken item is loaded
onto it.
The robot gets on the belt first; he brings his hands to his face to make a smile! He is going
back to his chamber to fix more items!
Rationale:
For this film I feel it checks a lot of targets that I would like to achieve from a thesis film; I’m
extremely interested in studying and researching the dynamic between the human being and the
“cyber” being. The relation between the uncertain (human emotion) and the resolute
(calculated actions of the robot) provides an interesting contrast. With this film, I’ll try to
explore the possibilities of how can a robot changes the emotional state of a human being?
What makes this film unique as an idea is the fact that it reverses what is common and
prevalent in the current narrative of such a relationship. Usually the human fixes the robot, uses
it or controls it. Here, the roles are reversed. The robot is the main character and is the one
trying to fix the human.
Another aspect that makes this film an interesting project to me is the incorporation of the
some elements of humor within this piece will only elevate the film by highlighting the
differences in logic, pace, movement and nature between these two characters.
I see audio as an important factor in this piece to control the pace of the film. The sound design
will serve as an extra storytelling device to highlight the humorous gags in the film. I will also
be trying to use certain sound effects to create musical rhythms that will help emphasize the
robot’s mechanical nature. The background music will help hold the movie together
thematically. Themes like friendship, loss of a beloved one, bewilderment and the desire to fix
things are all elements I would like the music to help convey.
From a technical point of view, this film also poses interesting lighting settings, something I
love working with. The contrast between the orderly robot chamber and the messy human
chamber would provide a very interesting visual conversation. The two contrasting styles of
motion between the human (organic) and the robot (mechanical) poses a very interesting
challenge from an animation point of view. For that, I’ll need to study the differences between
the two, and apply them to the two characters’ animations.
I’ve completed two 3D shorts at SOFA so far. One was with the purpose of getting used to
working with Maya and doing a short 30-second character-based film. My second was an
experimental 3D short. I enjoyed both and both introduced their own challenges. Developing a
four to five-minute 3D narrative film is what I believe is the right type of challenge for me at
Timeline:
Alshehri Thesis Timeline
Week 01 02 03 04 05 06 07 08 09 10 11 12 13 14 15 01 02 03 04 05 06 01 02 03 04 05 06 07 08 09 10 11 12 13 14 15 PRE PRODUCTION
Finalize Story Storyboard Character Designs 2D Animatics 3D Animatics PRODUCTION Character Modeling Character Texture Character Rigging Animation
Props Modeling & Texturing POST PRODUCTION Rendering Compositing Music Composing Sound Mixing Title design and credits Final Delivery
Budget:
Description Units Fee Subtotal Total
Pre-Production:
Story $0
Character Design/ Concept Art 1 $150 $150 $150
Production Team :
Modeling/ Texturing/
Animation
1 $0 $0 $0
Rigging 1 $100 $100 $100
Compositing 1 $0 $0 $0
Rendering 1 $0 $0 $0
Composer 1 $500 $500 $500
Sound Designer 1 $150 $150 $150
Production Equipment:
External Hard Drives 2 $55 $110
Festival Submission Funds 5 $30-$50
$150-$300
Online automatic backup $55 $55 $55
Appendix B: Fixino 1.0 Movie Screenshots