ASP.NET 2.0
Instant Results
ASP.NET 2.0
Instant Results
ASP.NET 2.0 Instant Results
Published byW
Wiilleeyy PPuubblliisshhiinngg,, IInncc.. 10475 Crosspoint Boulevard Indianapolis, IN 46256 www.wiley.com
Copyright © 2006 by Wiley Publishing, Inc., Indianapolis, Indiana
Published simultaneously in Canada
ISBN-13: 978-0-471-74951-6 ISBN-10: 0-471-74951-6
Manufactured in the United States of America
10 9 8 7 6 5 4 3 2 1
1MA/QS/QT/QW/IN
No part of this publication may be reproduced, stored in a retrieval system or transmitted in any form or by any means, electronic, mechanical, photocopying, recording, scanning or otherwise, except as permitted under Sec-tions 107 or 108 of the 1976 United States Copyright Act, without either the prior written permission of the Pub-lisher, or authorization through payment of the appropriate per-copy fee to the Copyright Clearance Center, 222 Rosewood Drive, Danvers, MA 01923, (978) 750-8400, fax (978) 646-8600. Requests to the Publisher for permission should be addressed to the Legal Department, Wiley Publishing, Inc., 10475 Crosspoint Blvd., Indianapolis, IN 46256, (317) 572-3447, fax (317) 572-4355, or online at http://www.wiley.com/go/permissions.
L
LIIMMIITT OOFF LLIIAABBIILLIITTYY//DDIISSCCLLAAIIMMEERR OOFF WWAARRRRAANNTTYY:: THE PUBLISHER AND THE AUTHOR MAKE NO REPRESENTATIONS OR WARRANTIES WITH RESPECT TO THE ACCURACY OR COMPLETENESS OF THE CONTENTS OF THIS WORK AND SPECIFICALLY DISCLAIM ALL WARRANTIES, INCLUDING WITHOUT LIMITATION WARRANTIES OF FITNESS FOR A PARTICULAR PURPOSE. NO WARRANTY MAY BE CREATED OR EXTENDED BY SALES OR PROMOTIONAL MATERIALS. THE ADVICE AND STRATEGIES CONTAINED HEREIN MAY NOT BE SUITABLE FOR EVERY SITUATION. THIS WORK IS SOLD WITH THE UNDERSTANDING THAT THE PUBLISHER IS NOT ENGAGED IN RENDERING LEGAL, ACCOUNTING, OR OTHER PROFESSIONAL SERVICES. IF PROFESSIONAL ASSISTANCE IS REQUIRED, THE SERVICES OF A COMPETENT PROFESSIONAL PERSON SHOULD BE SOUGHT. NEITHER THE PUBLISHER NOR THE AUTHOR SHALL BE LIABLE FOR DAMAGES ARISING HERE-FROM. THE FACT THAT AN ORGANIZATION OR WEBSITE IS REFERRED TO IN THIS WORK AS A CITATION AND/OR A POTENTIAL SOURCE OF FURTHER INFORMATION DOES NOT MEAN THAT THE AUTHOR OR THE PUBLISHER ENDORSES THE INFORMATION THE ORGANIZATION OR WEBSITE MAY PROVIDE OR RECOMMENDATIONS IT MAY MAKE. FURTHER, READERS SHOULD BE AWARE THAT INTERNET WEBSITES LISTED IN THIS WORK MAY HAVE CHANGED OR DISAP-PEARED BETWEEN WHEN THIS WORK WAS WRITTEN AND WHEN IT IS READ.
For general information on our other products and services or to obtain technical support, please contact our Customer Care Department within the U.S. at (800) 762-2974, outside the U.S. at (317) 572-3993 or fax (317) 572-4002.
Wiley also publishes its books in a variety of electronic formats. Some content that appears in print may not be available in electronic books.
L
Liibbrraarryy ooff CCoonnggrreessss CCaattaalloogg NNuummbbeerr:: 2006003345
T
Trraaddeemmaarrkkss:: Wiley, the Wiley logo, Wrox, the Wrox logo, Programmer to Programmer, and related trade dress are trademarks or registered trademarks of John Wiley & Sons, Inc. and/or its affiliates, in the United States and other countries, and may not be used without written permission. All other trademarks are the property of their respective owners. Wiley Publishing, Inc., is not associated with any product or vendor mentioned in this book.
FCKeditor–The text editor for the Internet. Copyright © 2003-2006 Frederico Caldeira Knabben. Licensed under the terms of the GNU Lesser General Public License (LGPL).
About the Authors
IImmaarr SSppaaaannjjaaaarrss graduated in Leisure Management from the Leisure Management School in the Netherlands, but quickly changed his career path into the Internet world. After working for a large cor-poration and doing some freelance work, he is now working for Design IT, an IT company in the Netherlands that specializes in Internet and Intranet applications built with Microsoft technologies like ASP.NET. As a software designer and lead developer, he’s responsible for designing, building, and implementing medium- to large-scale e-commerce web sites and portals.
Before this book on ASP.NET 2.0, Imar wrote two books about Macromedia Dreamweaver, called Beginning Dreamweaver MX and Beginning Dreamweaver MX 2004, both published under the Wrox brand. Imar is also one of the top contributors to the Wrox Community Forums at http://p2p.wrox.com where he shares his knowledge with fellow programmers.
Imar lives in Utrecht, the Netherlands, together with his girlfriend Fleur. You can contact him through his web site at http://imar.spaanjaars.com.
P
Paauull WWiillttoonn got an initial start as a Visual Basic applications programmer at the Ministry of Defense in the UK before finding himself pulled into the Net. Having joined an Internet development company, he spent three years helping create Internet solutions. He’s now running his own company developing online holiday property reservation systems.
Paul’s main skills are in developing web front ends using DHTML, JavaScript, and VBScript as well as back-end solutions with ASP, ASP.NET, Visual Basic, and SQL Server.
S
Credits
Senior Acquisitions Editor
Jim Minatel
Development Editor
Brian Herrmann
Technical Editors
Dan Maharry and Scott Spradlin
Production Editor
Felicia Robinson
Copy Editor
Kim Cofer
Editorial Manager
Mary Beth Wakefield
Production Manager
Tim Tate
Vice President and Executive Group Publisher
Richard Swadley
Vice President and Executive Publisher
Joseph B. Wikert
Project Coordinator
Michael Kruzil
Graphics and Production Specialists
Lauren Goddard Brooke Graczyk Denny Hager Joyce Haughey Barbara Moore Alicia B. South
Quality Control Technicians
Jessica Kramer Brian Walls
Media Development Project Supervisor
Shannon Walters
Media Development Specialist
Steven Kudirka
Proofreading and Indexing
Imar Spaanjaars: To Fleur - The love of my life.
Shawn Livermore: This book is dedicated to my Lord Jesus, who has mastered all things, much less a simple piece of software.
Paul Wilton: With lots of love to my darling Beci, who now the book’s finished will get to see me for more than 10 minutes a week.
Acknowledgments
Imar Spaanjaars
Writing a book like this one is definitely not a solo project. During development of this book I got a lot of support from many people who helped me to stay focused and get inspiration. I would like to give all of you that helped a big thanks! While I can’t possibly thank all of you here personally, there are a few peo-ple I’d like to thank in particular.
First of all I’d like to thank the people at Wiley for working with me on this project, with Brian Herrmann in particular for his efforts during the editorial process.
I would also like to thank Anne Ward for helping me with the designs of some of the applications fea-tured in this book.
A big thanks goes out to the people at Design IT for their participation in my “hallway usability tests” that I randomly brought up in the office. Thanks guys! It’s always good to have a few extra sets of eyes. My appreciation also goes out to my two good friends René and Joost for their friendship. Looking for-ward to spending more time with you again.
Last but certainly not least, I would like to thank my girlfriend Fleur for her support during this project. I know it wasn’t always fun when I disappeared in my home office for hours, but you were a great sup-porter and motivator nonetheless.
Paul Wilton
I’d like to say a very big thank you to Brian Herrmann, who has been a great editor to work with and has done amazing work on the book. He manages to maintain professionalism and sense of humor even when faced with another of my “just a few more days and I’ll get the chapter to you” e-mails!
Thanks also to Jim Minatel for making this book happen, and also his support in what has for me been a challenging and difficult year.
Many thanks to everyone who has supported and encouraged me over the many years of writing books. Your help will always be remembered.
Finally, pats and treats to my German Shepherd Katie, who does an excellent job warding off distur-bances from door-to-door salespeople.
P
Paauull WWiillttoonn ccoonnttrriibbuutteedd CChhaapptteerr 11 ttoo tthhiiss bbooookk..
Shawn Livermore
I thank my gorgeous wife Shantell, who is a truly beautiful and caring person, and has always encour-aged me to shoot higher. Your love has changed my life. Thanks for supporting me through the long hours and boring computer nerd conversations. I owe you a pair of Gucci shoes. And of course, to my daughter Elexzandreia, who is a gift from heaven. You have taught me so much about life and have made me want to be a better dad. I love you “134,000.”
S
Contents
Acknowledgments
v
Introduction
xvii
Chapter
1: The Online Diary and Organizer
1
Using the Online Diary
1
Design of the Online Diary
6
The Data Access Layer
6
The Business Layer
8
The OnlineDiary Class 8
The Contact Class 8
The ContactCollection Class 10
The DiaryEntry Class 11
The DiaryEntryCollection Class 13
The DiaryEvent Class 14
The DiaryEventCollection Class 16
Code and Code Explanation
17
File Structure
17
Registration, Logging On, and Security
18
Logging On 18
New User Registration 19
Password Reminder 23
Viewing the Online Calendar
24
Creating, Editing, and Viewing a Diary Entry
26
Creating, Editing, and Viewing Diary Events
29
Managing Contacts
32
Setting up the Online Diary
34
Summary
35
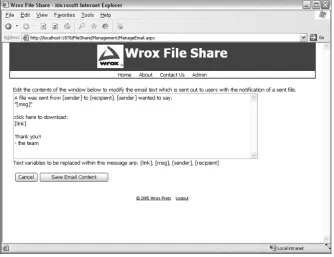
Chapter 2: Wrox File Share
37
Using the Wrox File Share
38
Wrox File Share Design
41
Uploading Files
41
Sending E-Mails
42
Data Model and Database Objects
44
The Email Table 44
The Contact Table 44
The Resource Table 45
Themes and Skins
50
Security Model
51
Classes Involved
52
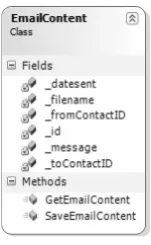
The EmailContent Class 52
The Resource Class 53
The Config Class 54
The Utilities Class 55
Code and Code Explanation
55
Root Files
56
Web.config 56
config.vb 56
Resource.vb 58
resourceDB.vb 59
WebForms
62
Default.aspx 62
Login.aspx 63
Download.aspx 64
User Controls
65
header.ascx 65
footer.ascx 66
navigation.ascx 66
Setting up the Project
67
Hosted Web Site Installation
67
Local Developer Installation
68
Summary
69
Chapter 3: Wrox Chat Server
71
Using the Wrox Chat Server
73
Wrox Chat Server Design
75
Sending Messages Using Callbacks
75
Structure of the Site
78
Data Model
78
The Category Table 79
The Room Table 79
The Message Table 80
Themes and Skins
80
Classes Involved
81
The ChatRoom Class 81
The ChatRoomDB Class 82
The Config Class 83
Code and Code Explanation
84
Root Files
84
Web.config 84
Config.vb 84
ChatRoom.vb 85
ChatRoomDB.vb 86
WebForms
88
SignIn.aspx 88
Default.aspx 88
ChatRoom.aspx 90
ChatWindow.aspx 92
User Controls
94
header.ascx 95
footer.ascx 95
navigation.ascx 95
Setting up the Project
96
Hosted Web Site Installation
96
Local Developer Installation
96
Summary
97
Chapter 4: Wrox Survey Engine
99
Using the Wrox Survey Engine
100
Adding a New Survey
105
Editing an Existing Survey
109
Wrox Survey Engine Design
110
Object Binding and SQL Server Data Binding
110
Structure of the Site
111
Data Model and Database Objects
112
Themes and Skins
115
Security Model
116
Classes Involved
117
The SurveyBase Class 117
The Survey Class 118
The SurveyDB Class 120
Code and Code Explanation
122
Root Files
122
Web.config 122
Survey.vb 122
Config.vb 123
SurveyDB.vb 124
WebForms
126
Default.aspx 126
Login.aspx 126
TakeSurvey.aspx 126
User Controls
127
header.ascx 127
footer.ascx 128
navigation.ascx 128
surveyresults.ascx 129
currentsurvey.ascx 130
Setting up the Project
130
Hosted Web Site Installation
131
Local Developer Installation
131
Summary
132
Chapter 5: Wrox CMS
133
Using the Wrox CMS
133
Viewing Content on the Site
134
Managing Content with the CMS
135
Design of the Wrox CMS
136
The Business Layer
137
The Data Access Layer
139
The Data Model 139
Helper Class
140
Code and Code Explanation
141
Root Files
141
Web.config 141
SiteMaster.master and AdminMaster.master 142
Login.aspx 146
The Management Folder
146
Managing Categories 146
Managing Content 153
Displaying Content on the Web Site
159
Setting up the Wrox CMS
162
Using the Installer
162
Changing IIS Settings
162
Changing Security Settings
163
Testing Out the Site
164
Summary
165
Chapter 6: Wrox Blog
167
Using the Blog
168
Design of the Wrox Blog
170
The Business Layer
170
The BlogEntry Class 171
The BlogManager Class 172
The UserManager Class 173
The Data Access Layer
174
The BlogManagerDB Class 176
The UserManagerDB Class 177
The Data Model 178
Stored Procedures and Queries 179
Helper Classes
180
Code and Code Explanation
181
Root Files
181
Web.config 181
Login.aspx 181
Global.asax 184
Writing Provider-Independent Code
185
The Controls Folder
188
BlogEntriesFilter.ascx 188
BlogEntries.ascx 191
Structured Error Handling and Logging
198
Configuration
198
Handling and Logging Errors
198
Setting up the Wrox Blog
200
Using the Installer
200
Manual Installation
201
Summary
203
Chapter 7: Wrox Photo Album
205
Using the Wrox Photo Album
206
Wrox Photo Album Design
211
How It All Fits Together
211
Storing Images 212
Site Structure 213
Themes and Skins 214
Data Model 216
Security Model 217
Classes Involved
218
Code and Code Explanation
221
Root Files
222
Web.config 222
Masterpage.master and Admin.master 222
Web.sitemap 223
WebForms
223
Photos.aspx 223
Login.aspx 224
Admin.aspx 225
Editphotos.aspx 227
Secure Area Files
228
User Controls
229
header.ascx 229
footer.ascx 229
navigation.ascx 229
Setting up the Project
230
Hosted Web Site Installation
230
Local Developer Installation
231
Summary
232
Chapter 8: Customer Support Site
233
Using the Customer Support Site
233
Design of the Customer Support Site
235
The Business Layer
236
The ContentBase Class 236
The Product Class 237
The Download Class 239
The Faq Class
239
The Category Class
241
The Data Access Layer
241
The ProductDB Class 242
The DownloadDB Class 243
The FaqDB class 243
The CategoryDB class 243
The Data Model 244
Stored Procedures and User-Defined Functions 247
Helper Classes
247
Code and Code Explanation
248
Root Files
248
Web.config 248
Global.asax 248
Default.aspx 248
Master Pages 249
Other Files and Folders 250
The Product Locator
251
The Downloads List
256
Searching Frequently Asked Questions
262
The Customer Support Site CMS
268
Categories.aspx 268
The List Pages 268
The Create and Update Pages 269
Setting up the Customer Support Site
269
Using the Installer
269
Manual Installation
270
Using the Customer Support Site
270
Summary
271
Chapter 9: Wrox WebShop
273
Using the WebShop
273
Navigating the WebShop
274
Maintaining the WebShop Product Catalog
276
Design of the WebShop
277
The Business Layer
277
Product 277
OrderedProduct 279
ShoppingCart 280
ShopManager 281
Customer 283
The Data Access Layer
284
The Data Model 284
ShopManagerDB 287
Helper Classes
288
Code and Code Explanation
289
Root Files
289
Global.asax 289
Web.config 289
MasterPage.master 291
Default.aspx 292
Login.aspx 292
The Shop Folder
293
Displaying Products 294
Adding a Product to the Cart 296
The ShoppingCart.aspx Page 297
Changing Items in the Cart 298
Finalizing Orders 301
The Management Folder
306
Setting up the WebShop
307
Using the Installer
307
Manual Installation
307
Modifying Security Settings
307
Changing E-mail Settings
309
Managing Products
309
Summary
309
Chapter 10: Appointment Booking System
311
Using the Appointment Booking System
311
Maintaining the Appointment Booking System
312
Making Appointments with the Appointment Booking System
314
Creating an Account 314
The Availability Checker 314
The Appointment Wizard 315
Design of the Appointment Booking System
316
The Business Layer
316
BookingObject 316
BookingObjectManager 317
Appointment 318
AppointmentManager 320
Weekdays 321
The Data Access Layer
322
BookingObjectManagerDB 322
AppointmentManagerDB 322
The Data Model 323
Helper Classes
324
AppConfiguration 324
Helpers 325
Code and Code Explanation
325
Web.config 325
Global.asax 326
Master Pages 326
Other Files and Folders 326
The Availability Checker
327
The Appointment Wizard
334
The Sign Up Page
340
The Management Section
342
Saving Configuration Information 342
Managing Booking Objects 344
Viewing Appointments 345
Setting up the Appointment Booking System
349
Using the Installer
349
Manual Installation
349
Configuring the Application
350
Summary
350
Chapter 11: Greeting Cards
351
Creating Your Own Greeting Card
352
Design of the Greeting Cards Application
355
The Toolkit
356
The Imaging Class 356
The UploadHandler Class 358
Helper Classes
361
The FileHandlingEventArgs Class 361
AppConfiguration 361
Code and Code Explanation
362
The Host Page
362
Uploading and Resizing Images
366
Uploading Files 367
Resizing Images 369
Rotating and Flipping Images
372
Cropping Images
374
Adding Text to Images
379
Sending E-Mail with Embedded Images
384
Setting up the Greeting Card Application
386
Using the Installer
387
Manual Installation
387
Configuring the Application
387
Configuring Security Settings 387
Configuring the Mail Server 389
Chapter 12: The Bug Base
391
Using the Bug Base
392
Design of the Bug Base
396
The Business Layer
397
Bug 397
BugManager 399
BugComparer 400
CommentManager 400
ListManager 400
MemberManager 402
NameValue 402
SearchCriteria 402
The Data Access Layer
403
BugManagerDB 407
CommentManagerDB 408
ListManagerDB 409
MemberManagerDB 410
Code and Code Explanation
410
Root Files
410
Web.config 410
MasterPage.master 412
Global.asax 413
Web.sitemap 413
Filing a Bug
413
Searching and Viewing Bugs
423
Other Files and Folders
433
Setting up the Bug Base
435
Using the Installer
435
Manual Installation
435
Browsing to the Bug Base
436
Summary
436
Introduction
For all of the programmers out there who just love a good .NET book to get them up and running fast in a new technology, you are in luck. ASP.NET 2.0 Instant Results is the perfect fast-track book for the pro-grammer or architect to pick up on the new features and tools available in the 2.0 version of ASP.NET. Sure, you could read a traditional book, and spend countless hours guessing what you really have to do in order to get the software to work properly—or you could simply use the materials in the following chapters to understand and test the example projects provided in a short amount of time.
Some of the compelling reasons to produce this book are tied to the incredible reviews about the 2.0 version of the .NET Framework, along with the development advancements seen within the Visual Studio 2005 environment. ASP.NET 2.0 is a hot technology, poised for rapid adoption and growth compared to the 1.1 version, thanks to some exciting features that focus on providing web developers with the tools they need for the majority of their development projects. These must-haves include the new login controls, which enable developers to quickly drag and drop a set of controls on the design surface, set a few properties, and have a near-instantaneous security system. Another new feature is the enhancements to the design-time user interfaces for binding data controls. A wizard-like aspect surrounds most of the controls, which are in fact very easy to operate. Other exciting controls exist, but they are not the end of the story. A vast amount of changes has been planted within ASP.NET 2.0, involving the architecture of sites, speed of page requests, management of stateful information, and efficiency of development overall. Sound too good to be true? Well, if you are taking on ASP.NET 2.0, your programming effort just got a whole lot easier.
Who This Book Is For
This book is ideal for any programmer with .NET experience to learn the new technology. Anyone who has experimented with .NET 1.1 or implemented full-scale solutions for their employers would be a per-fect candidate to easily absorb all of the materials within this book. You should have some general understanding of how a basic database works, with experience in developing software to access a database object such as a stored procedure.
For a beginner, you may want to skip over to Chapter 7. This chapter is very lightweight in design, aimed at providing a simplistic approach to a very common web site style. That is, the family photo album web site. This chapter explains the basic concepts of sharing photos within a web site and adding and deleting photos. It would be a great way to catch the basic concepts early on, before diving into more complicated site designs and concepts within the book.
What This Book Covers
The book contains a dozen projects you can use right off the disk with minimal setup needed. Each pro-ject has step-by-step instructions on installing the source code to your local machine. The goal of the chapter and accompanying project code is to enable you to understand and quickly modify the project to enhance its capabilities or to learn how to implement some of the features it uses within different situa-tions. Through the repeated studying of simple project walkthroughs and hands-on experimentation, you learn more about the design and creation of full projects in the 2.0 version of ASP.NET. The book ref-erences some of the advancements since the older version 1.1, but not to any level of detail. Most of the logic and material is gauged toward explaining the deeper concepts within the 2.0 version in its entirety.
How This Book Is Str uctured
This book is designed in similar fashion to other Wrox Press Instant Results titles, in that it serves as more of a reference manual of usable and instructional source projects, as compared to a traditional end-to-end book. This is because most programmers do not need to absorb all of the available information on a particular subject in a traditional fashion. Many times, programmers are looking to find the answers within the code, and then read content or material on it as an afterthought. This book aims to satisfy this tendency, but not at the expense of providing quality information and useful instruction at the same time. Thus, the topics and concepts that must be learned are taught from basic to advanced forms, across all of the 12 projects, with overlapping tools and features to drive home the concepts.
The structure of each chapter follows the following general pattern:
❑ Overview—What does this project do?
❑ Design
❑ Code and code explanation
❑ Setting up the project
Each project is designed with reusable controls, class files, and/or modules. Classes and noteworthy project files are highlighted and analyzed with sufficient information in each chapter to make the research effort as easy as possible.
The chapters of the book, and consequently the source projects used within the book, are as follows:
❑ Chapter 1: The Online Diary and Organizer
❑ Chapter 2: Wrox File Share ❑ Chapter 3: Wrox Chat Server
❑ Chapter 4: Wrox Survey Engine ❑ Chapter 5: Wrox CMS
❑ Chapter 6: Wrox Blog
❑ Chapter 7: Wrox Photo Album
❑ Chapter 9: Wrox WebShop
❑ Chapter 10: Appointment Booking System
❑ Chapter 11: Greeting Cards
❑ Chapter 12: The Bug Base
The easier chapters to pick up and learn might include Chapters 4, 7, and 9, whereas Chapters 3, 10, and 12 all provide advanced topics you will be sure to learn from.
At the end of your studies, you will be able to create your own site from scratch, implementing security, a structured architecture, profiles, new and more efficient data-bound controls, object-based data bind-ing, and many more features.
What You Need to Use This Book
The basic software needed to use this book includes Windows 2000 Professional or Windows XP Professional and an installation of Visual Web Developer Express Edition with SQL Server 2005 Express Edition. Visual Web Developer Express Edition is available from http://msdn.microsoft.com/vstudio/ express/vwd/. As an alternative to Visual Web Developer Express Edition, you can use one of the full versions of Visual Studio 2005, including the Standard and Professional editions. It is understood with the development tools mentioned that the .NET Framework version 2.0 is required to run the project samples as well.
Source Code
As you work through the examples in this book, you may choose either to type in all the code manually or to use the source code files that accompany the book. All of the source code used in this book is avail-able on the companion CD-ROM and for download at www.wrox.com. Once at the site, simply locate the book’s title (either by using the Search box or by using one of the title lists) and click the Download Code link on the book’s detail page to obtain all the source code for the book.
Because many books have similar titles, you may find it easiest to search by ISBN; this book’s ISBN is 0-471-74951-6 (changing to 978-0-471-74951-6 as the new industry-wide 13-digit ISBN numbering system is phased in by January 2007).
Once you download the code, just decompress it with your favorite compression tool. Alternatively, you can go to the main Wrox code download page at www.wrox.com/dynamic/books/download.aspxto see the code available for this book and all other Wrox books.
Errata
reader hours of frustration and at the same time you will be helping us provide even higher quality information.
To find the errata page for this book, go to www.wrox.comand locate the title using the Search box or one of the title lists. Then, on the book details page, click the Book Errata link. On this page you can view all errata that has been submitted for this book and posted by Wrox editors. A complete book list includ-ing links to each book’s errata is also available at www.wrox.com/misc-pages/booklist.shtml. If you don’t spot “your” error on the Book Errata page, go to www.wrox.com/contact/techsupport .shtmland complete the form there to send us the error you have found. We’ll check the information and, if appropriate, post a message to the book’s errata page and fix the problem in subsequent editions of the book.
p2p.wrox.com
For author and peer discussion, join the P2P forums at p2p.wrox.com. The forums are a Web-based system for you to post messages relating to Wrox books and related technologies and interact with other readers and technology users. The forums offer a subscription feature to e-mail you topics of interest of your choosing when new posts are made to the forums. Wrox authors, editors, other industry experts, and your fellow readers are present on these forums.
At http://p2p.wrox.comyou will find a number of different forums that will help you not only as you read this book, but also as you develop your own applications. To join the forums, just follow these steps:
1.
Go to p2p.wrox.comand click the Register Now link.2.
Read the terms of use and click Agree.3.
Complete the required information to join as well as any optional information you wish to pro-vide and click Submit.4.
You will receive an e-mail with information describing how to verify your account and com-plete the joining process.You can read messages in the forums without joining P2P but in order to post your own messages, you must join.
Once you join, you can post new messages and respond to messages other users post. You’ll find this book’s own forum under the Books category that is available from the homepage or by clicking View All Forums on the menu on the left. You can read messages at any time on the Web. If you would like to have new messages from a particular forum e-mailed to you, click the Subscribe to this Forum icon by the forum name in the forum listing.
1
The Online Diar y
and Organizer
By the end of this chapter you’ll have created an online diary, organizer, and contacts manager. So what exactly does the online diary and organizer do? Using a calendar-based interface it allows you to add, delete, and edit a diary entry for any day. It also allows you to create events: for exam-ple, to keep a note of your rich Uncle Bob’s birthday — wouldn’t want to forget that, would you? It’s not just limited to birthdays, but any event: meetings, appointments, and so on.
The system has a basic username and password logon system, so that only you and no one else can view your own diary. This is what differentiates it from a blog. This system is a private diary and contacts manager — a place to put all those thoughts and comments you’d rather not have the world see. Unlike a blog, where you want the world to see it!
This whole project demonstrates the power of ASP.NET 2.0 and how easy it makes creating pro-jects like this. Gone are the days of hundreds of lines of code to do security logons, create new users, and so on. This chapter employs the new security components of ASP.NET 2.0 to show just how easy it is to create fun, exciting, and useful projects.
The first section takes you through using the diary and its main screens. Then, the “Design of the Online Diary” section walks you through an overview of the system’s design. After that you get into the nuts and bolts of the system and how it all hangs together. In the final section, you set up the diary.
Using the Online Diar y
Figure 1-1
Figure 1-2
This shows another of the new security controls in ASP.NET 2.0; creating a registration process is now just a matter of adding a control to a form!
[image:25.531.158.342.489.580.2]If you’ve forgotten your password, you can click the Forgotten Your Password? link, which directs you to the Password Reminder wizard pages (see Figure 1-3).
Figure 1-3
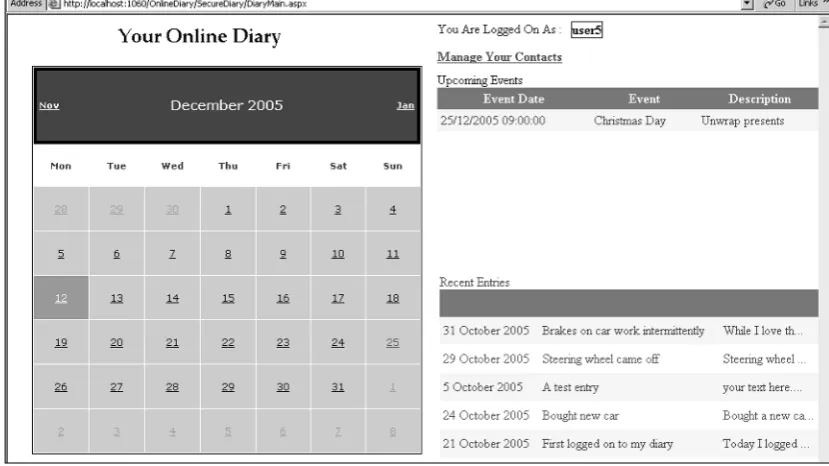
Figure 1-4
On this page you see a monthly calendar. Days with diary entries are marked with a blue background. Days with events are marked in red text. Notice also on the right that upcoming events are highlighted, as are recent diary entries.
[image:26.531.115.476.409.613.2]You can also navigate your diary from here via the small calendar to the right.
Adding a diary entry simply involves typing in the Entry Title and Diary Text boxes and clicking the Save Entry button.
[image:27.531.155.345.473.556.2]Events happening on a particular day are listed in the Events table at the bottom-left of Figure 1-5. You can edit and delete events, or click the Add New Event link to add a new event. The Edit and Add event pages are almost identical in look. An example of the Edit Event page is shown in Figure 1-6.
Figure 1-6
In the Edit Event page, you can set the event’s name, include a brief description, what time the event starts, and how long it lasts.
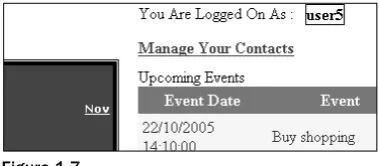
Returning to the main diary page (refer to Figure 1-4) you’ll see a Manage Your Contacts link, as shown in Figure 1-7.
Figure 1-7
Figure 1-8
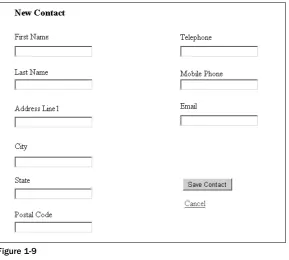
Here you see a list of your contacts, which you can edit and delete by clicking the appropriate link in the Contacts table. You can also add a new contact by clicking the Add New Contact link, which takes you to the New Contact page (no surprise there!), shown in Figure 1-9.
Figure 1-9
So you’ve seen what the Online Diary does, now you can look at how it does it! The next section describes the overall design and how the system hangs together. You get a high-level tour of the database setup and each of the classes the system uses.
Design of the Online Diar y
The diary system is split into the common three-layer architecture. All data and direct data modifying code are in the data layer, a combination of database tables and stored procedures. The data access layer is examined next.
Above the data access layer is the business layer providing all the rules and intelligence of the system. The business layer has been coded as seven classes, which you tour through shortly.
Finally, the bit the user sees is the presentation layer, consisting of a number of .aspx files that utilize the business and data access layers to create the diary’s interface. This layer is discussed in the last part of this section.
The Data Access Layer
The Online Diary uses a SQL Server 2005 Express database. However, there’s no reason why this couldn’t be changed to work with other databases. If the database supports stored procedures, then in theory all that’s needed is a change of connection string and creation of stored procedures matching those in the current SQL Server database. If the database doesn’t support stored procedures — for example, MS Access — changes to class code would be necessary but not difficult.
Figure 1-10 shows the tables in the Online Diary database (DiaryDB).
The default database created using the new membership features of ASP.NET 2.0 is also used. The database is a SQL Server Express database and not modified from the one created by Visual Studio Express. However, to link the log on and the diary details, the UserName field in the DiaryDB database takes its value originally from the membership database. You go through this in more detail shortly. Membership details are contained in the ASPNETDB database that Visual Web Developer Express cre-ates for you. Although it contains quite a few tables, you never access them via the code in this project. It’s accessed exclusively by the new Logincontrols — it does all the hard work behind the scenes! This project only makes use of the aspnet_Users table, shown in Figure 1-11, to provide log on security checking and provide a username for the main DiaryDB. You may well want to extend the membership database to include extra functionality such as personalizing the user experience or providing different levels of membership (admin, user, operator), among other things.
Figure 1-11
The tables of the main Online Diary database and their roles are listed in the following table:
Table Name Description
Diary Contains details of all Online Diary users, their DiaryId, and names. DiaryEntry Contains all the diary entries for all diary users.
DiaryEvent Contains all the diary events for all diary users. Contact Holds the details of all contacts for the diaries.
The key that links all of the tables together is the DiaryId field. It’s the primary key field in the Diary table and a foreign key field in all the other tables. Why not use the UserName field? Basically speed — it’s easier and therefore faster for the database to do joins and searches on an integer field than it is on character-based fields.
Consider this very simple stored procedure: DeleteContact
Rather unsurprisingly, DeleteContactdeletes a contact from the database. The naming convention means the purpose of each stored procedure doesn’t need a lot of explanation. As the code is discussed, you look at the stored procedures in more detail where necessary.
The Business Layer
The business layer is organized into seven classes. The four main classes are as follows:
❑ OnlineDiary
❑ DiaryEntry
❑ DiaryEvent
❑ Contact
These classes do most of the work of temporarily holding diary-related data and retrieving and storing it in the database. There are also three collection classes. The first order of business is the OnlineDiary class.
The OnlineDiary Class
This class contains only two shared public methods, detailed in the following table:
Method Return Type Description
InsertDiary(ByVal UserName As String, None Inserts a new diary user ByVal FirstName As String, ByVal into the OnlineDiary
LastName As String) database.
GetDiaryIdFromUserName(ByVal Integer Looks up the UserName
UserName As String) in the database and returns
the associated DiaryId.
The purpose of the OnlineDiaryclass is simply to provide a couple of handy shared methods relating to an online diary as a whole. It could also be used to expand the diary system and add new functional-ity that relates to the overall diary system, rather than a specific part such as contacts.
The Contact Class
It has two constructors, outlined in the following table:
Constructor Description
New(ByVal Diaryid as Integer) Creates a new Contactobject with all properties set to their default values.
New(ByVal ContactId As Long) Creates a new Contactobject with its properties retrieved from the database using the argument ContactId.
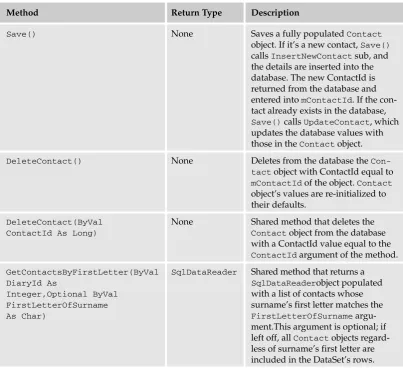
Having created a Contactobject, saving it involves simply calling the Save()method. The class will work out whether it’s a new contact that needs to be inserted into the database, or an existing one that needs to be updated. In addition to the Save()method, the Contactsclass contains two Delete() methods, as well as two GetContacts()methods, all of which are outlined in the following table:
Method Return Type Description
Save() None Saves a fully populated Contact
object. If it’s a new contact, Save() calls InsertNewContactsub, and the details are inserted into the database. The new ContactId is returned from the database and entered into mContactId. If the con-tact already exists in the database, Save()calls UpdateContact, which updates the database values with those in the Contactobject. DeleteContact() None Deletes from the database the
Con-tactobject with ContactId equal to mContactIdof the object. Contact object’s values are re-initialized to their defaults.
DeleteContact(ByVal None Shared method that deletes the
ContactId As Long) Contactobject from the database
with a ContactId value equal to the ContactIdargument of the method. GetContactsByFirstLetter(ByVal SqlDataReader Shared method that returns a
DiaryId As SqlDataReaderobject populated
Integer,Optional ByVal with a list of contacts whose FirstLetterOfSurname surname’s first letter matches the
As Char) FirstLetterOfSurname
[image:32.531.91.495.229.598.2]argu-ment.This argument is optional; if left off, all Contactobjects regard-less of surname’s first letter are included in the DataSet’s rows.
Method Return Type Description
GetContactsByFirstLetterAsCollection(ByVal SqlDataReader Shared method DiaryId As Integer, Optional ByVal that returns a
FirstLetterOfSurname As Char) ContactCollection
object populated withContactobjects whose surname’s first letter matches the FirstLetterOfSurname argument. This argument is optional; if left off, all Contactobjects regard-less of surname’s first letter are included in the DataSet’s rows.
Finally, the Contactclass contains the following properties:
Property Type Description
ContactId Long Each contact is represented by a unique ID. The ID is auto-generated by the Contact table in the database whenever a new contact is inserted.
FirstName String Contact’s first name. LastName String Contact’s surname. Email String Contact’s e-mail address. Telephone String Contact’s telephone number. MobilePhone String Contact’s mobile phone number.
AddressLine1 String Contact’s house name and street address. City String Contact’s city of residence.
State String Contact’s state.
PostalCode String Contact’s zip or postal code.
The ContactCollection Class
The ContactCollectionclass has only one property:
Property Type Description
Item(ByVal Index As Integer) Integer Returns the Contactobject stored at the position in index in the collection.
The ContactCollectionclass’s public methods are as follows:
Method Return Type Description
Add(ByVal NewContact As Contact) None Adds a Contactobject to the collection held by the ContactCollectionobject. Add(ByVal ContactId As Long) None Creates a new Contactobject.
ContactIdis passed to the Contactobject’s constructor to ensure it’s populated with the contact’s details from the database. The new Contact object is then added to the collection maintained by the ContactCollectionobject. Remove(ByVal Index as Integer) None Removes the Contactobject
from the collection at the speci-fied index.
That deals with the Contactclasses; now take a look at the two classes dealing with diary entries.
The DiaryEntry Class
The DiaryEntryclass objectifies a single entry in a diary. It encapsulates everything to do with diary entries, including creating, updating, and retrieving diary entry data. It handles all the database access for diary entries.
It has three constructors, outlined in the following table:
Constructor Description
New(ByVal DiaryId as Integer) Creates a new DiaryEntryobject with all properties set to their default values.
New(ByVal DiaryEntryId As Long) Creates a new DiaryEntryobject with its properties retrieved from the database using the argument DiaryEntryId.
New(ByVal DiaryId AS Integer, Creates a new DiaryEntryobject with its properties ByVal EntryDate As Date) retrieved from the database using the arguments
Having created a DiaryEntryobject, saving it involves simply calling the Save()method. As with the Save()method of the Contactsclass, the DiaryEntryclass will work out whether it’s a new diary entry that needs to be inserted into the database, or an existing entry that needs to be updated. As well as enabling retrieval of one diary entry’s details, the DiaryEntryclass provides additional methods for getting details of a number of diary entries as either a collection or as a DataSet by returning a
sqlDataReaderobject. The methods of this class are explained in the following table:
Method Return Type Description
Save() None Saves a fully populated
DiaryEntryobject. If it’s a new entry, Save()calls InsertNewDiaryEntry sub and the details are inserted in to the database. The new DiaryEntryIdis returned from the database and entered in to mDi-aryEntryId.
If the entry already exists in the database, Save() calls UpdateContact, which updates the
database values with those in the DiaryEntryobject. GetDaysInMonthWithEntries(ByVal Boolean Array Shared method that DiaryId As Integer, ByVal Month returns a Boolean As Integer, ByVal Year As
Integer) array detailing which days
have a diary entry associ-ated with them. The array index matches with the day of the month (1 is the first of the month, 2 the second, and so on). GetDiaryEntriesByDate(ByVal SqlDataReader Shared method
DiaryId As Integer, ByVal that returns a
FromDate As Date, ByVal ToDate SQLDataReaderobject
As Date) populated with rows from
Method Return Type Description
GetDiaryEntriesByDateAsCollection(ByVal DiaryEntryCollection Creates a new
DiaryId As Integer, ByVal FromDate DiaryEntry
As Date, ByVal ToDate As Date) Collection
object and populates it with DiaryEntry objects whose EntryDateis between the FromDateand ToDatearguments. GetDiaryEntriesRecentlyChanged(ByVal SqlDataReader Returns a
DiaryId As Integer) SqlDataReader
containing a DataSet of diary entries recently created.
In addition to the constructors and methods, the DiaryEntryclass contains the following properties:
Property Type Description
EntryTitle String Title for the day’s diary entry.
EntryText String Text of the day’s diary entry.
EntryDate Date Date the entry was posted.
The other class dealing with diary entries is the DiaryEntryCollectionclass, which is explained next.
The DiaryEntryCollection Class
The DiaryEntryCollectionclass inherits from the System.Collections.CollectionBaseclass. Its purpose is simply to store a collection of DiaryEntryobjects.
This class contains only one property, described in the following table:
Property Type Description
Item(ByVal Index As Integer Returns the DiaryEntryobject stored
Integer) at the specified position in index in the
Along with the Item()property, the DiaryEntryCollectionclass has three public methods:
Method Return Type Description
Add(ByVal New DiaryEntry None Adds a DiaryEntryobject to the collection
As DiaryEntry) held by the DiaryEntryCollection
object.
Add(ByVal DiaryEntryId None Creates a new DiaryEntryobject.
As Long) DiaryEntryIdis passed to the
DiaryEntryobject’s constructor to ensure it’s populated with the diary entry’s details from the database. The new DiaryEntry object is then added to the collection main-tained by the DiaryEntryCollection object.
Remove(ByVal Index as None Removes the DiaryEntryobject from the
Integer) collection at the specified index.
So far the classes dealing with contacts and diary entries have been discussed. The next section discusses the diary events.
The DiaryEvent Class
The DiaryEventclass objectifies a single entry in a diary. It encapsulates everything to do with diary entries, including creating, updating, and retrieving diary events data. It handles all the database access for diary events.
The DiaryEventclass has three constructors, outlined as follows:
Constructor Description
New(ByVal Diaryid as Integer) Creates a new DiaryEventobject with all properties set to their default values.
New(ByVal EntryId As Long) Creates a new DiaryEventobject with its properties retrieved from the database using the argument EventId. New(ByVal DiaryId AS Integer, Creates a new DiaryEventobject with its properties ByVal EventDate As Date) retrieved from the database using a combination of the
arguments DiaryIdand EventDate.
The following table explains these methods in detail:
Method Return Type Description
Save() None Saves a fully populated
DiaryEventobject. If it’s a new entry, Save()calls InsertNew DiaryEvent sub and the details are inserted into the data-base. The new EventId is returned from the database and entered in tomEventId. If the entry already exists in the database, Save()calls UpdateDiaryEvent, which updates the database values with those in the DiaryEvent object.
GetDaysInMonthWithEvents(ByVal Boolean Array Shared method that
DiaryId As Integer, ByVal returns a Boolean array
Month As Integer, ByVal Year detailing which days
As Integer) have events associated
with them. The array index matches with the day of the month (1 is the first of the month, 2 the second, and so on). GetDiaryEventsByDate(ByVal DiaryId SqlDataReader Shared method As Integer, ByVal FromDate As Date, that returns a
ByVal ToDate As Date) SqlDataReaderobject
populated with rows from the database detail-ing diary events between the FromDateand ToDatearguments. GetDiaryEventsByDateAsCollection(ByVal DiaryEventCollection Creates a new Diary DiaryId As Integer, ByVal FromDate As EventCollection
Date, ByVal ToDate As Date) object and populates it
Method Return Type Description
DeleteEvent() None Deletes from the database the
event with EventIdequal to mEventIdof the object. The DiaryEventobject’s values are re-initialized to their defaults. DeleteEvent(ByVal EventId As Long) None Shared method that deletes the
event from the database with an EventIdvalue equal to the EventIdargument of the method.
In addition to the constructors and public methods, the DiaryEventclass has these four properties:
Property Type Description
EventDescription String Description of the event. EventName String Short name for the event.
EventDate Date Date the event starts.
EventDuration Integer Length of time in minutes that the event lasts. One more class to go. The next section looks at the diary collection handling class:
DiaryEventCollection.
The DiaryEventCollection Class
The DiaryEventCollectionclass inherits from the System.Collections.CollectionBaseclass. Its purpose is simply to store a collection of DiaryEventobjects. The class employs the following methods:
Method Return Type Description
Add(ByVal NewDiaryEvent As None Adds a DiaryEventobject to the collection
DiaryEvent) held by the DiaryEventCollection
object.
Add(ByVal DiaryEventId None Creates a new DiaryEventobject.
As Long) DiaryEventIdis passed to the
DiaryEventobject’s constructor to ensure it’s populated with the event’s details from the database. The new DiaryEventobject is then added to the collection maintained by the DiaryEventCollectionobject. Remove(ByVal Index As None Removes the DiaryEventobject from the
This class contains only one property:
Property Type Description
Item(ByVal Index As Integer) Integer Returns the DiaryEventobject stored at the position in index in the collection.
That completes an overview of all the classes and their design, methods, and properties. The next section takes a more in-depth look at the code and the .aspx pages dealing with presentation.
Code and Code Explanation
This section digs into each of the important pages and shows you how they interact with each other, as well as how they use the classes in the business layer. This section doesn’t cover every single line of every page, but rather it takes a general overview of how the application works and dives a bit deeper where necessary.
Discussion of the project is approached in a functionality-based way. Instead of discussing a specific page and what it does, the following sections discuss a process — such as registration — and how it’s achieved.
It begins with an overview of the files and file structure.
File Structure
[image:40.531.233.359.393.603.2]An overview of the file structure is shown in Figure 1-12.
Each of the seven class files is stored in the App_Code directory (at the top of the figure). The App_Data directory contains the two databases: the login database (ASPNETDB.MDF) and the Online Diary database (DiaryDB.mdf). Pages that require you to log in before viewing are stored separately in the SecureDiary directory. Finally, the root directory contains login pages, registration pages, and password reminder pages; basically anything that requires you to be logged in to view.
Registration, Logging On, and Security
The Online Diary application uses the new Logincontrols to provide the diary’s user handing features, including new user registration, log in, and password reminder.
The Logincontrols are a real time saver, allowing a lot of sophisticated functionality to be added with just a little work and hardly any code! ASP.NET 2.0 has seven new security or login controls:
❑ Login: Enables users to log in and verifies username and password.
❑ LoginView: Enables the display of different templates depending on whether a user is logged in and also his or her role membership.
❑ PasswordRecovery: Provides password reminder functionality for users who forget their password.
❑ LoginStatus: Displays whether a user is logged in or out.
❑ LoginName: Displays currently logged-in username.
❑ CreateUserWizard: Creates a new user wizard — registration of a new user in simple steps.
❑ ChangePassword: Enables users to change their password.
The Online Diary project, however, use only the Login, LoginName, CreateUserWizard, and ChangePasswordcontrols.
Logging On
The SignOn.aspx page contains a Logincontrol. The user database is created using the web site admin-istration tools. This goes through the steps needed one by one, and once it’s finished a new database called ASPNETDB.MDF appears in the App_Data directory of the diary project.
The markup for the Logincontrol is shown here:
<asp:Login ID=”Login1” runat=”server” BackColor=”#F7F6F3” BorderColor=”#E6E2D8” BorderPadding=”4”
BorderStyle=”Solid” BorderWidth=”1px” CreateUserText=”Not registered? Click here to register now.”
CreateUserUrl=”~/RegisterStart.aspx”
DestinationPageUrl=”~/SecureDiary/DiaryMain.aspx” Font-Names=”Verdana” Font-Size=”0.8em” ForeColor=”#333333” Height=”197px” PasswordRecoveryText=”Forgotten your password?”
PasswordRecoveryUrl=”~/PasswordReminder.aspx” Style=”z-index: 100; left: 78px;
position: absolute; top: 55px” Width=”315px”>
Font-Names=”Verdana” Font-Size=”0.8em” ForeColor=”#284775” />
<TextBoxStyle Font-Size=”0.8em” />
<TitleTextStyle BackColor=”#5D7B9D” Bold=”True” Font-Size=”0.9em” ForeColor=”White” />
<InstructionTextStyle Font-Italic=”True” ForeColor=”Black” />
</asp:Login>
Important attributes to note are DestinationPageUrl, which determines where the user is navigated to if he or she enters a valid username and password. In the Online Diary project it’s the Diarymain.aspx page, the center of the Online Diary’s interface.
To enable new users to register, the CreateUserTexthas been set to a friendly “register here” message; the URL for registering is specified in CreateUserUrl.
Finally, just in case the user has already registered but forgotten his or her password, the PasswordRecoveryTextattribute displays a “Forgotten your password?” message and
PasswordRecoveryUrlsets the URL the users are navigated to if they need to find out their password. The only code you need to write is in the Logincontrol’s LoggedInevent, which fires if the user suc-cessfully enters a username and password:
Protected Sub Login1_LoggedIn(ByVal sender As Object, ByVal e As System.EventArgs) Handles Login1.LoggedIn
Dim DiaryId As Integer = GetDiaryIdFromUserName(Login1.UserName) Session(“DiaryId”) = DiaryId
End Sub
This uses the supplied username to look up the user’s DiaryIdin the Online Diary database. This is then stored in the session variable.
The SignOn.aspx page also allows new users to register.
New User Registration
The RegisterStart.aspx. page deals with the registration of a new user. As with SignOn.aspx, this page also uses one of the new Logincontrols, this time the CreateUserWizardcontrol. The markup for the CreateUserWizardcontrol is shown in the following code:
<asp:CreateUserWizard ID=”CreateUserWizard1” runat=”server” BackColor=”#F7F6F3” BorderColor=”#E6E2D8”
BorderStyle=”Solid” BorderWidth=”1px” Names=”Verdana” Font-Size=”0.8em”
Style=”z-index: 100; left: 66px; position: absolute; top: 43px” Height=”164px” Width=”300px” FinishDestinationPageUrl=”~/SignOn.aspx”>
<SideBarStyle BackColor=”#5D7B9D” BorderWidth=”0px” Font-Size=”0.9em” VerticalAlign=”Top” />
<NavigationButtonStyle BackColor=”#FFFBFF” BorderColor=”#CCCCCC” BorderStyle=”Solid”
BorderWidth=”1px” Font-Names=”Verdana” ForeColor=”#284775” /> <HeaderStyle BackColor=”#5D7B9D” BorderStyle=”Solid” Font-Bold=”True” Font-Size=”0.9em”
ForeColor=”White” HorizontalAlign=”Left” />
<CreateUserButtonStyle BackColor=”#FFFBFF” BorderColor=”#CCCCCC” BorderStyle=”Solid”
BorderWidth=”1px” Font-Names=”Verdana” ForeColor=”#284775” /> <ContinueButtonStyle BackColor=”#FFFBFF” BorderColor=”#CCCCCC” BorderStyle=”Solid”
BorderWidth=”1px” Font-Names=”Verdana” ForeColor=”#284775” /> <StepStyle BorderWidth=”0px” />
<TitleTextStyle BackColor=”#5D7B9D” Font-Bold=”True” ForeColor=”White” />
<WizardSteps>
<asp:CreateUserWizardStep runat=”server”> </asp:CreateUserWizardStep>
<asp:WizardStep ID=”personalDetailsStep” runat=”server” Title=”User Details”>
<table border=”0” style=”font-size: 100%; font-family: Verdana; z-index: 100; left: 0px; position: absolute; top: 0px;”>
<tr>
<td align=”center” colspan=”2” style=”font-weight: bold; color: white; background-color: #5d7b9d”>
Your Personal Details</td> </tr>
<tr>
<td align=”right” style=”height: 26px”> <label for=”UserName”>
Your First Name:</label></td> <td style=”width: 179px; height: 26px”>
<asp:TextBox ID=”firstNameTextBox” runat=”server” CausesValidation=”True”></asp:TextBox> </td> </tr> <tr> <td align=”right”> <label for=”Password”>
Your Last Name:</label></td> <td style=”width: 179px”>
<asp:TextBox ID=”lastNameTextBox” runat=”server” CausesValidation=”True”></asp:TextBox>
</td> </tr> <tr>
<td align=”center” colspan=”2” style=”height: 18px”>
</td> </tr>
<tr>
<td align=”center” colspan=”2” style=”color: red”> </td>
</table> </asp:WizardStep>
<asp:CompleteWizardStep runat=”server”> <ContentTemplate>
<table border=”0” style=”font-size: 100%; width: 383px; font-family: Verdana; height: 164px”>
<tr>
<td align=”center” colspan=”2” style=”font-weight: bold; color: white; background-color: #5d7b9d”>
Complete</td> </tr>
<tr> <td>
Your account has been successfully created.</td>
</tr> <tr>
<td align=”right” colspan=”2”>
<asp:Button ID=”ContinueButton” runat=”server” BackColor=”#FFFBFF” BorderColor=”#CCCCCC”
BorderStyle=”Solid” BorderWidth=”1px” CausesValidation=”False” CommandName=”Continue”
Font-Names=”Verdana” ForeColor=”#284775” Text=”Continue” ValidationGroup=”CreateUserWizard1” />
</td> </tr> </table> </ContentTemplate> </asp:CompleteWizardStep> </WizardSteps>
</asp:CreateUserWizard>
Most of the markup and attributes relate to style settings. However, one essential attribute is the FinishDestinationPageUrl. This is where the user is taken once the registration process is com-pleted; in the Online Diary it’s the SignOn.aspx page.
You’ve probably noticed a number of WizardSteptags in the markup, such as this one:
<asp:WizardStep ID=”personalDetailsStep” runat=”server” Title=”User Details”>
The CreateUserWizardworks on a step-by-step basis. There must be least one step that allows the user to choose a username and password and various security questions (see Figure 1-13).
This step and its style can be modified, but Figure 1-13 shows its default value. The control takes care of inserting the new user data into the user database.
Figure 1-13
Figure 1-14
This screen asks users for their first name and last name. This time it’s up to you to store the data some-where, and you do that in the CreateUserWizardcontrol’s FinishButtonClickevent:
Protected Sub CreateUserWizard1_FinishButtonClick(ByVal sender As Object, ByVal e As System.Web.UI.WebControls.WizardNavigationEventArgs) Handles
CreateUserWizard1.FinishButtonClick Dim myTextBox As TextBox
Dim UserName, FirstName, LastName
myTextBox = CreateUserWizard1.FindControl(“firstNameTextBox”) FirstName = myTextBox.Text
myTextBox = CreateUserWizard1.FindControl(“lastNameTextBox”) LastName = myTextBox.Text
UserName = CreateUserWizard1.UserName
This step creates a new diary for users and stores their first and last names. The UserNamecomes from the CreateUserWizardcontrol’s UserNameproperty, and then uses the shared method InsertDiary() to insert the new user in the Online Diary’s database.
Being human, sometimes people forget their passwords. Fortunately, ASP.NET 2.0 comes with the capa-bility to refresh overloaded memories.
Password Reminder
Again with virtually no code, you can create a fully functional password reminder feature for the Online Diary, this time courtesy of the PasswordRecoverycontrol. Virtually all of its settings are at the default values or simply related to style. Even better, there’s just one line of code and that’s in the SendingMail event:
Protected Sub PasswordRecovery1_SendingMail(ByVal sender As Object, ByVal e As System.Web.UI.WebControls.MailMessageEventArgs) Handles
PasswordRecovery1.SendingMail
returnToLogOnHyperLink.Visible = True End Sub
The SendingMailevent fires when the user presses the Send Email button and simply displays the Return to Main Page link, rather than leaving the user guessing as to where to go next.
The main work involved is configuring the SMTP server settings that’ll be used to actually send the password reminder e-mail. Visual Web Developer doesn’t come with an SMTP server. However, if you are using Windows XP or 2000, all you need to do to install one is go to the Start➪Settings➪Control Panel➪Add or Remove Programs. From there, select Add/Remove Windows Components. Select the
Internet Information Server (IIS) option and click Details at the bottom-right of the dialog. In the result-ing dialog box, you’ll see a list. Check the box next to SMTP Service and click OK. Then click Next to install an SMTP service.
Once the SMTP service is installed, add the following shaded code between the <configuration>tags in the Web.config file:
<configuration xmlns=”http://schemas.microsoft.com/.NetConfiguration/v2.0”> <connectionStrings>
<add name=”DiaryDBConnectionString” connectionString=”Data
Source=.\SQLEXPRESS;AttachDbFilename=|DataDirectory|\DiaryDB.mdf;Integrated Security=True;User Instance=True”
providerName=”System.Data.SqlClient” /> </connectionStrings>
<system.web>
<roleManager enabled=”true” /> <authentication mode=”Forms”/>
<compilation debug=”true”/></system.web> <system.net>
<mailSettings>
<smtp from=”[email protected]”>
<network host=”localhost” password=”” userName=”” /> </smtp>
Viewing the Online Calendar
The DiaryMain.aspx page is the central hub of the application. It displays a calendar of the current month, showing which days have events or diary entries associated with them. It also displays a list of upcoming events and diary entries for the current month.
To display when a day has events or a diary entry, the OnDayRenderevent of the Calendarcontrol is used:
Protected Sub Calendar1_OnDayRender(ByVal sender As Object, ByVal e As System.Web.UI.WebControls.DayRenderEventArgs) Handles Calendar1.DayRender
If Not e.Day.IsOtherMonth Then
If entryArrayOfDays Is Nothing Then
entryArrayOfDays = GetDaysInMonthWithEntries(Session(“DiaryId”), e.Day.Date.Month, e.Day.Date.Year)
End If
If eventArrayOfDays Is Nothing Then
eventArrayOfDays = GetDaysInMonthWithEvents(Session(“DiaryId”), e.Day.Date.Month, e.Day.Date.Year)
End If
If entryArrayOfDays(CInt(e.Day.DayNumberText)) Then e.Cell.BackColor = Drawing.Color.Blue
End If
If eventArrayOfDays(CInt(e.Day.DayNumberText)) Then e.Cell.ForeColor = Drawing.Color.Red
End If
End If End Sub
The first Ifblock in the preceding event code deals with ensuring entryArrayOfDaysand
eventArrayOfDaysare populated with details of which days have an associated event or diary entry. They are both Boolean arrays; if a day has an event or entry, the array element for that day contains True. Arrays are populated by the DiaryEntyand DiaryEventclasses’ shared functions
GetDaysInMonthWithEntries()and GetDaysInMonthWithEvents().
In the second Ifblock of the event the code checks to see whether the day of the month being rendered has a diary event or diary entry. If there’s an event, the day’s text is set to red. If there’s a diary entry the day’s background is rendered in blue.