Take Your iPad
™
to Work
Australia • Brazil • Japan • Korea • Mexico • Singapore • Spain • United Kingdom • United States Course Technology PTR
be reproduced, transmitted, stored, or used in any form or by any means graphic, electronic, or mechanical, including but not limited to photocopying, recording, scan-ning, digitizing, taping, Web distribution, information networks, or information stor-age and retrieval systems, except as permitted under Section 107 or 108 of the 1976 United States Copyright Act, without the prior written permission of the publisher. Brian Proffitt
Publisher and General Manager, Course Technology PTR: Stacy L. Hiquet
Associate Director of Marketing: Sarah Panella
Manager of Editorial Services: Heather Talbot
Marketing Manager: Mark Hughes Acquisitions Editor: Mitzi Koontz Project and Copy Editor: Marta Justak
Technical Reviewer: Brown Partington Interior Layout Tech: Judy Littlefield
Cover Designer:Mike Tanamachi Indexer:Kelly Talbot
Proofreader:Kelly Talbot
Printed in the United States of America 1 2 3 4 5 6 7 12 11 10
For product information and technology assistance, contact us at Cengage Learning Customer & Sales Support, 1-800-354-9706
For permission to use material from this text or product, submit all requests online at cengage.com/permissions
Further permissions questions can be emailed to permissionrequest@cengage.com
iPad, iPhone, iPod, iPod Touch, iOS, and OS X are registered trademarks or trade-marks of Apple Inc. BlackBerry is a registered trademark of Research In Motion Limited. Droid is a registered trademark of LucasFilm Ltd. Android is a trademark of Google Inc. Linux is a trademark of Linus Torvalds. Microsoft, Windows, and Internet Explorer are either registered trademarks or trademarks of Microsoft Corporation in the United States and/or other countries. PalmPilot, Palm, and webOS are either registered trademarks or trademarks of Palm, Inc., a subsidiary of Hewlett-Packard Company. HP EliteBook is a trademark of the Hewlett-Packard Company. Dell Latitude is a trademark of Dell Inc. Wite-Out is a registered mark of the BIC Corporation. GTD and Getting Things Done are registered trade-marks of David Allen and Co. Kindle is a trademark of Amazon Technologies, Inc. All other trademarks are the property of their respective owners.
All images © Cengage Learning unless otherwise noted. Library of Congress Control Number: 2010936613 ISBN-10: 1-4354-5899-0
ISBN-13: 978-1-4354-5899-4
Course Technology, a part of Cengage Learning 20 Channel Center Street
Boston, MA 02210 USA
Cengage Learning is a leading provider of customized learning solutions with office locations around the globe, including Singapore, the United Kingdom, Australia, Mexico, Brazil, and Japan. Locate your local office at: international.cengage.com/region
Cengage Learning products are represented in Canada by Nelson Education, Ltd. For your lifelong learning solutions, visit courseptr.com Visit our corporate Web site at cengage.com
For Team Proffitt:
Five women who make life an adventure
Acknowledgments
I
am pretty sure this is my twentieth published book, and writing this part of the book is always my favorite thing to do. Not only is it the last thing I need to write before the book is done, but it also gives me a chance to give credit where credit very much is due.For as long as I have been writing professionally, having great editors has been the secret to success. Mitzi Koontz, Marta Justak, Brown Partington, and Kelly Talbot get thanks for taking my content and crafting it into something better.
Being a professional geek as well as a writer, it’s amazing to me that I have so many great women in my life. My wife, three daughters, and mother shape my daily life in ways that help me get books like these done. They really helped me through a slam-fest of work on this book and other projects that would not get finished at the same time. I cannot thank the women of Team Proffitt enough.
About the Author
B
rian Proffitt is a technology expert who blogs on ITworld.com on Open Source technology and Twitters as @TheTechScribe on a wide range of technology sectors. Currently, he is an adjunct instructor at the Mendoza College of Business at the University of Notre Dame. Formerly the Community Manager of the Linux Foundation, he has also been Managing Editor of Linux Today (linuxtoday.com), a news and information site about all things Linux and Open Source, as well as four other Linux Web sites for Jupitermedia Corp. He is the author of numer-ous books on computer technology, mostly on Linux, but with a Mac and Windows book thrown in just for variety. He is also the author of a student guide on Plato. A black belt in taekwondo and a private pilot, he enjoys spending time with his family in his home in northern Indiana.vii
Introduction . . . xv
Chapter 1 First Step: Introducing the iPad . . . 1
What Is the iPad?...2
The Business Case for the iPad ...4
Choosing the Right iPad...5
Getting an iPad ...7
Throwing in the Extras ...8
Setting Up the iPad...8
Conclusion...13
Chapter 2 Second Step: Interfacing with the iPad . . . 15
Touring the iPad Device ...16
Having the Right Touch...22
Keying in the Keyboard ...23
Moving Text Around ...26
Configuring the iPad ...27
Conclusion...34
Chapter 3 Third Step: Connecting with the iPad . . . 35
Connecting to iTunes...37
Auto and Manual Syncing ...37
Choosing What to Sync ...40
Restore the iPad ...41
Using the WiFi Connection ...42
Using the 3G Connection ...45
Troubleshooting Connectivity ...49
Conclusion...50
Chapter 4 Fourth Step: Using the iPad Apps . . . 51
Opening and Arranging Apps ...52
Acquiring Apps...56
Using the iTunes Application ...57
Using the App Store App...60
Updating Apps...64
Configuring Apps ...65
Removing Apps ...66
Conclusion...66
Chapter 5 Work the Web: Safari . . . 67
Navigating Web Sites ...69
Managing Bookmarks and History...72
Managing Multipage Browsing...76
Searching for Content...78
Customizing Your Browser ...79
Conclusion...80
Chapter 6 Get the Word Out: Mail . . . 81
Setting Up an Account...82
Receiving and Sending Email ...88
Organizing Mail...92
Conclusion...96
Chapter 7 Get to iWork: Documenting with Pages . . . 97
Creating a Pages Document ...98
Exploring the Pages Interface...103
Editing Documents ...105
Defining Words...108
Spell Checking Your Work ...109
Applying Styles ...109
Making Lists ...112
Working with Objects ...112
Configuring a Document ...116
Sharing Pages Documents ...118
Conclusion ...119
Chapter 8 Get to iWork: Analyzing with Numbers . . . 121
A Spreadsheet Primer ...122
Exploring the Numbers Interface ...124
Editing Spreadsheets ...127
Navigating Spreadsheets...127
Manipulating Content ...128
Working with Cell Content ...130
Creating Formulas ...132
Adding Charts...134
Building Input Forms ...135
Conclusion...136
Chapter 9 Get to iWork: Presenting with Keynote . . . 137
The Second Greatest Fear...138
Exploring the Keynote Interface ...139
Creating a Presentation...140
Editing Text...142
Handling Images...143
Adding Slides...145
Changing Slide Order ...145
Animating Transitions ...147
Presenting Your Ideas ...150
Conclusion...150
Chapter 10
From iPad to Paper: Printing . . . 151
Setting Up Printers ...152
Network Printers...153
WePrint for WiFi...156
WePrint for 3G/EDGE ...157
Printing ...158
Files...158
Email...161
Web Pages...162
Contacts ...162
Images...163
Clipboard ...164
File Sharing ...164
Network Sharing...164
Google Docs ...166
Conclusion...166
Chapter 11 In the Clouds: Using MobileMe . . . 167
Connecting to MobileMe...169
Synchronizing Across Multiple Devices ...172
Storing Files on iDisk...175
Securing Your iPad ...179
Conclusion...182
Chapter 12 Remote Desktop Connectivity: LogMeIn Ignition . . . 183
Exploring LogMeIn...184
Setting Up LogMeIn...185
Connecting with LogMeIn ...187
Working with LogMeIn...189
Chapter 13
Ring Me Up: Point of Sale . . . 193
Customizing Quick Sale...194
Integrating Credit Card Terminal ...197
Making a Retail Sale ...199
Reporting Sales...204
Managing Inventory ...206
Conclusion...208
Chapter 14 When the Work’s Done: Invoicing. . . 209
Creating an Invoice Template...210
Creating a Service Invoice ...214
Creating a Sales and Service Invoice ...215
Sending Invoices to Customers ...217
Conclusion...218
Chapter 15 Shout to the World: Social Media . . . 219
Making a Business Facebook Page ...221
Getting Friendly with Facebook...223
Setting Up a Twitter Account ...228
Managing Tweets with Twitterrific ...230
Conclusion...235
Chapter 16 Box It Up: Shipping . . . 237
Tracking Shipments...238
Tracking Vendor Shipments ...242
Notifying Customers of Shipping Status...242
Conclusion...243
Chapter 17 Face-to-Face, Face-to-Web: Meetings . . . 245
Connecting with WebEx...246
Participating in a WebEx Meeting...248
Whiteboarding with Air Sketch...252
Conclusion...256
Chapter 18
Write Online: Web Content Creation. . . 257
Connecting to a Blog...258
Posting a Blog Entry...261
Editing a Blog Entry...264
Conclusion...266
Chapter 19 Track Online: Web Site Management . . . 267
Connecting to Your Google Analytics Account...269
Interpreting the Analytics Data...272
Viewing Analytics Reports...274
Conclusion...274
Chapter 20 Make a List: Task Management . . . 275
Creating Tasks in Things ...276
Creating Projects ...281
Organizing Tasks ...283
Conclusion...285
Chapter 21 See the Big Picture: Project Management . . . 287
Creating Projects in SG Projects ...288
Building New Tasks ...291
Viewing Projects...294
Editing Projects ...296
Editing Tasks ...297
Conclusion...297
Chapter 22 Manage the Customer: CRM . . . 299
Adding Contacts ...300
Editing Contacts ...302
Working with Contacts ...303
Exporting Data ...306
Chapter 23
From the Home Office: Enterprise Collaboration . . . 309
Connecting to a SharePoint Site...310
Managing Events...314
Managing Items...315
Opening Documents ...316
Conclusion...317
Chapter 24 Get Ready to Go: Travel Arrangements. . . 319
Now Boarding: Kayak...320
Searching for a Flight ...321
Booking a Flight ...325
Finding a Hotel ...326
Getting a Rental Car ...328
In-Flight: Tracking Your Flight ...329
Conclusion...334
Chapter 25 On the Plane: Multimedia . . . 335
Getting Multimedia: iTunes...336
Multimedia Playback: iPod and Videos ...341
Internet Video: YouTube...344
Conclusion...346
Chapter 26 Continuing Education: iBooks . . . 347
Finding Your Reading Material ...348
Reading in iBooks ...352
Conclusion...354
Index. . . 355
Introduction
With the right applications, the iPad can become more than just a con-tent consumption device for videos, music, and electronic books. It can be a content production device as well—generating documents, spread-sheets, and presentations for the workplace.
This ability to produce content, given the right applications, immediately shifts the iPad into a useful business device. Businesses that depend on fast, accurate business processes can utilize the iPad to quickly supply data, invoice customers, and manage vendors from a reliable, highly mobile platform.
The potential business use cases for the iPad are limited only by your ingenuity:
◆ Restaurant owners can deploy iPads to wait staff to use as electronic devices to capture orders. The devices can, at the touch of an icon, double as colorful menus in any language the customer prefers. ◆ A traveling salesman can take orders, make presentations, and even
demonstrate aspects of the product via video, all with the same iPad. ◆ A roving food vendor can use the iPad to announce his or her current location, handle sales, and track inventory from the truck, even as hungry food fans descend.
These, of course, are just a few possible scenarios for using the iPad in a business setting. While a computer could handle just about all of these tasks, such a device would be inconvenient to carry around, whereas the iPad’s flat form greatly simplifies mobility.
Is the iPad right for every business situation? That’s what this book will explore. By demonstrating the many types of business apps available for the iPad, you should be able to make the case for using the iPad effectively in your place of business.
Is This Book for You?
Take Your iPad to Workis for anyone who wants to get started using the iPad in a professional environment. Think of this book as a personal tutorial, a one-on-one class with an expert user of the iPad. You get to stay in the comfort of your own home or office and learn how to do the following things:
◆ Familiarize yourself with the iPad controls and interfaces
◆ Connect to the Internet with the iPad using WiFi or a cellular connection ◆ Add apps and multimedia content to your iPad
◆ Communicate with colleagues via email
◆ Create documents, spreadsheets, and presentations ◆ Print documents from the iPad
◆ Connect to an online storage service ◆ Remotely control your PC from the iPad
◆ Use the iPad as a point-of-sale and inventory tracking tool ◆ Use the power of social media to connect to customers ◆ View online meetings with the iPad
◆ Manage your online blog sites
◆ Manage your professional tasks and projects
◆ Track customers with customer resource management tools ◆ Plug in to any SharePoint site
First Step:
Introducing the iPad
Chapter 1
◆
What Is the iPad?
◆
The Business Case for the iPad
◆
Choosing the Right iPad
◆
Getting an iPad
◆
Throwing in the Extras
◆
Setting Up the iPad
I
t is not the first device of its kind, but there is little doubt that the Apple iPad has revolutionized the consumer electronics market of the second decade of the 21stcentury.This may seem a grandiose statement, but the overwhelmingly positive consumer reaction (in the form of millions of units sold) to date demon-strates that there must be somethingto this shiny new device, beyond the hype generated by Apple, that’s making this device such a hot commodity.
Like many successful products, there’s a combination of things involved. Certainly marketing and sales timing helps. The iPad was introduced at a time when smartphones were just hitting their stride in terms of gen-eral consumer adoption. Prior to 2007, the expense and usefulness of smartphones placed these handheld devices right within the bailiwick of business workers.
But as the decade drew to a close, more and more “regular” folks were entering the smartphone market, discovering the advantages of instant-on, highly mobile Internet and processing access. What changed? Perhaps the most notable catalyst was the introduction of iPad’s ancestor, the original iPhone, in 2007.
With its sleek form factor, broad range of applications, and processing speed, the iPhone became a huge sales hit among consumers and business personnel alike. In that same year, Apple released what’s considered to be the true predecessor to the iPad: the iPod Touch, an iPhone-like device without an onboard phone that connected to the Internet via wireless access points (WiFi).
Today, the smartphone market is dominated by the iPhone, although other excellent smartphones exist, such as RIM’s stalwart BlackBerry product line and the various Droid phone models running multiple versions of Google’s Linux-based Android software. Even Microsoft has offerings in the smartphone market with its Windows Mobile 7 software, though right now those offerings are few and far between.
Faced with some stiff competition, Apple has continued to improve its iPhone product line, most recently with the release of the iPhone 4 model. But in 2010, Apple decided to raise the bar again, this time announc-ing a long-rumored tablet device scheduled for release in April 2010: the iPad.
What Is the iPad?
the screen was bigger, and the apps looked better, but other than that, what could such a device offer to consumers?
It turns out, plenty.
Perhaps the biggest draw to the iPad was the tablet form itself. In computer jargon, a tablet is any device that has a flat interface and a size that approximates a notebook tablet of paper. The size of the device is key: personal digital assistants (PDAs) such as the PalmPilot certainly have flat interfaces, but their hand-held size places them in a different category than tablets.
Other examples of tablet devices include the Dell Latitude XT2 or the HP EliteBook 2740p—both devices that have a touchscreen interface, though with a swiveled screen that allows users to quickly convert these computers to traditional laptop devices.
The iPad features no physical keyboard, and most applications don’t even require a pen-like stylus to function. Just use your fingers to enter text and manipulate objects onscreen. With such a simple interface, and because the device itself is much lighter than laptops, notebooks, and even the ultra-light netbooks, it is a large-screen device that is much more portable for business travelers and general consumers.
Besides being large enough to get work done, (and watch the occasional movie), the screen also features a multitouch interface, which is often a unique experience for many electronic device users. In the past, touch-screens on PDAs, smartphones, or even the occasional kiosk were primarily single-touch interfaces, meaning that one and only one touch at a time was registered by the application running on the screen. Beginning with the iPhone, and now continuing with the iPad, there is a multitouch interface, which allows users to touch and manipulate objects on the screen with more than one finger (or device) at a time. This interface enables users to shrink objects by “pinching” them or expand object by fanning out their fingers. Or they can type capital letters onscreen by virtually holding down the Shift key.
Applications are the biggest key to iPad’s success, if only by sheer numbers alone. Thousands of applications are available in the Apple App Store, free or otherwise, with a high percentage of them reviewed by other users. This social review system lets you find out quickly what’s really going to work, and what may not. More than that, the stunning variety of apps available makes the iPad highly suitable for any number of use cases.
The Business Case for the iPad
With the right applications, the iPad can become more than just a content consumption device for videos, music, and electronic books. It can be a content production device as well, generating documents, spreadsheets, presentations, music, and video.
This ability to produce content, given the right applications, immediately shifts the iPad into a useful business device. Businesses who depend on fast, accurate business processes can utilize the iPad to quickly supply data, invoice customers, and manage vendors from a reliable, highly mobile platform.
The potential business use cases for the iPad are limited only by your ingenuity:
◆ Restaurant owners can give iPads to waitstaff to use as electronic devices to capture orders. The devices can, at the touch of an icon, double as colorful menus in any language the customer prefers. ◆ A traveling salesman can take orders, make presentations, and even
demonstrate aspects of the product via video, all with the same iPad. ◆ A roving food vendor can use the iPad to announce his current location, handle sales, and track inventory from the truck, even as hungry food fans descend.
These, of course, are just a few possible scenarios to use in a business setting. While a computer could handle just about all of these tasks, such a device would be inconvenient to carry around (in the case of the wait-staff, nearly impossible!), while the iPad’s flat form greatly simplifies transport.
Is the iPad right for every situation? Potentially, it is, although the design of the device itself should make you think about deploying it in certain instances. For example, this device has a large amount of glass, so using it in an environment where it’s likely to be damaged is obviously not a good idea. Still, with the right accessory—namely, a good carrying case—even that problem can be mitigated.
Choosing the Right iPad
Before you buy an iPad, you need to figure out first which iPad you’re going to get. While all iPads may look alike, there are two key differ-ences found within all iPads that make it possible to choose between a total of six different iPad models.
The first choice point for iPad models is whether to get an iPad WiFi or an iPad WiFi+3G model. All iPads have the capability to connect to the Internet using wireless access—the kind found in your home or most public businesses, like the coffee shop on the corner. This is usually pretty adequate, particularly within your own business, which should have its own wireless network.
WiFi+3G models, on the other hand, can also tap into the AT&T cellular network and connect to the Internet anywhere the iPad can receive the AT&T network signal. WiFi+3G models uniformly cost $130 more than their WiFi-only counterparts, so using a WiFi-only device is a real cost saver.
The other differentiator across these two iPad product lines is the amount of solid-state storage each device has. The iPad is currently available with 16, 32, or 64 gigabyte. The price of each model is directly propor-tional to the amount of memory, as shown in Table 1.1.
Table 1.1 iPad Model Pricing (August 2010)
16GB 32GB 64GB
iPad (WiFi) $499 $599 $699
iPad (WiFi+3G) $629 $729 $829
The question of how much memory you need is one that plagues most iPad users. While you may understand in the abstract that 16 gigabytes equates to 16,000 megabytes, which in turn represents 16,000,000 kilo-bytes, you may not know how that equates to real-world terms. (Not to mention, you may need a hobby.)
Table 1.2 puts together some numbers from Apple that do a better job of relating how big this storage is.
5 Chapter 1 First Step: Introducing the iPad
Y
OURP
RICEM
AYV
ARYTable 1.2 iPad Storage Comparison
File (Average Size) 16 GB 32 GB 64 GB
Images (1.5 Mb) 10,922 21,844 43,688
Songs (5 Mb) 3,276 6,552 13,104
Movies (700 Mb) 23 46 92
TV Shows (325 Mb) 50 100 200
eBooks (1.2 Mb) 13,653 27,306 54,612
Documents (50 Kb) 335,544 671,088 1,342,176
Presentations (100 Kb) 167,722 335,544 671,088
Looking at Table 1.2, you might wonder why in the world you would ever need to store 1.3 million documents, and that certainly seems unlikely. But these sizes can give you a more practical idea of what kind of storage capacity we’re talking about.
From a business standpoint, you need to factor in how you will use the device. If you are going to be based in one central location, and plan to sync the device with a PC or Mac computer on a regular basis, then you will not need a lot of storage space. You can simply use your computer (and any storage device the computer has access to) to handle storing files. In such a case, it is recommended you stick with one of the 16GB models.
If, however, you plan to travel or otherwise be unable to sync on a regular basis, and will be handling a significant number of files, then consider purchasing one of the larger memory devices. It’s likely that 32GB’s worth of capacity is enough for most traveling use cases, unless you have an inordinate amount of multimedia files to carry around. One good way for you to pin this down is to look at all of the files you must have to do your job on the road, calculate the amount of memory those files need, and then triple that number. This calculation should account for the original files’ storage and the potential of creating twice as many files while out of the office.
As for the decision on WiFi-only versus WiFi+3G, here the recommenda-tion is not strictly along financial lines. It would be easy to say, for instance, that all stationary iPad users should be fine without plunking down an extra $130 for 3G cellular connectivity. You’ve got WiFi set up in your workplace, so why bother with 3G?
With these criteria in mind, you should be able to make an informed choice on getting the iPad you need.
Getting an iPad
If you are fortunate enough to live near one of the 229 U.S. Apple retail stores (as of this writing), purchasing that needed iPad should be a relatively painless process. Just walk in, pick out the one you want, and then take it home. To date, most U.S. Apple stores had caught up with the huge demand for these devices, and usually had them in stock. That’s not always the case, of course, so you may want to call ahead and see if the model you want is in-stock before driving in to purchase it. If you don’t reside near an Apple store, you have two basic options: purchase the iPad online or through Apple’s partner retailer, specifically, Best Buy.
The good news about either of these options is that the cost of the iPad, either online or at another retail store, is always the same. There’s no markup when you purchase the iPad somewhere other than an Apple store, and the online store will ship iPads free of charge, so there’s no additional costs there.
The bad news is, since most iPad buyers use the online option to get their device, the delivery channel is exceedingly slow. As of this writing, Apple indicated 7 to 10 business days to receive an iPad, and while this has been mostly true, anecdotal evidence has suggested otherwise; in some cases, shipping times of three weeks have been reported.
The option to go to Best Buy, if there’s one near you, is a little better, but not by much. You should definitely call ahead and see if there’s an iPad in stock. Be sure to specify which model—you don’t want to get there and find out they have models that don’t meet your technical or budgetary requirements.
7 Chapter 1 First Step: Introducing the iPad
W
HEN3G M
AYN
OTB
E AG
OODI
DEAIf you are not in a hurry to receive the iPad, ordering it online is definitely recommended. You’re working directly with Apple, and you won’t have to dodge and weave past other shoppers to get the exact device you want.
Throwing in the Extras
When you purchase the iPad, you may be tempted by all of the nifty-looking accessories you see around you in the actual or virtual store. You might be tempted to try one over the other, but here’s some recom-mendations based on business-use cases.
◆ Cases.Available from Apple and a number of third-party vendors, a case is essential for anyone planning to transport the iPad from one location to another. With a glass screen and a burnished metal exte-rior, the iPad could easily be damaged without some sort of protective covering. Not to mention that carrying the iPad in full view in some public locations is an invitation to theft.
◆ Apple iPad Camera Connection Kit. If you plan to connect any USB camera or SD flash drive to your iPad, then this accessory is essential. The ability to transfer photos, videos, or other files to your iPad without using an iTunes-equipped computer is a real time-saver. ◆ Apple iPad Dock.This is a great stand to park your iPad in an upright
position while you sync or charge the battery.
◆ A Bluetooth-capable wireless keyboard.Available from Apple and third-party vendors, a wireless keyboard is a very essential tool for iPad. You might be tempted to purchase the Apple iPad Keyboard Dock and just get all-in-one functionality. This is not recommended, because the Keyboard Dock means that your screen and keyboard are mated and any change in position between the two will be impossi-ble. Also, if you prefer a more ergonomic keyboard, the Keyboard Dock will be ill-suited for you. Better to get the Dock and a wireless keyboard separately.
Setting Up the iPad
When the big day comes and you bring that white box inside, you will be very tempted to turn the iPad on and start playing, er, working with it right away. Like all good things, you will need to put a little effort into your iPad before you can run it.
PCs with Windows should have Windows XP Home or Professional (Service Pack 3), Windows Vista, or Windows 7 installed. Macs should have OS X 10.5.8 or later. Both kinds of machines should have available USB 2.0 ports.
If you don’t have one already, you (or your business) should have an iTunes Store account. While many iPad applications are free, you may want to purchase some applications later, and it’s a good idea to get your account set up first.
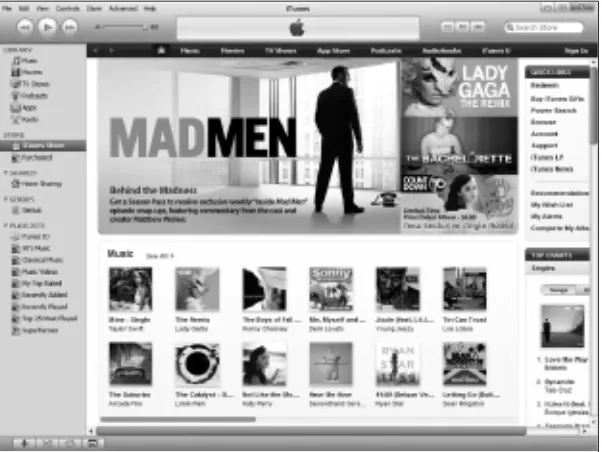
To set up iTunes and an iTunes store account, follow these steps: 1.Visit the iTunes Web page at www.apple.com/itunes/ (see Figure 1.1).
[image:26.453.36.344.223.453.2]9 Chapter 1 First Step: Introducing the iPad
Figure 1.1 The iTunes home page.
2. Click the Download iTunes link. The Download page will appear. 3. Confirm the operating system you are currently running and click
Download Now. The installation file will be downloaded and saved to your system.
4. Follow the normal installation procedures you use to install software on your operating system to install iTunes.
6. Click the Sign In link located in the upper-right corner. The account dialog box will open (see Figure 1.3).
Figure 1.2 The iTunes Store
[image:27.453.117.418.63.289.2]home page.
Figure 1.3 The account sign-in dialog box.
7. Click the Create New Account button. The Welcome page will appear.
11 Chapter 1 First Step: Introducing the iPad
Figure 1.4 The iTunes Store Account page.
10. Enter the pertinent information and click Continue. The Payment Method page will appear.
11. Enter your credit card or iTunes gift card information, then billing address, and click Continue. Your account will be created.
Once the iTunes account is created, you will now be able to set up your iPad. When you first press the Sleep/Wake button along the top edge of the device, you will see a graphic depicting a USB cord being “plugged into” an icon representing iTunes. This means exactly what it signifies: you need to plug the iPad into your computer using the provided 10W USB Power Adapter. Simply detach the power adapter from the USB end of the cord and plug it into an open USB port on your computer. Then plug the other end into the Dock Connector at the bottom of the iPad.
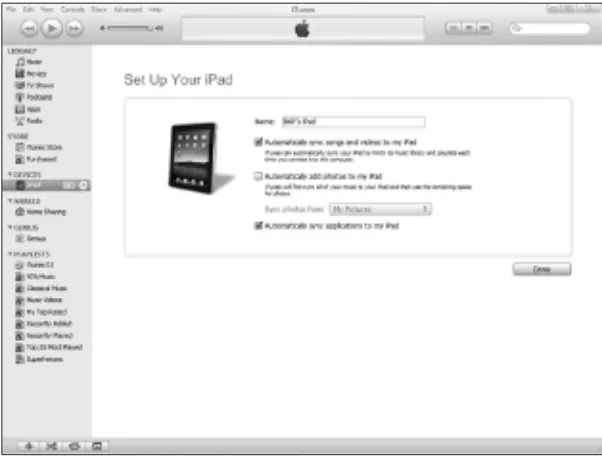
That’s all you need to do; your computer will automatically detect the iPad, start iTunes, and begin the Setup Assistant (see Figure 1.5).
1. Click the Set up as a new iPad option and then click Continue. The second page of the Setup Assistant will appear (see Figure 1.6). 2. Type a name for your iPad.
3. Confirm that the two Automatically sync options are checked. This will enable your iPad’s contents to be backed up on your PC or Mac. 4. Click Done. The iPad will be configured to your specifications and
Figure 1.5 The iPad Setup Assistant.
[image:29.453.115.416.318.547.2]13 Chapter 1 First Step: Introducing the iPad
It is important to note that this first synchronization between iPad and computer could take quite some time, particularly if you have any music or video files already in your iTunes library.
Conclusion
In this chapter, you learned about the origins of the iPad, and why it has become so influential. You also were presented with the pros and cons of purchasing a particular iPad model for your business, and why cheaper may not always be better. Finally, you learned how to set up iTunes, an iTunes Store Account, and the iPad itself.
Second Step:
Interfacing with the iPad
Chapter 2
L
ike most iPad customers, you were probably already aware of quite a few of the iPad’s capabilities. Apple’s massive marketing plan did a good job of highlighting the device so that by now most people know that the iPad is a touchscreen device, capable of connecting to the Internet and viewing a large variety of multimedia content.When you first get to use the iPad, you will find a sleek, simple device that doesn’t seem to belie that impression. A few buttons, a couple of switches—how hard can this be?
The simplicity is certainly there, but there’s also a lot more going on with the iPad than you’d think. In this chapter, you will explore the following: ◆ The controls of the iPad
◆ The right way to use the touchscreen ◆ The virtual iPad keyboard
◆ The tools to configure the iPad
Touring the iPad Device
[image:33.453.110.400.370.622.2]Take a look at the iPad. You hold in your hands a 9½ by 7½ inch, half-inch thick tablet with a grand total of four controls (not counting the screen itself, which is the iPad’s main control). As you can see in Figure 2.1, three of the controls are located near the “upper-right” corner of the iPad.
Figure 2.1 The iPad’s minimalist controls.
On/off, Sleep/wake
Screen rotation lock
The control you will use the most is the Home button, located on the front of the iPad, centered below the screen. Click the Home button, and you will be taken immediately back to the last home screen you used. The iPad can only use one application at a time, so the Home button is the only way to pause and close one application and move on to the next app. The On/off or Sleep/wake button is something you’ll also use often. Its dual name hints at its multifunction capability. If you simply press the button quickly, it will put the iPad to sleep, a very low-power state that will turn the screen off and prevent any other inputs until the Sleep/wake button or the Home button is pressed again.
The thing to remember about sleep mode is that, while the iPad appears to be powered down, it’s actually not. The device will be waiting quietly for you to pick it up and start working again, ready to pop on the instant you wake it up. To come back so quickly, the iPad is in a state of readiness that uses a little bit of power as time goes by. Very little, to be sure, but the drain on the batteries is real. Leave the iPad asleep for too long (over a day or so), and it’s possible you will find the batteries very weak or even drained when you come back to wake it up.
To prevent this unfortunate surprise, you can use the same button as an On/off control. To turn the iPad completely off, press and hold the On/off button for a few seconds. A red confirmation slide control will appear at the top of the window.
If you want to power down the device, drag the slide control to power off control to the right, and the iPad will shut down. If you hold the Sleep/wake button down too long by mistake, you can tap the Cancel button on the bottom of the screen.
Once the device is all the way off, pressing and holding the On/off button is the only way to start the power-on sequence. (This is to prevent any accidental bumps from turning the iPad back on and thus start draining the batteries.) It takes a few moments to cycle all the way back on, so don’t worry if it seems to take a while.
17 Chapter 2 Second Step: Interfacing with the iPad
W
HATI
SU
P? W
HATI
SD
OWN?
The Volume up/down control, located on the right side of the iPad, is pretty straightforward. Press the top of the control to turn the volume of the iPad’s speaker up, and press the bottom of the control to bring the volume down. This control is the master volume control for the iPad. Some applications, such as the iPod and Video apps, have their own on-screen volume controls that handle output volume just for those apps. This is something you should be aware of, as you might see sound amplitude differences as you use different apps.
The Screen rotation lock switch is just above the Volume up/down control. In the up, or off, position, the screen will rotate freely based on the orientation of the device. Flip the switch to the on position, and the orientation of the screen will stay right where it is, no matter how you hold the device. This is useful, should you be reading something and don’t want the contents of the screen to shift every time you move in your chair or set the iPad down.
There are other notable elements on the iPad about which you should know. Figure 2.2 displays the top and bottom of the iPad device, where these important features lie.
T
AKE AP
ICTUREThere’s a cool little undocumented feature you can use with the Home and Sleep/wake buttons. Hold the Home key down and then press the Sleep/wake button at the same time. The screen will flash, and you’ll hear the sound of a camera shutter. You’ve just taken a pic-ture of your iPad’s screen, which you will be able to view using the Photo app. In fact, all of the iPad pictures in this book were acquired using this method.
Figure 2.2 Other iPad hardware features. Headphone jack Microphone On/off,
We’ve already reviewed the Sleep/wake On/off button, so here’s more details about the other features:
◆ Headphone Jack.This is a standard 3.5-mm stereo headphone jack, to which you can plug in your favorite headphones.
◆ Microphone.This tiny hole is actually the microphone for the iPad. It does work well for everyday applications, but for higher-quality work, you may want to get a better microphone.
◆ Dock Port.This port is the primary way to connect the iPad to a PC or Mac, a power adapter, or to an iPad Dock or Keyboard Dock. ◆ Speaker.This is where the sound comes from if headphones are not
in use. Try not to cover this up, so you get better sound.
Now that we’ve looked at the other controls of the iPad, let’s examine the most important control: the iPad screen itself. Most of the work you will do and content you will view will be done on the screen, so it’s a good idea to get the lay of the land.
When you press the Sleep/wake or On/off button for the first time, you will initially see the Lock screen (shown in Figure 2.3). This screen will stay visible until you slide the Slide to Unlock control or about seven seconds have passed—in which case the iPad will go back to sleep.
19 Chapter 2 Second Step: Interfacing with the iPad
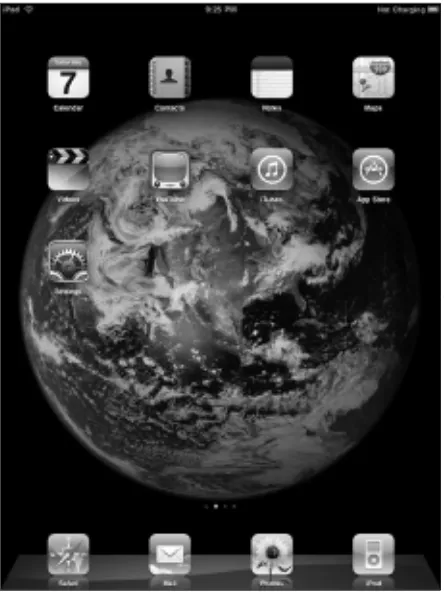
To slide the control, place your finger on the gray arrow button and drag your finger to the right. This will open the home screen, as shown in Figure 2.4.
Figure 2.4 The iPad home screen.
Connection
Status Clock Status Bar Battery Status
Apps
Home Screen Status
Favorite Apps
Here’s a rundown of the different components of the home screen: ◆ Status Bar.This area on the top of the screen is home to various status
messages the iPad or its apps may display.
◆ Connection Status.Displays the status of the WiFi connection the iPad is currently using. In 3G models, the connectivity to AT&T is also displayed.
21 Chapter 2 Second Step: Interfacing with the iPad
◆ Battery Status.Displays the strength of the current battery charge. Also displays when the battery is being charged.
◆ Apps.Icons that, when tapped, start the various applications that run on the iPad.
◆ Home Screen Status.Displays which home screen the iPad is cur-rently showing, and the number of available home screens. The iPad can accommodate up to 11 home screens.
◆ Favorite Apps.An area that houses your favorite apps. This area is displayed on all the home screens.
The look and feel of any of the home screens will remain the same, regardless of how many or how few apps are displayed. Each home screen can display 20 apps and the Favorites section can hold up to six applications, giving you the capacity to display 226 applications on the iPad. As you can see in Figure 2.5, the same components are visible when the iPad is in landscape mode.
Figure 2.5 The iPad home screen in landscape.
Having the Right Touch
Using an iPad is not like using a “typical” PC or Mac, where a mouse is used to move a cursor around a screen and clicking the mouse once or twice brings up menus, windows, and dialog boxes. No, the iPad has a different interface, but one that mirrors the now-familiar actions many people are used to on their computers.
The most useful gesture is the tap. Tapping once on the screen will start an app, “press” a button, type a letter, or select an option on a list. The results of the tap vary from application to application, but it is directly analogous to a single click of a mouse.
A related gesture is the double-tap, which can also perform useful actions. In Maps, for instance, a double-tap will zoom in on that area of the map.
Pinching the screen on a given spot can zoom out from that spot. This may not be intuitive when you read it, but try it (Maps is a good app), Figure 2.6
thus creating the zoom-out effect. The farther away your two fingers (or finger and thumb) are when starting the gesture, the more dramatic the “zoom.” To get the opposite effect, you can pinch out, which is how Apple refers to the motion of starting with two fingers together on the screen and moving them apart to zoom in. This is also referred to as “fanning,” since you can fan your fingers out to achieve the zoom. Panning, also known as dragging, is done by placing your finger on the screen and moving it around to display the area you want, or move an object or text around the screen. A related move is two-fingered dragging, which will scroll any window within a window.
Swiping, as you’ve seen in the previous section, is done by quickly press-ing and draggpress-ing a control across the screen. Swippress-ing is also how you can move from one home screen to another. Flicking is a similar gesture: if you have a long list of items to scroll through, flicking a finger across the screen will simulate a quick scroll with some inertia behind it. Some objects, particularly in iWorks applications, will contain objects that can be rotated. A special two-fingered move known as rotating will handle this. The best way to describe it is like grabbing an imaginary radio knob and twisting your fingers in opposite directions to rotate the object. Finally, some applications will call for a long-press,also known as the “touch and hold.” This gesture is pretty self-explanatory, and can be done by pressing a part of the screen for over one second.
Keep in mind, not every application will use every gesture. It varies from application to application. But these are the basic moves that will help you navigate the iPad when needed.
23 Chapter 2 Second Step: Interfacing with the iPad
B
USINESSG
ESTURESAll of the gestures that are unique to the iPad give the business applica-tions a common trait: many funcapplica-tions are done with an economical use of gestures and touches, with a minimum of data entry. You will see these traits recurring in many of the business applications in this book.
Keying in the Keyboard
Keyboards appear whenever the user taps a field or area of the screen where text needs to be entered or changed. Yes, it’s “keyboards,” plural, because as software, the keyboard can self-configure itself to meet the needs of the environment in which you are typing.
The keyboard in Figure 2.7, for instance, is the keyboard that displays when using the Pages app. But tapping on the URL field (where Web addresses are entered) in the Safari Web browser shows some key differences (shown in Figure 2.8).
Note the presence of the .com key, which is a nice shortcut for typing what falls at the end of most Web addresses. The Return key has been changed to Go, and common Web address punctuation has been added to the bottom row of keys.
Because each application developer may require a different set of com-mon keystrokes, the variations of keyboards are potentially limitless. And that’s just in English (more on that in a bit).
Figure 2.7 The iPad keyboard.
Backspace key
Hide Keyboard Spacebar
Numbers/punctuation (.?123) key
Shift key
25 Chapter 2 Second Step: Interfacing with the iPad
If you tap the symbols key, denoted as #+=, the symbols keyboard will appear (see Figure 2.10).
Figure 2.9 The numbers and punctuation keyboard.
Main Keyboard (ABC) key Symbols (#+=) key
Figure 2.10 The symbols keyboard.
To return to the main keyboard, tap the ABC key at any time. If you want to remove any keyboard from the screen, tap the hide keyboard key. The keyboard will be hidden until the next time you tap in a text-entry area. Typing with the iPad keyboard is just like typing with a regular key-board, but with some slick differences. For instance, if you find yourself typing a word that needs accented characters (such as résumé), then press and hold the “e” key and a pop-over menu containing several variations of the vowel will appear, with different accents and umlauts. Slide your finger to the correct variant (in this case, “é”), release the key, and the letter will appear in your text.
Not every key in a keyboard has these variant keys available, so you will need to explore. Two very useful variant keys include:
◆ Hold and slide the comma key to access an apostrophe without click-ing the .?123 key.
Another hold-and-slide trick, which will take a little practice, is to type a letter, then slide your finger over to the .?123 key, and without lifting your finger, slide to the number or punctuation mark you need and then let go. This will insert the character and return you right back to the ABC keyboard without having to tap the ABC key.
Moving Text Around
Most of us who have used computers are familiar with the word process-ing capabilities of our machines when it comes to creatprocess-ing documents. We even take these features for granted, especially the cut, copy, and paste text functions.
But in the iPad, the question immediately becomes, how to cut, copy, or paste text without a mouse? Or a Ctrl key?
[image:43.453.120.333.324.621.2]The answer is actually quite simple, and it’s just a few taps away. To cut or copy text, double-tap the word you want to edit. The word will be selected and an Edit menu will appear immediately above it (see Figure 2.11).
Tap Cut, and the word will immediately be removed from the document, but held in storage on the iPad’s “clipboard,” which is a temporary storage area for text and objects that have been cut or copied. If you tap Copy, the word will be stored on the clipboard, but not removed from the document.
Long-press the location in the document you want the cut or copied word to appear. The Edit menu will appear again. Tap Paste, and the cut or copied term will appear at the desired location.
Configuring the iPad
Now that you have a good idea of the layout of the iPad, it’s time to start customizing it to meet your personal needs. You can customize many things about the iPad, but for now we will focus on some of the more popular settings.
One of the first things users want to do is change the wallpaper on their iPad. While this seems trivial, let’s face it, we all want to give things our own identifier.
To change the wallpaper:
1. Tap the Settings icon on the home screen. The Settings split view app will open, as seen in Figure 2.12.
2. Tap the Brightness & Wallpaper setting. The Brightness & Wallpaper pane will open.
3. Tap the Wallpaper control. The Wallpaper pane will open (see Figure 2.13).
4. Tap the Wallpaper control again. A gallery of wallpaper options will appear.
27 Chapter 2 Second Step: Interfacing with the iPad
C
LIPBOARDF
UNCTIONALITYText or objects in the clipboard can be pasted indefinitely until another set of text or another object is cut or copied.
S
ELECTINGP
ARAGRAPHSFigure 2.12 The Settings app.
29 Chapter 2 Second Step: Interfacing with the iPad
5. Tap an option you like. The wallpaper will appear full size, with an Options bar on top. You can use this wallpaper for the Lock Screen, the Home Screen, or Set Both (see Figure 2.14).
6. Tap the option you prefer. The sample wallpaper will close, and the Settings app will appear.
7. Press the Home button. The new wallpaper will be visible (see Figure 2.15).
Users for whom English is not their native language will very likely want to make a more significant change—the addition of a keyboard more suited to their own language.
1. Tap the Settings icon on the home screen. The Settings split view app will open.
2. Tap the General settings. The General pane will open. 3. Tap the Keyboard option. The Keyboard pane will open.
4. Tap the International Keyboards option. The International Keyboard pane will open.
5. Tap Add New Keyboard. The Add New Keyboard pane will open. 6. Tap an option. The option will be added to the International
Keyboards pane.
To use an added keyboard, enter an app that uses a keyboard. Immediately, you will see a globe key in the keyboard (see Figure 2.16). This is the International Keyboard key.
[image:47.453.116.339.62.358.2]Figure 2.15 The new wallpaper.
31 Chapter 2 Second Step: Interfacing with the iPad
To activate the new keyboard, tap the globe icon to cycle through the available options. The name of the keyboard will appear in the spacebar as you type. Or long-press the globe icon to see an action menu of the available options (see Figure 2.17). Slide your finger to the desired International option and release. The keyboard will be set.
Figure 2.17 The International Keyboard options.
To remove an International Keyboard:
1. Tap the Settings icon on the home screen. The Settings split view app will open.
2. Tap the General settings. The General pane will open. 3. Tap the Keyboard option. The Keyboard pane will open.
4. Tap the International Keyboards option. The International Keyboard pane will open.
5. Tap the Edit key. The pane will appear in Edit mode.
6. Tap the red delete icon for the keyboard you want to remove. The Delete button will appear (see Figure 2.18).
7. Tap the Delete button. The option will be removed.
8. Tap Done. The International Keyboard pane will return to Display mode.
For English users, there are additional keyboard enhancements that you may want to explore.
1. Tap the Settings icon on the home screen. The Settings split view app will open.
3. Tap the Keyboard option. The Keyboard pane will open (see Figure 2.19), and the following options will be displayed.
◆ Auto-Correction. Displays suggested words from the iPad dictionary when iPad thinks you have made a spelling error. ◆ Auto-Capitalization.Capitalizes the first letter after the end of
a sentence.
◆ Enable Caps Lock.Lets you start Caps Lock typing by double-tapping the Shift key.
◆ “.” Shortcut.Double-tapping the spacebar will insert a period followed by a space.
4. Select the options you want to activate or deactivate by sliding the appropriate control.
[image:49.453.112.340.60.358.2]5. Press the Home button. The changes will be made. Figure 2.18
33 Chapter 2 Second Step: Interfacing with the iPad
Finally, you can specify one of three actions that can take place if you double-press the Home button. By default, double-pressing Home will return you to the first Home screen. But you can have the same action call up the Search page or start the iPad app—a popular choice for music lovers.
To change the Home button action:
1. Tap the Settings icon on the home screen. The Settings split view app will open.
2. Tap the General settings. The General pane will open. 3. Tap Home. The Home pane will open.
4. Tap the option you want to use.
[image:50.453.116.339.61.358.2]5. Press the Home button. The changes will be made.
Conclusion
In this chapter, you learned about the various hardware and software controls available on the iPad. You discovered the basic gestures needed to navigate the iPad interface and learned some handy shortcuts along the way.
Third Step:
Connecting with the iPad
Chapter 3
O
n its own as a stand-alone device, the iPad is an intuitive platform to view videos, listen to music, or edit documents. All you need to perform these and other tasks is the iPad itself and a connection to a local computer that will enable you to share files with the iPad.That’s all well and good, of course, but let’s face it—the real attraction to devices like the iPad is its ability to visit and view content on the Internet.
Apple’s approach to the Internet is different than that of other computer or mobile device companies. Since the opening of the Internet to the public in the early 1990s, the basic approach that software developers took to Internet software like browsers and email applications was this: show the user everything, and let them figure out what’s good.
In the last decade of the 20thcentury, that was not much of a problem,
since content on the Internet was scarce, and what content there was, was such a novelty, it could not help but be interesting. That didn’t last long. As PCs and Macs got better, and networks got faster, content shifted from static text and images to dynamic applications and multi-media experiences. The nature of the content grew much more diverse, ranging from the very good to the very ugly.
“Ugly” is not just a judgment on the taste or aesthetics of the content; it also means the content can be actively unsafe for you and your data. Viruses, Trojans, and other forms of computer malware can lie hidden on even the most reputable of Web sites, if they’ve been hacked. Apple, particularly with their iPhone and iPad devices, has decided to leave the one-window-on-the-Internet approach behind and shift to a more managed content approach. Safari, the traditional browser, is still available, of course, but other apps on the iPad (and iPhone) present Internet content in a very managed, “clean” environment.
You may or may not agree with this “walled garden” approach, but the good news is that you can opt to use this approach or surf the Internet traditionally with the Safari browser.
This approach means that how the iPad processes business data is also segmented into defined channels. Instead of one-size-fits-all applications that manage different types of data, iPad apps work well on smaller data sets and data types.
In this chapter, you will learn how to: ◆ Connect to and sync with iTunes ◆ Connect to the Internet with WiFi ◆ Connect to the Internet via 3G service ◆ Troubleshoot Internet connectivity
Connecting to iTunes
Because of the connectivity the iPad has to the Internet, it is possible to use iTunes with the iPad just once in its operational life—at the very first con-figuration described in Chapter 1. Many people do this, since music, videos, and applications can all be purchased and downloaded “over the air.” You could make the case that for personal use only, this approach is fine. But from a business standpoint, it is very important that you connect to and synchronize your iPad with an iTunes computer on a regular basis. Even if you don’t download a lot of content, syncing with iTunes will give you the very important benefit of backing up all of your iPad’s data. As nice as the iPad is, the truth is that things can—and will—go wrong. Your iPad could be dropped. Or damaged. Or lost. Even less drastic prob-lems might happen—a poorly put-together app could freeze the iPad and the only way to stop the problem might be to restore the device back to its original factory state. When that happens, having a backup of your iPad’s data and settings is a great thing because you can direct iTunes to restore your data and put you right back where you were, with no loss of data. For this reason alone, it is strongly recommended that business users regularly sync the iPad with iTunes. Personal users should do so as well.
Auto and Manual Syncing
Synchronizing the iPad with iTunes is very simple, as demonstrated in Chapter 1: just plug one end of the USB/docking cable into the Dock port and the other end into the PC or Mac with iTunes installed. This will immediately start iTunes and begin the syncing process, as shown in Figure 3.1.
Depending on how long it’s been since you last synced your iPad, this operation could take anywhere from one to several minutes. As it’s sync-ing, your iPad will show a sync variation of the Lock screen, preventing you from working with the iPad until the sync process is completed. You can use the slide control to stop the synchronization, and most of the time this can be done with no ill effect. However, if you have a lot of data to back up, or you’re adding or removing a lot of data from the iPad, stopping in mid-sync is not recommended.
After the sync operation is complete, you can disconnect the iPad from the computer. If you leave it connected, you can use iTunes to configure the iPad and the synchronization process.
With the iPad still connected to your iTunes-equipped computer, click the name of the iPad in the Devices section. The iPad’s configuration pages will appear, as shown in Figure 3.2.
Figure 3.1
Syncing the iPad.
Figure 3.2
iTunes’ iPad pages.
Sync button
The tabs along the top of the iPad window will navigate to other pages that will let you configure various aspects of the iPad directly from within iTunes. Click the Info tab, for instance, and you will find a page that will enable you to configure MobileMe, Apple’s online storage service, as well as where the contacts, calendar, and email apps will collect their data (see Figure 3.3).
39 Chapter 3 Third Step: Connecting with the iPad
Figure 3.3
The iPad Info page.
If you make any changes to your iPad configuration anywhere in iTunes, then the Sync button in the iPad window will change to two buttons: Apply and Cancel (see Figure 3.4).
Figure 3.4
Apply your iPad setting changes.
Figure 3.5
The iPad Music page.
To manually sync the iPad with the new changes, click Apply.
To manually sync the iPad at any time, regardless of changes that may or may not have been made, simply click the Sync button in iTunes.
Choosing What to Sync
The iPad window not only lets you configure iPad and its apps (which will be more thoroughly reviewed in Chapter 4, “Fourth Step: Using the iPad Apps”), but it also synchronizes file types from the iTunes com-puter to the iPad. This is important, especially if you have a very large collection of music or video files. Even at a maximum of 64GB, the iPad may not have the capacity to hold your entire multimedia collection. Or, if it does, it may not leave you enough room for apps or other data. To demonstrate, let’s specify which music files will be moved to the iPad.
1. With the iPad still connected to your iTunes-equipped computer, click the name of the iPad in the Devices section. The iPad’s Configuration window will appear.
2. Click the Music tab. The iPad Music page will appear (see Figure 3.5).
3. Click the Selected playlists, artists, and genres option. The Options windows will appear, as shown in Figure 3.6.
4. In the Genres window, select the Blues option.
Restore the iPad
As mentioned earlier in this chapter, you can use iTunes to restore your iPad to either completely new factory settings (useful if you’re going to sell the iPad and want no personal or business data on the device) or to the last backup you made.
Care must be taken that you only perform a restore operation when absolutely needed. This is a last-ditch solution for resolving issues with the iPad, mainly because it can take a very long time to restore the iPad.
[image:58.453.121.365.62.430.2]41 Chapter 3 Third Step: Connecting with the iPad
Figure 3.6
Choose the music you want to sync.
Figure 3.7
Chasin’ those naughty blues.
M
IXINGY
OUR IP
ADM
USICFigure 3.8
Confirm that you want to restore the iPad.
D
ON
OTD
ISCONNECTDo not disconnect the iPad from the iTunes computer during restora-tion. An incomplete restoration could create more problems on your iPad.
Still, if all other options are exhausted, restoration can greatly help put your iPad to rights.
1. With the iPad still connected to your iTunes-equipped computer, click the name of the iPad in the Devices section. The iPad’s Configuration window will appear.
2. In the Summary tab, click Restore. A confirmation dialog box will appear (see Figure 3.8).
3. Click Restore. The confirmation dialog box will close, and the restoration process will begin.
4. Once the restoration process reaches the halfway point, you will be asked to restore the device to factory new settings or from your last backup. Click the From backup option and then click Restore. At the end of the lengthy restoration process, your iPad should be restored to its last backed-up state.
Using the WiFi Connection
In many Western nations, high-speed Internet access is provided by Internet Service Providers (ISPs), such as telephone, cable, or satellite companies. These large ISPs provide broadband Internet connectivity to business and home customers at relatively affordable rates, usually based on usage. Most of these broadband consumers have wireless access by default, as the routers provided by the ISPs usually have connections for network cables (“wired”) to your computer(s) and802.11 wireless service. All wireless service in the 802.11 spectrum works something like this: a router in your business or home is connected to the ISP’s network (and from there out to the Internet). Your computers and other devices access-ing the Internet communicate to the router only, either through wired or wireless connections. This (if all is secure) hopefully means that your devices are protected from the pitfalls and malware of the Internet, since the router also acts as a firewall, keeping the “fire” of the Internet safely at bay.
If your router supports wireless, it will broadcast a radio signal at a range of about 100 yards in the clear or throughout a typical two-story home, depending on the composition of walls, layout, etc. The signal is identified by a unique label, known as the SSID.The SSID is the name of the router’s wireless network; think of it as the call letters of your favorite radio station. Knowing the SSID of your wireless network is important, although most of the time it will be pretty obvious what the SSID is.
That’s because when devices like laptops and the iPad detect a wireless network, the device’s software will also see the strength of the network and whether it’s an open or protected network. If you are using your iPad in your local coffee shop, for example, you may detect a few nearby wireless networks, but the strongest one has the SSID “Cup_O_Joe,” so it isn’t hard to tell in this case.
43 Chapter 3 Third Step: Connecting with the iPad
M
AKES
URE THATY
OUK
NOW THEN
ETWORKIf you are at all unsure what the right network is, do not connect to it— even if it looks right. The author was once in a major bookstore chain and noted the right SSID was accompanied by one that had a similar name, but not as strong and not protected. A little walking around found a teenager sitting in the stacks with his own router, trying to catch unsuspecting customers to log on to his network and thus have their data intercepted. If you’re not sure, ask the manager. If you are
For some networks, you may also need the key to the network. Public networks or some business networks will provide a completely open net-work for citizen or customer convenience. You might find the netnet-work to which you want to connect is protected (or locked) by a password, also known as a key.Before you can connect to the Internet through such a network, make sure that you have the key.
S
AFETYF
IRSTUnless you are on your own home or business wireless network, do not conduct any business or financial transactions on a wireless net-work—even if it’s protected. Radio signals can still be received by mali-cious individuals and potentially decrypted. Under no circumstances should you conduct any private business over an open network. Ever.
Once you have the SSID and key in hand, you can quickly connect the iPad to the Internet.
1. Tap the Settings app. The Settings screen will open.
[image:61.453.122.329.337.619.2]2. Tap the WiFi setting. The WiFi Networks pane will appear (see Figure 3.9).
Figure 3.9
45 Chapter 3 Third Step: Connecting with the iPad
[image:62.453.131.338.107.384.2]3. Tap the network you want to join. If the network is protected, the Enter Password form will appear (see Figure 3.10).
Figure 3.10
Protected networks will need a password.
4. Type the password and tap the Join key. If the password is entered correctly, the network will be joined, as indicated by the check mark next to the network name.
One great feature of the iPad is that it will remember networks as you join them. So once you join networks in various businesses and locations, the iPad will keep track of them and auto-join them when you return. Now that you’re connected to the wireless network, you can start to use any iPad application that uses Internet connectivity.
Using the 3G Connection
There are some caveats to keep in mind when deciding to use the 3G connection. First, cellular connections will never let you work as fast as a solid WiFi connection. If you never work away from WiFi, then don’t just activate the 3G for the sake of turning it on.
That said, the very nice thing about using the iPad’s 3G connection is that it’s strictly pay as you go—no contracts needed. You sign up for the service, and you’re set for the next 30 days. At the end of the 30 days, the plan will automatically renew, but you can cancel the plan at any time. In the U.S., 3G is provided by AT&T, and comes in one of two plans: ◆ 250MB for 30 days: U.S. $14.99
◆ 2GB for 30 days: U.S. $25
If you sign up for the 250MB plan and end up transmitting more data over the network than you planned, you will be asked to upgrade to the 2GB option. If you use 2GB up before the end of 30 days, you will have the opportunity to purchase one of the plans again for another 30-day period. AT&T plans include unlimited WiFi at all AT&T hotspots. Canadian residents have similar plans in place through Rogers: ◆ 250MB for 30 days: C $15
◆ 5GB for 30 days: C $35
UK residents have a choice of three carriers for their 3G plans, as listed in Table 3.1.
Table 3.1 UK Resident iPad 3G Plans
Carrier Plan
O2 500MB at £2/day
1GB for 30 days: £10 3GB for 30 days: £15
Orange 5p per MB for 30 days (capped at £40) 200MB at £2/day
1GB at £7.50/day 3GB for 30 days: £15 10GB for 30 days: £25
Vodafone 1GB for 30 days: £10
Unlimited for 30 days: £25 (fair use capped at 5GB)