Oracle
®
Linux
Security Guide for Release 6
Oracle
®
Linux: Security Guide for Release 6
Copyright © 2013, 2014, Oracle and/or its affiliates. All rights reserved.
Oracle and Java are registered trademarks of Oracle and/or its affiliates. Other names may be trademarks of their respective owners. Intel and Intel Xeon are trademarks or registered trademarks of Intel Corporation. All SPARC trademarks are used under license and are trademarks or registered trademarks of SPARC International, Inc. AMD, Opteron, the AMD logo, and the AMD Opteron logo are trademarks or registered trademarks of Advanced Micro Devices. UNIX is a registered trademark of The Open Group.
This software and related documentation are provided under a license agreement containing restrictions on use and disclosure and are protected by intellectual property laws. Except as expressly permitted in your license agreement or allowed by law, you may not use, copy, reproduce, translate, broadcast, modify, license, transmit, distribute, exhibit, perform, publish, or display any part, in any form, or by any means. Reverse engineering, disassembly, or decompilation of this software, unless required by law for interoperability, is prohibited.
The information contained herein is subject to change without notice and is not warranted to be error-free. If you find any errors, please report them to us in writing.
If this is software or related documentation that is delivered to the U.S. Government or anyone licensing it on behalf of the U.S. Government, the following notice is applicable:
U.S. GOVERNMENT END USERS: Oracle programs, including any operating system, integrated software, any programs installed on the hardware, and/or documentation, delivered to U.S. Government end users are "commercial computer software" pursuant to the applicable Federal Acquisition Regulation and agency-specific supplemental regulations. As such, use, duplication, disclosure, modification, and adaptation of the programs, including any operating system, integrated software, any programs installed on the hardware, and/or documentation, shall be subject to license terms and license restrictions applicable to the programs. No other rights are granted to the U.S. Government.
This software or hardware is developed for general use in a variety of information management applications. It is not developed or intended for use in any inherently dangerous applications, including applications that may create a risk of personal injury. If you use this software or hardware in dangerous applications, then you shall be responsible to take all appropriate fail-safe, backup, redundancy, and other measures to ensure its safe use. Oracle Corporation and its affiliates disclaim any liability for any damages caused by use of this software or hardware in dangerous applications.
This software or hardware and documentation may provide access to or information on content, products, and services from third parties. Oracle Corporation and its affiliates are not responsible for and expressly disclaim all warranties of any kind with respect to third-party content, products, and services. Oracle Corporation and its affiliates will not be responsible for any loss, costs, or damages incurred due to your access to or use of third-party content, products, or services.
Oracle Virtual Desktop Client software is an included component of Oracle's Sun Ray Software and Oracle Virtual Desktop Infrastructure software products that must be separately downloaded from Oracle Software Delivery Cloud (https://edelivery.oracle.com). Use of Oracle Virtual Desktop Client is subject to the Oracle software license agreement provided with and/or applying to Sun Ray Software and Oracle Virtual Desktop Infrastructure.
Abstract
This manual provides security guidelines for the Oracle Linux 6 operating system.
Table of Contents
Preface ... v
1 Oracle Linux Security Overview ... 1
1.1 Basic Security Considerations ... 1
1.1.1 Keep Software up to Date ... 1
1.1.2 Restrict Network Access to Critical Services ... 1
1.1.3 Follow the Principle of Least Privilege ... 1
1.1.4 Monitor System Activity ... 2
1.1.5 Keep up to Date on the Latest Security Information ... 2
1.2 The Oracle Linux Security Model ... 2
1.3 Overview of Oracle Linux Security ... 2
1.4 Understanding the Oracle Linux Environment ... 3
1.5 Recommended Deployment Configurations ... 3
1.6 Component Security ... 4
1.7 References ... 4
2 Secure Installation and Configuration ... 7
2.1 Pre-Installation Tasks ... 7
2.2 Installing Oracle Linux ... 7
2.2.1 Shadow Passwords and Hashing Algorithms ... 8
2.2.2 Strong Passwords ... 8
2.2.3 Separate Disk Partitions ... 8
2.2.4 Encrypted Disk Partitions ... 8
2.2.5 Software Selection ... 9
2.2.6 Network Time Service ... 9
2.3 Post-Installation Tasks ... 9
3 Implementing Oracle Linux Security ... 11
3.1 Configuring and Using Data Encryption ... 11
3.2 Configuring a GRUB Password ... 12
3.3 Configuring and Using Certificate Management ... 13
3.3.1 About the openssl Command ... 14
3.3.2 About the keytool Command ... 16
3.4 Configuring and Using Authentication ... 17
3.4.1 About Local Oracle Linux Authentication ... 18
3.4.2 About IPA ... 18
3.4.3 About LDAP Authentication ... 19
3.4.4 About NIS Authentication ... 20
3.4.5 About Winbind Authentication ... 20
3.4.6 About Kerberos Authentication ... 21
3.5 Configuring and Using Pluggable Authentication Modules ... 22
3.6 Configuring and Using Access Control Lists ... 24
3.7 Configuring and Using SELinux ... 24
3.7.1 About SELinux Administration ... 26
3.7.2 About SELinux Modes ... 27
3.7.3 Setting SELinux Modes ... 27
3.7.4 About SELinux Policies ... 28
3.7.5 About SELinux Context ... 29
3.7.6 About SELinux Users ... 32
3.8 Configuring and Using Auditing ... 33
3.9 Configuring and Using System Logging ... 34
3.10 Configuring and Using Process Accounting ... 37
3.11 Configuring and Using Software Management ... 37
Oracle® Linux
3.11.2 Installing and Using the Yum Security Plugin ... 39
3.12 Configuring Access to Network Services ... 42
3.12.1 Configuring and Using Packet-filtering Firewalls ... 43
3.12.2 Configuring and Using TCP Wrappers ... 46
3.13 Configuring and Using Chroot Jails ... 47
3.13.1 Running DNS and FTP Services in a Chroot Jail ... 47
3.13.2 Creating a Chroot Jail ... 47
3.13.3 Using a Chroot Jail ... 48
3.14 Configuring and Using Linux Containers ... 48
3.15 Configuring and Using Kernel Security Mechanisms ... 49
3.15.1 Address Space Layout Randomization ... 49
3.15.2 Data Execution Prevention ... 49
3.15.3 Position Independent Executables ... 50
4 Security Considerations for Developers ... 51
4.1 Design Principles for Secure Coding ... 51
4.2 General Guidelines for Secure Coding ... 52
4.3 General Guidelines for Network Programs ... 53
5 Secure Deployment Checklist ... 55
5.1 Minimizing the Software Footprint ... 55
5.2 Configuring System Logging ... 56
5.3 Disabling Core Dumps ... 57
5.4 Minimizing Active Services ... 57
5.5 Locking Down Network Services ... 60
5.6 Configuring a Packet-filtering Firewall ... 61
5.7 Configuring TCP Wrappers ... 61
5.8 Configuring Kernel Parameters ... 61
5.9 Restricting Access to SSH Connections ... 62
5.10 Configuring File System Mounts, File Permissions, and File Ownerships ... 62
5.11 Checking User Accounts and Privileges ... 64
6 Enabling FIPS Mode for OpenSSL ... 67
6.1 About the FIPS 140-2 OpenSSL Library Modules ... 67
6.2 Configuring a System for FIPS Mode ... 67
Preface
The Oracle Linux Security Guide provides security guidelines for the Oracle Linux 6 operating system. The guide presents steps that you can take to harden an Oracle Linux system and the features that you can use to protect your data and applications. You can tailor the recommendations in the guide to suit your site security policy.
Audience
This document is intended for administrators who analyze security requirements, implement site security policy, install and configure the Oracle Linux operating system, and maintain system and network security. It is assumed that readers have a general knowledge of Linux administration, a good foundation in
software security, and knowledge of your organization's site security policy.
Document Organization
The document is organized as follows:
• Chapter 1, Oracle Linux Security Overview provides an overview of Oracle Linux security.
• Chapter 2, Secure Installation and Configuration outlines the planning process for a secure installation and describes how the choices that you make during installation affect system security.
• Chapter 3, Implementing Oracle Linux Security describes the various ways in which you can configure the security of an Oracle Linux system.
• Chapter 4, Security Considerations for Developers provides information for developers about how to create secure applications for Oracle Linux, and how to extend Oracle Linux to access external systems without compromising security.
• Chapter 5, Secure Deployment Checklist provide guidelines that help secure your Oracle Linux system.
• Chapter 6, Enabling FIPS Mode for OpenSSL describes how to make an Oracle Linux 6 system compliant with Federal Information Processing Standard (FIPS) Publication 140-2.
Documentation Accessibility
For information about Oracle's commitment to accessibility, visit the Oracle Accessibility Program website at http://www.oracle.com/pls/topic/lookup?ctx=acc&id=docacc.
Access to Oracle Support
Oracle customers have access to electronic support through My Oracle Support. For information, visit
http://www.oracle.com/pls/topic/lookup?ctx=acc&id=info or visit http://www.oracle.com/pls/topic/lookup? ctx=acc&id=trs if you are hearing impaired.
Related Documents
The documentation for this product is available at:
http://www.oracle.com/technetwork/server-storage/linux/documentation/index.html.
Conventions
Convention Meaning
boldface Boldface type indicates graphical user interface elements associated with an action, or terms defined in text or the glossary.
italic Italic type indicates book titles, emphasis, or placeholder variables for which you supply particular values.
monospace Monospace type indicates commands within a paragraph, URLs, code in
Chapter 1 Oracle Linux Security Overview
Table of Contents
1.1 Basic Security Considerations ... 1
1.1.1 Keep Software up to Date ... 1
1.1.2 Restrict Network Access to Critical Services ... 1
1.1.3 Follow the Principle of Least Privilege ... 1
1.1.4 Monitor System Activity ... 2
1.1.5 Keep up to Date on the Latest Security Information ... 2
1.2 The Oracle Linux Security Model ... 2
1.3 Overview of Oracle Linux Security ... 2
1.4 Understanding the Oracle Linux Environment ... 3
1.5 Recommended Deployment Configurations ... 3
1.6 Component Security ... 4
1.7 References ... 4
This chapter provides an overview of Oracle Linux security.
1.1 Basic Security Considerations
The following sections list the fundamental principles for using Oracle Linux securely.
1.1.1 Keep Software up to Date
One of the principles of good security practice is to keep all software versions and patches up to date. Throughout this document, we assume a maintenance level of Oracle Linux Release 6 or later.
For more information, see Section 3.11, “Configuring and Using Software Management”
1.1.2 Restrict Network Access to Critical Services
Keep both middle-tier applications and databases behind a firewall. In addition, place a firewall between middle-tier applications and databases if these are hosted on separate servers. The firewalls provide assurance that access to these systems is restricted to a known network route, which can be monitored and restricted, if necessary. As an alternative, a firewall router substitutes for multiple, independent firewalls.
If firewalls cannot be used, restrict access based upon IP address. Restricting database access by IP address often causes application client/server programs to fail for DHCP clients. To resolve this, consider using static IP addresses, a software/hardware VPN or Windows Terminal Services or its equivalent.
For more information, see Section 3.12, “Configuring Access to Network Services”.
1.1.3 Follow the Principle of Least Privilege
Monitor System Activity
For more information, see Section 5.11, “Checking User Accounts and Privileges”.
1.1.4 Monitor System Activity
System security stands on three legs: good security protocols, proper system configuration, and system monitoring. Auditing and reviewing audit records address the third requirement. Each component within a system has some degree of monitoring capability. Follow audit advice in this document and regularly monitor audit records.
For more information, see Section 3.8, “Configuring and Using Auditing”.
1.1.5 Keep up to Date on the Latest Security Information
Oracle continually improves its software and documentation. Check regularly on the Oracle Technology Network at http://www.oracle.com/technetwork/server-storage/linux for revisions. For information about common vulnerabilities and exposures (CVE) and errata that are available on the Unbreakable Linux Network, see http://linux.oracle.com/cve and http://linux.oracle.com/errata.
1.2 The Oracle Linux Security Model
Oracle Linux provides a complete security stack, from network firewall control to access control security policies, and is designed to be secure by default.
Traditional Linux security is based on a Discretionary Access Control (DAC) policy, which provides minimal protection from broken software or from malware that is running as a normal user or as root. The SELinux enhancement to the Linux kernel implements the Mandatory Access Control (MAC) policy, which allows you to define a security policy that provides granular permissions for all users, programs, processes, files, and devices. The kernel's access control decisions are based on all the security relevant information available, and not solely on the authenticated user identity. By default, SELinux is enabled when you install an Oracle Linux system.
For more information, see Section 3.7, “Configuring and Using SELinux”.
1.3 Overview of Oracle Linux Security
Oracle Linux has evolved into a secure enterprise-class operating system that can provide the performance, data integrity, and application uptime necessary for business-critical production environments.
Thousands of production systems at Oracle run Oracle Linux and numerous internal developers use it as their development platform. Oracle Linux is also at the heart of several Oracle engineered systems, including the Oracle Exadata Database Machine, Oracle Exalytics In-Memory Machine, Oracle Exalogic Elastic Cloud, and Oracle Database Appliance.
Oracle On Demand services, which deliver software as a service (SaaS) at a customer's site, via an Oracle data center, or at a partner site, use Oracle Linux at the foundation of their solution architectures. Backed by Oracle support, these mission-critical systems and deployments depend fundamentally on the built-in security and reliability features of the Oracle Linux operating system.
Understanding the Oracle Linux Environment
reviews posted Linux code extensively prior to its testing and release. The open-source Linux community has supplied many security improvements over time, including access control lists (ACLs), cryptographic libraries, and trusted utilities.
1.4 Understanding the Oracle Linux Environment
To better understand your security needs, ask yourself the following questions:
Which resources am I protecting?
Many resources in the production environment can be protected, including information in databases accessed by WebLogic Server and the availability, performance, applications, and the integrity of the Web site. Consider the resources you want to protect when deciding the level of security you must provide.
From whom am I protecting the resources?
For most Web sites, resources must be protected from everyone on the Internet. But should the Web site be protected from the employees on the intranet in your enterprise? Should your employees have access to all resources within the WebLogic Server environment? Should the system administrators have access to all WebLogic resources? Should the system administrators be able to access all data? You might consider giving access to highly confidential data or strategic resources to only a few well trusted system administrators. Perhaps it would be best to allow no system administrators access to the data or resources.
What will happen if the protections on strategic resources fail?
In some cases, a fault in your security scheme is easily detected and considered nothing more than an inconvenience. In other cases, a fault might cause great damage to companies or individual clients that use the Web site. Understanding the security ramifications of each resource will help you protect it properly.
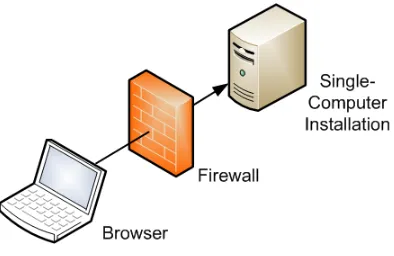
1.5 Recommended Deployment Configurations
This section describes recommended architectures for deploying Oracle products with secure Internet access.
[image:9.612.103.300.527.655.2]Figure 1.1, “Simple Firewall Deployment Configuration” shows a simple deployment architecture.
Figure 1.1 Simple Firewall Deployment Configuration
This single-computer deployment may be cost effective for small organizations. However, it cannot provide high availability because all components are stored on the same computer.
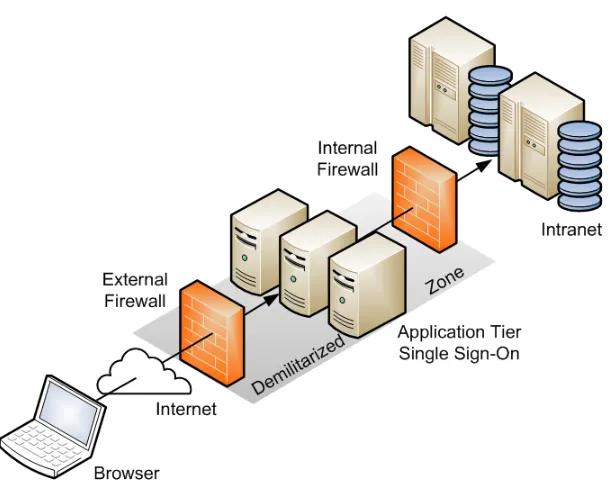
Component Security
Figure 1.2 DMZ Deployment Configuration
A demilitarized zone (DMZ) refers to a server that is isolated by firewalls from both the Internet and the intranet, and which acts a buffer between them. The firewalls that separate DMZ zones provide two essential functions:
• Block any traffic types that are not permitted.
• Provide intrusion containment in the event that successful intrusions take over processes or processors.
1.6 Component Security
Each application software component usually has its own security considerations that you should take into account independently of those that apply to the operating system. Refer to the security guidelines for each component to determine how best to configure it for the requirements of security at your site.
1.7 References
For more information on the security topics covered in this guide, see the following references:
NIST Checklist Details for DoD Consensus Security Configuration Checklist for Red Hat Enterprise Linux 5
2.0: http://web.nvd.nist.gov/view/ncp/repository/checklistDetail?id=294.
NIST SCAP: Guide To The Secure Configuration of Red Hat Enterprise Linux 5: http://nvd.nist.gov/scap/ content/stylesheet/scap-rhel5-document.htm.
NSA Guide to the Secure Configuration of Red Hat Enterprise Linux 5: http://www.nsa.gov/ia/_files/os/ redhat/NSA_RHEL_5_GUIDE_v4.2.pdf.
NSA Hardening Tips For Default Installation of Red Hat Enterprise Linux 5: http://www.nsa.gov/ia/_files/ factsheets/rhel5-pamphlet-i731.pdf.
References
NSA SELinux Frequently Asked Questions (FAQ): http://www.nsa.gov/research/selinux/faqs.shtml.
Oracle Tips for Hardening an Oracle Linux Server by Lenz Grimmer and James Morris: http:// www.oracle.com/technetwork/articles/servers-storage-admin/tips-harden-oracle-linux-1695888.html.
Oracle Tips for Securing an Oracle Linux Environment by Ginny Henningsen, James Morris, and Lenz Grimmer: http://www.oracle.com/technetwork/articles/servers-storage-admin/secure-linux-env-1841089.html.
SELinux Project Wiki: http://selinuxproject.org/page/Main_Page.
Note
Chapter 2 Secure Installation and Configuration
Table of Contents
2.1 Pre-Installation Tasks ... 7
2.2 Installing Oracle Linux ... 7
2.2.1 Shadow Passwords and Hashing Algorithms ... 8
2.2.2 Strong Passwords ... 8
2.2.3 Separate Disk Partitions ... 8
2.2.4 Encrypted Disk Partitions ... 8
2.2.5 Software Selection ... 9
2.2.6 Network Time Service ... 9
2.3 Post-Installation Tasks ... 9
This chapter outlines the planning process for a secure installation and describes how the choices that you make during installation affect system security.
2.1 Pre-Installation Tasks
An important consideration is the security of the physical system on which you will install Oracle Linux. If possible, keep server systems in a locked data center and limit access to authorized personnel. Such personnel should also receive appropriate administrative training as human error is often the cause of a security breach. For more information about the available Oracle Linux coursework and certification options, see http://education.oracle.com.
Aside from the risks of theft and data compromise, physical security is critical because it prevents an unauthorized user from possibly modifying the system BIOS, altering the boot device, and booting from an alternate medium. If a system is not kept in a locked data center, consider password-protecting the BIOS. Consult the system manufacturer's documentation for information on setting a BIOS password. Edit the BIOS settings to disable booting from the CD-ROM drive, floppy disk drive, USB ports, and other external devices. In addition, you can configure disk encryption during installation, or password-protect the GRUB boot loader after installation.
Note
Setting a BIOS, encrypted disk, or boot-loader password requires you to enter the password whenever you reboot the system. Only disk encryption can prevent access to the data on disk when an attacker uses techniques such as resetting the BIOS, accessing the disk by booting an operating system from a memory stick, or simply removing the hard drive to read its contents on another system.
2.2 Installing Oracle Linux
When you install Oracle Linux, you can reduce the attack surface by installing only the software packages that are required for operation. Software packages are a potential source of setuid programs, network services, and libraries that an attacker can potentially use to gain access illegitimately and compromise a system.
You can use a pretested Kickstart profile to provide consistent and precise control over what is installed. Automated installation using a Kickstart profile reduces both security risk and administrative effort.
Alternatively, you can use Oracle Enterprise Manager Ops Center, which supports the import of OS images and explicit provisioning profiles. For more information, refer to the Oracle Enterprise Manager Ops Center
Shadow Passwords and Hashing Algorithms
2.2.1 Shadow Passwords and Hashing Algorithms
By default, an Oracle Linux system is configured to use password hashes that are stored in the /etc/ shadow file rather than in the world-readable /etc/passwd file. If shadow passwords were not used, an attacker is much more likely to be able to discover a password by applying cracking software to the hashes. Similarly, using a password-hashing algorithm that is weaker than SHA-512 would make it much easier to find likely candidates that match a hash value.
2.2.2 Strong Passwords
During installation, you are prompted to enter passwords for root and one additional user, if you choose the user to be authenticated locally rather than over the network. The passwords that you enter should be strong in that they should be extremely difficult to deduce by guesswork or by other means, such as automated FTP or SSH logins. By default, the installation process rejects null passwords and warns about weak passwords, but it does not enforce strong passwords. It is your responsibility to ensure that passwords are sufficiently strong.
Some general guidelines for creating a strong password are:
• Make the password at least eight characters long.
• Use a mixture of lower and upper case letters, numbers, and other characters.
• Do not include whole words from English, LEET speak, or any other language or technology, even if you spell the words in reverse order. Password cracking programs are more sophisticated that one might naively assume.
• Do not include personal information such as names, dates, addresses, email addresses, or telephone numbers.
• Do not use well-known acronyms, abbreviations, or character sequences such as QWERTY.
• Do not use a password that is the same as or very similar to a password that you used previously on the system.
• Use a password for root that is different from the password for any other user.
2.2.3 Separate Disk Partitions
The National Security Agency (NSA) recommendations state that you should set up user-writable file systems such as /home, /tmp, and /var/tmp on partitions that are separate from /. In addition, /boot must be a dedicated file system if you encrypt the root file system.
For more information, see http://www.nsa.gov/ia/_files/factsheets/rhel5-pamphlet-i731.pdf.
2.2.4 Encrypted Disk Partitions
When choosing a disk layout, you have the option of encrypting disk partitions with the Linux Unified Key Setup (LUKS) format. As for any other password, ensure that you enter a strong passphrase if you choose to encrypt any partitions.
Note
Software Selection
2.2.5 Software Selection
If you choose to customize the software to be installed on a system, you can select or deselect packages from the default set. For example, the basic server configuration does not install the Gnome and KDE desktop software and the X Windows System packages from the Desktops section. Additional packages that you might want to install on a server system are available under the Servers, Web Services,
Databases, and other section headings.
2.2.6 Network Time Service
If you select to synchronize the data and time over the network, the system is configured as an NTP client that uses the [012].rhel.pool.ntp.org public servers by default. If your systems rely on Kerberos authentication, which requires close synchronization of the clocks on each participating system, you might prefer to configure your systems to use a local NTP server instead.
2.3 Post-Installation Tasks
For information about the way that you can configure the security of an Oracle Linux system, see
Chapter 3, Implementing Oracle Linux Security.
Chapter 3 Implementing Oracle Linux Security
Table of Contents
3.1 Configuring and Using Data Encryption ... 11
3.2 Configuring a GRUB Password ... 12
3.3 Configuring and Using Certificate Management ... 13
3.3.1 About the openssl Command ... 14
3.3.2 About the keytool Command ... 16
3.4 Configuring and Using Authentication ... 17
3.4.1 About Local Oracle Linux Authentication ... 18
3.4.2 About IPA ... 18
3.4.3 About LDAP Authentication ... 19
3.4.4 About NIS Authentication ... 20
3.4.5 About Winbind Authentication ... 20
3.4.6 About Kerberos Authentication ... 21
3.5 Configuring and Using Pluggable Authentication Modules ... 22
3.6 Configuring and Using Access Control Lists ... 24
3.7 Configuring and Using SELinux ... 24
3.7.1 About SELinux Administration ... 26
3.7.2 About SELinux Modes ... 27
3.7.3 Setting SELinux Modes ... 27
3.7.4 About SELinux Policies ... 28
3.7.5 About SELinux Context ... 29
3.7.6 About SELinux Users ... 32
3.8 Configuring and Using Auditing ... 33
3.9 Configuring and Using System Logging ... 34
3.10 Configuring and Using Process Accounting ... 37
3.11 Configuring and Using Software Management ... 37
3.11.1 Configuring Update and Patch Management ... 39
3.11.2 Installing and Using the Yum Security Plugin ... 39
3.12 Configuring Access to Network Services ... 42
3.12.1 Configuring and Using Packet-filtering Firewalls ... 43
3.12.2 Configuring and Using TCP Wrappers ... 46
3.13 Configuring and Using Chroot Jails ... 47
3.13.1 Running DNS and FTP Services in a Chroot Jail ... 47
3.13.2 Creating a Chroot Jail ... 47
3.13.3 Using a Chroot Jail ... 48
3.14 Configuring and Using Linux Containers ... 48
3.15 Configuring and Using Kernel Security Mechanisms ... 49
3.15.1 Address Space Layout Randomization ... 49
3.15.2 Data Execution Prevention ... 49
3.15.3 Position Independent Executables ... 50
This chapter describes the various ways in which you can configure the security of an Oracle Linux system.
3.1 Configuring and Using Data Encryption
Configuring a GRUB Password
data is increasingly being made a mandatory requirement of corporate security policy and by governmental regulations (for example, HIPAA, GLBA, SOX, and PCI DSS).
Oracle Linux systems provide several strategies for protecting data:
• When installing systems and application software, only accept RPM packages that have been digitally signed. To ensure that downloaded software packages are signed, set gpgcheck=1 in the repository configuration file and import the GPG key provided by the software supplier. You can also install RPMs using the Secure Sockets Layer (SSL) protocol, which uses encryption to protect the communications channel.
• To protect against data theft, consider using full-disk encryption, especially on laptops, external hard drives, or removable devices such as USB memory sticks. Oracle Linux supports block device encryption using dm-crypt and the Linux Unified Key Setup (LUKS) format. The cryptsetup administration command is available in the cryptsetup-luks package. These technologies encrypt device partitions so that the data is inaccessible when a system is turned off. When the system boots and you supply the appropriate passphrase, the device is decrypted and its data is accessible. For more infomation, see the cryptsetup(8) manual page.
• An alternative approach for protecting data on a device is to use the eCryptfs utilities to encrypt a file system. The eCryptfs utilities are available in the ecryptfs-utils package. Unlike dm-crypt, which encrypts block devices, eCryptfs encrypts data at the file-system level, and you can also use it to protect individual files and directories. For more information, see the ecryptfs(7), ecryptfs-setup-private(1), ecryptfs-mount-ecryptfs-setup-private(1), and ecryptfs-umount-private(1) manual pages.
• Oracle Linux uses encryption to support Virtual Private Networks (VPN), Secure Shell (ssh), and password protection. By default, Oracle Linux uses a strong password hashing algorithm (SHA-512) and stores hashed passwords in the /etc/shadow file.
• Oracle Linux takes advantage of hardware-accelerated encryption on Intel CPUs that support the Advanced Encryption Standard New Instructions (AES-NI) instruction set, which speeds up the execution of AES algorithms as well as SHA-1 and RC4 algorithms on x86 and x86_64 architectures.
3.2 Configuring a GRUB Password
If a system is not kept in a locked data center, and as an alternative to using any password protection mechanism built into the BIOS, you can add a degree of protection to the system by requiring a valid password be provided to the GRUB boot loader.
Note
Password protecting GRUB access prevents unauthorized users from entering single user mode and changing settings at boot time. It does not prevent someone from accessing data on the hard drive by booting into an operating system from a memory stick, or physically removing the drive to read its contents on another system.
To configure a GRUB password:
1. Use the following command to generate the MD5 hash of your password:
# /sbin/grub-md5-crypt
Password: clydenw Retype password: clydenw
Configuring and Using Certificate Management
2. Edit /boot/grub/grub.conf, and add a password entry below the timeout entry near the top of the file, for example:
timeout=5
password --md5 pwhash
where pwhash is the hash value that grub-md5-crypt returned.
3. If GRUB has been configured to boot multiple operating systems on the same machine, add a lock entry to after the title entry for each operating system, for example:
title Windows lock
When you reboot the machine, you must press P and enter the password before you can access the GRUB command interface.
For more information, use the info grub command to access the GRUB manual.
3.3 Configuring and Using Certificate Management
Public-key cryptography allows secure communication on an insecure public network and verification of the identity of the entity at the other end of a network connection. Public-key cryptography is based on establishing pairs of secret and public keys. Either key can be used to encrypt some data, and the other key can then be used to decrypt that data. You cannot use just one of the keys to perform both operations on the same data. Because of the asymmetric nature of the key operations, you can distribute the public key without fear of compromising security. Possession of the private key is required to be able to read messages that are encrypted with the public key.
However, if you receive a public key, this in itself does not establish the identity of the sender. A public-key infrastructure implements digital certificates that allow public public-keys to be distributed in a hierarchy of trusted relationships. A Certification Authority (CA) acts as a trusted third party that can issue signed certificates on behalf of another entity on a network. The CA uses its own private key to encrypt the certificate, which contains the entity's public key together with other information about the entity (subject), the CA (issuer), the period of validity of the certificate, and the cryptographic algorithms used. Assuming that you trust the CA, you can also trust the entity's public key stored in the certificate. Decrypting the certificate with the CA's public key yields the entity's public key, and this key can be used to establish a secure communications channel.
For the Internet, there are many public top-level (root) CAs and there are also many intermediate CAs that are trusted by a root CA to issue certificates on behalf of entities. An intermediate CA usually returns a certificate chain, where each certificate in the chain authenticates the public key of the signer of the previous certificate in the chain up to and including a root CA. The secure communication channels that are required for website security usually use the Transport Layer Security (TLS) or Secure Sockets Layer (SSL) cryptographic protocols. Because most financial transactions on the Internet rely on TLS and SSL, a more limited number of CAs are permitted to issue TLS/SSL certificates that web browsers trust, and these CAs are regularly audited for security.
About the openssl Command
Typically, TLS/SSL certificates expire after one year. Other certificates, including root certificates that are distributed with web browsers, and which are issued by root and intermediate CAs usually expire after a period from five to 10 years. To avoid applications displaying warnings about out-of-date certificates, you should plan to replace TLS/SSL certificates before they expire. For root certificates, this is not usually a problem as you would typically update the software before the certificate would expire.
If you request a signed certificate from a CA for which a root certificate or certificate chain that
authenticates the CA's public key does not already exist on your system, obtain a trusted root certificate from the CA. To avoid a potential man-in-the-middle attack, verify the authenticity of the root certificate before importing it. Check that the certificate's fingerprint matches the fingerprint that the CA publishes.
The openssl command allows you to generate self-signed certificates that web browsers can use. You can also use the keytool command to generate self-signed certificates, but this command's primary purpose is to install and manage JSSE (Java Secure Socket Extension) digital certificates for use with Java applications.
Note
For production environments, you should obtain external CA-signed certificates, which can be revoked if the private key is compromised. Self-signed certificates cannot be revoked, and should only be used when developing, testing, or demonstrating software.
For more information about using TLS/SSL and certificates with the Apache HTTP server, see the Apache documentation at http://httpd.apache.org/docs.
3.3.1 About the openssl Command
The openssl command, which is included in the openssl package, allows you to perform various cryptography functions from the OpenSSL library including:
• Creating and managing pairs of private and public keys.
• Performing public key cryptographic operations.
• Creating self-signed certificates.
• Creating certificate signing requests (CSRs).
• Creating certificate revocation lists (CRLs).
• Converting certificate files between various formats.
• Calculating message digests.
• Encrypting and decrypting files.
• Testing both client-side and server-side TLS/SSL with HTTP and SMTP servers.
• Verifying, encrypting and signing S/MIME email.
• Generating and testing prime numbers, and generating pseudo-random data.
The following are some sample openssl commands.
About the openssl Command
# openssl req -x509 -nodes -days 365 -subj '/C=US/ST=Ca/L=Sunnydale/CN=www.unserdom.com' \ -newkey rsa:1024 -keyout prikey.pem -out cert.pem
Test a self-signed certificate by launching a server that listens on port 443.
# openssl s_server -accept 443 -cert cert.pem -key prikey.pem -www
Test the client side of a connection. This command returns information about the connection including the certificate, and allows you to directly input HTTP commands.
# openssl s_client -connect server:443 -CAfile cert.pem
Convert a root certificate to a form that can be published on a web site for downloading by a browser.
# openssl x509 -in cert.pem -out rootcert.crt
Extract a certificate from a server.
# echo | openssl s_client -connect server:443 2>/dev/null | \ sed -ne '/BEGIN CERT/,/END CERT/p' > svrcert.pem
Display the information contained in an X.509 certificate.
# openssl x509 -text -noout -in svrcert.pem
Display the SHA1 fingerprint of a certificate.
# openssl x509 -sha1 -noout -fingerprint -in cert.pem
Generate a CSR, writing the unencrypted private key to prikey.pem and the request to csr.pem for submission to a CA. The CA signs and returns a certificate or a certificate chain that authenticates your public key.
# openssl req -new -nodes '/CN=www.unserdom.com/O=Unser Dom, Corp./C=US/ST=Ca/L=Sunnydale' \ -newkey rsa:1024 -keyout prikey.pem -out csr.pem
Display the information contained in a CSR.
# openssl req -in csr.pem -noout -text
Verify a certificate including the signing authority, signing chain, and period of validity.
# openssl verify cert.pem
Display the directory that holds information about the CAs trusted by your system. By default, this directory is /etc/pki/tls. The /etc/pki/tls/certs subdirectory contains trusted certificates.
# openssl version -d
Create an SHA1 digest of a file.
# openssl dgst -sha1 file
Sign the SHA1 digest of a file using the private key stored in the file prikey.pem.
# openssl dgst -sha1 -sign prikey.pem -out file.sha1 file
Verify the signed digest for a file using the public key stored in the file pubkey.pem.
About the keytool Command
List all available ciphers.
# openssl list-cipher-commands
Encrypt a file using Blowfish.
# openssl enc -blowfish -salt -in file -out file.enc
Decrypt a Blowfish-encrypted file.
# openssl enc -d -blowfish -in file.enc -out file.dec
Convert a base 64 encoded certificate (also referred to as PEM or RFC 1421) to binary DER format.
# openssl x509 -in cert.pem -outform der -out certificate.der
Convert the base 64 encoded certificates for an entity and its CA to a single PKCS7 format certificate.
# openssl crl2pkcs7 -nocrl -certfile entCert.cer -certfile CACert.cer -out certificate.p7b
For more information, see the openssl(1), ciphers(1), dgst(1), enc(1), req(1), s_client(1), s_server(1), verify(1), and x509(1) manual pages.
3.3.2 About the keytool Command
Most Java applications use the keystore that is supplied with the JDK to store cryptographic keys, X.509 certificate chain information, and trusted certificates. The default JDK keystore on Oracle Linux is the file / etc/pki/java/cacerts. You can use the keytool command to generate self-signed certificates and to install and manage certificates in the keystore. Note that the keytool command syntax changed in Java SE 6. The examples given here are for that version of keytool.
The following are some sample keytool commands.
List the contents of the keystore /etc/pki/java/cacerts. The default keystore password is changeit. If specified, the verbose option -v displays detailed information.
# keytool -list [-v] -keystore /etc/pki/java/cacerts
Change the password for a keystore (for example, /etc/pki/java/cacerts).
# keytool -storepasswd -keystore /etc/pki/java/cacerts
Create a new keystore keystore.jks for managing your public/private key pairs and certificates from entities that you trust, generate a public/private key pair using the RSA algorithm and a key length of 1024 bits, and create a self-signed certificate that includes the public key and the specified distinguished name information. pkpassword is the private key password and storepassword is the keystore password. The certificate is valid for 100 days and is associated with the private key in a keystore entry that has the alias engineering.
# keytool -genkeypair -alias mycert -keyalg RSA -keysize 1024 \
-dname "CN=www.unserdom.com, OU=Eng, O=Unser Dom Corp, C=US, ST=Ca, L=Sunnydale" \
-alias engineering -keypass pkpassword -keystore keystore.jks \
-storepass storepassword -validity 100
Print the contents of a certificate file in a human-readable form. If specified, the verbose option -v displays detailed information.
Configuring and Using Authentication
Generate a CSR in the file carequest.csr for submission to a CA. The CA signs and returns a certificate or a certificate chain that authenticates your public key.
# keytool -certreq -file carequest.csr
Import the root certificate or certificate chain for the CA from the file ACME.cer into the keystore
keystore.jks and give it the alias acmeca. If specified, the -trustcacerts option instructs keytool to add the certificate only if it can validate the chain of trust against the existing root CA certificates in the cacerts keystore. Alternatively, use the keytool -printcert command to check that the certificate's fingerprint matches the fingerprint that the CA publishes.
# keytool -importcert -alias acmeca [-trustcacerts] -file ACME.cer \ -keystore keystore.jks -storepass storepassword
Import the signed certificate for your organization after you have received it from the CA. In this example, the file containing the certificate is ACMEdom.cer. The -alias option specifies the entry for the first entity in the CA's root certificate chain. The signed certificate is added to the front of the chain and becomes the entity that is addressed by the alias name.
# keytool -importcert -v -trustcacerts -alias acmeca -file ACMEdom.cer \ -keystore keystore.jks -storepass storepassword
Delete the certificate with the alias aliasname from the keystore keystore.jks.
# keytool -delete -alias aliasname -keystore keystore.jks -storepass storepassword
Export the certificate with the alias aliasname as a binary PKCS7 format file, which includes the supporting certificate chain as well as the issued certificate.
# keytool -exportcert -noprompt -alias aliasname -file output.p7b \ -keystore keystore.jks -storepass storepassword
Export the certificate with the alias aliasname as a base 64 encoded text file (also referred to as PEM or RFC 1421). For a certificate chain. the file includes only the first certificate in the chain, which authenticates the public key of the aliased entity.
# keytool -exportcert -noprompt -rfc -alias aliasname -file output.pem \ -keystore keystore.jks -storepass storepassword
For more information, see the keytool(1) manual page.
3.4 Configuring and Using Authentication
Authentication is the verification of the identity of a user. A user logs in by providing a user name and a password, and the operating system authenticates the user's identity by comparing this information to data stored on the system. If the login credentials match and the user account is active, the user is authenticated and can successfully access the system.
The information that verifies a user's identity can either be located on the local system in the /etc/ passwd and /etc/shadow files, or on remote systems using Identity Policy Audit (IPA), the Lightweight Directory Access Protocol (LDAP), the Network Information Service (NIS), or Winbind. In addition, IPSv2, LDAP, and NIS data files can use the Kerberos authentication protocol, which allows nodes communicating over a non-secure network to prove their identity to one another in a secure manner.
About Local Oracle Linux Authentication
use the authconfig command. Both the Authentication Configuration GUI and authconfig adjust settings in the PAM configuration files that are located in the /etc/pam.d directory.
3.4.1 About Local Oracle Linux Authentication
You can use the User Manager GUI (system-config-users) to add or delete users and groups and to modify settings such as passwords, home directories, login shells, and group membership. Alternatively, you can use commands such as useradd and groupadd.
Unless you select a different authentication mechanism during installation or by using the Authentication Configuration GUI or the authconfig command, Oracle Linux verifies a user's identity by using the information that is stored in the /etc/passwd and /etc/shadow files.
The /etc/passwd file stores account information for each user such as his or her unique user ID (or UID, which is an integer), user name, home directory, and login shell. A user logs in using his or her user name, but the operating system uses the associated UID. When the user logs in, he or she is placed in his or her home directory and his or her login shell runs.
The /etc/group file stores information about groups of users. A user also belongs to one or more groups, and each group can contain one or more users. If you can grant access privileges to a group, all members of the group receive the same access privileges. Each group account has a unique group ID (GID, again an integer) and an associated group name.
Oracle Linux implements the user private group (UPG) scheme where adding a user account also creates a corresponding UPG with the same name as the user, and of which the user is the only member.
Only the root user can add, modify, or delete user and group accounts. By default, both users and groups use shadow passwords, which are cryptographically hashed and stored in /etc/shadow and /etc/ gshadow respectively. These shadow password files are readable only by the root user. root can set a group password that a user must enter to become a member of the group by using the newgrp command. If a group does not have a password, a user can only join the group by root adding him or her as a member.
The /etc/login.defs file defines parameters for password aging and related security policies.
For more information about the content of these files, see the group(5), gshadow(5), login.defs(5), passwd(5), and shadow(5) manual pages.
3.4.2 About IPA
IPA allows you to set up a domain controller for DNS, Kerberos, and authorization policies as an alternative to Active Directory Services. You can enrol client machines with an IPA domain so that they can access information for single sign-on authentication. IPA combines the capabilities of existing well-known technologies such as certificate services, DNS, LDAP, Kerberos, LDAP, and NTP.
To be able to configure IPA authentication, use yum to install the ipa-client and ipa-admintools packages.
If you use the Authentication Configuration GUI and select IPA v2 as the user account database, you are prompted to enter the names of the IPA domain, realm, and server. You can also select to configure NTP so that the system time is consistent with the IPA server. If you have initialized Kerberos, you can click
Join Domain to create a machine account on the IPA server and grant permission to join the domain.
About LDAP Authentication
3.4.3 About LDAP Authentication
LDAP allows systems to access centrally stored information over a network. LDAP servers store the information in directory-based database that is optimized for searching. Directory entries are arranged in a hierarchical tree-like structure that can store a variety of information such as names, addresses, phone numbers, authentication data, network services, printers, and many other types of data. LDAP can also be used to authenticate users, allowing users to access their account from any machine on the LDAP network.
An entry is the basic unit of information within an LDAP directory. Each entry has one or more attributes. Each attribute has a name, a type or description, and one or more values. Examples of types are cn for common name and mail for an email address. In addition, the objectClass attribute allows you to control which attributes are required and which are optional. The values of objectClass determine the schema rules that an entry must obey.
Each entry in an LDAP directory is uniquely identified and referenced by its Distinguished Name (DN). The DN is constructed by taking the name of the entry itself (called the Relative Distinguished Name or RDN) and concatenating the names of its ancestor entries, known as the LDAP Search Base DN. For example, the DN for a user with an RDN of uid=gab451 might be similar to
uid=gab451,ou=People,dc=mydomain,dc=com, where ou=People,dc=mydomain,dc=com is the LDAP Search base DN, ou stands for Organizational Unit and dc stands for Domain Component.
To be able to configure LDAP authentication, use yum to install the openldap-clients package.
If you use the Authentication Configuration GUI and select LDAP as the user account database, you are prompted to enter the LDAP Search Base DN and the URL of the LDAP server including the port number (for example, ldap://ldap-svr.mydomain.com:389).
You can configure LDAP to use either LDAP authentication or Kerberos authentication. LDAP authentication requires that you use either LDAP over SSL (ldaps) or Transport Layer Security (TLS) to secure the connection to the LDAP server. If you use TLS, you must enter the URL from which to download the CA certificate that provides the basis for authentication within the domain.
You can also enable and configure LDAP by using the authconfig command.
To use LDAP as the authentication source, specify the --enableldapauth option together with the full LDAP server URL (including the port number) and the LDAP Search Base DN, as shown in the following example:.
# authconfig --enableldap --enableldapauth \ --ldapserver=ldap://ldap-svr.mydomain.com:389 \ --ldapbasedn="ou=people,dc=mydomain,dc=com" \ --update
If you want to use TLS, additionally specify the --enableldaptls option and the download URL of the CA certificate:
# authconfig --enableldap --enableldapauth \ --ldapserver=ldap://ldap-svr.mydomain.com:389 \ --ldapbasedn="ou=people,dc=mydomain,dc=com" \ --enableldaptls \
--ldaploadcacert=https://ca-server.mydomain.com/caCert.crt \ --update
For information about using Kerberos authentication with LDAP, see Section 3.4.6, “About Kerberos Authentication”.
For more information, see the authconfig(8) manual page.
About NIS Authentication
3.4.4 About NIS Authentication
NIS stores administrative information such as user names, passwords, and host names on a centralized server. Client systems on the network can access this common data. This configuration allows to move from machine to machine without having to remember different passwords and copy data from one machine to another. Storing administrative information centrally, and providing a means of accessing it from networked systems, also ensures the consistency of that data. NIS also reduces the overhead of maintaining administration files such as /etc/passwd on each system.
A network of NIS systems is a NIS domain. Each system within the domain has the same NIS domain name, which is different from a DNS domain name. The DNS domain is used throughout the Internet to refer to a group of systems. A NIS domain is used to identify systems that use files on a NIS server. A NIS domain must have exactly one master server but can have multiple slave servers.
To be able to configure NIS authentication, use yum to install the yp-tools and ypbind packages.
If you use the Authentication Configuration GUI and select NIS as the user account database, you are prompted to enter the names of the NIS Domain and the NIS master server.
You can configure NIS to use either NIS authentication or Kerberos authentication.
Warning
NIS authentication is deprecated as it has security issues, including a lack of protection of authentication data.
For information about using Kerberos authentication with NIS, see Section 3.4.6, “About Kerberos Authentication”.
3.4.5 About Winbind Authentication
Winbind is a client-side service that resolves user and group information on a Windows server, and allows Oracle Linux to understand Windows users and groups. To be able to configure Winbind authentication, use yum to install the samba-winbind package. This package includes the winbindd daemon that implements the winbind service.
If you use the Authentication Configuration GUI and select Winbind as the user account database, you are prompted for the information that is required to connect to a Microsoft workgroup, Active Directory, or Windows NT domain controller. Enter the name of the Winbind domain and select the security model for the Samba server:
ads In the Activity Directory Server (ADS) security model, Samba acts as a domain member in an ADS realm, and clients use Kerberos tickets for Active Directory authentication. You must configure Kerberos and join the server to the domain, which creates a machine account for your server on the domain controller.
domain In the domain security model, the local Samba server has a machine account (a domain security trust account) and Samba authenticates user names and passwords with a domain controller in a domain that implements Windows NT4 security.
Warning
If the local machine acts as a Primary or Backup Domain Controller, do not use the domain security model. Use the user security model instead.
About Kerberos Authentication
Warning
The server security model is deprecated as it has numerous security issues.
user In the user security model, a client must log in with a valid user name and password. This model supports encrypted passwords. If the server successfully validates the client's user name and password, the client can mount multiple shares without being required to specify a password.
Depending on the security model that you choose, you might also need to specify the following information:
• The name of the ADS realm that the Samba server is to join (ADS security model only).
• The names of the domain controllers. If there are several domain controllers, separate the names with spaces.
• The login template shell to use for the Windows NT user account (ADS and domain security models only).
• Whether to allow user authentication using information that has been cached by the System Security Services Daemon (SSSD) if the domain controllers are offline.
Your selection updates the security directive in the [global] section of the /etc/samba/smb.conf configuration file.
If you have initialized Kerberos, you can click Join Domain to create a machine account on the Active Directory server and grant permission for the Samba domain member server to join the domain.
You can also use the authconfig command to configure Winbind authentication. To use the user-level security models, specify the name of the domain or workgroup and the host names of the domain controllers. for example:
# authconfig --enablewinbind --enablewinbindauth --smbsecurity user \
[--enablewinbindoffline] --smbservers="ad1.mydomain.com ad2.mydomain.com" \ --smbworkgroup=MYDOMAIN --update
To allow user authentication using information that has been cached by the System Security Services Daemon (SSSD) if the domain controllers are offline, specify the --enablewinbindoffline option.
For the domain security model, additionally specify the template shell, for example:
# authconfig --enablewinbind --enablewinbindauth --smbsecurity domain \ [--enablewinbindoffline] --smbservers="ad1.mydomain.com ad2.mydomain.com" \ --smbworkgroup=MYDOMAIN --update --winbindtemplateshell=/bin/bash --update
For the ADS security model, additionally specify the ADS realm and template shell, for example:
# authconfig --enablewinbind --enablewinbindauth --smbsecurity ads \
[--enablewinbindoffline] --smbservers="ad1.mydomain.com ad2.mydomain.com" \ --smbworkgroup=MYDOMAIN --update --smbrealm MYDOMAIN.COM \
--winbindtemplateshell=/bin/bash --update
For more information, see the authconfig(8) manual page.
3.4.6 About Kerberos Authentication
Both LDAP and NIS authentication optionally support Kerberos authentication. (In the case of IPA,
Configuring and Using Pluggable Authentication Modules
To be able to use Kerberos authentication, use yum to install the krb5-libs and krb5-workstation packages.
If you use the Authentication Configuration GUI and select LDAP or NIS as the user account database, select Kerberos password as the authentication method. You are prompted for the following information that is required to connect to the Kerberos realm:
• The name of the Kerberos realm.
• A comma-separated list of Key Distribution Center (KDC) servers that can issue Kerberos tickets.
• A comma-separated list of Kerberos Administration Servers.
You can also select whether Kerberos should use DNS to resolve the host names of Kerberos servers and to search for KDCs within the realm. DNS domains are typically coterminous with Kerberos realms.
You can use the following options with the authconfig command to configure Kerberos authentication with LDAP or NIS:
--enablekrb5 Use Kerberos authentication. (Specify instead of --enableldapauth
for LDAP.)
--enablekrb5kdcdns Use DNS to resolve the host names of Kerberos servers.
--enablekrb5realmdns Use DNS to search for KDCs within a Kerberos realm.
--krb5adminserver=server Specify a Kerberos Administration Server.
--krb5kdc=server Specify a KDC server.
--krb5realm=realm Specify the name of the Kerberos realm.
For more information, see the authconfig(8) manual page.
3.5 Configuring and Using Pluggable Authentication Modules
The Pluggable Authentication Modules (PAM) feature is an authentication mechanism that allows you to configure how applications use authentication to verify the identity of a user. The PAM configuration files, which are located in the /etc/pam.d directory, describe the authentication procedure for an application. The name of each configuration file is the same as, or is similar to, the name of the application for which the module provides authentication. For example, the configuration files for passwd and sudo are named passwd and sudo.
Each configuration file contains a list (stack) of calls to authentication modules. For example, the following is the content of the login configuration file:
#%PAM-1.0
auth [user_unknown=ignore success=ok ignore=ignore default=bad] pam_securetty.so auth include system-auth
account required pam_nologin.so account include system-auth password include system-auth
# pam_selinux.so close should be the first session rule session required pam_selinux.so close
session required pam_loginuid.so session optional pam_console.so
# pam_selinux.so open should only be followed by sessions to be executed in the user context session required pam_selinux.so open
session required pam_namespace.so
Configuring and Using Pluggable Authentication Modules
session include system-auth
-session optional pam_ck_connector.so
Comments in the file start with a # character. The remaining lines each define an operation type, a control flag, the name of a module such as pam_rootok.so or the name of an included configuration file such as system-auth, and any arguments to the module. PAM provides authentication modules as 32 and 64-bit shared libraries in /lib/security and /lib64/security respectively.
For a particular operation type, PAM reads the stack from top to bottom and calls the modules listed in the configuration file. Each module generates a success or failure result when called.
The following operation types are defined for use:
auth The module tests whether a user is authenticated or authorized to use a service or
application. For example, the module might request and verify a password. Such modules can also set credentials, such as a group membership or a Kerberos ticket.
account The module tests whether an authenticated user is allowed access to a service or application. For example, the module might check if a user account has expired or if a user is allowed to use a service at a given time.
password The module handles updates to an authentication token.
session The module configures and manages user sessions, performing tasks such as mounting or unmounting a user's home directory.
If the operation type is preceded with a dash (-), PAM does not add an create a system log entry if the module is missing.
With the exception of include, the control flags tell PAM what to do with the result of running a module. The following control flags are defined for use:
optional The module is required for authentication if it is the only module listed for a service.
required The module must succeed for access to be granted. PAM continues to execute the remaining modules in the stack whether the module succeeds or fails. PAM does not immediately inform the user of the failure.
requisite The module must succeed for access to be granted. If the module succeeds, PAM continues to execute the remaining modules in the stack. However, if the module fails, PAM notifies the user immediately and does not continue to execute the remaining modules in the stack.
sufficient If the module succeeds, PAM does not process any remaining modules of the same operation type. If the module fails, PAM processes the remaining modules of the same operation type to determine overall success or failure.
The control flag field can also define one or more rules that specify the action that PAM should take depending on the value that a module returns. Each rule takes the form value=action, and the rules are enclosed in square brackets, for example:
[user_unknown=ignore success=ok ignore=ignore default=bad]
If the result returned by a module matches a value, PAM uses the corresponding action, or, if there is no match, it uses the default action.
Configuring and Using Access Control Lists
Most authentication modules and PAM configuration files have their own manual pages. In addition, the /usr/share/doc/pam-version directory contains the PAM System Administrator’s Guide (html/ Linux-PAM_SAG.html or Linux-PAM_SAG.txt) and a copy of the PAM standard (rfc86.0.txt).
For more information, see the pam(8) manual page. In addition, each PAM module has its own manual page, for example pam_unix(8).
3.6 Configuring and Using Access Control Lists
POSIX Access Control Lists (ACLs) provide a richer access control model than traditional UNIX
Discretionary Access Control (DAC) that sets read, write, and execute permissions for the owner, group, and all other system users. You can configure ACLs that define access rights for more than just a single user or group, and specify rights for programs, processes, files, and directories. If you set a default ACL on a directory, its descendents inherit the same rights automatically. The kernel provides ACL support for ext3, ext4, and NFS-exported file systems.
The following are examples of setting and displaying ACLs for directories and files.
Grant read access to a file or directory by a user.
# setfacl -m u:user:r file
Display the name, owner, group, and ACL for a file or directory.
# getfacl file
Remove write access to a file for all groups and users by modifying the effective rights mask rather than the ACL.
# setfacl -m m::rx file
Remove the entry for a group from the ACL of a file.
# setfacl -x g:group file
Copy the ACL of file f1 to file f2.
# getfacl f1 | setfacl --set-file=- f2
Promote the ACL settings of a directory to default ACL settings that can be inherited.
# getfacl --access dir | setfacl -d -M- dir
For more information on how to manage ACLs, see the setfacl(1) and getfacl(1) manual pages.
3.7 Configuring and Using SELinux
Traditional Linux security is based on a Discretionary Access Control (DAC) policy, which provides minimal protection from broken software or from malware that is running as a normal user or as root. Access to files and devices is based solely on user identity and ownership. Malware or broken software can do anything with files and resources that the user that started the process can do. If the user is root or the application is setuid or setgid to root, the process can have root-access control over the entire file system.
Configuring and Using SELinux
you to define a security policy that provides granular permissions for all users, programs, processes, files, and devices. The kernel's access control decisions are based on all the security relevant information available, and not solely on the authenticated user identity.
When security-relevant access occurs, such as when a process attempts to open a file, SELinux intercepts the operation in the kernel. If a MAC policy rule allows the operation, it continues; otherwise, SELinux blocks the operation and returns an error to the process. The kernel checks and enforces DAC policy rules before MAC rules, so it does not check SELinux policy rules if DAC rules have already denied access to a resource.
The following table describes the SELinux packages that are installed by default with Oracle Linux:
Package Description
policycoreutils Provides utilities such as load_policy, restorecon, secon, setfiles,
semodule, sestatus, and setsebool for operating and managing SELinux.
libselinux Provides the API that SELinux applications use to get and set process and
file security contexts, and to obtain security policy decisions.
selinux-policy Provides the SELinux Reference Policy, which is used as the basis for other policies, such as the SELinux targeted policy.
selinux-policy-targeted
Provides support for the SELinux targeted policy, where objects outside the targeted domains run under DAC.
libselinux-python Contains Python bindings for developing SELinux applications.
libselinux-utils Provides the avcstat, getenforce, getsebool, matchpathcon,
selinuxconlist, selinuxdefcon, selinuxenabled, setenforce, and togglesebool utilities.
The following table describes a selection of useful SELinux packages that are not installed by default:
Package Description
mcstrans Translates SELinux levels, such as s0-s0:c0.c1023, to an easier-to-read
form, such as SystemLow-SystemHigh.
policycoreutils-gui Provides a GUI (system-config-selinux) that you can use to manage
SELinux. For example, you can use the GUI to set the system default enforcing mode and policy type.
policycoreutils-python
Provides additional Python utilities for operating SELinux, such as audit2allow, audit2why, chcat, and semanage.
selinux-policy-mls Provides support for the strict Multilevel Security (MLS) policy as an alternative to the SELinux targeted policy.
setroubleshoot Provides the GUI that allows you to view setroubleshoot-server
messages using the sealert command.
setroubleshoot-server
Translates access-denial messages from SELinux into detailed descriptions that you can view on the command line using the sealert command.
setools-console Provides the Tresys Technology SETools distribution of tools and libraries, which you can use to analyze and query policies, monitor and report audit logs, and manage file context.