Rivendell Operations Guide
Version 1.3.2-1
Rivendell Automation System
System Operations Guide
Table of Contents
Chapter 1 -- System Overview
Section 1.0 – Introducing Rivendell
Section 1.1 – The Rivendell Security System 1.1.0 Hosts
1.1.1 Users 1.1.2 Groups 1.1.3 Services
Section 1.2 – The Rivendell Hardware Paradigm 1.2.0 Audio Adapters
1.2.1 Serial Ports
1.2.2 GPIO/Switcher Devices
Chapter 2 – Setting the Current User with RDLogin
Section 2.0 - RDLogin
Chapter 3 – Content Management with RDLibrary
Section 3.0 – The Rivendell Library Structure and RDLibrary 3.0.0 Carts
3.0.1 Cuts
3.0.1.0 Multiple Cuts in a Cart 3.0.1.1 Cut Dayparting
3.0.1.2 Cart and Cut Color Coding
3.0.1.3 Recording and Auditioning a Cut in the Record Dialog
Section 3.1 – Alternative Methods of Audio Ingestion 3.1.0 Importing Audio from a File
3.1.1 Ripping Audio from a CD Track 3.1.2 Ripping Multiple CD Tracks at a Time
Section 3.2 – Macro Carts
Section 3.3 – Navigating the Audio Library 3.3.0 Changing the Cart Sort Order 3.3.1 Selecting Carts by the Filter Field 3.3.2 Selecting Carts by Group
3.3.3 Selecting Carts by Type 3.3.4 Selecting and Opening Carts
Section 3.4 – Library Maintenance 3.4.0 Editing Markers
3.4.1 Copying and Pasting Audio from Cut to Cut
3.5.0 The Cart Report 3.5.1 The Cut Report 3.5.2 The Cart Data Dump
Chapter 4 – Automating Tasks with RDCatch
Section 4.0 – Choosing the Correct Automation Tool
Section 4.1 – The RDCatch Main Window 4.1.0 The Record/Play Out Deck Area 4.1.1 The Filter Area
4.1.2 The Event List 4.1.3 The Button Area
Section 4.2 – Adding New Events
Section 4.3 – Automating Recordings 4.3.1 The 'Start Parameters' Section 4.3.2 The 'End Parameters' Section
4.3.3 Programming Multiple Recordings in a Single Event 4.3.4 Selecting a Record Source
4.3.5 Selecting a Record Destination
4.3.6 Setting the Active Days for a Recording
4.3.7 Record List Management with Event Active and Make OneShot
Section 4.4 – Automating Play Outs
Section 4.5 – Automating Uploads/Downloads
Section 4.6 – Automating Macro Execution
Section 4.7 – Automating Switcher Operations
Chapter 5 – Creating and Maintaining Logs with RDLogEdit
Section 5.0 – Logs and Log Events 5.0.1 Audio Carts
5.0.2 Macro Carts 5.0.3 Note Markers 5.0.4 Track Markers 5.0.5 Chain Events 5.0.6 Import Links
Section 5.1 – Event Transitions 5.1.1 The PLAY Transition 5.1.2 The SEGUE Transition 5.1.3 The STOP Transition
5.2.1 The Relative Time Type 5.2.2 The Hard Time Type
5.2.2.1 Start Immediately
5.2.2.2 Cut to the Event (“Make Next”) 5.2.2.3 Wait N Seconds
Section 5.3 – Editing Log Event Parameters 5.3.1 Specifying a Cart
5.3.2 Specifying Meta Event Parameters 5.3.3 Rearranging Log Events
5.3.4 Saving or Abandoning Changes to a Log 5.3.5Missing/Invalid Cart Events
Section 5.4 – Generating Log Reports 5.4.1 Log Listing
5.4.2 Log Exception Report
Section 5.5 – Auditioning Audio
Chapter 6 – Running Logs with RDAirPlay
Section 6.0 -- Overview Section 6.1 – Log Machines Section 6.2 -- Layout
6.2.0 The Wall Clock
6.2.1 The Post Point Counter 6.2.2 The Audio Meter 6.2.3 The Pie Wedge Widget 6.2.4 The Next Stop Counter 6.2.5 The Mode Indicator 6.2.6 The Label Area 6.2.7 The Right-Hand Side 6.2.8 The Full Log Widget 6.2.9 The Button Log Widget
Section 6.3 – Editing a Log 6.3.0 Adding an Event 6.3.1 Moving an Event 6.3.2 Deleting an Event 6.3.3 Copying an Event Section 6.4 – The SoundPanel
6.4.0 Panel Types
6.4.1Programming a SoundPanel Button
Chapter 7 – Generating Logs with RDLogManager
Section 7.4 – Generating Logs Section 7.5 – Generating Reports
7.5.0 Purging Old Report Data
Chapter 8 – Voice Tracker
Section 8.0 – Voicetracking in Rivendell 8.0.1 Prerequisites
8.0.2 Voice Track Markers
Section 8.1 – Using the Voicetrack Interface 8.1.0 The Voicetracker Dialog 8.1.1 Editing Transitions
8.1.2 Inserting and Deleting Track Markers 8.1.3 Moving Between Track Markers 8.1.4 Recording a Voicetrack
8.1.5 Adjusting Transition Levels 8.1.6 Importing Voicetracks 8.1.7 Hitting the Post
Chapter 9 – Rivendell Macro Language (RML) Section 9.0 – Overview
Section 9.1 – Command Structure Section 9.2 – Specifying Color Section 9.3 – Available Commands Section 9.4 – RML Command Index
Chapter 10 – Interfacing with the Linux Ecosystem: RMLSend and RDImport Section 10.0 – RMLSend
Section 10.1 – RDImport
Appendix A – The GNU General Public License, Version Two
Appendix B – The Creative Commons Non-Commercial ShareAlike License 2.5
Section 1.0 Introducing Rivendell
Rivendell is a digital audio content management and delivery system that is targeted for use in professional radio broadcast environments. It includes robust tools for the acquisition, organization, management and play out of audio material from and to a diverse array of sources and destinations. Support for a wide variety of external third party hardware devices and software packages commonly used in the radio industry is featured, including interfaces for:
● Audio Routing Switchers ● Satellite Down Link Receivers
● Audio Mixing Consoles
● Commercial Traffic and Music Scheduling Systems
Rivendell is made available under the terms of the GNU General Public License version 2 (GPLv2), a copy of which can be found in Appendix A. As such, it comes with
absolutely no warranty, not even the implied warranties of merchantability or fitness for a particular purpose. See the full text of the GPLv2 for details.
Rivendell has been designed and developed from the ground up to run on the popular and highly stable GNU/Linux1 operating system. Selected tools (mostly having to do with log generation) have also been ported to run in the Microsoft Windows2 environment as well. Full source code as well as binary installation packages for Windows and select Linux distributions are available on line. Consult the Rivendell Technical and
Administration Guide for details.
Rivendell has been designed to be able to operate in a wide variety of roles, ranging from single, self-contained workstations to large, multi-station clusters consisting of multiple workstations and centralized servers. Also included are redundancy and hot-standby capabilities to allow for reliable operation even in the presence of hardware faults. Details can be found in the Rivendell Technical and Administration Guide.
Rivendell is implemented as a set of interactive tools or 'modules' that collectively provide the complete functionality of the system. Briefly, these modules and their functions are:
RDAdmin – System wide configuration
RDLibrary – Library content management
RDCatch – Automatic event scheduler
RDAirPlay – On-air play out application
RDLogEdit – Simple log editing tool
RDLogManager – Automated log generation and interface utility
RDLogin – Set the current user on a Rivendell host
The operation of each of these modules is explained in detail in the chapters that follow. However, we first need to cover some basic concepts common to all Rivendell modules.
1 Linux is a registered trademark of Linus Torvalds
Section 1.1 The Rivendell Security Paradigm
All Rivendell modules make use of the following four classes of system resources:
● Hosts ● Users ● Groups ● Services
We'll cover each of these concepts in turn.
1.1.0 Hosts
Every physical computer within a given network that is running Rivendell software is referred to as a host. Any host in a Rivendell network can be individually configured and controlled from any other host (provided the system administrator has enabled this
capability). Hosts can be used for a wide variety of applications, including content ingestion and management, automatic recording (sometimes referred to as netcatching), on-air play out or log (sometimes also referred to as playlist) generation. It is also possible for a single host to perform all of these functions.
1.1.1 Users
Every host on a Rivendell network has one or more users available to it. In this context, a 'user' is merely a set of access policies established by the system administrator that defines what tasks a given host is or is not allowed to perform. Every host has at least one user, called the default user. As the name suggests, this is the set of user policies that are loaded by default when the system starts up. It is also possible to change the user currently in use on a given host by running the RDLogin module.
1.1.2 Groups
A Rivendell group is a system of categories that is used by the audio library to classify and organize the audio within the library. Groups are a very powerful capability, and many operations within Rivendell can be specified on the basis of group membership. The actual classification scheme, including the number of available groups and their names, is completely arbitrary so as to allow each facility to tailor a schema that best fits its own operational requirements. Designing and implementing the group schema is one of the most important tasks facing the Rivendell system administrator, as a well-designed schema can make long-term maintenance and management of the system substantially easier vis-a-vis a poorly thought out one. We will cover groups in detail in the chapters devoted to the RDLibrary and RDAdmin modules.
1.1.3 Services
Every facility at which Rivendell is deployed is presumed to have one or more ultimate
Section 1.2 The Rivendell Hardware Paradigm
In addition to the core computer hardware (CPU, motherboard, etc), each Rivendell host typically interacts with specialized hardware required to accomplish the task at hand. Three main categories of such 'special' hardware are of interest to us here, the three being
audio adapters, serial ports and GPIO/switcher devices. We'll cover each below.
1.2.0 Audio Adapters
An audio adapter in Rivendell is simply a device or facility for getting audio into and/or out of a host on a realtime basis. Most commonly this will be a sound card, although other, more exotic possibilities (using TCP/IP networking or direct routing to other audio applications) also exist. The three main classes of audio adapters supported by Rivendell are:
Advanced Linux Sound Architecture (ALSA) – The standard Linux sound card driver starting with the 2.6.x kernel series, ALSA supports a huge array of commercially available sound cards, ranging from entry level 'game' cards to high-end cards aimed at professional audio uses. More information, including a current list of supported cards, is available at the ALSA web site, http://www.alsa-project.org/.
HPI Adapters – These are high-performance sound cards manufactured by AudioScience Corporation. Designed and built specifically for broadcast automation applications, many feature advanced capabilities (such as on-board MPEG codecs and AES3 i/o) specially aimed for use in that setting. They are so-called because Rivendell uses AudioScience's special 'HPI' driver to access and control them. More information is available at AudioScience's web site, http://www.audioscience.com/.
JACK Audio Interconnect Kit – JACK is not a particular set of hardware devices, but rather an audio 'framework' that allows compliant applications to share audio resources and route audio in realtime amongst themselves. JACK is different from similar efforts within the Linux realm in that it was designed from the ground up for professional audio work, with particular focus upon low-latency operation and synchronous execution of all clients. More information can be found at the JACK web site, http://jackit.sourceforge.net/.
1.2.1 Serial Ports
Commonly known in the DOS/Windows world as 'COM ports', serial ports are often used to communicate with outboard gear, such as satellite receivers and audio switchers. Up to eight serial ports can be accessed simultaneously by each Rivendell host.
1.2.2 GPIO/Switcher Devices
Chapter Two
Section 2.0 RDLogin
Rivendell uses a sophisticated system of user privileges to keep track of which users have permission to perform what operations. These privileges are tracked by the system on the basis of user accounts. Creating user accounts and administering their permissions are done in the RDAdmin module and are covered in the Rivendell Technical and
Administration Guide.
It's important to note that these user accounts are not the same thing as the “Login Name” that is used to log into the computer system itself. Rather, they exist and have meaning only within the Rivendell system. For the rest of this discussion, when we talk about “users”, it is these “Rivendell users” that we are referring to.
Each Rivendell host has a default user. As the name implies, this is the user that is automatically logged in after the system is booted. By default, the name of this user is “user”, but the system administrator may have changed this to some other name.
For many sites, a single default user is all that is ever required. For some sites however, particularly larger ones, it is desirable to have multiple user accounts, each tailored to a particular person or “role”, with privileges assigned appropriately. Such sites require a means to log different users in and out of the system, without interfering with any playout operations that may be ongoing at the time. RDLogin is the module for doing this.
RDLogin will display a small window after being started, showing the currently logged-in user (see Illustration 1). To change to a different user, select the desired user name from the Username: control, enter the correct password, and then touch the Set User button. To “log out” of the system (in reality, just return to the default user), simply touch the Default User button (no password is required to set the default user). To exit RDLogin and do nothing, simply touch the Cancel button.
Chapter Three
Section 3.0 The Rivendell Library Structure and RDLibrary
3.0.0 Carts
The Rivendell Library consists of a set of objects called carts. A cart is a data container that holds either one or more pieces of audio (called an audio cart), or macro commands to the system (called a macro cart). The cart is the fundamental schedule building block in Rivendell, in that it is the smallest object or 'atom' that the outside world (like a traffic or music scheduler) can see.
RDLibrary, upon startup, will show the current list of all carts on the system, as in
Illustration 2 below:
Illustration 2: The RDLibrary Cart List
A number of important attributes of carts can be seen from this illustration. First is the cart's number. Each cart in the Library gets assigned a unique number when it is created. This number can range between 000001 and 999999, and is the primary 'handle' by which both Rivendell and external systems (like traffic or music schedulers) refer to the cart. Very often, sites have specific rules concerning which types of audio (commercials, promos, music, etc) and macros get assigned which numbers. We'll cover this area in some detail when we discuss groups.
Immediately to the left of the cart number is an icon indicating the type of cart.
value is calculated automatically by the system.
Next comes various columns showing information from the cart label – Title, Artist, Client and Agency data, etc. This information can be edited by opening RDLibrary's Edit Cart dialog (Illustration 3), either by double-clicking on the desired cart entry in the list, or by touching the desired cart entry and then touching the Edit button. In either case, you should get a dialog similar to that shown in Illustration 3.
This is how an audio cart looks when loaded into the Edit Cart dialog. The upper half of the dialog is the cart label data. The meaning of most of these fields should be fairly self-evident, but a few call for special comment:
Enforce Length – When checked, this indicates that timescaling should be applied to this cart when it is played in RDAirPlay, meaning that the cart will air at the length indicated by the Forced Length field, rather than the native length of the audio. Care is needed when implementing
timescaling within a facility, as there are limits to how much the length can be altered, while only certain types of audio adapters support it at all. See the Rivendell Technical Guide for more information.
Group – This is a pull down menu by which the group ownership for the cart can be set. The system administrator configures the list of available groups for each user in RDAdmin.
User Defined – As the name implies, this field has no dedicated meaning to Rivendell itself, but is provided for each site to use as is seen fit.
The example in Illustration 3 shows an audio cart. As such, the bottom half of the dialog displays the lists of cuts contained within the cart.
3.0.1 Cuts
Each audio cart can contain one or more cuts. A Rivendell cut is an actual piece of audio, somewhat analogous to a 'track' on a CD. Up to 999 such cuts can exist within a single cart. Each line in the cut list contains information about the cut, including:
Description – An arbitrary name, assignable by the user as an aid in keeping track of the content, it is roughly analogous to the 'Title' field in the cart label.
Length – The actual, measured play out length of the cut audio. This field is set automatically by the system.
Last Played – The last date and time that the cut was aired by the RDAirPlay module. Useful for keeping track of stale inventory.
# Of Plays – The total number of times the cut has been aired by the RDAirPlay module.
Origin – The name of the host upon which the audio in the cut was last recorded, along with the date and time.
Outcue – A user settable field. This line shows up in the RDAirPlay log when the cut is played.
3.0.1.0 Multiple Cuts in a Cart
To edit the properties of a cut, either double-click its entry in the cut list, or touch it once to highlight and then touch the Cut Info/Record button. The Record Dialog (Illustration 4) will now open up.
Roughly the upper third of the dialog is
for editing the various cut parameters, the middle section is for configuring the cut's daypart settings, and the bottom third is a record machine that can be used both to record new audio into the system and to audition any recording already made.
3.0.1.1 Cut Dayparting
Each cut in Rivendell can be dayparted on the basis of three parameters:
● Absolute Start and End Date-Time ● Relative Start and End Time
● Day of the Week
By default, each newly created cut starts out with dayparting disabled, meaning that it will be 'eligible to play' at all times. By clicking the Enabled button in the Air Date/Time box, an absolute start and end date for the cut can be entered,
meaning that the cut will be prevented from airing in the RDAirPlay module at any time outside the range of those date-times. Likewise, by selecting the
Enabled button in the Daypart box, start and end times (relative to the day the cut is to air) can be entered. Cuts designated in this way will be allowed to air only within the specified range of times. Finally, by selecting or clearing the
appropriate boxes in the Day of the Week box, a cut can be designed to air only on certain days of the week.
All of the dayparting parameters can be used either singly or in combination with each other. When combined, the resulting 'eligibility' is calculated as the logical AND of the applied dayparting limits. For example, a cut with the 'Monday' box cleared will refuse to air on Mondays, regardless of whether any of the other daypart rules match.
It's important to remember that dayparting rules affect audio play out only within the RDAirPlay module. You will still be able to audition and play the audio without limitation in the other Rivendell modules.
3.0.1.2 Cart and Cut Color Coding
Each cart or cut in RDLibrary is assigned a color to indicate it's 'playability' for air, as follows:
● NO COLOR – Event will play normally
● RED – Event will not play (due to dayparting or lack of audio) ● GREEN – Event will play an Evergreen
It's important to remember that the color displayed for each event indicates playability at the instant that the event is being viewed.
3.0.1.3 Recording and Auditioning a Cut in the Record Dialog
The lower third of the Record Dialog is used both to audition and record audio. To audition the cut, simply press the play button (the one with the triangular symbol). The button should illuminate, audio should show on the bar meter and start playing immediately. The audio will play to completion, unless either the stop button (square symbol) is pressed, or the Record Dialog is closed.
We have two options for actually starting the record machine. We can start it manually by pressing the play button, at which point the machine will
immediately begin recording, or we can set the Record Mode drop-down menu to the VOX (short for voice activated) setting. When in VOX mode, the record machine will start automatically as soon as it senses the presence of audio at the input.
Once started, recording will continue until either the stop button is pushed, or the maximum allowed length for a manual recording (set by the system administrator) has been reached. Once stopped, if the AutoTrim drop-down menu has been set to On, the Start and End markers will be automatically set to the beginning and end of detected audio within the cut. (We will discuss Markers in detail when we get to the section on the Edit Markers dialog).
Section 3.1 Alternative Methods of Audio Ingestion
In addition to manually recording material in realtime, RDLibrary supports two alternative methods for audio ingestion:
● Importing from a File
● Ripping from a CD
3.1.0 Importing Audio from a File
To import audio from a file directly into a cut, we start by opening the cut's parent cart in the Edit Cart Dialog. Next, touch the cut's entry in the cut list and then touch the Import/Export button to open the Import/Export Audio Dialog
(Illustration 5).
Select the file
you wish to import, either by entering the path and filename to it in the Filename
field or by clicking the Select button to open a file browsing dialog. Rivendell is capable of importing the following types of audio files:
● Microsoft WAV (*.wav) – Both PCM16 and MPEG supported
● MPEG (*.mp1, *.mp2, *.mp3)
● OggVorbis (*.ogg)
● Free Lossless Audio Codec [FLAC] (*.flac)
Next, set the Channels drop-down menu to the appropriate number of channels. You may also wish to adjust the Normalize or Autotrim controls, although these will normally be set to reasonable default values by the system administrator and should seldom have to be altered. If Normalize is selected, then the imported audio will be peak normalized to the level indicated. The Autotrim does the same thing as in the Record Dialog (see section 2.0.1.2, 'Recording and Auditioning a Cut in the Record Dialog' above for details).
Finally, touch the Import button. A progress bar will indicate percentage
completion of the import, followed by a popup box to announce completion. The Import Audio Dialog will automatically close after acknowledging completion. The audio is now imported, and can now be auditioned and otherwise processed in the usual way.
3.1.1 Ripping Audio from a CDTrack
Illustration 6: The Rip CD Dialog
Load a CD into the CD drive. After a few seconds, list of tracks should appear in the Tracks area. If the system administrator has enabled the FreeDB CD Lookup Service, the names of the various tracks may appear as well.
Set the Channels, Normalize and Autotrim controls appropriately (see section 2.1.0 for more details on using the Normalize and Autotrim controls). Next, touch the track you wish to rip and then press the Rip Track button. The track will now be ripped into the cut, with a progress bar keeping you informed of progress. When the rip is complete, a message box will pop up to inform you of this.
If FreeDB data was found for the CD, you can have the FreeDB track, artist and album names be automatically placed on the cart label for the cart by checking Apply FreeDB Values to Cart before closing the Dialog.
3.1.2 Ripping Multiple CD Tracks at a Time
Sometimes, when transferring multiple audio tracks from CD, it's more
do this, click the Rip CDbutton near the bottom of the main RDLibrary screen, bringing up the Rip Disk Dialog (Illustration 7).
Illustration 7: The Rip Disk Dialog
This dialog is similar in many ways to the Rip CD Dialog described above, except that each track can be assigned to transfer to a different cut by double clicking on its listing, or by touching the listing and then the Set Cut button, bringing up the Select Cut Dialog (see Illustration 8).
Illustration 8: The Select Cut Dialog
Once all of the desired tracks have been assigned to cuts, be sure that the Normalize, Autotrim, Channels and Apply FreeDB Values to Carts controls have been set as desired, then click the Rip Disk button. A set of progress bars will keep you informed of the progress of each track, as well as overall progress. When, the rip is finished, a message box will let you know.
Section 3.2 Macro Carts
A macro cart is a cart that contains one or more commands written in Rivendell Macro Language (or 'RML' for short). The Edit Cart dialog for a macro cart is similar in many ways to that for an audio cart with the exception of the lower half, which contains a list of RML commands to be executed rather than a list of cuts (see Illustration 9). (NOTE: for a complete description of Rivendell Macro Language, including a breakdown of available commands, see Chapter Nine).
To add a new line of RML, select the desired location in the list and touch the Add button. Similarly, a line can be deleted by selecting it and then touching the Delete button, or modified by touching the Edit button. The RML can be tested, eight line-by-line or as a whole by touching the Run Line or Run Cart button
respectively. It is also possible to Copy and Paste individual lines both within a given cart or between carts.
Section 3.3 Navigating the Audio Library
The uppermost section of RDLibrary's main window contains tools designed to allow for fast searching of the entire audio library, making locating a particular piece of audio easy even in a library containing thousands of carts. It's possible to control what carts are listed, as well as how they are sorted.
3.3.0 Changing the Cart Sort Order
The order in which carts are displayed in the cart list can be changed by simply clicking on the header of the column by which you want them sorted by. By default, the carts are sorted by Cart Number. To instead sort them alphabetically by Title, simply click the TITLE header once. To sort them by Title in reverse – i.e. from 'Z' to 'A' – click the TITLE header once again. Clicking the TITLE header a third time restores the sort to normal 'A' to 'Z' again. And so on for all of the columns in the cart list – it's possible to sort the Library by Artist, Length, or any other parameter shown in the cart list.
3.3.1 Selecting Carts by the Filter Field
Very often, one will want to find a cart or set of carts whose label(s) contains a
particular word or phrase. It's possible to narrow the list of displayed carts to this set by simply entering the desired word or phrase into the Filter field at the top of the main RDLibrary screen. The full list can be restored by clearing the Filter field or by clicking the Clear button.
3.3.2 Selecting Carts by Group
It's possible to limit the list of carts to only those in a particular group by setting the Group drop-down menu to the desired group name.
3.3.3 Selecting Carts by Type
You can tell RDLibrary what type of carts to list by checking the Show Audio Carts and Show Macro Carts boxes. Clearing both boxes obviously results in no carts at all being displayed.
It's also possible to combine all four of the above search and sorting methods.
3.3.4 Selecting and Opening Carts
Once the desired cart has been located on the cart list, load it into the Edit Cart Dialog (Illustration 3) by either double clicking its list entry, or by touching its list entry and then touching the Edit button.
Section 3.4 Library Maintenance
3.4.0 Editing Markers
Rivendell uses a system of cue points within audio cuts, referred to as markers. Markers can be used to specify a number of parameters for a piece of audio.
Table One shows what markers are available, their purpose and their corresponding color.
Markers are set in the Edit Markers Dialog (see Illustration 10). To access the Dialog, open an audio cart, select the cut to open on the cut list and then touch the Edit button.
It's possible to 'zoom-in' on the waveform in various ways by clicking the
Amplitude and Time buttons. By default, the waveform is displayed fully
'zoomed-out', thus showing the entire length of the audio cut. The GoTo buttons can be used to jump directly to the current play out cursor position, start or end of the waveform.
Audio can be played one of two ways: either by clicking on the waveform to indicate where play out should start and then clicking the left-hand Play button, causing play out to start from the selected position, or by clicking the right-hand Play button, which will cause play out to start from the Start Marker (just as it would in RDAirPlay). Clicking the Pause button while playing will cause audio to stop and the play out cursor (a thin vertical black line in the waveform area) to freeze at its current position, while pressing the Stop button will stop the audio while resetting the play out cursor to the position it was in when Play was started. Clicking the Loop button will cause the audio to play out continuously, looping from end back to start, until either the Stop, Pause, Save or Cancel buttons are clicked.
To set a marker, click on the corresponding marker button and then left-click on the waveform area to indicate where on the audio the marker should be placed.
(NOTE: With the exception of the FadeUp and FadeDown markers, all markers in
Marker Type Function Color
Start / Stop Indicates start and end points of audio. RED
TalkStart / TalkStop Indicates point to start and stop the Talk Counter in RDAirPlay. BLUE
SegueStart / SegueEnd Indicates the start and end of the audio overlap during Segue transitions in
RDAirPlay. CYAN
HookStart / HookEnd Not used at present. VIOLET
FadeUp Indicates the point at which audio should be faded up to full level after starting in
RDAirPlay. YELLOW
FadeDown Indicates the point at which audio should start fading down to off before ending in
[image:36.612.95.523.110.339.2]RDAirPlay. YELLOW
Table 1: Rivendell Marker Types
Rivendell are assigned in pairs. For example, placing a TalkStart marker will also cause a TalkEnd marker to be placed.) Markers that have already been placed can be moved by selecting the appropriate marker button and then dragging the marker to the desired location. It's also possible to specify the position of a marker in the form of hh:mm:ss.s (relative to time after the Start marker) by entering the desired value next to a selected marker button. It is also possible to remove a set of markers that have already been placed, either by accessing the marker menu by doing a right-click on the waveform display, or by touching the Remove Marker button and then touch the marker button corresponding to the marker to be removed. (NOTE: the exceptions to this are the Start / End markers, which are always present and hence cannot be removed.)
As an aid for accurately setting the Start and End markers, it's possible to use the Trim Start and Trim End buttons to automatically set the markers to the first and last instances of the level specified by the Threshold field, respectively.
3.4.1 Copying and Pasting Audio from Cut to Cut
It's possible to make copies of existing an audio cut on the system by opening up the cut's parent cart in the Edit Cart Dialog, selecting it on the cut list and clicking the Copy button. To paste the copied audio, simply select the desired destination cut (within the same cart or a different one) and press Paste.
Section 3.5 – Generating Library Reports
3.5.0 The Cart Report
The cart report consists of a list of all selected carts on the system, with their attributes.
3.5.1 The Cut Report
The cut report consists of a list of all cuts contained by the selected carts on the system, with their attributes.
3.5.2 The Cart Data Dump
Chapter Four
Section 4.0 Choosing the Correct Automation Tool
Rivendell includes two modules specially optimized for performing automatic operations: The RDCatch and RDAirPlay modules. The two modules take radically different approaches in how they go about organizing and controlling operations, so a few words regarding each may be in order here.
RDCatch is aimed at executing actions on the basis of a strict time-based schedule, referred to as an event list. Each action (which can be a recording, a play out, an up- or download, a macro execution or an operation on an audio switcher device) executes on the basis of its scheduled time in the event list, independently of all other actions. As such, RDCatch is often best suited for use in settings such as network head end
operations or 'auxiliary' roles at broadcast stations, where the transitions between events are generally not an important part of the presentation.
RDAirPlay takes a very different approach, in that most events are organized into one or more playlists or logs. A Rivendell log is a list of one or more carts, organized in
chronological order. As the name implies, RDAirPlay is optimized for use in situations where the transitions between the various program elements are a key part of the delivery and presentation of the content, such as in live air play environments.
Of course, it's entirely possible to use both modules, even together on the same machine at the same time – the Linux OS makes for a very robust and capable multitasking system.
Section 4.1 The RDCatch Main Window
After starting up RDCatch, you should see the main RDCatch window, looking
something like Illustration 11. The window consists of four areas: the record / play out decks at the top, the filter areas just below the decks, the events list and the audition buttons and other buttons at the bottom. We'll cover each of these in turn.
4.1.0 The Record / Play Out Deck Area
If the system administrator has configured one or more RDCatch record or play out decks, they will be visible at the top of the RDCatch main window. A record deck is a virtual 'recorder' that can be used to make automated recordings, while a play out deck can be used to automatically play out audio. It does not matter on which particular host a particular deck 'resides' – all Rivendell decks throughout the system are visible in RDCatch, regardless of which host it is run upon.
Starting at the left-hand edge of each deck, there is the deck's name, consisting of the name of the deck's host machine followed by a number and a letter, an 'R' to indicate a record deck and a 'P' to indicate a play out deck. Next, for record decks, there is a MON button, used to monitor the audio present at the deck input, followed by an ABORT
button, used to manually stop an event running in the deck. A description of the currently running event next appears (this area will be blank if no event is currently active),
STATUS MEANING
IDLE The deck is available for events
READY The deck has started monitoring audio but the transport is not yet rolling (record decks only).
WAITING The deck is waiting for a GPI event (record decks only) RECORDING The deck is recording (record decks only).
[image:42.612.91.522.256.574.2]PLAYING The deck is playing out (play out decks only). OFFLINE The deck is configured but not available.
Table 2: RDCatch Deck Statuses
Illustration 11: The RDCatch Main Window
Finally, each deck has an audio meter on its right-hand end, used to verify audio levels in realtime.
4.1.1 The Filter Area
4.1.2 The Event List
The event list is a system wide list of all events to be executed by RDCatch on all of the various hosts on the Rivendell network, with each event occupying a single line. The status of each event is indicated by its background color, as shown in Table 3.
COLOR MEANING
YELLOW The event is next to be executed.
GREEN The event is active.
CYAN The event is in the READY state.
VIOLET The event is in the WAITING state.
[image:43.612.90.412.138.253.2]RED The event is reporting an error.
Table 3: RDCatch Event List Colors
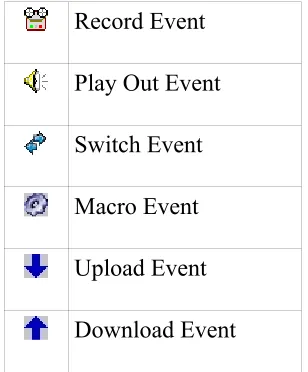
Each entry in the event list starts with an icon that indicates the type of the event, as shown in Table 4.
Record Event
Play Out Event
Switch Event
Macro Event
Upload Event
Download Event
Table 4: RDCatch Event Icons
Next on each line comes the description (settable by the user) and location for the event, the location being the name of the host/deck where the event will run. Then, comes the
start and end parameters. These time-based parameters come in one of three different forms: a hard time, which is simply an absolute time (in twenty-four hour 'military' format), a length (in HH:MM format, relative to an earlier start time), or a GPI start. The GPI parameters can be somewhat involved. They are specified in the following format:
Gpi: <start-time>,<end-time>,<gpi-num>,<wait-time>
Where:
[image:43.612.88.242.327.513.2]<end-time> The time, in HH:MM:SS format, when RDCatch will stop looking for a GPI event (also sometime referred to as the window end time).
<gpi-num> The number of the GPI event to wait for, in the format MATRIX:LINE. We will deal with GPI matrix and line numbers in detail when we cover RDAdmin.
<wait-time> The amount of time to wait, in MM:SS format, between the reception of the GPI event and the actual start of the event (used only for Start parameters).
For example, the start parameter 'Gpi: 14:00:00,14:05:59,0:1,01:00' has a window start time of 14:00:00 [2:00:00 PM], a window end time of 14:05:59, looks for a GPI event on line 0:1 and will wait one minute [01:00] after receiving the GPI before starting the event.
Next come the source and destination fields. The uses of these will vary depending upon what type of event is being listed, but should normally be fairly self-evident. For example, for a record event, the source field indicates the audio source from which the recording is to be made, while the destination indicates the cat/cut combo to which the recording should be made. Some events may leave one or the other of these fields blank.
Now come the day of the week fields. These indicate on which days of the week the listed event should be executed, followed by the origin field, which is simply a readout of the Origin data of the events underlying cut. There are a number of other fields which follow, but these are less important for understanding the operation of RDCatch.
4.1.3 The Button Area
At the bottom of the main window are various buttons. On the left-hand side, the Add, Edit and Delete buttons are used to manage events in the event list. Clicking the Scroll button toggles RDCatch into and out of 'scroll mode'. In this mode, the event list display will be advanced automatically so as to keep the first actively running event centered within the event list area.
On the right hand side, in addition to Close, are three audition buttons. These buttons can be used to audition the head and tail of each cut referenced by an event, thus making it possible to quickly verify that a set of automatic recordings were properly executed.
Section 4.2 – Adding New Events
Illustration 12: The Add Event Dialog
Section 4.3 – Automating Recordings
Automated recordings are configured by means of the Edit Recording dialog (see
Illustration 13), which can be accessed either by clicking the Recording button in the Add Event dialog to create a new record event or by touching the Edit button to modify an existing event.
4.3.1 The 'Start Parameters' Section
The start parameters of each recording are configured in the 'Start Parameters' section. A recording can be programmed to start on the basis of the wall clock time, referred to the hard start time, or upon reception of a general-purpose input, or GPI event originated by a satellite receiver, tone decoder or other external device. Programming a hard start time is merely a matter of entering the desired start time, in 24 hour 'military' format. Programming a GPI start involves, in addition to entry of the GPI parameters themselves (matrix and GPI line numbers) that Window Start and Windows End times be entered, that define the 'window' during which reception of the appropriate GPI event will be 'recognized' by RDCatch. It is also optionally possible to specify a Start Delay
Illustration 13: The Edit Recording Dialog
4.3.2 The 'End Parameters' Section
The end parameters of each recording are configured in the 'End Parameters' section. A recording can be programmed to end on the basis of a hard time, its absolute length or in response to a GPI event. Programming of the Hard Time and Length parameters should be fairly self-explanatory, while the parameters needed to program a GPI event are similar to those used for the start parameters, with the exception of the 'Max Record Length' setting, which limits the maximum length of the recording in the event that the expected GPI event is never received.
4.3.3 Programming Multiple Recordings in a Single Event
If a record event is configured to use GPI for its start and Length or GPI for its end parameter, then it is possible to configure the event to make repeated, multiple recordings within a single event by checking the 'Allow Multiple Recordings Within This Window' box in the 'Start Parameters' section. This can significantly reduce the amount of required record events when capturing material with high on-air turnover, such as newscasts or traffic reports.
4.3.4 Selecting a Record Source
audio input can be chosen from the Source drop-down menu.
4.3.5 Selecting a Record Destination
Each programmed recording must have a 'destination', a designated Cart/Cut which will hold the audio. The currently programmed destination is shown in the Destination field, and can be changed by clicking the Select button.
4.3.6 Setting the Active Days for a Recording
A check should be placed next to each day of the week for which a recording should be made in the Active Days box. If no days are checked, then no recordings at all will be made.
4.3.7 Record List Management with Event Active and Make OneShot
The record event will be actually executed only if Event Active (in the upper left corner of the dialog box) is checked. By clearing this box, it's possible to 'bank' a record event without actually having it run, useful for events that are only used sporadically.
For events that need to be executed only once, the Make OneShot box can be checked. Such an event will execute just once, and them automatically delete itself from the event list.
Section 4.4 – Automating Playouts
Automated playouts are configured by means of the Edit Playout dialog (see Illustration 14), which can be accessed either by clicking the Playout button in the Add Event dialog to create a new record event or by touching the Edit button to modify an existing event. The process of configuring a playout is very similar to that for configuring a recording – see the relevant part of Section 3.3, 'Automating Recordings' above for details.
Illustration 14: The Edit Playout Dialog
Section 4.5 – Automating Uploads/Downloads
Illustration 15: The Edit Download Dialog
With the exception of the Url, Username and Password controls, the process of configuring a download is very similar to that for configuring a recording – see the relevant part of Section 3.3, 'Automating Recordings' above for details.
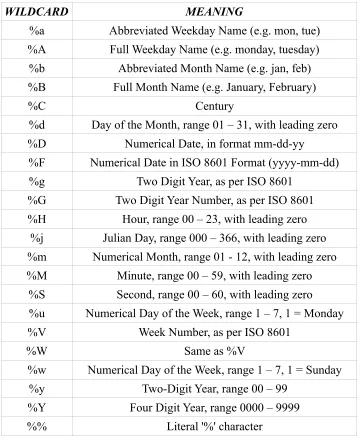
The Url control is used to specify the Uniform Resource Locater for the material to be downloaded. The following download types are supported: http, ftp, smb and file. The URL field can also include wildcard characters that can be used to construct date-based URLs, as shown in Table 5.
The Username and Password fields are used to indicate the username and password required for access to the server referenced in the URL. For public web pages and anonymous FTP servers, these fields can be left blank.
Automated uploads are configured by means of the Edit Upload dialog (see Illustration 16), which can be accessed either by clicking the Upload button in the Add Event dialog to create a new record event or by touching the Edit button to modify an existing event. The following upload types are supported: ftp, smb and file. As with downloads, the URL field can also include wildcard characters that can be used to construct date-based URLs, as shown in Table 5.
Configuration of an upload event is very similar to that of a download, with the addition of the Export Format control. This is used to set what file format should be used for the upload. Depending upon what software encoders have been installed by the system administrator, the following export types may be available:
● PCM16 Linear (*.wav)
● Free Lossless Audio Codec [FLAC] (*.flac)
● MPEG Layer 2 (*.mp2)
● MPEG Layer 3 (*.mp3)
● OggVorbis (*.ogg)
WILDCARD MEANING
%a Abbreviated Weekday Name (e.g. mon, tue)
%A Full Weekday Name (e.g. monday, tuesday)
%b Abbreviated Month Name (e.g. jan, feb)
%B Full Month Name (e.g. January, February)
%C Century
%d Day of the Month, range 01 – 31, with leading zero
%D Numerical Date, in format mm-dd-yy
%F Numerical Date in ISO 8601 Format (yyyy-mm-dd)
%g Two Digit Year, as per ISO 8601
%G Two Digit Year Number, as per ISO 8601
%H Hour, range 00 – 23, with leading zero
%j Julian Day, range 000 – 366, with leading zero
%m Numerical Month, range 01 - 12, with leading zero
%M Minute, range 00 – 59, with leading zero
%S Second, range 00 – 60, with leading zero
%u Numerical Day of the Week, range 1 – 7, 1 = Monday
%V Week Number, as per ISO 8601
%W Same as %V
%w Numerical Day of the Week, range 1 – 7, 1 = Sunday
%y Two-Digit Year, range 00 – 99
%Y Four Digit Year, range 0000 – 9999
[image:50.612.127.488.70.506.2]%% Literal '%' character
Table 5: RDCatch Date/Time Wildcards
Section 4.6 – Automating Macro Execution
It's possible to configure the automatic execution of a Macro Cart by means of the Edit Cart Event dialog (see Illustration 17), which can be accessed either by clicking the Macro Cart button in the Add Event dialog to create a new Macro Cart event or by
Illustration 16: The Edit Upload Dialog
Illustration 17: The Edit Cart Event Dialog
Section 4.7 – Automating Switcher Operations
It's possible to configure an automatic operation on a switcher device by means of the Edit Switcher Event dialog (see Illustration 18), which can be accessed either by clicking the Switch Event button in the Add Event dialog to create a new switch event or by
touching the Edit button to modify an existing event.
Chapter Five
Section 5.0 Logs and Log Events
A Rivendell log is a sequence of one or more events to be executed by the system, arranged in chronological order. (This functionality is sometimes referred to as a playlist
in other automation systems). Several different types of events can be included in a log, along with parameters governing how and under what circumstances they will be
executed.
Upon startup, RDLogEdit will show the current list of all logs on the system, as in
Illustration 19. A number of important attributes of logs can be seen from this
illustration, the first being the log name, with a summary status indicator next to it. The name is an alpha-numeric label that is used as a unique “handle” by the system to
reference each log, and can be up to a maximum of 64 characters long. The status indicator is intended as a quick visual guide as to whether a particular log is ready for air (green check mark) or not (red ex).
Next comes the log's description. This is a free-form alpha-numeric label that can be used to record any information that might be useful to have appear on the log list (e.g. “This log for Sunday's show, don't modify!”).
Next comes a column showing the owning service. Each log is owned by exactly one service, which determines under what circumstances the log can be played and where electronic log reconciliation (ELR) data resulting from log playouts is sent (for an
overview of Rivendell services, see section 1.1.3).
Next comes three “status indicator” columns (“MUSIC”, “TRAFFIC” and “TRACKS”) indicating the log's degree of readiness for air. A red indicator indicates that the
particular data element is required but currently missing, a green indicator indicates an element is required and present, while a white indicator indicates that an element is not required. Additionally, the “TRACKS” column contains a pair of numbers indicating how many completed voice tracks exist in the log versus how many total track markers exist (the subject of voice tracks and track markers will be covered in more detail below). When all three of these status indicators show either green or white, the summary status indicator (at the beginning of the log's entry in the list) will show as a green check mark, while a red indicator in any of these three fields will show a red ex. (NOTE: because a log sports a red ex does not indicate that the respective log cannot be played. It is merely a visual indicator to allow logs to be quickly “eyeballed” for completeness).
Next comes a pair of columns indicating the valid start date and end date for the log.
Finally, there is a column indicating the log's origin –i.e. the place, date and time it was originally created.
A report that lists the available logs on the system can be generated by touching the Log Report button.
A new log can be created by touching the Add button and entering a name, or an existing log inspected and modified by touching its entry on the log list and then touching the Edit button, resulting in the log being opened in the Edit Log dialog as shown in Illustration 20. The Edit Log dialog consists of three parts: the top section, where much of the information shown on the log list can be inspected and modified; the middle section, which shows the list of events comprising the log, and the bottom section, where buttons for modifying and saving the log are located. Each event in a log can be one of several different types, indicated by the icon displayed at the start of the line (see Table 6 for a breakdown of the various icons). The following types of events can be incorporated into a Rivendell log:
5.0.1 Audio Carts
The first, and usually most common type of log event is an audio cart. As the name implies, audio carts are Library entries that contain audio material intended for playout. Audio carts were covered in detail in Chapter Two in the discussion about RDLibrary.
5.0.2 Macro Carts
A macro cart is a cart from the Library that contains one or more system commands that can be used to cause the system to take various actions. They were touched upon in Chapter Two in the discussion about RDLibrary, and will be discussed in detail in Chapter Seven.
5.0.3 Note Markers
and used as a guide or reminder (program coders sometimes refer to this sort of functionality as a remark or comment, as seen in the REM command used by BASIC programmers). Note markers belong to a class of log events known as meta events
because (unlike carts, which exist in the Library independently of whether they are placed in a log or not), they have no independent existence outside of the specific log where they are placed. A note marker has absolutely no effect on the execution of a log other than to simply display some text at a specified point in a log, and as such can be useful as a mechanism for making notes or reminders to oneself or to others who may be executing the log.
5.0.4 Track Markers
A track marker is another meta event that is very similar in operation to note markers, with one key addition: track markers designate or “bookmark” a place in the log where a voice track is to be recorded. (The entire topic of voice tracks and tracking will be covered in detail in Chapter Eight). As with note markers, track markers have absolutely no effect on the execution of a log.
5.0.5 Chain Events
A third type of meta event is the chain event. Unlike markers, a chain event has a very definite effect when executed in a log: namely, causing a new log (whose name is
specified as part of the event) to be loaded and executed. Chain events are often placed at the very end of a log, typically just before midnight so as to cause a new log to load for the next broadcast day.
5.0.6 Import Links
An import link is a placeholder event that shows where events imported from the external music or traffic scheduling system will eventually go. They will be covered in detail in the chapter on RDLogManager.
Each event in a Rivendell log can have its parameters modified by touching its entry in the Edit Log dialog and then clicking the Edit button, thus opening up the Edit Log Entry dialog, shown in Illustration 21 for a cart event, or Illustration 22 for a meta event.
Section 5.1 Event Transitions
Each event in a log has a transition type, shown in the “TRANS” column of the Edit Log dialog. The transition type determines what happens when one event in a log ends and the next starts. Three basic transition types can exist in a Rivendell log: PLAY,
SEGUE and STOP.
Illustration 21: The Edit Log Entry Dialog for Cart Events
Audio Cart
Voice Track Audio Cart
Macro Cart
Note Marker
Track Marker
Chain Event
Music Import Link
[image:59.612.89.241.82.345.2]Traffic Import Link
Table 6: Rivendell Log Event Type Icons 5.1.1 The PLAY Transition
If an event has a PLAY transition, then it will begin playing when the previous event has finished. PLAY transitions are used when automatic event sequencing is desired with no audio overlap (such as when playing two voice-only announcements back-to-back).
5.1.2 The SEGUE Transition
SEGUE transitions are similar to PLAY transitions, with one key difference: if the finishing event contains segue data (either from the Library or from a custom transition programmed in the voice tracker), then the event will start before the prior event is
finished, causing the two pieces of audio to overlap and mix together. SEGUE transitions can be a very powerful tool for creating a variety of special effects, particularly when used in conjunction with musical material.
5.1.3 The STOP Transition
As the name implies, STOP transitions cause execution of the log to be suspended prior to execution of the event. This is often the desired behavior in situations where the log playout needs to be synchronized to one or more external audio sources (such as remote satellite feeds), and is commonly used in conjunction with Hard Timed events (see below).
Section 5.2 Time and Time Types
All Rivendell log events have an associated time type, which controls what effect (if any) the passage of time will have on the event. There are two basic time types: relative
5.2.1 The Relative Time Type
The default time type for log events, a relative time type simply means that the event is assumed to have a start time of whenever the previous event ends (if it has a PLAY or SEGUE transition) or whenever it is started (if it has a STOP transition).
5.2.2 The Hard Time Type
A hard time type causes the event to be executed or otherwise acted upon when the wall clock equals the time associated with the event. Hard times are a powerful feature that can be used to synchronize the log to various external events. An event can be assigned a hard time by clicking the Start at check box in the Edit Log Entry and filling in the
desired time, and will show up with the letter 'T' appearing at the beginning of its listed time in the “TIME” column of the Edit Log dialog. An event which has been assigned a hard time can also be set to be a Post Point by checking the Make Post Point check box (the concept of post points will be discussed in detail in the chapter covering RDAirPlay).
The specific action that is performed when the time matches is determined by the option parameters supplied as part of the event. Three basic actions are possible:
● Start the event immediately ● Cue to the event (“Make Next”)
● Wait up to N Seconds, then start the event 5.2.2.1 Start Immediately
As implied by the name, if the event is set to start immediately, it will be started as soon as the hard time is reached. Any currently playing events in the log will be stopped down.
5.2.2.2 Cue to the Event (“Make Next”)
If set to 'Make Next', the event will be cued up to become the next event to be executed in the log, bypassing any intervening events in the log between the currently playing event and the hard timed one. Any currently playing events are unaffected.
5.2.2.3 Wait up to N Seconds, then start the event
Section 5.3 Editing Log Event Parameters
5.3.1 Specifying a Cart
The cart number to use for an event can be specified by touching the Select Cart button in the Edit Log Entry dialog, which will open up the Select Cart dialog, as shown in
Illustration 23. Alternatively, it is possible to simply enter the cart number in the Cart field if the number is already known. The Title and Artist information will be
automatically supplied by the system from the cart's label.
5.3.2 Specifying Meta Event Parameters
Note marker and track marker events each take only a single parameter: a Comment text that will show up on the log entry. In the case of a chain event, the name of the log to chain to must be supplied in the Log Namefield, or the Select button can be touched to bring up the Select Log dialog to allow a name to picked from a list of all those available. Note that meta events are assigned transition and time types just the same as cart events.
5.3.3 Rearranging Log Events
Existing events in a log can be cut, copied, pasted or rearranged by touching the
appropriate buttons in the Edit Log dialog. In addition, touch the Delete button will cause the selected log event(s) to be removed from the log.
5.3.4 Saving or Abandoning Changes to a Log
Any changes made to a log can be saved by touching either the Saveor OK buttons in the Edit Log dialog. The current log can be saved under a different name by touching the
Save As button, while touching Cancel will abandon any changes made since the last save.
5.3.5 Missing/Invalid Cart Events
If a given event has a problem (such as referencing a cart that does not exist in the Library, or that is not enabled for play on the log's owning service) its entry will be highlighted either RED (indicating a missing/invalid cart) or MAGENTA (indicating a cart without permission to run on the owning service). It's also possible to generate an exception report summarizing problem cart entries by touching the Check Log button.
Section 5.4 – Generating Log Reports
Various Log reports can be generated by touching the Reports button on the Edit Log dialog and then selecting the desired report and touching the Generate button. The following reports are available:
5.4.1 Log Listing
A chronological listing of all events in the log.
5.4.2 Log Exception Report
A list of missing/unplayable carts referenced in the log.
Section 5.5 – Auditioning Audio
Chapter Six
Section 6.0 Overview
RDAirPlay is the Rivendell module used to run logs generated by the RDLogEdit or RDLogManager (for an overview of Rivendell logs, see Chapter Four). It contains a wide array of features for enabling playout of audio content in live assist as well as fully automated environments.
Section 6.1 Log Machines
Fundamental to the operation of RDAirPlay is the concept of a log machine. A log machine is a virtual “device” into which a Rivendell log may be loaded and executed. RDAirPlay has three such log machines, called Main Log, Aux 1 Log and Aux 2 Log. Each of these log machines is completely independent of the others in the sense that different logs can be loaded and executed simultaneously in the respective machines.
Section 6.2 Layout
As shown in Illustration 24, the RDAirPlay main screen consists of four primary areas: the top area, which contains a variety of indicators for use in live assist situations as well as a set of audio meters; the button widget, which occupies the bulk of the left-hand side of the screen; the right-hand side, which displays either a SoundPanel array or a full log width; and the edit buttons in the lower left-hand corner of the screen.
The top area contains the following indicators:
6.2.0 The Wall Clock
In the upper left-hand corner is wall clock indicator, which indicates the current system date and time. The style used for displaying times throughout RDAirPlay can be toggled between 24 hour “military” format and the traditional “AM/PM” presentation by clicking once on this display. If the system administrator has enabled it, this display will also flash RED to indicate possible clock inaccuracy due to loss of master clock
synchronization.
6.2.1 The Post Point Counter
Immediately to the right of the wall clock is the Post Point Counter. A post point is an attribute applied to a log event with a hard time type. The post point counter uses this information to display countdown and timing information.
The counter can be in one of four possible states: Idle, On Time, Under Time or Over Time. If the next upcoming hard timed event does not have its post point attribute set, then the counter will be in Idle mode (see Illustration 26). If the attribute is set however, then the counter will provide an estimate of how “on-time” the log currently is, on the basis of the current time and events still scheduled to be played.
If the playout is such that the post point will be reached within one second of its
programmed time, then the counter will be in On Time mode (see Illustration 27). The value shown in the square brackets is the scheduled time of the point point.
If the playout is such that the post point will be reached one second or more before its programmed time, then the counter will be in Early mode (see Illustration 28). It will also give an indication of how much more material would need to be added to make the join on time.
Illustration 25: The Wall Clock
Illustration 26: The Post Point Counter (Idle)
Illustration 27: The Post Point Counter (On Time)
If the playout is such that the post point will be reached one second or more after its programmed time, then the counter will be in Late mode (see
Illustration 29). It will also give an indication of how much material would need to be removed to make the join on time.
6.2.2 The Audio Meter
Immediately beneath the wall clock and post point counter is the audio meter. The meter shows the current peak levels of audio being played out of RDAirPlay, with '0' level referenced to -16 dBFS.
6.2.3 The Pie Wedge Widget
In the top center of the top area is the pie wedge widget. This widget counts down the final few seconds of each event. The length of time it counts down, along with whether it counts to the start of the next transition or the absolute end of the event are both
configurable in RDADmin. The color of the band that grows as the countdown
progresses (shown RED in Illustration 31) will change color to indicate if the currently playing event is the last event before a log stopdown. If it is the last, it will be RED, if not, GREEN. A BLUE band and countdown will also appear to indicate the event's talk time (if talk time markers have been set in the underlying cart).
6.2.4 The Next Stop Counter
Immediately to the right of the pie wedge widget is the next stop counter. The large
Illustration 29: The Post Point Counter (Late)
Illustration 31: The Pie Wedge Widget
Illustration 32: The Next Stop Counter