1 TABLE OF CONTENT
SESSION TITLE PAGE 1 Values 10 2 Psychosocial Skills (developing skills for living) 13
-Self- Esteem - Assertiveness
- Negotiation
- Non- Verbal and Verbal Communication - The P.O.W.E.R Model
Adolescent Reproductive Health
3 Adolescent growth and development 29
4 Adolescent Sexual and Reproductive Health 36
5 Adolescent Sexuality and Sex Education 40
6 Norms, Ethics and Adolescent Sexuality 47
7. Basic facts about Sexually Transmitted Infections (STIs) 50
8 Basic facts about HIV infection and AIDS 58
9 Major factors that influence the spread of HIV infection 71 - Sexual Abuse
- Drug Abuse - Gender Issues
10 Knowing your HIV Status 82
11 People Living with HIV and AIDS (PLWH) 85
12 Stigma and Discrimination 88
13 Goal Setting and Time Management 96
14 The Adolescent and the Social Media 101
15 My role as a Peer Educator 105
INTEGRATED LESSON PLANS
Bibliography 121
2 LIST OF TABLES
Tables Page
Table 1: Examples of Values 12
Table 2: Facts about my body and their description 14
Table 3: Summary of ‘Myself’ 16
Table 4: Self-esteem 19
Table 5: Four Steps to Assertiveness 22
Table 6: Assertiveness Skills 25
Table 7: Negotiation Skills 27
Table 8: Worksheet: Changes in Adolescent Boys and Girls 30
Table 9: Changes that occur in Adolescent Boys 31
Table 10: Changes that occur in Adolescent Girls 32
Table 11: Hygiene for Adolescents 34
Table 12: Consequences of Unwanted Pregnancy 39
Table 13: Exercise on Sexuality 40
Table 14: Worksheet: Learning to avoid risky situations 43
Table 15: Ways of Preventing Sexual Abuse 43
Table 16: Advantages of Abstaining from Pre-marital Sex 45
Table 17: Some Rumours and Misconceptions Associated with Abstinence 45 Table 18: Knowledge on STIs 51
Table 19: Testing yourself about the basic facts on STIs 52
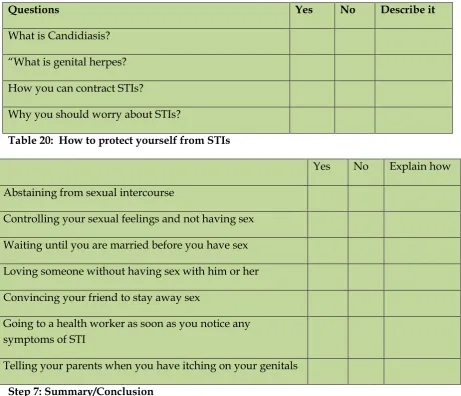
Table 20: How to protect yourself from STIs 53
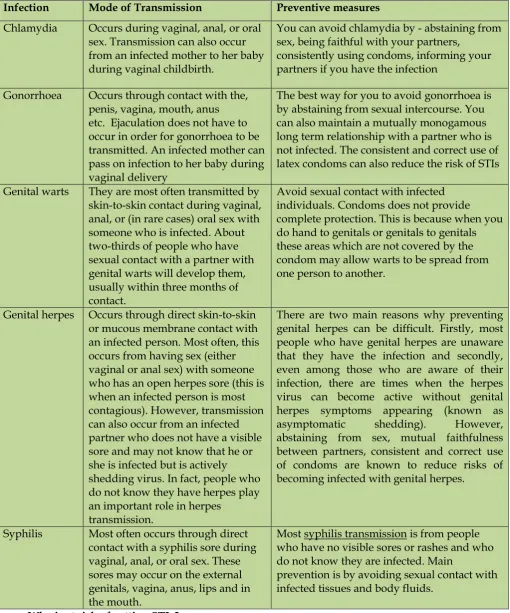
Table 21: Mode of HIV Transmission and Preventive Measures 57
Table 22: Definition of HIV and AIDS 59
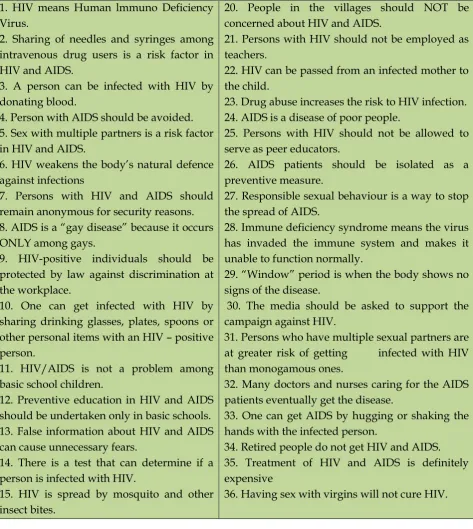
Table 23: Statements on HIV and AIDS – Worksheet 63
Table 24: Statements on HIV and AIDS 64
Table 25: Main Ways of HIV Spread 65
Table 26: Signs and Symptoms of HIV and AIDS 67
Table 27: HIV Preventive Methods 69
Table 28: Types and Forms of Sexual Abuse 73
Table 29: Effects of Rape 73
Table 30: How can we Prevent Rape 74
Table 31: Ways in which Drugs can be Abused 77
Table 32: Effects of Drug Abuse 77
3
Table 35: What boys/girls and girls/women can/cannot do 79
Table 36: HIV Counselling and Testing 83
Table 37: Questions on PLHIV 87
Table 38: How to take care of PLHIV 93
Table 39: Types and Effect of Stigma 94
Table 40: Coping with Stigma 94
Table 41: Ways of Preventing Stigma 95
Table 42: Ministry of Education Policy on Stigma 96
Table 43: Goal Setting and Time Management 98
Table 44: Managing your time 99
Table 45: Two ways of Looking at Leisure 100
Table 46: Worksheet on Examples of Social Media 101
Table 47: Worksheet on Effects of the Social Media 102 Table 49: Social Media and Examples of Social Media 103
Table 50: Effects of Social Media
103
Table 52: Skills of a Peer Educator 105Table 53: Qualities of a Peer Educator 106
Table 54: Key Attributes of Peer Educators 107 Table 55: Criteria for selecting Peer Educators 108 Table 56: Exercise on Chastity 118 Table 57: Exercise on Nutrients 120
LIST OF FIGURES Figures Page Figure 1: Sample Treasure Map 14
Figure 2: ‘Head and Heart’ Chart 15
Figure 3: The Female Reproductive System 29
4 ACRONMYS
AIDS- Acquired Immune Deficiency Syndrome
CHRAJ - Commission on Human Rights and Administrative Justice CT - Counselling and Testing
CRDD – Curriculum Research and Development Division DHMT – District Health Management Team
DoVVSU - Domestic Violence and Victims Support Unit of the Ghana Police FAWE -Forum for African Women Educationalists
FIDA- International Federation of Women Lawyers GES – Ghana Education Service
GHS – Ghana Health Service
HIV- Human Immunodeficiency Virus
HASM - HIV Alert School Model
JHS – Junior High School MoE – Ministry of Education
PPAG - Planned Parenthood Association of Ghana PLWHV – People living with HIV
STIs - Sexually transmitted infections UNFPA – United Nations Populations Fund UNICEF – United Nations Children’s Fund
5 PREFACE
In 2006, the Ministry of Education (MoE) launched the HIV Alert School Model for implementation in Basic Schools with the support of UNICEF. The Model which is an HIV prevention education programme is delivered as a curricula and co-curricular activity. In implementing the model, the Ghana Education Service (GES) developed a number of teaching and learning materials for use by teachers, peer educators and parents to facilitate learning on HIV and AIDS.
Subsequent to the recommendations on the impact assessment of the Model, it has become necessary to review the manuals on all three pillars to meet the growing needs of teachers, pupils and parents. This Teacher-Led manual is, therefore, an enhanced version of the HIV and AIDS manual for Basic School Teachers (2003).
In particular, the manual takes into account health issues related to adolescent sexuality, development of appropriate life skills and a better understanding of the changes that adolescents have to go through to becoming adults including the challenges they may face in the process. Essentially, the revised manual seeks to give school children lifelong learning experiences.
It is hoped that this Teacher-Led manual will assist Primary and Junior High School (JHS) teachers in teaching adolescent sexuality and related health and psychosocial skills effectively. It is also envisaged that the use of this manual will contribute immensely in promoting behaviour and attitudinal change in our school children for better and healthy adult life.
Teachers are encouraged to use the many different participatory learning approaches to engage the children in interactive teaching and learning. This will allow for active involvement of the children in identifying and working at developing the skills they require in their developmental process.
This manual has been developed by GES with the technical and financial support of UNICEF, UNFPA and UNESCO to whom we are most grateful.
6 ACKNOWLEDGEMENT
The Teacher–Led manual is the outcome of the contributions of staff of the Curriculum Research and Development Division (CRDD), the School Health Education Program (SHEP), Guidance and Counselling Unit and other stakeholders.
We are grateful to the under listed persons who were responsible for reviewing and writing different chapters of the manual. These are:
1. Mrs Felicia Boakye-Yiadom – CRDD, GES Headquarters 2. Mr. Ebenezer Charles Otu - CRDD, GES Headquarters 3. Mr. Isaac Asiegbor - CRDD, GES Headquarters
4. Mrs Agnes Asamoah Duodu (CRDD, GES Headquarters 5. Ms. Judith Sakara – formerly of CRDD, GES Headquarters 6. Mr. Aaron Adarkwah – SHEP, GES Headquarters
7. Mrs. Marvin Colerangle-Ashun SHEP, GES Headquarters 8. Mr. Steve Arko – HIV Secretariat, Ministry of Education 9. Ms. Mercy Kwafoa – PLAN Ghana
Our special thanks go to Mr. Kissah Korsah of University of Cape Coast (UCC), Department of Population and Health, Mrs Felicia Boakye-Yiadom and Ms Judith Sakara for the tireless effort in editing the content of the manual. To Mrs. Alice Baffoe, Ms.Georgina Antwi and Mrs.Veronica Odoom much thanks go to you for joining the team to write aspects of the final parts of the manual.
We would like to recognize and express our thanks to Miss Bridget Aku Gashika who spent time in typing the manuscript and Mr. Kenneth Wontumi and Nii Adjei Agoe for the illustrations in the manual. We wish to thank the Director of CRDD, Mr.Jacob Kor for his personal involvement and direction in the development of the manual.
We recognize and express our thanks also to Mr. Carl Ampah of UNESCO and Ms. Esi Awotwi and Ms. Adjoa Yenyi of UNFPA for their immense support and contributions towards the development of the manual.
7 INTRODUCTION
This manual is a revision of the Teacher – Agents for Change Manual for HIV education in Basic Schools. Many teachers were trained on this manual to enable them teach HIV prevention issues to their pupils. The manual was subsequently integrated into the HIV Alert School Model (ASM) for national implementation in 2006. The Alert School Model is implemented on three pillars i.e. teacher led pillar, child led pillar and school community directed pillar. This manual represents the teacher led component of ASM.
In 2010, GES conducted an impact study on ASM among basic school children in the country. The report indicated knowledge about HIV is widespread but poor with regards to comprehensive knowledge on Adolescent Sexual and Reproductive Health (ASRH) issues. The study also highlighted the limited competencies among basic school children in life skills to reduce risks associated with adolescent sexuality. It is against this background that this manual has been produced. It is thus an evidence based document with the aim to providing school children with knowledge on ASRH issues and equipping them with the essential life skills that will enable them get along with other people and deal effectively with pressures, demands and challenges of everyday life.
The manual emphasises 21st century learning approaches where the teacher facilitates and engages the children in hands-on activities and experiential learning. This represents a significant shift from the traditional didactic way of teaching. The interactive teaching and learning processes suggested in this manual are designed to support the children to acquire relevant knowledge, attitudes and appropriate life skills. Developing life skills will enable children take greater responsibility of their own lives; making healthy life choices; developing greater resistance to negative peer pressures and minimizing harmful behaviours. Specific to ASRH issues, developing life skills will enable the children to have control over many of the factors that contribute to early sex and the consequences of pregnancy, abortion and Sexually Transmitted Infections (STIs) and also help them to make informed decisions and avoid engaging in risky behaviours such as drug abuse and violent behaviours such as rape and defilement.
8 HOW TO USE THE MANUAL
This manual is primarily for use in Upper Primary and Junior High Schools. Teachers in the lower primary may adapt aspects of the manual for their lessons. The manual is intended to make it possible for you to teach sexuality and reproductive health and related psychosocial skills within the teaching period specified on the time table. For example, based on the infusion and integration approaches, a teacher doing a science lesson can integrate issues on STIs into a lesson on infectious diseases or the ICT teacher can infuse a topic on HIV into lesson on computer viruses. Where you adopt the infusion and integration methods effectively, it is possible for you to teach ASRH issues without looking for extra time outside the normal teaching period. A couple of sample lesson plans have been provided to guide you on the application of the two methods. The sample lesson plans are not exhaustive and you are encouraged to develop more lesson plans to cover the other issues in this manual.
Where the duration of a lesson stated in the manual is more than 30 and 35 minutes for Upper Primary and JHS respectively, you may decide to break the lesson and teach it over two periods. At the Upper Primary levels in particular, teachers are encouraged to use the local or the child’s play language to enhance understanding of the concepts.
A novelty in the manual is entrusting responsibility of training peer educators to the teacher. This is a departure from the current arrangement where peer educators are trained for the school. You are required to identify suitable children based on the criteria for selecting peer educators and train them as your class peer educators. Teachers are encouraged to train a minimum of two and maximum of ten (gender balance in a mixed sex class) peer educators for a class. The class peer educators will facilitate child led sessions including peer education and school club activities which have been set up to reinforce lessons on the teacher led pillar. This explains why in the revised child led manual, all the activities have been derived from this teacher led manual. The teacher will find the roles and responsibilities of a peer educator in Session 15 of this manual.
9 SESSION 1: VALUES
Introduction
An important aspect of knowing oneself is examining one’s values. Values are things we cherish most. Our values influence everything about us; our thoughts, goals, decisions and our actions. In this session, you will be provided with the knowledge and skills to help children learn about values; how they are developed, and how they influence our actions. Session Objectives: By the end of the lesson, the child will be able to:
1. explain the term ‘values’
2. explain how values are developed
3. identify the values that are important to him/her 4. analyse how values determine decisions he/she makes Duration: (This session may be done in more than one period) Materials: Cards, value statements and scenarios/situations Preparation:
Read session notes,
Prepare three cards/handbills marked Agree, Disagree and Unsure Prepare ‘value statements’
Prepare situations/scenarios Procedure:
Step 1: Introduce the lesson by asking children to answer the following questions:
a) What would you do if you caught a friend copying during an examination? Would you keep quiet or report him/her to the teacher?
b) Someone has dropped a GH¢20.00 note on the school compound. Would you pick it up and hide it or find the owner to return it?
c) You broke a plate when your mother was away. Would you quietly throw the pieces away and say nothing about it?
d) What are the things that your friends do that you disapprove of? e) What kind of things do you praise them for?
Examine the responses of children and let them know that answers to these questions say something about what is important to them; and that is their values.
Step 2: Ask children to explain what values are. Refer children to their responses Step 3: Discuss how values are developed. Let children know that we have individual, family, community and national/societal values.
10
Step 5: Guide children to clarify their values. Place the marked cards/handbills: Agree, Disagree and Unsure on the wall at three different places in the classroom. Read out the prepared value statements one after the other and allow the children to decide on their own whether they agree, disagree or are unsure about each statement. They should stand by the cards/handbills that match their position. Remind children that there are no right or wrong answers, only opinions based on their values
Value Statements
a. Having a child while you are still in school is alright.
b. People with HIV and AIDS should not tell their sexual partners that they are infected. c. Waiting to have sexual intercourse until you are married is a good idea.
d. Boys and girls should be treated equally in schools.
e. A girl who dresses in sexy, revealing clothing is asking to be raped. f. Abortion should be legalized to make it safe.
g. A girl’s place is in the kitchen
Step 6: Let each child give reasons for deciding to stand by a handbill/card.
Step 7: Put children into groups to discuss how their values determine their behaviour. Step 8: Let two children act out the scenario below while the rest pay attention to how the actors communicate e.g. body language, consistency with ‘No’ and the girl’s assertiveness
Role-play Scenarios
Mensah’s role
You like Adjoa a lot and have respected her wishes not to have sex before marriage. It has become hard for you recently and you feel that there is enough trust to have sex with each other. Try to convince her to have sex with you.
Adjoa’s role
You really like Mensah and often find yourself thinking about him in a sexual way, but your Auntie has raised you to believe that sexual intercourse is for people who are married. She also told you about the problems that early and unprotected sex can cause and you are too scared to try. How will you get Mensah to understand how you feel?
Step 9: Discuss the sketch from children’s observations/based on the following:
a) body language; eye contact; consistency with ‘No’; the girl’s assertiveness etc. Step 11: Summary/Conclusion
Values are what we cherish or find important and worthwhile.
We get our values from many sources e.g. parents, family, community, friends and media.
11
Our values help us understand right from wrong and can help us make the right decisions and choices.
Values continue to change as we grow and are influenced by external factors e.g. friends. Evaluation Exercise
Ask children the following questions to reinforce their knowledge on values: 1. What influences people to behave in line with their values?
2. Why do people behave in ways that are not in agreement with their values?
3. What happens when your behaviour is not in line with your parent’s or friend’s values?
Session Notes What are values?
Values are things, ideas beliefs and principles that are of worth to a person and shape his/her behaviour. They are things one believes in and one is willing to stand up for in front of people. Values play an important role in shaping our lives as we grow. Every individual is influenced by family and community values.
[image:12.595.71.524.455.723.2]Our values influence everything about us – our thoughts, goals, decisions, and our actions. If our values are important to us, our actions will be consistent with our values e.g. if one values education, one will spend more time and money on education in preference to say food and recreation. Values are acquired from our parents, family, community and society.
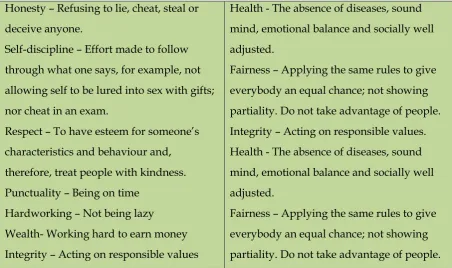
Table 1: Examples of values.
Honesty – Refusing to lie, cheat, steal or deceive anyone.
Self-discipline – Effort made to follow through what one says, for example, not allowing self to be lured into sex with gifts; nor cheat in an exam.
Respect – To have esteem for someone’s characteristics and behaviour and, therefore, treat people with kindness. Punctuality – Being on time
Hardworking – Not being lazy Wealth- Working hard to earn money Integrity – Acting on responsible values
Health - The absence of diseases, sound mind, emotional balance and socially well adjusted.
Fairness – Applying the same rules to give everybody an equal chance; not showing partiality. Do not take advantage of people. Integrity – Acting on responsible values. Health - The absence of diseases, sound mind, emotional balance and socially well adjusted.
12 SESSION 2: LIFE SKILLS
Introduction
In session one, we learnt about values as the things that we cherish most and are dear or worthy to us. We have also seen how our values help us to stay away from indulging in risky behaviours. This session will help us to learn and develop essential life skills (psychosocial skills) that will help us to say ‘No’ to things we do not like.
Session Objectives: By the end of the session, the child will be able to: 1. explain the terms self-esteem and assertiveness
2. exhibit positive self-esteem 3. demonstrate basic assertive skills
4. demonstrate skills to communicate effectively 5. develop decision-making skills
Topic: Self-Esteem (Feeling good about yourself) LESSON PLAN FOR PRIMARY AND JHS
Introduction:
Introduce children to self-esteem with focus on positive body image, character and feelings. Some children have poor body image about themselves and have to be helped to say positive things about themselves.
Lesson objective: By the end of this lesson, the child will be able to: 1. explain self-esteem
2. distinguish between positive self-esteem and negative self-esteem 3. explain how positive self-esteem is developed
4. demonstrate positive self-esteem
Materials: Old newspapers, plain sheets, scrap paper, crayons or paint, glue/starch, sticky tape, a mirror and tape measure.
Preparation: Look for mirror(s), tape measure, glue Activity 1: Making a ‘Treasure map of me’ (30 minutes)
Step 1: Let children take a look of themselves in a mirror. Ask them to write down any differences and similarities between the one sitting close by and themselves.
Step 2: Ask a pair to talk about their differences and similarities. Link children’s responses to the topic, ‘self-esteem’. Explain to children that each one of us is unique.
13 Figure 1: Sample Treasure Map
[image:14.595.68.494.70.496.2]Step 4: Each child completes the ‘Facts about my body’ as below, inside the treasure map. Children are to choose the sections they want to fill. (Table 1)
Table 2: Facts about my body and their description Facts about my body Description
Height Tall
Weight Skin colour
Hair colour and texture Eye shape
14
Step 5: Summary/Conclusion: Let children tell you what they have learnt from the lesson. Let children know that no two people are the same. We have different looks, likes and dislikes. So, each one of us is unique. Each one of us is special.
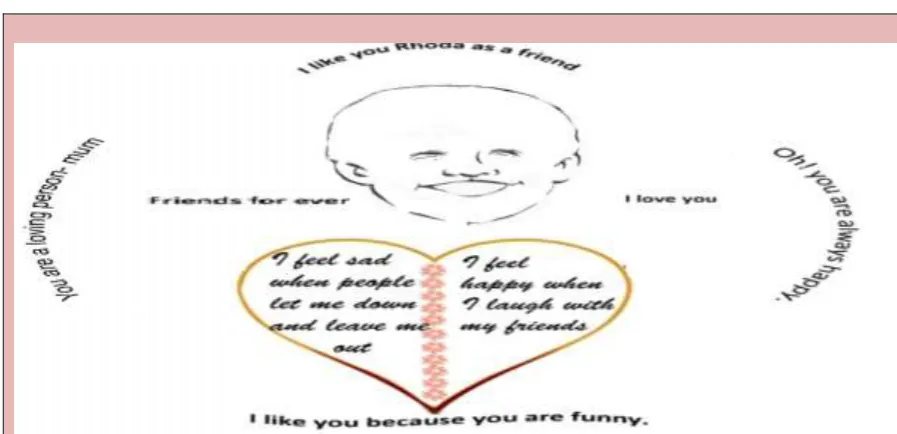
Activity 2: ‘Head and heart chart’- My character and my feelings (30 minutes) Materials: Paper, crayons or felt pens, children task sheet (see figure 2)
Preparation: Prepare head and heart chart. Procedure:
Step 1: Review the previous lesson on ‘The Treasure Map of Me’ by asking children to state lessons they learnt from that activity. Remind them that every child is unique and special. Step 2: Ask children these questions to self- assess themselves.
What do you think about yourself?
Do you think good or bad about yourself? Are the thoughts good or bad?
[image:15.595.74.523.367.584.2]Step 3: Summarize children’s responses on the board. Tell children they are going to explore their own character and feelings. Show the completed “Head and Heart Chart’ to them. Figure 2: ‘Head and Heart’ Chart
Step 4: Give each child a sheet of paper to make their chart.
Let children draw their head and heart (see sample illustration above) and then fill in at least three words which describe their character. Discuss a list of words and their meanings to help them choose positive character words, for example, kind, confident, determined, gentle, funny, loving, and friendly.
15
Step 6: Let children take their ‘Head and Heart Chart’ home for their parents or other persons to fill in a sentence which says something nice/special about their character.
Step 7: Discuss feedback from home. Step 8: Summary/Conclusion:
Since no two people are the same, and each one of us is unique, we should learn to appreciate ourselves and think positively about ourselves. This will help us develop positive self-esteem.
Activity 3: Reviewing self –esteem Duration: 30 minutes
Materials: Paper, crayons or felt pens Preparation: Copies of summary grid
[image:16.595.77.528.332.476.2]Step 1:
Allow children to write things they like about themselves using headings on
Summary of ‘Myself’ table
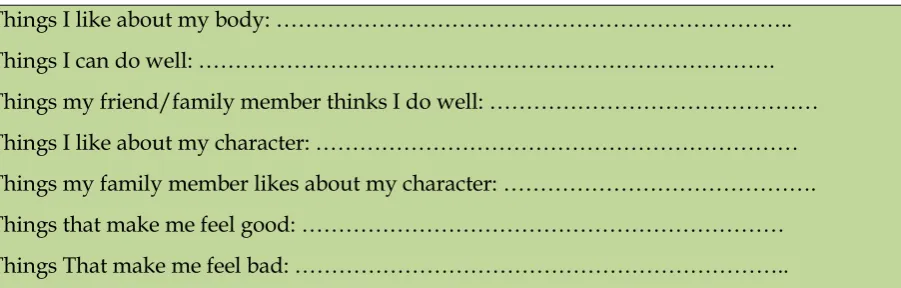
below.Table 3: Summary of ‘Myself’
Things I like about my body: ……….. Things I can do well: ………. Things my friend/family member thinks I do well: ……… Things I like about my character: ……… Things my family member likes about my character: ………. Things that make me feel good: ……… Things That make me feel bad: ………..
Note: This must be a private journal activity which the teacher should be careful to control so that children do not make unfavourable comparisons with each other. Keep a portfolio on children’s task and review with children from time to time.
Step 3: Guide children to compose a song or poem on “There is no one like me”.
Step 4: Summary/Conclusion: Each child is different and has special qualities and is unique.
LESSON PLAN FOR JHS
Activity 4: Self-esteem - Knowing Myself Sentence completion Introduction
Self-esteem includes knowing one’s capabilities, strengths, weaknesses, likes and dislikes. Children should be helped to know themselves so that they can feel good about themselves. Lesson Objective: By the end of this lesson, the child will be able to:
1. explain self-esteem
16 3. explain how positive self-esteem is developed 4. demonstrate positive self-esteem
Duration: 35 minutes
Materials: Old newspapers, plain sheets of papers, scrap papers, crayons or paint, glue/starch, sticky tape, a mirror and tape measure.
Preparation: Prepare sentence completion cards Procedure:
Step 1: Children to complete the following sentences about themselves: e.g. a. I am beautiful/ handsome because………..
b. I am capable of………. c. I feel--- about myself.
Step 2: Children read their responses. Teacher summarises by writing them on the board. Step 3: Discuss the responses and link them to the topic and explain what self- esteem is. Step 4: In pairs, children tell each other the things they like about each other e.g. looks, behaviour or something one is good at. Ask them to tell the other partner one negative thing about themselves. Each partner must help the other to change it to a positive thing.
Step 6: Each pair shares with the class how they helped their friend.
Note: Teacher refer children who have peculiar problems to the school counsellor. Activity 5: Discussion of scenarios on self-esteem
Duration: 35 minutes Preparation:
Step 1: Narrate the two scenarios below on self-esteem. Ask children to listen attentively. Scenario 1: on Amina
Amina thinks she is beautiful and intelligent. She always feels good about herself and often makes comments like ‘I am Miss Ghana’. She is always sure she is capable of doing anything. She works on any task given to her until she accomplishes it. It is not difficult for her to make friends.
Scenario 2: on Kwaw
Kwaw always thinks he is not strong like his friends, ‘I know I am not strong’. He always keeps to himself. He often worries about what people think about him. This has affected his ability to do things successfully. He feels so low and left out. Kwaw does not easily make friends.
Step 2: Discuss the two scenarios by asking children the following questions: a. What are the differences between Amina and Kwaw’s behaviours? b. What influenced Amina to behave in that way?
c. What influenced Kwaw to behave in that way?
17 Step 3: Summary/Conclusion
Based on children’s responses, explain positive and negative self-esteem, summarise the lesson by emphasising children should:
understand that they should not be over confident by over doing things not be forced to behave in a way that is not natural to them
not look down on others
Activity 6: Role-play- Positive self-esteem Duration: 35 minutes
Materials: Manila cards, markers, pencil, pen, a chart illustrating case study scenarios Preparation: Prepare role-play
Procedure:
Step 1: Guide children to role-play scenarios depicting both positive and negative self-esteem.
Role-play scenario on Afiba and Afua
One day, Afiba and Afua’s teacher asked them to lead a group assignment. Afiba asked Afua to lead the group discussion because she did not feel confident. She also said she did not think her colleagues would listen to her. Two group members held her hands in an assuring way and told her she could do it. Afiba insisted that she would not do it. So, Afua offered to lead the group. She prompted and encouraged everyone to talk, since everyone had ideas. Their group got the highest marks and Afua was praised for leading the group successfully.
Step 2: Discuss the role-play by asking the following questions: 1. Why did Afiba refuse to lead the group?
2. How can you describe Afiba’s behaviour? 3. What qualities does Afua have?
4. Which of the two girls would you like to be? Why?
5. How can you as a friend help Afiba develop positive self-esteem? Step 3: Discuss how positive self-esteem can be developed (refer to session notes) Step 4: Summary/ Conclusion
Positive self-esteem makes one develop confidence to do many things such as standing before peers to perform a task and taking initiatives and responsibilities.
Activity 7: Rate Yourself Duration: 35 minutes
18
EXCELLENT GOOD AVERAGE POOR NOT SURE 1 Friendly --- --- --- --- --- 2. Truthful --- --- --- --- --- 3. Honest --- --- --- --- --- 4. Kind --- --- --- --- --- 5. Helpful --- --- --- --- --- 6. Cheerful --- --- --- --- --- Step 2: Tell children to allow their friends to rate them using the same guidelines. Compare their ratings. If they are different, they will begin to know what others think they are.
Step 3: Summary/Conclusion
Teacher sums up the session with the information on table Table 4: Self Esteem
What is Self-esteem? Persons who have positive self-esteem ……...
What is Negative self – esteem
We develop high or positive self- esteem when ……….
- The way that we feel and assess ourselves. It is the belief that one is naturally worthy. - It is the awareness of the good in oneself. - The feelings you have about your appearance, ability, capability, behaviour, past experiences and your beliefs about the way others see you - Taking pride in yourself and accomplishment
- It is strongly influenced by an individual’s relationship with others
- considers themselves as unique and worthy - are confident to say what they think and feel clearly and expect to be treated well
- will be able to stand firm against what they believe is wrong and will not fear being ridiculed and being different
Occurs when a person does not see himself / herself as a worthy person.
- Our friends, family, teachers and others praise and value us as unique human beings. - We achieve what we want. - We imagine a good future for ourselves.
- We feel that we belong to a community or group.
- We make a habit of praising each other
- We tell people what we do not like about their behaviour in a helpful way and not in ways that make people sad.
- We find things we are good at and remember them when we feel bad about ourselves
- We listen to each other and accept each other as special human
beings.
Topic: Assertiveness –Saying how we feel, what we want and what you don’t want Lesson objectives: By the end of the lesson, the child will be able to:
1. say ‘No’ to the things he/she does not like (assertive)
2. explain the differences between assertive, passive and aggressive behaviour 3. demonstrate how to communicate assertively about what he/she likes Activity 8: Learning to say ‘No’
19
Step 1: Choose children to role-play the different possible responses of Kofi and Amarley in the situation below.
The Situation
Kofi invites her friend Amarley to a film show. At the show, it was fun at first, but now she doesn’t
like the way he is touching her. He is being rough and trying to touch her breast. He won’t listen
when she asks him not to.
Here are different ways Amarley could respond
:
Yelling and pushing Kofi angrily -
Don’t do that Kofi!!
Firmly, while pushing him away with one hand -
Don’t do that Kofi!!
Timid soft voice, pushing gently with one hand, hanging her head shyly -
Don’t do that Kofi
Grabbing Kofi roughly and shouting.
You stupid guy! If you don’t stop I am going to tell my brother to beat you, eh!
Firm voice, using a protecting gesture by holding her arms across her chest -
I have asked you to
stop. You are making me feel uncomfortable. I do not like it.
Giggling nervously. Weakly trying to push Kofi away unsuccessfully.
Ha Kofi no nooo no.
Step 2: Discuss the role-play using the following questions:a) What was the best way Amarley responded to the situation in the scenarios? b) Which was the worst response?
c) Does anyone think Amarley will end up going out with Kofi again? Give reasons d) What could have been done differently?
Note: Did they notice how tone of voice and manner can make all the difference when people say exactly the same thing they want the other person to know?
Step 3: Categorize the children’s responses into: assertive, passive and aggressive communication and explain them to children.
Step 4: Ask children to describe the different ways that Amarley communicated to Kofi in trying to say ‘No’. For example talking, shouting, yelling, pushing and holding her arms across her chest, grabbing, laughing and hanging her head slightly.
Step 5: Children say which ones were verbal and which were non- verbal.
Tell children that the seriousness people attach to our ‘No’ is determined by our body and verbal language. Even without words, we can still use our face and body to express happiness, love, anger, acceptance and surprise.
Step 6: Children stand in a circle and teacher guides them to use non-verbal expressions to show: anger, confusion, disappointment, frustration, satisfaction, delight, disinterested. Step 8: Children share their feelings and comments about non-verbal communication. LESSON PLAN FOR JHS
20
Lesson Objective: to explore how non-verbal communication can be used to demonstrate assertiveness.
Duration: 35 minutes Procedure:
Step 1: Introduce the lesson by asking children, in pairs to communicate the following non-verbally for the other partner to respond.
a) Come; Go; Stop that! I don’t like that! Wait here! Come and let’s go! Sit here with me Let the rest of the class pay close attention to the non-verbal expressions - how clearly and strongly the message was communicated; they should also observe facial expressions as well.
Step 2: Allow pupils to explain whether the non-verbal messages were clear and strong enough to convey the meaning; and whether the message was understood by their partners. Note: Let children know that in communication, we use speech, actions, body language, expressions, looking and listening. The message should be understood by the one receiving the message so that he/she can act or respond appropriately.
Step 3: Let children come out with different non-verbal communication among their peers and explain their meanings.
Step 4: Based on their examples, highlight the importance of non-verbal communication and how their mode of communication may become barrier between them and their parents. Step 5: In pairs, let children demonstrate how to communicate assertively using non-verbal
communication. Children should use scenarios showing: a) dislike for someone touching your breast or buttocks
b) dislike for someone shaking your hands while scratching your palm
c) someone standing in his/her doorway and flicking one finger to beckon you to come d) someone squeezing one eye at you
e) somebody sitting on your chair in the classroom
Step 6: Let children share their feelings and general comments about non-verbal communication in the activity in step 5.
Step 7: Summary/Conclusion
21
of what our bodies are saying – not just our lips. We must make sure that there is one and the same message that we are sending both verbally and non- verbally.
Topic: Assertive communication
Lesson Objectives: By the end of the lesson, the child will be able to: 1. distinguish between assertive, aggressive, and passive communication 2. demonstrate assertive skills
Duration: 35 minutes
Materials: Flipchart, makers or chalkboard, copies of scenarios Preparation:
1. Talk to a colleague teacher about the role-play or arrange with a very confident child ahead of time to help with the role-play.
2. Write steps to Assertiveness on the chalkboard.
3. Study the scenarios/situations provided in the session. Procedure:
Step 1: Allow children to describe how they would react to a friend or someone who is forcing them to do something they do not like.
Step 2: Use children’s responses to explain that, assertiveness involves knowing what an individual wants and why. It also involves communicating ones views, feelings, needs and preferences in a manner that is not threatening or harmful towards another person.
Step 3: Demonstrate three different types of communication skills: passive, aggressive and assertive. Use your colleague teacher or a confident child for the demonstration.
a) Passive: without looking at your partner say, ‘it would be nice if someone would help me with my homework, without assistance, I will fail’.
b) Aggressive: Look at your partner and get too close to him/her and shout, ‘you think you are so smart, you better help me with my homework or I’ll hold your neck for my failure.’
c) Assertive: Look at the person, and respectfully ask, ‘I think you are very intelligent and I need help with my homework. Would you please help me with my homework after school today?
Step 4: Ask children which of the communication was the most appropriate and why? Step 5: Take children through the four steps of assertiveness as follows:
Table 5: The Four Steps of Assertiveness Step 1:Explain Your Feelings and the Problem
State how you feel about the behaviour or problem and describe the behaviour or problem that violates your rights or disturbs you; you might say:
i. I feel hurt and betrayed when you say girls are stupid, because I am not stupid. ii. I feel frightened when you get so close to me, because it is threatening.
22 Step 2:Make Your Request
State clearly what you would like to have happened. You might say: i. I would like it better if you do not say that again
ii. I would be pleased, if you keep some distance iii. Could you please………..
iv. I wish you would……….
Step 3: Find out How the Other Person Feels about Your Request
Invite the other person to express his/her feelings or thoughts about your request e.g. i. How do you feel about that? Or is that OK with you?
ii. What do you think?
iii. What are your thoughts on that? iv. Is that alright with you?
Step 4:Accept With Thanks
If the person agrees with your request, saying thanks is a good way to end the discussion e.g. You might say:
i. Thanks
ii. Great! I appreciate that.
iii. I am happy that is okay with you. Great!!!
Step 6: Let children pair up. Each pair to take turns to respond to the following situations using the four steps of assertive communication
Step 7: Teacher reads each situation and allows each child time to share his/her assertive statement with his/her partner.
Kofi’s Situation
Kofi’s friends are trying to persuade him to have a drink. He doesn’t feel very good about drinking alcohol and feels uncomfortable about the situation. How does he deliver his assertive message?
Step 8: Discuss the role-play by asking the following questions: 1. What did Kofi do about the situation?
2. Did Kofi succeed in saying ‘No’, was he indecisive or did he go along with his friends? 3. If he was successful, why was he successful?
4. If he was not successful, what else could he have done? Questions to Kofi:
1. How did you feel about the situation?
2. What caused you to make the decision you made? Step 9: Summary/Conclusion
Conclude the lesson with the following questions:
1. How can assertive skills help you to protect your rights and the rights of others? 2. How can assertive skills help you with your goals for the future?
23 Effective Communication:
Communication is a process through which messages e.g. opinions, ideas, words, feelings and actions between people are passed on to another verbally or non-verbally. Listening, asking questions, observing non-verbal cues, clarity of messages and use of appropriate language enhances effective communication. Effective communication enables individuals to interact with other people meaningfully.
Non-verbal communication includes the use of facial expressions, hands, posture and eyes to communicate a message. It is important to pay attention to both verbal and non-verbal messages and ask direct questions so that you can get open, honest responses.
Verbal communication as the name suggest is where words, sound, lyrics etc. are used to send and receive messages. It is the most common form of communication used
Passive, Aggressive and Assertive communication
Passive: delivering a message without expressing your thoughts or feelings; sometimes staying silent. A passive person knows his or her rights, preferences, needs and feelings but is too timid to stand up for them and communicate effectively.
Aggressive: delivering a message forcefully without thinking of the other person’s feelings; expressing yourself in a confrontational manner. An aggressive person forcefully demands that which he or she wants and does not respect other people’s feelings, rights or options. Assertiveness involves knowing what an individual wants and why. It also involves communicating ones views, feelings, needs and preferences in a manner that is not threatening or harmful towards another person. An assertive person listens, speaks, values and respects other people’s feelings, rights and opinions.
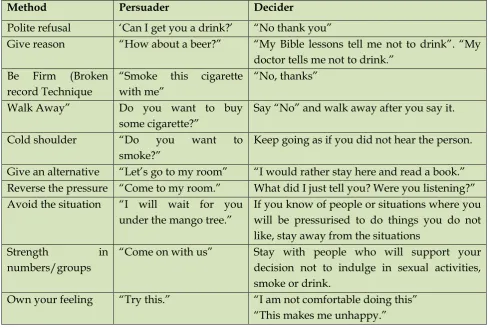
Topic: Resistance Skills (PRIMARY AND JHS)
When your assertiveness fails, that is, when the person would not take ‘No’ for an answer and you can’t talk your way out, act by using resistance skills
Objective: By end of the lesson, the child will be able to use resistance skills to avoid risky behaviours, pressures and dangers.
Procedure:
24 Table 6: Assertive Skills
Use the Word ‘NO’ Make It Loud
and Clear Use Body Language Follow Through Fight Back Be clear and direct. If
you want the person to stop, there is no better word than ‘No’
Say it with confidence (even if you do not feel that way)
You do not need to give any other reason; saying ‘No’ by itself is enough. You do not even have to know the reason. If you just feel unsure or uncomfortable, you can still say ‘No’.
Look the
person in the eye.
Make your voice firm. If the person is not listening, say ‘No’ again-louder!
Say it as many times as it
takes to
address your feelings.
Put both hands in front of you in a ‘step’ position. Stand up straight. If you are standing, move away. If you need to, walk or run away.
Keep your message clear. Say, ‘No’, this is not OK with me” Trust yourself. Don’t let him or her try to change your mind. Even if you really like the person, you have the right to say ‘No’ to any activity-even if it hurts his/her feelings. Offer an alternative. Don’t stay in a situation where it will be hard for your ‘No’ to be respected.
If the person won’t take ‘No’ for an answer and you can’t talk your way out, fight back. Use all of your strength to push him/her away.
Repeat ‘No’ and yell for help Get away and go where there
are other
people.
Take a self-defense lessons Topic: Negotiation
Introduction:
We have learnt when and how to say ‘No’ when we are pressurized into doing what we do not like or want; that is assertiveness. In expressing ourselves assertively, we also negotiate to work out a problem or a difference e.g. you may want to go out with friends but your parents want you to stay at home. This kind of situation requires good negotiation skills. In this session, we will go through the process of negotiation.
Objectives: By the end of the session, the child will be able to: 1. explain the term negotiation
2. use negotiation skills to get out of a problem LESSON FOR JHS
Duration: 35 minutes
Preparation: Prepare the following:
25 Procedure:
Step 1: Give a situation and ask children to explain how they will come out of that situation Bibi’s Situation
Bibi, a JHS one girl, is in the same class with Buka who is very good at Mathematics. Buka has been helping Bibi with her math. One day, Buka asked Bibi to stay alone with him after ‘prep’ in the classroom. Bibi did not like the idea of staying alone with Buka in the class room at that time. How will Bibi solve the problem and at the same time maintain their friendship?
Step 2: Based on children’s responses, explain what negotiation is
Step 3: Put children into smaller groups to discuss the following statements and come up with as many responses as possible to deal with such statements.
Statements and their responses
Statements for which the children need to frame their responses: Let’s dodge class tomorrow and go for a movie
Tell your parents you are going to do group studies and stay at my place tonight? Come on, just have one shot. It will relax you.
Let’s go to the head teacher’s poultry farm and steal some eggs.
Step 4: Discuss children’s responses by asking the following questions: a) How easy was it to come up with their responses?
b) Did they enjoy the task?
c) Will they be able to give such responses in a real life situation? If yes, how? If not, why? Step 5: Pupils to demonstrate how they can negotiate in different given situations.
Situations
1. Negotiate with boy/girl friend to wait till you are matured to marry before sex.
2. Your friend wants you to skip school and go to a movie. He/she tells you that the whole group is going. He/she says, ‘you are afraid; aren’t you?
Step 6: Summary/ Conclusion: Emphasise that, we all in our lifetime face situations where the best way is an assertive ‘No’. In getting what we want in a given situation, problem or circumstance, we need to negotiate our way out of the situation.
Session Notes: Negotiation skills
26 Table 7:Negotiation Skills
How does one develop negotiation skills? To negotiate one must ….. - identify the problem/issue
- collect more information/knowledge
- identify the physical, emotional and psychological feelings associated with the problem on either side. - ascertain the possible ways of solving the problem - communicate with the person involved and offer possible alternatives to reach a mutual decision
- try to make a decision that both like e.g. Let’s do……..
- I won’t do that, but maybe we could do……..
- I won’t drink that …. maybe we could drink tea instead
Topic: Decision Making (The P.O.W.E.R. Model) Preparation:
Make sure you have the P.O.W.E.R Model cards before you start the session Step 1: Stating some problems and how to solve them
Ask children to mention 5 problems which affect adolescents. Brainstorm on the causes of each problem. Write responses on the board. In small groups, assign them one problem. They will identify ways to solve them and explain its effect on their family, friends or other people. Groups present their findings for discussion.
Step 2: Developing decision making skills
Take children through the P O W E R model as follows: The P.O.W.E.R. Model
Step 1: P = PROBLEM: Stop and state (or identify) the problem.
Step 2: O = OPTIONS: Think of different options you can take to solve the problem.
Step 3: W = WEIGH: Look at the good options and weigh them against the bad ones - the choice of every option you think of should help solve your problem.
Step 4: E = ELECT: Choose the best option, talk to a person you respect, then take the best action. Select the option that maintains what is important to you (values).
Step 5: R = REFLECT: Think or reflect about what will happen because of your decision. Is it the best choice? Will you learn something for the next time you have to make a decision? Step 6: Provide children with problems and let them use the model to make decision Key messages
Adolescents must try to make up their minds on what they like and do not like. Adolescents must be able to decide on what is best for them.
Those who value themselves are able to think independently and make wise decisions. Adolescents should be responsible for the decisions they make.
Developing decision making skills
27
Factors that influence our decision making include peers, family, education, culture, traditions and experiences.
28
SESSION 3: ADOLESCENT GROWTH AND DEVELOPMENT Introduction
Series of changes occur during the period of adolescence. These changes are normal in the human developmental process. In this session, teachers will assist children to appreciate the changes and develop appropriate life skills to cope with the changes.
Session Objectives: By the end of the session, the child will be able to:
1. describe the physical, social and emotional changes that occur during adolescence; 2. describe the reproductive organs of both the male and female;
3. relate the parts of the reproductive organs to their functions; 4. explain menstruation, wet dreams and their effects on adolescents;
5. analyse myths and misconceptions associated with the developmental changes; 6. describe the hygienic practises the adolescents need to undertake for healthy living; 7. demonstrate appropriate life skills to cope with the developmental changes
Duration: (This lesson can be treated in three periods)
[image:29.595.75.438.467.683.2]Materials: Manila cards, Markers, Pencil, pen, eraser, Chalk, Two word cards, i.e. Card one: ‘ADOLESCENT’. Card two: ‘ADOLESCENCE’, Chart of the male and female reproductive parts, Charts of labelled diagrams of the male and female reproductive parts (inner and outer)
29 Figure 4: The Male Reproductive Organs
Preparation: Draw female and male reproductive organs or find a prepared diagram of male and female reproductive organs.
Procedure
Step 1: Introduction:
Let children share their experiences and the changes they have been going through since they were five years old. Discuss their responses help them to understand these
Step 2: Post on the wall the chart showing the female and male reproductive organs Discuss the parts and functions of the organs with the class.
Step 3: Group discussion on the physical, social and emotional changes that occur in boys and girls during adolescence together with the associated myths.
i. Put the class into two groups - Female group and Male Group.
ii. Ask each group to work on the issues in the table and plan to present their work in plenary:
Table 8: Worksheet: Changes that occur in Adolescent Boys and Girls Physical changes Emotional /social changes Mental changes
Step 4: Some aspects of developmental changes that need attention.
Discuss with children some key changes that boys and girls experience during puberty.
i. Wet dreams (in the case of boys) ii. Menstruation (in the case of girls)
Note: Use the female reproductive organ diagram to explain how menstruation occurs. Discuss the Life skills they will need to manage the developmental challenges.
30 ii. List their responses on the writing board.
iii. Post teachers’ notes on the wall for children to compare with theirs and fill in the gaps.
iv. Invite children to share personal lessons on cleanliness. Step 6: Evaluation Exercise
Let children answer the following questions to check their understanding of the topic. i. What is the difference between ‘Adolescence ‘and ‘Adolescent’?
ii. What are some of the physical changes in boys and girls?
iii. Do all girls and boys have the same changes at the same time? Explain. iv. What causes the growth changes in the body?
v. Describe some hygienic practises to observe during adolescence. vi. Describe how menstruation occurs in girls.
Step 7: Summary/ Conclusion:
End lesson with the following key points:
i. A number of physical, social, emotional and mental changes occur in adolescence ii. Special chemicals called hormones produced in the body bring about growth
changes.
a. In boys the hormones are produced in the testicles and in girls in the ovaries. b. The changes in the body occur at different times in different people of the same sex.
iii. Many important decisions are made at this stage of development which affects the future of the individual.
iv. The reproductive organs develop during adolescence but the adolescent is socially, economically and emotionally not ready to be a parent and should therefore exercise self-control to preserve sexual health.
Session Notes
An Adolescent is a child in the age range of 10 and 18 years. The period of adolescence precedes adulthood. Children experience a number of social, emotional and physical changes during this period. It is also the period when children are at greater risk of falling into risky behaviours such as smoking, alcoholism, the use of hard drugs and experimenting with sex. .
Table 9: Changes that occur in Adolescent Boys
Physical Changes Social Changes Emotional
Changes
Mental Changes Enlargement of testicles and
penis
Scrotum begins to hang down
Make friends, out-going for recreation
Attracted to the opposite sex Respects peers views and
Attracted to the opposite sex Anger, shyness Mood swing
31 Increase in body weight and
height –muscles more pronounced and stronger. Thicker and longer vocal cords and deeper voice. Erections and first ejaculations, Wet dreams Development of pubic ,facial and underarm hairs
Voice changes – deepens Skin problems/ acne
decisions.
Wants to be recognize as adult
Want independence and privacy
Move around in small groups of same sex and peers
Desire for sex; Pay more attention to appearance
Feel like isolating oneself from friends
Easily embarrassed Feels like an adult
Develop new skills
Curious Aware of the developmental changes in them Question many of the social norms imaginative
Table 10: Changes that occur in Adolescent Girls
Changes in Girls Social Changes Emotional Changes Mental Changes Development of breasts
Vaginal lubrication Development of sweat glands
Enlargement of Hips and buttocks to a rounder shape
Increase in body weight Onset of menstruation and ovulation
Development of pubic and underarm hairs Nipples become darker and larger Skin problems
Make friends Out-going for recreation Attracted to the opposite sex Respects peers views and decisions Want to be recognize as adults Want independence and privacy Move around in small groups of same sex and peers Desire for sex; Pay more attention to appearance
Conscious about appearance
Attracted to the opposite sex Anger Shyness Mood swing
Fast thinking Ability to make decisions Gain experience
Development of new skills Curious
Becoming imaginative Aware of the
developmental changes in them Able to
differentiate between good and bad Question many of the social norms
Parts of the Female Reproductive Organs
The female reproductive organs are located inside and outside her body. Examples of External Reproductive Parts of the Female
i. Vulva – The vulva is found in between the thighs and the different parts make up the outer sex organ.
ii. Clitoris – It is shaped like a flower bud and found where the inner lips meet. It is sensitive to touch and makes a female gets sexually excited.
32
iv. Vaginal Opening – This is the outside end of the vagina. Babies are born through this opening.
v. Hymen – is the skin that surrounds the vaginal opening and partly blocks it. It can easily break through exercise, sexual intercourse or with any direct force on it.
Examples of Internal Reproductive Parts of a Female
i. Vagina – Leads from the vulva to the womb. It is moist and self-cleaning. It is lined with folds of skin which stretch easily during sexual intercourse and when giving birth.
ii. Ovaries – There are two ovaries, one on each side of the womb. The female eggs and hormones are made in the ovaries.
iii. Fallopian Tubes - are found at each side of the upper end of the womb. They reach toward the ovaries. When a female egg (ovum) is released from an ovary, it is sucked into the fallopian tubes. The ovum begins to travel through the tubes to the womb. iv. The Uterus or Womb – It is a hollow part shaped like an upside down pear. A foetus
grows inside the womb during pregnancy.
v. Cervix - The mouth of the womb that connects the womb to the vagina and protects the womb. It makes it impossible for objects to enter the womb.
Example of the External Reproductive Parts of the Male
i. Scrotum – It is a muscular sac hanging between the thighs. The scrotum holds the testes. ii. Testes – are two balls that sit in the scrotum; produce sperms and the male hormone called testosterone.
iii. Penis - It contains a tube called the urethra which carries urine to the outside of the body and also allows semen to pass through during sexual intercourse.
iv. Foreskin – The skin that covers the head of the penis. This is the skin that is removed during circumcision.
Examples of Internal Reproductive Parts the Male
i. Epididymis –Store the sperms until they are matured. Once a sperm is matured it travels along a tube called the Vas deferens.
ii. Seminal Vesicles –Are two pouches that contain some fluid that nourishes the sperms iii. The prostate gland – Produces lubricating fluid for sperms.
Myths and Facts on reproductive organs
There are several myths associated with the changes in the reproductive organs. These myths must be managed with accurate information to avoid adolescent getting into risky behaviours.
33
Fact: The size of the penis is determined by the traits inherited from parents. Myth: A boy needs to have sex whenever he gets erection to avoid being injured. Fact: The erection will go down on its own without sex or injury.
Myth: Wet dreams are a sign that a boy needs to have sex.
Fact: Wet dreams are ways the body gets rid of sperms and semen. Myth: Girls with drooping breasts have already had sex.
Fact: Breasts droop because of gravity. Big breasts are more likely to drop. Puberty
Puberty is the name given to changes that happen to boys and girls as they grow up. It refers to physical and sexual maturation. Most boys and girls begin to notice these changes taking place within their bodies between the ages of 10 and 16.
Puberty is also described as the period in life when the person changes physically from a child into an adult; usually between 10 and16 years.
i. Wet dreams – The release of semen during sleep. It occurs in boys.
ii. Ovulation – At puberty, in a female, once a month, and an egg ripens and is released from the ovary. This occurs about 14 days before the next menstrual period.
iii. Menstruation- This is a normal cyclic process for all women until menopause (45-55 years). Most women have menstrual period about once every 28 days and it lasts up to a maximum of seven days. However, for many girls it will be irregular.
Conception occurs when a sperm fertilizes an egg while it is in one of the female fallopian tubes. The fertilized egg then travels to the womb where it is implanted.
Table 11:Hygiene for Adolescents
Body part Cleaning
Hands and
Fingernails Wash hands with water and soap before touching food and after using the toilet. Trim nails and keep them clean all the time. Long and dirty finger nails
harbour germs and eggs of worms
Skin Take bath regularly, at least twice a day with soap and water. This prevents skin infection and reduces body odour.
Avoid sharing towel and sponge to prevent the spread of infection.
Trim pubic hair and shave armpit hair to prevent them from trapping perspiration and developing bad odour.
Use lemon, lime, antiperspirant or deodorant in the armpit to check perspiration and bad odour.
Do not squeeze pimples; wash face with mild soap and clean face towel. Always wear clean underwear to avoid bacteria from multiplying on your
body and causing diseases and bad smell.
Apply body cream, oil, lotion or pomade to the skin for a nice finish. Choose according to the nature of skin – whether dry skin or oily skin
34
Proper care prevents dandruff and lice infestation.
Comb and brush hair to exercise the scalp to allow free circulation of air on the scalp
Feet Feet should be scrubbed when bathing.
The spaces between the toes should be cleaned and wiped dry. Trim/ cut toenails.
Remove callous using pumice stone to scrub the hard areas.
Teeth Clean teeth to remove particles which get caught in between teeth after eating to prevent bad breath and dental caries.
Always rinse mouth with clean water after eating.
Clean teeth first thing in the morning, when you wake up and last thing in the night before sleeping.
Brush teeth with tooth brush and fluoride containing tooth paste. Chewing stick or sponge may also be used.
Visit the dentist regularly. Female Genital (Vulva) Hygiene Secretions from the vagina sometimes come into contact with bacteria (microorganis ms) resulting in irritations, rashes and other infections
The vulva must be washed from the top down towards the anus to clean the urethral and vagina opening. Ensure no faecal material is pushed into the vagina or urethra, when cleaning the anus after defecation, to cause infection.
The anus should be cleaned away from the vagina to avoid infection from faeces.
Vaginal douching to clean the vagina should be avoided to prevent infection.
The groove between the labia major and the thigh should be washed and properly dried.
Menstrual flow provides a rich medium for bacteria growth; therefore regular baths is necessary during the period to avoid infection and bad odour.
Use good and absorbent sanitary towels, change frequently to prevent bad odour.
Avoid the use of toilet tissue for sanitary pads because the torn pieces could enter the vagina and cause infection.
Pubic hairs should be trimmed or shaved to prevent it from collecting microorganisms.
Dispose sanitary towels appropriately during menstruation. Keep the body clean; bathe as necessary.
Hygiene of the Male Reproductive Organs
The penis has a foreskin which covers the opening of the urethra, which unless removed by circumcision, needs to be folded outwards and washed regularly. If this is not done properly, the skin may harbour dirt and bacteria, which may lead to infection.
During baths the folds around and underneath the scrotum should be cleaned and dried very well to reduce the possibility of sheltering microorganisms.
Boys should never wear tight underpants and should wear cotton pants to avoid the development of heat around the genitals.
Trim or shave pubic hair.
35
SESSION 4: ADOLESCENT SEXUAL REPRODUCTIVE HEALTH Introduction
This session builds on what was discussed in session three. The teacher will be equipped with knowledge and skills to help children manage their sexual reproductive health challenges. Session Objectives: By the end of the session, the child will be able to:
1. explain the term ‘Adolescent Sexual Reproductive Health (ASRH); 2. state the major ASRH issues in Ghana;
3. analyse the factors that lead to pre-marital sex;
4. analyse the consequences of pre-marital sex and unwanted pregnancies; 5. identify values that help to avoid pre-marital sex;
6. identify sources of help of ASRH issues in Ghana Activity 1: Topic: Meaning of Sexual Reproductive Health Objectives: By the end of the lesson, the child will be able to:
1. explain the term ‘Sexual and Reproductive Health’;
2. explain the definition of World Health Organization (WHO); 3. identify some ASRH Issues in Ghana Duration: 70 minutes Materials: Flip charts, pens, markers
Procedure:
Step 1: Review the session on adolescent growth and development. Emphasise sexual maturation during the period and the need for adolescent boys and girls to stay healthy. Step 2: Lead pupils to brainstorm on the meaning of the term ‘Adolescent Sexual and Reproductive Health’.
Step 3: Discuss some ASRH Issues in Ghana. Encourage children to share their experiences to show that the issues are real and could affect any adolescent.
Step 4: Evaluate the lesson by asking the following questions: a. What are some of the ASRH issues in Ghana?
b. Why is it important to have knowledge about ASRH? Step 5: Summary/ Conclusion
During the adolescent period, boys and girls experience marked rapid growth and changes. These are physical, emotional and social changes It is important for teachers to assist children with knowledge and skills to enable them manage their sexual reproductive health challenges.
Topic: Factors that lead to Pre-Marital Sex