Pawan K. Bhardwaj
Windows System
tion (collectively “Makers”) of this book (“the Work”) do not guarantee or warrant the results to be obtained from the Work.
There is no guarantee of any kind, expressed or implied, regarding the Work or its contents.The Work is sold AS IS and WITHOUT WARRANTY.You may have other legal rights, which vary from state to state.
In no event will Makers be liable to you for damages, including any loss of profits, lost savings, or other incidental or consequential damages arising out from the Work or its contents. Because some states do not allow the exclusion or limitation of liability for consequential or incidental damages, the above limitation may not apply to you.
You should always use reasonable care, including backup and other appropriate precautions, when working with computers, networks, data, and files.
Syngress Media®, Syngress®, “Career Advancement Through Skill Enhancement®,” “Ask the Author UPDATE®,” and “Hack Proofing®,” are registered trademarks of Syngress Publishing, Inc. “Syngress:The Definition of a Serious Security Library”™, “Mission Critical™,” and “The Only Way to Stop a Hacker is to Think Like One™”are trademarks of Syngress Publishing, Inc. Brands and product names mentioned in this book are trademarks or service marks of their respective companies.
KEY SERIAL NUMBER
001 HJIRTCV764 002 PO9873D5FG 003 829KM8NJH2 004 94287PLK49 005 CVPLQ6WQ23 006 VBP965T5T5 007 HJJJ863WD3E 008 2987GVTWMK 009 629MP5SDJT 010 IMWQ295T6T PUBLISHED BY Syngress Publishing, Inc. 800 Hingham Street Rockland, MA 02370
How to Cheat at Windows System Administration Using Command Line Scripts
Copyright © 2006 by Syngress Publishing, Inc. All rights reserved. Except as permitted under the Copyright Act of 1976, no part of this publication may be reproduced or distributed in any form or by any means, or stored in a database or retrieval system, without the prior written permission of the pub-lisher, with the exception that the program listings may be entered, stored, and executed in a computer system, but they may not be reproduced for publication.
1 2 3 4 5 6 7 8 9 0 ISBN: 1-59749-105-5
Publisher: Andrew Williams Page Layout and Art: Patricia Lupien Acquisitions Editor: Gary Byrne Copy Editor: Audrey Doyle Technical Editor: Kimon Andreou Indexer: Odessa&Cie Cover Designer: Michael Kavish
Distributed by O’Reilly Media, Inc. in the United States and Canada.
iii
Lead Author
Pawan K. Bhardwaj
(MCSE, MCT, Security+, Network+, I-Net+
and A+) is an independent technical trainer and author. He has been
actively involved in Windows administration ever since Windows
NT 3.51 was released. In the past 16 years he has worked at various
system and network support levels for small and medium-sized
companies. Some of his major projects included working for one of
India’s largest newspaper groups and a large e-commerce
organiza-tion in the United States where he had an active involvement in
design and implementation of large-scale LAN and WAN solutions
based on Windows technologies.
Pawan was one of the first 100 in India to attain MCSE
certifi-cation back in 1997. He teaches Windows administration and
net-working classes and also acts as a consultant to training institutions.
He has authored or contributed to more than 12 certification books
by Syngress/McGraw Hill. He also coauthored
MCSE 2003 Electives
Exams in a Nutshell
(O’Reilly Media, Inc., 2006).
This book is dedicated to the loving memory of my father, Sudershan
Bhardwaj, and my father-in-law, Ghanshyam Pandit, both of whom passed
away during the writing of this book.
—Pawan K. Bhardwaj
Kimon Andreou
is IT Portfolio Manager at Royal Caribbean
International in Miami, FL. His expertise is in software
develop-ment, software quality assurance, data warehousing, and data security.
Kimon’s experience includes positions as CTO for Secure Discovery
Solutions, an e-Discovery company; Manager of Support & QA at
S-doc, a software security company; and as Chief Solution Architect
iv iv
for SPSS in the Enabling Technology Division. He also has led
pro-jects in Asia, Europe, North America, and South America. Kimon
holds a Bachelor of Science in Business Administration from the
American College of Greece and a Master of Science in
Management Information Systems from Florida International
University.
Kimon wrote Chapter 12.
Brian Barber
(MCSE, MCP+I, MCNE, CNE-5, CNE-4, CNA-3,
CNA-GW) is coauthor of Syngress Publishing’s
Configuring Exchange
2000 Server
(ISBN: 1-928994-25-3),
Configuring and Troubleshooting
Windows XP Professional
(ISBN: 1-928994-80-6), and two study
guides for the MSCE on Windows Server 2003 track (exams 70-296
[ISBN: 1-932266-57-7] and 70-297 [ISBN: 1-932266-54-2]). He is a
Senior Technology Consultant with Sierra Systems Consultants Inc. in
Ottawa, Canada. He specializes in IT service management and
tech-nical and infrastructure architecture, focusing on systems management,
multiplatform integration, directory services, and messaging. In the
past he has held the positions of Senior Technical Analyst at MetLife
Canada and Senior Technical Coordinator at the LGS Group Inc.
(now a part of IBM Global Services).
Brian wrote Chapter 11.
Dave Kleiman
(CAS, CCE, CIFI, CISM, CISSP, ISSAP, ISSMP,
MCSE) has worked in the Information Technology Security sector
since 1990. Currently, he is the owner of SecurityBreach
Response.com. A former Florida Certified Law Enforcement
Officer, he specializes in litigation support, computer forensic
v
tigations, incident response, and intrusion analysis. He has developed
a Windows Operating System lockdown tool, S-Lok
(www.s-doc.com/products/slok.asp), which surpasses NSA, NIST, and
Microsoft Common Criteria Guidelines.
Dave was a contributing author for
Microsoft Log Parser Toolkit
(Syngress Publishing, ISBN: 1-932266-52-6) and
Security Log
Management: Identifying Patterns in the Chaos
(Syngress Publishing,
ISBN: 1-59749-042-3). He was also technical editor for
Perfect
Passwords: Selection, Protection, Authentication
(Syngress Publishing,
ISBN: 1-59749-041-5) and
Winternals Defragmentation, Recovery, and
Administration Field Guide
(Syngress Publishing, ISBN: 1597490792).
He is frequently a speaker at many national security conferences and
is a regular contributor to security-related newsletters, Web sites, and
Internet forums. Dave is a member of many professional security
organizations, including the International Association of Counter
Terrorism and Security Professionals (IACSP), International Society
of Forensic Computer Examiners® (ISFCE), Information Systems
Audit and Control Association® (ISACA), High Technology Crime
Investigation Association (HTCIA), Association of Certified Fraud
Examiners (ACFE), Anti Terrorism Accreditation Board (ATAB), and
ASIS International®. He is also the Sector Chief for Information
Technology at the FBI’s InfraGard® and Director of Education at
the International Information Systems Forensics Association (IISFA).
Dave cowrote Chapter 13.
vi
worldwide. Mahesh will be joining the Architecture and Design
domain at Caritor’s development center in Bangalore, India, where
he will develop software systems for mobile devices. His areas of
expertise include Windows security and related Microsoft
program-ming technologies. He is also currently working toward
adminis-trator-level certification on the Red Hat Linux platform.
Mahesh wrote Appendix A.
Some examples of syntax or code for the command utilities
discussed in this book are available for download from
www.
syngress.com/solutions
. Look for the Syngress icon in the
margins indicating which examples are available from the
companion Web site.
Introduction . . . xv
Part I Getting Started with Command Line . . . 1
Chapter 1 Basics of the Command Line . . . 3
Introduction . . . .4
Basics of the Windows Command Shell . . . .4
The MS-DOS Command Shell . . . .5
Starting the Windows Command Shell . . . .5
Customizing the Command Shell Startup . . . .6
Customizing the Command Shell Window . . . .9
Internal Commands for the Command Shell . . . .13
Getting Help for Commands . . . .17
Command History . . . .17
Displaying Previous Commands with Arrow Keys . . . .18
Viewing the Command History in a Pop-Up Window . . . .18
Using Function Keys . . . .18
Accessing the Windows Command Reference . . . .19
Installing Windows Support Tools . . . .20
Summary . . . .23
Chapter 2 Using Batch Files . . . 25
Introduction . . . .26
Working Safely with the Command Line . . . .26
Configuring the Command Path . . . .28
Using the Path Command . . . .29
Using the Set and Setx Commands . . . .30
Changing Environment Variables in System Properties . . . .31
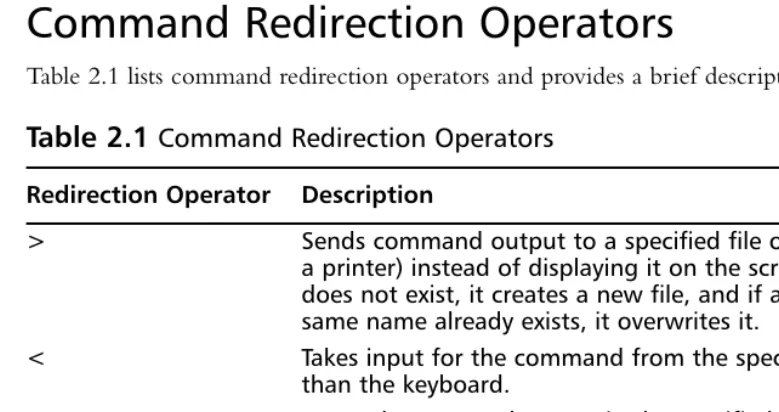
Using Command Redirection . . . .33
Command Redirection Operators . . . .33
Input Redirection . . . .34
Output Redirection . . . .34
Redirecting Output to Other Commands . . . .35
Error Handling with Redirection Operators . . . .36
Using Groups of Commands . . . .37
Using & for Sequential Processing . . . .37
Using && and || for Conditional Processing . . . .37
Grouping Sets of Commands with Parentheses . . . .38
Creating Batch Files . . . .38
Batch File Commands . . . .39
Batch File Parameters . . . .53
Summary . . . .55
vii
Chapter 3 Managing Scheduled Tasks . . . 57
Introduction . . . .58
Scheduling Tasks . . . .58
The Task Scheduler . . . .58
The Task Scheduler Service . . . .59
Accessing the Task Scheduler Service . . . .60
Configuring the Properties of the Task Scheduler Service . . . .62
Managing Tasks Using the Task Scheduler . . . .64
Managing the Properties of Scheduled Tasks . . . .65
Monitoring Tasks in the Scheduled Tasks Window . . . .68
Creating New Tasks . . . .69
Deleting a Scheduled Task . . . .73
Running a Scheduled Task Immediately . . . .73
Enabling or Disabling a Scheduled Task . . . .74
Ending a Running Task . . . .74
Event-Based Tasks . . . .74
The schtasks Command-Line Utility . . . .75
Creating and Running Tasks Using schtasks /Create . . . .76
Managing Tasks with schtasks . . . .86
Using schtasks /Query to Query a Scheduled Task . . . .86
Modifying a Scheduled Task with schtasks /Change . . . .89
Running a Scheduled Task with schtasks /Run . . . .91
Ending Running Tasks with schtasks /End . . . .92
Deleting Scheduled Tasks with schtasks /Delete . . . .93
Summary . . . .94
Part II Basic Windows Administration . . . 95
Chapter 4 Managing Files and Directories . . . 97
Introduction . . . .98
Using Wildcards in Commands . . . .98
File and Folder Attributes . . . .99
Viewing Attributes . . . .100
Changing Attributes . . . .101
Basic File and Folder Operations . . . .101
Copying Files with the Copy Command . . . .102
Copying Files and Directories with the Xcopy Command . . . .106
Renaming Files with the Rename (Ren) Command . . . .113
Moving Files Using the Move Command . . . .113
Deleting Files with the Del (Erase) Command . . . .115
Comparing Files with the Comp Command . . . .116
Comparing Files with the FC Command . . . .118
Sorting Files with the Sort Command . . . .121
Recovering Files with the Recover Command . . . .123
Decompressing Files with the Expand Command . . . .123
Duplicating and Comparing Disks . . . .125
Duplicating Disks with the Diskcopy Command . . . .125
Comparing Two Disks with the Diskcomp Command . . . .127
Directory-Specific Commands . . . .129
Creating a New Directory with MD or Mkdir . . . .130
Removing a Directory with RD or Rmdir . . . .131
Removing a Directory Tree with the Deltree Command . . . .133
Summary . . . .134
Chapter 5 Maintaining Hard Disks. . . 135
Introduction . . . .136
Physical and Logical Disks . . . .136
Physical Disks . . . .136
Logical Disks . . . .136
Understanding Basic and Dynamic Disks . . . .136
Basic Disks . . . .137
Dynamic Disks . . . .138
Tasks Common to Basic and Dynamic Disks . . . .140
Supported File Systems . . . .140
Formatting a Disk or Partition with the Format Command . . . .141
Converting File Systems . . . .145
Converting a File System with the Convert Command . . . .147
Examining Volume Serial Numbers with the Vol Command . . . .148
Managing Volume Labels with the Label Command . . . .149
Maintaining Disks and File Systems . . . .150
Using the Fsutil Utility for Advanced Disk Management . . . .151
Checking Available Disk Space with the Freedisk Command . . . .156
Saving Disk Space with the Compact Command . . . .157
Managing Mounted Volumes with the Mountvol Command . . . .160
Checking and Fixing Bad Sectors with the Chkdsk Command . . . .161
Defragmenting Disks with the Defrag Command . . . .165
Checking Autocheck Status with the Chkntfs Command . . . .168
Summary . . . .170
Chapter 6 Managing Hard Disks with the Diskpart Utility . . . 171
Introduction . . . .172
The Diskpart Utility . . . .172
The Object in Focus . . . .172
Diskpart Commands . . . .174
Scripting with Diskpart . . . .191
Diskpart Error Codes . . . .192
Obtaining Volume Information . . . .194
Understanding Volume Status . . . .195
Managing Dynamic Volumes . . . .197
Simple Volumes . . . .197
Striped Volumes . . . .198
Managing Fault-Tolerant Volumes . . . .198
Mirrored Volumes . . . .199
RAID 5 Volumes . . . .200
Summary . . . .201
Part III Managing Windows Systems and Printers. . . 203
Chapter 7 System Services, Drivers, and the Registry . . . 205
Obtaining System Information . . . .206
Determining the Operating System Version . . . .206
Locating Files with the Where Command . . . .207
Checking the System Date and Time . . . .209
Obtaining Information on the Logged-On User . . . .211
Obtaining System Configuration Information . . . .213
Checking Protected System Files with the SFC Command . . . .214
Shutting Down and Restarting the System . . . .216
Specifying Reasons for the Event Tracker . . . .217
Using the Shutdown Command on the Local Computer . . . .218
Using the Shutdown Command on the Remote Computer . . . .218
Differences between the Windows XP and Windows Server 2003 Shutdown Commands . . . .220
Managing System Services . . . .221
Obtaining Information about Services . . . .222
Starting, Stopping, Pausing, and Resuming Services . . . .225
Configuring a Service’s Startup Type . . . .225
Managing Service Failures . . . .226
Configuring the Service Logon Type . . . .228
SC Subcommands That Affect All Services . . . .229
Obtaining Driver Information . . . .230
Managing the Windows Registry . . . .232
Data Types Supported in the Windows Registry . . . .234
Examining Values Stored in a Subkey . . . .235
Comparing Subkeys . . . .236
Adding and Deleting Subkeys . . . .237
Saving and Restoring Registry Keys . . . .238
Copying Registry Keys . . . .239
Summary . . . .240
Chapter 8 Monitoring System Events, Processes, and Performance . . 241
Introduction . . . .242
Managing Event Logs from the Command Line . . . .242
Creating New Events . . . .243
Working with Event Triggers . . . .244
Viewing Logged Events . . . .249
Using Filters to View Specific Events . . . .251
Monitoring Application Processes and Tasks . . . .254
Viewing Running Processes and Applications . . . .254
Terminating Applications and Processes . . . .261
Using Filters with the TaskList and TaskKill Commands . . . .263
Working with System Performance . . . .265
Viewing Performance Data . . . .265
Adding New Performance Counters . . . .269
Removing Performance Counters . . . .270
Extracting Performance Counters from Existing Logs . . . .270
Summary . . . .272
Chapter 9 Managing Printing Services . . . 273
Working with Printer Commands . . . .274
Working with Remote Computers . . . .275
Installing a Local Printer . . . .275
Listing All Printers Installed on a Computer . . . .276
Adding a Local Printer . . . .277
Deleting an Installed Printer . . . .278
Displaying All Printers Configured on a Computer . . . .279
Displaying the Default Printer . . . .279
Setting the Default Printer . . . .280
Configuring and Renaming Printers . . . .280
Displaying the Printer Configuration . . . .281
Configuring Printer Properties . . . .282
Renaming a Printer . . . .289
Managing Printer Drivers . . . .290
Displaying Driver Information for All Printers on a Computer . . . .290
Installing a Printer Driver . . . .292
Deleting a Printer Driver . . . .293
Deleting All Printer Drivers from a Computer . . . .294
Creating and Configuring TCP/IP Printer Ports . . . .294
Viewing TCP/IP Printing Ports Configured on a Computer . . . .294
Creating and Configuring a Standard TCP/IP Printing Port . . . .296
Deleting a Standard TCP/IP Printing Port . . . .298
Managing Print Queues and Print Jobs . . . .298
Printing a Test Page . . . .299
Pausing and Resuming a Printer . . . .299
Canceling All Print Jobs in the Print Spooler . . . .300
Listing All the Print Jobs in a Print Queue . . . .300
Pausing, Resuming, and Canceling a Print Job . . . .301
Summary . . . .303
Part IV Working with Active Directory . . . 305
Chapter 10 Overview of Directory Services Commands . . . 307
Introduction . . . .308
Getting Started with DS Commands . . . .308
Types of Objects for DS Commands . . . .309
Working on Remote Computers . . . .310
Querying the Directory Database with DSQuery . . . .311
Parameters Common to All DSQuery Commands . . . .312
DSQuery Computer . . . .313
DSQuery Contact . . . .314
DSQuery Group . . . .314
DSQuery OU . . . .314
DSQuery Site . . . .315
DSQuery Server . . . .315
DSQuery User . . . .316
DSQuery Quota . . . .318
DSQuery Partition . . . .319
Adding New Objects with DSAdd . . . .321
Parameters Common to All DSAdd Commands . . . .321
DSAdd Computer . . . .322
DSAdd Contact . . . .323
DSAdd Group . . . .324
DSAdd OU . . . .325
DSAdd User . . . .326
DSAdd Quota . . . .328
Displaying Object Properties with DSGet . . . .329
Parameters Common to All DSGet Commands . . . .329
DSGet Computer . . . .331
DSGet Contact . . . .332
DSGet Group . . . .332
DSGet OU . . . .333
DSGet Server . . . .333
DSGet User . . . .334
DSGet Subnet . . . .335
DSGet Site . . . .335
DSGet Quota . . . .336
DSGet Partition . . . .336
Modifying Objects with DSMod . . . .337
DSMod Computer . . . .338
DSMod Contact . . . .338
DSMod Group . . . .339
DSMod OU . . . .339
DSMod Server . . . .340
DSMod User . . . .340
DSMod Quota . . . .340
DSMod Partition . . . .341
Moving and Renaming Objects with DSMove . . . .341
Deleting Directory Objects with DSRm . . . .342
Summary . . . .344
Chapter 11 Managing Active Directory Users, Groups, and Computers 345 Introduction . . . .346
Managing User Accounts . . . .346
Searching for Users in Active Directory . . . .348
Searching for Disabled User Accounts . . . .350
Determining Group Memberships of Users . . . .351
Creating New User Accounts . . . .352
Setting and Modifying User Account Properties . . . .353
Moving and Renaming User Accounts . . . .354
Resetting User Passwords . . . .356
Enabling and Disabling User Accounts . . . .357
Deleting User Accounts . . . .358
Managing Group Accounts . . . .359
Searching for Group Accounts in Active Directory . . . .360
Creating New Group Accounts . . . .361
Modifying Group Account Properties . . . .362
Moving and Renaming Group Accounts . . . .364
Deleting Group Accounts . . . .365
Managing Computer Accounts . . . .365
Searching for Computer Accounts in Active Directory . . . .365
Creating New Computer Accounts . . . .366
Managing Properties of Computer Accounts . . . .367
Resetting Computer Accounts . . . .367
Moving and Renaming Computer Accounts . . . .368
Enabling and Disabling Computer Accounts . . . .369
Deleting Computer Accounts . . . .370
Managing Domain Controller Accounts . . . .370
Searching for Domain Controllers in Active Directory . . . .370
Searching for Domain Controllers with an Operations Master Roles . . . .371
Searching for GC Servers . . . .372
Managing Roles of GC Servers . . . .373
Summary . . . .374
Part V Windows Networking . . . 375
Chapter 12 Basic TCP/IP Networking Commands . . . 377
Introduction . . . .378
Overview of the Net Commands . . . .378
Starting and Stopping TCP/IP Services . . . .380
Troubleshooting Commands for TCP/IP . . . .385
Arp . . . .385
IPConfig . . . .386
Finger . . . .389
Getmac . . . .390
Hostname . . . .391
Netstat . . . .392
NBTStat . . . .396
NSLookup . . . .398
Pathping . . . .400
Ping . . . .402
Commands for Remote Computers . . . .404
FTP . . . .404
TFTP . . . .406
RCP . . . .407
RSH and REXEC . . . .408
LPR . . . .409
LPQ . . . .409
Summary . . . .410
Chapter 13 Administering Network Services. . . 411
Introduction . . . .412
Overview of the NETSH Commands . . . .412
Commands Available within the NETSH Prompt . . . .412
List of Subcommands Available within the NETSH Prompt . . . .413
Using Ping to Verify Connectivity . . . .418
Managing Interfaces with NETSH . . . .422
Managing IP Addressing . . . .422
Managing the DNS Settings of an Interface . . . .428
Managing Interface IP WINS Settings . . . .430
Managing Automatic Addressing Using DHCP Services . . . .434
NETSH DHCP . . . .434
NETSH DHCP SERVER . . . .437
NETSH DHCP SERVER SCOPE . . . .438
NETSH Commands for AAAA . . . .439
Summary . . . .442
Appendix A MS-DOS Commands Not Supported in Windows XP and Windows 2003. . . 443
Introduction . . . .443
MS-DOS Commands Not Supported in Windows XP/2003 32-Bit Operating Systems . . . .443
assign . . . .443
backup . . . .444
choice . . . .445
ctty . . . .445
deltree . . . .446
emm386 . . . .446
fdisk . . . .447
mscdex . . . .447
scandisk . . . .448
Smartdrv . . . .448
sys . . . .449
MS-DOS Commands Not Supported in Windows XP/2003 64-Bit Operating Systems . . . .450
debug . . . .450
edit . . . .450
edlin . . . .451
exe2bin . . . .451
expand . . . .451
fasthelp . . . .452
fastopen . . . .452
forcedos . . . .453
graphics . . . .453
loadfix . . . .454
loadhigh . . . .454
mem . . . .455
nlsfunc . . . .455
setver . . . .456
share . . . .456
Welcome to How to Cheat at Windows System Administration Using Command-Line Scripts. This book is designed to help you learn the power of Windows command shell.There was a time in the history of computers when there was no graphical user interface (GUI), and every small and big task was performed using the commands and batch files.With every new version of Windows, Microsoft is trying to ease administrators’ jobs by adding more and more layers of GUI or configuration wizards (dialog boxes). Although these “wizards” are interactive and make the administrator’s job easier, they are not always the most convenient and efficient way to accomplish the everyday administration tasks.These wizards are time-consuming and, at times, may seem a bit confusing.There is certainly a way to avoid these wizards and still accomplish a given task using the command-line utilities included with the operating system.
Consider a situation where you wish to add a user to the Active Directory using the Windows wizards or the GUI, assign him/her appropriate permissions to access certain resources, and restrict access to others. It would take roughly one hour to complete the job. By using command line the same task could be done in about half the time.That not only saves you time but also increases your productivity as an administrator.
Although the importance of Windows GUIs should not be underrated, the com-mand-line tools have their own importance and utility when it comes to increasing efficiency, boosting effectiveness, and saving time. Command-line tools are both problem solvers as well as time-savers. Not many administrators explore the usefulness of these tools.The purpose of this book is to let administrators know how to utilize these command-line tools to complete everyday administrative jobs, solve recurring network problems, and improve their efficiency.
This book contains a total of 13 chapters, divided into five different parts.The first part deals with the basics of Windows command shell, batch files, and scheduled tasks. The second part of the book deals with basic Windows system administration, which consists of managing files and hard disks.The third part of the book covers system ser-vices, event logs, performance, and printing services. In the fourth part of the book, we cover Active Directory services.The fifth part of the book deals with managing net-working services in a Windows Server 2003 environment.
Your journey starts in Chapter 1 with the basics of the Windows command shell. You will learn how to access the command shell and how to customize its properties. You will learn that the command shell’s properties can be modified in several different ways to suit your needs. Installing the support tools included with the Windows Server 2003 setup CD Windows is also covered in this chapter.You will also learn how to access the Windows A-Z Command Reference available in the Help and Support Center.
xv
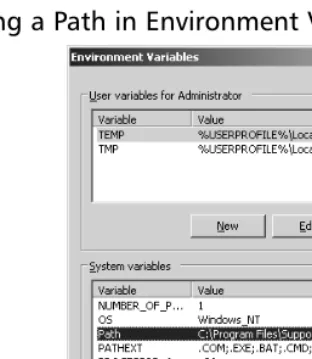
In Chapter 2 we explain how to work safely with the command line using a non-administrative account.While working with the command shell, you sometimes need to specify a path where commands or batch files are located.You will learn how to change or modify the command path by modifying the environment variable either from the command prompt or from the System Propertiesdialog box.This chapter also explains how to change command input and output from the standard keyboard and the command shell window, respectively, and how to handle errors generated by com-mands. Moving ahead, we will discuss the concept of creating simple batch files.You will learn about commonly used commands in batch files and how to use each com-mand inside a batch file.
In Chapter 3, we discuss the task scheduler service, the Scheduled Tasks GUI, and the schtaskscommand-line utility. If the task scheduler service is not running, you will not be able to schedule any script or application to run automatically.The Scheduled Tasks wizard is a perfect tool for scheduling tasks to run at predetermined schedules, but you can also use the schtasksutility to perform the same tasks.This utility replaces the older ATcommand, which is still supported in Windows XP and Windows Server 2003.You will learn to use different subcommands of the schtasksutility to create, change, delete, query, run, or end a task.schtasksis considered to be one of the most complex command sets in Windows.
In Chapter 4, we discuss some of the very common commands used to manage and maintain files, folders, and floppy disks. Having in-depth knowledge of these com-mands, their syntax, and their use is a great help when you want to use them in batch files or scripts to simplify your administrative tasks.Traditional Copy,Xcopy,Move, and
Del (Erase)commands are covered in this chapter, and examples of their usage are included.We continue with the discussion on the use of the Diskcopy command for duplicating disks and comparing disks using the Diskcomp command. Other commands related to file and folder management such as Tree,MD (Mkdir), and RD (Rmdir)are also covered in this chapter.
Chapter 5 covers maintenance of file systems and hard disks.The most notable utilities covered in this chapter include Fsutil,Chkdsk, and Defrag.The Fsutilutility is new to the Windows XP and Windows Server 2003 families of operating systems. Although you might have experience with older utilities such as Chkdsk and Defrag, you will need to have thorough knowledge of the operating systems to use the Fsutil
command and its subcommands when creating scripts.We will also discuss Format,
Convert, and Compact commands in this chapter.
and managing fault-tolerant volumes. Because Diskpartworks in a more enhanced mode than its counterpart, the Disk Management snap-in, it has more control over the selected disk, partition, or volume.Diskpartsupports scripting, and you can create scripts to automate repeated disk-related administrative tasks.Diskparterror codes make it easy for you to handle command execution more precisely.
In Chapter 7, we explain some of the key issues with maintaining the Windows operating system, including services, drivers, and most importantly, the Windows Registry.We discuss the SCand Regcommand-line utilities, which offer sets of several subcommands that are helpful in configuring and maintaining the Windows operating system.You will rarely need to edit the Windows Registry directly, either from the GUI or from the command line, but it is good to understand how you can query, add, delete, save, and restore Registry entries.
In Chapter 8, we discuss some command-line utilities for monitoring and man-aging event logs, processes, and performance logs. Monitoring is an important aspect of system and network administration, and you cannot ignore it.The command-line utili-ties related to managing Windows event logs covered in this chapter include
Eventcreate,Eventtriggers, and Eventquery.You will learn how to view system services and applications using the TaskListcommand and how to terminate nonresponsive pro-cesses using the TaskKillcommand.This chapter also includes some command-line utilities for monitoring and managing performance logs.These utilities include TypePerf
for displaying performance data in the command shell window,Lodctrfor registering new performance counters in the Windows Registry, and Relogfor extracting and resampling stored performance data.
We move on to Chapter 9 to discuss the command-line utilities used to manage printers and print jobs. It is interesting to note that most of these commands have very simple, facile syntax.You will learn that you can use the Prnmngr command to install printers while the Prncnfg command is used to view and configure installed printers. Other commands discussed in this chapter include Prndrvr, Prnport, Prnqctl,and Prnjobs
to manage printer drivers, create and configure TCP/IP ports, manage print queues, and manage print jobs, respectively.
In Chapter 11, we take our discussion of Directory Service commands to the next level.This chapter includes several examples that will help you understand how simple it is to use the DS commands that otherwise look so complex.
Chapter 12 covers the procedures for performing basic network troubleshooting tasks and discusses the use of standard network tools available with Windows com-mand-line utilities.We discuss the utilization of the Netcommand and its associated subcommands.We then examine a number of other network diagnostic tools, such as
Ping, IPConfig, Pathping, Finger, and ARP.We examine the use of more powerful utili-ties, such as Netstat and NBTStat, and learn to interpret the results of these commands. We also cover the versatile DNS querying command-line tool, NSLookup, in this chapter. Finally, we look at how to communicate with remote UNIX computers and the services they use—services that are not commonly, if at all, found on Windows computers.
You finish your learning journey in Chapter 13 with the discussion of the
NETSHcommands.You learn how the NETSHcommands can be used to view the settings and configure networking components in a Windows Server 2003 environ-ment.NETSHruns as a separate command interpreter within the Windows command shell and has a bundle of subcommands associated with it. Although it is not possible to discuss each NETSH command or subcommand within the scope of this book, we try to explain the most commonly used commands in this chapter.
With Windows XP and Windows Server 2003, Microsoft made several changes to the command-line functionality. It added several new commands and made changes to the functionality of some other commands. But at the same time, several commands have been dropped from the list of supported commands.These are some of the com-mands you had been using ever since the MS-DOS operating system was introduced. The appendix in this book discusses the MS-DOS commands not supported in 32-and 64-bit editions of Windows XP 32-and Windows Server 2003.
This book is an effort to introduce you to the powerful command-line utilities available in Windows XP and Windows Server 2003 operating systems.You will learn how to write batch files once you get a strong understanding of these utilities.
Although this is not a scripting book, writing scripts or batch files is the next step after you get a grip of the basics. Most of the experienced system administrators depend on preconfigured batch files or scripts to manage networking services. A search on the Web can be very helpful for you to find ready-made scripts. But you must try these freely available scripts on a test server before using them on any production server.
Working on this book has been a great experience for all of us.We do hope that the results of the efforts put in by the team of authors, technical editors, and the edito-rial staff at Syngress Publishing will result in an informative, useful, and enjoyable expe-rience for our readers.We are always open to your suggestions.
Part I
Getting Started
with Command Line
Basics of the
Command Line
Topics in this chapter:
■
Basics of the Windows Command Shell
■
Starting the Windows Command Shell
■
Internal Commands for the Command Shell
■
Command History
■
Accessing the Windows Command
Reference
■
Installing Windows Support Tools
Chapter 1
Introduction
Most system administrators think that the primary way to manage Windows-based networks is through Windows graphical user interfaces (GUIs).This is true to some extent. If you are working in a small or medium-sized organization, you can complete most of your everyday administration tasks via Windows GUIs. But you may not realize that an even more powerful interface exists within the Windows operating system: the command line. Most administra-tors think the command line has something to do with programming.This is not true.The Windows command line is actually another type of administration utility that is much more powerful than wizards and other interfaces.
Basics of the Windows Command Shell
Each time Microsoft has shipped a new version of Windows, it has tried to simplify the task of managing the operating system by introducing new GUIs in the form of wizards. As a result, veteran administrators have already started to forget the command prompt, which at one time used to be the only means of managing operating systems and applications. Furthermore, many novice administrators have never even opened the command prompt window. When an easier method exists to perform a task, why muddle with commands and their switches and syntaxes?
The Windows command shell is becoming increasingly versatile with every new version of Windows Microsoft introduces. When the first version of Windows appeared in the early 1990s, support professionals started thinking that the era of MS-DOS commands would soon be over. Although Microsoft provided newer GUIs with each new version of the operating system, it never stopped supporting the command line. Instead, support for the command line increased, and new command-line tools accompanied every new Windows release.
The MS-DOS Command Shell
The MS-DOS command shell was originally known as the DOS prompt. Administrators and users alike used to perform almost every operating system task they needed to perform from the DOS prompt—whether it was copying a file from one directory to another, creating a directory, or setting the attributes of a file. In addition, people used to write batch files directly from the DOS prompt, and then save them and execute them from there.
Today, people refer to the DOS prompt as the MS-DOS command shell, and it still exists in all versions of Windows. Although the MS-DOS command shell works in a 32-bit environment by default, it supports older, 16-bit commands in Windows XP and Windows Server 2003. However, support for some commands has been discontinued; for instance, sev-eral older MS-DOS external commands are not supported on 64-bit versions of Windows Server 2003.
You can access the MS-DOS command shell from the Run dialog box as follows: 1. Click Start | Runand type commandin the Openfield of the Rundialog
box.
2. Click OKor press Enter.
This starts the MS-DOS command shell.You will notice the words Microsoft Windows DOSin the window.This is different from the Windows command shell (discussed next), where you’d see the words Microsoft Windows. Another difference is that you cannot close the MS-DOS window by just clicking the cross (X)button in the top right-hand corner. If you do this, the End Program error message will appear and you will have to click End Processto close the window.To properly close the MS-DOS command shell, you must type
Exitand press Enter.
Starting the Windows Command Shell
The first step in learning to work with command-line utilities is to determine the different methods you can use to start the Windows command shell.The Windows command shell, in turn, starts the command interpreter.
The Windows command shell is actually an application built into the Windows oper-ating system. CMD.exe is the command interpreter that accepts your commands and exe-cutes them in the way you want.You can access the Windows command shell in one of the following ways:
■ Click Start | Runand type cmd in the Openfield of the Rundialog box. Click OKor press Enter.
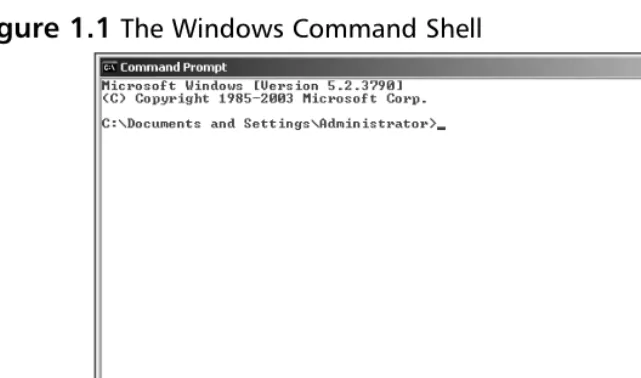
shortcut for the command prompt on your desktop if you will be using it often. Figure 1.1 shows the command shell.
Figure 1.1
The Windows Command ShellThe command interpreter executable, CMD.exe, is placed in the
%SystemRoot%\System 32 folder. In Windows XP, the command shell window title will read C:\Windows\System32\CMD.exe, and in Windows 2003, it will simply read
Command Prompt. By default, the command shell starts in the user profile folder of the cur-rently logged on user.That’s why the current working directory is shown as C:\Documents and Settings\Administrator in Figure 1.1.
A blinking cursor following the command prompt indicates that it is in interactive mode.This mode allows you to enter commands directly at the prompt and press the Enter
key to execute them. For example, if you type the command Dirat the command prompt and press the Enterkey, the command will execute immediately and the results will appear in the window.You can also write a series of commands and save them as a batch file. When the batch file is executed, the command interpreter reads the commands, one line at a time, and executes them in order.You can also group multiple commands in a single command line and process them sequentially. We discuss these techniques, along with the basics of batch files, in Chapter 2.
Customizing the Command Shell Startup
prompt to execute a string of commands and then exit interpreter mode by typing Cmd /c
in the Run dialog box, or you can type Cmd /qto turn off echo, which is enabled by default.
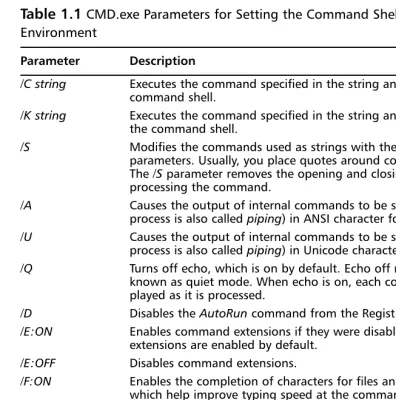
The syntax for CMD.exe is:
Cmd [{/A | /U}] [/Q] [/D] [/E: {ON | OFF}] [[/S] [{/C | /K}] string] [/V:{ON | /OFF}] [/T:FG]
[image:26.612.60.456.190.590.2]Table 1.1 explains the switches for the cmd.execommand.
Table 1.1
CMD.exe Parameters for Setting the Command Shell Working EnvironmentParameter Description
/C string Executes the command specified in the string and then exits the command shell.
/K string Executes the command specified in the string and does not exit the command shell.
/S Modifies the commands used as strings with the /Cand /K
parameters. Usually, you place quotes around command strings. The /Sparameter removes the opening and closing quotes before processing the command.
/A Causes the output of internal commands to be sent to a file (this process is also called piping) in ANSI character format.
/U Causes the output of internal commands to be sent to a file (this process is also called piping) in Unicode character format.
/Q Turns off echo, which is on by default. Echo off mode is also known as quiet mode. When echo is on, each command is dis-played as it is processed.
/D Disables the AutoRuncommand from the Registry.
/E:ON Enables command extensions if they were disabled. Command extensions are enabled by default.
/E:OFF Disables command extensions.
/F:ON Enables the completion of characters for files and directories, which help improve typing speed at the command prompt.
/F:OFF Disables the completion of characters for files and directories.
/V:ON Enables delayed environment variable expansion by using the exclamation point character (!) as the delimiter. This means that using !ThisVar!will expand the variable ThisVarat the time of execution.
/V:OFF Disables delayed environment variable expansion.
From Table 1.1, it is clear that you cannot use some variables together. For example, if you are using /A, you cannot use /Uat the same time. Similarly, you can use either /E:ON
or /E:OFF. Besides this, several parameters are set by default when you start the command shell.
Master Craftsman…
Commands and Caps Lock
The commands you use at the command prompt in Windows are not case sensi-tive. You do not have to worry about the Caps Lock key when you are typing com-mands. This means that DelTree.exe, DELTREE.exe, and deltree.exehave the same meaning. We have used upper- and lowercase in this book just to increase the clarity and readability of the commands. You might find this to be different from UNIX and Linux environments, where commands are case sensitive.
You also may have noticed in Table 1.1 the function of the /Sparameter that modifies the strings when using the /Cor /Kparameter.The /Sparameter removes the quotation marks from the beginning and end of the command.The quotation marks are preserved only if all of the following conditions are met:
■ You are not using the /Sswitch.
■ There is exactly one set of quotation marks.
■ There are no special characters, such as &, <, >, (, ), @, and ^, between two quota-tion marks.
■ There are one or more spaces between the quotations marks.
■ The string is the name of an executable file.
If any of these conditions are not met, the /Sswitch removes the opening and closing quotes.
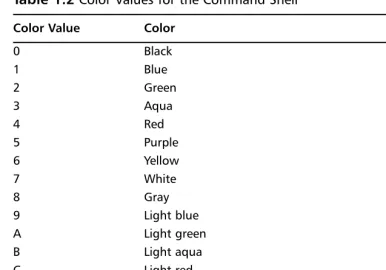
Table 1.2
Color Values for the Command ShellColor Value Color
0 Black
1 Blue
2 Green
3 Aqua
4 Red
5 Purple
6 Yellow
7 White
8 Gray
9 Light blue
A Light green
B Light aqua
C Light red
D Light purple
E Light yellow
F Bright white
Customizing the Command Shell Window
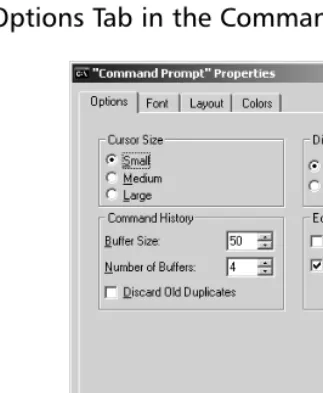
The command prompt window shown in Figure 1.1 has several properties that you can con-figure to customize your working environment. For example, the window is 80 characters wide and is 25 lines long by default.The characters are displayed in white over a black back-ground.You can set the cursor size, fonts, colors, and number of commands in the command history, and whether the command shell should use a small window or the full screen.
To change the default settings of the command shell, right-click the command iconin the top-left corner of the window and select Propertiesfrom the menu.The following sec-tions explain the settings in each tab in this window.
The Options Tab
com-mands.You can set these numbers at anywhere from zero to 999. If you are not sure how many buffers you will need, you should not change this setting.You can choose to discard duplicate commands in the history to avoid unnecessarily filling up the buffer by repeating the same command.
Figure 1.2
The Options Tab in the Command Shell Properties WindowYou can use Quick Edit Mode or Insert Mode when editing commands. Use Quick Edit Mode when you want to use the mouse to edit entries. Insert Mode works by inserting text without overwriting the existing text in a line. For example, if you want to copy a line from another application and paste it directly into the command line, you can use Insert Mode.
The Font Tab
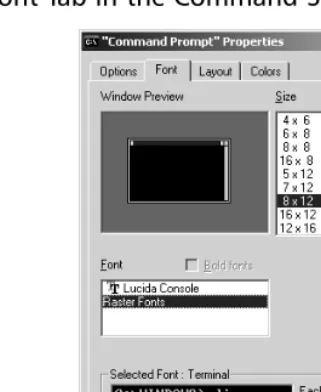
Figure 1.3
The Font Tab in the Command Shell Properties WindowThe Layout Tab
You can change the layout of the command shell window from the Layout tab, as shown in Figure 1.4.The screen buffer size affects the size of the window and is set at 80 x 300 by default. A smaller screen buffer size lets you scroll through the window so that you can check previously used commands and their outputs. Some scripts require a large screen buffer, but a buffer setting of 1,000 by 1,500 would suffice in most cases.The combination of screen buffer size and window height lets you view the executed commands easily and scroll up and down the command shell window.You can also set the window position to any corner of the screen, or let Windows manage the position automatically.
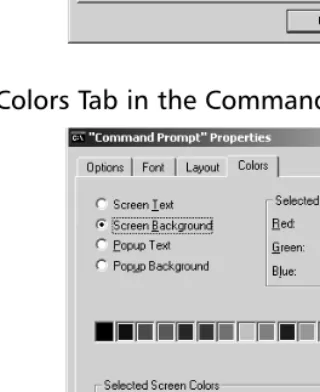
The Colors Tab
Figure 1.4
The Layout Tab in the Command Shell Properties WindowFigure 1.5
The Colors Tab in the Command Shell Properties WindowWhen you finish changing the properties of the command shell, click OK. A small
[image:31.612.162.322.301.497.2]the second option changes to “Modify shortcut that started this window” and every time you start the command prompt from that shortcut, the changes will take effect.
Figure 1.6
Applying Changes to Command Shell Window PropertiesInternal Commands
for the Command Shell
You can execute two types of commands from within the command shell.The first type is an internal command—these commands are built in the command shell itself and do not appear as executable files anywhere in the system. Most of these commands are very similar to MS-DOS commands. Examples of internal commands are Dirfor generating a directory listing,Clsfor clearing the screen, and Delfor deleting a specific file.
The second type of command you can execute from within the command shell is an
external command. External commands are separate executable files located in the
%SystemRoot\System32 folder. Although these are called external, they still run from within the command shell. Examples of external commands are XCOPY.exefor copying the entire directory tree,DISKPART.exefor managing disk partitions, and IPCONFIG.exefor dis-playing the computer’s Transmission Control Protocol/Internet Protocol (TCP/IP) configu-ration. External commands are more versatile and offer more advanced capabilities than internal commands. Most of this book is focused on using the external commands for everyday system administration. But in this section, we list some of the more common internal commands:
■ Assoc Displays or modifies the current filename extension associations. When you use this command without any parameters, it displays a list of all filename extension associations. For example, if you type assoc .docat the command prompt, the extension association will be displayed as .doc=Word.Document.8.
■ CD (ChDir) Displays the name of the current working directory or changes the current working directory. If you use it without any parameters, the current working directory is displayed. For example, to change the working directory to C:\Adminfiles\Support, assuming your current working drive is C:, type cd \adminfiles\supportat the command prompt.
■ Color Changes the foreground and background colors for the current session of the command shell.This command has the same effect as using the cmd /t:FB
command discussed earlier.The parameters Fand Bare values of the colors, as shown in Table 1.2. For example, the command color 17will change the fore-ground color to blue and the backfore-ground color to white.
■ Cls Clears the screen of the current command shell and erases the screen buffer, resulting in a blank command prompt window.
■ Copy Copies the specified file from one location to another. If the source and destination locations are the same, an error is returned that says “File cannot be copied on to itself.”
■ Date Displays or changes the current date on the computer.
■ Dir Displays the contents of the current working directory, including names of the subdirectories.You can specify a different directory and use wildcards to limit the results.This command also displays the total number of files and subdirectories, their size, total space used, and space remaining on the drive.
■ Del (Erase) Deletes the specified file, multiple files, or all files within a given directory. For example, the command Del C:\Reportswill delete all files in the C:\Reports folder.You can use wildcards to specify certain types of files to delete; for example,Del C:\Reports\*.docwill delete all files with a .doc extension in the C:\Reports folder.
■ Echo Displays text strings used with the command line and sets the echo on or off.This command is similar to using the command Cmd.exe /e:on | off. You can also use this command to display a message.
■ Endlocal Ends localization of the environment variables in a batch file and restores them to their values before the Setlocalcommand.This command works only in batch files and has no effect if you use it separately at the command prompt.
■ Exit Used to exit from the command shell window.
■ Ftype Displays current file types or modifies the file types used in filename extension associations. If you use it without any parameters, it displays the file types that have open command strings defined.The open command string specifies the open command used to open the file type.
■ Goto Used to direct the command interpreter to jump to a command specified with the label.You use it in batch files to direct the processing from the command identified by the label.
■ If Used in batch files to perform conditional processing of commands. If the con-dition is satisfied, the command following the If command is processed. Otherwise, the interpreter processes the command that follows the Elsecommand.
■ Md (Mkdir) Creates a directory or a subdirectory. For example,Md
C:\Reports\MyFiles or Mkdir C:\Reports\MyFileswill create a Myfiles subdirectory within the Reports directory on the C: drive.
■ Move Moves one or more files from one directory to another.The source and target locations of the files are specified in the command. If the source is not spec-ified, files are moved from the current working directory.
■ Path Displays or changes the command path for searching the executable files. When you use this without any parameters, it displays the current command path the operating system uses to search for executables.
■ Pause Suspends the processing of a batch file and prompts the user to press any key to continue processing. Using pausein a batch file is different from using the Ctrl + C key combination.This key combination stops the batch program from processing and asks the user whether she wants to terminate the procedure.
■ PopD Changes the directory stored by the PushDcommand as the current working directory in a batch file.The PushDcommand creates a virtual directory, and repeated use of the PushDcommand creates a stack of multiple directories. The PopDcommand changes the current directory to the one most recently stored by PushD.
■ Prompt Sets the display text for the command prompt.You use it to customize the command prompt to display any text, such as the current date and time.To reset the prompt to its default, use the Promptcommand without any parameters.
■ PushD Stores the name of the current directory for use by PopDbefore changing to another specified directory.The directories are stored in a stack with the last directory on top.
and you cannot delete the current working directory.You must first use the Cd
command to change the current directory.
■ Rem Used to insert comments or remarks in a batch file.The text after the Rem
command is not processed.
■ Set Displays, sets, or removes the environment variables. When you use this com-mand without any parameters, it displays the current environment variables.The environment variables are used to control the behavior of batch files.You would commonly use this command in the Autoexec.nt file.
■ Setlocal Starts localization of environment variables in a batch file.The localiza-tion ends when the command interpreter encounters the Endlocal command.This command is effective only in batch files.
■ Shift Changes the position of a replaceable parameter in a batch file.
■ Start Opens a second command prompt window to run a specified program or an executable. If no program or command is specified, the command just opens another command prompt window.
■ Time Displays or changes the current time on the computer.
■ Title Used to change the title of the command prompt window during the pro-cessing of a batch file.You can reset the title to its default by using the Title com-mand again.
■ Type Displays the contents of a text file.This command does not modify the text file.
■ Vol Displays the volume number and serial number of a disk.
Swiss Army Knife…
Commands for Batch Files
Getting Help for Commands
In the preceding section, you learned about several internal commands available in the com-mand shell. In addition to these internal comcom-mands, several external comcom-mands are available with Windows XP and Windows Server 2003. It is not possible to remember the syntax of every command available. Fortunately, you can get help on both internal and external com-mands in either of the following ways:
■ Open the command prompt window and type Helpat the command prompt. This will give you a list of available commands and a brief description.You can select the command you want to use.
■ To get help on a specific command, type Help [command]and press Enter.The complete syntax and parameters of the command are displayed.You can also type the command followed by /?to view the syntax and parameters of the specified command. For example, you can type either Help tasklistor Tasklist /?to get help on the Tasklistcommand.
Command History
When you are working at the command prompt, you may need to keep track of the com-mands that you use during a session. In some cases, you may need to reuse some complex commands as is, or with a minor modification. Each session of the command shell keeps a history of recently used commands in the history buffer.The default size is 50 commands; you can change it to your preference. Earlier in this chapter, in the section Customizing the Command Shell Window, we discussed how you can configure the command history buffer and the number of buffers from the Options tab. Remember that each instance of the com-mand shell keeps a separate comcom-mand history buffer independent of the other comcom-mand shell windows that might be running simultaneously.
If you want to change the command history buffer settings and apply the settings to all instances of the command shell window, follow these steps:
1. Open the Command Shell Propertiesdialog box from the title bar.The
Optionstab is displayed by default.
2. Change the Command History Bufferto 250. Click OK.
3. You are prompted to choose whether you want to apply changes to the current command window only or save the properties for future windows with the same title. Select the second option and click OK.
reuse.You can also display, in a separate pop-up window, a list of all the commands you’ve used so far and choose one.The following sections explain how you can use all of these options.
Displaying Previous
Commands with Arrow Keys
You can use the Up- and Down-arrow keys to display the previously used commands in the sequence they were used. When you find the command you are looking for, you can either press Enterto execute it or edit it before pressing the Enterkey.
Viewing the Command
History in a Pop-Up Window
If you press the F7key, a separate window pops up that displays all the commands stored in the command history buffer. Once again, you can scroll through the commands using the Up- and Down-arrow keys.To use a particular command, highlight it and press Enter.The command is pasted and executed at the command prompt. Press the Esckey to close the pop-up window.
Using Function Keys
The last command you type in the command shell window is stored in a special memory buffer known as the template. Function keys provide several options for using the commands in the command history buffer, as listed in Table 1.3.
Table 1.3
Using Function Keys to Search the Command History BufferFunction Key Description
F1 Copies one character from the same column in the template to the same column in the command prompt.
F2 Searches forward in the template for the next key you type after pressing the F2 key.
F3 Copies the remainder of the template to the command line. F4 Deletes characters from the current insertion point up to a
position you specify.
F5 Copies the command in the template (the previous command) to the command line.
F6 Places an end-of-file character (Ctrl + Z) at the current insertion point position.
Table 1.3 continued
Using Function Keys to Search the Command History BufferFunction Key Description
F7 Displays a pop-up window that contains all commands stored in the command history buffer. Use the Up- and Down-arrow keys to select a command and press Enterto execute it.
F8 Displays all commands in the command history buffer that start with the characters you type in the command line.
F9 Prompts you to specify a number corresponding to a command stored in the command history buffer. The selected command is inserted into the command line.
Alt + F7 Clears all commands stored in the command history buffer. Alt + F10 Deletes all macro definitions.
Many of the command history functions listed in Table 1.3 are also provided by the DOSKEY.exe utility. In addition, you can use DOSKEY.exe to create macros for use in applications.The DOSKEY.exe utility has several limitations, and very few applications use this utility.You can get help on DOSKEY syntax and parameters by typing Doskey /?at the command prompt.
Accessing the
Windows Command Reference
You can find a complete, alphabetized list of commands available with Windows XP and Windows Server 2003 in the Help and Support Center.You can access this reference as follows:
1. Click Start | Help And Support.
2. Click Administrative and Scripting Tools. 3. Expand the Command Line Referencenode. 4. Click Command-Line Reference A-Z.
The resulting details pane shows an alphabetical listing of all available commands.You can click on any command and get help on its syntax, parameters, and correct usage.This reference also contains examples with each command.
Figure 1.7
Command Reference Window for Windows Server 2003Installing Windows Support Tools
In addition to built-in command-line utilities, Windows Server 2003 includes several other tools to help you simplify your everyday administration jobs.They are called Support Tools
and they are included on the Windows Server 2003 installation CD.You must install them before you can use them. When you install the Support Tools, the installation process modi-fies the Help and Support Center screen shown in Figure 1.7.You must close the Help and Support Center window before starting the installation.
To install the Support Tools, follow these steps: 1. Insert the Windows Server 2003 CD.
2. In the Windows Welcomescreen, click Perform Additional Tasks. 3. Click Browse This CD.
4. Double-click the Supportfolder and double-click the Toolsfolder.
5. Double-click the SUPTOOLS.msi file.This starts the Windows Support Tools Installation Wizard. Click Next.
6. Click I Agreein the End User License Agreement dialog box and click Next. 7. Enter your name and the name of the organizationin the User
Informationpage and click Next.
8. Select an installation folder. By default, the support tools are installed in the %Program Files%\Support Tools folder.
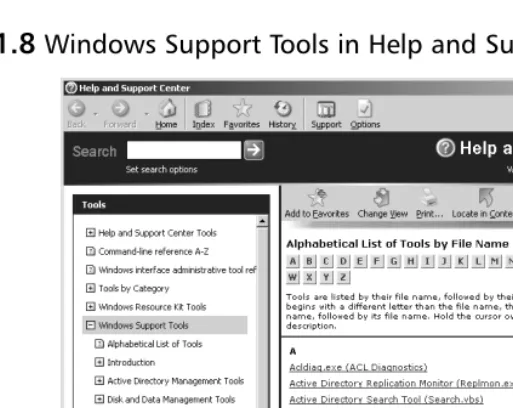
10. Click Finish in the Completing the Windows Support Tools Wizardpage. Once the support tools are installed, you can access them from the Start menu by pointing to All Programs| Windows Support Toolsand selecting Support Tools Help. If you are using the classic Start menu, click Start Programs | Windows Support Toolsand select Support Tools Help.This opens the Help and Support Center, which provides an alphabetical list of support tools as shown in Figure 1.8.
Figure 1.8
Windows Support Tools in Help and Support CenterMaster Craftsman…
Windows Resource Kit Tools
Besides installing Windows Support Tools from the Windows Server 2003 instal-lation CD-ROM, you can also download and install Windows Server 2003 Resource Kit Tools from the Microsoft download center. These tools are meant for advanced administrators who work in large and complex network environments. These tools are very helpful for managing and troubleshooting the Windows Server 2003 Active Directory, network, and system security and services. Interestingly, these tools work on both the Windows XP (SP1 or later) and Windows Server 2003 operating systems. You will need at least 30MB of free hard-disk space to download and install the Resource Kit Tools. The tools are con-tained in a single self-extracting file named RKTOOLS.exe. Double-click the down-loaded file and the tools will be installed. A shortcut to the Resource Kit Tools is added to the All Programs (or Programs) folder of the Start menu after installa-tion. Shortcuts to Resource Kit Help and the command prompt are also added. When you open the command shell window from this shortcut, the command prompt changes to C:\Program Files\Windows Resource Kits\Tools. Here is the direct link to the download page from the Microsoft Web site: www.microsoft.com/downloads/details.aspx?FamilyID=9d467a69-57ff-4ae7-96ee-b18c4790cffd&DisplayLang=en
After you install the Support Tools, another shortcut to the command shell window is placed in the program files folder under the Windows Support Tools header. When you open the command shell window from this shortcut, the command prompt changes to
Summary
In this chapter, we discussed the basics of the Windows command shell. We learned how we can access the command shell and how to modify its startup. We also learned how to cus-tomize the properties of the command shell window to get a larger command history buffer, and how to access previously used commands in the history buffer. After discussing the Windows Command Reference available in the Help and Support Center, we installed the Support Tools included with the Windows Server 2003 setup CD.
Using Batch Files
Topics in this chapter:
■
Working Safely with the Command Line
■
Configuring the Command Path
■
Using Command Redirection
■
Using Groups of Commands
■
Creating Batch Files
■
Batch File Commands
■
Batch File Parameters
Chapter 2
Introduction
This chapter introduces you to batch files. A batch file uses a combination of different com-mands to perform one or more specific tasks.The purpose of batch files is to simplify administration as well as to save time performing repetitive administrative tasks. In this chapter, we will discuss the basics of creating batch files and batch file commands.
But before we do that, we will discuss how to work safely in the command shell with nonadministrative credentials using the RunAscommand. We will discuss how to change command path variables and how command redirection works.Command redirectionrefers to taking input for one command from another command and sending the output of one mand to another command, file, or device. We also will discuss how you can group com-mands in a single command line to be processed sequentially by the command interpreter.
Working Safely with the Command Line
The RunAscommand allows you to work with the command shell using any user account that has sufficient permissions to perform a task from the command line. It is particularly useful when you are working on a user’s computer and the user is currently logged on to the system.You don’t want the user to log off because you want to run some commands with your credentials.You can simply run them using the RunAscommand; the user does not need to log off and log on to the system when you are done.
Another benefit of using the RunAscommand is safety.You would not want to use your administrative credentials to perform a simple task that you could complete without having administrative rights. A simple rule of thumb is that you should use your administrative user account only when it is extremelynecessary.This is because the administrative account is powerful. It has control over the entire system—or even the entire domain if it is a domain admin account. A small mistake at the command prompt can result in big trouble if you use any command incorrectly. In large organizations, administrators usually create a secondary account for everyday administrative functions instead of using their domain admin accounts. Most importantly, when you are working on a user’s computer, you do not want the user to notice your administrator username and password while you are typing them. A better prac-tice to secure an administrator account is to use the RunAsutility.