NetBeans IDE Field
Guide
Copyright© 2005 Sun Microsystems, Inc. All rights reserved.
Table of Contents
Importing an Eclipse Project into NetBeans IDE...1
Getting the Eclipse Project Importer...2
Choosing between Importing with or without Project Dependencies...3
Importing an Eclipse Project and Preserving Project Dependencies...3
Importing an Eclipse Project Ignoring Project Dependencies...5
Handling Eclipse Project Discrepancies...7
Handling Eclipse Project Reference Problems...8
Importing an Eclipse Project
into NetBeans IDE
To address developers needs in migrating applications to NetBeans, an optional module called the Eclipse Project Importer was created to automatically import Eclipse projects into NetBeans as NetBeans projects. This optional module is available in NetBeans IDE 4.1 via the Update Center. The Eclipse Project Importer greatly simplifies the task of migrating applications developed under Eclipse to NetBeans by processing Eclipse project metadata and mapping it directly to a new NetBeans project.
The NetBeans Eclipse Project Importer is so advanced it will not only identify and automatically fix Eclipse project discrepancies, it will also identify erroneous Eclipse project references and suggest corrective actions to resolve them once the project has been imported into NetBeans. The NetBeans Eclipse Project Importer is also very flexible since you can select projects from an Eclipse workspace where project dependencies are automatically identified and marked for importing if such project dependencies exist. In addition, the NetBeans Eclipse Project Importer will also let you select individual Eclipse projects for importing into NetBeans without specifying the location of the Eclipse Workspace.
Getting the Eclipse Project Importer
The NetBeans Eclipse Project Importer is an optional module for NetBeans IDE 4.1, so it is not in the standard download.
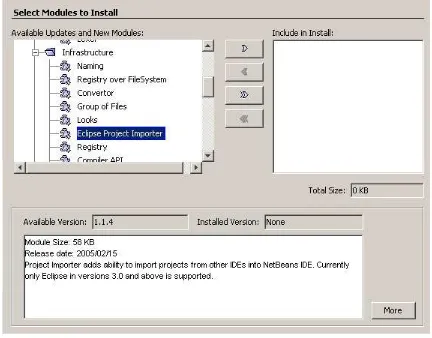
[image:2.612.90.522.276.614.2]To download and install the Eclipse Project Importer module, launch NetBeans IDE and choose Tools | Update Center from the main menu. In the Update Center, select the Eclipse Project Importer from the Infrastructure category (as shown in Figure A-1) and click the arrow button to add the module to list of modules to download.
Figure A-1
Update Center wizard with the Eclipse Project Importer module selected
Choosing between Importing with or without Project
Dependencies
As mentioned earlier, NetBeans IDE's Eclipse Project Importer provides two options for importing Eclipse projects into NetBeans.
One option is to select Eclipse projects from an Eclipse Workspace where project dependencies can be automatically identified, marked and selected by the NetBean's Eclipse Project Importer. This option preserves project dependancies and consequently makes it very easy to import Eclipse projects which have dependencies on other Eclipse projects. The NetBeans Eclipse Project Importer automatically determines the project dependencies for you. You can also use this option to import an Eclipse project which has no additional project dependencies.
The other option for importing Eclipse projects imports only the specified project and ignores any project dependencies which may exist with other Eclipse projects. This option is best suited for situations where you do not have an Eclipse Workspace, but have access to an Eclipse project.
NetBeans IDE Tip
In most cases you should use the option to import Eclipse projects using an Eclipse Workspace so that project dependancies are preserved. The option to import Eclipse projects directly while ignoring project
dependancies is most applicable when a Eclipse Workspace is no longer available as a result of an action such as an Eclipse IDE uninstall which resulted in an Eclipse Workspace removal.
Importing an Eclipse Project and Preserving Project
Dependencies
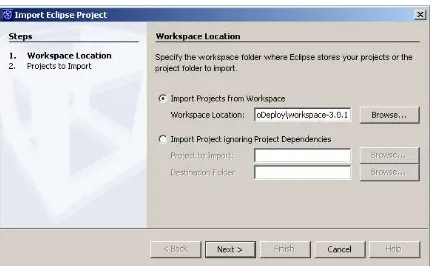
This section describes the procedure necessary to import an Eclipse project from an Eclipse Workspace. When using this option to import Eclipse projects, the NetBeans Eclipse Project Importer automatically determines any project dependencies and imports those projects as well.
Figure A-2
Import Eclipse Project wizard, Workspace Location panel
Once you have specified the location of the Eclipse Workspace, press Next to display the Project to Import portion of the Import Eclipse Project wizard. This portion of the wizard asks you which Eclipse projects you would like to import and the location of where to create the imported project(s) for NetBeans.
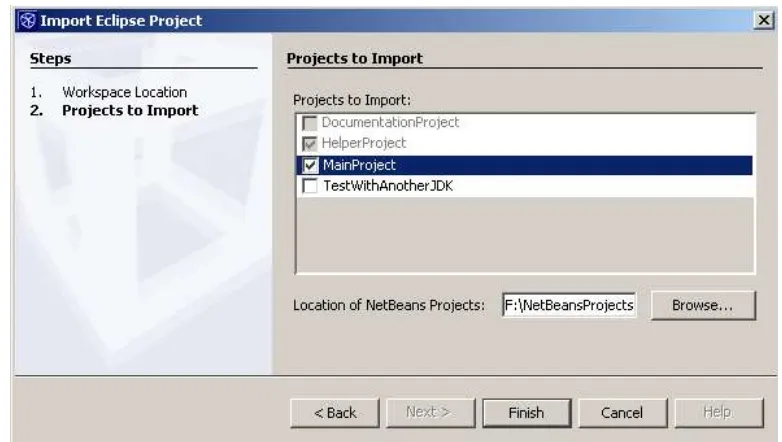
If there are project dependencies between a selected Eclipse project to import, the NetBeans Eclipse Project Importer will automatically determine this and mark those dependent projects for import also. In the example in Figure A-3, MainProject was initially selected, but since
Figure A-3
Import Eclipse Project wizard, Projects to Import panel
To complete the Import Eclipse Project wizard and complete the importing of the Eclipse project(s) into NetBeans, press the Finish button.
If NetBeans discovers discrepancies in the Eclipse project(s) while processing the Eclipse project information and believes it can resolve those discrepancies automatically, the NetBeans Eclipse Project Importer will display a warning dialog showing any Eclipse project discrepancies it has found and the corrective action NetBeans has taken. If you see this dialog, there is no additional work required. For more information on Eclipse Project Discrepancies, see Handling Eclipse Project Discrepancies on page XXX.
If the NetBeans Eclipse Project Importer has discovered problems in an Eclipse project such as a project resource that could not be found, NetBeans will display an Eclipse project Reference Problems warning dialog along with appropriate actions for you to take to resolve these Eclipse project reference problems once the project has been imported into NetBeans. This dialog is presented guide toward correcting problems that have been detected in the Eclipse project which the NetBeans Eclipse Project Importer can not correct itself. For more information on Eclipse project reference problems, see Handling Eclipse Project Reference Problems on page XXX.
If the NetBeans Eclipse Project Importer has found no project reference problems in the Eclipse project you are importing, you can begin using NetBeans IDE on your newly imported Eclipse project(s). For instance, you can immediately begin using the NetBeans Project Viewer to traverse the imported project(s), or you can begin running the newly imported Eclipse projects by right-clicking on the newly imported project in the Project Window and selecting Run Project from the context sensitive menu.
Importing an Eclipse Project Ignoring Project Dependencies
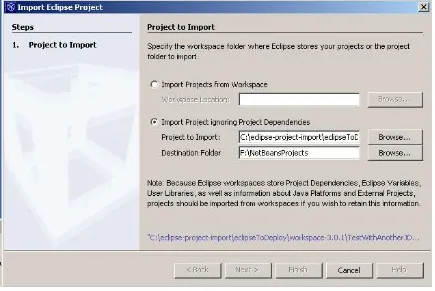
To initiate an import of an Eclipse project and ignore any project dependencies that may exist, choose File | Import Project | Eclipse Project menu in NetBeans IDE. In the Import Eclipse Project wizard, select the Import Project Ignoring Project Dependencies radio button and specify the Eclipse project to import and the destination folder where the project should be imported to.
Figure A-4
Import Eclipse Project wizard, Workspace Location panel
Once you have specified the location of the Eclipse project to import and the destination folder, press Finish button to complete the Import Eclipse Project wizard and complete the importing of the Eclipse project into NetBeans.
If the NetBeans Eclipse Project Importer has discovered problems in your Eclipse project such as a project resource that could not be found, NetBeans will display a Reference Problems warning dialog along with appropriate actions for you to take to resolve these Eclipse project reference problems once the project has been imported into NetBeans. This dialog is presented so that you may correct problems that have been detected in the Eclipse project while the NetBeans Eclipse Project Importer was processing the Eclipse project information. For more information on Eclipse project reference problems, see Handling Eclipse Project Reference Problems on page XXX.
If the NetBeans Eclipse Project Importer has found no project reference projects in the Eclipse project you are importing, you can begin using NetBeans IDE on your newly imported Eclipse project so long as you do not have other dependent projects that must be imported. If there are no additional project dependencies for the project you have just imported, you can immediately begin using the NetBeans Project Viewer to traverse the imported project(s). You can also begin running the newly imported Eclipse project by right clicking on the newly imported project in the Project Window and selecting Run Project from the context sensitive menu.
Handling Eclipse Project Discrepancies
If the NetBeans Eclipse Project Importer identifies Eclipse project discrepancies while importing an Eclipse project after pressing the Finish button on the Import Eclipse Project wizard, a warning dialog will be displayed explaining the Eclipse project discrepancies
discovered during the project import along with the action NetBeans will take in dealing with the Eclipse project discrepancies found. You do not need to take any additional action when this warning dialog appears. The warning dialog is meant to be informative and to tell you the NetBeans Eclipse Project Importer found discrepancies in the Eclipse project is was importing.
An example dialog is shown in Figure A-5, which illustrates an Eclipse project discrepancy found by the NetBeans Eclipse Project Importer during an Eclipse project import and shows the corrective action taken by NetBeans to fix the Eclipse project discrepancy.
Figure A-5
Notification that there inconsistencies in the imported Eclipse project that NetBeans has corrected
As already mentioned, if you see this warning dialog there is no additional work required on your part. The NetBeans Eclipse Project Importer is only telling you it has found project
Handling Eclipse Project Reference Problems
[image:8.612.104.472.174.349.2]If the NetBeans Eclipse Project Importer identifies an Eclipse project reference problem while processing an Eclipse project after you press the Finish button in the Import Eclipse Project wizard, a warning dialog will be displayed. This dialog reports that NetBeans has found an Eclipse project reference problem and suggests the corrective action you should take. An example of this warning dialog is shown in Figure A-6.
Figure A-6
Notification that there are reference problems in the imported project that you must resolve after closing the dialog
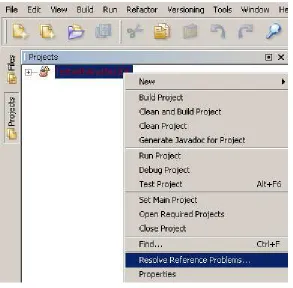
Figure A-7
Contextual menu item for resolving reference problems in an imported Eclipse project
After selecting the Resolve Reference Problems, a Resolve Reference Problems wizard is displayed which identifies what NetBeans has found for Eclipse project reference problems. An example of this wizard is shown below.
Figure A-8