USPEX
A
Copyright
Copyright ©1998, Auspex Systems, Inc. All rights reserved. Printed in the United States of America. Part Number 850477-001.
No part of this publication may be reproduced, in any form or by any means, without the prior written consent of Auspex Systems, Inc. Auspex Systems, Inc., reserves the right to revise this publication and make changes in content from time to time without obligation on the part of Auspex Systems to provide prior notification of such revision or change.
U.S. GOVERNMENT RIGHTS: As specified in 48 C.F.R.12.212 of the FAR and in 48.C.F.R 227-7202-1 of the DFARS, the use, duplication or disclosure of licensed commercial software and documentation is subject to the Auspex System's license. Such rights and restrictions are similar to those set forth in FAR 52.227-19(c)(1)&(c)(2).
Trademarks
Auspex, Auspex logo design, Functional Multiprocessor, Functional Multi-processor, Functional Multi-processing, Functional Multiprocessing Kernel, FMK, and FMP are registered trademarks of Auspex Systems, Inc. NS 7000, NS 6000, NS 6002, NS 5500, NS 5502, NS 5000, NS 3000, NetServer, DataGuard, ServerGuard, Functional
Multiprocessing, NeTservices, and Thrive Carefully are trademarks of Auspex Systems, Inc.
AT&T is a registered trademark of AT&T Corporation. Microsoft, MS, MS-DOS, Windows, Windows NT, and Backoffice are either registered trademarks or trademarks of Microsoft Corporation. Sun, Sun Microsystems, the Sun Logo, Solaris, SunOS, ONC, ONC/NFS, and NFS are trademarks or registered trademarks of Sun Microsystems, Inc. All SPARC trademarks are used under license and are the trademarks or registered trademarks of SPARC International, Inc. in the United States and other countries. UNIX is a registered trademark in the United States and other countries of The Open Group. VMEbus is a trademark of VMEbus Manufacturers Group. DEC and VT 510 are trademarks of Digital Equipment Corp. ForeRunner is a trademark of FORE Systems, Inc. Acrobat is a trademark of Adobe Systems, Inc.
Auspex NetServer System Software is derived from UNIX® licensed from The Santa Cruz Operation, Inc. and SunOs™ 4.1.4 and ONC/NFS 4.1 licensed from Sun
Microsystems, Inc. Auspex NetServer System Software Version 1.10 incorporates AT&T’s Advanced Server for UNIX Systems. Auspex Optional Products Premier Software Series for NeTservices incorporates AT&T’s Advanced Server for UNIX Systems and
NETBIOS/ix. NETBIOS/ix is a registered U.S. trademark of Micro Computer Systems, Inc.
Microsoft may have patents or pending patent applications, trademarks, copyrights, or other intellectual property rights covering subject matter in this document. The furnishing of this document does not give you any license to these patents, trademarks, copyrights, or other intellectual property rights except as expressly provided in any written license agreement from Microsoft.
Auspex Systems, Inc. 2300 Central Expressway Santa Clara, California 95050 Phone: (408) 566-2000
Fax: (408) 566-2020
Internet: [email protected]
Protection Against Electrostatic Discharge
To prevent damage to the system due to electrostatic discharge, always wear the antistatic wrist strap provided with your network server when you come in contact with the system.
Publication Change Record
The following table records all revisions to this publication. The first entry is always the publication’s initial release. Each entry indicates the date of the release and the number of the system release to which the revision corresponds.
Part Number Date Description
Contents ▲ v
USPEX
A
Contents
Chapter 1 Overview of DriveGuard
About This Chapter . . . 1-1 Overview . . . 1-2 System Requirements . . . 1-4 Software Architecture . . . 1-5 Spare Devices . . . 1-5 Device Numbering . . . 1-6 Array States . . . 1-7 Partitions. . . 1-7 Virtual Partitions . . . 1-7 DriveGuard Configuration. . . 1-8 Device Recovery . . . 1-9 Limitations. . . 1-10 Common Questions About DriveGuard. . . 1-11
Chapter 2 Installing DriveGuard
About This Chapter . . . 2-1 Installation Planning . . . 2-2 Obtaining a Software License Key . . . 2-2 Using Package Tools . . . 2-4 Software Installation . . . 2-5
Chapter 3 Using DriveGuard
About This Chapter . . . 3-1 Array Planning . . . 3-2 The ax_raid(8) Command . . . 3-3 Creating an Array. . . 3-4 /etc/raidtab Format . . . 3-4 Array Creation and Initialization . . . 3-5 Rebuilding a Damaged Array. . . 3-8 Automatic Rebuild . . . 3-8 Manual Rebuild . . . 3-8 Reestablishing Original Array Configuration . . . 3-9 Managing DriveGuard Arrays . . . 3-10
USPEX
A
Chapter 4 Maintenance
About This Chapter . . . .4-1 Expanding a DriveGuard Array . . . .4-2 Migrating File Systems . . . .4-4 Migrating to a DriveGuard Array . . . .4-4 Migrating from a DriveGuard Array . . . .4-4 Moving Arrays Between NetServers . . . .4-6 Removing DriveGuard . . . .4-7
Appendix A Configuration Worksheets
Preface ▲ vii
USPEX
A
Preface
About This Chapter
This guide provides information on how to operate and manage DriveGuard software. It is intended for the Auspex NetServer administrator.
Applicable Documentation
The following is a list of documents you will find useful when installing or operating DriveGuard:
▲ Software Release Note, Auspex Systems, Inc.
▲ System Manager’s Guide, Auspex Systems, Inc.
In addition to the above documents provided by Auspex, you may find the following document helpful:
▲ The RAIDbook, The RAID Advisory Board
Typographical Conventions
In this guide, different typefaces indicate different kinds of information. The following table explains these typographical conventions.
Hexadecimal values in the text are preceded with “0x,” and leading zeros are not always shown. For example, the notation 0x68 is used to indicate the hexadecimal address 00000068.
Font Meaning
Typewriter Indicates a literal screen message.
Bold In a command line, indicates information to be entered exactly as shown. In text, indicates a command name or device name.
USPEX
A
Special Messages
The following special messages are used in this guide:
Warning: Warnings alert you to the danger of personal injury and call attention to instructions you must follow for your personal safety.
Caution: Cautions call attention to instructions you must follow to prevent damage to system hardware or software or loss of system data.
Note: Notes call attention to important information you should be aware of as you follow the procedures described in this guide.
Recommendation: Recommendations call attention to an item or procedure that is not required but might help improve performance, ease of use, and ease of installation or configuration.
Tools
Preface ▲ ix
USPEX
A
Getting Help
Customer support and online help are described in this section.
Email Support
Customer service and help through electronic mail are available to North American and International customers at the following address:
North America Telephone Support
To reach Auspex customer service for North America at any time, dial 1-800-328-7739.
International Telephone Support
Customers within the countries and territory listed as follows can reach Auspex customer service at any time by dialing the appropriate telephone number.
International customers who purchase Auspex products from an authorized distributor or reseller should contact that distributor or reseller for support
To comment on the content of this online help facility, send email to Auspex Technical Publications:
Country or territory Telephone number Country or territory Telephone number
Australia 1-800-121-194 Luxembourg 0800-2721
Austria 0-660-7912 Malaysia 800-4509
Belgium 0800-1-0180 Netherlands 06-0222158
Denmark 80-01-03-60 Norway 800-1-1294
France 0800-91-21-32
(0800-26-38-22)*
* France has two toll-free numbers. The number in () is directed to the Paris office during the working day.
Philippines 1-800-116-0005
Germany 0130-81-8306 Poland 00-800-441-1220
Hong Kong 800-4803 Spain 900-95-4445
Ireland 1800 55 3343 Sweden 020-797326
Israel 177 440 9285 Switzerland 0800-55-1339
Italy 1678-73541 Taiwan 0080-14-9580
Japan 0044-22-12-2414 United Kingdom 0800-28-7739
USPEX
A
World Wide Web
For more information about Auspex Systems, Inc. and its products, use the following resource location on the World Wide Web:
http://www.auspex.com
Printing Online Documents
You can print individual pages or the entire contents of the online manual. To print individual pages, use the ax_docs command and choose Premier Software Series Menu in the Main Menu window. Choose the DriveGuard documentation, and pull down the File menu when the document appears. The Print option allows you to print a particular page, a range of pages, or the entire document. The Print Setup option allows you to select a paper size, including A4.
Overview of DriveGuard ▲ 1-1
USPEX
A
1
Overview of DriveGuard
About This Chapter
DriveGuard™ implements Redundant Arrays of Independent Disks (RAID) Level 5 within a single Storage Processor V (SP V) board. This chapter provides an overview of DriveGuard, summarizes its features and benefits, briefly describes the DriveGuard software architecture, and answers some commonly asked questions about DriveGuard.
The following topics are covered:
▲ Overview
▲ System Requirements
▲ Software Architecture
▲ Device Recovery
▲ Limitations
▲ Common Questions About DriveGuard
Chapter 1 provides an overview of DriveGuard. For installation instructions, see
Chapter 2; for operation, see Chapter 3; and for maintenance activities, see Chapter 4.
Auspex recommends that you read this entire document before installing and using DriveGuard.
USPEX
A
Overview
DriveGuard protects user data by supporting RAID Level 5 (RAID5) within a single SP V board. With DriveGuard, you define a group of three or more physical devices that make up a DriveGuard array. The software treats this array as a single device. You can read to and write from the array, as well as partition the array. You may also define one or more drives as spares, which are used to substitute for failed drives.
[image:12.612.99.467.252.378.2]DriveGuard stores parity information in blocks that are spread throughout all of the drives in the array, as shown in Figure 1-1. If any single drive in the array fails, DriveGuard can satisfy read and write requests by calculating the data on the failed drive using the data and parity information on the remaining drives in the array. Furthermore, all the contents of the failed drive can be reconstructed onto a spare drive or a replacement drive, once again restoring integrity and redundancy of the RAID5 array.
Figure 1-1. DriveGuard array with three member drives
[image:12.612.60.471.482.695.2]The ax_raid(8) command allows you to create, reconstruct, and maintain DriveGuard arrays. Chapter 3 describes how to use the ax_raid(8) command.
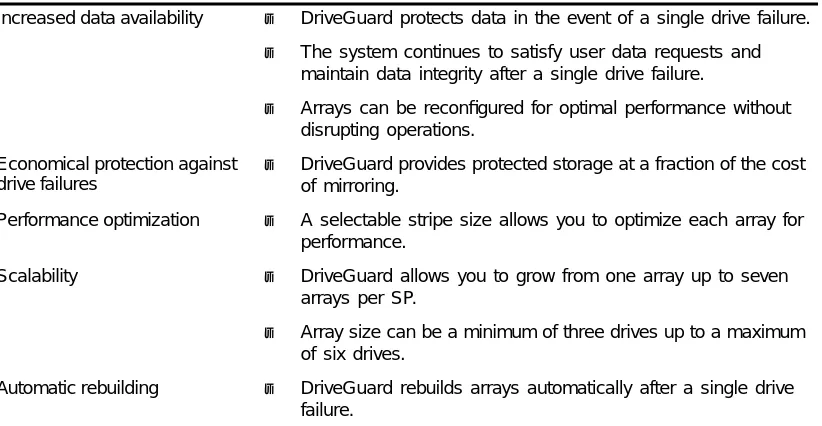
Table 1-1 summarizes the features and benefits of DriveGuard.
Table 1-1. Summary of DriveGuard features and benefits
Increased data availability ▲ DriveGuard protects data in the event of a single drive failure.
▲ The system continues to satisfy user data requests and maintain data integrity after a single drive failure.
▲ Arrays can be reconfigured for optimal performance without disrupting operations.
Economical protection against drive failures
▲ DriveGuard provides protected storage at a fraction of the cost of mirroring.
Performance optimization ▲ A selectable stripe size allows you to optimize each array for performance.
Scalability ▲ DriveGuard allows you to grow from one array up to seven
arrays per SP.
▲ Array size can be a minimum of three drives up to a maximum of six drives.
Automatic rebuilding ▲ DriveGuard rebuilds arrays automatically after a single drive failure. DATA2 PARITY DATA1 PARITY PARITY PARITY DATA6 DATA8 DATA5 DATA7 DATA3 DATA4
Overview ▲ 1-3
USPEX
A
Ease of administration ▲ The installation process uses standard operating system package tools. (Activation requires a software license key available from Auspex.)
[image:13.612.136.560.84.717.2]▲ Multiple dedicated or floating spares reduce the urgency and amount of administrator intervention.
USPEX
A
System Requirements
DriveGuard requires the following:
▲ SP V with Write Accelerator III
▲ Minimum of three 4-GB drives
Software Architecture ▲ 1-5
USPEX
A
Software Architecture
A DriveGuard array consists of a number of drives that the software treats as a single device. You can partition the array and perform read/write operations on the array just as you would for a single physical drive.
This section describes the following information about DriveGuard arrays:
▲ Spare Devices
▲ Device Numbering
▲ Array States
▲ Partitions
▲ Virtual Partitions
▲ DriveGuard Configuration
Spare Devices
In addition to defining the drives that make up an array, you may define a number of drives to be spare devices. Spare drives allow DriveGuard to automatically replace a failed drive with a spare drive in the event an array drive fails. Without spare drives defined, DriveGuard requires manual intervention to rebuild the array.
You can define two types of spare devices:
▲ Dedicated spares
▲ Floating spares
A dedicated spare belongs to a particular array. This spare drive can be used as a replacement drive only by the array to which it belongs. You can define one dedicated spare per array.
Floating spares can be used by any array within the same SP that needs to replace a failed drive. Each SP supports up to six floating spare drives. Floating spares are defined in an array with the state of RAID_SPECIAL. Although this array is defined in the same way as
a DriveGuard array, it is not a DriveGuard array. It is a pool of floating spare drives.
Note: Dedicated spares and floating spares must belong to the same SP as the arrays to which they are assigned.
During automatic rebuilding, the SP first checks for a dedicated spare drive. If a dedicated spare is not found, it then checks the floating spares array for a valid drive. Once a spare drive is used to reconstruct an array, it becomes part of that array and is no longer available as a spare device.
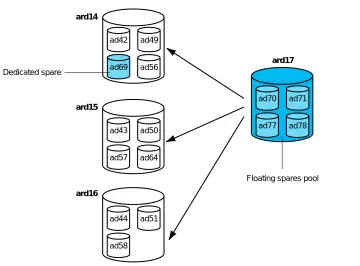
Figure 1-2 shows an example of three DriveGuard arrays and a floating spares pool. In the
USPEX
A
Figure 1-2. DriveGuard arrays and floating spares
In Figure 1-2, ard14, ard15, and ard16 are three DriveGuard arrays defined on SP1. ard14
has a dedicated spare drive, ad69, associated with it. A floating spares array, ard17, is also defined. The drives in the floating spares array are available as replacement drives if a drive in any of the three DriveGuard arrays fails. The dedicated spare, ad69, is available only for ard14. If a drive in ard14 fails, DriveGuard attempts to rebuild using the dedicated spare before using one of the floating spare drives.
Device Numbering
DriveGuard arrays are assigned a number ardx, where x is a number between 0 and 69.
Each SP is assigned 14 array numbers, as shown in Table 1-2.
Each SP is assigned 14 array numbers although an SP supports a maximum of only 7 DriveGuard arrays plus a floating spares array. For example, if SP0 contains 8 arrays (7 DriveGuard arrays plus 1 floating spares array), they may be numbered ard0 through ard7. The first array defined for SP1 is ard14.
Table 1-2. DriveGuard array numbering scheme
SP Number DriveGuard array number
SP0 0 – 13
SP1 14 – 27
SP2 28 – 41
SP3 42 – 55
SP4 56 – 69
ard14
ard15
ard16
ard17 Dedicated spare
Floating spares pool
ad42 ad49
ad56 ad69
ad70 ad71
ad78 ad77
ad44 ad51
ad58
ad43 ad50
[image:16.612.55.268.547.648.2]Software Architecture ▲ 1-7
USPEX
A
Array States
Every DriveGuard array has a state associated with it. When you create an array, the state is NEW. After initialization, the state changes to GOOD. You can perform reads and writes on the array when its state is GOOD. An array state of DEGRADED, which indicates a single
[image:17.612.143.554.220.350.2]device failure, continues to satisfy read and write requests using the remaining drives in the array. The array remains in DEGRADED state until it rebuilds successfully, at which point it changes back to GOOD. DriveGuard sends a message to ax_vold(8) when the array state changes.
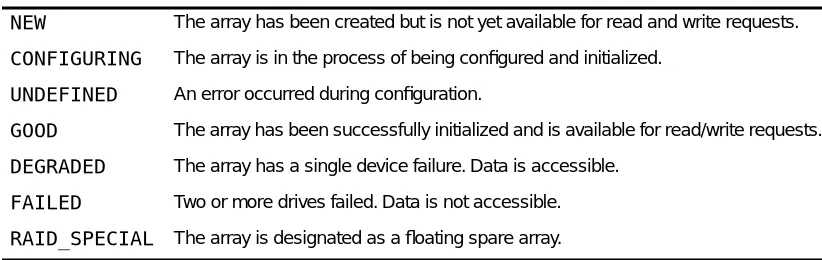
Table 1-3 shows the different states a DriveGuard array can take.
You can see what state an array is in by using the stat option of the ax_raid(8) command. Refer to “Displaying Array Status” on page 3-13 for information on using this option.
Partitions
Partitioning a DriveGuard array is similar to partitioning any other physical device. You can partition the array into as many as eight partitions.
The /etc/raidlabel.map file contains default partition maps for supported sizes of DriveGuard arrays. After initializing an array, ax_raid(8) creates a default partition as defined in /etc/raidlabel.map for the corresponding array size. If an appropriate entry is not found, ax_raid(8) creates a single c partition.
Arrays can be repartitioned using ax_label(8). Refer to the ax_label(8) man page for more information on defining partitions for a DriveGuard array.
Virtual Partitions
DriveGuard arrays can be members of concatenated virtual partitions. DriveGuard does not support striped virtual partitions. The following rules apply:
▲ If a DriveGuard array is a member of a concatenated virtual partition, all other members of that virtual partition must also be DriveGuard arrays.
▲ Striped virtual partitions are not supported; that is, you cannot have a striped virtual partition of DriveGuard arrays.
▲ Mirrored virtual partitions are supported only for expanding onto a larger
DriveGuard array and migrating file systems between DriveGuard arrays and regular Table 1-3. DriveGuard array states
NEW The array has been created but is not yet available for read and write requests.
CONFIGURING The array is in the process of being configured and initialized.
UNDEFINED An error occurred during configuration.
GOOD The array has been successfully initialized and is available for read/write requests.
DEGRADED The array has a single device failure. Data is accessible.
FAILED Two or more drives failed. Data is not accessible.
USPEX
A
[image:18.612.73.473.139.313.2]drives (drives that are not members of a DriveGuard array). Refer to Chapter 4 for information on expanding DriveGuard arrays and migrating file systems.
Figure 1-3 shows an example of a concatenated virtual partition with three members:
ard0a, ard1a, and ard2c.
Figure 1-3. Example of arrays in a concatenated virtual partition
The corresponding /etc/vpartab entry is:
/dev/vp1 concat ard0a,ard1a,ard2c
DriveGuard Configuration
An array has a minimum of three drives and a maximum of six drives. An SP V with Write Accelerator III can support up to seven arrays.
All the drives in an array must be controlled by the same SP. The drives do not have to be physically contiguous. In fact, for optimum fault tolerance and performance, do not define more than one drive per SCSI channel in an array.
[image:18.612.56.342.580.719.2]Recommendation: For optimum reliability and performance, configure only one device per SCSI channel in each array.
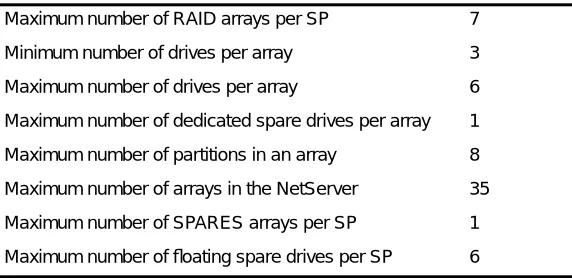
Table 1-4 shows the minimum and maximum array and drive configurations.
Table 1-4. DriveGuard configurations
Maximum number of RAID arrays per SP 7
Minimum number of drives per array 3
Maximum number of drives per array 6
Maximum number of dedicated spare drives per array 1
Maximum number of partitions in an array 8
Maximum number of arrays in the NetServer 35
Maximum number of SPARES arrays per SP 1
Maximum number of floating spare drives per SP 6 Concatenated Partition (vp1)
ad3 ad10 ad17 ad4 ad11 ad18 ad25 ad5 ad12 ad19
ard0a ard1a ard2c
Device Recovery ▲ 1-9
USPEX
A
Device Recovery
If a drive in a DriveGuard array fails, the state of the array changes to DEGRADED and the array must be rebuilt. When you create the array, you specify whether a rebuild initiates automatically or requires manual intervention. The automatic rebuild process does the following:
1. Checks for a replacement drive first from the dedicated spare and then from the array of floating spares.
2. Updates the array structure to remove the failed drive and include the new drive, if a valid spare was found.
3. Reconstructs the data from the damaged drive onto the new drive, using the parity and data from the remaining drives in the array.
If no spare drive was specified, the array remains in DEGRADED state.
During the rebuild process, you continue to have access to the array, although the performance of read operations decreases.
USPEX
A
Limitations
DriveGuard limitations are as follows:
▲ A DriveGuard array cannot span SPs. All of the drives in an array, including spares, must be managed by the same SP.
▲ All of the member drives of an array must be the same size.
▲ A drive that is a member of a DriveGuard array cannot be opened by itself. For example, you cannot partition and label the drive. You have to partition and label the DriveGuard array instead.
▲ A drive that is a member of a DriveGuard array cannot be a component of a virtual partition. A DriveGuard array cannot be a component of a virtual partition that contains nonarray devices.
▲ DriveGuard protects data in the event of a single device failure only. Data recovery is impossible if more than one device in an array fails simultaneously or if a second drive fails before the array can be restored to its redundant state.
▲ A drive can be a member of only one array at a time.
▲ If a SCSI cable disconnects while you are powering up the system and drives that are members of a DriveGuard array are on that SCSI channel, the array is in DEGRADED
state when the system comes up. If all of the member drives of an array are on that SCSI channel, you must reconnect the SCSI cable and reboot the system for the array to be recognized.
Common Questions About DriveGuard ▲ 1-11
USPEX
A
Common Questions About DriveGuard
This section contains questions and answers about DriveGuard.
▲ Can I use DriveGuard on an SP IV or SP III-E?
No. Because of memory and write cache requirements, DriveGuard runs only on an SP V board with Write Accelerator III.
▲ What do I do if a drive fails?
If you specified the rebuild=auto option when you created the array and you have a spare defined, you do nothing. The SP automatically initiates the rebuild process. If you do not have automatic rebuild enabled or do not have a spare defined, you must start the process yourself using ax_raid(8) with the rebuild option. Meanwhile, other I/O operations on the array continue.
Contact Auspex Technical Support for a replacement drive.
▲ What if no spares are available when the array is in DEGRADED state?
If the SP cannot locate an appropriate spare drive to replace a failed drive, the array remains in DEGRADED state. You can recover manually, specifying an alternate drive to build on.
▲ Can I introduce a spare while the array is in DEGRADED mode? Will it then rebuild using the new spare?
Yes. But you have to initiate the rebuild of the degraded array manually using the
rebuild option of the ax_raid(8) command.
▲ If a drive fails and the array is rebuilt using the spare, how am I alerted as to which drive failed?
The ax_vold(8) daemon sends a message to the console. You can also modify the /etc/raid_notify.sh file to notify you with an email message or a popup window when the state of the array changes.
▲ What if more than one drive fails?
If more than one drive fails at the same time in the same array, DriveGuard cannot reconstruct the data and the data is lost. Each DriveGuard array protects the data in the event of a single drive failure only.
▲ How do I know which floating spare drive is used for a rebuild?
After a rebuild, enter the ax_raid(8) command with the stat option. This command displays the name and member drives of each array.
▲ Does DriveGuard use a dedicated parity disk?
No. The parity information is spread throughout all the drives in the array, as shown in Figure 1-1.
▲ During recovery, will I continue to have access to the array?
Installing DriveGuard ▲ 2-1
USPEX
A
2
Installing DriveGuard
About This Chapter
This chapter explains how to configure and install DriveGuard for your environment. The procedures in this chapter assume your NetServer is installed at your site and you are familiar with the information in the System Manager’s Guide and in your NetServer hardware documentation.
This chapter covers the following topics:
▲ Installation Planning
USPEX
A
Installation Planning
This section reviews information you need to know before installing DriveGuard on the NetServer.
Obtaining a Software License Key
DriveGuard requires a software license key before installation on the server. A separate license key is required for each NetServer on which you plan to install DriveGuard. A license key can be either a demonstration or a purchase license. A demonstration license allows full use of DriveGuard until the demonstration license expires and the system is rebooted. The expiration date is included in the license key that is returned to you.
A purchase license key requires Auspex purchase order and sales order numbers and does not have an expiration date. Contact your Auspex sales representative or distributor for sales order and purchase order numbers.
You can obtain a key with the ax_request_key(8) command. ax_request_key prompts you for order information and sends email to Auspex with the appropriate NetServer
information. An automatic email response returns the key text to you. If you do not have email or Internet access, ax_request_key can save the information in a file that you can then print and fax to Auspex. The U.S. fax number is (408) 986-2359. A fax sent early in the day Monday through Friday generates a return the same day. Fax requests at other times generate a return in the next business day. If your site cannot communicate with Auspex through email or fax, call Auspex Technical Support, who can generate a key for you if you already have sales and purchase order numbers.
You must run ax_request_key for each NetServer on which you plan to install
DriveGuard. Because the license is mailed to the userid that invokes ax_request_key, do not run it as root.
To obtain a key:
1. Type ax_request_key at the prompt:
# ax_request_key
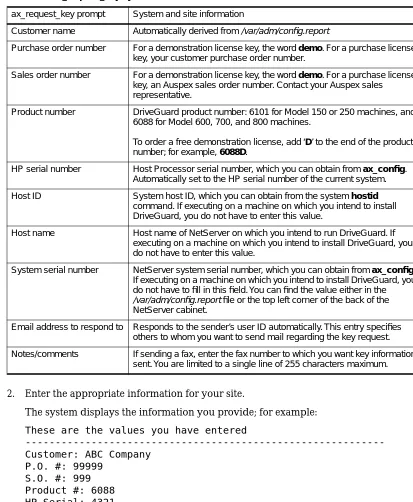
ax_request_key then prompts you for system and site information. All default information in the prompts comes from the local NetServer. Be sure to replace the defaults with correct information if the license is for another NetServer. Table 2-1 describes the system and site information entries in the following example:
You will be asked questions to obtain information required to request a key. Some of the questions have a default value obtained from your system enclosed in [square brackets]. If the default value is correct, just press <RETURN>
Customer Name? ABC Company Purchase Order Number? 99999 Sales Order Number? 999
For a demonstration license, use the word demo for the purchase and sales order numbers and add the letter “D” to the product number. For instance, the entry at “Product Number?” for a demonstration license is 6088D. The following example is for a purchase license:
Installation Planning ▲ 2-3
USPEX
A
HP Serial Number? [4321] Host Id? [0x1a001234] Host Name? [host1]
System Serial Number? [M0123]
Additional email address to respond to? [ ] Notes/Comments? [ ]
2. Enter the appropriate information for your site.
The system displays the information you provide; for example:
These are the values you have entered
---Customer: ABC Company
P.O. #: 99999 S.O. #: 999 Product #: 6088 HP Serial: 4321 Hostid: 0x1a001234 Hostname: host1
[image:25.612.137.550.161.663.2]System Serial #: M0123 Respond To: [email protected]
Table 2-1. ax_request_key system and site information
ax_request_key prompt System and site information
Customer name Automatically derived from /var/adm/config.report
Purchase order number For a demonstration license key, the word demo. For a purchase license key, your customer purchase order number.
Sales order number For a demonstration license key, the word demo. For a purchase license key, an Auspex sales order number. Contact your Auspex sales representative.
Product number DriveGuard product number: 6101 for Model 150 or 250 machines, and 6088 for Model 600, 700, and 800 machines.
To order a free demonstration license, add ‘D’ to the end of the product number; for example, 6088D.
HP serial number Host Processor serial number, which you can obtain from ax_config. Automatically set to the HP serial number of the current system.
Host ID System host ID, which you can obtain from the system hostid command. If executing on a machine on which you intend to install DriveGuard, you do not have to enter this value.
Host name Host name of NetServer on which you intend to run DriveGuard. If executing on a machine on which you intend to install DriveGuard, you do not have to enter this value.
System serial number NetServer system serial number, which you can obtain from ax_config. If executing on a machine on which you intend to install DriveGuard, you do not have to fill in this field. You can find the value either in the /var/adm/config.report file or the top left corner of the back of the NetServer cabinet.
Email address to respond to Responds to the sender’s user ID automatically. This entry specifies others to whom you want to send mail regarding the key request.
USPEX
A
Notes: none
---Mail to Auspex, Edit, Save, or Quit? [MESQ]
3. Type M to mail the information, E to change the information, or S to save the information to a file.
When you type M, the system responds with:
The above form has been mailed to Auspex
If you save the information to a file, you can email the file to [email protected] or print and fax the information (along with your fax number) to Auspex. If you email the file, you must include “OPF key request” as the subject line to receive a response. If you fax the file, Auspex verifies the information and returns a fax containing the key. The U.S. fax number is (408) 986-2359.
This completes the procedure for obtaining a key. After receiving a response, follow the installation instructions included with the key to install the license key.
Using Package Tools
The package tools allow you to install DriveGuard from the Auspex Premier Software Series CD-ROM shipped with your system. Package tools are the standard SVR4 package utilities, which are shipped as part of the Auspex system software. The tools allow you to add, check, remove, and display information about DriveGuard. The basic commands are:
▲ pkgadd(1M) – Transfers the contents of a software package from the distribution medium, and installs it onto a system. Messages from this command display on the console and are written to the file /var/log/pkgadd.log on the target drive and
/tmp/pkgadd.log on the current root drive.
Note: pkgadd(1M) sets userid to install, if it exists; otherwise, it sets userid to root. If you have a userid of install set up, it must have superuser permission or the pkgadd will fail. Either remove or rename the install userid, or give the install userid superuser permissions.
▲ pkgchk(1M) – Checks the accuracy of installed files or, by using the -l option, displays information about package files.
▲ pkgrm(1M) – Removes a previously or partially installed package from the system. Messages from this command display on the console and are written to the file /var/log/pkgrm.log on the target drive and /tmp/pkgrm.log on the current root drive.
▲ pkginfo(1) – Displays information about software packages installed on the system. For more information, refer to the man pages for these commands: pkgadd(1M),
Software Installation ▲ 2-5
USPEX
A
Software Installation
Before installing DriveGuard software, verify you have the required configuration (see
“System Requirements” on page 1-4) and then install the software key and license.
Recommendation: After completing the installation, test the new software to verify that the updated root drive is usable (for example, it boots, runs, and the newly added features work). If everything works correctly, clone the entire root disk to an alternate root disk using the ax_sputil(8) command with the
copy option. Alternatively, copy each file system on the root disk to an alternate root disk using the ax_clonefs(8) command on each file system.
1. Install the software key and license. The mail that was returned to you after using the
ax_request_key(8) command includes a script that installs the key and license. Here is an example of that script. Delete the message header and the “Cut Here” line, then execute the file with the sh(1) command.
# ---Cut Here---# This message installs a key and license.
# All you have to do is save the mail to a file, # delete the header, and sh the resulting file. #
# Product: AXdrvgrd # hostname: host1 # hostid: 0x1a001234
echo installing AXdrvgrd key
echo AXdrvgrd 0xaaaf3fc /etc/install/AXdrvgrd.lic > /tmp/ax_keys grep -v AXdrvgrd /etc/install/ax_keys >> /tmp/ax_keys 2> /dev/null cp /tmp/ax_keys /etc/install/ax_keys
rm /tmp/ax_keys
echo installing AXdrvgrd license
echo begin 644 /etc/install/AXdrvgrd.lic > /tmp/license.$$ cat <<\LICENSE >> /tmp/license.$$
M3T+J8J:,^!W]E:W?RAMI%GO((KGDUP74G!Y@+^*@ZO8Q " ['D%T!':D<G)P *EFQB=J"+77"6(*W?
end LICENSE
uudecode /tmp/license.$$ rm /tmp/license.$$
echo "Completed installation of AXdrvgrd key and license" echo "Checking AXdrvgrd license"
ax_checklicense AXdrvgrd
The license and key shown, 0xaaaf3fc, are examples. The license and key you receive are unique values for your system.
2. Mount the Premier Software Series CD-ROM; for example:
# mount -rt hsfs /dev/acd1 /cdrom
3. Mount /usr with read/write privilege:
# mount -o remount,rw /usr
USPEX
A
# pkgadd -d /cdrom
The system prompts you to select a software package.
pkgadd session started on Tue Jan 14 15:28:47 PST 1997
The following packages are available:
1 AX100bt Fast Ethernet 100Base-T
(HP-VII,HP-VIII) 1.9.2
2 AXatm2 ATM 2
(HP-VII,HP-VIII) 1.9.2
3 AXbackup FastBackup
(HP-VII,HP-VIII) 1.9.2
4 AXdguard DataGuard
(HP-VII,HP-VIII) 1.9.2
5 AXdocs Auspex System Documentation
(HP-VII,HP-VIII) 1.9.2
6 AXdrvgrd DriveGuard
(HP-VII,HP-VIII) 1.9.2
7 AXftp NP Resident FTP
(HP-VII,HP-VIII) 1.9.2
8 AXsrvgrd ServerGuard
(HP-VII,HP-VIII) 1.9.2
Select package(s) you wish to process (or 'all' to process all packages). (default: all) [?,??,q]:
5. Enter the number 6 for the DriveGuard package.
Note: If you are installing the document package only, you do not need a key.
The system responds with:
Processing package instance <AXdrvgrd> from </cdrom> DriveGuard
(HP-VII,HP-VIII) 1.9.2
Since DriveGuard is licensed and is being installed on the root drive, it can be enabled as soon as it is installed.
Do you want to enable it now, as part of the installation [y,n]
6. Enter y to enable DriveGuard immediately after installation. The system responds with:
## Processing package information. ## Processing system information. ## Verifying package dependencies. ## Verifying disk space requirements.
## Checking for conflicts with packages already installed. ## Checking for setuid/setgid programs.
This package contains scripts which will be executed with super-user permission during the process of installing this package.
Software Installation ▲ 2-7
USPEX
A
7. Enter y to continue the installation.
Installing DriveGuard as <AXdrvgrd>
## Installing part 1 of 1. /etc/raid_notify.sh.template /etc/raidlabel.map.template /etc/raidtab.template
/usr/auspex/ax_raid
[ verifying class <none> ]
## Executing postinstall script.
Renamed /etc/raidtab.template as /etc/raidtab
Renamed /etc/raid_notify.sh.template as /etc/raid_notify.sh Renamed /etc/raidlabel.map.template as /etc/raidlabel.map ax_enable: AXdrvgrd enabled
Installation of <AXdrvgrd> was successful.
The following packages are available:
1 AX100bt Fast Ethernet 100Base-T
(HP-VII,HP-VIII) 1.9.2
2 AXatm2 ATM 2
(HP-VII,HP-VIII) 1.9.2
3 AXbackup FastBackup
(HP-VII,HP-VIII) 1.9.2
4 AXdguard DataGuard
(HP-VII,HP-VIII) 1.9.2
5 AXdocs Auspex System Documentation
(HP-VII,HP-VIII) 1.9.2
6 AXdrvgrd DriveGuard
(HP-VII,HP-VIII) 1.9.2
7 AXftp NP Resident FTP
(HP-VII,HP-VIII) 1.9.2
8 AXsrvgrd ServerGuard
(HP-VII,HP-VIII) 1.9.2
Select package(s) you wish to process (or 'all' to process all packages). (default: all) [?,??,q]:
8. Enter q to leave the package menu.
pkgadd session finished on Tue Jan 14 15:31:47 PST 1997
A log of this session of pkgadd is at /tmp/pkgadd.log on the current root disk, and at /var/log/pkgadd.log on the target disk.
This completes the DriveGuard installation.
Note: If you are upgrading or reinstalling DriveGuard, the AXdrvgrd installation leaves the original configuration files, such as /etc/raidtab, unchanged. In step 7 of the above example, the new configuration files are installed in /etc/raidtab.template, /etc/raid_notify.sh.template, and
Using DriveGuard ▲ 3-1
USPEX
A
3
Using DriveGuard
About This Chapter
This chapter describes how to create and maintain DriveGuard arrays and how to recover from a single drive failure. The procedures in this chapter assume you are familiar with information in the System Manager’s Guide.
Setting up arrays and maintaining them is a simple procedure. Most of the array creation and management procedures can be done with a single command: ax_raid(8). This command and the procedures for creating and maintaining arrays are covered in the following sections:
▲ Array Planning
▲ The ax_raid(8) Command
▲ Creating an Array
▲ Rebuilding a Damaged Array
USPEX
A
Array Planning
Implementing an array of drives requires planning in several areas:
▲ Number of array members
▲ SCSI channel of each member
▲ Dedicated and floating spares
▲ Automatic or manual rebuild
▲ Rebuild priority
▲ Partition scheme of array
▲ Stripe size of array
Appendix A contains several worksheets to assist with your array planning.
For optimum performance, each of the member drives in an array should be on different SCSI channels on the SP.
The ax_raid(8) Command ▲ 3-3
USPEX
A
The ax_raid(8) Command
The ax_raid(8) command enables you to manage DriveGuard devices. This command supports several options that provide array administration functions. All of the options require super-user (root) privilege. The options are as follows:
load Download devices specified in /etc/raidtab.
init Write zeros across a given array. The array must be initialized to be usable.
delete Delete the given array, provided it does not have any open partitions.
verify Verify and optionally correct the parity of a given array.
scrub Detect and correct bad disk sectors for disks in a given array.
rebuild Reconstruct a given array when a member disk has failed.
stat Display the current state of all available DriveGuard arrays in the system.
print List all available DriveGuard arrays in /etc/raidtab format.
The init, verify, scrub, and rebuild options run as background jobs. Refer to the ax_raid(8) man page for more details.
USPEX
A
Creating an Array
This section describes the steps necessary to create and initialize a DriveGuard array, including defining the arrays in the /etc/raidtab file.
/etc/raidtab Format
The /etc/raidtab file describes the DriveGuard arrays and defines the drives that are assigned to each array. The first step in creating arrays is to define an entry for each array in the /etc/raidtab file. The format of a raidtab entry is:
ardn type[,parameters] adx1,adx2,...
ardn refers to the name of the array where n is a number from 0 to 69. Refer to “Device
Numbering” on page 1-6 for information on how the DriveGuard arrays are numbered.
The type of array is either raid5 or spares. A value of raid5 indicates that the member disks form a RAID5 array. A value of spares indicates that the member disks form an array of floating spares to be used during array reconstruction.
The parameters are optional and are valid only if type is raid5. The parameters can be one or more of the following, separated by commas:
spare=adn Declare adn as the dedicated spare for this array.
size=n Specify the stripe size of the array. Valid values for n are: 64K, 128K, and 256K. The letter K or k is optional. The default stripe size is 128K.
pri={ hi | lo } Set the priority of the verify and rebuild maintenance processes. A value of
hi priority gives preference to the array maintenance process over normal user I/O operations. The default value is lo.
rebuild=how Specify whether the array rebuilds automatically when it detects that a drive has failed or whether it requires manual intervention. Valid values for how are either auto or manual. The default is manual.
Note: If you are using DriveGuard arrays with the optional product ServerGuard, use rebuild=manual. An automatic rebuild may cause a ServerGuard failover. Refer to the ServerGuard Manager’s Guide for more information on using DriveGuard with ServerGuard.
The drives indicated by adx are the members of the array. Each RAID5 array must have a minimum of three member drives. Each SPARES array must have a minimum of one drive. The maximum number of member drives for both array types is six, not counting the dedicated spare.
All of the member drives in a RAID5 array must be the same size. Make sure the drives in the floating spares array are the same size as the member drives of the RAID5 arrays. For example, if you have an array of 4-GB drives and an array of 9-GB drives, make sure that your floating spares array contains both 4-GB and 9-GB drives.
Recommendation: Spread member drives across all SCSI channels for better performance and reliability. Each drive rack is a separate SCSI channel, as shown in Figure 3-1 on page -5. Refer to your hardware manual for more information about mapping SCSI channels to drives.
Creating an Array ▲ 3-5
USPEX
A
Array Creation and Initialization
This section describes the how to create DriveGuard arrays.
To create and initialize a DriveGuard array
1. Define the array in the /etc/raidtab file, as described in “/etc/raidtab Format” on
page 3-4. For example:
ard0 raid5,spare=ad4 ad3,ad10,ad17,ad24 ard1 raid5,rebuild=auto ad8,ad15,ad22 ard2 spares ad20,ad27
[image:35.612.148.528.317.684.2]These sample /etc/raidtab entries define three arrays: a RAID5 array with four members and a dedicated spare, a RAID5 array with three members, and a floating spares array with two members. Array ard1 rebuilds automatically in the event of a single drive failure. Array ard0 requires manual intervention. Both arrays have a default stripe size of 128K.
Figure 3-1 shows the front of a base cabinet with the arrays highlighted. Note that the
member drives for each array are on different SCSI channels on the SP.
Figure 3-1. Base cabinet with arrays defined
Disk ad6 Slot 6
Drive rack 1 SCSI channel 1 Disk ad5 Slot 5 Disk ad4 Slot 4 Disk ad3 Slot 3 Disk ad2 Slot 2 Disk ad1 Slot 1 Disk ad0 Slot 0 SP0 Drive rack 2
SCSI channel 2 Disk ad13 Slot 13 Disk ad12 Slot 12 Disk ad11 Slot 11 Disk ad10 Slot 10 Disk ad9 Slot 9 Disk ad8 Slot 8 Disk ad7 Slot 7
Drive rack 3 SCSI channel 3 Disk ad20 Slot 20 Disk ad19 Slot 19 Disk ad18 Slot 18 Disk ad17 Slot 17 Disk ad16 Slot 16 Disk ad15 Slot 15 Disk ad14 Slot 14
Drive rack 4 SCSI channel 4 Disk ad21 Slot 21 Disk ad22 Slot 22 Disk ad23 Slot 23 Disk ad24 Slot 24 Disk ad25 Slot 25 Disk ad26 Slot 26 Disk ad27 Slot 27
Spares Array ard2 Array ard1
Array ard0
USPEX
A
2. Download the information contained in the /etc/raidtab file to the SP. Use the load option on the ax_raid(8) command.
# ax_raid load
After the load is complete, all arrays have a status of NEW.
3. Initialize each RAID5 array using the init option on the ax_raid(8) command.
# ax_raid init ardx
where x is the number of the array to be initialized.
Note: This command automatically runs in the background. Do not append an ampersand (&) at the end of the command, or the job will hang.
Do not initialize the floating spares arrays. For example, for the array setup shown in
Figure 3-1, issue the following commands to initialize the arrays:
# ax_raid init ard0
ax_raid: Initialization started on ard0 (12GB) # ax_raid init ard1
Initialization started on ard1 (8GB)
After a while the system responds with:
ax_raid: initialization and partitioning of ard1 complete; elapsed time: 16 mins
. . .
ax_raid: initialization and partitioning of ard0 complete; elapsed time: 33 mins
After initialization, an array has a status of GOOD. You need to initialize an array only once in its lifetime.
Note: Initializing an array can take a long time, depending on the size of the disks and the number of members in the array. For example, a six-drive array of 4 GB each, all on different SCSI channels, takes about 21 minutes to
initialize. During initialization, commands that access the drives in the array may hang for up to 30 seconds (for example, ax_config -d and ax_sputil list).
4. Partition the array using ax_label(8) if you want to change the default partition scheme, as defined in the /etc/raidlabel.map file. You can partition the array into as many as seven partitions in addition to the c partition. For example:
# ax_label -a 200 -b 300 -h all ard1
Refer to the ax_label(8) man page for more information.
5. Run newfs(8) on the partitions that you created in step step 4. For example:
# foreach p (a b h) ? newfs ard1$p ? end
Creating an Array ▲ 3-7
USPEX
A
This completes the procedure for creating the DriveGuard array. The partitions are now available for mounting file systems.
A DriveGuard array can be a member of a virtual partition. Refer to “Virtual Partitions”
USPEX
A
Rebuilding a Damaged Array
In the event of a single drive failure, you can reconstruct the data on a spare drive. This reconstruction occurs either automatically or manually, depending on the value of the
rebuild option for the array in the /etc/raidtab file. During a rebuild operation, user data remains accessible, but performance is impacted.
Note: The ax_vold(8) command sends a message to the console when the state of an array changes.
Automatic Rebuild
If you specify rebuild=auto in the /etc/raidtab file, the SP automatically initiates the rebuild when the array state changes from GOOD to DEGRADED. The SP first checks for a dedicated spare drive. If a dedicated spare is not found, it then checks for a floating spare. If the SP does not find a valid spare drive, rebuilding does not occur. The state of the array changes from DEGRADED to GOOD after the rebuild is complete. If the rebuild fails, the array state remains DEGRADED.
After a rebuild, enter the following command to see which spare drive was used to rebuild the array:
# ax_raid stat ardn
where n is the array number of the rebuilt array.
Manual Rebuild
If you specify rebuild=manual in the /etc/raidtab file, or if you omit the rebuild option, then you must rebuild a degraded array manually.
Enter the ax_raid(8) command with the rebuild option. To rebuild the array onto one of the floating spares drives, enter the command in the following format:
# ax_raid rebuild ardn
where n is the array number of the array to be rebuilt. The device to rebuild onto is chosen from the floating spares pool. If no valid spare is found, ax_raid attempts to rebuild onto the failed drive.
After the rebuild, enter the ax_raid(8) command with the stat option to see which spare drive was used to rebuild the array.
To rebuild the array onto a specific disk, enter the command in the following format:
# ax_raid rebuild ardn adx
where n is the array number of the array to rebuild, and x is the number of the drive to rebuild on. The command checks if adx is the same size as the member disks in ardn. If not, an error displays, and the array stays in DEGRADED state.
Rebuilding a Damaged Array ▲ 3-9
USPEX
A
Optionally, you could first remove the failed drive, replace it with a good drive, and then do the rebuild, specifying the location of the drive. This procedure preserves the original physical configuration of the array.
Eventually the system responds with:
ax_raid: rebuild done; elapsed time: 1 hr 25 mins
The elapsed time varies depending on the rebuild priority and the system load.
Reestablishing Original Array Configuration
After an array rebuilds, you may want to restore the array to its original physical configuration. This involves doing the following:
1. Removing the failed drive.
2. Moving the replacement drive into the location of the failed drive.
3. Adding a new dedicated spare drive.
To remove a failed drive, refer to “Removing a Member Drive” on page 3-10.
To move the replacement drive into the location of the failed drive, refer to “Moving a
Member Drive” on page 3-10.
USPEX
A
Managing DriveGuard Arrays
This section describes how to do the following:
▲ Remove a drive from an array
▲ Move a drive in an array to another physical location
▲ Add a spare drive to an array
▲ Delete an array
▲ Verify and correct the parity of an array
▲ Detect and correct bad disk sectors
▲ Print a list of arrays
▲ Display the status of all arrays
▲ Terminate array maintenance processes
Removing a Member Drive
You cannot remove drives that are members of an array unless the drive is marked DOWN
and the array is in DEGRADED state. Use the ax_hot_plug(8) command to remove a failed drive. This command stops all activity on the SP while the drive is being removed. The SP reconstructs the array using a spare drive even if you do not physically remove the failed drive.
If for some reason a member of a good array needs to be removed or replaced, the command confirms the user’s intention before allowing the member disk to be replaced. If you remove a drive from a good array, the state of the array changes to DEGRADED.
Moving a Member Drive
After an array has been rebuilt onto a spare device, you may want to move drives to re-create the original physical array configuration. For example, you may want to ensure that all drives are on different SCSI channels. You can use ax_hot_plug(8) to move a drive that is a member of an array from one slot to another. The new slot must be connected to the same SP as the original slot. The ax_hot_plug(8) command stops all activity to the SP while the drive is being moved.
For example, the following command moves a drive from slot 4 to slot 8:
# ax_hot_plug move ad4/8
The system responds with:
Moving ad4 to slot 8
All activity on SP0 has been stopped. Insert or replace device.
**WARNING** Make sure you insert the drive in the proper slot. Otherwise, you may crash the system.
ad4 moved to slot 8.
Managing DriveGuard Arrays ▲ 3-11
USPEX
A
Adding Spare Drives to an Array
Once an array is created, you cannot directly increase its size by adding more drives. (Refer
to “Expanding a DriveGuard Array” on page 4-2 for instructions on increasing the size of
an array.) You can, however, add a dedicated spare to the array or add a spare drive to the floating spares array.
To add a dedicated spare drive to an array
1. Use ax_add_device(8) to add the spare drive to the server.
2. Edit the appropriate line in /etc/raidtab to indicate the location of the new dedicated spare.
3. Update the configuration by running ax_raid(8) with the load option:
# ax_raid load
This completes the procedure for adding a dedicated spare drive to an array.
To add a drive to the floating spares array
1. Use ax_add_device(8) to add the spare drive to the server.
2. Delete the floating spares array:
# ax_raid delete ardx
where x is the number of the floating spares array.
Note: Deleting the floating spares array is different from deleting a RAID5 array. The drives in the floating spares array are not in use, so a delete does not destroy data.
3. Edit the /etc/raidtab file to add a new drive to the floating spares array.
4. Reload the floating spares array:
# ax_raid load
This completes the procedure for adding a spare drive to the floating spares array.
Deleting an Array
Caution: When you delete an array, all the user data on that array is lost. Refer
to “Migrating File Systems” on page 4-4 if you want to move your user data off
of the array before deleting it.
When you delete an array, all devices, including dedicated spares, that are part of that array are free to be used for other purposes. If you delete an array, you cannot undelete it. Use the following command to delete an array:
# ax_raid delete ardx
where x is the number of the array that you want to delete. This command confirms that you want to delete the array and, if so, takes ardx out of the system, provided it is not in use.
USPEX
A
Verifying Array Parity
You can verify and correct array parity with the verify option on the ax_raid(8) command. The verify option modifies parity to be consistent with data in the array and assumes the data is correct. You cannot verify an array that is in DEGRADED state. During verification,
user data remains accessible, but performance is impacted.
Enter the following command to verify and correct array parity:
# ax_raid verify,pri=hi ardx
where x is the array number, and pri specifies the process priority of the command.
After a while, the system responds with:
ax_raid: Verify done; no parity errors; elapsed time: 32 mins
Recommendation: Verify and correct array parity at least once a week, during off hours.
Caution: If you verify your arrays in a cron job, make sure this job runs before an ax_isolated cron job. If a cron job that scrubs the array runs at the same time as an ax_isolated cron job, the ax_isolated hangs, causing all file systems to be isolated.
Correcting Bad Disk Sectors
The scrub option on the ax_raid(8) command detects and corrects errors associated with the disk media on all disks within an array. Use the following command to scrub an array:
# ax_raid scrub ardx
where x is the array number.
Recommendation: Scrub the array at least once a week, during off hours.
Printing a List of Arrays
Use the print option with the ax_raid(8) command to display a list of all the available DriveGuard arrays. This command displays information in the same format as required by /etc/raidtab:
# ax_raid print
The command returns a list similar to the following:
ard0 spares ad3
ard2 raid5 ad4,ad5,ad6
Use this command for keeping /etc/raidtab current. You redirect the output from this command to /etc/raidtab. For example:
Managing DriveGuard Arrays ▲ 3-13
USPEX
A
Displaying Array Status
The stat option on the ax_raid(8) command displays the status of all arrays in the
NetServer. For each array, the command displays the array name, type (RAID5 or spare), the SP that controls the array, any maintenance activities that are currently active, the size of the array, the state, the dedicated spare, and the array members.
Following is a sample output:
# ax_raid stat
Current RAID configuration:
___Maint__ _________Array__________ Type SP Proc Cmpl Size State Spare Members
ard0 RAID5 0 Init 30% 20G New ad4 ad11 ad14 ad21 ad34 ad41
ard1 RAID5 0 Verify 26% 8G Good ad6 ad13 ad20
ard2 RAID5 0 8G Degr ad35 ad18<-down ad25 ad33
ard3 RAID5 0 Rebld 35% 8G Degr ad32* ad26 ad37
ard9 SPARE 0 ad40
In this display, drive ad18 of array ard2 is marked down. The asterisk next to drive ad32 in array ard3 indicates that disk of the array is being rebuilt. Refer to the ax_raid(8) man page for more information.
Terminating Maintenance Processes
The abort option on the ax_raid(8) command terminates any array maintenance processes running on the specified arrays.
The following command terminates any maintenance processes running on array ard3 and
ard45:
Maintenance ▲ 4-1
USPEX
A
4
Maintenance
About This Chapter
This chapter contains the following information:
▲ Expanding a DriveGuard Array
▲ Migrating File Systems
▲ Moving Arrays Between NetServers
USPEX
A
Expanding a DriveGuard Array
After you create a DriveGuard array, you may want to expand it as your file system gets larger. You cannot directly enlarge a DriveGuard array. Instead, you expand it by moving it to a larger array.
Note: Both the original array and the new array must be on the same SP.
You expand a DriveGuard array in the same way you expand a virtual partition. The array that you want to expand and the array that you are moving to must be the single members of concatenated virtual partitions.
Expanding a DriveGuard array involves the following main steps:
1. Creating a new, larger array
2. Creating a virtual partition for the new array
3. Moving the contents of the first array onto the second array
4. Deleting the first array (optional)
The following example shows how to expand an array of three drives into an array of six drives.
To expand an array from three drives to six drives
1. Back up the original three-drive array.
2. Modify /etc/raidtab to define the array that you are expanding onto. For example, if the existing array has the following definition in /etc/raidtab,
ard1 raid5,rebuild=auto ad8,ad15,ad22
then you can define the new array that you are expanding onto as follows:
ard2 raid5,rebuild=auto ad5,ad12,ad19,ad26,ad33,ad40
Do not use the same drive numbers in the new array as are already in the existing array.
3. Download the /etc/raidtab information to the SP.
# ax_raid load
4. Initialize the six-drive array you just created. For example:
# ax_raid init ard2
This command runs in the background and can take a long time depending on the size of the disks and the number of members in the array. When initialization completes, the following message displays:
ax_raid: initialization and partitioning of ard2 complete; elapsed time: 38 mins
5. Partition the new array using ax_label(8) if you want to change the default partition scheme, as defined in the /etc/raidlabel.map file.
Expanding a DriveGuard Array ▲ 4-3
USPEX
A
/dev/vp200 concat ard1c
then you can create a partition for the new array as follows:
/dev/vp201 concat ard2c
7. Download the /etc/vpartab information to the SP.
# ax_loadvpar
8. Expand the virtual partition with the following command:
# ax_expand -s vp200 vp201
This concludes the procedure for expanding a DriveGuard array. For more information on using ax_expand to expand virtual partitions, refer to the System Manager’s Guide.
If you are not going to reuse the original three-drive array, you can delete it now. The following example deletes array ard1 and the corresponding virtual partition that was created as a result of the ax_expand command in step 8.
To delete the original array and corresponding virtual partition
1. Modify /etc/vpartab to delete the partition of the original array, ard1.
2. Download the /etc/vpartab information to the SP.
# ax_loadvpar
3. Delete the original array.
# ax_raid delete ard1
4. Modify /etc/raidtab to delete the entry for the original array.
# ax_raid print >/etc/raidtab
5. Download the /etc/raidtab information to the SP.
# ax_raid load
USPEX
A
Migrating File Systems
This section describes how to migrate existing file systems onto DriveGuard arrays, and how to migrate file systems from a DriveGuard array to regular (nonarray) drives.
Note: Both the array and the nonarray file systems must be on the same SP.
Migrating to a DriveGuard Array
The following example assumes that you are migrating the contents of a two-drive virtual partition to a three-drive DriveGuard array. The two-drive virtual partition is defined as follows in /etc/vpartab:
/dev/vp1024 striped,size=256K ad123,ad130
Note: The DriveGuard array must have one more drive than the nonarray file system to allow for array parity information.
To migrate a file system to a DriveGuard array
1. Create and initialize a DriveGuard array, as defined in “Array Creation and
Initialization” on page 3-5. For example, assume you create and initialize ard56 with
the following definition in the /etc/raidtab file:
ard56 raid5,rebuild=manual,size=256K ad102,ad109,ad116
2. Modify /etc/vpartab to create a virtual partition for the array that you created in step 1. The following entry defines the new virtual partition:
/dev/vp1025 concat ard56c
3. Download the virtual partition information to the SP.
# ax_loadvpar
4. Migrate the file system from a virtual partition (for example, vp1024) to the array.
# ax_expand -m vp1024 vp1025
After this command executes, vp1024 becomes a mirrored partition with one
member—vp1025. Access to the file system mounted on vp1024 is unaffected because the name of the virtual partition remains unchanged.
This concludes the procedure for migrating a file system to an array.
Migrating from a DriveGuard Array
The following example assumes that you are migrating the contents of a three-drive DriveGuard array to a two-drive virtual partition. The three-drive DriveGuard array is defined as follows in /etc/raidtab:
ard57 raid5,rebuild=manual,size=256K ad103,ad110,ad117
The example assumes that the array is encased in a virtual partition defined as follows in /etc/vpartab:
Migrating File Systems ▲ 4-5
USPEX
A
To migrate a file system from a DriveGuard array
1. Modify /etc/vpartab to create a new virtual partition consisting of two drives. For example:
/dev/vp1049 striped,size=256K ad124,ad131
Note: The nonarray file system can have one less drive than the DriveGuard array because the nonarray file system does not have to allow for array parity information.
2. Download the virtual partition information to the SP.
# ax_loadvpar
3. Migrate the contents of the DriveGuard array to the two-drive virtual partition.
# ax_expand -m vp1048 vp1049
After this command executes, vp1048 becomes a mirrored partition with one
member—vp1049. Access to the file system mounted on vp1048 is unaffected because the name of the virtual partition remains unchanged.
4. Delete the array if you are not going to reuse it.
# ax_raid delete ard57
5. Modify /etc/raidtab to delete the entry for the array.
# ax_raid print >/etc/raidtab
6. Download the /etc/raidtab information to the SP.
# ax_raid load
USPEX
A
Moving Arrays Between NetServers
This section describes how to physically move a DriveGuard array from one NetServer to another.
You need an antistatic wrist strap to complete this procedure.
To move a DriveGuard array to a different NetServer
1. Halt the NetServer that has the DriveGuard array you want to move.
Note: Even if you have DataGuard, you must halt the entire NetServer for this procedure.
2. Put on the antistatic wrist strap, and wear it throughout the procedure.
3. Remove the drives that make up the DriveGuard array.
4. Reboot this NetServer.
5. Halt the NetServer where you want to move the DriveGuard array.
6. Insert the drives that you removed in step 3 into the second NetServer.
Caution: Do not do an ax_raid load or otherwise access these drives before you reboot the system. You will lose data if you access these drives before rebooting the system.
7. Reboot the second NetServer.
8. Update the /etc/raidtab file with the following command (optional):