Paul McFedries
800 East 96th Street,
Indianapolis, Indiana 46240
Networking with Microsoft® Windows Vista™:
Your Guide to Easy and Secure Windows Vista Networking
Copyright © 2008 by Pearson Education, Inc.All rights reserved. No part of this book shall be reproduced, stored in a retrieval system, or transmitted by any means, electronic, mechanical, photocopying, recording, or other-wise, without written permission from the publisher. No patent liability is assumed with respect to the use of the information contained herein. Although every precaution has been taken in the preparation of this book, the publisher and author assume no responsi-bility for errors or omissions. Nor is any liaresponsi-bility assumed for damages resulting from the use of the information contained herein.
ISBN-13: 978-0-7897-3777-9 ISBN-10: 0-7897-3777-9
Library of Congress Cataloging-in-Publication Data McFedries, Paul.
Networking with Microsoft Windows Vista : your guide to easy and secure Windows Vista networking / Paul McFedries.
p. cm. Includes index. ISBN-10: 0-7897-3777-9 ISBN-13: 978-0-7897-3777-9
1. Computer networks--Management--Computer programs. 2. Microsoft Windows (Computer file) 3. Operating systems (Computers) I. Title.
TK5105.5.M33945 2008 005.4'46--dc22
2007045275 Printed in the United States of America
First Printing: December 2007
Trademarks
All terms mentioned in this book that are known to be trademarks or service marks have been appropriately capitalized. Que Publishing cannot attest to the accuracy of this infor-mation. Use of a term in this book should not be regarded as affecting the validity of any trademark or service mark.
Warning and Disclaimer
Every effort has been made to make this book as complete and as accurate as possible, but no warranty or fitness is implied. The information provided is on an “as is” basis. The author and the publisher shall have neither liability nor responsibility to any person or entity with respect to any loss or damages arising from the information contained in this book.
Bulk Sales
Que Publishing offers excellent discounts on this book when ordered in quantity for bulk purchases or special sales. For more information, please contact
U.S. Corporate and Government Sales 1-800-382-3419
[email protected] For sales outside of the U.S., please contact
Introduction
Part I:
Networking Hardware for Windows Vista
1 Understanding Ethernet Networking
2 Understanding Wireless Networking
3 Configuring Your Router
4 Putting Your Network Together
Part II:
Managing and Using Your Network
5 Working with Vista’s Basic Network Tools and Tasks
6 Managing Network Connections
7 Managing Wireless Network Connections
8 Accessing and Sharing Network Resources
9 Setting up Vista as a Digital Media Hub
10 Taking Advantage of Your Network
11 Work with Network Files Offline
12 Collaborating with Windows Meeting Space
Part III:
Securing Your Network
13 Securing Windows Vista
14 Implementing Network Security
15 Implementing Wireless Security
Part IV:
Advanced Networking with Windows Vista
16 Making Remote Network Connections
17 Monitoring Your Network
18 Troubleshooting Network Problems
19 Setting up a Website
iv
Networking
with Microsoft
®Windows Vista
™Table of Contents
Introducion . . . .1
How This Book Is Organized . . . .3
Part I: Networking Hardware for Windows Vista . . . .3
Part II: Managing and Using Your Network . . . .3
Part III: Securing Your Network . . . .4
Part IV: Advanced Networking with Windows Vista . . . .4
Conventions Used in This Book . . . .4
Part I:
Networking Hardware for Windows Vista 7
1Understanding Ethernet Networking . . . .9
What Is Ethernet? . . . .10
10BASE-T . . . .12
100BASE-T (Fast Ethernet) . . . .12
1000BASE-T (Gigabit Ethernet) . . . .13
Beyond Gigabit Ethernet . . . .13
Understanding Network Interface Cards . . . .13
Understanding Network Cables . . . .18
Twisted-Pair Cable . . . .18
Crossover Cable . . . .20
Understanding Switches . . . .22
Understanding Routers . . . .24
Understanding IP Addresses . . . .25
The Router and Dynamic IP Addressing . . . .26
The Router as Firewall . . . .27
The Router as Switch . . . .28
Understanding Other Ethernet Devices . . . .30
Network Attached Storage . . . .30
Print Server . . . .31
Digital Media Receiver . . . .32
Powerline Adapter . . . .32
A Buyer’s Guide to Ethernet Hardware . . . .32
Purchasing a NIC . . . .33
Purchasing Cables . . . .34
Purchasing a Switch . . . .35
Purchasing a Router . . . .36
2
Understanding Wireless Networking . . . .39
What Is Wireless Networking? . . . .40
Understanding Wi-Fi . . . .41
Understanding Wireless Hot Spots . . . .43
Understanding Wireless NICs . . . .44
Understanding Wireless Access Points . . . .47
Understanding Other Wireless Network Devices . . . .50
Wireless Range Extender . . . .50
Wireless Network Finder . . . .51
Wireless Print Server . . . .52
Wireless Digital Media Receiver . . . .53
A Buyer’s Guide to Wireless Networking Hardware . . . .53
Purchasing a Wireless NIC . . . .54
Purchasing a Wireless AP . . . .55
From Here . . . .57
3
Configuring Your Router . . . .59
Connecting the Router for Configuration . . . .60
Displaying the Router’s Setup Pages . . . .60
Entering the Router’s IP Address . . . .61
Using the Network Window . . . .62
Changing the Router’s IP Address . . . .63
Belkin . . . .64
D-Link . . . .64
Linksys . . . .64
Netgear . . . .66
Updating the Firmware . . . .66
Belkin . . . .67
D-Link . . . .68
Linksys . . . .69
Netgear . . . .70
Setting Up Your Broadband Connection . . . .71
Belkin . . . .73
D-Link . . . .74
Linksys . . . .75
Netgear . . . .75
Enabling UPnP . . . .77
Belkin . . . .78
Linksys . . . .79
Netgear . . . .79
Enabling the DHCP Server . . . .81
Belkin . . . .82
D-Link . . . .83
Linksys . . . .83
Netgear . . . .84
Modifying Wireless Settings . . . .85
Belkin . . . .86
D-Link . . . .87
Linksys . . . .88
Netgear . . . .89
Checking the Router Status . . . .90
Belkin . . . .90
D-Link . . . .91
Linksys . . . .91
Netgear . . . .92
Testing Your Router’s Capabilities . . . .93
From Here . . . .96
4
Putting Your Network Together . . . .97
Inserting an Internal NIC . . . .98
Installing the NIC’s Device Driver . . . .98
Installing the NIC . . . .100
Making Sure the NIC Installed Properly . . . .104
Connecting the Broadband Modem . . . .105
Attaching the Internet Connection Cable . . . .105
Registering the Modem . . . .107
Connecting the Router . . . .108
Connecting the Switch . . . .110
Laying the Network Cable . . . .111
Changing the Computer and Workgroup Name . . . .112
Making Wireless Network Connections . . . .113
Connecting to a Wireless Network . . . .114
Disconnecting from a Wireless Network . . . .117
Part II:
Managing and Using Your Network
119
5
Working with Vista’s Basic Network Tools and Tasks . . . .121
Understanding Vista’s Network Icon . . . .122
Accessing Common Networking Commands . . . .122
Viewing the Current Network Status . . . .123
Turning Off the Network Icon . . . .124
Accessing the Network and Sharing Center . . . .125
Turning On Network Discovery . . . .128
Viewing Network Computers and Devices . . . .130
Displaying a Network Map . . . .131
Viewing Network Status Details . . . .133
Customizing Your Network . . . .135
From Here . . . .137
6
Managing Network Connections . . . .139
Opening the Network Connections Window . . . .140
Renaming a Network Connection . . . .141
Enabling Automatic IP Addressing . . . .142
Confirming That Windows Vista Is Configured for Dynamic IP
Addressing . . . .142
Displaying the Computer’s Current IP Address . . . .143
Setting Up a Static IP Address . . . .145
Displaying the Current DNS Addresses . . . .146
Specifying the Static IP Address . . . .147
Finding a Connection’s MAC Address . . . .149
Using a Network Connection to Wake Up a Sleeping Computer . . . .151
Disabling a Network Connection . . . .154
From Here . . . .155
7
Managing Wireless Network Connections . . . .157
Opening the Manage Wireless Networks Window . . . .158
Making Other Wireless Connections . . . .158
Connecting to a Hidden Network . . . .159
Creating an Ad Hoc Wireless Network . . . .161
Working with Wireless Connection Properties . . . .163
Modifying Connection Properties . . . .164
Renaming Wireless Connections . . . .166
Reordering Wireless Connections . . . .167
Creating User-Specific Wireless Connections . . . .168
Removing Wireless Connections . . . .170
From Here . . . .170
8
Accessing and Sharing Network Resources . . . .171
Accessing Shared Network Resources . . . .172
Viewing a Computer’s Shared Resources . . . .172
Working with Network Addresses . . . .174
Mapping a Network Folder to a Local Drive Letter . . . .177
Creating the Mapped Network Folder . . . .177
Mapping Folders at the Command Line . . . .179
Disconnecting a Mapped Network Folder . . . .180
Creating a Network Location for a Remote Folder . . . .180
Accessing a Shared Printer . . . .182
Sharing Resources with the Network . . . .184
Activating File and Printer Sharing . . . .185
Sharing the Public Folder . . . .186
Activating Printer Folder Sharing . . . .187
Using Password Protected Sharing . . . .187
Using Public Folder Sharing . . . .188
Creating User Accounts for Sharing . . . .189
Sharing a Resource with the File Sharing Wizard . . . .190
Viewing Your Shared Resources . . . .192
From Here . . . .192
9
Setting Up Vista as a Digital Media Hub . . . .195
Understanding Digital Media Hardware . . . .196
Digital Media Computer . . . .196
Television . . . .201
Television Connectors . . . .202
Audio Receiver Connectors . . . .203
Digital Media Receivers . . . .204
Connecting Your Digital Media Hub . . . .205
Adding an Xbox 360 to the Network . . . .205
Connecting an Xbox 360 to Windows Vista . . . .206
Sharing Your Media Player Library . . . .207
10
Taking Advantage of Your Network . . . .211
Backing Up to the Network . . . .212
Publishing a Windows Vista Calendar on the Network . . . .216
Publishing Your Calendar . . . .217
Subscribing to a Calendar I: Using the Subscribe Message . . . .219
Subscribing to a Calendar II: Using Windows Calendar . . . .220
Working with Shared Calendars . . . .221
Importing Pictures to a Network Share . . . .221
Ripping Audio CDs to a Network Share . . . .223
Recording TV Shows to a Network Share . . . .225
Setting Up a Network-Based Slideshow . . . .228
Running a Screensaver Slideshow from the Network . . . .228
Running a Slideshow from the Network . . . .230
Display Network Images in the Slide Show Gadget . . . .234
From Here . . . .236
11
Working with Network Files Offline . . . .237
Activating the Offline Files Feature . . . .238
Making a File or Folder Available for Offline Use . . . .239
Changing the Amount of Disk Space Used by Offline Files . . . .240
Prohibiting a Network Folder from Being Made Available Offline . . .242
Encrypting Offline Files . . . .244
Working with Network Files While You’re Offline . . . .245
Working with Offline Files via the Sync Center . . . .245
Working with Offline Files via the Remote Computer . . . .247
Synchronizing Your Offline Files . . . .248
Scheduling a Synchronization by Time . . . .248
Scheduling a Synchronization by Event . . . .250
Dealing with Synchronization Conflicts . . . .252
From Here . . . .253
12
Collaborating with Windows Meeting Space . . . .255
Working with the People Near Me Service . . . .257
Signing In to People Near Me . . . .257
Working with Trusted Contacts . . . .258
Setting People Near Me Options . . . .261
Signing Out of People Near Me . . . .264
Configuring Windows Meeting Space . . . .264
Joining an Existing Meeting . . . .266
Starting Your Own Meeting . . . .267
Sending a Meeting Invitation . . . .269
Sending a Meeting Invitation Using People Near Me . . . .269
Sending a Meeting Invitation via Email . . . .270
Creating an Invitation File . . . .271
Handling a Meeting Invitation . . . .272
Handling a People Near Me Invitation . . . .272
Opening an Invitation File . . . .274
Sharing a Handout . . . .275
Starting a Shared Session . . . .276
Controlling the Shared Session . . . .277
Ending the Shared Session . . . .278
From Here . . . .278
Part III:
Securing Your Network
279
13Securing Windows Vista . . . .281
Understanding Vista’s Security Groups . . . .282
Understanding User Account Control . . . .283
Understanding the Least-Privileged User . . . .283
Elevating Privileges . . . .284
Implementing Parental Controls . . . .286
Setting Up User Accounts for the Kids . . . .287
Turning On Parental Controls and Activity Reporting . . . .288
Securing the Web . . . .290
Allowing Only Specific Programs . . . .291
Building a Strong Password . . . .292
Checking Your Computer’s Security Settings . . . .294
Making Sure Windows Firewall Is Turned On . . . .294
Making Sure Windows Defender Is Turned On . . . .295
Controlling Automatic Updates . . . .298
Making Sure User Account Control Is Turned On . . . .301
Making Sure the Administrator Account Is Disabled . . . .302
Thwarting Spyware with Windows Defender . . . .303
Protecting Yourself Against Phishing Scams . . . .307
Making Sure Internet Explorer’s Phishing Filter Is Turned On . . . .308
Making Sure Windows Mail Phishing Protection Is Turned On . . . .310
From Here . . . .311
14
Implementing Network Security . . . .313
Deactivating the Sharing Wizard . . . .314
Setting Sharing Permissions on Shared Folders . . . .315
Setting Security Permissions on Shared Folders . . . .318
Hiding Your Shared Folders . . . .320
Disabling the Hidden Administrative Shares . . . .322
Removing Stored Remote Desktop Credentials . . . .323
Preventing Users from Logging On at Certain Times . . . .325
Setting a User’s Logon Hours . . . .326
Automatically Logging Off a User When the Logon Hours Expire . . . .327
Hiding the Usernames in the Logon Screen . . . .328
Running the Baseline Security Analyzer on Your Network . . . .330
From Here . . . .333
15
Implementing Wireless Security . . . .335
Specifying a New Administrative Password . . . .336
Belkin . . . .336
D-Link . . . .337
Linksys . . . .338
Netgear . . . .339
Positioning the Access Point for Maximum Security . . . .340
Encrypting Wireless Signals with WPA . . . .341
Belkin . . . .342
D-Link . . . .343
Linksys . . . .344
Netgear . . . .345
Changing the Wireless Connection Security Properties . . . .345
Disabling Network SSID Broadcasting . . . .347
Belkin . . . .348
D-Link . . . .349
Linksys . . . .349
Netgear . . . .351
Changing the Default SSID . . . .352
Belkin . . . .352
Linksys . . . .353
Netgear . . . .355
Enabling MAC Address Filtering . . . .356
Getting the MAC Address of Your Wireless NIC . . . .356
Belkin . . . .358
D-Link . . . .359
Linksys . . . .360
Netgear . . . .361
From Here . . . .362
Part IV:
Advanced Networking with Windows Vista
363
16Making Remote Network Connections . . . .365
Setting Up the Remote Computer as a Host . . . .366
Windows Versions That Can Act as Hosts . . . .366
Setting Up User Accounts on the Host . . . .367
Configuring Vista to Act as a Remote Desktop Host . . . .367
Configuring XP to Act as a Remote Desktop Host . . . .371
Installing Remote Desktop on an XP Client Computer . . . .372
Connecting to the Remote Desktop . . . .373
Making a Basic Connection . . . .373
Making an Advanced Connection . . . .374
Working with the Connection Bar . . . .379
Disconnecting from the Remote Desktop . . . .380
Connecting to a Remote Desktop via the Internet . . . .380
Changing the Listening Port . . . .381
Configuring Windows Firewall . . . .382
Determining the Host IP Address . . . .383
Setting Up Port Forwarding . . . .384
Connecting Using the IP Address and New Port . . . .388
Using Dynamic DNS to Access Your Network . . . .389
D-Link . . . .390
Linksys . . . .391
Netgear . . . .392
From Here . . . .393
17
Monitoring Your Network . . . .395
Monitoring Network Performance . . . .396
Monitoring Network Performance with Task Manager . . . .397
Monitoring Shared Folders . . . .405
Launching the Shared Folders Snap-In . . . .405
Viewing the Current Connections . . . .406
Viewing Connections to Shared Folders . . . .407
Viewing Open Files . . . .407
Closing a User’s Session or File . . . .408
From Here . . . .409
18
Troubleshooting Network Problems . . . .411
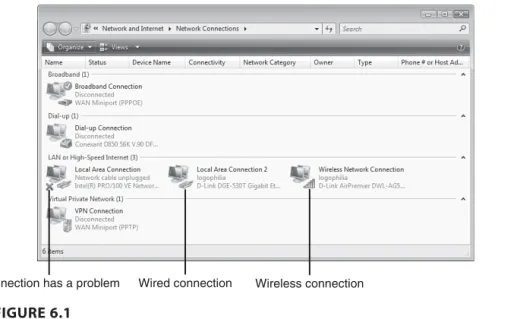
Repairing a Network Connection . . . .412
Checking the Connection Status . . . .413
General Solutions to Network Problems . . . .413
Checking for Solutions to Problems . . . .415
Troubleshooting Using Online Resources . . . .417
Checking Connectivity with the PING Command . . . .419
Troubleshooting Cables . . . .421
Troubleshooting the NIC . . . .422
Viewing the NIC in Device Manager . . . .423
Updating the NIC Device Driver . . . .425
Troubleshooting Wireless Network Problems . . . .426
Reverting to an Earlier Configuration . . . .427
From Here . . . .429
19
Setting Up a Website . . . .431
Understanding Internet Information Services . . . .432
Installing Internet Information Services . . . .433
Accessing Your Website . . . .434
Creating a Windows Firewall Exception for the Web Server . . . .434
Accessing Your Website Over the Network . . . .436
Accessing Your Website Over the Internet . . . .436
Understanding the Default Website . . . .437
Viewing the Default Website Folder . . . .437
Viewing the Default Website with IIS Manager . . . .438
Adding Folders and Files to the Default Website . . . .440
Setting Permissions on the Default Website Folder . . . .440
Adding a File to the Default Website . . . .441
Changing the Default Website Home Page . . . .443
Controlling and Customizing Your Website . . . .447
Stopping Your Website . . . .447
Restarting Your Website . . . .448
Renaming the Default Website . . . .448
Changing the Website Location . . . .448
Setting the Website’s Default Document . . . .449
Working Without a Default Document . . . .451
Disabling Anonymous Access . . . .454
Viewing the Server Logs . . . .456
From Here . . . .459
20
Setting Up an FTP Site . . . .461
Installing the FTP Publishing Service . . . .462
Starting the FTP Publishing Service . . . .462
Accessing Your FTP Site . . . .464
Creating a Windows Firewall Exception for the FTP Server . . . .464
Accessing Your FTP Site Over the Network . . . .466
Accessing Your FTP Site Over the Internet . . . .466
Understanding the Default FTP Site . . . .467
Viewing the Default FTP Site Folder . . . .467
Viewing the Default FTP Site with IIS 6 Manager . . . .468
Adding Folders and Files to the Default FTP Site . . . .469
Setting Permissions on the Default FTP Site Folder . . . .469
Adding a File to the Default FTP Site . . . .470
Adding a Folder to the Default FTP Site . . . .471
Working with Your FTP Site . . . .473
Stopping Your FTP Site . . . .473
Restarting Your FTP Site . . . .474
Renaming the Default FTP Site . . . .475
Changing the FTP Site Location . . . .475
Displaying Messages to FTP Users . . . .477
Disabling Anonymous Access . . . .478
Securing an FTP Folder . . . .480
From Here . . . .481
Glossary of Networking Terms . . . .483
Paul McFedriesis a full-time technical writer who has worked with computers in one form or another since 1975 and has used Windows since version 1 was foisted upon an unsuspecting (and underwhelmed) world in the mid-1980s. He is the author of more than 60 computer books that have sold more than three million copies worldwide. His recent titles include the Sams Publishing booksWindows Vista UnleashedandWindows Home Server Unleashedand the Que Publishing books Formulas and Functions with Microsoft Excel 2007,Tricks of the Microsoft Office 2007 Gurus, and Microsoft Access 2007 Forms, Reports, and Queries. Please visit Paul’s website at http://www.mcfedries.com/. Paul is also the proprietor of Word Spy (http://www.wordspy.com) a website devoted to tracking new words and phrases as they enter the English language.
Dedication
For Karen.
Acknowledgments
We Want to Hear from You!
As the reader of this book, youare our most important critic and commenta-tor. We value your opinion and want to know what we’re doing right, what we could do better, what areas you’d like to see us publish in, and any other words of wisdom you’re willing to pass our way.
As an associate publisher for Que Publishing, I welcome your comments. You can email or write me directly to let me know what you did or didn’t like about this book—as well as what we can do to make our books better.
Please note that I cannot help you with technical problems related to the topic of this book. We do have a User Services group, however, where I will forward specific technical questions related to the book.
When you write, please be sure to include this book’s title and author as well as your name, email address, and phone number. I will carefully review your comments and share them with the author and editors who worked on the book.
Email: [email protected] Mail: Greg Wiegand
Associate Publisher Que Publishing 800 East 96th Street
Indianapolis, IN 46240 USA
Reader Services
Visit our website and register this book at www.quepublishing.com/register for convenient access to any updates, downloads, or errata that might be avail-able for this book.
IN THIS
INTRODUC
TION
■
How This Book Is Organized
■
Conventions Used in This Book
Only connect!—E. M. Forster
I
f you have just a single computer in your home or small
office, and if you’re the only person who uses that
com-puter, your setup is inherently efficient. You can use the
machine whenever you like, and everything you need—
your applications, your printer, your CD/DVD drive, your
Internet connection, and so on—are readily available.
Things become noticeably less efficient if you have to share
the computer with other people. For instance, you might
have to wait for someone else to finish a task before you can
get your own work done, you might need to have separate
applications for each person’s requirements, and you might
need to set up separate folders to hold each person’s data.
User accounts and fast user switching in Vista ease these
problems, but they don’t eliminate them. For example, you
still have to twiddle a thumb or two while waiting for
another person to complete his work.
A better solution is to increase the number of computers available. Now that machines with fast processors, ample RAM, and massive hard disk space can be had for just a few hundred dollars, a multiple-machine setup is an afford-able proposition for most homes. At home, for example, the current trend is to buy a nice system for Mom and Dad to put in their office, while the kids inherit the old machine for their games and homework assignments. Now you have several computers kicking around the house or office, but they’re all islands unto themselves. If you want to print something using another computer’s printer, you’re forced to copy the file to a memory card or other removable media, walk that media over to the other computer, and then print from there. Similarly, if multiple computers require Internet access, you face the hassle (and expense) of configuring separate connections
So now you must take the final step on this road: Connect everything together to create your own small network. This will give you all kinds of benefits:
■ A printer (or just about any peripheral) that’s attached to one com-puter can be used by any other comcom-puter on the network.
■ You can transfer files from one computer to another.
■ Users can access disk drives and folders on network computers as though they were part of their own computer. In particular, you can set up a folder to store common data files, and each user will be able to access these files from the comfort of her machine. (For security, you can restrict access to certain folders and drives.)
■ You can set up an Internet connection on one device and share that connection with other machines on the network.
■ You can stream images, music, and videos from one computer to another computer or to a digital media receiver, such as an Xbox 360.
■ You can set up a wireless portion of your network, which enables you to access other computers and the Internet from just about anywhere in your house or office.
The benefits of a network are clear; but if you’ve been hesitating because you think getting the right equipment and putting it all together seem like com-plex tasks, you’ve come to the right book. Here, in Networking with Windows Vista, you get a complete beginner’s guide to creating, configuring, adminis-tering, and using a small network using Windows Vista computers. This book includes comprehensive coverage of networking hardware, including both wired and wireless devices. You get handy buyer’s guides that tell you how to make smart choices when purchasing network hardware. Then, when you
have your hardware in hand, this book shows you how to put everything together, including installing the devices, laying the cable, and connecting all the pieces.
With your hardware tasks complete, the book switches to the software side and examines Windows Vista networking features. These include the Network and Sharing Center, managing wired and wireless connections, accessing shared network resources, sharing local resources on the network, implement-ing security, and much more.
How This Book Is Organized
To help give you a sense of the overall structure of the book, the next few sec-tions offer a brief summary of the four main parts of the book.
Part I: Networking Hardware for Windows Vista
Part I gives you a complete look at the hardware side of networking, with a focus on networking for homes and small offices. The first two chapters describe the hardware and devices you need for wired networking (Chapter 1, “Understanding Ethernet Networking”) and wireless networking (Chapter 2, “Understanding Wireless Networking”). As you learn in those chapters, your network needs a device called a router to share your Internet connection with the network, and the book next tells you how to configure your router (Chapter 3, “Configuring Your Router”). Part I ends by showing you how to bring everything together and get your network connected and running (Chapter 4, “Putting Your Network Together”).
Part II: Managing and Using Your Network
your network (Chapter 10, “Taking Advantage of Your Network”), how to work with network files even when you’re not connected to the network (Chapter 11, “Work with Network Files Offline”), and how to collaborate with other people on the network using Vista’s Meeting Space program (Chapter 12, “Collaborating with Windows Meeting Space”).
Part III: Securing Your Network
Network security is a serious and important topic, so I devote three chapters to it here in Part III. You first learn how to secure each Vista computer (Chapter 13, “Securing Windows Vista”), and you then learn techniques for general net-work security (Chapter 14, “Implementing Netnet-work Security”), and then spe-cific techniques to enhance wireless security (Chapter 15, “Implementing Wireless Security”).
Part IV: Advanced Networking with Windows Vista
The book closes with five chapters that take your networking skills to a higher (although still practical) level. You learn how to connect to your network from remote locations (Chapter 16, “Making Remote Network Connections”), how to monitor network users and activity (Chapter 17, “Monitoring Your Network”), how to troubleshoot network woes (Chapter 18, “Troubleshooting Network Problems”), how to set up your own website on the network (Chapter 19, “Setting Up a Website”), and how to set up an FTP site (Chapter 20, “Setting up an FTP Site”).
Conventions Used in This Book
To make your life easier, this book includes various features and conventions that help you get the most out of this book and Windows Vista networking:
Steps Throughout the book, I’ve broken many networking tasks into easy-to-follow step-by-step procedures. Things you type Whenever I suggest that you type something, what you
type appears in a bold monospacefont. Filenames, folder These things appear in a monospacefont. names, and code
Commands Commands and their syntax use the monospacefont, too. Command placeholders (which stand for what you actually type) appear in an italic monospacefont.
Pull-down menu commands I use the following style for all applica-tion menu commands: Menu,Command, whereMenuis the name of the menu that you pull down and Commandis the name of the command you select. Here’s an example: File, Open. This means that you pull down the File menu and select the Open command.
Code continuation character When a line of code is too long to fit on only one line of this book, it is broken at a convenient place and continued to the next line. The continuation of the line is preceded by a code continuation charac-ter (➥). You should type a line of code that has this character as one long line without breaking it.
This book also uses the following boxes to draw your attention to important (or merely interesting) information:
The Note box pres-ents asides that give you more information about the current topic. These tidbits pro-vide extra insights that offer a better understanding of the task.
note
The Tip box tells youabout Windows Vista methods that are easier, faster, or more efficient than the standard methods.
tip
The all-important Caution box tells you about potential accidents waiting to happen. There are always ways to mess things up when you’re working with computers. These boxes help you avoid those traps and pitfalls.
I
Networking Hardware for
Windows Vista
1
Understanding Ethernet Networking
2
Understanding Wireless Networking
3
Configuring Your Router
1
IN THIS
CHAPTER
■
What Is Ethernet?
■
Understanding Network
Interface Cards
■
Understanding Network Cables
■
Understanding Switches
■
Understanding Routers
■
Understanding Other Ethernet
Devices
■
A Buyer’s Guide to Ethernet
Hardware
■
From Here
Understanding Ethernet
Networking
A
ll computing topics begin, at some level, with
hard-ware. No matter what you want to do digitally, you do
it with and through hardware. From the computer
itself and all of its internal components, to external devices
such as the keyboard, mouse, monitor, printer, modem, and
speakers, software requires hardware. But there’s one
com-puting topic that is particularly hardware intensive, and
that’s the subject of this book: networking. Although
con-necting a couple of computers together can be as simple as
slinging a special cable between them, true networking
requires not only a number of different devices, it also
requires devices that work well together. To set up a network
that not only works, but is also fast, reliable, affordable, and
expandable, you need to make the right decisions at the
start
before
your network is a going concern. (Although, of
course, you can always modify your configuration if you’ve
already got some kind of network on the go; it’s just more
expensive that way.) This chapter will help you do that by
explaining the hardware and devices you need to set up the
wired portion of your network. Chapter 2, “Understanding
Wireless Networking,” takes you through the devices you
What Is Ethernet?
When networking geeks gather, they often talk about network architecture, which (to give you a definition that would be about a tenth as long as the one you’d get from a networking geek) refers to the hardware components that encompass a network, how those components connect together, and the meth-ods those components use to send data from one part of the network to another. In other words (to give you an even shorter definition), the network architecture is the overall design of the network.
Networking geeks also seem overly fond of inventing new networking architec-tures, so the computing world has seen its share of designs, from Token Ringto
ArcNettoFDDI(Fiber Distributed Data Interface, if you must know).
Fortunately, you don’t need to know a thing about any of these architectures. That’s because, in recent years, one networking architecture has come to dom-inate most of computing, and is in fact universal in the small home and office networks that I talk about in this book. That architecture is called ethernet, and it’s the subject of this chapter.
Ethernet technology exists in what network mavens call the physical layerand thedata link layerof the networking model. The physical layer deals with the technical specifications of networking hardware, and the data link layer deals with the basic transfer of data from one part of the network to another.
THE OSI MODEL
The specifics of the networking model aren’t important for day-to-day
net-working, but I’ll provide you with some details here, just in case you’re
curi-ous. The full networking model is called the
Open System Interconnection
(OSI)
model
, and it contains seven layers in all. Layer 1 is the physical layer;
layer 2 is the data link layer; layer 3 is the
network layer
, which deals with
how data is routed from one network location to another; layer 4 is the
transport layer
, which deals with ensuring that data is successfully and
accurately transferred from network location to another; layer 5 is the
ses-sion layer
, which deals with initiating, managing, and terminating
connec-tions between network devices (the period between the initial connection
and the termination of that connection is called a
session
); layer 6 is the
presentation layer
, which deals with formatting, converting, or encrypting
data received from the session layer so that it can be used by the
applica-tion layer (discussed next); and finally, layer 7 is the
application layer
, which
provides the connection between the network and network-based
applica-tions such as email programs, web browsers, and FTP clients.
10
Networking
with Microsoft
®Windows Vista
™The specifics of how ethernet works are hideously complex, and you don’t need to know any of it to get your own small network operating successfully. However, it doesn’t hurt to have at least a high-level understanding of what’s going on when your ethernet devices are hard at work.
All ethernet devices are given a unique identifier called the Media Access Control(MAC)address. When data is ready to be sent over the network, ether-net divides the data into small chunks called frames, which include part of the data (this is often called the payload) and an extra header that includes (among other things) the MAC addresses of the sending and receiving devices. The ethernet device then waits until the network isn’t transferring any data (this “wait” is typically measured in milliseconds), and it then sends the first frame. This process is then repeated until all the data has been sent. If, along the way, two devices attempt to send data at the same time (resulting in a col-lision), both machines wait for a randomly chosen amount of time (again, we’re talking milliseconds here), and then resend their frames.
The medium through which all this data is transferred is the network cable. (For more information, see “Understanding Network Cables,” later in this chapter.) Because of this, and because of
the universality of ethernet, particularly in homes and small offices, the word ethernet
is, for all intents and purposes, synony-mous with wired networking (as opposed to wireless networking, the subject of Chapter 2). In other words, if you hear someone talking about (or see someone writing about) ethernet, rest assured that all that person is really talking (or writing) about is networking that uses cables. However, that isn’t to say that there’s only one kind of “networking that uses cables.” There are, in fact, a number of different ethernet standards, and it’s the differences between these standards (and the ways in which these standards are compatible or incompatible) that should form the bulk of your ethernet knowledge. From the point of view of your small home or office net-work, the only significant difference between the standards is the speed at which they transfer data.
1
This is as good a time as any to introduce the word the-oreticalinto our discussion. The data transfer rate associated with any ethernet standard (indeed, any form of communications) is the rate that would be obtained if conditions were perfect. That is, if there were no noise on the line, no nearby interference, no frame collisions, and so on. So, in the discussion that follows, the speeds I mention are purely theo-retical, and it’s unlikely you’ll ever reach such velocities in practice. However, the comparisons are still useful because the relative
difference between two stan-dards will still hold in practice. That is, if the theoretical rate of standard B is 10 times faster than that of standard A, standard B’s real-world rate will also be 10 times faster than standard A’s real-world rate.
10BASE-T
The first commercial ethernet standard (first published more than a quarter of a century ago) was called 10BASE-T, which breaks down as follows:
10 This designates the maximum theoretical data transfer rate of 10megabitsper second (Mbps). BASE This is short for baseband, which
describes a communications medium (in this case, an ether-net cable) that only allows one
sig-nal at a time. Compare this with broadband, which describes a communications medium that allows multiple simultaneous signals.
T This tells you that the standard uses twisted-pair cables.
100BASE-T (Fast Ethernet)
Around 1995, a new ethernet standard was introduced: Fast Ethernetor
100BASE-T. As you can tell from the latter, this standard operated at a theoret-ical maximum transmission speed of 100Mbps, making the new devices 10 times faster than 10BASE-T. (To be accurate, the designation 100BASE-Tis an umbrella term for the various implementations of Fast Ethernet that have appeared, including 100BASE-TX, 100BASE-T2, and 100BASE-T4; of these, only 100BASE-TX survives, so that’s now the actual standard underlying the Fast Ethernet moniker.)
Although (like all new technologies) Fast Ethernet was expensive at first, the prices of Fast Ethernet devices quickly fell, and by the end of the 1990s Fast Ethernet had become the most common implementation of ethernet found in offices and, increasingly, in homes. It helped, too, that most Fast Ethernet devices were 10/100devices, which meant that they were also backward com-patible with 10BASE-T devices, so you could mix and match the two types in your network. Use of Fast Ethernet remains widespread today, mostly on older networks that haven’t yet upgraded to the faster Gigabit Ethernet (discussed next).
12
Networking
with Microsoft
®Windows Vista
™1
When you’re talking about data commu-nications, a megabit(Mb) is equal to one million bits. So, the 10Mbps transmission speed of 10BASE-T means that it can (theo-retically, of course) transfer 10 million bits of data per second. Just to confuse matters, if you’re talking about memory or data storage, a megabit equals 1,048,576 bits.
1000BASE-T (Gigabit Ethernet)
In 1995, the Institute for Electrical and Electronics Engineers(IEEE), which creates and maintains the ethernet standards (among many other duties), published a new standard technically labeled 802.3ab, but more commonly known as Gigabit Ethernetor1000BASE-T. This standard
boasts an impressive top speed of 1,000Mbps,
or 1Gbps, making it 10 times faster than Fast Ethernet.
The prices of Gigabit Ethernet devices have fallen rapidly over the past few years, to the point now where a gigabit-speed network is affordable for almost any home or small office. As with Fast Ethernet, the adoption of Gigabit Ethernet is being helped by the availability of 10/100/1000devices, which are backward compatible with both 10BASE-T devices and Fast Ethernet devices.
Beyond Gigabit Ethernet
Right now, Gigabit Ethernet is the fastest ethernet standard that’s both afford-able and readily availafford-able. However, it’s not the fastest version of ethernet. That distinction goes to the most recent ethernet standard—10 Gigabit Ethernet
or10GBASE-T—which the IEEE published in 2006. As these names imply, this implementation of ethernet comes with a theoretical transmission speed of 10Gbps, an order of magnitude faster than Gigabit Ethernet. However, as I write this in late 2007, 10GBASE-T devices are extremely rare and extremely expensive. It will likely be a few years before this standard becomes affordable and easy to find.
The need for network speed can never be satisfied, of course, so the folks at the IEEE have started work on an even faster ethernet standard: 100 Gigabit Ethernet, which will ship data at the giddy rate of 100Gbps. It will certainly be quite a few years before this standard is even published, and quite a few years after that before 100 Gigabit Ethernet devices become available.
Understanding Network Interface Cards
The starting point for your ethernet network is the network interface card(NIC). This is a device that serves as the connection point between some network
1
In the context of data communica-tions, a gigabit(Gb) is equal to one billion bits. As with megabits, if you’re talking about memory or data storage, a gigabit equals the more exact value of 1,073,741,824 bits.
node and the rest of the network. (A nodeis a device connected to a network. Example nodes include desktop computers, notebooks, and network devices such as routers and print servers.) As you’ll see in the next section, an ether-net NIC connects a node to the ether-network by means of a cable. The back of the NIC contains a port into which you plug the cable.
➔ If you’re looking for information on wireless network cards, see“Understanding Wireless NICs,”p. 41.
After the physical connection is established, the NIC works with a device driver to process incoming and outgoing network data. As such, the NIC is the focal point for the computer’s network connection, so it plays a big part in the overall performance of that connection. Most NICs sold today (or that come preinstalled in new computers) are either Fast Ethernet or, increasingly, Gigabit Ethernet, and the vast majority are either 10/100 or 10/100/1000 devices that you can add seamlessly to your existing network.
Ethernet NICs come in four main varieties:
Motherboard NIC The components required by a NIC have become so small that most PC manufacturers can now easily place them directly on the computer’s moth-erboard. (The motherboardis the computer’s main circuit board, which includes connectors for the CPU, memory chips, hard drives, ports, expansion slots, controllers, and BIOS—the basic input/out-put system.) The NIC is added in such a way that the port for the network cable appears flush with the back of the computer, usually among the other built-in ports such as USB, FireWire, monitor, and so on. The motherboard NIC port is almost always labeled in some way, either with text such asLANorEthernet(as shown in Figure 1.1), or with some kind of network icon (as shown in Figure 1.2).
14
Networking
with Microsoft
®Windows Vista
™FIGURE 1.1
On some PCs, the motherboard NIC comes with a text label.
1
Text label marks the Ethernet port
An icon marks the Ethernet port
FIGURE 1.2
Network adapter If your computer doesn’t have a motherboard NIC or if the built-in NIC is only Fast Ethernet and you want to upgrade to Gigabit Ethernet, you need to purchase and attach your own NIC. One common NIC type is an internal adapter card that you insert into a free slot on the computer’s bus. Most computers today use a PCI bus, so you need to get a PCI network adapter. If your computer has a freePCI Express(PCIe) slot, there are PCIe network adapters available. Figure 1.3 shows a typical eth-ernet network adapter.
➔ To learn how to install a network adapter, see“Inserting an Internal NIC,”p. 98.
16
Networking
with Microsoft
®Windows Vista
™1
FIGURE 1.3
An ethernet network adapter goes inside the computer and attaches to a free slot on the sys-tem bus.
an available USB port. In this case, make sure you get a USB 2.0 NIC to ensure top performance. Figure 1.4 shows an example of a USB-based NIC.
1
FIGURE 1.4
For easy installation, insert a USB 2.0 NIC into a free USB slot on your computer.
FIGURE 1.5
For a notebook computer, you can insert a PC Card (or PCMCIA) Ethernet NIC.
Understanding Network Cables
As mentioned earlier, when it comes to small networks, ethernet networking is synonymous with wired networking, where wiredmeans that each computer or device is connected to the network by means of a network cable.
The “starting point” (figuratively speaking) for any cable is the network adapter. As mentioned in the preceding section, every NIC comes with a port into which you insert a network cable, which can be either a twisted-pair cable or a crossover cable.
Twisted-Pair Cable
There are several different types of network cable, such as coaxial cable and fiber-optic cable, but virtually all small ethernet networks use twisted-pair cable. It consists of four pairs of twisted copper wires that together form a cir-cuit that can transmit data. The wires are twisted together to reduce interfer-ence. This is similar to the cable used in telephone wiring, but network cables are often shielded by a braided metal insulation to further reduce interference problems. This type of cable is called, not surprisingly, shielded twisted-pair, or
18
Networking
with Microsoft
®Windows Vista
™STP. You can use unshielded twisted-pair(UTP) cabling, which doesn’t have the insulation layer of STP cable. UTP cable is usually cheaper than STP cable, but it does tend to be less reliable than STP.
A twisted-pair cable comes with an RJ-45 jack on each end. (Networking purists cringe if you use the term RJ-45to refer to a network cable plug; they insist that the correct term is 8P8C, which is short for 8 Position 8 Contact; the rest of us ignore this unwieldy term and stick with RJ-45 or RJ45. (The RJ, by the way, is short for registered jack.) Figure 1.6 compares a network cable’s RJ-45 jack with the RJ-11 jack used by a telephone cable.
1
RJ-45 jack (network cable)
RJ-11 jack (telephone cable)
FIGURE 1.6
Network cables come with RJ-45 connectors at each end, which are similar to, but consider-ably larger than, the RJ-11 connectors used with telephone cables.
FIGURE 1.7
Twisted-pair cables use RJ-45 jacks to plug into the complementary RJ-45 connectors in net-work switches (as shown here) and in netnet-work adapter cards.
Twisted-pair cable is categorized according to the maximum transmission rates supported by various types of cable. With network data, for example, Category 3 (also called Cat 3) cable only supports up to a 16Mbps transmis-sion rate, so it only works with 10BASE-T networks. These days, however, few people purchase anything less than Category 5 (Cat 5) cable, which is rated at 100Mbps and so can handle the transmission rate associated with Fast
Ethernet. If you think you’re going to move to Gigabit Ethernet at some point, you will want Category 6 (Cat 6) cables, which support 1Gbps throughput. (Category 5e cables also support 1Gbps, but Category 6 cables are higher quality.)
Crossover Cable
Plugging one end of an RJ-45 network cable into a computer’s NIC is the first step in getting the computer on the network. The second step is clear: Plug in the other end of the network cable. But, plug it in to what, exactly? Your first guess might be to plug the other end of the cable into the NIC of a second computer. Good try, but that won’t work.
20
Networking
with Microsoft
®Windows Vista
™To understand why, you need to know that each network cable has both a transmit line and a receive line, and signals on those lines specify which direc-tion the data is flowing. The NIC’s port also has transmit and receive pins, so it can specify or detect the direction of the data flow. For example, suppose you have Computer A and Computer B connected by a network cable. When Computer A wants to send data, the transmit pin on Computer A’s NIC is acti-vated, which in turn activates the transmit line on the network cable.
That’s fine, but the problem occurs when this signal reaches the NIC port on Computer B. The cable’s transmit line will correspond with the transmit pin on the other NIC, so Computer B will get a signal that it should be transmit-ting data. This won’t make sense (because Computer B isn’t transmittransmit-ting), so no data goes through.
The solution is to use a special kind of network cable called an ethernet
crossover cable. This cable reverses the position of the transmit and receive lines. So when Computer A transmits data and activates the transmit pin of its NIC port, the signal goes through the crossover cable’s receive line. This in turn activates the receive pin of Computer B’s NIC, so the data transfer occurs successfully.
As with regular network cable, crossover cables also come in the same cate-gories—Cat 3, Cat 5, Cat 5e, and Cat 6—so get a cable that corresponds to the ethernet standard supported by your NICs.
IDENTIFYING A CROSSOVER CABLE
From a distance (or, heck, sometimes even up close), crossover cables
look identical to regular network cables. To help you identify them,
many crossover cables come with a label such as “CROSS” taped to
them. If you don’t see such a label, I suggest you add your own so that
you can keep the two types of cable separate. If you didn’t do that and
now you’re not sure which of your cables is a crossover, there’s a way to
tell. Take the connectors on each end of the cable and place them side
by side so that you have a good view of the colored wires inside. (A
clear plastic covering helps here.) Make sure you hold the connectors
with the same orientation (it’s usually best to have the plastic tabs
fac-ing down). If the layout of the wires is identical on both connectors,
then you’ve got a regular network cable. If you see, instead, that two of
the wires—specifically, the red and the green— have switched
posi-tions, then you’ve got a crossover cable.
Understanding Switches
In the preceding section, you learned that you can use an ethernet crossover cable to connect two computers directly via their NIC ports. That’s fine if you only want to network two computers, but what if your network consists of three or more computers, or if it also includes other network devices such as a printer or an Xbox gaming console? In these more complex—and decidedly more common—scenarios, direct connections with crossover cables won’t work.
To work around the limitations of direct connections, you need some other way to combine multiple computers and devices into a network. Specifically, you need a central connection point that each device can use. On simple net-works, that connection point is often a switch, which is a device with multiple RJ-45 ports. Figure 1.8 shows two switches: a basic 5-port switch and a larger 16-port switch.
22
Networking
with Microsoft
®Windows Vista
™1
FIGURE 1.8
Switches contain multiple RJ-45 ports for connections to computers and other network devices.
network segment, a collection of network devices connected to a single switch. (If this network segment comprises your entire network, you can call it a
switched network.)
1
Computer
Computer Switch
Computer
FIGURE 1.9
You can use a switch as the central connection point for your network.
The switch then forwards data from one network node to another. On basic switches such as the type used in homes or small offices, the switch usually reads the MAC address of the destination node in each ethernet frame and sends the frame directly to that device. Most switches maintain a switching table, a record of the MAC addresses and network port numbers used by each device on the network. As you use your network, the switch makes note of each new MAC address and adds it to the switching table, which improves overall switch performance.
You can also use a switch to send data across multiple network segments. For example, you might have a network segment in one room or office and a sec-ond segment in the room or office next door. Similarly, if your network out-grows your original switch, you might add a second switch to the network instead of upgrading to a switch with more ports. To join the two segments, you have three choices:
■ Many older switches come with a special uplinkport that’s designed to connect two switches by running a
network cable from the uplink port of one switch to the uplink port of the other switch. On some of these switches, a button controls whether the port is used as a regular RJ-45 port or an uplink port.
The network config-uration shown in Fig-ure 1.9—that is, multiple network nodes joined to a central connec-tion point—is called the star topology.
■ Use an ethernet crossover cable to link two switches by running the cable from any port in the first switch to any port in the second switch.
■ Get switches where the ports support Auto Crossover(also called Auto MDI/MDI-Xcrossover detection; MDI stands for Medium-Dependent Interface). This enables you to connect two switches without using an uplink port or a crossover cable.
As with NICs and cables, all switches support one or more of the ethernet standards. For example, a Fast Ethernet switch will almost always support 10/100 connections, whereas a Gigabit Ethernet switch will usually support 10/100/1000 connections. Make sure you match your switch to the ethernet standard you’re using on your network.
Understanding Routers
You saw in the previous section that a switch forwards ethernet packets according to the device MAC address in the frame header. This works extremely well, and most modern switches are high-performance devices. However, the inherent limitation of a switch becomes obvious when you want to add an Internet connection to your network:
■ When you want to request data from a web server, it’s impossible to know the MAC address of the remote server computer, so the switch has no way to forward the data request.
■ When a web server wants to send data to your computer, it’s impossi-ble for the remote machine to know your computer’s MAC address, so the switch cannot get the data to your computer.
In other words, the MAC address-based forwarding performed by a switch is limited to LAN traffic and cannot be used to handle WAN (wide area network) data.
To solve this problem, you need to add a routerto your network (see Figure 1.10). A router is a device that makes decisions about where to send the net-work packets it receives. So far, this sounds
suspiciously similar to a switch. The major difference is that while a switch uses a MAC address-based switching table to for-ward data, a router uses a routing table
that tracks IP addresses, unique addresses assigned to every Internet host and to
24
Networking
with Microsoft
®Windows Vista
™1
A wide area network
is network that cov-ers a wide geographical area. Some corporations use wide area networks, but the Internet is the
wide area network.
every computer on your network. For example, this is useful when the com-puters share a high-speed Internet connection, because the router ensures that the Internet data goes to the computer that requested it. To make this work, you plug your high-speed modem directly into the special WAN port in the back of the router.
1
FIGURE 1.10
You add a router to your network when you want to add Internet access.
Understanding IP Addresses
An IP address is a 32-bit value assigned to a computer by a network adminis-trator or, if you’ve signed up for an Internet account, by your Internet service provider(ISP). As you’ll see in a minute, these addresses are designed so that every host and router on the Internet or within a network has a unique address. That way, when an application needs to send data to a particular locale, it knows that the destination address it plops into the packet header will make sure that everything ends up where it’s supposed to.
The problem with IP addresses is their “32-bitness.” Here’s an example:
Not very inviting, is it? To make these numbers easier to work with, you use
dotted-decimal notation(also known in the trade as dotted-quad notation). This notation divides the 32 bits of an IP address into four groups of 8 bits each (each of these groups is called a quad), converts each group into its decimal equivalent, and then separates these numbers with dots.
Let’s look at an example. Here’s the previ-ous IP address grouped into four 8-bit quads:
11001101 11010000 01110001 00000010
Now you convert each quad into its decimal equivalent. When you do, you end up with this:
11001101 11010000 01110001 00000010
205 208 113 2
Now you insert dots between each decimal number to get the dotted-decimal form of the address:
205.208.113.2
The Router and Dynamic IP Addressing
The MAC addresses of network devices are assigned in advance by the device manufacturer. How, then, are IP addresses assigned? For the servers and other remote machines you deal with on the Internet, each network that wants on the Internet must sign up with a domain registrar (such as VeriSign.com or Register.com). In turn, the registrar assigns that network a block of IP addresses that the administrator can then dole out to each computer (or, in the case of an ISP, to each customer).
For your own network, however, the IP addresses are assigned as follows:
■ Your router is given its own IP address—called the public IP address— from the pool of addresses controlled by your ISP. Internet data sent to any computer on your network is first sent to the router’s external IP address.
■ The computers on your network are assigned IP addresses. In other words, when a computer logs on to the network, it is assigned an IP
26
Networking
with Microsoft
®Windows Vista
™1
You can convert a value from binary to decimal using Windows Vista’s Calculator. Select Start, All Programs, Acces-sories, Calculator, and then, in the Calculator window, select View, Scientific. Click the Bin (binary) option, use the text box to type the 1s and 0s of the binary value you want to convert, and click the Dec (decimal) option.
address from a pool of available addresses. When the computer logs off, the address it was using is returned to the pool. The system that manages this dynamic alloca-tion of addresses is called the
Dynamic Host Configuration Protocol
(DHCP), and the computers or devices that implement DHCP are called
DHCP servers. In most home networks, the router acts as a DHCP server. In most cases, the range of addresses is from 192.168.1.1 to 192.168.1.254. (On some routers, the range is from 192.168.0.1 to 192.168.0.254.) The router itself usually takes the 192.168.1.1 address (this is called its private IP address), and the pool of possible addresses is usually some subset of the total range, such as between 192.168.1.100 and 192.168.1.150.
The big advantage of this setup is that your network is never exposed to the Internet. All communication goes through the router’s public IP address; so as far as, say, a web or email server is concerned, it’s communicating with a device at that address. The router is able to get the correct data to your com-puter because when you initially request data, it adds your comcom-puter’s private IP address and the number of the communications port your computer is using and stores this data in a routing table. When data comes back from the Internet, the router converts the public destination IP address of the data to the private address of your computer, a process known as network address translation(NAT).
The Router as Firewall
On a small network, the main function of a router is to be used as a gateway between your network and the Internet. Through the magic of NAT, your net-work cannot be seen from any device attached to the Internet; as far as the Internet is concerned, your network is nothing but a router. (For this reason, an Internet-connected router that performs NAT duties is sometimes called an
edge router.) NAT, therefore, acts as a kind of simple firewall, a technology that prevents unwanted data from reaching a network.
However, most modern routers go one step further and come with separate firewall software. This gives you an interface for controlling and managing the firewall, which mostly means opening and closing specific software ports used by applications. For example, you’ll see in Chapter 19, “Setting Up a Website,” that to successfully use a web server on your network you need to configure the router’s firewall to allow incoming connections on port 80.
1
When a device such as a router is set up as the sole connection point between a network and the Internet, that device is called a
gateway.
The Router as Switch
You’ve seen that a router can act as a gateway device and a firewall device, but there’s a third hat that’s worn by most modern routers: a switch device. A typical router has a few RJ-45 ports (usually four; see Figure 1.11); so, as with a dedicated switch, you can create ethernet connections for computers and other devices by running ethernet cable from each device to a router port.
28
Networking
with Microsoft
®Windows Vista
™1
WAN port (for broadband modem) RJ-45 ports
FIGURE 1.11
Most routers have built-in switches, meaning you can use the router’s ports to connect devices to your network.
This means that if you have a small ethernet network, you might be able to get away with using just a router as your network’s connection point. Figure 1.12 shows this network configuration.