Mark Sawicki
AMSTERDAM • BOSTON • HEIDELBERG • LONDON NEW YORK • OXFORD • PARIS • SAN DIEGO SAN FRANCISCO • SINGAPORE • SYDNEY • TOKYO
© 2010 Mark Sawicki. Published by Elsevier, Inc. All rights reserved.
No part of this publication may be reproduced or transmitted in any form or by any means, electronic or mechanical, including photocopying, recording, or any information storage and retrieval system, without permission in writing from the publisher. Details on how to seek permission, further information about the Publisher’s permissions policies and our arrangements with organizations such as the Copyright Clearance Center and the Copyright Licensing Agency, can be found at our website: www.elsevier.com/permissions.
This book and the individual contributions contained in it are protected under copyright by the Publisher (other than as may be noted herein).
Notices
Knowledge and best practice in this field are constantly changing. As new research and experience broaden our understanding, changes in research methods, professional practices, or medical treatment may become necessary.
Practitioners and researchers must always rely on their own experience and knowledge in evaluating and using any information, methods, compounds, or experiments described herein. In using such information or methods they should be mindful of their own safety and the safety of others, including parties for whom they have a professional responsibility.
To the fullest extent of the law, neither the Publisher nor the authors, contributors, or editors, assume any liability for any injury and/or damage to persons or property as a matter of products liability, negligence or otherwise, or from any use or operation of any methods, products, instructions, or ideas contained in the material herein.
Library of Congress Cataloging-in-Publication Data Sawicki, Mark.
Animating with Stop motion pro / Mark Sawicki. p. cm.
Includes bibliographical references and index.
ISBN 978-0-240-81219-9 (pbk. : alk. paper) 1. Computer Animation. 2. Puppet films. 3. Stop motion pro. I. Title.
TR897.7.S3665 2010 006.6′96—dc22
2009046737
British Library Cataloguing-in-Publication Data
A catalogue record for this book is available from the British Library. ISBN: 978-0-240-812199-9
For information on all Focal Press publications visit our website at www.elsevierdirect.com
09 10 11 12 13 5 4 3 2 1 Printed in the United States of America
Juniko and Jennifer
and
I am extremely grateful to Elinor Actipis and Kathryn Spencer of Focal Press, along with Paul Howell, Ross Garner, and Diane Cook of Stop Motion Pro without whose faith and contributions this book would not have been possible. I also want to thank Joe Clokey and Premavision.com for sharing Gumby and Will Vinton for sharing his wonderful Claymation stills from willvinton.net. The richness of the illustrations would have fallen far short without the much appreciated contributions of publisher Ernest Farino and his fabulous book Ray Harryhausen Master of Majicks by Mike Hankin from archive-editions.com. Another well-deserved nod goes to Harry Walton, who lived and practiced the history of the art and shared stills of his journey from vfxmasters.com.
I’d also like to extend thanks to the following supportive individuals:
The Evangelical Lutheran Church of America for the fabulous Davey and Goliath still
Rick Goldschmidt and Rankin Bass for sharing the Rudolph still (www.enchantedworldofrankinbass .blogspot.com)
Jason Rau of Cameracontrol.com
Susannah Shaw for sharing some great illustrations from her book: Stop Motion Craft Skills for Model Animation.
Kathi Zung for sharing her terrific DVD available at www.angelfire.com/anime4/zungstudio
Dave of Dave’s camera in Camarillo, who let me shoot one of his cameras on the sidewalk outside of his store
Mr. and Mrs. Aldo Balarezo for letting me photograph their daughter Francheska in her debut as a clay animator
My former student Lucy Xi Xing, who graciously let me turn her into an animated character Reynier Molenaar for photographing me (reyniermolenaar.com)
My wife, Juniko, whose tremendous support gave me the ability to write this book in the middle of the worst recession in recent memory
Devices You’ll Need and Teacher Ideas
This book is designed to explore the history and technique of stop motion animation. The software is secondary and is in fact so easy to use and ingenious that it allows you to concentrate on the art instead of the technology. You will need to use a computer, a camera, and connectors, so let’s get these issues out of the way so we can start having some fun.
Computer
Stop Motion Pro is designed to run on the Windows operating systems XP, Vista (32 bit, 64 bit), or Windows 7 (32 bit, 64 bit). It is recommended that you have at least a 1.8+ GHz CPU and 1 GB of RAM for Windows XP and 2 GB for Vista or Windows 7. The faster the machine, the better! For hard drive space, you should have more than 10 GB to store your projects. If you are an Intel MAC user, you can run Stop Motion Pro if you install Apple boot camp, Parralells, or VMfusion and a version of Windows XP, Vista, or Windows 7.
If you are using a web cam, keep in mind that it will have system requirements as well so you will need to add those to the Stop Motion Pro recommendations. For Chapter 1 I use a Microsoft LifeCam VX-6000 web cam. Its system requirements are as follows:
● Processor ● Windows Vista
● Intel Pentium 4 2.8 GHz (Pentium Dual Core 2.0 GHz or higher recommended), 1 GB of RAM (2 GB
recommended), 200- to 600-MB hard drive
● Windows XP with Service Pack 2 (P2) or later
● Intel Pentium 4 1.8 GHz (Pentium Dual Core 1.8 GHz or higher recommended) 256 MB of RAM
(500 MB recommended) 400- to 1250-MB hard drive
As with all things digital, the faster the CPU and the more RAM and disc space you have, the better off you will be, especially if you embark on large projects.
Where to Get Stop Motion Pro
The software is available in the United States directly from Amazon, or go to www.filmingthefantastic.com, click on the product page, and select Software. Both the Action! and Action! Plus editions are available as well as the video adapter. You can also download a free trial version from www.stopmotionpro.com. For educational sales, a list of resellers can be found at www.stopmotionpro.com.
Versions and Editions
● SMP Action—An enhanced version of the 6.5 junior ● SMP Action! Plus—Enhanced SMP v6.5 Education
● SMP Action! HD—Replaces SMP SD, offering high-definition capture for home use ● SMP Studio—Enhanced SMP v6.5 HD
● SMP Studio Plus—Enhanced SMP v6.5 HD Studio
You can find a list of the features in each edition at stopmotionpro.com.
Connectors
It used to be dreadfully difficult to get video in and out of the com-puter. Today we have many options. To begin with, an electronic camera will output an analog signal, a digital signal, or both.
Analog Signal
The best way to think of an analog signal is by comparing it to a tradi-tional clock with sweep hands that are in constant motion. An analog signal is a constant flow of varying voltage. Much like an analog clock is subject to running too fast or too slow, an analog video signal has similar drawbacks because the quality of the image can deteriorate each time it is copied. Typical con-nectors for analog video can be found at the back of a VCR or DVD player. You will find RCA connectors that are used for the video signal and the right and left audio signal. Another connector you might see is what is called an S-video connector, sometimes called super video. S video is another type of analog signal that has better quality than the signals coming out of the RCA connectors. The analog signals coming from the camera can be either composite or component signals. Composite signals take all
Figure 1 Analog connectors on the back of a DVD player. RCA plugs for video and right and left audio signals.
the RGB information and blend it together to create a “composite” signal that is of lesser quality. For your computer to translate these analog signals, you will need a special video card or the Stop Motion Pro Video Adapter that will turn the video signals into digital signals that can be used by Stop Motion Pro and your computer. A component signal is fairly easy to understand, as it breaks the video signal into the three com-ponent colors that make up a color image, namely red, green, and blue. If your high-definition camera has this type of output, you will have three cables, one for each color RGB. For high-definition signals, Stop Motion Pro recommends using the Blackmagic-design Intensity card that will convert a wide range of video signals to digital (www.blackmagic-design.com).
Digital Signal
One can think of a digital signal as a digital clock that breaks time down into discrete separate numbers. It isn’t a continuously varying signal but a stream of distinct binary codes that when uncoded create an image. A digital signal is better than an analog signal because it does not suffer from the degradation that analog images are prone to. Digital outputs can be DV or HDV. DV (or digital video) gives a digital signal for standard definition televi-sion with an aspect ratio of 1.33 to 1. HDV is the new high-definition video signal that has an image with a much wider aspect ratio of 16 ×
9. There are two primary connec-tors for a digital signal; the first is the IEEE 1394 interface commonly known as FireWire (Apple Inc.), i.LINK (Sony), and Lynx (Texas Instruments). These can be either smaller four-pin connectors or larger six-pin connectors. There are a number of cables you can buy that will go from four to six, four to four, or six to six, and so on that will accommodate whichever input and output your camera and com-puter will accept. The other con-nector is called a USB concon-nector
Figure 3 An iLink connector on the left and a USB connector on the right.
and has grown quite popular with computer users as this universal connector is used for all sorts of gadgets such as printers and scanners as well as cameras. There are at present four variations of the USB connector: the type A, type B, mini-A, and mini-B. Your local computer store will be able to supply you with an assort-ment of USB cables that will allow you to connect your camera to your computer. With all these different connectors, I have found it invaluable to purchase a connector kit like the Ultra Cord Travel Pack, which has 13 varieties of connectors.
Cameras
Stop Motion Pro can use both analog and digital cameras. You can use web cameras, video cameras, high-definition cameras, and high-end digital still cameras. The important common denominator with cameras is that they must provide a live video output signal.
To use Stop Motion Pro, you will need a camera
Figure 6 The output ports of a Sony TRV 27 camera. There are ports for USB, i.LINK, S video, and standard analog video. Older cameras are less expensive and can have many more connec-tion options. The universal solution is to use the Stop Motion Pro Video Adapter to convert analog video to digital. The adapter is covered in depth in Chapter 10.
Figure 7 The size and quality difference of a variety of resolutions.
that has this ability. For some exercises in this book I chose to use a Sony TRV 27 camera. It is an older mini-DV tape camera, but it has all of the outputs previously mentioned: RCA, S video, i.LINK, and USB. For some exercises I used a cable for the i.LINK that went from the camera’s four-pin output to my IMAC computer (running Windows) and its six-pin input. In most cases your best bet is to use the analog output from your camera and plug it into the Stop Motion Pro Video Adapter that in turn plugs into the USB input of your computer. The adapter will easily convert the analog signal to digital and away you go.
Resolution and Video Formats
Resolution, for the most part, generally refers to how many pixels make up your video image. A pixel or picture element is a tiny square of color that makes up the mosaic of a digital image. High definition has many more pixels than standard definition. One high-definition standard has an image that is 1280 pixels across by 720 pixels high, whereas standard definition (your traditional old-style TV image) is 720 pixels across by 480 pixels high. Most of the exercises in this book will use standard resolution, as it allows you to use less storage space for the projects while keeping the image quality quite acceptable. Video signal formats vary depending on where you live: NTSC for the United States and PAL for the United Kingdom, Europe, and other countries. Stop Motion Pro is capable of accepting video signals from all over the world. As I am in the United States, my video will be in the NTSC format. The differences between video formats will be examined in more detail in Chapter 1 and Chapter 10.
File Formats
into the software, such as when you want to add a background using the Chroma Key option. The other format files—AVI and WMV—are used in the Make Movie function in Stop Motion Pro and allow you to post projects on the Internet or load your animation sequences into editing software. The AVI format is uncompressed and is used to transfer your animation to an external video editing or effects application. The AVI format ensures the quality of the captured frames is not compromised. WMV (Windows Media Video) is a compressed format and is therefore smaller than the AVI files. These files can be used directly on the Internet or sent to YouTube and MySpace.
Figure 8 Your animation is converted to AVI or WMV files for editing or playback over the Internet.
For Instructors
All the Rest
There are a few more technical details that will be addressed bit by bit using purposeful exercises that illustrate the tools in Stop Motion Pro. For the most part, the lessons involve the development of the reader as an artist. The exercises are more about your thought processes as you use the software tool rather than memoriz-ing button pushes. Stop motion, like fine art, provides a direct connection between artist and audience. Whether you move a puppet, an object, or a lump of clay, you are the ultimate performer and the move-ments you create come directly from you. Most important are the magic and fun of it all. Even after my 30-year career in the effects field, I have never grown tired of the simple and unbridled joy of breathing life into an inanimate object. It is really the stuff of wonder! Enjoy.
Animate Time
Today we live in an age where moving images are all around us: television, motion pictures, billboards, the Internet, and even cell (mobile) phones. It is hard to imagine that just a little over a century ago there was no such thing as moving images. Before we get involved with synthetically creating motion through anima-tion, we need to explore the development of motion pictures.
Persistence of Vision
In the 19th century, many fun and amusing devices were created to evoke motion into two-dimensional objects. One of the simplest was the thaumatrope, invented by Dr. John Paris of England in 1824 to demon-strate a phenomenon known as persistence of vision. A typical thaumatrope consisted of a rapidly rotating disc. On one side of the disc was a drawing of a bird on a perch on a blank field of white; on the other side was a drawing of an empty birdcage. When the disc was spun rapidly past the eye, it appeared to the viewer that the bird was in the cage; the images of the cage and the bird melded together because the eye retained both images simultaneously, ergo creating a “persistence” of vision. In today’s scientific circles, this simplistic idea of the phenomenon is considered false science, but for artistic purposes the idea of “persistence of vision” … persists. This amusing toy transformed into more sophisticated devices such as the zoetrope that allowed a series of slightly different images to move past the eye to create cyclical motion. It wasn’t long before the magic of photography and persistence of vision came together to create motion pictures.
Eadweard Muybridge
Muybridge was an English photographer whose early career involved the pictorial documentation of the early West where his work was very popular. In 1872, Leland Stanford, a former governor of California and a racehorse owner, had boldly taken a position on one of the hotly debated questions of the day: whether all four hooves of a horse left the ground at the same time during a gallop. Stanford believed that all hooves did
indeed leave the ground to produce an “unsupported transit” for the animal and sought to prove this fact scientifically. It is hard to imagine the mindset of only a few genera-tions ago, but then again it is hard to imagine a world without moving pictures. Stanford hired Muybridge to settle the question. To create proof of the claim, Muybridge rigged up a series of still cameras that would take pictures when prompted by an electrical trigger created by John C. Isaacs, chief engineer for Southern Pacific Rail-road. The series of photographs did indeed settle the question and ushered in a remarkable collection of motion studies of human and animal alike. These studies of motion are available in books of Muybridge collections and can be used as a motion template in Stop Motion Pro. Today the fabulous work of Muybridge is an invaluable reference for both 2D and 3D animators the world over.
The Motion Picture Camera
Toward the end of the 19th century, inventors around the world began to experiment with placing photo-graphic emulsion on flexible film to enable them to take a series of still pictures rapidly with a single camera. This movie camera was the obvious extension of the work of Muybridge and enabled the rapid adoption of the film industry. One of the main hurdles to overcome was how fast you should take the pictures. The tremendous number of experiments with persistence of vision revealed that you could eliminate the perception of “flicker” (a rapid variation in brightness) in the images if they were flashed past the eye at 45 images or Figure 1.2 A zoetrope cylinder. When spun rapidly past the eye, the illusion of
cyclical motion was obtained.
Figure 1.3 Proof of the unsupported transit using Muybridge’s photography.
more per second. Being a frugal generation, early inventors would hold a single image in the gate of the projector and reveal that image to the audience through a three-bladed shutter that would flash the same image three times in rapid succession on the screen before the shutter blocked the light and the next frame was pulled and placed into position. Using a three-bladed shutter in the projector and a capture rate in the camera of approximately 16 frames per second (fps), you created imagery that flashed past the eye at 48 flashes per second. Sixteen actual frames multiplied by a three-bladed shutter reveal 48 flashes. Now because these early cameras did not have motors but were hand cranked, the speed often varied depending on the operator and the desire of the filmmaker. Hand cranking yielded an organic variable frame rate of sorts, and if projected too slowly it would introduce the perception of flicker. Hence, early silent films became known as “flickers.”
The Introduction of Sound
decided to go with 24 frames per second and switch to a two-bladed shutter that once again created an image refresh rate above 45 : 24 frames per second times a two-bladed shutter = 48 image flashes per second. As sound films became the dominant art form, this new film speed created an odd perception of the golden age of silent films when they were resurrected for inclusion into a sound speed film. If the 16 fps silent film was used “as is,” it would appear to be moving comically fast when projected at 24 frames per second. This did little damage to light-hearted comic films like the Keystone Cops comedies that involved outrageous car chases, but it was a notable disservice to the beautiful dramatic films of the era that were always meant to be projected at their native rate of 16 frames per second. The important point to keep in mind is that if you capture and play back at the same frame rate, the motion will remain natural as long as the capture rate is rapid enough to blend the images together. This concept is important to remember when you see all the different frame rates offered in Stop Motion Pro software.
Television
Motion pictures were the high point of entertainment for many years, as they were the only venue for cinema. The 1950s presented competition for the silver screen with the introduction of mass television broadcasts. This led to further developments in the motion picture field, the most important for this discussion being the birth of the 30-frames-per-second rate for video. One would think that because 24 frames per second had been used for years in movies, television technology would have adopted it as well. The actual outcome, however, lies in a brief history of power transmission.
Figure 1.4 Muybridge’s motion studies are invaluable references for animators. These excellent books are avail-able from Dover Press.
In the late 1800s, Thomas Edison and George Westinghouse were battling over how electricity was to be delivered to consumers. Edison was a fan of direct current (DC) as one finds in batteries with a constant flow of positive and negative energy. Westinghouse and the genius inven-tor Nikola Tesla promoted alternat-ing current (AC), which alternates the positive and negative poles at a cyclic rate. AC eventually won out because of the extreme energy loss of DC with long-distance transmis-sion. Because AC cycles back and forth, Westinghouse had a similar problem as that faced by the makers of motion picture technology, and that was how to reduce flicker, but this time with regard to street light-ing. Westinghouse in the United States came up with a system that would enable arc and other public lighting to appear flickerless by choosing a rate of 60 cycles per second for his AC power. Around this same period of time, electrical developers in Europe chose an AC rate of 50 cycles per second. The reason these two power rates become the cornerstones for television frame rates is that the electronic medium of television is built around power, and 30 pictures per second is a convenient mathematical and electrical subdivision of the power supply. So in a nutshell, U.S. video is 30 frames per second because of 60 cycles per second AC, and in Europe video is 25 frames per second because of its 50 cycles per second AC power.
Now those of you who were paying attention might say, well yes, but 30 frames per second is still below the minimum 45 flashes per second to prevent flicker. This would be correct, except for the fact that one picture of video is composed of two partial pictures of the same frame called fields. These fields blast by our eyes 60 times per second and therefore preserve the persistence of vision phenomenon. The rapid pre-sentation of field 1 and field 2 is similar to the shutter idea used in motion picture projectors. This system of creating images in video is called interlace. Video is made up of lines of information. Field 1 contains odd-numbered lines, and field 2 contains even-odd-numbered lines. When these odd and even collections of lines are flashed in sequence at 1/60th of a second, the viewer receives an interwoven view of these two fields together. If nothing moves in the image, one perceives a whole picture. If an object or camera moves in between the creation of field 1 and field 2, then there will be an offset to the imagery that yields a stairstep appearance. This stair stepping or aliasing of moving images is one of the primary image differences between video and film.
[image:17.535.45.327.81.296.2]With the advent of digital video, digital cinema, and high definition, a few new terms have come into the mix. The most prominent of these is 24p, which stands for 24-frames-per-second progressive imagery. The term progressive means that each single frame of the digital image is made at one time with no video interlace. This form of digital video mimics film because it does not have odd and even fields, just one whole digital image. Interlace is still available in these digital formats, which have labels such as 30i for 30-frames-per-second interlace.
Figure 1.8 The image difference between an interlaced and progressive capture.
Figure 1.7 Each video frame is made up of two interlaced fields.
But Wait, There’s More!
mathematical magic to cram color into the signal and in doing so slightly altered the 30-frames-per-second frame rate to 29.97.
For an artist, numbers like this usually instill unbridled panic, but there is no need to be alarmed. As far as an animator is concerned, 29.97 is exactly the same as 30 frames per second. The only time 29.97 matters is when a long program (such as one that runs for an hour) is being evaluated for real time. For example, there are 60 seconds in a minute and 60 minutes in an hour, so 60 × 60 = 3600 seconds × 30 frames = 108,000 frames; 3600 seconds × 29.97 frames = 107,892 frames. So the difference between running an hour-long program at 29.97 fps and 30 fps is that you will lose 108 frames. This insignificant change only becomes important during the postproduction process when we need to know the exact length of a program. Most animation shots typically last for 120 to 240 frames, and the slight speed difference is completely imperceptible in the performance. The use of 29.97 is an engineering label, so that Stop Motion Pro is absolutely accurate. As an animator, you will be much happier if you think of 29.97 as being exactly the same as 30 frames per second and plan accordingly. Here are the primary capture speeds for a variety of media as seen by an animator:
● Motion pictures: 24 frames per second
● U.S. video: 30 frames per second (forget that it’s really 29.97) ● European video (PAL): 25 frames per second
As you look at the main capture speed pulldown of the Stop Motion Pro speed menu, all of the choices will begin to make sense. At the bottom we have 5 frames per second. If images are recorded and played back at this rate, a second will be a second but the motion will be choppy as the refresh rate is so slow. One might ask, why do I have this option at all? The 5-frames-per-second rate is ideal for the 5-year-old tiny tyke who has a short attention span. Moving an object 5 times for a second is just right. As the child grows older, the frame rate goes up, to 6 frames per second for the 6-year-old and so on. Things get interesting when we get to the 12-frames-per-second rate, which is half of the standard 24. Many profes-sional animators will animate at this rate or in the case of profesprofes-sional venues shoot on “2”s or 2 frames for each position, which amounts to animating at 12 frames per second and time stretching
to 24 for standard projection. Some of the fabulous work of the animators at the Aardman studio is done at this frame rate, and the quality is astounding.
For student and professional work, these would be the frame rates I would use:
● 12 frames per second for a speedier production with pro results
● 24 frames per second for the full advantage of moving for each frame (Harryhausen
[Chapter 7] would use this rate)
● 29.97, otherwise known as 30 frames per second, for the maximum refresh rate for
video presentation
For my work I usually stick with 24 frames per second, as I did with traditional film cameras. I save the effort of shooting 30 frames per second because I know the film-to-video transfer would generate what is known as a 3 : 2 pulldown that essentially
transforms 24 fps footage into 30 fps footage, yielding acceptable results for television broadcast. If I animate a long project I shoot at 12 frames per second to speed up the production process while still main-taining quality.
Resolution
Digital images are made up of a mosaic of colored squares or picture elements called pixels. The lower the pixel count, the lower the reso-lution and the less distinct or fuzzier the image is. For example, 160 pixels wide by 120 pixels tall might be a typical low-resolution web cam image, whereas a full-blown, high-quality motion picture frame converted to pixels might be 2048 × 1556. Standard definition video in the United States is 720 × 486, and a typical high-definition frame resolution falls around 1280 × 720. When digital still cameras are used, the nomenclature changes a bit in the sales bro-chure as the resolutions are referred to in mega-pixels. To obtain the megapixel count, you multiply the horizontal and vertical pixel counts together. So 2048 × 1556 = 3,186,688 or more than 3 megapixels. Fortunately for us, Stop Motion Pro takes the pain out of the mathemat-ics and sets up automatically or lets you choose exactly the resolution you want to use. Now that we have those frame rates and resolution issues out of the way, let’s look at cameras.
Cameras for Stop Motion Pro
The Electronic CameraStop Motion Pro is an excellent tool for digitally capturing moments in time and generating ani-mation. The reason it is a much more effective tool than older motion picture cameras is that you can always reference what you shot (or captured) previously with what the camera is seeing now. Once you shoot a frame in a motion picture camera and then move the subject, that original position is lost to every-thing except the animator’s memory until the film is processed. With Stop Motion Pro, the animator has a continuous record of exactly what was captured in the past that can be
imme-diately referenced during animation. To do this, Stop Motion Pro requires a camera that can supply a live video feed. An assortment of cameras of varying quality can do this. The most readily available and inexpensive
camera that meets these criteria is the web camera. There are many kinds of web cameras, but the most useful for stop motion animation would be one that has an easily adjustable mount that can be taped or clamped in place to ensure that the camera doesn’t move yet allows for subtle pan and tilt adjustments for composition and camera moves. The input into the computer usually comes via a universal serial bus (USB) plug. Although these web cameras are the least expen-sive and readily available, they are typically of low resolution and should be used for animation exercises and not for actual productions. Stepping up from the web camera we have a number of digital or analog video cameras. These cameras offer higher resolution and can output a continuous live view through a USB connection, FireWire, or straight analog output if you use the Stop Motion Pro Video Adapter Kit. Because your computer is the central hub of your input, it is best to see what connections your particular computer offers. You can then match the input compatibility with the output of the camera. High-definition cameras can be used as well, as long as they provide that continuous live input signal. At the extreme high end of cameras for professional feature film use is the digital still camera such as the Canon DSLR 1000D, which offers this live view feature and is able to capture extremely high-resolution images. For our first exercise, we will use a simple web cam to create a time-lapse shot. The Time Machine
A good starting point for understanding animation timing is to record a natural event and work out how to manipulate its speed using simple mathematics. For this exercise, you will need to purchase and install the software for a web cam. In this case I used a Microsoft Life Cam VX-6000, but you can Figure 1.11 A Microsoft VX-6000 Web Cam. The
Logitech series of web cams are also compatible with Stop Motion Pro. To obtain the latest up-to-date list of compatible cameras, go to www.stopmotionpro.com.
Figure 1.12 Click on Stop Motion Pro.
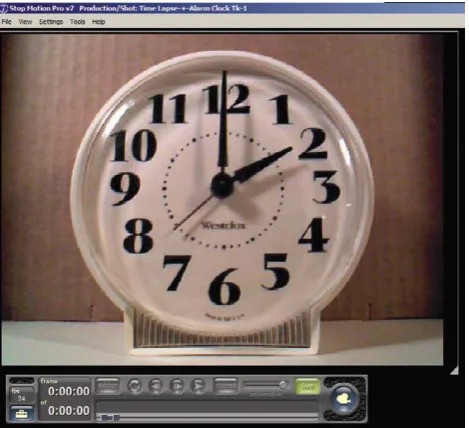
use other models as well such as those from the Logitech line. Check out the Stop Motion Pro web site to check on compat-ibility before purchasing a camera. If you have a camera, you can download a trial version of Stop Motion Pro and check to see if your camera will work. Now we’ll set up Stop Motion Pro to do a time-lapse shot of an alarm clock.
After installing the Stop Motion Pro soft-ware, you should have an icon on your desktop for starting the tool.
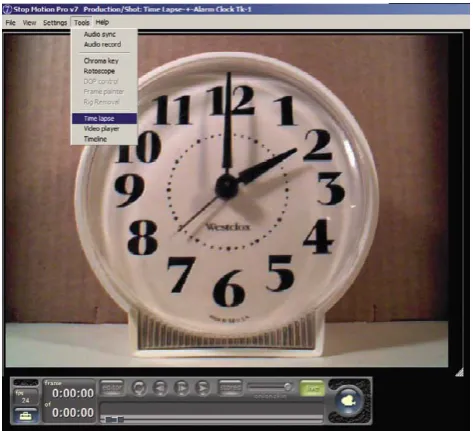
This next section is very important and holds true for all the cameras we will be using throughout the book. Because you want full control over your ani-mation and don’t want any changes to the image other than what you decide to change (animation), you will want to disable all the automatic functions on the camera. If the automatic settings are used, you will notice that as you bring your hand close to the lens of the camera, the image will brighten to compensate for the reduction of light. When you move your hand away, the image will go from bright to a proper exposure as the camera adjusts to the changing light conditions. If you let the camera “help you” in this manner, your animation will flicker constantly as the camera makes minute adjust-ments frame for frame. For animation you want to make sure the camera does nothing without your consent. Follow the steps in Figures 1.12–1.22 to make time “fly”.
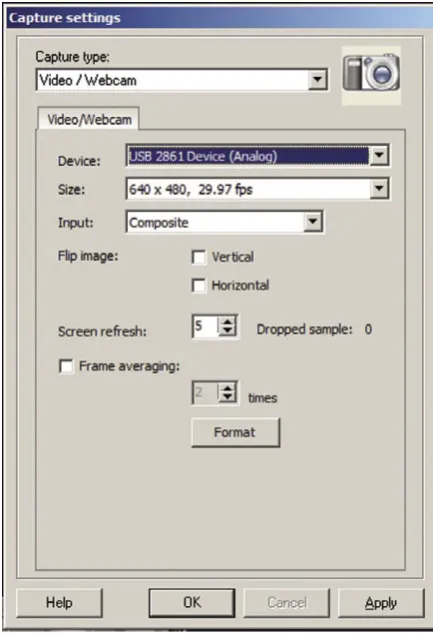
Figure 1.15 The capture settings window should appear. In the top menu, select Web Cam. Stop Motion Pro will recognize your web camera and set up accordingly. If the model of your web cam does not appear, you may find it as you scroll down the device menu. Go to the size drop-down menu and select 640 × 480 pixels 30 fps. I chose this for no particular reason other than it is a nice, viewable image that won’t take up too much memory. Click Apply.
Figure 1.16 Position your web cam to frame the clock. Position both in a bright, flatly lit area to avoid reflections on the face of the clock.
Figure 1.17 The web cam image will now appear in the Stop Motion Pro main panel. The next step is to turn off all automatic functions on the camera.
Figure 1.19 Different manufacturers have different controls. What you want to look for and turn off or disable are Face Tracking, Auto Expo-sure, Auto Gain, Auto White Balance, Auto Focus, and, well, any-thing auto. Once you do this, you can use your hand-in-front-of-the-lens test to make sure that the camera isn’t compensating. Then go to the capture settings window and click OK. The Stop Motion Pro web site has an excellent step-by-step video tutorial of this process.
Figure 1.20 Go to the lower menu bar of Stop Motion Pro, and place the cursor over the fps button. Push down the right mouse button, and select 24 frames per second. This will be our standard motion picture time base. Note that the 24 fps option is available from the Stop Motion Pro Action Plus on up.
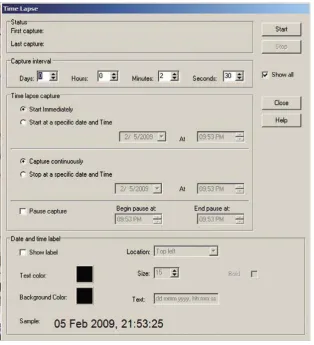
[image:24.535.31.263.85.442.2] [image:24.535.271.508.384.599.2]Figure 1.22 The Time Lapse menu.
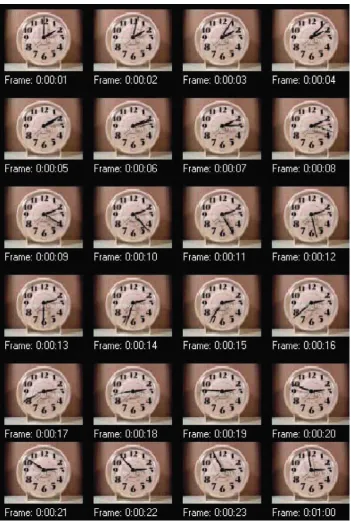
You now have a control panel that will allow you to manipulate time. This exercise requires you to have an analog clock (a clock with hands). Our goal is to have the hands move one hour in one second. The calculation is simple once you know the time base of your project, which in this case is 24 frames per second. First we need to make all the time units the same. Instead of thinking of one hour, we have to know how many seconds are in an hour. We know that there are 60 seconds in a minute and there are 60 minutes in one hour, so 60 seconds × 60 minutes = 3600 seconds in an hour. If we want one hour to pass in one second of our time base (or 24 frames), then we merely need to divide 3600 by 24 to learn what interval of time we need to capture the clock: 3600 divided by 24 = 150 seconds. If we go back to the Time Lapse control panel, we see that the seconds window only goes up to 60, at which point the minutes window takes over. We will need to use both minutes and seconds windows by converting the 150 seconds into minutes and seconds. So 150 seconds divided by 60 seconds (representing a minute) = 2.5 minutes or 2 minutes and 30 seconds. In the Time Lapse window, put in those settings for the capture interval. Now to start the project:
Select Start Immediately Select Capture Continuously Push the start button and go to lunch
[image:25.535.112.427.81.427.2]Summary
1. Though not a true scientific theory, persistence of vision is the common explanation for how moving images work.
2. A thaumatrope persistence of vision toy is easy to create. Can you come up with other ideas to create a two-position animation thaumatrope?
3. One of the first frame rates was around 16 frames per second and would vary as the camera was cranked by hand.
4. A three-bladed shutter was used in silent cinema to ensure that the images flashed by the eye at a rate slightly higher than 45 flashes per second to eliminate flicker.
5. Upon the advent of sound, theater owners established the sound standard speed of 24 fps.
6. In the 1950s, U.S. television was invented around the 60-cycle power available. As a result, the U.S. video frame rate is 30 fps.
7. In Europe, the power cycle is 50 cycles per second. This is why PAL video runs at 25 frames per second. 8. Video images are composed of two fields of image lines representing odd and even lines that are
inter-woven in time to create interlace images.
9. In a move for digital video to replicate a film look, progressive imaging schemes were invented that create whole digital image frames without interlace. One common notation for this process is 24p, meaning 24 frames per second progressive.
10. With the introduction of color in the 1950s, the video frame rate had to be altered to 29.97. This new rate change is subtle and of no concern to animators who still think of U.S. video as running at 30 fps. 11. As long as an image is recorded and played back at the same rate (regardless of speed), a second of time
will be a second. The quality or smoothness of the motion may be choppy at slower frame rates. 12. An animator’s job is to work to a master frame rate and break down movement and its desired effect
into a block of time. In this chapter, we made the hour-long movement of the minute hand fit into a second of screen time.
13. Can you think of other candidates for time lapse? Further exercises would be to plot out and shoot a time-lapse sunset. Make clouds roar overhead. Show a breathtakingly fast snail. Make an ice cube melt in less than a second. Traffic jam? Not using time lapse with Stop Motion Pro. The cars will begin moving again in seconds.
Film to See
[image:28.535.177.359.165.430.2]One of the most remarkable time-lapse films ever made is Koyaanisqatsi (1982), directed by Godfrey Reggio. The title is derived from a Hopi Indian word that means “life out of balance.” It is an amazing look at modern society through the eyes of the time-lapse camera and high-speed camera, and it gives a chilling perspective on our environmental crisis.
Animate People
Since the birth of cinema, a number of notable pioneers have used stop motion to generate visual effects that create fantastic worlds. An early example is the work of French magician George Méliès. His pivotal work, A Trip to the Moon, made in 1902, explored a whole host of tricks that became the foundation for visual effects as we know them today. One trick related to animation is thought to have been discovered by accident. As the story goes, Méliès was photographing a horse-drawn carriage parked in front of a shop when the “hand-cranked” film camera froze up and jammed. As a result, the filming abruptly stopped and the operator paused to unsnarl and fix the jam that apparently involved something outside of the film chamber as the film stayed arrested in the confines of the dark camera chamber during the fix. During this camera fix, the horse-drawn carriage moved on and a horse-horse-drawn hearse took its place and happened to park in the same area. When the photography resumed, little notice was made of the change in the subject until the film was pro-cessed and projected the next day and the audience witnessed a horse-drawn carriage “magically” transform into a horse-drawn hearse! As with all animation techniques, we learned that we were able to manipulate subjects in between exposures to amazing effect.
For A Trip to the Moon, Méliès made use of the mistake (now turned technique) in a scene in which a group of wizards magically changed their raised telescopes into chairs in the blink of an eye; Méliès created the effect by merely stopping the camera to allow the switch before photography resumed. This simple trick and Méliès’ work is documented beautifully in Part 12 of the Tom Hanks HBO miniseries From the Earth to the Moon, titled “Le Voyage Dans La Lune.” It was only a matter of time before filmmakers explored the magic of manipulation in between exposures to generate synthetic movement. In the landmark film Nosferatu by F.W. Murnau (1922) (the first film version of the famous Dracula story by Bram Stoker), the film was enhanced with stop motion animation for the ocean voyage sequence. When the vampire comes up from the hold of the ship, live action set pieces were animated to create the effect of the cloth cover magically moving away from the hatch that opens by itself; then we suddenly go to a live-action performance of the vampire emerg-ing from the hold.
In other shots from Nosferatu, the camera is “undercranked” or run at a taking speed of 8 frames per second when shooting the vampire moving his coffins about. As we saw with the clock exercise in the previ-ous chapter, when filmed at slower than normal speed the vampire seems to set about his tasks with superhuman speed. These tech-niques laid the groundwork for the animation of human performers often referred to as Pixillation (not to be confused with the digital artifact known as pixelation). A landmark film that utilized Pixilla-tion was the Academy Award– winning short subject Neighbours, by Canadian filmmaker Norman McLaren in 1952.
Figure 2.1 The vampire emerges from a hatch that was opened via stop motion animation. From the film Nosferatu, 1922.
As a side note to Nosferatu, I always point out to my students that this film is a prime example of why everyone should honor copyright. F.W. Murnau and his production company, Prana Film, never obtained the rights to do a screen adaptation of Dracula that was published in 1897. Bram Stoker’s widow successfully sued the filmmakers for copyright infringement, and Prana Film subsequently went bankrupt after only making this one film. The bankruptcy judge also ordered all prints and negatives to be destroyed. It is only by chance that this landmark film survives; had it not been widely distributed at the time, this classic would have been lost to the ages. The moral of the story is to honor copyright, credit the author, and ask for permission.
Norman McLaren
Neighbours (1952) was born out of McClaren’s experiences during a tumultuous time in history and had a decided antiwar message. In the film we see two neighbors living in simple cardboard boxes next to each other. Trouble begins when a small flower grows between the houses and the two neighbors fight to the death for the tiny bloom. Aside from using live actors as animated actors with Pixillation, McLaren also created synthetic audio by physically drawing on the film’s soundtrack itself to create an oddly disturbing montage of sound effects to enhance the image. Neighbours—along with many other NFB animations—has no dialogue and takes advantage of the universality of visual storytelling to make its point. As a result, these films have become timeless classics that have global appeal. Other great examples of pixilation technique are Jan Kounen’s Gisele Kerozene (1989) and the work of Mike Jitlov, The Wizard of Speed and Time (1979). Animating people is a great deal of fun and the results are captivating. Pixillation is one of the most physically demanding ani-mation projects you can undertake. I hope you have a lot of energy, because here we go.
Setting up the Camera
For this exercise, we will be using an older-generation digital video camera. The Sony TRV 27 is a terrific mini-DV camera that has a large number of outputs for you to connect with the computer. The main thing to remember when you are using a mini-DV or any tape recording device is to remove the tape. The tape is fragile and sensitive to the constant abrasion of the rotating tape head. To prevent damage, the camera has an automatic “turn off” circuit that will shut down the camera if you keep it on pause for too long. Because Stop Motion Pro (SMP) records from the constant feed it receives, there is no need to record anything to tape as the animation is recorded on your computer’s hard drive. To keep the constant video feed coming in to Stop Motion Pro and prevent a camera shutoff, all you need do is remove the tape from the camera. Remove the tape and the camera will not shut off until you turn it off. Next, arrange a long extension cord for both the camera and the computer so that we can do some outdoor animation. If you run Stop Motion Pro on a portable laptop computer, both the camera and the computer can run off batteries, but it is always better to have a constant power supply than have to worry about the battery dying right in the middle of your shot. Because we are shooting outside, you will want to set the camera for shooting in daylight. This will ensure that all the colors will come out properly and not appear blue. Daylight has much more blue light in it than indoor tungsten light, and the camera needs to have its sensitivity adjusted accordingly. For the TRV 27, you would open the menu of the camera and select “outdoor” under WHT BAL (white balance). Place the camera on a sturdy tripod, and point it at your subject. In this case, it is a shady part of a driveway. Shady settings are good for video cameras, as the extreme contrast of bright sun is difficult for many video sensors to handle. Shooting in shade or on overcast days is always best if you want to see pleasing detail in the image. The other advantage is that you won’t see the shadows move during long animation sequences.
The final two things we want to do with any animation camera is to prevent it from “helping us.” Just like the web camera, most digital video cameras have automatic focus and exposure that constantly adjusts to create a good picture under changing conditions. The problem with using automatic settings during animation is that the camera might change focus and exposure slightly in between each frame as we animate. The result can be a flickering of exposure and focus, because Stop Motion Pro might grab a frame while the camera is making an automatic adjustment. To eliminate this problem, set both the focus and the exposure to manual, find an ideal focus and exposure setting, and leave them there. If you do that, then nothing will change except the changes you make to your animation.
Animating Actors
For this exercise, we will animate our character riding on her behind (as if she was a car) to enter a garage. Choose a frame rate of 12 frames per second, and be sure to tell your actor that you want him or her to sit on the ground so the actor won’t bring his or her best pair of pants to the shoot. To begin, we will want to animate the garage door opening, and we run into our first problem. You can press the automatic garage door opener and stop the door at any point, but when you press it again, the door will close, defeating your efforts to animate. You can do one of three things:
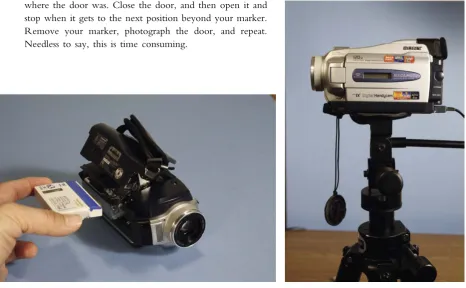
1. Raise the door to the first position and photograph it. Put in a C stand, tripod, or some other pointer that indicates where the door was. Close the door, and then open it and stop when it gets to the next position beyond your marker. Remove your marker, photograph the door, and repeat. Needless to say, this is time consuming.
[image:32.535.38.505.336.624.2]Figure 2.4 If your camera and computer have an iLink or FireWire cable, you can use that connection. Another solution is to use the video out with the Stop Motion Pro Video Adapter.
Figure 2.5 If shooting outside, get a long extension cord for both camera and computer and make a sunshade for the monitor from a cardboard box. Mount your equipment on a roll-around table so you can easily move your setup.
[image:33.535.276.456.80.310.2] [image:33.535.78.257.84.353.2]Figure 2.7 Set the camera white balance for daylight or the outdoor setting. The sun icon should appear. Set your exposure to manual, find a good setting, and leave it alone. This prevents auto exposure fluctuations.
Hooking up a Digital Video Camera to Stop Motion Pro
At this point, we will begin to use video cameras to image our animation. There have been tremendous changes in technology over the years, with many cameras, formats, and cables coming into the mix. With an older camera like this Sony TRV 27, a digital iLink cable was a good choice if you were for-tunate enough to have an iLink connector on your computer. Stop Motion Pro would recognize the signal instantly. As time went by and things became a bit more confusing with different signals and formats, one signal remained constant, and that was the video signal coming out of cameras that allowed you to see the image on your TV set. Because this was stable technology, Stop Motion Pro has come up with a great solution for getting video cameras to talk to computers. In these situations, you can use a converter box called the Stop Motion Pro Video Adapter. All you need do is take the yellow video output from your camera, plug it into the SMP video adapter, and plug the adapter into the USB port of your computer. It’s as easy as that. This system will work for a wide range of cameras and is reliable for Windows XP, Vista 32, Windows 7 32, and Windows 7 64. There will be more on this technology in Chapter 10. The SMP Video Adapter is available on Amazon and can be found in the products page at filmingthefantastic.com.
2. Unplug the automatic door opener and open the door manually bit by bit, locking it in posi-tion for each frame.
3. The fun way is to not care how fast the door opens and just click on the Stop Motion Pro capture button several times in rapid succession as the door is opening. This is not only fast but also captures the blur of the door opening because it will be moving as you are taking the pictures.
All you need do now is direct your actor to pose like he or she is driving and have the actor come down the driveway and move into the garage. The easiest way to direct your actor is to reference the set. In this case, the driveway was made up of several large concrete pads that made a convenient checker-board and alignment grid. There were 10 division lines from the street to the garage door opening. You can instruct your actor to position his or her feet at the division line for each frame and also align the body along another line so that the actor travels straight. Have the actor strike her pose, shoot a frame, and tell her to get up and reposition on the next line. Once she is set, shoot the next frame and continue. Because we are shooting at 12 frames per second, we know we will get to the garage in a little less than 1 second. On the 11th frame, we instruct the actress to turn her body. You can use your hands as a guide for her to position her feet. When she has entered the garage and exited the frame, click away and close the door again. Presto! You’ve done Pixillation.
Flying People
Many pixillated films have images of actors flying through the air. When animating with a film camera, you had to trust your sense of timing as you had the actor jump just as you pressed the camera button. In most cases, the camera operator was able to shoot the actor at the height of the jump. One would never know for sure until the film was processed the next day. Needless to say, this blind procedure can be nerve wracking. Happily, when animating with Stop Motion Pro you can always reference the frame you just shot by pressing the space bar. Use this procedure:
1. On the count of three, have your actor jump as you press the capture button.
2. After you shoot the frame, press the space bar to see the frame you just photographed. If the actor is in the air, “hooray”; you can move on to the next frame. If you didn’t time it right, you will know instantly Figure 2.9 The Capture Settings window comes up, and the
[image:35.535.44.261.82.400.2]Figure 2.11 As a director, you may need to guide your actor using your hands.
Figure 2.12 Animating people is fast and fun.
[image:37.535.45.489.82.397.2]and will be able to take the frame over again. The bad frame can be hidden later, as we will see with the next example.
Flying People Using Multiple Capture
The older method of synchronizing the jump and button push might be anxiety provoking for some anima-tors. For animators who are more editorially driven, there is a way to capture a number of frames at once and then pick the best one later by using the Editor. This method can increase your chances of getting a good frame, as you will be shooting a burst of frames.
When this setting is made Stop Motion Pro will continuously capture eight frames with every button push. The idea is that within those eight frames will be an image that has the figure at the top of the jump. Later on when you use the frame editor, you will “hide” all but the best of the eight frames to create your anima-tion. For this exercise, we
will animate Lucy flying through the closed garage door. So let’s start with the flying:
1. Have the performer stand ready. On the count of three, have the actor jump as you press the button. You will capture eight frames of the actor’s jump.
2. Check the frames you just shot by pressing the space bar and moving along the timeline. You should find a good frame; if not, you can always try again.
Figure 2.15 Click on the Capture button and select perhaps 8 frames for each capture. Click OK.
3. Have the actor walk one step forward and then say, “Ready?” When the actor acknowledges that he or she is ready, repeat step 1.
4. To create the illusion of Lucy flying through the door, all we need do is create one frame that gives a sense of her passing through. In this case, I had her wear a shirt and hat that were removed and pinned to the garage door to make it appear that half of her body went into the door.
Edit the Sequence
After shooting the animation, you can use the editor tool to “hide” the unwanted frames.
The preceding example merely scratches the surface of the editing tool. Using the simple selection process, you can copy and paste frames, cycle animation, cut out mistakes, extend or shorten shots, and do any number of nondestructive editing functions to hone your animation to perfection.
Prepare Your Subject for Animation
If you do a lot of this type of work, your actors will become exhausted
quite quickly. Be sure you have readily available chairs for them to rest in between takes and plenty of water, food, and shade. Jumping up in the air once is a breeze, but doing it 150 times can be pretty rough. The other issue is that props don’t lend themselves easily to animation unless you have special rigs that enable them to be supported. People can hold still, but a flap of clothing or a hat has trouble suspending itself in midair. The good thing is that this type of animation is very forgiving because of its graphic nature. Things can’t help but look herky-jerky because of the imprecision of the process, but it is this lack of precision that lends Pixil-lation its endearing charm. As a result you can get away with murder. If the hat, for example, needs to look like it is falling off the actor’s head in midair, I could use a wire rig but more than likely I would just clamp the hat from behind to the performer’s outstretched arm. This will give the appearance of the hat floating, but in actuality it is clamped from behind and the power of impression will lead the mind’s eye to think it was in the air for a brief moment. In the rock video Point of No Return by Nu Shooz, I had the performers’ shoes unlace themselves and slide off the performers’ feet. It was a simple matter to make a thin slit in the shoelaces and insert aluminium wire inside the fabric of the lace. In this way the shoelace could stand on end and seemingly defy gravity without the use of “hanging” wires.
Figure 2.16 You can tape or pin clothing to the wall to create a special animation frame that gives the sense that a character has gone through the wall.
[image:39.535.346.493.337.397.2]More Ideas
[image:40.535.44.493.84.353.2]In the book Experimental Animation, an illustrated anthol-ogy by Robert Russett and Cecile Starr (1976, Litton Educational Publishing, p. 126), McClaren wrote of his techniques:
Figure 2.19 Click on the Hide button and all the frames you highlighted will have a diagonal line applied to them indicating that they will be ignored in playback. Note that the frames are ignored (i.e., hidden and not deleted). If you should change your mind, you can quickly go back and “unhide” any frames you want to.
Figure 2.18 You now see every frame that you photographed as a thumbnail image. Use the left mouse button and click on the first frame you want to hide. Hold down the shift key and select the last frame you want to hide. The entire row will light up. Click on the actions arrow to open that control panel.
[image:40.535.45.238.422.530.2]Figure 2.20 Choose the frames you want to hide, and then close the edit window to view your finished sequence, or you can select the Preview option to see a thumbnail playback of your edited sequence before exiting the editor.
Figure 2.21 The edited sequence showing Lucy vanishing into the wall. Although the pinned clothing looks odd as a single frame, it creates a convincing illusion when the sequence runs at speed. Improvements could be made by using the toggle function and perhaps repositioning the pinned clothing to better align with the height of the last frame of Lucy.
[image:41.535.47.488.196.397.2]Many rock videos have built upon McClaren’s ideas to create novel movement in performances, such as the Eurythmic’s video Missionary Man. The performer performs to a slow playback of the music and then is speeded up to normal speed to generate bizarre movement. You can experiment with tempo control by using the Time Lapse tool in Stop Motion Pro and shooting at 1 frame a second. Have the performer perform 12 times slower (for a 12-frames-per-second rate). In other words, if the intent is to have the performer stretch out his arm in 1 second, it would normally take 12 frames or 1 second. If you shoot at 1 frame per second with the Time Lapse tool, the performer would slow down his movement and stretch out his arm in 12 seconds. If a performer performs
this movement slowly yet in the middle of the performance makes a sudden movement, it will create a startling effect when speeded up. The possibilities are endless and the results are loads of fun.
Summary
1. George Méliès (a stage magician) was one of the first to discover that you could create effects and ani-mation by manipulating subjects in between exposures. Méliès’s landmark film A Trip to the Moon is a testament to this pioneering genius.
2. F.W. Murnau’s film Nosferatu, made in 1922, made use of early stop motion in the ocean voyage sequence. The film was nearly lost because of reckless copyright infringement.
3. Pixillation is defined as the animation of live subjects as opposed to pixelation, which is a visual artifact involving digital pixels.
4. Norman McClaren of the National Film Board of Canada made use of pixillation in his Academy Award–winning film Neighbours in 1952.
5. For outdoor shoots, it would be best to use a power supply for the camera and the computer rather than to depend on a battery during a long animation shoot.
6. Mount your camera on a sturdy tripod that will prevent unwanted movement of the camera. very slow movement, up to normal speed. The tempo
of the actor’s behavior and the tempo of the camera’s shooting were therefore adjusted to any desired ratio, depending on the final desired effect, and the speed at which it would be easiest for the actor to achieve his point. For instance, if the actors moved half as slow as normal (twelve frames per second), the final screen speed would appear normal but, in the process of shoot-ing, a tempo-control factor of two had entered in and the actor, by performing at speeds between half-normal and normal, had available a range of final screen speeds ranging from normal to twice normal. The concept of a tempo-control factor proved to be a useful one.
[image:42.535.309.491.80.307.2]7. When setting up a video camera for Stop Motion Pro animation, it is important to disable all automatic functions such as auto exposure and auto focus to prevent fluctuations in the animation sequence. 8. It is important to set the sensitivity of the camera for the light source used to image the subject. If
outside, you should choose the sun icon or technically the color temperature of 5500 degrees Kelvin. If shooting with tungsten lighting or 3200 degrees Kelvin, you should choose the lightbulb icon. For more on color temperature, refer to Chapter 5 of Filming the Fantastic from Focal Press.
9. Because pixillation is demanding on your actors, make sure they have a place to rest and plenty of water and refreshments.
10. When shooting flying people animations, you will need to synchronize the jump of the actor and the button push of the Stop Motion Pro operator so that the image is captured at the height of the jump. 11. You can shoot multiple frames during a single button push to “oversample” if you wish to use editing
to find the best frame.
12. Having the performers move in one-footstep increments is a good start for a simple pixillation exercise. As you learn more about animation you will be able to refine the movements of your actors for even more professional results.
Films to See
Chapter 3
Animate Objects
As we learned from the previous chapter, animation in the real world can be challenging when it comes to gravity. With pixillation, we have the advantage of our subjects being able to move and jump for us to create the illusion of flight. Inanimate objects such as office tools, kitchen utensils, and the like will need to be supported and modified in various ways to prepare them to defy gravity. Let’s explore several approaches for preparing everyday objects for animation.
Modifying Objects for Animation
I have noticed that when I have invited people to animate a little Lego dump truck using Stop Motion Pro at conventions, neophyte animators have no trouble pushing the truck along to generate forward motion but inevitably get disappointed when trying to raise the shovel. In their mind’s eye, they can envision the shovel raising but when they attempt to make that happen through animation, two things occur:
1. The shovel pivots on loose hinges and won’t stay put when raised.
2. If the shovel can be held in place by some last-minute means such as with the use of tape, the shovel creates a weight imbalance and the rear of the truck tips upward.
Our little Lego dump truck is a wonderful toy, but it needs to be modified or rigged to make it useful for animation. In this case, I needed to rig something quickly and came up with two simple solutions. Because the shovel was on a loose hinge and I did not have time to create a stiff hinge from scratch, I gave the exist-ing hexist-inge some resistance by placexist-ing rubber bands around the arms of the shovel, thereby pinchexist-ing them in creating tension on the loose hinge. Because I did this, the shovel could be moved upward and stay in posi-tion. The camera would see these rubber bands, but for the purposes of demonstration this solution was perfect. To solve the second problem of weight imbalance, I chose to advise the animators to take a lump of clay and affix the far tires (out of sight of the camera) to the floor. The lumps of clay were hidden by the toy and