Editing and Refactoring Code
Copyright© 2005 Sun Microsystems, Inc. All rights reserved.
Table of Contents
Opening the Source Editor...2
Managing Automatic Insertion of Closing Characters...3
Finishing a Statement...3
Splitting a String Between Two Lines...3
Displaying Line Numbers...4
Generating Code Snippets...4
Completing Java Statements...4
Disabling Automatic Appearance of the Java Code Completion Box...6
Changing Shortcuts for Code Completion...6
Matching Other Words in the File...7
Generating Methods to Override From Extended Classes...7
Generating Methods From Implemented Interfaces...8
Generating Read/Write Properties...8
Expanding Abbreviations...9
Adding, Changing, and Removing Abbreviations...11
Creating and Using Macros...11
Creating and Customizing File Templates...12
Handling Imports...13
Displaying Javadoc Documentation While Editing...14
Formatting Code...14
Indenting Blocks of Code Manually...15
Changing Formatting Rules...15
Changing Fonts and Colors...16
Text Selection Shortcuts...17
Navigating Within the Current Java File...18
Viewing and Navigating Members of a Class... 18
Moving the Insertion Point and Scrolling the Window...19
Bookmarking Lines of Code...20
Hiding Sections of Code...20
Navigating From the Source Editor...21
Switching Between Open Files...21
Jumping to Related Code and Documentation...21
Jumping Between Areas Where You Have Been Working...21
Jumping From the Source Editor to a File's Node...22
Searching and Replacing...22
Finding Occurrences of the Currently Selected Class, Method, or Field Name... 22
Renaming All Occurrences of the Currently Selected Class, Method, or Field Name...23
Searching and Replacing Combinations of Characters in a File... 24
Other File Searches...25
Moving a Class to a Different Package...26
Changing a Method's Signature...28
Refactoring Commands...28
Tracking Notes to Yourself in Your Code...29
Adding, Removing and Changing Task List Tags...30
Displaying Tasks By Priority...30
Filtering Task List Entries...31
Comparing Differences Between Two Files...31
Maximizing Space For the Source Editor...32
Changing Source Editor Keyboard Shortcuts...32
Building Rich Clients with NetBeans...33
Layout Managers...34
Designing a Form With GridBagLayout...35
Limitations of GridBagLayout...37
An Example Using GridBagLayout...37
Specifying Component Behavior and Appearance...41
Generating Event Listening and Handling Methods...42
Customizing Generated Code...44
NetBeans IDE provides a lot of tools to support Java application development, but it's the Source Editor where you will spend most of your time. Given that fact, a lot of attention has been put into features and subtle touches to make coding faster and more pleasurable.
Code generation and navigation features are available with keyboard shortcuts so that your hands rarely have to stray from the keyboard. Refactoring features enable you to make changes to the structure of your code and have those changes propagated throughout your project. In
addition, there are a wide range of simple shortcuts for file navigation that, taken together, make coding much smoother.
Architecturally, the Source Editor is actually a collection of different types of editors, each of which contains features specific to certain kinds of files. For example, when you open up a Java file, there is a syntax highlighting scheme specifically for Java files, along with code completion, refactoring, and other features specific to Java files. Likewise, when you open up JSP, HTML, XML, .properties, deployment descriptor, and other types of files, you get a set of features specific to those files.
Perhaps most importantly, the Source Editor is tightly integrated with other parts of the IDE, which greatly streamlines your workflow. For example, you can specify breakpoints directly in the Source Editor and trace code as it executes. When compilation errors are reported in the Output window, you can jump to the source of those errors by double-clicking the error or pressing F12.
Opening the Source Editor
Before you start working in the Source Editor, you should have an IDE project set up. You can then open an existing file or create a new file from template. See Chapter 3 for basic information on creating projects and files and a description of the various file templates.
If you would like to simply create a file without immediately making it part of a project, you can use the Favorites window. The Favorites window enables you to make arbitrary folders and files on you system accessible through the IDE. The Favorites window is not designed for full-scale project development, but it can be useful if you just want to quickly open and edit a few files.
To use the Source Editor without creating a project:
1. Choose Window | Favorites to open up the Favorites window.
2. Add the folder where you want the file to live (or where it already lives) by right-clicking the Favorites node and choosing Add To Favorites and choosing the folder from the file chooser.
If you want to create a new file, right-click a folder node and choose New | Empty File and enter a file name (including extension).
Managing Automatic Insertion of Closing Characters
When typing in the Source Editor, one of the first things that you will notice is that the closing characters are automatically inserted when you typing the opening character. For example, if you type a quote mark, the closing quote mark is inserted at the end of the line. Likewise, parentheses(()), brackets ({]), and curly braces ({}) are also completed for you.
While this might seem annoying at first, the feature was designed to not get in your way. If you type the closing character yourself, the automatically inserted character is overwritten. Also, you can end a line by typing a semicolon (;) to finish a statement. The semicolon is inserted at the end of the line after the automatically generated character or characters.
See the following sub-topics for information on how to use the insertion of matching closing characters.
Finishing a Statement
When the Source Editor inserts matching characters at the end of the line, this would appear to force you to manually move the insertion point past the closing character before you can type the semicolon. In fact, you can just type the semicolon without moving the insertion point and it will be placed at the end of the the line automatically.
For example, to get the line:
System.out.println("Testing");
you would only have to type:
System.out.println("Testing;
Splitting a String Between Two Lines
If you have a long string that you want to split between two lines, the Source Editor adds the syntax for concatenating the string when you press Enter.
For example, to get the lines:
String s = "Though typing can seem tedious, reading long" + "and convoluted sentences can be even worse."
you could type
String s = "Though typing can seem tedious, reading long and convoluted sentences can be even worse.
The final three quote marks and the plus sign (+) are added for you.
If you want to break the line without creating the concatenation, press Shift-Enter.
NetBeans IDE Tip
line to type the semicolon. One way to get around this might be to create an abbreviation or macro for the code that contains the string to generate the semicolon and to place the insertion point between the quote marks.
Displaying Line Numbers
By default, line numbers are switched off in the Source Editor to save space and reduce visual clutter. If you need the line numbers, you can turn them on by right-clicking in the left gutter of the Source Editor and choosing Show Line Numbers as shown in Figure 4-1. Figure 4-1
Activating Line Numbers
Generating Code Snippets
The Source Editor has several features for reducing the keystrokes needed for typing code. In addition to saving keystrokes, these features might save typos and help you find the right class and method names. This section concentrates on features for Java files, but many of the features (such as code code completion and word matching) are also available for other types of files, such as JSP and HTML files.
Completing Java Statements
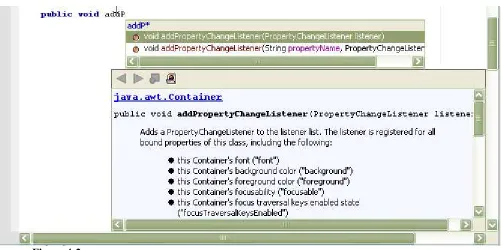
Figure 4-2
Code Completion dialog box with accompanying Javadoc popup. To open the code completion box, do one of the following:
• Type the first few characters of an expression and then press Ctrl-Space (or Ctrl-\).
• Pause after typing a period (.) in an expression.
• Type the new or import keyword, type a space, and then pause for a moment.
The code completion box opens with a selection of possible matches for what you have typed so far.
To narrow the selection in the code completion box, continue typing the expression. To complete the expression and close the code completion box, do one of the following:
• Continue typing until there is only one option left and press Enter.
• Scroll through the list using the arrow keys or your mouse to select a value and then press Enter.
To complete the expression and leave the code completion box open, select a completion and press Shift-Enter. This is useful if you are chaining methods. For example, if you want to type:
getRootPane().setDefaultButton(defaultButton)
you might do the following:
1. Type getRo (which would leave only getRootPane() in the code completion box) and press Shift-Enter.
2. Type .setDef (which should make setDefaultButton
(defaultButton) the selected method in the code completion box) and press Enter.
If the method that you choose in the completion box has a parameter (like in the example above), a placeholder parameter is inserted. You can type over this placeholder with the parameter name that you want to use. If the method takes multiple parameters, the a placeholder for the first parameter is generated. When you enter a value and then a comma, a placeholder for the next value is entered.
Once you have finished typing parameter values, type a semicolon (;) to end the line. The semicolon is automatically inserted after the closing parenthesis.
To fill in text that is common to all of the remaining choices, press Tab. For example, if you are working on a Swing class and you have typed addW, there will be three listener methods beginning with addWindow. Press Tab to extend addW to addWindow. Then type the next letter (F for addWindowFocusListener(l), L for addWindowListener(l), or S for
addWindowStateListener(l)) and press Enter to complete the expression. To close the code completion box without entering any selection, press Esc.
Disabling Automatic Appearance of the Java Code Completion Box
If you find the code completion box to be more of a nuisance than a help, you can disable automatic appearance of the code completion popup. Code completion will still work if you manually activate it by pressing Ctrl-Space or Ctrl-\.
You can also leave automatic appearance of the code completion popup enabled, but disable the bulkier Javadoc code completion dialog box. The Javadoc popup can be manually invoked with Ctrl-Shift-Space.
To disable automatic appearance of the code completion box:
1. Choose Tools | Options, expand the Editor | Editor Settings settings node, and select the Java Editor node.
2. Scroll down to the Expert section of the property sheet and deselect the Auto Popup Completion Window property.
To disable automatic appearance of the Javadoc popup when you use code completion box: 1. Choose Tools | Options, expand the Editor | Editor Settings settings node, and
select the Java Editor node.
2. Deselect the Auto Popup Javadoc Window property.
NetBeans IDE Tip
You can also merely adjust the amount of time elapses before the completion box appears. By default, the delay is 500 milliseconds. You can change this value in the Delay of Completion Window Auto Popup property.
Changing Shortcuts for Code Completion
If you prefer to use different shortcuts for code completion, you can change those shortcuts in NetBeans IDE.
1. Choose Tools | Options and select the Editor | Editor Settings settings node. 2. Click the button in the Global Key Bindings property to open the Global
3. Select a key binding that you want to change, click Add, and type the shortcut that you want to use.
Relevant commands are Show Code Completion, Hide Code Completion, and Show the Javadoc Window.
Matching Other Words in the File
If you are typing a word that appears elsewhere in your file, you can use a keyboard shortcut to complete that word according to the first word found in the Source Editor that matches the characters you have typed. This word match feature works for any text in the file.
To search backwards from the cursor for a match, press Ctrl-K. To search forwards from the cursor for a match, press Ctrl-L.
For example, if you have defined the method refreshCustomerInfo on line 100 and now
want to call that method from line 50, you can type ref and then press Ctrl-L. If there are no
other words that start with ref between lines 50 and 100, the rest of the word
refreshCustomerInfo will be filled in. If a different match is found, keep pressing Ctrl-L until the match that you want is filled in.
Generating Methods to Override From Extended Classes
When you extend a class, you have the extended methods available to override. To make overriding the classes easier, you can generate the methods to be overridden in your new class and then modify the methods in your class.
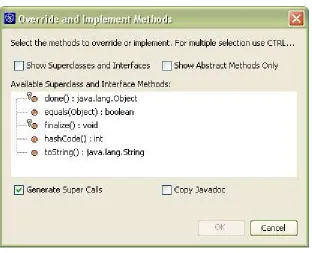
To have methods that are to be overridden inserted into your code: 1. Choose Tools | Override Methods or press Ctrl-I.
2. In the Override Methods dialog box (as shown in Figure 4-3), select the methods to be overridden. You can Ctrl-click items to select multiple methods.
Figure 4-3
Override and Implement Methods dialog box
Generating Methods From Implemented Interfaces
When you create a class that implements an interface, you can use the IDE's Synchronize feature to generate that interface's methods in the class.
To generate methods in a class that implements an interface:
1. In your class declaration, type implements InterfaceName. 2. Choose Tools | Synchronize.
The Synchronize dialog box appears and enables you to specify which of the interfaces you want to generate methods for.
NetBeans IDE Tip
You can also have the IDE automatically prompt you to generate a methods interfaces after you declare that a class implements an interface. Choose Tools | Options. Expand Editing | Java Sources and select the Source Synchronization node. In the Properties pane of the window, select the Synchronization Enabled checkbox.
Generating Read/Write Properties
You can generate properties in accordance with the JavaBeans component model from scratch or you can use use the Encapsulate Fields feature to create a getter and setter for an already existing field.
To create a read-write property from scratch:
1. In the Project window, expand the file's node and then the class ( ) node. 2. Right-click the Bean Patterns node and choose Add | Property.
After you click OK, a field along with get and set methods for that field are generated.
To provide accessor methods for a given field:
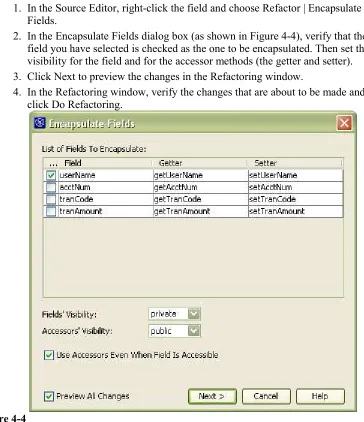
1. In the Source Editor, right-click the field and choose Refactor | Encapsulate Fields.
2. In the Encapsulate Fields dialog box (as shown in Figure 4-4), verify that the field you have selected is checked as the one to be encapsulated. Then set the visibility for the field and for the accessor methods (the getter and setter). 3. Click Next to preview the changes in the Refactoring window.
[image:9.612.113.477.117.539.2]4. In the Refactoring window, verify the changes that are about to be made and click Do Refactoring.
Figure 4-4
Encapsulate Fields dialog box
NetBeans IDE Tip
The Encapsulate Fields is one of several “refactoring” commands in the IDE. Refactoring commands provide a way for you to make naming and structural changes and have those changes reflected in the rest of your project. See Refactoring Commands on page XXX for a summary of the refactoring commands.
Expanding Abbreviations
If an abbreviation is the same as a text that you want to type (i.e. you do not want it to be expanded into something else), press Shift-Space to keep it from expanding.
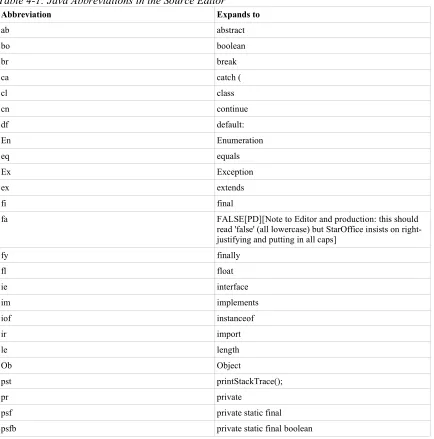
See Table 4-1 for a list of abbreviations for Java files. There are also abbreviations set for JSP files (see Chapter 5: Expanding Abbreviations for JSP Files).
NetBeans IDE Tip
[image:10.612.92.526.270.709.2]In the expansion of some of your abbreviations, it might be desirable to have the insertion point rest somewhere in the middle of the text. For example, the insertion point appears between the quote marks when sout is expanded to System.out.println(“”); so that you can then type the string to be printed without having to move the cursor. Use the pipe (|) character in the Expansion field of the abbreviation to mark where the insertion point should appear when the abbreviation is expanded.
Table 4-1: Java Abbreviations in the Source Editor
Abbreviation Expands to
ab abstract
bo boolean
br break
ca catch (
cl class
cn continue
df default:
En Enumeration
eq equals
Ex Exception
ex extends
fi final
fa FALSE[PD][Note to Editor and production: this should
read 'false' (all lowercase) but StarOffice insists on right-justifying and putting in all caps]
fy finally
fl float
ie interface
im implements
iof instanceof
ir import
le length
Ob Object
pst printStackTrace();
pr private
psf private static final
Abbreviation Expands to
psfi private static final int
psfs private static final String
pe protected
pu public
Psf public static final
Psfb public static final boolean
Psfi public static final int
Psfs public static final String
re return
st static
St String
serr System.err.println(“|”);
sout System.out.println(“|”);
sw switch {
sy synchronized
tds Thread.dumpStack();
tw throw
twn throw new
th throws
wh while (
Adding, Changing, and Removing Abbreviations
You can modify existing abbreviations (both the abbreviation and the expansion), create new ones, and delete abbreviations in the Abbreviations dialog box for a type of file.
1. Choose Tools | Options, expand the Editing | Editor Settings node, and select the node for type of editor you want to modify abbreviations for.
2. Click the button in the Abbreviations property to open the Abbreviations property editor.
3. Use the Add, Edit, and Remove buttons to modify the list of abbreviations.
Creating and Using Macros
You can record macros in the IDE to reduce what would normally involve a long set of keystrokes to one keyboard shortcut. In macros, you can combine the typing of characters in the Source Editor and the typing of other keyboard shortcuts.
To record a macro:
1. Put the insertion point in the part of a file in the Source Editor where you want to record the macro.
3. Record the macro using any sequence of keystrokes, whether it is the typing of characters or using keyboard shortcuts. Mouse movements and clicks (such as menu selections) are not recorded.
4. Click the in the Source Editor's toolbar (or press Ctrl-J and then type e) to
finish recording.
5. In the Recorded Macro dialog box that appears, click Add to assign a keyboard shortcut to the macro.
6. In the Add Keybinding dialog box, press the keys that you want to use for the keyboard shortcut. (For example, if you want the shortcut Alt-Shift-Z, press the Alt, Shift, and Z keys.) If you press a wrong key, click the Clear button to start over.
Be careful not to use a shortcut that is already assigned. If the shortcut you enter is an editor shortcut, a warning appears in the dialog box, but if the key combination is a shortcut that applies outside of the Source Editor, you will not be warned.
Any macro that you record works only for the type of file that you recorded it in.
NetBeans IDE Tip
After you have recorded a macro, you can edit it by hand in the Recorded Macro dialog box.
The keyboard shortcuts that you include in a macro are indicated by their action names. You can get a list of these action names in the Key
Bindings dialog box for the particular editor type, which you use when you assign or edit keyboard shortcuts.
Creating and Customizing File Templates
You can customize the templates that you create files from in the IDE and create your own templates. This might be useful if you need to add standard elements in all of your files (such as copyright notices) or want to change the way other elements are generated.
You can also create your own templates and make them available in the New File wizard. There are several macros available for use in templates to dynamically generate text in the created files. These macros are identifiable by the double underscores that appear both before and after the macro name. See Table 4-2 for a list of the macros available.
To edit a template:
1. Choose Tools | Options and expand the Source Creation and Management | Templates node and then expand the category node for the template that you want to edit.
2. Right-click the template's node and choose Open. 3. Edit the template and then save it.
NetBeans IDE Tip
Not all of the templates listed under Source Creation and Management | Templates node represent objects that can be modified at the user level. In some cases, the templates are available in the New File wizard but do not represent file constructs (e.g. those in the Enterprise and Sun
Resources categories). In others, the templates not related to file creation at all are exposed (such as those in the Filesystems and Privileged categories).
1. Choose File | New File and select the template that you want to base your new template on.
2. Edit the file, incorporating any of the template macros that you want to use (see Table 4-2), and save it.
If the template is for a Java class, you can use the file name for the class name and constructor name. These are automatically adjusted in the files you create from the template.
3. In the Projects window, right-click the file's node and choose Save As Template from the contextual menu.
[image:13.612.89.522.233.544.2]4. In the Save As Template dialog box, select the category to be used for the template in the New File wizard.
Table 4-2: Java File Template Macros
Macro Substituted Information
__USER__ Your user name. If you would like to change the value of __USER__, Choose Tools | Options and select the Editing | Java Sources node. Then the click button in the Strings Table property and change the value of USER.
__DATE__ The date the new file is created.
__TIME__ The time the new file is created.
__NAME__ The name of the class (without the file extension). It is best not to use this macro for class and constructor name in the file (instead use the file name).
__PACKAGE__ The name of the package where the class is created.
__PACKAGE_SLASHES__ The name of the class's package with slash (/) delimiters instead of periods (.).
__PACKAGE_AND_NAME__ The fully-qualified name of the file (e.g. com.mydomain.mypackage.MyClass).
__PACKAGE_AND_NAME_SLASHES__ The fully-qualified name of the file with slash (/) delimiters instead of periods (.).
__QUOTES__ A double quote mark ("). Use this macro if you want the substituted text to appear in quotes in the generated file. If you place a macro within quote marks in the template, text is not substituted for the macro name in the created file.
Handling Imports
The IDE has a pair of commands that you can use to manage import statements in your code. • Fix Imports (Alt-Shift-F), which automatically inserts any missing import
statements for the whole file. Import statements are generated by class (rather than by package). For rapid management of your imports, use this command. • Fast Import (Alt-Shift-I), which enables you to add an import statement or
This command is useful if you want to generate an import statement for a whole package or if you want to use a fully-qualified class name inline instead of an import statement.
Displaying Javadoc Documentation While Editing
The IDE gives you a few ways to access documentation for JDK and library classes. To glance at documentation for the currently selected class in the Source Editor, press Ctrl-Shift-Space. A popup window appears with the Javadoc documentation for the class. This popup also appears when you use code completion. You can dismiss the popup by clicking outside of the popup.
To open a web browser on documentation for the selected class, right-click the class and choose Show Javadoc (or press Alt-F1).
To open the index page for a library's documentation in a web browser, choose View | Documentation Indices and choose the index from the submenu.
NetBeans IDE Tip
Documentation for some libraries is bundled with the IDE. However, you might need to register the documentation for other libraries in the IDE for the Javadoc features to work. See Chapter 3, Making External Sources and Javadoc Available in the IDE for more information.
Paradoxically, JDK documentation is available through a popup in the Source Editor but not through a browser by default. This is because the Javadoc popup in the Source Editor picks up the documentation from the sources that are included with JDK. However, the browser view of the documentation requires compiled Javadoc documentation, which you have to download separately from the JDK.
Formatting Code
When you type or have code generated in the Source Editor, your Java code is automatically formatted in the following ways by default:
• Members of classes are indented four spaces. • Continued statements are indented eight spaces. • Any tabs that you enter are converted to spaces.
• When you are in a block comment (starting with /**), an asterisk is automatically added to the new line when you press Enter.
• The opening curly brace is put on the same line as the declaration of the class or method.
• No space is put before an opening parenthesis.
Indenting Blocks of Code Manually
You can select multiple lines of code and then indent all of those lines by pressing Tab or Ctrl-T.
You can reverse indentation by selecting some lines and then pressing Shift-Tab or Ctrl-D.
Changing Formatting Rules
You can adjust the way your files are formatted using so-called indentation engines, which hold settings for number of spaces, placement of curly braces, etc. By default, all Java files uses the Java indentation engine. You can modify this indentation engine, set up Java files to use a different one, or create a new one entirely.
To adjust formatting rules for Java files: 1. Choose Tools | Options.
2. Expand Editing | Indentation Engines and select the Java Indentation Engine node.
3. Adjust the properties for the indentation engine to your taste.
4. Reformat each file to the new rules by opening the file and pressing Ctrl-Shift-F (with no text selected).
There are other preset indentation engines available, both generic (such as the “simple” and “line wrapping” indentation engines) and for other types of files (notably for JSP, HTML, and XML files).
To change the indentation engine that is used for Java files: 1. Choose Tools | Options.
2. Expand Editing | Editor Settings and select the Java Editor node.
3. Select the indentation engine from the Indentation Engine property's combo box.
4. Reformat each file to the new rules by opening the file and pressing Ctrl-Shift-F (with no text selected).
To create a new indentation engine: 1. Choose Tools | Options.
2. Expand Editing | Indentation Engines, right-click the node for the indentation engine you want to base your new indentation engine on, and choose Copy. 3. Right-click the Indentation Engines node and choose Paste | Copy.
4. Modify the name of the indentation inline and adjust the properties to your taste.
5. In the Options dialog box, expand Editing | Editor Settings and select the node for the editor (e.g. Java Editor or HTML Editor) that you want the indentation engine to apply to.
NetBeans IDE Tip
Changing Fonts and Colors
You can adjust the fonts that are used in the Source Editor and the way colors and background highlighting are used to represent syntactic elements of your code.
Fonts and colors are determined by the type of file that you are editing, so any adjustments that you make are per type of file.
To change font size for an editor type: 1. Choose Tools | Options.
2. Expand Editing | Editor Settings and select the node for the editor type (e.g. Java Editor or HTML Editor).
3. Change the Font Size property.
To change the color and highlighting scheme for a type of file: 1. Choose Tools | Options.
2. Expand Editing | Editor Settings and select the node for the editor type (e.g. Java Editor or HTML Editor).
3. Click the button in the Fonts and Colors property.
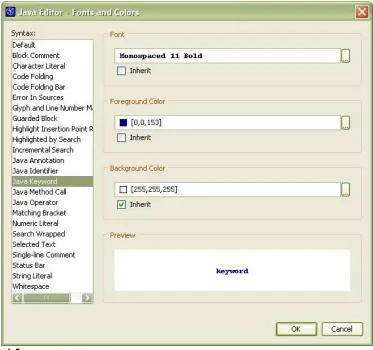
4. In the Fonts and Colors dialog box (as shown in Figure 4-5), select an item from the Syntax column.
5. Change the scheme for that syntax element in the Font, Foreground Color, and Background Color fields. You can enter the values directly or click the
Figure 4-5
Fonts and Colors dialog box for Java Editor
Text Selection Shortcuts
To enable you to keep both hands on the keyboard, there are a number of shortcuts that enable you to select text, deselect text, and change the text that is selected. See Table 4-3 for a selection of these shortcuts. Table 4-3 Text Selection Shortcuts
Description Shortcut
Select the current identifier or other word that the insertion point is on. Alt-J Selects all the text between a set of parentheses, brackets, or curly braces. The insertion point must be resting immediately after either the opening or closing parenthesis/bracket/brace.
Ctrl-Shift-[
Selects the next (previous) character or extends the selection one character. Shift-Right (Shift-Left)
Selects the next (previous) word or extends the selection one word. Ctrl-Shift-Right (Ctrl-Shift-Left) Creates or extends the text selection one line down (up). Shift-Down (Shift-Up)
Creates or extends the text selection to the end (beginning) of the line. Shift-End (Shift-Home)
Navigating Within the Current Java File
The IDE provides several mechanisms to make it easier to view and navigate a given Java file:
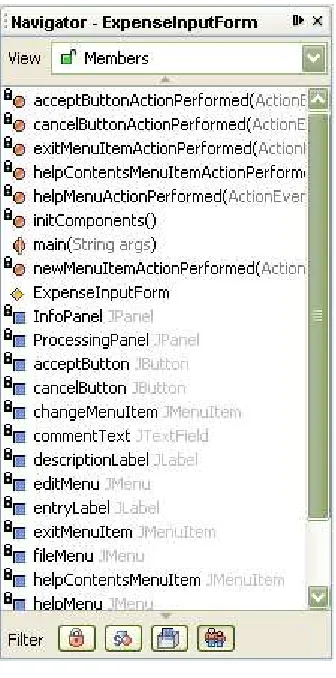
• The Navigator window, which appears below the Projects window and provides a list of members (i.e. constructors, fields, and methods) in the currently selected Java file.
• Bookmarks, which enable you to easily jump back to specific places in the file.
• The Alt-K and Alt-L “jump list” shortcuts mentioned in Jumping Between Areas Where You Have Been Working on page XXX.
• Keyboard shortcuts to scroll the window. See Table 4-4.
• The code folding feature, which enables you to collapse sections of code (such as method bodies, Javadoc comments, and blocks of import statements) thus making a broader section of your class visible in the window at a given time.
Viewing and Navigating Members of a Class
Figure 4-6
Navigator window.
You can use the filter buttons in the bottom of the window to hide non-public members, static members, fields, and/or inherited members.
Moving the Insertion Point and Scrolling the Window
[image:19.612.91.524.556.720.2]There are a wide range of shortcuts that you can use for moving the insertion point around and scrolling the Source Editor without moving the insertion point. See Table 4-4 for a list of some of the more useful file navigation shortcuts.
Table 4-4: Cursor and Scrolling Shortcuts
Description Shortcut
Moves the insertion point to the next word (previous word). Ctrl-Right (Ctrl-Left) Moves the insertion point to the top (bottom) of the file. Ctrl-Home (Ctrl-End) Scrolls up (down) without moving the insertion point. Ctrl-Up (Ctrl-Down) Scrolls the window so that the current line moves to the top of the window. Alt-U, then T Scrolls the window so that the current line moves to the middle of the
window. Alt-U, then M
Scrolls the window so that the current line moves to the bottom of the
window. Alt-U, then B
Moves the insertion point to the parenthesis, bracket, or curly brace that
Bookmarking Lines of Code
You can set bookmarks in files to make it easy to find an area of the file that you are working with a lot. You can then cycle through the file's bookmarks by pressing F2.
To bookmark a line in a file, click in the line and press Ctrl-F2. To remove a bookmark, also use Ctrl-F2.
Hiding Sections of Code
You can collapse (or “fold”) low-level details of code so that only one line of that block is visible in the Source Editor, leaving more room to view other lines. Methods, inner classes, import blocks, and Javadoc comments are all foldable.
Figure 4-7
Examples of expanded and folded code in the Source Editor
Collapsible blocks of code are marked with the icon in the left margin next to the first line of the block. The rest of the block is marked with a vertical line that extends down from the icon. Collapsed blocks are marked with the icon. You can click one of these icons to fold or expand the particular block that it represents. See Figure 4.7 for an example.
[image:20.612.89.525.424.569.2]You can also collapse and expand single or multiple blocks of code with keyboard shortcuts and menu items in the Edit | Code Folds menu and the Code Folds submenu in the Source Editor. See Table 4-5 for a list of these commands and shortcuts.
Table 4-5: Code Folding Commands
Command Shortcut
Collapse Fold Ctrl-NumPad-Minus
Expand Fold Ctrl-NumPad-Plus
Collapse All Ctrl-Shift-NumPad-Minus
Expand All Ctrl-Shift-NumPad-Plus
Collapse All Javadoc [none]
Expand All Javadoc [none]
Collapse All Java Code [collapses everything except Javadoc documentation] [none] Expand All Java Code [expands everything except Javadoc documentation] [none]
By default, no code is folded. You can configure the Source Editor to fold code by default when you create a file or open a previously unopened file.
To configure the IDE to automatically fold certain elements of code:
1. Choose Tools | Options and select the Editing | Editor Settings | Java Editor node.
3. Select the checkbox for any of the code elements that you would like to be folded by default (method, inner class, import, Javadoc comment, initial comment).
Navigating From the Source Editor
The IDE includes handy shortcuts for navigating among files, different bits of code, and different windows. The more of these shortcuts that you can incorporate into your workflow, the less your fingers will have to stray from your keyboard to your mouse.
Switching Between Open Files
You can switch between open files with the Alt-Left and Alt-Right keyboard shortcuts.
Jumping to Related Code and Documentation
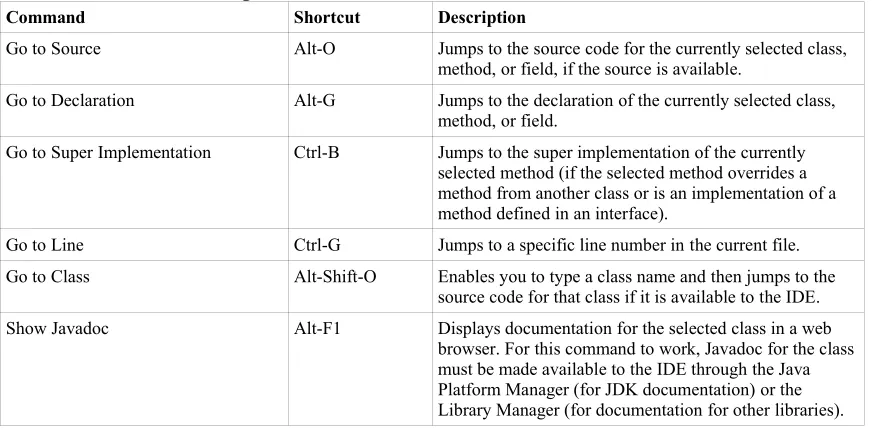
[image:21.612.90.526.357.572.2]The shortcuts in Table 4.6 enable you to jump to parts of the current file or other files that are relevant to the selected identifier. The first five of these shortcuts are available from the Edit menu and the Go To submenu of the Source Editor's contextual (right-click) menu. The Show Javadoc command is available straight from the Source Editor's contextual menu.
Table 4-6: Java Class Navigation Shortcuts
Command Shortcut Description
Go to Source Alt-O Jumps to the source code for the currently selected class, method, or field, if the source is available.
Go to Declaration Alt-G Jumps to the declaration of the currently selected class, method, or field.
Go to Super Implementation Ctrl-B Jumps to the super implementation of the currently selected method (if the selected method overrides a method from another class or is an implementation of a method defined in an interface).
Go to Line Ctrl-G Jumps to a specific line number in the current file. Go to Class Alt-Shift-O Enables you to type a class name and then jumps to the
source code for that class if it is available to the IDE. Show Javadoc Alt-F1 Displays documentation for the selected class in a web
browser. For this command to work, Javadoc for the class must be made available to the IDE through the Java Platform Manager (for JDK documentation) or the Library Manager (for documentation for other libraries).
Jumping Between Areas Where You Have Been Working
When you are working on multiple files at once or in different areas of the same file, you can use the “jump list” shortcuts to navigate directly to areas where you have been working instead of scrolling and/or switching windows. The “jump list” is essentially a history of lines where you have done work in the Source Editor.
Jumping From the Source Editor to a File's Node
When you are typing in the Source Editor, you can jump to the node that represents the current file in other windows. This can be useful, for example, if you want to quickly navigate to another file in the same package or you want to browse versioning information for the current file.
[image:22.612.93.515.163.237.2]See Table 4-7 for a list of available shortcuts.
Table 4-7: Shortcuts for Selecting the Current File in a Different Window
Command Shortcut
Select the node for the current file in the Projects window. Ctrl-Shift-1 Select the node for the current file in the Files window. Ctrl-Shift-2 Select the node for the current file in the Favorites window. Ctrl-Shift-3
Searching and Replacing
There are several types of searches in the IDE for different needs. You can:
• Find and replace names of classes, methods, and fields in your project using the Find Usages command.
• Find and replace specific character combinations in an open file by pressing Ctrl-F in the file.
• Find files that match search criteria based on characters in the file, characters in the file name, file type, date, and/or version control status by right-clicking a folder or project node in the Projects window and choosing Find (or by pressing Ctrl-F).
Finding Occurrences of the Currently Selected Class, Method, or Field Name
When you are working in the Source Editor, you can quickly find out where a given Java identifier is used in your project using the Find Usages command. The Find Usages improves upon a typical Find command by being sensitive to the relevance of text in the Java language context.
The Find Usage command output displays lines in your project that contain: • a declaration of the class, interface, method, or field.
• (for classes and interfaces) a declaration of a method or variable of the class or interface.
• (for classes and interfaces) a usage of the type, such as at the creation of a new instance, importing a class, extending a class, implementing an interface, casting a type, or throwing an exception.
• (for classes and interfaces) a usage of the type's methods or fields. • (for fields) getting or setting of the field's value.
• Parts of words.
• Words that differ in case.
To find occurrences of a specific identifier in your code:
1. In the Source Editor, move the insertion point to the class, method, or field name that you want to find occurrences of.
2. Right-click and choose Find Usages or press Alt-F7.
3. In the Find Usages dialog box, select the types of occurrences that you want displayed and click Next.
[image:23.612.90.523.236.426.2]The results are displayed in the Usages window (as shown in Figure 4-8), which appears in the bottom of the IDE.
Figure 4-8 Usages window.
You can navigate to a given occurrence of a class, method, or field name by double-clicking the occurrences line in the Usages window.
Renaming All Occurrences of the Currently Selected Class, Method, or Field Name
If you want to rename a class, method, or field, you can use the Refactor | Rename command to update all occurrences of the identifier to the new name.
To rename a class, method, or field name:
1. In the Source Editor, move the insertion point to an occurrence in the code of the class, method, or field name that you want to rename.
2. Right-click and choose Refactor | Rename or press Alt-Shift-R.
3. If you want occurrences of the name in comments to also be changed, check the Apply Name on Comments checkbox in the Rename dialog box.
4. In the Rename dialog box, click Next.
Figure 4-9
Refactoring preview window.
NetBeans IDE Tip
You can initiate the renaming of a class or interface by renaming it inline in the Projects window. After you rename the node, you are prompted with the Rename dialog box to rename other occurrences. You can click Cancel if you do not want other occurrences to be renamed.
Searching and Replacing Combinations of Characters in a File
If you merely want to find a combination of characters in your file, click in the file that you want to search, press Ctrl-F, and type the text that you want to find in the Find dialog box (as shown in Figure 4-10).
You can use a regular expression as your search criterion.
Unlike the Find Usages command, you can use the Find command to search for parts of words, do case insensitive searches, and highlight matches in the current file.
Once you have dismissed the Find dialog box, you can jump between occurrences of the search string by pressing F3 (next occurrence) and Shift-F3 (previous occurrence).
To search for other occurrences of the currently selected text or the word surrounding the insertion point, press Ctrl-F3.
To search and replace text, click in the file that you want to replace text, press Ctrl-H, and fill in the Find What and Replace With fields.
Figure 4-10
Find window for the Source Editor
[image:24.612.135.473.544.674.2]By default, matches to a find command remain highlighted in the Source Editor after you have dismissed the Find dialog box. To turn off the highlighting, press Alt-Shift-H.
Other File Searches
If you want to do a search on multiple files for something other than an occurrences of a specific Java identifier, you can use the Find in Projects command. The Find in Projects command enables you to search files within a given folder or project based on any combination of the following type of criteria:
• Matches to a substring or regular expression on text in the file. • Matches to a substring or regular expression on the file name. • Dates the files were modified.
• File type.
• Version control status (for files that are kept under version control and in a folder that is registered in the IDE's Versioning Manager).
To initiate such a file search, do one of the following:
• In the Projects window, right-click the node for the folder or project that you want to search in and choose Find (or press Ctrl-F).
• Choose Edit | Find in Projects to search for files in all open projects.
Figure 4-11
Find in Projects dialog box
NetBeans IDE Tip
The dialog box that the Ctrl-F keyboard shortcut depends on what part of the IDE is in focus. If you have the Source Editor selected, the Find dialog box for an individual file appears. If you have a node selected in the Projects window, the dialog box for searching in multiple files is opened.
Moving a Class to a Different Package
If you want to place a class in a different package, you can use the IDE's refactoring features to automatically update references to that class throughout your project.
To move a class:
1. In the Projects window, drag the class from its current package to the package you want to place it in. (You can also use the Cut and Paste commands in the contextual menus or the corresponding keyboard shortcuts.)
Figure 4-12
Refactor Code for Moved Classes dialog box
[image:27.612.109.499.427.596.2]3. In the Refactoring window (shown in Figure 4-13), look at the preview of the code to be changed. If there is a modification that you do not want to be made, deselect the checkbox next to the line for that change.
Figure 4-13
Refactor Code for Moved Classes dialog box 4. Click Do Refactoring.
If you find that the refactoring has had some consequences that you would like to reverse, you can choose Refactor | Undo
NetBeans IDE Tip
Changing a Method's Signature
If you want to change a method's signature, you can use the IDE's Refactor | Change Method Parameters command to update other code in your project that uses that method. Specifically, you can:
• Add parameters.
• Change the order of parameters.
• Change the access modifier for the method.
You can not use the Change Method Parameters to remove a parameter from a method. If you remove a parameter from a method, you have to update any code that references that method manually.
To change a method's signature:
1. Right-click the method in the Source Editor or the Projects window and choose Refactor | Change Method Parameters.
2. Click Add if you want to add parameters to the method. Then edit the Name, Type, and (optionally) the Default Value cells for the parameter. You have to double-click a cell to make it editable.
3. To switch the order of parameters, select a parameter in the Parameters table and click Move Up or Move Down.
4. Select the preferred access modifier from the Visibility Modifier combo box. 5. Click Next.
6. In the Refactoring window, look at the preview of the code to be changed. If there is a modification that you do not want to be made, deselect the
checkbox next to the line for that change. 7. Click Do Refactoring.
If you find that the refactoring has had some consequences that you would like to reverse, you can choose Refactor | Undo.
Refactoring Commands
NetBeans IDE has special support for refactoring code. The term refactoring refers to renaming and rearranging code without changing what the code does. Reasons for refactoring include things such as the need to separate API from implementation, making code easier to read, and making code easier to re-use.
The IDE's refactoring support makes refactoring easier by enabling you to automatically update all of the code in your project to reflect changes that you make in other parts of your project.
You can access most refactoring commands from the Refactor menu on the main menu bar or by right-clicking in the Source Editor or on a class node in the Projects window and choosing from the Refactor submenu. The Find Usages command is in the Edit menu and the contextual (right-click) menu for the Source Editor and the Projects window.
Typically, the currently selected identifier is filled in as the code element to be refactored.
Table 4-8 provides a summary of the refactoring commands that are available. These commands are explained more thoroughly in task-specific topics throughout this chapter.
Table 4-8: Refactoring Commands
Command Description
Rename Renames all occurrences of the selected class, interface, method, or field name. See Renaming All Occurrences of the Currently Selected Class, Method, or Field Name on page XXX.
Change Method Parameters Enables you to change the parameters and the access modifier for the given method. See Changing a Method's Signature on page XXX.
Encapsulate Fields Generates accessor methods (“getters” and “setters”) for a field. See Generating Read/Write Properties on page XXX.
Move Class Moves a class to a different package and updates all references to that class with the new package name. See Moving a Class to a Different Package on page XXX.
Find Usages Displays all occurrences of the name of a given class, method, or field. See Finding Occurrences of the Currently Selected Class, Method, or Field Name on page XXX.
Tracking Notes to Yourself in Your Code
The IDE has a task list feature which provides a way for you to write notes in your code and then view all of these notes in a single task (or “to do”) list. You can use the task list as the center of operations when cleaning up loose ends in your code.
A line is displayed in the task list if it is “tagged” with any of the following text:
• @todo
• TODO
• FIXME
• XXX
• PENDING
• <<<<<<<
NetBeans IDE Tip
When you type a tag in your code, it must be typed as a whole word for the IDE to recognize it. For example, if you do not put a space between the tag and the note, the note will not appear in the task list.
Figure 4-14 To Do window
Once you have displayed the To Do window (shown in Figure 4-14), you can view tasks for the current file, all open files, or for a specific folder by pressing the corresponding button at the top of the To Do window.
You can sort task list items by task, location, or priority by clicking the corresponding column titles. See below for information on displaying the Priority column.
You can jump from an entry in the task list straight to the line in the code where you wrote the note by double-clicking the entry.
Adding, Removing and Changing Task List Tags
To change the tags that are used for the task list:
1. Choose Tools | Options and select the Editing | To Do Settings node. 2. Click the button in the Task Tags property.
3. In the To Do Settings dialog box, use the Add, Change, and Delete buttons to modify the contents of the Tag List table.
Displaying Tasks By Priority
You can also display priorities for each task list item. The available priorities are High, Medium-High, Medium, Medium-Low, and Low.
By default, the Priority column is not displayed. You can display the Priority column by clicking the icon and selecting the Priority checkbox in the Change Visible Columns dialog box.
The priority values can be assigned by tag. By default, all tags are assigned Medium priority except for the <<<<<<< tag, which is given High priority.
To change a priority value for a tag:
1. Choose Tools | Options and select the Editing | To Do Settings node. 2. Click the button in the Task Tags property.
Filtering Task List Entries
You can further entries displayed in the task list by creating and using filters. When you use a filter, only entries that match criteria specified by the filter are displayed. Criteria include text that needs to appear in the note, the priority of the task, and/or the file name.
To create a filter:
1. Click the icon in the To Do window's toolbar.
2. In the Edit Filters dialog box, click the New button and then type a name for the filter in the Name field.
3. Fill in the details for the criterion.
4. Optionally, add additional criteria by clicking the More button and then filling in the details for the filters. You can select to have the filter match all or any of the criteria using the radio buttons at the top of the dialog box. An entry for the new-defined filter appears in a combo box in the To Window toolbar.
Comparing Differences Between Two Files
You can generate a side-by-side comparison of two files with the differing lines highlighted. To compare two files, select the nodes for the two files in the Projects window and choose Tools | Diff.
The “diff” appears as a tab in the Source Editor.
NetBeans IDE Tip
The Diff command only appears in the Tools menu when two (and no more than two) files are selected in the Projects, Files, or Favorites window.
Splitting the Source Editor
You can split the Source Editor in order to view two files simultaneously or view different parts of the same file.
To split the Source Editor window:
1. Make sure at least two files already open.
2. Click one the file's tabs, hold down the mouse button, and drag the tab to the far left, far right, or bottom of the Source Editor window.
3. Release the mouse button when the red outline that appeared around the tab when you started dragging has changed to a rectangular indicating the placement of the split window.
To view different parts of the same file simultaneously:
1. Click the file's tab in the Source Editor and choose Clone Document to create a second tab for the same document.
Maximizing Space For the Source Editor
There are a number of things you can do to make more space for your code in the IDE such as:
• Maximize a file in the Source Editor within the IDE by double-clicking that file's tab. When you do this, the file takes the entire space of the IDE except for the main menu and row of toolbars. You can make the other windows reappear as they were by double-clicking the tab again.
• Make other windows “sliding” so that they only appear when you click or mouse over a button representing that window on one of the edges of the IDE. You can make a window sliding by clicking its icon. You can return the window to its normal display by clicking the button within the sliding window. See Chapter 2, Managing IDE Window for information on working with windows in the IDE.
• Hide the IDE's toolbars. You can hide the main toolbars by choosing View | Toolbars and then individually choosing the toolbars that you want to hide. You can hide the Source Editor's toolbar by choosing Tools | Options,
selecting Editing | Editor Settings, and deselecting the checkbox for the Show Toolbar property.
Changing Source Editor Keyboard Shortcuts
You can change existing keyboard shortcuts or map other available commands to shortcuts. To change keyboard shortcuts for the Source Editor:
1. Choose Tools | Options and select the Editor | Editor Settings settings node. 2. Click the button in the Global Key Bindings property to open the Global
Key Bindings dialog box.
3. Select a key binding that you want to change, click Add, and type the shortcut that you want to use.
NetBeans IDE Tip
It is also possible to add keyboard shortcuts for specific file types. In the Options window, expand the Editor Settings node and select the node for the editor of the type of file you want to add a shortcut for. Click the button in the Key Bindings property to open the Key Bindings dialog box for that editor type.
The different editor types inherit shortcuts from the global level and it is not possible to override these global shortcuts for a specific editor type.
You can modify non-editor keyboard shortcuts by choosing Tools | Keyboard Shortcuts and adding and/or deleting keyboard shortcuts there.
NetBeans IDE Tip
If you change such a keyboard shortcut for the Source Editor, it will not affect the keyboard shortcut for other parts of the IDE, and vice versa.
Building Rich Clients with NetBeans
NetBeans IDE provides a number of tools for creating “rich” Java clients using Java Foundation Classes (JFC or “Swing”) and AWT packages. These tools include:
• Form Editor – Provides both Design and Source views for you to create visual components. The Design view is an area where you can drag, drop, and rearrange the visual components that make up the user interface of client you are building. The Source view contains the generated source code for the class you are designing and also allows you to enter your own code for the class.
• Inspector Window – Provides a tree view of all of the components in the form, whether visual (such as menus, text fields, labels, and buttons) or non-visual (such as button groups and data sources). You can drag and drop components in these window between different containers, which is useful if the components that you drag from the Palette to the Form Editor are not placed in the proper container. You can also add components directly through this window by right-clicking a container's node and choosing from the Add From Palette menu. This window appears in the same space as the Navigator window.
• Palette Window – Provides a list of components that you can drag and drop onto your form.
• Properties Window – Contains a list of editable properties for the selected component and access to special property editors for the more complex properties.
• Connection Wizard – Helps you create event listener and event handler code that links two components.
• Form Tester – Quickly displays a runtime view of the form under construction, allowing checks of resizing behavior, etc.
• Palette Manager – Enables you to add custom components to the Palette Window. Choose Tools | Palette Manager to open this window.
Figure 4-15
Form Editor windows, including the Inspector, Form Editor (Design View), Palette, and Properties window.
This section does not provide a complete guide to developing visual applications with Swing in NetBeans IDE – a whole book could be devoted to that. Instead it focuses on a few of the unique but somewhat tricky features of Swing and the IDE that assist designing of visual applications.
Layout Managers
One of the most important decisions you make when you start designing a form concerns which layout manager (or layout managers) to use in your form.
NetBeans IDE provides full support for the standard Swing layouts managers: • FlowLayout
• BorderLayout • GridLayout • GridBagLayout • CardLayout
• BoxLayout (note that the “struts” and “glue” normally used with BoxLayout are not provided as out-of-the-box components)
In addition, support for forms without layout manager (NullLayout) and forms with absolutely positioned components (AbsoluteLayout) are provided. Neither of these are
recommended for production use, as their behavior across platforms or when resizing is unlikely to be acceptable.
Of these layouts, GridBagLayout is far and away the most powerful, but suffers from bad press as being difficult to use. Fortunately, NetBeans IDE provides a clever tool – the
“customizer” – to tame GridBagLayout to the point where you might well find it’s the most commonly used layout in your forms.
NetBeans IDE Tip
the final result. Unfortunately, this is not as useful as it might be – the conversion often introduces large offsets for the components, and massaging these into an acceptable state is often as much work as creating the layout from scratch.
Designing a Form With GridBagLayout
The IDE's GridBagLayout customizer (as shown in Figure 4-16) provides extra support for fine tuning the placement of components within the layout and adjustment of the constraints. You can drag components around the grid and modify constraints with buttons that are built into the same view.
To use the customizer:
1. Add the components you require to your form by dragging and dropping those components from the Palette to the Form Editor.
2. Set GridBagLayout as your layout manager by right-clicking the container's node (e.g. that of a JFrame or JPanel component) in the Inspector window and choosing Set Layout | GridbagLayout.
3. Open the customizer by again right-clicking the container's node and
choosing Customize Layout. The Customizer window opens. See Figure 4-16. 4. Establish the relative position you desire between the components by
dragging them around the design area in the right pane.
Figure 4-16
GridBag Customizer
The following constraints can be individually adjusted for each component:
• Grid X and Grid Y– the grid position to be occupied by the component. Grid positions are numbered from top left, zero-based.
• Grid Width and Grid Height – specifies how many grid positions are allocated for the component in each direction. Although “remainder” and “relative” can be specified, generally specifying an absolute position is easier to maintain.
• Fill – specifies whether the component uses all of the vertical or horizontal space (or both) that is allocated to it.
• Internal Padding X and Y – increases the size of the component, in pixels. • Anchor – places the component in one of nine positions within the space
allocated to it (Center, North, North-West, and so on). Note that this setting has no effect if there is no free space remaining for the component.
• Weight X and Weight Y – determines how much space a component should be given relative to other components in its row or column when the
space allocated in their row or column when the window is resized. For example, if each of two components in a row have a “Weight X” of 1, they will equally share any increase in row width. One the other hand, if one has a “Weight X” of 1 and the other 0.5, the first will get two-thirds and the second one-third of any increase. Note that specifying a weight has effect only if Fill is specified for the component in the appropriate direction
• Insets – determines the minimum amount of external space – in pixels – on each of the four sides of the component.
Limitations of GridBagLayout
If GridBagLayout is so powerful, why would one use anything else? Two reasons:
limitations and convenience. A major limitation of GridBagLayout is that it has no mechanism to force two columns or rows to have the same size. GridLayout can be used to overcome this – see the example below – although only if the rows or columns are adjacent. If your form has this problem, consider using the jGoodies Forms layout (http://www.jgoodies.com/freeware/forms/).
Convenience also plays a part: often the container you’re designing just naturally fits with, say, BorderLayout. Or perhaps the ease of use of FlowLayout works well with your container.
NetBeans IDE Tip
The IDE makes it easy to use different layouts for different containers. A container nested in a form can be designed independently by right-clicking on the container node in the Inspector Window and choosing Design this Container. To return to working on the whole form, right-click on the container node again and choose Design Top Container. This can also be helpful with highly nested forms to enable drag and drop
placement of components within a specific container. Note that adding a component to a container can also be accomplished by right-clicking on the container node and choosing Add from Palette.
An Example Using GridBagLayout
An relatively simple form that provides a bit of complexity in its layout is shown in Figure 41-7. Aspects that require special attention include:
• The Options and Available Options columns should have the same width, with the Remove and Add buttons centered beneath them.
• The Sort Descending and Case Sensitive checkboxes should be centered under the Options column.
Figure 4-17 GridBag Example
Figure 4-18 Inspector window.
Figure 4-19
GridBagLayout Customizer with the example components as they appear when the customizer is opened.
Figure 4-20
Layout section of GridBag Layout Customizer showing padding panel
Specifying Component Behavior and Appearance
You can use the Properties window to set the behavior and appearance of components that you have added to a form. The Properties window displays the properties for the component that is selected in the Inspector or the Form Editor. The properties come in three categories:
• Properties – a configurable list of characteristics for the component. Technically speaking, these are the JavaBeans properties for the component. • Events – a list of event listeners that you can attach to a component. You can
specify event listeners here (or remove them here) or use the Connection Wizard. See Generating Event Listening and Handling Methods on page XXX.
• Code – some NetBeans IDE-specific properties that you can use to customize the way the code is generated. See Customizing Generated Code below. To edit component properties:
1. Select the property category by clicking on the appropriate button at the top of the Properties window (Properties, Events or Code).
2. Edit the component's properties in the Properties window by selecting the property and entering the desired value.
3. If a property has a button, you can click it to open a special property editor enabling you to modify the property and the initialization code generated for it.
4. In the property editor, use the Select Mode combo box to choose each custom editor for the property and make the necessary changes.
For some components, the key property is listed in bold in the Properties window. For example, the “model” property for the JTable and JList properties is marked in bold.
Generating Event Listening and Handling Methods
The IDE relieves the developer of the task providing the infrastructure required around event handling by generating the code to link the occurrence of the event with the invocation of a private method in the form class. For example, a JButton named “myBtn” might have the code
myBtn.addActionListener(new java.awt.event.ActionListener() { public void actionPerformed(java.awt.event.ActionEvent evt) { myBtnActionPerformed(evt);
}
added to its initialization, where the method myBtnActionPerformed is generated as:
private void myBtnActionPerformed(java.awt.event.ActionEvent evt) { // TODO add your handling code here:
}
NetBeans IDE Tip
Comments – generated or otherwise – within your Java code that start with “TODO” have special significance. To see a list of your “TODO” lines, display the “TODO” window via Window ToDo – or press CTRL-6. From the displayed window, you can navigate to the source line with the TODO with a double-click in the TODO window. See Consolidating Notes to Yourself on page XXX for more information.
Generation of this event infrastructure code can be done in a couple of different ways: • By right-clicking the component and choosing the event to be handled from
the Events menu.
The IDE generates the event handler and positions the cursor to the
appropriate TODO line in the generated private method for completion of the event handling code.
• By using the Connection wizard to generate code for the case when an even on component should result in modification of another component.
To use the Connection wizard:
1. Enter “connection mode” by clicking the icon in the Form Editor's toolbar. 2. Open the Connection wizard by clicking successively on the two components
– first the component that will fire the event and then component upon which an operation is to be performed.
3. In the Select Source Event page of the wizard (as shown in Figure 4-21), select the event to be fired.
Figure 4-21
Figure 4-22
Connection Wizard, Specify Target Operation page
The Connection Wizard approach is simply a “point and click” approach to the task. The code generated by the wizard is not guarded and can be modified in the editor after generation.
Customizing Generated Code
The NetBeans IDE dynamically generates the code for GUI construction. You can view this code in the Source view of the Form Editor (click the Source button in the Form Editor's toolbar). In addition to the code generated within the class in its class-name.java file, the IDE also maintains an XML file called class-name.form that details the structure of the form. Note that
the source-code control systems – e.g. CVS – supported by NetBeans ensure by default that the . form file is maintained in the repository as well as the .java file.
The generated code within the java source file is delimited by special comments (for example //GEN-BEGIN:initComponents . . . //GEN-END:initComponents). The editor
does not allow this code to be modified, and indicates the unmodifiable code with a pale blue background. Although you could modify this code outside the IDE, it is not recommended, since those modifications would be lost if you reopened the form in the IDE. (The IDE regenerates the
.java file of a form created in the IDE from the .form files each time you open the file in the IDE.)
The use of delimited generated code prompted vigorous discussion in the NetBeans IDE team, but the advantages are significant: it is extremely difficult to reliably “reverse engineer” arbitrary Swing code without requiring restrictive coding discipline on the developer’s part.
• Custom Creation Code – code to be inserted instead of the default new ComponentClassName(); statement.
• Pre-Creation Code – one or more lines of code to precede the statement that instantiates the component.
• Post-Creation Code – one or more lines of code to follow the statement that instantiates the component..
• Pre-Init Code – one or more lines of code to precede the first statement that initializes the properties of component.
• Post-Init Code – one or more lines of code to follow the last statement that initializes the properties of component
In addition, the initial values of the various properties of components can be specified in various ways:
• a static value.
• a property from a component written to the JavaBeans architecture. • a property of another component on the form.
• a call to a method of the form or one of its components. You can choose from a list of methods that return the appropriate data type.