CHAPTER 9: Super Jumper: A 2D OpenGL ES Game
488
B
eginning Android Games offers everything you need to join the ranks of suc-cessful Android game developers. You’ll start with game design fundamen-tals and programming basics, and then progress toward creating your own basic game engine and playable games. This will give you everything you need to branch out and write your own Android games.Beginning Android Games will guide you through the process of making some great games for the Android platform, and you’ll soon find yourself actively cod-ing and creatcod-ing games, across these topics:
•
Set up and use the Android development tools: get ready to write your own games•
Classic 2D game programming: build addictive action and platform games of your own•
Android graphics and audio: make your games look and sound gorgeous•
Game mechanics: use collision detection, physics, and sprite animation to deadly effect•
3D game programming: add complex 3D to your games the easy way•
The final yard: publish your game, get crash reports, and support your usersAll you need is a basic knowledge of Java and the desire to write awesome mobile games. Beginning Android Games will help you kick-start your project to be the next break-through Android game.
Beginning
Android Games
Mario Zechner
For your convenience Apress has placed some of the front
matter material after the index. Please use the Bookmarks
iv
Contents at a Glance
Contents ... v
About the Author ... xii
About the Technical Reviewer ... xiii
Acknowledgments ... xiv
Introduction ... xv
■
Chapter 1: Android, the New Kid on the Block ... 1
■
Chapter 2: First Steps with the Android SDK ... 25
■
Chapter 3: Game Development 101 ... 51
■
Chapter 4: Android for Game Developers ... 103
■
Chapter 5: An Android Game Development Framework ... 185
■
Chapter 6: Mr. Nom Invades Android ... 229
■
Chapter 7: OpenGL ES: A Gentle Introduction ... 269
■
Chapter 8: 2D Game Programming Tricks ... 351
■
Chapter 9: Super Jumper: A 2D OpenGL ES Game ... 429
■
Chapter 10: OpenGL ES: Going 3D ... 489
■
Chapter 11: 3D Programming Tricks ... 525
■
Chapter 12: Droid Invaders: the Grand Finale ... 577
■
Chapter 13: Publishing Your Game ... 625
■
Chapter 14: What’s Next? ... 637
xv
Introduction
Hi there, and welcome to the world of Android game development. My name is Mario; I’ll be your guide for the next fourteen chapters. You came here to learn about game development on Android, and I hope to be the person who enables you to realize your ideas.
Together we’ll cover quite a range of materials and topics: Android basics, audio and graphics programming, a little math and physics, and a scary thing called OpenGL ES. Based on all this knowledge we’ll develop three different games, one even being 3D.
Game programming can be easy if you know what you’re doing. Therefore I’ve tried to present the material in a way that not only gives you helpful code snippets to reuse, but actually shows you the big picture of game development. Understanding the underlying principles is the key to tackling ever more complex game ideas. You’ll not only be able to write games similar to the ones developed over the course of this book, but you’ll also be equipped with enough knowledge to go to the Web or the bookstore and take on new areas of game development on your own.
A Word About the Target Audience
This book is aimed first and foremost at complete beginners in game programming. You don’t need any prior knowledge on the subject matter; I’ll walk you through all the basics. However, I need to assume a little knowledge on your end about Java. If you feel rusty on the matter, I’d suggest refreshing your memory by reading the online edition of Thinking in Java, by Bruce Eckel (Prentice Hall, 2006), an excellent introductory text on the programming language. Other than that, there are no other requirements. No prior exposure to Android or Eclipse is necessary!
This book is also aimed at the intermediate-level game programmer that wants to get her hands dirty with Android. While some of the material may be old news for you, there are still a lot of tips and hints contained that should make reading this book worthwhile. Android is a strange beast at times, and this book should be considered your battle guide.
How This Book Is Organized
■ INTRODUCTION
xvi
Getting the Source Code
This book is fully self-contained; all the code necessary to run the examples and games is
included. However, copying the listings from the book to Eclipse is error prone, and games do not consist of code alone, but also have assets that you can’t easily copy out of the book. Also, the process of copying code from the book's text to Eclipse can introduce errors. Robert (the book’s technical reviewer) and I took great care to ensure that all the listings in this book are error free, but the gremlins are always hard at work.
To make this a smooth ride, I created a Google Code project that offers you the following: • The complete source code and assets, licensed under the GPL version 3,
available from the project’s Subversion repository.
• A quickstart guide showing you how to import the projects into Eclipse in textual form, and a video demonstration for the same.
• An issue tracker that allows you to report any errors you find, either in the book itself or in the code accompanying the book. Once you file an issue in the issue tracker, I can incorporate any fixes in the Subversion repository. This way you’ll always have an up-to-date, (hopefully) error-free version of this book’s code from which other readers can benefit as well.
• A discussion group that is free for everybody to join and discuss the contents of the book. I’ll be on there as well of course.
For each chapter that contains code, there’s an equivalent Eclipse project in the Subversion repository. The projects do not depend on each other, as we’ll iteratively improve some of the framework classes over the course of the book. Each project therefore stands on its own. The code for both Chapters 5 and 6 is contained in the ch06-mrnom project.
1
Chapter
Android, the New Kid on
the Block
As a kid of the early nineties, I naturally grew up with my trusty Nintendo Game Boy. I spent countless hours helping Mario rescue the princess, getting the highest score in Tetris, and racing my friends in RC Pro-Am via link cable. I took this awesome piece of hardware with me everywhere and every time I could. My passion for games made me want to create my own worlds and share them with my friends. I started programming on the PC but soon found out that I couldn’t transfer my little masterpieces to the Game Boy. I continued being an enthusiastic programmer, but over time my interest in actually playing video games faded. Also, my Game Boy broke . . .
Fast forward to 2010. Smartphones are becoming the new mobile gaming platforms of the era, competing with classic dedicated handheld systems such as the Nintendo DS or the Playstation Portable. That caught my interest again, and I started investigating which mobile platforms would be suitable for my development needs. Apple’s iOS seemed like a good candidate to start coding games for. However, I quickly realized that the system was not open, that I’d be able to share my work with others only if Apple allowed it, and that I’d need a Mac to develop for the iOS. And then I found Android. I immediately fell in love with Android. Its development environment works on all the major platforms, no strings attached. It has a vibrant developer community happy to help you with any problem you encounter as well as comprehensive documentation. I can share my games with anyone without having to pay a fee to do so, and if I want to monetize my work, I can easily publish my latest and greatest innovation to a global market with millions of users in a matter of minutes.
The only thing I was left with was actually figuring out how to write games for Android and how to transfer my PC game development knowledge to this new system. In the following chapters, I want to share my experience with you and get you started with Android game development. This is of course a rather selfish plan: I want to have more games to play on the go!
Let’s start by getting to know our new friend: Android.
CHAPTER 1: Android, the New Kid on the Block
2
A Brief History of Android
Android was first publicly noticed in 2005 when Google acquired a small startup called Android, Inc. This fueled speculation that Google wanted to enter the mobile space. In 2008, the release of version 1.0 of Android put an end to all speculation, and Android became the new challenger on the mobile market. Since then, it’s been battling it out with already established platforms such as iOS (then called iPhone OS) and BlackBerry, and its chances of winning look rather good.
Because Android is open source, handset manufacturers have a low barrier of entry when using the new platform. They can produce devices for all price segments, modifying Android itself to accommodate the processing power of a specific device. Android is therefore not limited to high-end devices but can also be deployed to low-budget devices, thus reaching a wider audience.
A crucial ingredient for Android’s success was the formation of the Open Handset Alliance (OHA) in late 2007. The OHA includes companies such as HTC, Qualcomm, Motorola, and NVIDIA, which collaborate to develop open standards for mobile devices. Although Android’s core is developed mainly by Google, all the OHA members
contribute to its source in one form or another.
Android itself is a mobile operating system and platform based on the Linux kernel version 2.6 and is freely available for commercial and noncommercial use. Many members of the OHA build custom versions of Android for their devices with modified user interfaces (UIs)—for example, HTC’s HTC Sense and Motorola’s MOTOBLUR. The open source nature of Android also enables hobbyists to create and distribute their own versions of Android. These are usually called mods, firmwares, or ROMs. The most prominent ROM at the time of this writing was developed by a fellow known as
Cyanogen and is aimed at bringing the latest and greatest improvements to all sorts of Android devices.
Since its release in 2008, Android has received seven version updates, all code-named after desserts (with the exception of Android 1.1, which is irrelevant nowadays). Each version has added new functionality to the Android platform that has relevance in one way or another for game developers. Version 1.5 (Cupcake) added support for including native libraries in Android applications, which were previously restricted to being written in pure Java. Native code can be very beneficial in situations where performance is of upmost concern. Version 1.6 (Donut) introduced support for different screen resolutions. We will revisit this fact a couple of times in this book because it has some impact on how we approach writing games for Android. With version 2.0 (Éclair) came support for multi-touch screens, and version 2.2 (Froyo) added just-in-time (JIT) compilation to the Dalvik virtual machine (VM), which powers all the Java applications on Android. The JIT speeds up the execution of Android applications considerably—depending on the scenario, up to a factor of five. At the time of this writing, the latest version is 2.3, called Gingerbread. It adds a new concurrent garbage collector to the Dalvik VM. If you haven’t noticed yet: Android applications are written in Java.
run on phones at this point. However, some features of Honeycomb will be ported to the main line of Android. At the time of this writing, Android 3.0 is not available to the public, and no devices on the market are running it. Android 2.3 can be installed on many devices using custom ROMs. The only handset using Gingerbread is the Nexus S, a developer phone sold by Google directly.
Fragmentation
The great flexibility of Android comes at a price: companies that opt to develop their own user interfaces have to play catch-up with the fast pace at which new versions of Android are released. This can lead to handsets not older than a few months becoming outdated really fast as carriers and handset manufacturers refuse to create updates that incorporate the improvements of new Android versions. The big bogeyman called fragmentation is a result of this process.
Fragmentation has many faces. For the end user, it means being unable to install and use certain applications and features because of being stuck on an old Android version. For developers, it means that some care has to be taken when creating applications that should work on all versions of Android. While applications written for earlier versions of Android will usually run fine on newer versions, the reverse is not true. Some features added in newer Android versions are of course not available on older versions, such as multi-touch support. Developers are thus forced to create separate code paths for different versions of Android.
But fear not. Although this sounds terrifying, it turns out that the measures that have to be taken are minimal. Most often, you can even completely forget about the whole issue and pretend there’s only a single version of Android. As game developers, we’re less concerned with differences in APIs and more concerned about hardware capabilities. This is a different form of fragmentation, which is also a problem for platforms such as iOS, albeit not as pronounced. Throughout this book, I will cover the relevant
fragmentation issues that might get in your way while you develop your next game for Android.
The Role of Google
Although Android is officially the brainchild of the Open Handset Alliance, Google is the clear leader when it comes to implementing Android itself as well as providing the necessary ecosystem for Android to grow.
The Android Open Source Project
CHAPTER 1: Android, the New Kid on the Block
4
Program, a process ensuring baseline compatibility with third-party applications written by developers like us. Compatible systems are allowed to participate in the Android ecosystem, which also includes the Android Market.
The Android Market
The Android Market was opened to the public in October 2008 by Google. It’s an online software store that enables users to find and install third-party applications. The market is generally accessible only through the market application on a device. This situation will change in the near future, according to Google, which promises the deployment of a desktop-based online store accessible via the browser.
The market allows third-party developers to publish their applications either for free or as paid applications. Paid applications are available for purchase in only about 30 countries. Selling applications as a developer is possible in a slightly smaller number. Table 1–1 shows you the countries in which apps can be bought and sold.
Table 1–1. Purchase and Selling Options per Country.
Country User Can Purchase Apps Developer Can Sell Apps
Australia Yes Yes
Austria Yes Yes
Belgium Yes Yes
Brazil Yes Yes
Canada Yes Yes
Czech Republic Yes No
Denmark Yes Yes
Finland Yes Yes
France Yes Yes
Germany Yes Yes
Hong Kong Yes Yes
Hungary Yes Yes
India Yes Yes
Country User Can Purchase Apps Developer Can Sell Apps
Israel Yes Yes
Italy Yes Yes
Japan Yes Yes
Mexico Yes Yes
Netherlands Yes Yes
New Zealand Yes Yes
Norway Yes Yes
Pakistan Yes No
Poland Yes No
Portugal Yes Yes
Russia Yes Yes
Singapore Yes Yes
South Korea Yes Yes
Spain Yes Yes
Sweden Yes Yes
Switzerland Yes Yes
Taiwan Yes Yes
United Kingdom Yes Yes
United States Yes Yes
Users get access to the market after setting up a Google account. Applications can be bought only via credit card at the moment. Buyers can decide to return an application within 15 minutes from the time of purchasing it and will receive a full refund. Previously, the refund time window was 24 hours. The recent change to 15 minutes has not been well received by end users.
CHAPTER 1: Android, the New Kid on the Block
6
registration, a developer can immediately start to publish a new application in a matter of minutes.
The Android Market has no approval process but relies on a permission system. A user is presented with a set of permissions needed by an application before the installation of the program. These permissions handle access to phone services, networking access, access to the Secure Digital (SD) card, and so on. Only after a user has approved these permissions is the application installed. The system relies on the user doing the right thing. On the PC, especially on Windows systems, this concept didn’t work out too well. On Android, it seems to have worked so far; only a few of applications have been pulled from the market because of malicious behavior.
To sell applications, a developer has to additionally register a Google Checkout
Merchant Account, which is free of charge. All financial business is handled through this account.
Challenges, Device Seeding, and Google I/O
In an ongoing effort to draw more developers to the Android platform, Google started to hold challenges. The first challenge, called the Android Developer Challenge (ADC) was launched in 2008, offering relatively high cash prices for the winning projects. The ADC was carried out in the subsequent year and was again a huge success in terms of developer participation. There was no ADC in 2010, which can probably be attributed to Android now having a considerable developer base and thus not needing any further actions to get new developers on board.
Google also started a device-seeding program in early 2010. Each developer who had one or more applications on the market with more than 5,000 downloads and an
average user rating of 3.5 stars or above received a brand new Motorola Droid, Motorola Milestone, or Nexus One phone. This was a very well-received action within the
developer community, although it was initially met with disbelief. Many considered the e-mail notifications that came out of the blue to be an elaborate hoax. Fortunately, the promotion turned out to be a reality, and thousands of devices were sent to developers across the planet—a great move by Google to keep its third-party developers happy and make them stick with the platform and to potentially attract new developers.
The annual Google I/O conference is an event every Android developer looks forward to each year. At Google I/O, the latest and greatest Google technologies and projects are revealed, among which Android has gained a special place in recent years. Google I/O usually features multiple sessions on Android-related topics, which are also available as videos on YouTube’s Google Developers channel.
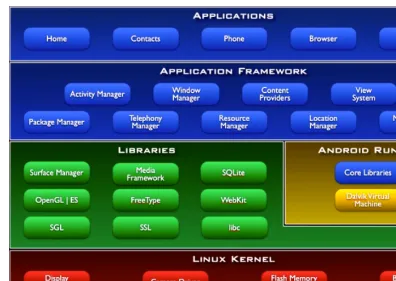
Android’s Features and Architecture
Android is not just another Linux distribution for mobile devices. While you develop for Android, you’re not all that likely to meet the Linux kernel itself. The developer-facing side of Android is a platform that abstracts away the underlying Linux kernel and is programmed via Java. From a high-level view, Android possesses several nice features:
An application framework providing a rich set of APIs to create various types of applications. It also allows the reuse and replacement of components provided by the platform and third-party applications. The Dalvik virtual machine, which is responsible for running
applications on Android.
A set of graphics libraries for 2D and 3D programming.
Media support for common audio, video, and image formats such as Ogg Vorbis, MP3, MPEG-4, H.264, and PNG. There’s even a
specialized API for playing back sound effects, which will come in handy in our game development adventures.
APIs for accessing peripherals such as the camera, Global Positioning System (GPS), compass, accelerometer, touch screen, trackball, and keyboard. Note that not all Android devices have all of these
peripherals—hardware fragmentation in action.
There’s of course a lot more to Android than the few features I just mentioned. For our game development needs, these features are the most relevant, though.
CHAPTER 1: Android, the New Kid on the Block
8
Figure 1–1. Android architecture overview
The Kernel
Starting from the bottom of the stack, you can see that the Linux kernel provides the basic drivers for the hardware components. Additionally, the kernel is responsible for such mundane things as memory and process management, networking, and so on.
The Runtime and Dalvik
The Android runtime is built on top of the kernel and is responsible for spawning and running Android applications. Each Android application is run in its own process with its own Dalvik virtual machine.
Dalvik runs programs in the DEX bytecode format. Usually you transform common Java .class files to the DEX format via a special tool called dx that is provided by the
software development kit. The DEX format is designed to have a smaller memory footprint compared to classic Java .class files. This is achieved by heavy compression, tables, and merging of multiple .class files.
the classes available in Java SE through the use of a subset of the Apache Harmony Java implementation. This also means that there’s no Swing or Abstract Window Toolkit (AWT) available, nor any classes that can be found in Java ME. However, with some care, you can still use many of the third-party libraries available for Java SE on Dalvik. Before Android 2.2 (Froyo), all bytecode was interpreted. Froyo introduces a tracing JIT compiler, which compiles parts of the bytecode to machine code on the fly. This increases the performance of computationally intensive applications considerably. The JIT compiler can use CPU features specifically tailored for special computations such as a dedicated Floating Point Unit (FPU).
Dalvik also has an integrated garbage collector (GC). It’s a mark-and-sweep
nongenerational GC that has the tendency to drive developers a tad bit mad at times. With some attention to details, you can peacefully coexist with the GC in your day-to-day game development, though. The latest Android release (2.3) has an improved concurrent GC, which relieves some of the pain. We’ll investigate GC issues in more detail later in the book.
Each application running in an instance of the Dalvik VM has a total of 16MB to 24MB of heap memory available. We’ll have to keep that in mind as we juggle our image and audio resources.
System Libraries
Besides the core libraries, which provide some Java SE functionality, there’s also a set of native C/C++ libraries that build the basis for the application framework (located in the next layer of Figure 1–1). These system libraries are mostly responsible for the
computationally heavy tasks such as graphics rendering, audio playback, and database access, which would not be so well suited for the Dalvik virtual machine. The APIs are wrapped via Java classes in the application framework, which we’ll exploit when we start writing our games. We’ll abuse the following libraries in one form or another:
Skia Graphics Library (Skia): This software renderer for 2D graphics is used for rendering the UI of Android applications. We’ll use it to draw our first 2D game.
CHAPTER 1: Android, the New Kid on the Block
10
OpenCore: This is a media playback and recording library for audio and video. It supports a good mix of formats such as Ogg Vorbis, MP3, H.264, MPEG-4 and so on. We’ll be mostly concerned with the audio portion, which is not directly exposed to the Java side but wrapped in a couple of classes and services.
FreeType: This is a library to load and render bitmap and vector fonts, most notably the TrueType format. FreeType supports the Unicode standard, including right-to-left glyph rendering for Arabic and similar peculiarities. Sadly, this is not entirely true for the Java side, which to this point does not support Arabic typography. As with OpenCore, FreeType is not directly exposed to the Java side but is wrapped in a couple of convenient classes.
These system libraries cover a lot of ground for game developers and perform most of the heavy lifting for us. They are the reason why we can write our games in plain old Java.
Note: Although the capabilities of Dalvik are usually more than sufficient for our purposes, at times you might need more performance. This can be the case for very complex physics simulations or heavy 3D calculations—for which we would usually resort to writing native code. I do not cover this aspect in this book. A couple of open source libraries for Android already exist that can help you stay on the Java side of things. See http://code.google.com/p/libgdx/ for an example. Also worth noting is the excellent book Pro Android Games by VladimirSilva
(Apress, 2009), which goes into depth about interfacing with native code in the context of game programming.
The Application Framework
The application framework ties together the system libraries and the runtime, creating the user side of Android. The framework manages applications and provides an elaborate framework within which applications operate. Developers create applications for this framework via a set of Java APIs that cover such areas as UI programming, background services, notifications, resource management, peripheral access, and so on. All core applications provided out of the box by Android, such as the mail client, are written with these APIs.
As game developers, we will create UI applications within this framework. As such, we will be interested in an application’s architecture and life cycle as well as its interactions with the user. Background services usually play a small role in game development, which is why I will not go into details about them.
The Software Development Kit
To develop applications for Android, we will use the Android software development kit (SDK). The SDK is composed of a comprehensive set of tools, documentation, tutorials, and samples that will help you get started in no time. Also included are the Java libraries needed to create applications for Android. These contain the APIs of the application framework. All major desktop operating systems are supported as development environments.
Prominent features of the SDK are as follows:
The debugger, capable of debugging applications running on a device or in the emulator
A memory and performance profile to help you find memory leaks and identify slow code
The device emulator, based on QEMU (an open source virtual machine to simulate different hardware platforms), which, although accurate, can be a bit slow at times
Command-line utilities to communicate with devices
Build scripts and tools to package and deploy applications
The SDK can be integrated with Eclipse, a popular and feature-rich open source Java integrated development environment (IDE). The integration is achieved through the Android Development Tools (ADT) plug-in, which adds a set of new capabilities to Eclipse to create Android projects; to execute, profile and debug applications in the emulator or on a device; and to package Android applications for their deployment to the Android Market. Note that the SDK can also be integrated into other IDEs such as NetBeans. There is, however, no official support for this.
NOTE: Chapter 2 covers how to set up the development environment with the SDK and Eclipse.
The SDK and the ADT plug-in for Eclipse receive constant updates that add new features and capabilities. It’s therefore a good idea to keep them updated.
CHAPTER 1: Android, the New Kid on the Block
12
The Developer Community
Part of the success of Android is its developer community, which gathers in various places around the Web. The most frequented site for developer exchange is the Android Developers group at http://groups.google.com/group/android-developers. This is the number one place to ask questions or seek help when you stumble across a seemingly unsolvable problem. The group is visited by all sorts of Android developers, from system programmers, to application developers, to game programmers. Occasionally, the Google engineers responsible for parts of Android also help out with valuable insights. Registration is free, and I highly recommend starting reading the group now! Apart from providing a place for you to ask questions, it’s also a great place to search for already answered questions and solutions to problems. So, before asking a question, check whether it has been answered already.
Every developer community worth its salt has a mascot. Linux has Tux the penguin, GNU has its, well, gnu, and Mozilla Firefox has its trendy Web 2.0 fox. Android is no different and has selected a little green robot as its mascot of choice. Figure 1–2 shows you that little devil.
Figure 1–2. Android’s nameless mascot
Although its choice of color may be disputable, this nameless little robot already starred in a couple of popular Android games. Its most notable appearance was in Replica Island, a free and open source platfom created by Google engineer Chris Pruett as a 20 percent project.
Devices, Devices, Devices!
wagon and offer a wide range of devices running Android. Besides handsets, there’s also a slew of tablet devices coming to the market that build upon Android. Some key concepts are shared by all devices, though, which makes our lives as game developers a little easier.
Hardware
There are no hard minimum requirements for an Android device. However, Google has recommended the following hardware specifications, which virtually all available Android devices fulfill and most often surpass significantly:
ARM-based CPU: At the time of writing this book, this requirement was relaxed. Android now also runs on the x86 architecture. The latest ARM-based devices are also starting to feature dual-core CPUs.
128MB RAM: This specification is a minimum. Current high-end devices already include 512MB RAM, and 1GB RAM devices are expected in the very near future.
256MB flash memory: This minimum amount of memory is for storing the system image and applications. For a long time, this lack of memory was the biggest gripe among Android users because third-party
applications could be installed only to flash memory. This changed with the release of Froyo.
Mini or Micro SD card storage: Most devices come with a few gigabytes of SD card storage, which can be replaced with bigger SD cards by the user.
16-bit color Half-Size Video Graphics Array (HVGA) TFT LCD with touch screen: Before Android version 1.6, only HVGA screens (480320 pixels) were supported by the operating system. Since version 1.6, lower- and higher-resolution screens are supported. The current high-end devices have Wide Video Graphis Array (WVGA) screens (800480, 848480, or 852480 pixels), and some low-end devices sport Quarter-Size Video Graphics Array (QVGA) (320280 pixels) screens. Touch screens are almost always capacitive and are only single-touch capable on most older devices.
Dedicated hardware keys: These keys are used for navigation. Most phones to date have at least a menu, search, home, and a back key. Some manufacturers have started to deviate from this and are including a subset of these keys or no keys at all.
CHAPTER 1: Android, the New Kid on the Block
14
Cameras are also available on almost all current devices. Some handsets and tablets have two cameras, one on the back and one on the front for video chat.
Especially crucial for game development are dedicated graphics processor units (GPUs). The earliest handset to run Android already had an OpenGL ES 1.0compliant GPU. More-modern devices have GPUs comparable in performance to the Xbox or PlayStation 2 and support OpenGL ES 2.0. If no graphics processor is available, a fallback in the form of a software renderer called PixelFlinger is provided by the platform. Many low-budget handsets rely on the software renderer, which is often sufficiently fast for low-resolution screens.
Along with the graphics processor, any currently available Android device also has dedicated audio hardware. Many hardware platforms also have special circuitry to decode different media formats such as H.264 in hardware. Connectivity is provided via hardware components for mobile telephony, Wi-Fi, and Bluetooth. All these hardware modules of an Android device are most often integrated in a single system on a chip (SoC), a system design also found in embedded hardware.
First Gen, Second Gen, Next Gen
Given the differences in capabilities, especially in terms of performance, Android developers usually group devices into first-, second-, and next-generation devices. This terminology comes up a lot, even more so when it comes to game development for Android. Let’s try to define these terms.
Each generation has a specific set of characteristics, mostly a combination of the Android version(s) used, the CPU/GPU, and the screen resolution of the devices within a generation. Although the hardware specifications are static, this might not be the case for the Android version used on a device.
In the Beginning: First Generation
Figure 1–3. The HTC Hero
This was one of the first Android phones that was said to be an iPhone killer, released in October 2009. The Hero was first shipped with Android version 1.5 installed, which was the standard for most Android handsets for most of 2009. The last official update for the Hero was to Android version 2.1. Newer updates can be installed only if the phone is rooted, a process that grants full system access.
The Hero has a 3.2-inch HVGA capacitive LCD touch screen, a 528MHz Qualcomm MSM7201A CPU/GPU combination, an accelerometer, and a compass, as well as a 5-megapixel camera. It also has the typical set of navigational hardware keys that most first-generation devices exhibit, along with a trackball.
The Hero is a prime example of first-generation devices. The touch screen has only limited support for multi-touch gestures such as the pinch zoom and no true multi-touch capability. Note that multi-touch gestures are not officially supported by the device and are also not exposed through the APIs of the official Android version 1.5. In this regard, the Hero was a major diasppointment for game developers who had hoped for similar multi-touch capabilities as those found on the iPhone.
Another common trait of first-generation devices is the screen resolution of 480320 pixels, the standard resolution up until Android version 1.6.
CHAPTER 1: Android, the New Kid on the Block
16
shader-based pipeline. The GPU is reasonably fast but outperformed by the PowerVR MBX Lite chip found in the iPhone 3G, which was available at the same time. HTC used the same chip in a couple of other first-generation handsets, such as the famous HTC Dream (T-Mobile G1). The MSM7201A is considered the low end when it comes to hardware-accelerated 3D graphics and is thus your greatest enemy when you want to target all generations of Android devices.
First-generation devices can thus be identified by the following features:
A CPU running at up to ~500MHz without hardware floating-point support A GPU, mostly in the form of the MSM7201A chip, supporting OpenGL ES 1.x A screen resolution of 480320 pixels
Limited multi-touch support
Initially deployed with Android 1.5/1.6 or even earlier versions
This classification is of course not strict. Many low-budget devices just coming out share a similar feature set. Although they are not exactly first generation, we can still put them in the same category as the Hero and similar devices.
First-generation devices still have a considerable market share at the time of writing this book. If we want to reach the biggest possible audience, we have to consider their limitations and adapt our games accordingly.
More Power: Second Generation
At the end of 2009, a new generation of Android devices entered the scene.
Spearheaded by the Motorola Droid and Nexus One (released in January 2010), this new generation of handsets demonstrated raw computational power previously unseen in mobile phones.
Figure 1–4. The Nexus One and Motorola Droid
Both phones have a WVGA screen, an 800480 pixel Active-Matrix Organic Light-Emiting Diode (AMOLED) screen (in the case of the Nexus One) or a 854480 pixel LCD screen (in the case of the Motorola Droid). Both screens are capacitive multi-touch screens. Although both devices were advertised as multi-touch capable, they do not work as expected in a couple of situations. The most common problem is the reporting of false touch positions when two fingers are close on either the x- or y-axis on the screen.
The Nexus One was first shipped with Android version 2.1, and the Motorola Droid was shipped with version 2.0. Both phones have received updates to Android version 2.2. Of special interest to game developers are the built-in GPUs. The PowerVR SGX530 is a very potent GPU also used in the iPhone 3GS. Note that the screen size of the iPhone 3GS is actually half that of the Motorola Droid, which gives the iPhone 3GS a slight performance advantage, because it has to draw fewer pixels per frame. The Adreno 200 chip used in the Nexus One is a Qualcomm product and slightly slower than the
PowerVR SGX530. Depending on the rendered scene, both chips can be nearly a magnitude faster than the MSM7201A found in many first-generation devices. Second-generation devices can be identified by the following features:
A CPU running between 550MHz and 1GHz with hardware floating-point support
A programmable GPU supporting OpenGL ES 1.x and 2.0 A WVGA screen
Multi-touch support
CHAPTER 1: Android, the New Kid on the Block
18
Note that a few first-generation devices received updates to Android version 2.1, which has some positive impact on overall system performance but does not, of course, change the fact that their hardware specifications are inferior to second-generation devices. The distinction between first- and second-generation devices can thus be made only if all factors such as CPU, GPU, or screen resolution are taken into account. Over the course of 2010, many more second-generation devices appeared, such as the HTC Evo or the Samsung i9200 Galaxy S. Although they feature some improvements over the Nexus One and Motorola Droid such as bigger screens and slightly faster CPUs/GPUs, they are still considered second-generation devices.
The Future: Next Generation
Device manufacturers try to keep their latest and greatest handsets a secret for as long as possible, but there are always some leaks of specifications.
General trends for all future devices are dual-core CPUs, more RAM, better GPUs, and higher screen resolutions. One such future device is the Samsung i9200 Galaxy S2, which is rumored to have a 1280720 pixel AMOLED 2 display, a 2GHz dual-core CPU, and 1GB RAM. Not much is known about the GPU this handset will use. A possible candidate would be the new NVIDIA Tegra 2 family of chips, which promises a
significant boost in graphics performance. The next generation is also expected to ship with the latest Android version (2.3).
Although mobile phones will probably remain the focus of Android for the immediate future, new form factors will also play a role in Android’s evolution. Hardware
manufacturers are creating tablet devices and netbooks, using Android as the operating system. Ports of Android for other architectures such as x86 are also already in the making, increasing the number of potential target platforms. And with Android 3.0, there’s even a dedicated Android version for tablets available.
Whatever the future will bring, Android is here to stay!
Game Controllers
Given the differences of input methods available on various Android handsets, a few manufacturers produce special game controllers. Because there’s no API in Android for such controllers, game developers have to integrate support separately by using the SDK provided by the game controller manufacturer.
Figure 1–5. The Zeemote JS1 controller
The controller is coupled with the device via Bluetooth. Game developers integrate support for the controller via a separate API provided by the Zeemote SDK. A couple of Android games already support this controller when available.
Users could in theory also couple the Nintendo Wii controller with their device via Bluetooth. A couple of prototypes exploiting the Wii controller exist, but there’s no officially supported SDK—which makes integration a tad bit awkward.
CHAPTER 1: Android, the New Kid on the Block
20
Figure 1–6. The Game Gripper in action
Game controllers are still a bit esoteric in the realm of Android. However, some successful titles have integrated support for some controllers, a move generally well received by Android gamers. Integrating support for such peripherals should therefore be considered.
Mobile Gaming Is Different
Gaming was already huge way before the likes of the iPhone and Android started to conquer this market segment. However, with those new forms of hybrid devices, the landscape has started to change. Gaming is no longer something for nerdy kids. Serious businesspeople have been caught playing the latest trendy game on their mobile phones in public, newspapers pick up stories of successful small game developers making a fortune on mobile phone application markets, and established game publishers have a hard time keeping up with the developments in the mobile space. We game developers must recognize this change and adjust accordingly. Let’s see what this new ecosystem has to offer.
A Gaming Machine in Every Pocket
Previously, people had to make the conscious decision to buy a video game system or a gaming PC in order to play video games. Now they get that functionality for free from their mobile phones. There’s no additional cost involved (at least if you don’t count the data plan you’ll likely have), and your new gaming device is available to you at any time. Just grab it from your pocket or purse, and you are ready to go—no need to carry a second dedicated system with you, because everything’s integrated in one package. Apart from the benefit of having to carry only a single device for your telephony, Internet, and gaming needs, another factor makes gaming on mobile phones incredibly
accessible to a much larger audience: you can fire up a dedicated market application on your phone, pick a game that looks interesting, and immediately start to play. There’s no need to go to a store or download something via your PC only to find out, for example, that you lost the USB cable needed to transfer that game to your phone.
The increased processing power of current-generation smartphones also has an impact on what’s possible for us as game developers. Even the middle class of devices is capable of generating gaming experiences similar to titles found on the older Xbox and PlayStation 2 systems. Given these capable hardware platforms, we can also start experimenting with more-elaborate games with physics simulations, an area offering great potential for innovation.
With new devices also come new input methods, which we have already discussed a little. A couple of games already exploit the GPS and/or compass available in most Android devices. The use of the accelerometer is already a mandatory feature of most games, and multi-touch screens offer new ways for the user to interact with the game world. Compared to classic gaming consoles (and ignoring the Wii for the moment), this is quite a change for game developers. A lot of ground has been covered already, but there are still new ways to use all this functionality in an innovative way.
Always Connected
Smartphones are usually bought along with data plans. They are not only used for pure telephony anymore but actually drive a lot of traffic to popular Internet sites. A user having a smartphone is very likely to be connected to the Web at any point in time (neglecting for a moment poor reception, for example, caused by hardware design failures).
Permanent connectivity opens up a completely new world for mobile gaming. People can challenge other people across the planet for a quick match of chess, explore virtual worlds together, or try fragging their best friend in another city in a fine death match of gentlemen. And all of this occurs on the go, on the bus or train or in their most beloved corner of the local park.
CHAPTER 1: Android, the New Kid on the Block
22
the market penetration of services such as Facebook and Twitter is a lot higher, and so the user is relieved of the burden of managing multiple networks at once.
Casual and Hardcore
The huge user adaption of smartphones also means that people who have never even touched a NES controller suddenly discover the world of gaming. Their mental image of a good game often deviates quite a bit from the one a hardcore gamer might have. Given the use cases for mobile phones, users tend to lean toward the more casual sort of games that they can fire up for a couple of minutes while on the bus or waiting in line at their preferred fast food restaurant. These games are equivalent toall those small flash games on the PC that are forcing many people in the workforce to Alt+Tab frantically each time they sense the presence of someone watching their back. Ask yourself this: how much time would you be willing to spend playing games on your mobile phone? Can you imagine playing a “quick” game of Civilization on such a device?
Surely there are people who would actually offer their firstborn if only they could play their beloved Advanced Dungeons & Dragons variant on a mobile phone. But this group is a small minority, as evidenced by the top-selling games on the iPhone and Android Markets. The top-selling games are usually extremely casual but have a nice trick under their sleeves: The average time taken to play a round of such a game is in the range of minutes, but the games make you come back by employing various evil schemes. The game might provide an elaborate online achievement system that lets you virtually brag about your skills. But it could also be an actual hardcore game in disguise. Offer users an easy way to save their progress, and you are set to sell them your hardcore game as a casual game!
Big Market, Small Developers
The environment also allows for a lot of experimentation and innovation as bored people surfing the market are longing for little gems, including new ideas and game play
mechanics. Experimentation on classic gaming platforms such as the PC or consoles are often met with failure. However, the Android Market enables you to reach a much larger audience that is willing to try experimental new ideas, and to reach them with a lot less effort.
This doesn’t mean, of course, that you don’t have to market your game. One way to do so is to inform various blogs and dedicated sites on the Web about your latest game. Many Android users are enthusiasts and regularly frequent such sites, checking in on the latest and greatest.
Another way to reach a large audience is to get featured in the Android Market. Once featured, your application will appear to users in a list immediately after they start the market application. Many developers have reported a tremendous increase in
downloads directly correlated to getting featured on the market. How to get featured is a bit of a mystery, though. Having an awesome idea and executing it in the most polished way is your best bet, whether you are a big publisher or a small one-person shop.
Summary
25
25
Chapter
First Steps with the
Android SDK
The Android SDK provides a set of tools that allows creating applications in no time. This chapter will guide you through the process of building a simple Android application with the SDK tools. This involves the following steps:
1. Setting up the development environment
2. Creating a new project in Eclipse and writing our code
3. Running the application on the emulator or on a device
4. Debugging and profiling the application
Let’s start with setting up the development environment.
Setting Up the Development Environment
The Android SDK is pretty flexible and integrates well with a couple of development environments. Purists might choose to go all hard-core with command-line tools. We want things to be a little bit more comfortable, though, so we’ll go for the simpler, more visual route using an IDE (integrated development environment).
Here’s the grocery list of software you’ll need to download and install in the given order: The Java Development Kit (JDK), version 5 or 6. I suggest going for 6.
The Android Software Development Kit (Android SDK). Eclipse for Java Developers, version 3.4 or 3.5.
The Android Development Tools (ADT) plug-in for Eclipse. Let’s go through the steps required to set everything up properly.
NOTE: As the Web is a moving target, I don’t provide URLs here. Fire up your favorite search engine and find the appropriate places to get ahold of the above items.
Setting Up the JDK
Download the JDK with one of the specified versions for your operating system. On most systems it comes in the form of an installer or package, so there shouldn’t be any hurdles. Once the JDK is installed, it is advisable to add a new environment variable called JDK_HOME pointing to the root directory of the JDK installation. Additionally, you should add the $JDK_HOME/bin (%JDK_HOME%\bin on Windows) directory to your PATH environment variable.
Setting Up the Android SDK
The Android SDK is also available for the three mainstream desktop operating systems. Choose the one fitting for your platform and download it. The SDK comes in the form of a ZIP or tar gzip file. Just uncompress it to a convenient folder (e.g., c:\android-sdk on Windows or /opt/android-sdk on Linux). The SDK comes with a couple of command-line utilities located in the tools/ folder. Create an environment variable called ANDROID_HOME pointing to the root directory of the SDK installation and add
$ANDROID_HOME/tools (%ANDROID_HOME%\tools on Windows) to your PATH environment variable. This way you can easily invoke the command-line tools from a shell later on if the need arises.
After performing the preceding steps, you’ll have a bare-bones installation that consists of the basic command-line tools needed to create, compile, and deploy Android
projects, as well as the SDK and AVD manager, a tool for installing SDK components and creating virtual devices used by the emulator. These tools alone are not sufficient to start developing, so you need to install additional components. That’s were the SDK and AVD manager comes in. The manager is a package manager, much like the package management tools you find on Linux. The manager allows you to install the following types of components:
Android platforms: For every official Android release there’s a platform component for the SDK that includes the runtime libraries, a system image used by the emulator, and any version-specific tools.
SDK add-ons: Add-ons are usually external libraries and tools that are not specific to a platform. Some examples of these are the Google APIs that allow you to integrate Google maps in your application.
CHAPTER 2: First Steps with the Android SDK
27
Samples: For each platform there’s also a set of platform-specific samples. These are great resources for seeing how to achieve specific goals with the Android runtime library.
Documentation: This is a local copy of the documentation for the latest Android framework API.
Being the greedy developers we are, we want to install all of these components to have the full set of functionality at our disposal. For this, we first have to start the SDK and AVD manager. On Windows there’s an executable called SDK manager.exe in the root directory of the SDK. On Linux and Mac OS X you simply start the script android in the tools directory of the SDK.
[image:31.612.71.469.255.456.2]Upon first startup, the SDK and AVD manager will connect to the package server and fetch a list of available packages. It will then present you with the dialog in Figure 2–1, which allows you to install individual packages. Simply check Accept All, click the Install button, and make yourself a nice cup of tea or coffee. The manager will take a while to install all the packages.
Figure 2–1. First contact with the SDK and AVD manager
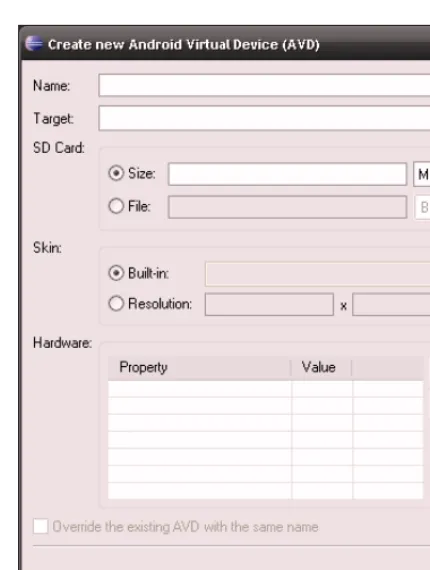
You can use the SDK and AVD manager at any time to update components or install new ones. The manager is also used to create new AVDs, which will be necessary later on when we start running and debugging our applications on the emulator.
Installing Eclipse
Eclipse comes in a couple of different flavors. For Android developers, I suggest using Eclipse for Java Developers version 3.6, Like the Android SDK, Eclipse comes in the form of a ZIP or tar gzip package. Simply extract it to a folder of your choice. Once it’s uncompressed, you can create a nice little shortcut on your desktop to the eclipse executable in the root directory of your Eclipse installation.
The first time you start Eclipse, you will be prompted to specify a workspace directory. Figure 2–2 shows you the dialog for this.
Figure 2–2. Choosing a workspace
A workspace is Eclipse’s notion of a folder containing a set of projects. Whether you use a single workspace for all your projects or multiple workspaces that group just a few projects is completely up to you. The sample projects accompanying this book are all organized in a single workspace, which you could specify in this dialog. For now, we’ll simply create an empty workspace somewhere.
Eclipse will then greet us with a welcome screen, which we can safely ignore and close. This will leave us with the default Eclipse Java perspective. We’ll get to know Eclipse a little better in a later section. For now it suffices to have it running.
Installing the ADT Eclipse Plug-In
CHAPTER 2: First Steps with the Android SDK
29
Installing plug-ins for Eclipse can be done either manually, by dropping the contents of a plug-in ZIP file into the plug-ins folder of Eclipse, or via the Eclipse plug-in manager integrated with Eclipse. Here we’ll choose the second route.
1. To install a new plug-in, go to Help Install New Software..., which will open the installation dialog. In this dialog you can choose from which source to install what plug-in. First, you have to add the plug-in
repository from which the ADT plug-in is fetched. Click the Add button, and you will be presented with the dialog depicted in Figure 2–3.
2. In the first text field, you can enter the name of the repository;
something like “ADT repository” will do. The second text field specifies the URL of the repository. For the ADT plug-in, this field should be https://dl-ssl.google.com/android/eclipse/. Note that this URL might be different for newer versions, so check the ADT plug-in site for an up-to-date link.
Figure 2–3. Adding a repository
3. After you’ve confirmed the dialog, you’ll be brought back to the installation dialog, which should now be fetching the list of available plug-ins in the repository. Check the Developer Tools check box and click the Next button.
4. Eclipse will now calculate all the necessary dependencies, and then present you a new dialog that lists all the plug-ins and dependencies that are going to be installed. Confirm that dialog with a click on the Next button.
5. Yet another dialog will pop up, prompting you to accept the licenses of each plug-in to be installed. You should of course accept those
NOTE: During the installation you will be asked to confirm the installation of unsigned software. Don’t worry, the plug-ins simply do not have a verified signature. Agree to the installation to continue the process.
6. Finally, Eclipse will ask you whether it should restart to apply the changes. You can opt for a full restart or for applying the changes without a restart. To play it safe, choose Restart Now, which will restart Eclipse as expected.
After all this dialog madness, you’ll be presented with the same Eclipse window as before. The toolbar features a couple of new buttons specific to Android, which allow you to start the SDK and AVD manager directly from within Eclipse, as well as create new Android projects. Figure 2–4 shows these new shiny toolbar buttons.
Figure 2–4. ADT toolbar buttons
The first button on the left allows you to open the AVD and SDK Manager. The next button is a shortcut to creating a new Android project. The other two buttons will create a new unit test project or Android manifest file (functionality we won’t use in this book). As one last step in finishing the installation of the ADT in, you have to tell the plug-in where the Android SDK is located.
1. Open Window Preferences, and select Android in the tree view in the upcoming dialog.
2. On the right side, click the Browse button to chose the root directory of your Android SDK installation.
3. Click the OK button to close the dialog, and you’ll finally able to create your first Android application.
A Quick Tour of Eclipse
Eclipse is an open source IDE that you can use to develop applications written in various languages. Usually, Eclipse is used in connection with Java development. Given its plug-in architecture, a lot of extensions have been created, so it is also possible to develop pure C/C++, Scala, or Python projects as well. The possibilities are endless; there even exist plug-ins to write LaTeX projects, for example—something only slightly resembling your usual code development tasks.
CHAPTER 2: First Steps with the Android SDK
31
The user interface (UI) of Eclipse revolves around two concepts:
A view, which is a single UI component such as a source code editor, an output console, or a project explorer
A perspective, which is a set of specific views that you’ll most likely need for a specific development task, such as editing and browsing source code, debugging, profiling, synchronization with a version control repository, and so on.
[image:35.612.73.469.231.509.2]Eclipse for Java Developers comes with a couple of predefined perspectives. The ones we are most interested in are called Java and Debug. The Java perspective is the one shown in Figure 2–5. It features the Package Explorer view on the left side, a source-editing view in the middle (it’s empty as we didn’t open a source file yet), a Task List view to the right, an Outline view, and a tabbed view that contains subviews called Problems view, Javadoc view, and Declaration view.
Figure 2–5. Eclipse in action—the Java perspective
To switch to another perspective, you can go to Window Open Perspective and choose the one you want. A faster way to switch between already open perspectives is given to you in the top-left corner of Eclipse. There you will see which perspectives are already open and which perspective is the active one. In Figure 2–5, notice that the Java perspective is open and active. It’s the only currently open perspective. Once you open additional perspectives, they will also show up in that part of the UI.
The toolbars shown in Figure 2–5 are also just views. Depending on the perspective you are in, the toolbars may change as well. Recall that a couple of new buttons appeared in the toolbar after we installed the ADT plug-in. This is common behavior of plug-ins: they will in general add new views and perspectives. In the case of the ADT plug-in, we can now also access a perspective called DDMS (which is specific to debugging and profiling Android applications) in addition to the standard Java Debug perspective. The ADT plug-in also adds a couple of new views, including the LogCat view, which displays the live logging information of any attached device or emulator.
Once you get comfortable with the perspective and view concepts, Eclipse is a lot less intimidating. In the following subsections, we will explore some of the perspectives and views we’ll use to write Android games. I can’t possibly cover all the details of
developing with Eclipse, as it is such a huge beast. I therefore advise you to learn more about Eclipse via its extensive help system if the need arises.
Hello World, Android Style
With our development set up, we can now finally create our first Android project in Eclipse. The ADT plug-in installed a couple of wizards for us to make the creation of new Android projects really easy.
Creating the Project
There are two ways to create a new Android project. The first one works by right-clicking in the Package Explorer view (see Figure 2–4) and selecting New Project... from the pop-up menu. In the new dialog, select Android Project under the Android category. As you can see, there are a lot of other options for project creation in that dialog. This is the standard way to create a new project of any type in Eclipse. After confirming the dialog, the Android project wizard will open.
The second way is a lot easier: just click the button responsible for creating a new Android project (shown earlier in Figure 2–4).
Once you are in the Android project wizard dialog, you have to make a few choices. 1. First, you must define the project name. A usual convention is to keep it
all lowercase. For this example, name the project “hello world.”
CHAPTER 2: First Steps with the Android SDK
33
NOTE: In Chapter 1 you saw that each new release of Android adds new classes to the Android framework API. The build target specifies which version of this API you want to use in your application. For example, if you choose the Android 2.3 build target, you get access to the latest and greatest API features. This comes at a risk, though: if your application is run on a device that uses a lower API version (say, a device running Android version 1.5), then your application will crash if you access API features that are only available in version 2.3. In this case, you’d need to detect the supported SDK version during runtime and only access the 2.3 features when you’re sure that the Android version on the device supports it. This may sound pretty nasty, but as you’ll see in Chapter 5, given a good application architecture you can easily enable and disable certain version-specific features without running the risk of crashing.
3. Next, you have to specify the name of your application (e.g., Hello World), the name of the Java package in which all your source files will eventually be located (e.g., com.helloworld), and an activity name. An activity is similar to a window or dialog on a desktop operating system. Let’s just name it HelloWorldActivity.
4. The Min SDK Version field allows you to specify what minimum Android version your application requires to run. This parameter is not required, but it’s good practice to specify it. SDK versions are numbered starting from 1 (1.0) and increase with each release. Since 1.5 is the third release, specify 3 here. Remember that you had to specify a build target previously, which might be newer than the minimum SDK version. This allows you to work with a higher API level, but also deploy to older versions of Android (making sure that you only call the supported API methods for that version, of course).
5. Click Finish to create your first Android project.
NOTE: Setting the minimum SDK version has some implications. The application can only be run on devices with an Android version equal to or greater than the minimum SDK version you specify. When a user browses the Android Market via the Market application, only applications with a fitting minimum SDK version will be shown to her.
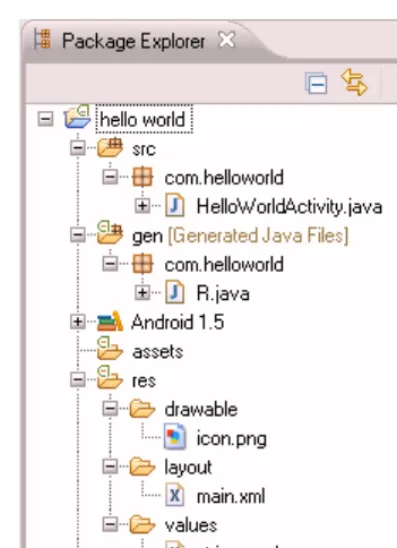
Exploring the Project
AndroidManifest.xml describes your application. It defines what activities and services it is composed of, what minimum and target Android version it is supposed to run on, and what permissions it needs (e.g., access to the SD card or networking).
default.properties holds various settings for the build system. We won’t touch this, as the ADT plug-in will take care of modifying it when necessary.
src/ contains all your Java source files. Notice that the package has the same name as the one you specified in the Android project wizard.
gen/ contains Java source files generated by the Android build system. You shouldn’t mess with them, as they get regenerated automatically in some cases.
assets/ is where you store file our application needs (e.g.,
configuration files or audio files and the like). These files get packaged with your Android application.
res/ holds resources your application needs, such as icons, strings for internationalization, and UI layouts defined via XML. Like assets, they also get packaged with your application.
Android 1.5 tells us that we are building against an Android version 1.5 target. This is actually a dependency in the form of a standard JAR file that holds the classes of the Android 1.5 API.
CHAPTER 2: First Steps with the Android SDK
35
Figure 2–6. Hello World project structure
We can easily add new source files, folders, and other resources in the Package Explorer view by right-clicking the folder we want to put the new resources in, and selecting New plus the corresponding resource type we want to create. For now, though, we’ll leave everything as is. Next, let’s modify the source code a little.
Writing the Application Code
We still haven’t written a single line of code, so let’s change that. The Android project wizard created a template activity class for us called HelloWorldActivity, which will get displayed when we run the application on the emulator or a device. Open the source of the class by double-clicking the file in the Package Explorer view. We’ll replace that template code with the code in Listing 2–1.
Listing 2–1. HelloWorldActivity.java package com.helloworld;
import android.app.Activity; import android.os.Bundle; import android.view.View; import android.widget.Button;
implements View.OnClickListener { Button button;
int touchCount;
@Override
public void onCreate(Bundle savedInstanceState) { super.onCreate(savedInstanceState);
button = new Button(this); button.setText( "Touch me!" ); button.setOnClickListener(this); setContentView(button);
}
public void onClick(View v) { touchCount++;
button.setText("Touched me " + touchCount + " time(s)"); }
}
Let’s dissect Listing 2–1 so you can understand what it’s doing. We’ll leave the nitty-gritty details for later chapters. All we want is to get a sense of what’s happening here. The source code file starts off with the standard Java package declaration and a couple of imports. Most Android framework classes are located in the android package.
package com.helloworld;
import android.app.Activity; import android.os.Bundle; import android.view.View; import android.widget.Button;
Next, we define our HelloWorldActivity and let it extend the base class Activity, which is provided by the Android framework API. An Activity is a lot like a window in classical desktop UIs, with the constraint that it always fills the complete screen (except for the notification bar at the top of the Android UI). Additionally, we let it implement the interface OnClickListener. If you have experience with other UI toolkits, you’ll probably see what’s coming next. More on that in a second.
public class HelloWorldActivity extends Activity
implements View.OnClickListener {
We let our Activity have two members: a Button and an integer that counts how often the Button was clicked.
Button button; int touchCount;
Every Activity must implement the abstract method Activity.onCreate(), which gets called once by the Android system when the activity is first started. This replaces a constructor you’d normally expect to use to create an instance of a class. It is mandatory to call the base class onCreate() method as the first statement in the method body.
@Override