bsd hacks pdf
278
0
0
Full text
(2) 33. Hack 16 Format Text at the Command Line 34. Hack 17 Delimiter Dilemma 35. Hack 18 DOS Floppy Manipulation 36. Hack 19 Access Windows Shares Without a Server 37. Hack 20 Deal with Disk Hogs 38. Hack 21 Manage Temporary Files and Swap Space 39. Hack 22 Recreate a Directory Structure Using mtree 40. Hack 23 Ghosting Systems 41. Chapter 3. The Boot and Login Environments 42. Introduction 43. Hack 24 Customize the Default Boot Menu 44. Hack 25 Protect the Boot Process 45. Hack 26 Run a Headless System 46. Hack 27 Log a Headless Server Remotely 47. Hack 28 Remove the Terminal Login Banner 48. Hack 29 Protecting Passwords With Blowfish Hashes 49. Hack 30 Monitor Password Policy Compliance 50. Hack 31 Create an Effective, Reusable Password Policy 51. Hack 32 Automate Memorable Password Generation 52. Hack 33 Use One Time Passwords 53. Hack 34 Restrict Logins 54. Chapter 4. Backing Up 55. Introduction 56. Hack 35 Back Up FreeBSD with SMBFS 57. Hack 36 Create Portable POSIX Archives 58. Hack 37 Interactive Copy 59. Hack 38 Secure Backups Over a Network 60. Hack 39 Automate Remote Backups 61. Hack 40 Automate Data Dumps for PostgreSQL Databases 62. Hack 41 Perform Client-Server Cross-Platform Backups with Bacula 63. Chapter 5. Networking Hacks 64. Introduction 65. Hack 42 See Console Messages Over a Remote Login 66. Hack 43 Spoof a MAC Address.
(3) 67. Hack 44 Use Multiple Wireless NIC Configurations 68. Hack 45 Survive Catastrophic Internet Loss 69. Hack 46 Humanize tcpdump Output 70. Hack 47 Understand DNS Records and Tools 71. Hack 48 Send and Receive Email Without a Mail Client 72. Hack 49 Why Do I Need sendmail? 73. Hack 50 Hold Email for Later Delivery 74. Hack 51 Get the Most Out of FTP 75. Hack 52 Distributed Command Execution 76. Hack 53 Interactive Remote Administration 77. Chapter 6. Securing the System 78. Introduction 79. Hack 54 Strip the Kernel 80. Hack 55 FreeBSD Access Control Lists 81. Hack 56 Protect Files with Flags 82. Hack 57 Tighten Security with Mandatory Access Control 83. Hack 58 Use mtree as a Built-in Tripwire 84. Hack 59 Intrusion Detection with Snort, ACID, MySQL, and FreeBSD 85. Hack 60 Encrypt Your Hard Disk 86. Hack 61 Sudo Gotchas 87. Hack 62 sudoscript 88. Hack 63 Restrict an SSH server 89. Hack 64 Script IP Filter Rulesets 90. Hack 65 Secure a Wireless Network Using PF 91. Hack 66 Automatically Generate Firewall Rules 92. Hack 67 Automate Security Patches 93. Hack 68 Scan a Network of Windows Computers for Viruses 94. Chapter 7. Going Beyond the Basics 95. Introduction 96. Hack 69 Tune FreeBSD for Different Applications 97. Hack 70 Traffic Shaping on FreeBSD 98. Hack 71 Create an Emergency Repair Kit 99. Hack 72 Use the FreeBSD Recovery Process 100. Hack 73 Use the GNU Debugger to Analyze a Buffer Overflow.
(4) 101. Hack 74 Consolidate Web Server Logs 102. Hack 75 Script User Interaction 103. Hack 76 Create a Trade Show Demo 104. Chapter 8. Keeping Up-to-Date 105. Introduction 106. Hack 77 Automated Install 107. Hack 78 FreeBSD from Scratch 108. Hack 79 Safely Merge Changes to /etc 109. Hack 80 Automate Updates 110. Hack 81 Create a Package Repository 111. Hack 82 Build a Port Without the Ports Tree 112. Hack 83 Keep Ports Up-to-Date with CTM 113. Hack 84 Navigate the Ports System 114. Hack 85 Downgrade a Port 115. Hack 86 Create Your Own Startup Scripts 116. Hack 87 Automate NetBSD Package Builds 117. Hack 88 Easily Install Unix Applications on Mac OS X 118. Chapter 9. Grokking BSD 119. Introduction 120. Hack 89 How'd He Know That? 121. Hack 90 Create Your Own Manpages 122. Hack 91 Get the Most Out of Manpages 123. Hack 92 Apply, Understand, and Create Patches 124. Hack 93 Display Hardware Information 125. Hack 94 Determine Who Is on the System 126. Hack 95 Spelling Bee 127. Hack 96 Leave on Time 128. Hack 97 Run Native Java Applications 129. Hack 98 Rotate Your Signature 130. Hack 99 Useful One-Liners 131. 9.13 Fun with X 132. index 133. index_SYMBOL 134. index_A.
(5) 135. index_B 136. index_C 137. index_D 138. index_E 139. index_F 140. index_G 141. index_H 142. index_I 143. index_J 144. index_K 145. index_L 146. index_M 147. index_N 148. index_O 149. index_P 150. index_Q 151. index_R 152. index_S 153. index_T 154. index_U 155. index_V 156. index_W 157. index_X 158. index_Y 159. index_Z. < Day Day Up >.
(6) Table of Contents Index Reviews Reader Reviews Errata Academic BSD Hacks By Dru Lavigne Publisher: O'Reilly Pub Date: May 2004 ISBN: 0-596-00679-9 Pages: 300. Looking for a unique set of practical tips, tricks, and tools for administrators and power users of BSD systems? From hacks to customize the user environment to networking, securing the system, and optimization, BSD Hacks takes a creative approach to saving time and accomplishing more with fewer resources. If you want more than the average BSD user--to explore and experiment, unearth shortcuts, create useful tools--this book is a must-have. < Day Day Up >.
(7) < Day Day Up >. Table of Contents Index Reviews Reader Reviews Errata Academic BSD Hacks By Dru Lavigne Publisher: O'Reilly Pub Date: May 2004 ISBN: 0-596-00679-9 Pages: 300. Credits About the Author Contributors Acknowledgments Preface Why BSD Hacks? How to Use this Book How This Book Is Organized.
(8) Conventions Used in This Book Using Code Examples We'd Like to Hear from You Chapter 1. Customizing the User Environment Section 0. Introduction Section 1. Get the Most Out of the Default Shell Section 2. Useful tcsh Shell Configuration File Options Section 3. Create Shell Bindings Section 4. Use Terminal and X Bindings Section 5. Use the Mouse at a Terminal Section 6. Get Your Daily Dose of Trivia Section 7. Lock the Screen Section 8. Create a Trash Directory Section 9. Customize User Configurations Section 10. Maintain Your Environment on Multiple Systems Section 11. Use an Interactive Shell Section 12. Use Multiple Screens on One Terminal Chapter 2. Dealing with Files and Filesystems Section 12. Introduction Section 13. Find Things Section 14. Get the Most Out of grep Section 15. Manipulate Files with sed Section 16. Format Text at the Command Line Section 17. Delimiter Dilemma Section 18. DOS Floppy Manipulation Section 19. Access Windows Shares Without a Server Section 20. Deal with Disk Hogs Section 21. Manage Temporary Files and Swap Space Section 22. Recreate a Directory Structure Using mtree Section 23. Ghosting Systems Chapter 3. The Boot and Login Environments Introduction.
(9) Section 24. Customize the Default Boot Menu Section 25. Protect the Boot Process Section 26. Run a Headless System Section 27. Log a Headless Server Remotely Section 28. Remove the Terminal Login Banner Section 29. Protecting Passwords With Blowfish Hashes Section 30. Monitor Password Policy Compliance Section 31. Create an Effective, Reusable Password Policy Section 32. Automate Memorable Password Generation Section 33. Use One Time Passwords Section 34. Restrict Logins Chapter 4. Backing Up Introduction Section 35. Back Up FreeBSD with SMBFS Section 36. Create Portable POSIX Archives Section 37. Interactive Copy Section 38. Secure Backups Over a Network Section 39. Automate Remote Backups Section 40. Automate Data Dumps for PostgreSQL Databases Section 41. Perform Client-Server Cross-Platform Backups with Bacula Chapter 5. Networking Hacks Introduction Section 42. See Console Messages Over a Remote Login Section 43. Spoof a MAC Address Section 44. Use Multiple Wireless NIC Configurations Section 45. Survive Catastrophic Internet Loss Section 46. Humanize tcpdump Output Section 47. Understand DNS Records and Tools Section 48. Send and Receive Email Without a Mail Client Section 49. Why Do I Need sendmail? Section 50. Hold Email for Later Delivery.
(10) Section 51. Get the Most Out of FTP Section 52. Distributed Command Execution Section 53. Interactive Remote Administration Chapter 6. Securing the System Introduction Section 54. Strip the Kernel Section 55. FreeBSD Access Control Lists Section 56. Protect Files with Flags Section 57. Tighten Security with Mandatory Access Control Section 58. Use mtree as a Built-in Tripwire Section 59. Intrusion Detection with Snort, ACID, MySQL, and FreeBSD Section 60. Encrypt Your Hard Disk Section 61. Sudo Gotchas Section 62. sudoscript Section 63. Restrict an SSH server Section 64. Script IP Filter Rulesets Section 65. Secure a Wireless Network Using PF Section 66. Automatically Generate Firewall Rules Section 67. Automate Security Patches Section 68. Scan a Network of Windows Computers for Viruses Chapter 7. Going Beyond the Basics Introduction Section 69. Tune FreeBSD for Different Applications Section 70. Traffic Shaping on FreeBSD Section 71. Create an Emergency Repair Kit Section 72. Use the FreeBSD Recovery Process Section 73. Use the GNU Debugger to Analyze a Buffer Overflow Section 74. Consolidate Web Server Logs Section 75. Script User Interaction Section 76. Create a Trade Show Demo Chapter 8. Keeping Up-to-Date.
(11) Introduction Section 77. Automated Install Section 78. FreeBSD from Scratch Section 79. Safely Merge Changes to /etc Section 80. Automate Updates Section 81. Create a Package Repository Section 82. Build a Port Without the Ports Tree Section 83. Keep Ports Up-to-Date with CTM Section 84. Navigate the Ports System Section 85. Downgrade a Port Section 86. Create Your Own Startup Scripts Section 87. Automate NetBSD Package Builds Section 88. Easily Install Unix Applications on Mac OS X Chapter 9. Grokking BSD Introduction Section 89. How'd He Know That? Section 90. Create Your Own Manpages Section 91. Get the Most Out of Manpages Section 92. Apply, Understand, and Create Patches Section 93. Display Hardware Information Section 94. Determine Who Is on the System Section 95. Spelling Bee Section 96. Leave on Time Section 97. Run Native Java Applications Section 98. Rotate Your Signature Section 99. Useful One-Liners Section 9.13. Fun with X Index < Day Day Up > < Day Day Up >.
(12) Credits •. About the Author. •. Contributors. •. Acknowledgments < Day Day Up > < Day Day Up >. About the Author Dru Lavigne is the author of ONLamp.com's FreeBSD Basics column and has been an avid BSD user since FreeBSD 2.2.1. As an IT instructor, she specializes in networking, routing, and security. She is also responsible for ISECOM's Protocol Database, which can be found at http://www.isecom.org. < Day Day Up > < Day Day Up >.
(13) Contributors The following people contributed their hacks, writing, and inspiration to this book: • •. John Richard, known locally as JR, is a system administrator in Kingston, Ontario, Canada. His trademark in the field is his insistence on a FreeBSD box as the primary firewall on a network. He has enjoyed working with the author in the past at a private college in Kingston. In his spare time, he experiments with FreeBSD and rides his Harley-Davidson.. • •. [Hack #64]. •. Joe Warner is a Technical Analyst for Siemens Medical Solutions Health Services Corporation and has been using FreeBSD as a server and desktop since October of 2000. Joe has lived in Salt Lake City, Utah for most of his life and enjoys *BSD, computing, history, and The Matrix.. • •. [Hacks #35 and #59]. •. Dan Langille (http://www.langille.org/) runs a consulting group in Ottawa, Canada. He has fond memories of his years in New Zealand, where the climate is much more conducive to year-round mountain biking. He lives in a house ruled by felines.. • •. [Hack #41]. •. Robert Bernier's professional career has included engineering, accident investigation, and Olympic trials. In the 1980s, his interest returned to IT when he realized he wouldn't have to use a punch card anymore. Eventually he discovered Linux and by the mid-1990s had developed a passion for all things open source. Today, Robert teaches at the local community college and writes for a number of IT publications based in North America and Europe.. • •. [Hack #12]. •. Kirk Russell ([email protected]) is a kernel tester at QNX Software Systems (http://www.qnx.com/)..
(14) < Day Day Up > < Day Day Up >. Acknowledgments I would like to thank the many BSD and open source users who so willingly shared their experiences, ideas, and support. You serve as a constant reminder that BSD is more than an operating system—it is a community.. I would also like to thank all of my students and the readers of the FreeBSD Basics column. Your questions and feedback fuel my curiosity; may this book return that favor.. Thanks to David Lents and Rob Flickenger for reviews and advice. Special thanks to Jacek Artymiak for his invaluable input from the OpenBSD and NetBSD perspectives. And finally, special thanks to chromatic. A writer couldn't have asked for a better editor. < Day Day Up > < Day Day Up >.
(15) Preface "What was it about UNIX that won my heart? . . . UNIX is mysterious when you first approach. A little intimidating, too. But despite an unadorned and often plain presentation, the discerning suitor can tell there's lot going on under the surface." —Thomas Scoville, http://unix.oreilly.com/news/unix_love_0299.html. When the above-mentioned article was first published, I was still very much a BSD newbie. My spare hours were spent struggling with kernel recompiles, PPP connectivity (or lack thereof), rm and chmod disasters, and reading and rereading every bit of the then available documentation. Yet, that article gave voice to my experience, for, like the quoted author, I had stumbled upon operating system love. In other words, I was discovering how to hack on BSD.. Since then, I've learned that there is an unspoken commonality between the novice Unix user and the seasoned guru. It doesn't matter whether you've just survived your first successful installation or you've just executed a complex script that will save your company time and money, the feeling is the same. It's the excitement of venturing into unknown territory and discovering something new and wonderful. It's that sense of accomplishment that comes with figuring something out for yourself, with finding your own solution to the problem at hand.. This book contains 100 hacks written by users who love hacking with BSD. You'll find hacks suited to both the novice user and the seasoned veteran, as well as everyone in between. Read them in any order that suits your purpose, but keep the "onion principle" in mind. While each hack does present at least one practical solution to a problem, that's just the outer layer. Use your imagination to peel away deeper layers, exposing new solutions as you do so..
(16) < Day Day Up > < Day Day Up >. Why BSD Hacks? The term hacking has an unfortunate reputation in the popular press, where it often refers to someone who breaks into systems or wreaks havoc with computers. Among enthusiasts, on the other hand, the term hack refers to a "quick-n-dirty" solution to a problem or a clever way to do something. The term hacker is very much a compliment, praising someone for being creative and having the technical chops to get things done. O'Reilly's Hacks series is an attempt to reclaim the word, document the ways people are hacking (in a good way), and pass the hacker ethic of creative participation on to a new generation of hackers. Seeing how others approach systems and problems is often the quickest way to learn about a new technology.. BSD Hacks is all about making the most of your BSD system. The BSDs of today have a proud lineage, tracing back to some of the original hackers—people who built Unix and the Internet as we know it today. As you'd expect, they faced many problems and solved problems both quickly and elegantly. We've collected some of that wisdom, both classic and modern, about using the command line, securing systems, keeping track of your files, making backups, and, most importantly, how to become your own BSD guru along the way. < Day Day Up >.
(17) < Day Day Up >. How to Use this Book One of the beauties of Unix is that you can be very productive with surprisingly little knowledge. Even better, each new trick you learn can shave minutes off of your day. We've arranged the chapters in this book by subject area, not by any suggested order of learning. Skip around to what interests you most or solves your current problem. If the current hack depends on information in another hack, we'll include a link for you to follow.. Furthermore, the "See Also" sections at the end of individual hacks often include references such as man fortune. These refer to the manual pages installed on your machine. If you're not familiar with these manpages, start with [Hack #89] . < Day Day Up > < Day Day Up >.
(18) How This Book Is Organized To master BSD, you'll have to understand several topics. We've arranged the hacks loosely into chapters. They are:. Chapter 1Customizing the User Environment. Though modern BSDs have myriad graphical applications and utilities, the combined wisdom of 35 years of command-line programs is just a shell away. This chapter demonstrates how to make the most of the command line, customizing it to your needs and preferences.. Chapter 2Dealing with Files and Filesystems. What good is knowing Unix commands if you have no files? You have to slice, dice, and store data somewhere. This chapter explains techniques for finding and processing information, whether it's on your machine or on a server elsewhere.. Chapter 3The Boot and Login Environments. The best-laid security plans of administrators often go out the window when users enter the picture. Keeping the bad guys off of sensitive machines requires a two-pronged approach: protecting normal user accounts through good password policies and protecting the boxes physically. This chapter explores several options for customizing and securing the boot and login processes.. Chapter 4Backing Up. After you start creating files, you're bound to run across data you can't afford to lose. That's where backups come in. This chapter offers several ideas for various methods of ensuring that your precious data will persist in the face of tragedy.. Chapter 5Networking Hacks. Unless you're a die-hard individualist, you're likely connected to a network. That fact presents several new opportunities for clever hacks.
(19) < Day Day Up > < Day Day Up >.
(20) Conventions Used in This Book This book uses the following typographical conventions:. Italic. Indicates new terms, URLs, email addresses, filenames, pathnames, and directories.. Constant width. Indicates commands, options, switches, variables, attributes, functions, user and group names, the contents of files, and the output from commands.. Constant width bold. In code examples, shows commands or other text that should be typed literally by the user.. Constant width italic. Shows text that should be replaced with user-supplied values.. Color. The second color is used to indicate a cross-reference within the text.. This icon signifies a tip, suggestion, or general note.. This icon indicates a warning or caution..
(21) < Day Day Up > < Day Day Up >. Using Code Examples This book is here to help you get your job done. In general, you may use the code in this book in your programs and documentation. You do not need to contact us for permission unless you're reproducing a significant portion of the code. For example, writing a program that uses several chunks of code from this book does not require permission. Selling or distributing a CD-ROM of examples from O'Reilly books does require permission. Answering a question by citing this book and quoting example code does not require permission. Incorporating a significant amount of example code from this book into your product's documentation does require permission.. We appreciate, but do not require, attribution. An attribution usually includes the title, author, publisher, and ISBN, for example: "BSD Hacks by Dru Lavigne. Copyright 2004 O'Reilly Media, Inc., 0-596-00679-9.". If you feel your use of code examples falls outside fair use or the permission given here, feel free to contact us at [email protected]. < Day Day Up >.
(22) < Day Day Up >. We'd Like to Hear from You Please address comments and questions concerning this book to the publisher: O'Reilly Media, Inc. 1005 Gravenstein Highway North Sebastopol, CA 95472 (800) 998-9938 (in the United States or Canada)(707) 829-0515 (international or local) (707) 829-0104 (fax) We have a web page for this book, where we list errata, examples, and any additional information. You can access this page at: http://www.oreilly.com/catalog/bsdhks To comment or ask technical questions about this book, send email to: [email protected] For more information about our books, conferences, Resource Centers, and the O'Reilly Network, see our web site at: http://www.oreilly.com/ < Day Day Up > < Day Day Up >.
(23) Chapter 1. Customizing the User Environment •. Section 0. Introduction. •. Section 1. Get the Most Out of the Default Shell. •. Section 2. Useful tcsh Shell Configuration File Options. •. Section 3. Create Shell Bindings. •. Section 4. Use Terminal and X Bindings. •. Section 5. Use the Mouse at a Terminal. •. Section 6. Get Your Daily Dose of Trivia. •. Section 7. Lock the Screen. •. Section 8. Create a Trash Directory. •. Section 9. Customize User Configurations. •. Section 10. Maintain Your Environment on Multiple Systems. •. Section 11. Use an Interactive Shell. •. Section 12. Use Multiple Screens on One Terminal < Day Day Up >.
(24) < Day Day Up >. Hack 0 Introduction Users of open source (http://opensource.org) Unix operating systems are an interesting breed. They like to poke under the surface of things, to find out how things work, and to figure out new and interesting ways of accomplishing common computing tasks. In short, they like to "hack.". While this book concentrates on the BSDs, many of the hacks apply to any open source operating system. Each hack is simply a demonstration of how to examine a common problem from a slightly different angle. Feel free to use any of these hacks as a springboard to your own customized solution. If your particular operating system doesn't contain the tool used in the solution, use a tool that does exist, or invent your own!. This chapter provides many tools for getting the most out of your working environment. You'll learn how to make friends with your shell and how to perform your most common tasks with just a few keystrokes or mouse clicks. You'll also uncover tricks that can help prevent command-line disasters. And, above all, you'll discover that hacking BSD is fun. So, pull your chair up to your operating system of choice and let's start hacking. < Day Day Up > < Day Day Up >.
(25)
(26) Hack 1 Get the Most Out of the Default Shell. Become a speed daemon at the command line.. For better or for worse, you spend a lot of time at the command line. If you're used to administering a Linux system, you may be dismayed to learn that bash is not the default shell on a BSD system, for either the superuser or regular user accounts.. Take heart; the FreeBSD superuser's default tcsh shell is also brimming with shortcuts and little tricks designed to let you breeze through even the most tedious of tasks. Spend a few moments learning these tricks and you'll feel right at home. If you're new to the command line or consider yourself a terrible typist, read on. Unix might be a whole lot easier than you think.. NetBSD and OpenBSD also ship with the C shell as their default shell. However, it is not always the same tcsh, but often its simpler variant, csh, which doesn't support all of the tricks provided in this hack.. However, both NetBSD and OpenBSD provide a tcsh package in their respective package collections.. 1.2.1 History and Auto-Completion. I hate to live without three keys: up arrow, down arrow, and Tab. In fact, you can recognize me in a crowd, as I'm the one muttering loudly to myself if I'm on a system that doesn't treat these keys the way I expect to use them.. tcsh uses the up and down arrow keys to scroll through your command history. If there is a golden rule to computing, it should be: "You should never have to type a command more than once." When you need to.
(27) < Day Day Up > < Day Day Up >.
(28) Hack 2 Useful tcsh Shell Configuration File Options. Make the shell a friendly place to work in.. Now that you've had a chance to make friends with the shell, let's use its configuration file to create an environment you'll enjoy working in. Your prompt is an excellent place to start.. 1.3.1 Making Your Prompt More Useful. The default tcsh prompt displays % when you're logged in as a regular user and hostname# when you're logged in as the superuser. That's a fairly useful way to figure out who you're logged in as, but we can do much better than that.. Each user on the system, including the superuser, has a .cshrc file in his home directory. Here are my current prompt settings: dru@~:grep prompt ~/.cshrc if ($?prompt) then set prompt = "%B%n@%~%b: ". That isn't the default tcsh prompt, as I've been using my favorite customized prompt for the past few years. The possible prompt formatting sequences are easy to understand if you have a list of possibilities in front of you. That list is buried deeply within man cshrc, so here's a quick way to zero in on it: dru@~:man cshrc /prompt may include. Here I've used the / to invoke the manpage search utility. The search string prompt may include brings you to the right section, and is intuitive enough that even my rusty old brain can remember it.. If you compare the formatting sequences shown in the manpage to my prompt string, it reads as follows: set prompt = "%B%n@%~%b: ". That's a little dense. Table 1-1 dissects the options..
(29) < Day Day Up > < Day Day Up >.
(30) Hack 3 Create Shell Bindings. Train your shell to run a command for you whenever you press a mapped key.. Have you ever listened to a Windows power user expound on the joys of hotkeys? Perhaps you yourself have been known to gaze wistfully at the extra buttons found on a Microsoft keyboard. Did you know that it's easy to configure your keyboard to launch your most commonly used applications with a keystroke or two?. One way to do this is with the bindkey command, which is built into the tcsh shell. As the name suggests, this command binds certain actions to certain keys. To see your current mappings, simply type bindkey. The output is several pages long, so I've included only a short sample. However, you'll recognize some of these shortcuts from [Hack #1]. Standard key bindings "^A". ->. beginning-of-line. "^B". ->. backward-char. "^E". ->. end-of-line. "^F". ->. forward-char. "^L". ->. clear-screen. "^N". ->. down-history. "^P". ->. up-history. "^U". ->. kill-whole-line. Arrow key bindings down. -> history-search-forward. up. -> history-search-backward. left. -> backward-char. right. -> forward-char. home. -> beginning-of-line. end. -> end-of-line. The ^ means hold down your Ctrl key. For example, press Ctrl and then l, and you'll clear your screen more quickly than by typing clear..
(31) < Day Day Up > < Day Day Up >.
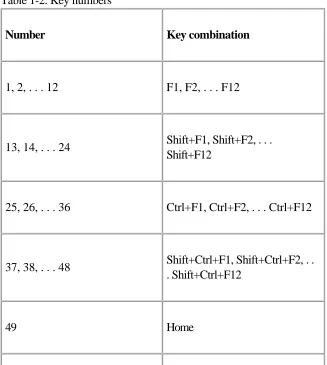
(32) Hack 4 Use Terminal and X Bindings. Take advantage of your terminal's capabilities.. It's not just the tcsh shell that is capable of understanding bindings. Your FreeBSD terminal provides the kbdcontrol command to map commands to your keyboard. Unfortunately, neither NetBSD nor OpenBSD offer this feature. You can, however, remap your keyboard under X, as described later.. 1.5.1 Creating Temporary Mappings. Let's start by experimenting with some temporary mappings. The syntax for mapping a command with kbdcontrol is as follows: kbdcontrol -f number " command ". Table 1-2 lists the possible numbers, each with its associated key combination.. Table 1-2. Key numbers Number. Key combination. 1, 2, . . . 12. F1, F2, . . . F12. 13, 14, . . . 24. Shift+F1, Shift+F2, . . . Shift+F12. 25, 26, . . . 36. Ctrl+F1, Ctrl+F2, . . . Ctrl+F12. 37, 38, . . . 48. Shift+Ctrl+F1, Shift+Ctrl+F2, . . . Shift+Ctrl+F12. 49. Home.
(33) < Day Day Up > < Day Day Up >.
(34) Hack 5 Use the Mouse at a Terminal. Use your mouse to copy and paste at a terminal.. If you're used to a GUI environment, you might feel a bit out of your element while working at the terminal. Sure, you can learn to map hotkeys and to use navigational tricks, but darn it all, sometimes it's just nice to be able to copy and paste!. Don't fret; your mouse doesn't have to go to waste. In fact, depending upon how you have configured your system, the mouse daemon moused may already be enabled. The job of this daemon is to listen for mouse data in order to pass it to your console driver.. Of course, if you're using screen [Hack #12], you can also take advantage of its copy and paste mechanism.. 1.6.1 If X Is Already Installed. If you installed and configured X when you installed your system, moused is most likely started for you when you boot up. You can check with this: % grep moused /etc/rc.conf moused_port="/dev/psm0" moused_type="auto" moused_enable="YES". Very good. moused needs to know three things: • • •. The mouse port (in this example, /dev/psm0, the PS/2 port). • •. The type of protocol (in this example, auto).
(35) < Day Day Up > < Day Day Up >.
(36) Hack 6 Get Your Daily Dose of Trivia. Brighten your day with some terminal eye candy.. As the saying goes, all work and no play makes Jack a dull boy. But what's a poor Jack or Jill to do if your days include spending inordinate amounts of time in front of a computer screen? Well, you could head over to http://www.thinkgeek.net/ to stock up on cube goodies and caffeine. Or, you could take advantage of some of the entertainments built into your operating system.. 1.7.1 A Fortune a Day. Let's start by configuring some terminal eye candy. Does your system quote you a cheery, witty, or downright strange bit of wisdom every time you log into your terminal? If so, you're receiving a fortune: login: dru Password: Last login: Thu Nov 27 10:10:16 on ttyv7. "You can't have everything. Where would you put it?" -- Steven Wright. If you're not receiving a fortune, as the superuser type /stand/sysinstall. Choose Configure, then Distributions, and select games with your spacebar. Press Tab to select OK, then exit out of sysinstall when it is finished.. Then, look for the line that runs /usr/games/fortune in your ~/.cshrc file: % grep fortune ~/.cshrc /usr/games/fortune. If for some reason it isn't there, add it: % echo '/usr/games/fortune' >> ~/.cshrc. Don't forget to use both greater-than signs; you don't want to erase the contents of your .cshrc file! To test your change, use the source shell command, which re-executes the contents of the file. This can come in handy if you've updated an alias and want to take advantage of it immediately:.
(37) < Day Day Up > < Day Day Up >.
(38) Hack 7 Lock the Screen. Secure your unattended terminal from prying eyes.. If you work in a networked environment, the importance of locking your screen before leaving your workstation has probably been stressed to you. After all, your brilliant password becomes moot if anyone can walk up to your logged in station and start poking about the contents of your home directory.. If you use a GUI on your workstation, your Window Manager probably includes a locking feature. However, if you use a terminal, you may not be aware of the mechanisms available for locking your terminal.. As an administrator, you may want to automate these mechanisms as part of your security policy. Fortunately, FreeBSD's screen locking mechanism is customizable.. 1.8.1 Using lock. FreeBSD comes with lock (and it's available for NetBSD and OpenBSD). Its default invocation is simple: % lock Key: 1234 Again: 1234 lock /dev/ttyv6 on genisis. timeout in 15 minutes. time now is Fri Jan 2 12:45:02 EST 2004 Key:. Without any switches, lock will request that the user input a key which will be used to unlock the terminal. This is a good thing, as it gives the user an opportunity to use something other than her login password. If the user tries to be smart and presses Enter (for an empty password), the lock program will abort.. Once a key is set, it is required to unlock the screen. If a user instead types Ctrl-c, she won't terminate the program. Instead, she'll receive this message:.
(39) < Day Day Up > < Day Day Up >.
(40) Hack 8 Create a Trash Directory. Save "deleted" files until you're really ready to send them to the bit bucket.. One of the first things Unix users learn is that deleted files are really, really gone. This is especially true at the command line where there isn't any Windows-style recycling bin to rummage through should you have a change of heart regarding the fate of a removed file. It's off to the backups! (You do have backups, don't you?). Fortunately, it is very simple to hack a small script that will send removed files to a custom trash directory. If you've never written a script before, this is an excellent exercise in how easy and useful scripting can be.. 1.9.1 Shell Scripting for the Impatient. Since a script is an executable file, you should place your scripts in a directory that is in your path. Remember, your path is just a list of directories where the shell will look for commands if you don't give them full pathnames. To see your path: % echo $PATH PATH=/sbin:/bin:/usr/sbin:/usr/bin:/usr/games:/usr/loc al/sbin:/usr/ local/bin:/usr/X11R6/bin:/home/dru/bin. In this output, the shell will look for executables in the bin subdirectory of dru's home directory. However, it won't look for executables placed directly in my home directory, or /home/dru. Since bin isn't created by default, I should do that first: % cd % mkdir bin. As I create scripts, I'll store them in /home/dru/bin, since I don't have permission to store them anywhere else. Fortunately, no one else has permission to store them in my bin directory, so it's a good match.. The scripts themselves contain at least three lines: #!/bin/sh # a comment explaining what the script does.
(41) < Day Day Up > < Day Day Up >.
(42) Hack 9 Customize User Configurations. Now that you know how to set up a useful environment for yourself, it's time to share the wealth.. It's very easy for a system administrator to ensure that each newly created user starts out with the same configuration files. For example, every user can receive the same customized prompt, shell variables, or hotkeys.. Whenever you create a new user, several default (and hidden, or dot, files) are copied into the new user's home directory. In FreeBSD, the source of these files is /usr/share/skel/. Any customizations you make to these files will be seen by all subsequently created users. Do note that you'll have to manually copy over any modified files to existing users.. It's useful to understand these files, as they apply to every user you create. Depending upon your needs, you'll probably end up removing some of the defaults, customizing others, and even adding a few of your own.. 1.10.1 Default Files. Let's take a quick tour of the default files: % ls -l /usr/share/skel total 24 drwxr-xr-x. 2 root. wheel. 512 Jul 28 16:09 ./. drwxr-xr-x. 27 root. wheel. 512 Jul 28 16:06 ../. -rw-r--r--. 1 root. wheel. 921 Jul 28 16:09 dot.cshrc. -rw-r--r--. 1 root. wheel. 248 Jul 28 16:09 dot.login. -rw-r--r-1 root dot.login_conf. wheel. 158 Jul 28 16:09. -rw------1 root dot.mail_aliases. wheel. 371 Jul 28 16:09. -rw-r--r-dot.mailrc. 1 root. wheel. 331 Jul 28 16:09. -rw-r--r--. 1 root. wheel. 797 Jul 28 16:09.
(43) < Day Day Up > < Day Day Up >.
(44) Hack 10 Maintain Your Environment on Multiple Systems. The sign of a true Unix guru is the ability to perform a task quickly when confronted with an unfamiliar shell, keyboard, terminal, window manager, or operating system.. A large part of using Unix systems effectively involves configuring a comfortable environment using familiar tools available from the Unix shell prompt. It's much easier to perform a task quickly when all of the shortcuts your fingers have learned work on the first try.. Even something as simple as setting up your prompt the way you like it can steal significant time from your productivity if you need to do it on several hosts. If you're going to spend significant time in a Unix shell, it's worth getting organized. A bit of onetime effort will reward you later, every time you sit down at the keyboard.. 1.11.1 Enter unison. unison is a tool for maintaining synchronized copies of directories. I've used it to maintain a central repository of all of my dot files, shell scripts, signatures file, SpamAssassin configuration—basically any file I'd like to have available, regardless of which host I happen to be logged into.. You can install unison from the NetBSD pkgsrc collection: # cd /usr/pkgsrc/net/unison # make install clean. FreeBSD and OpenBSD ports also include net/unison.. Even better, this utility is available for most Unix and Windows platforms. See the main unison web site for details.. 1.11.2 Using unison. Whenever I configure a new Unix host or get a shell on another system, I install unison. Then, I create a directory to receive the files I've stored in the /usr/work/sync directory at host.example.com. I call the local.
(45) < Day Day Up > < Day Day Up >.
(46) Hack 11 Use an Interactive Shell. Save and share an entire login session.. How many times have you either struggled with or tried to troubleshoot another user through a thorny problem? Didn't you wish you had another set of eyes behind you so you could simply type your command set, point at the troublesome output, and say, "That's the problem." Well, if you can't bring another user to your output, you can still share that real-time output using an interactive shell.. 1.12.1 Recording All Shell Input and Output. There are actually several ways to share what is happening on your screen. Let's start by recording all of your input and output to a file. Then we'll see how we can also allow another user to view that output from another terminal.. Your BSD system comes with the script command which, not surprisingly, allows you to script your session. This command is extremely simple to use. Simply type script: % script Script started, output file is typescript. By default, script will create an output file named typescript in your current directory. If you prefer, you can specify a more descriptive name for your script file: % script configure.firewall.nov.11.2003 Script started, output file is configure.firewall.nov.11.2003. Regardless of how you invoke the command, a new shell will be created. This means that you will see the MOTD and possibly a fortune, and your .cshrc will be reread.. You can now carry on as usual and all input and output will be written to your script file. When you are finished, simply press Ctrl-d. You will see this message: Script done, output file is configure.firewall.nov.11.2003. If you've ended a script and decide later to append some more work to.
(47) < Day Day Up > < Day Day Up >.
(48) Hack 12 Use Multiple Screens on One Terminal. Running a graphical environment is great. You can have numerous applications and utilities running, and you can interact with all of them at the same time. Many people who have grown up with a GUI environment look down upon those poor souls who continue to work in a terminal console environment. "After all," they say, "you can only do one thing at a time and don't get the same information and control that you have in a desktop environment.". It's true; they do say those things. (I am curious to know who they are, however.). It's also true that the utility of a graphical environment diminishes when you need to administer machines remotely. Do you really want to squander network bandwidth just to maintain a GUI session?. Here are some more questions to ask yourself regarding remote administration: • •. Are you worried about making your services vulnerable just so you can administer them across the Internet?. • • •. Do you want a secure connection?. •. Do you want to run multiple terminal sessions from a single login?. • •. Do you want to be able to password protect your session to prevent unauthorized access?. • •. Do you want multiple windows with labels and of different sizes?. • • •. Do you want to copy and paste between the windows?.
(49) < Day Day Up > < Day Day Up >.
(50) Chapter 2. Dealing with Files and Filesystems •. Section 12. Introduction. •. Section 13. Find Things. •. Section 14. Get the Most Out of grep. •. Section 15. Manipulate Files with sed. •. Section 16. Format Text at the Command Line. •. Section 17. Delimiter Dilemma. •. Section 18. DOS Floppy Manipulation. •. Section 19. Access Windows Shares Without a Server. •. Section 20. Deal with Disk Hogs. •. Section 21. Manage Temporary Files and Swap Space. •. Section 22. Recreate a Directory Structure Using mtree. •. Section 23. Ghosting Systems < Day Day Up > < Day Day Up >.
(51) Hack 12 Introduction Now that you're a bit more comfortable with the Unix environment, it's time to tackle some commands. It's funny how some of the most useful commands on a Unix system have gained themselves a reputation for being user-unfriendly. Do find, grep, sed, tr, or mount make you shudder? If not, remember that you still have novice users who are intimidated by—and therefore aren't gaining the full potential of—these commands.. This chapter also addresses some useful filesystem manipulations. Have you ever inadvertently blown away a portion of your directory structure? Would you like to manipulate /tmp or your swap partition? Do your Unix systems need to play nicely with Microsoft systems? Might you consider ghosting your BSD system? If so, this chapter is for you. < Day Day Up > < Day Day Up >.
(52) Hack 13 Find Things. Finding fles in Unix can be an exercise in frustration for a novice user. Here's how to soften the learning curve. Remember the first time you installed a Unix system? Once you successfully booted to a command prompt, I bet your first thought was, "Now what?" or possibly, "Okay, where is everything?" I'm also pretty sure your first foray into man find wasn't all that enlightening.. How can you as an administrator make it easier for your users to find things? First, introduce them to the built-in commands. Then, add a few tricks of your own to soften the learning curve.. 2.2.1 Finding Program Paths. Every user should become aware of the three w's: which, whereis, and whatis. (Personally, I'd like to see some why and when commands, but that's another story.). Use which to find the path to a program. Suppose you've just installed xmms and wonder where it went: % which xmms /usr/X11R6/bin/xmms. Better yet, if you were finding out the pathname because you wanted to use it in a file, save yourself a step: % echo `which xmms` >> somefile. Remember to use the backticks (`), often found on the far left of the keyboard on the same key as the tilde (~). If you instead use the single quote (') character, usually located on the right side of the keyboard on the same key as the double quote ("), your file will contain the echoed string which xmms instead of the desired path.. The user's current shell will affect how which's switches work. Here is an example from the C shell: % which -a xmms -a: Command not found. /usr/X11R6/bin/xmms.
(53) < Day Day Up > < Day Day Up >.
(54) Hack 14 Get the Most Out of grep. You may not know where its odd name originated, but you can't argue the usefulness of grep.. Have you ever needed to find a particular file and thought, "I don't recall the filename, but I remember some of its contents"? The oddly named grep command does just that, searching inside files and reporting on those that contain a given piece of text.. 2.3.1 Finding Text. Suppose you wish to search your shell scripts for the text $USER. Try this: % grep -s '$USER' * add-user:if [ "$USER" != "root" ]; then bu-user: echo " user to backup". [-u user] - override $USER as the. bu-user:if [ "$user" = "" ]; then user="$USER"; fi del-user:if [ "$USER" != "root" ]; then mount-host:mounted=$(df | grep "$ALM_AFP_MOUNT/$USER") ..... mount-user: echo " the user to backup". [-u user] - override $USER as. mount-user:if [ "$user" = "" ]; then user="$USER"; fi. In this example, grep has searched through all files in the current directory, displaying each line that contained the text $USER. Use single quotes around the text to prevent the shell from interpreting special characters. The -s option suppresses error messages when grep encounters a directory.. Perhaps you only want to know the name of each file containing the text $USER. Use the -l option to create that list for you: % grep -ls '$USER' * add-user bu-user del-user.
(55) < Day Day Up > < Day Day Up >.
(56) Hack 15 Manipulate Files with sed. If you've ever had to change the formatting of a file, you know that it can be a time-consuming process.. Why waste your time making manual changes to files when Unix systems come with many tools that can very quickly make the changes for you?. 2.4.1 Removing Blank Lines. Suppose you need to remove the blank lines from a file. This invocation of grep will do the job: % grep -v '^$' letter1.txt > tmp ; mv tmp letter1.txt. The pattern ^$ anchors to both the start and the end of a line with no intervening characters—the regexp definition of a blank line. The -v option reverses the search, printing all nonblank lines, which are then written to a temporary file, and the temporary file is moved back to the original.. grep must never output to the same file it is reading, or the file will end up empty.. You can rewrite the preceding example in sed as: % sed '/^$/d' letter1.txt > tmp ; mv tmp letter1.txt. '/^$/d' is actually a sed script. sed's normal mode of operation is to read each line of input, process it according to the script, and then write the processed line to standard output. In this example, the expression '/^$/ is a regular expression matching a blank line, and the trailing d' is a sed function that deletes the line. Blank lines are deleted and all other lines are printed. Again, the results are redirected to a temporary file, which is then copied back to the original file.. 2.4.2 Searching with sed. sed can also do the work of grep: % sed -n '/$USER/p' *.
(57) < Day Day Up > < Day Day Up >.
(58) Hack 16 Format Text at the Command Line. Combine basic Unix tools to become a formatting expert.. Don't let the syntax of the sed command scare you off. sed is a powerful utility capable of handling most of your formatting needs. For example, have you ever needed to add or remove comments from a source file? Perhaps you need to shuffle some text from one section to another.. In this hack, I'll demonstrate how to do that. I'll also show some handy formatting tricks using two other built-in Unix commands, tr and col.. 2.5.1 Adding Comments to Source Code. sed allows you to specify an address range using a pattern, so let's put this to use. Suppose we want to comment out a block of text in a source file by adding // to the start of each line we wish to comment out. We might use a text editor to mark the block with bc-start and bc-end: % cat source.c if (tTd(27, 1)) sm_dprintf("%s (%s, %s) aliased to %s\n", a->q_paddr, a->q_host, a->q_user, p); bc-start if (bitset(EF_VRFYONLY, e->e_flags)) { a->q_state = QS_VERIFIED; return; } bc-end message("aliased to %s", shortenstring(p, MAXSHORTSTR));. and then apply a sed script such as: % sed '/bc-start/,/bc-end/s/^/\/\//' source.c.
(59) < Day Day Up > < Day Day Up >.
(60) Hack 17 Delimiter Dilemma. Deal with double quotation marks in delimited files.. Importing data from a delimited text file into an application is usually painless. Even if you need to change the delimiter from one character to another (from a comma to a colon, for example), you can choose from many tools that perform simple character substitution with great ease.. However, one common situation is not solved as easily: many business applications export data into a space- or comma-delimited file, enclosing individual fields in double quotation marks. These fields often contain the delimiter character. Importing such a file into an application that processes only one delimiter (PostgreSQL for example) may result in an incorrect interpretation of the data. This is one of those situations where the user should feel lucky if the process fails.. One solution is to write a script that tracks the use of double quotes to determine whether it is working within a text field. This is doable by creating a variable that acts as a text/nontext switch for the character substitution process. The script should change the delimiter to a more appropriate character, leave the delimiters that were enclosed in double quotes unchanged, and remove the double quotes. Rather than make the changes to the original datafile, it's safer to write the edited data to a new file.. 2.6.1 Attacking the Problem. The following algorithm meets our needs: 1. 1. Create the switch variable and assign it the value of 1, meaning "nontext". We'll declare the variable tswitch and define it as tswitch = 1. 2. 2. Create a variable for the delimiter and define it. We'll use the variable delim with a space as the delimiter, so delim = ' '. 3. 3. Decide on a better delimiter. We'll use the tab character, so new_delim = '\t'..
(61) < Day Day Up > < Day Day Up >.
(62) Hack 18 DOS Floppy Manipulation. Bring simplicity back to using floppies.. If you're like many Unix users, you originally came from a Windows background. Remember your initial shock the first time you tried to use a floppy on a Unix system? Didn't Windows seem so much simpler? Forever gone seemed the days when you could simply insert a floppy, copy some files over, and remove the disk from the drive. Instead, you were expected to plunge into the intricacies of the mount command, only to discover that you didn't even have the right to use the floppy drive in the first place!. There are several ways to make using floppies much, much easier on your FreeBSD system. Let's start by taking stock of the default mechanisms for managing floppies.. 2.7.1 Mounting a Floppy. Suppose I have formatted a floppy on a Windows system, copied some files over, and now want to transfer those files to my FreeBSD system. In reality, that floppy is a storage media. Since it is storing files, it needs a filesystem in order to keep track of the locations of those files. Because that floppy was formatted on a Windows system, it uses a filesystem called FAT12.. In Unix, a filesystem can't be accessed until it has been mounted. This means you have to use the mount command before you can access the contents of that floppy. While this may seem strange at first, it actually gives Unix more flexibility. An administrator can mount and unmount filesystems as they are needed. Note that I used the word administrator. Regular users don't have this ability, by default. We'll change that shortly.. Unix also has the additional flexibility of being able to mount different filesystems. In Windows, a floppy will always contain the FAT12 filesystem. BSD understands floppies formatted with either FAT12 or UFS, the Unix File System. As you might expect from the name, the UFS filesystem is assumed unless you specify otherwise.. For now, become the superuser and let's pick apart the default.
(63) < Day Day Up > < Day Day Up >.
(64) Hack 19 Access Windows Shares Without a Server. Share files between Windows and FreeBSD with a minimum of fuss.. You've probably heard of some of the Unix utilities available for accessing files residing on Microsoft systems. For example, FreeBSD provides the mount_smbfs and smbutil utilities to mount Windows shares and view or access resources on a Microsoft network. However, both of those utilities have a caveat: they require an SMB server. The assumption is that somewhere in your network there is at least one NT or 2000 Server.. Not all networks have the budget or the administrative expertise to allow for commercial server operating systems. Sure, you can install and configure Samba, but isn't that overkill for, say, a home or very small office network? Sometimes you just want to share some files between a Windows 9x system and a Unix system. It's a matter of using the right-sized tool for the job. You don't bring in a backhoe to plant flowers in a window box.. 2.8.1 Installing and Configuring Sharity-Light. If your small network contains a mix of Microsoft and Unix clients, consider installing Sharity-Light on the Unix systems. This application allows you to mount a Windows share from a Unix system. FreeBSD provides a port for this purpose (see the Sharity-Light web site for other supported platforms): # cd /usr/ports/net/sharity-light # make install clean. Since Sharity-Light is a command-line utility, you should be familiar with UNC or the Universal Naming Convention. UNC is how you refer to Microsoft shared resources from the command line. A UNC looks like \\NetBIOSname\sharename. It starts with double backslashes, then contains the NetBIOS name of the computer to access and the name of the share on that computer.. Before using Sharity-Light, you need to know the NetBIOS names of the computers you wish to access. If you have multiple machines running Microsoft operating systems, the quickest way to view each system's name is with nbtstat. From one of the Windows systems, open.
(65) < Day Day Up > < Day Day Up >.
(66) Hack 20 Deal with Disk Hogs. Fortunately, you no longer have to be a script guru or a find wizard just to keep up with what is happening on your disks.. Think for a moment. What types of files are you always chasing after so they don't waste resources? Your list probably includes temp files, core files, and old logs that have already been archived. Did you know that your system already contains scripts capable of cleaning out those files? Yes, I'm talking about your periodic scripts.. 2.9.1 Periodic Scripts. You'll find these scripts in the following directory on a FreeBSD system: % ls /etc/periodic/daily | grep clean 100.clean-disks 110.clean-tmps 120.clean-preserve 130.clean-msgs 140.clean-rwho 150.clean-hoststat. Are you using these scripts? To find out, look at your /etc/periodic.conf file. What, you don't have one? That means you've never tweaked your default configurations. If that's the case, copy over the sample file and take a look at what's available: # cp /etc/defaults/periodic.conf /etc/periodic.conf # more /etc/periodic.conf. 2.9.1.1 daily_clean_disks. Let's start with daily_clean_disks. This script is ideal for finding and deleting files with certain file extensions. You'll find it about two pages into periodic.conf, in the Daily options section, where you may note that it's not enabled by default. Fortunately, configuring it is a heck of a lot easier than using cron to schedule a complex find statement.. Before you enable any script, test it first,.
(67) < Day Day Up > < Day Day Up >.
(68) Hack 21 Manage Temporary Files and Swap Space. Add more temporary or swap space without repartitioning.. When you install any operating system, it's important to allocate sufficient disk space to hold temporary and swap files. Ideally, you already know the optimum sizes for your system so you can partition your disk accordingly during the install. However, if your needs change or you wish to optimize your initial choices, your solution doesn't have to be as drastic as a repartition—and reinstall—of the system.. man tuning has some practical advice for guesstimating the appropriate size of swap and your other partitions.. 2.10.1 Clearing /tmp. Unless you specifically chose otherwise when you partitioned your disk, the installer created a /tmp filesystem for you: % grep tmp /etc/fstab /dev/ad0s1e. /tmp. ufs. rw. 2. 2. % df -h /tmp Filesystem. Size. Used. /dev/ad0s1e. 252M. 614K. Avail Capacity 231M. 0%. Mounted on /tmp. Here I searched /etc/fstab for the /tmp filesystem. This particular filesystem is 256 MB in size. Only a small portion contains temporary files.. The df (disk free) command will always show you a number lower than the actual partition size. This is because eight percent of the filesystem is reserved to prevent users from inadvertently.
(69) < Day Day Up > < Day Day Up >.
(70) Hack 22 Recreate a Directory Structure Using mtree. Prevent or recover from rm disasters.. Someday the unthinkable may happen. You're doing some routine maintenance and are distracted by a phone call or perhaps another employee's question. A moment later, you're faced with the awful realization that your fingers typed either a rm * or a rm -R in the wrong place, and now a portion of your system has evaporated into nothingness.. Painful thought, isn't it? Let's pause for a moment to catch our breath and examine a few ways to prevent such a scenario from happening in the first place.. Close your eyes and think back to when you were a fresh-faced newbie and were introduced to the omnipotent rm command. Return to the time when you actually read man rm and first discovered the -i switch. "What a great idea," you thought, "to be prompted for confirmation before irretrievably deleting a file from disk." However, you soon discovered that this switch can be a royal PITA. Face it, it's irritating to deal with the constant question of whether you're sure you want to remove a file when you just issued the command to remove that file.. 2.11.1 Necessary Interaction. Fortunately, there is a way to request confirmation only when you're about to do something as rash as rm *. Simply make a file called -i. Well, actually, it's not quite that simple. Your shell will complain if you try this: % touch -i touch: illegal option -- i usage: touch [-acfhm] [-r file] [-t [[CC]Y]MMDDhhmm[.SS]] file .... You see, to your shell, -i looks like the -i switch, which touch doesn't have. That's actually part of the magic. The reason why we want to make a file called -i in the first place is to fool your shell: when you type rm *, the shell will expand * into all of the files in the directory. One of those files will be named -i, and, voila, you've just given the interactive.
(71) < Day Day Up > < Day Day Up >.
(72) Hack 23 Ghosting Systems. Do you find yourself installing multiple systems, all containing the same operating system and applications? As an IT instructor, I'm constantly installing systems for my next class or trying to fix the ramifications of a misconfiguration from a previous class.. As any system administrator can attest to, ghosting or hard drive-cloning software can be a real godsend. Backups are one thing; they retain your data. However, an image is a true timesaver—it's a copy of the operating system itself, along with any installed software and all of your configurations and customizations.. I haven't always had the luxury of a commercial ghosting utility at hand. As you can well imagine, I've tried every homegrown and open source ghosting solution available. I started with various invocations of dd, gzip, ssh, and dump, but kept running across the same fundamental problem: it was easy enough to create an image, but inconvenient to deploy that image to a fresh hard drive. It was doable in the labs that used removable drives, but, otherwise, I had to open up a system, cable in the drive to be deployed, copy the image, and recable the drive into its own system.. Forget the wear and tear on the equipment; that solution wasn't working out to be much of a timesaver! What I really needed was a floppy that contained enough intelligence to go out on the network and retrieve and restore an image. I tried several open source applications and found that Ghost For Unix, g4u, best fit the bill.. 2.12.1 Creating the Ghost Disk. You're about two minutes away from creating a bootable g4u floppy. Simply download g4u-1.12fs from http://theatomicmoose.ca/g4u/ and copy it to a floppy: # cat g4u-1.12fs > /dev/fd0. Your only other requirement is a system with a drive capable of holding your images. It can be any operating system, as long as it has an installed FTP server. If it's a FreeBSD system, you can configure an FTP server through /stand/sysinstall. Choose Configure from the menu, then Networking. Use your spacebar to choose Anon FTP..
(73) < Day Day Up > < Day Day Up >.
(74) Chapter 3. The Boot and Login Environments •. Introduction. •. Section 24. Customize the Default Boot Menu. •. Section 25. Protect the Boot Process. •. Section 26. Run a Headless System. •. Section 27. Log a Headless Server Remotely. •. Section 28. Remove the Terminal Login Banner. •. Section 29. Protecting Passwords With Blowfish Hashes. •. Section 30. Monitor Password Policy Compliance. •. Section 31. Create an Effective, Reusable Password Policy. •. Section 32. Automate Memorable Password Generation. •. Section 33. Use One Time Passwords. •. Section 34. Restrict Logins < Day Day Up > < Day Day Up >.
(75) Introduction When it comes to configuring systems, many users are reluctant to change the default boot process. Visions of unbootable systems, inaccessible data, and reinstalls dance in their heads. Yes, it is good to be mindful of such things as they instill the necessary attention to detail you'll need to use when making changes. However, once you've taken the necessary precautions, do take advantage of the hacks found in this chapter. Many of them will increase the security of your system.. This chapter also includes several password hacks. You'll learn how to create an effective password policy and monitor compliance to that policy. You'll find tools designed to assist you and your users in making good password choices. You'll also learn how to configure OTP, an excellent choice for when you're on the road and wish to access your network's resources securely. < Day Day Up > < Day Day Up >.
(76) Hack 24 Customize the Default Boot Menu. Configure a splash screen. You're not quite sure what you did to give the impression that you don't already have enough to do. Somehow, though, you were elected at the latest staff meeting to create a jazzy logo that will appear on every user's computer when they boot up in the morning.. While you may not be able to tell from first glance, the FreeBSD boot menu supports a surprising amount of customization. Let's start by examining your current menu to see which tools you have to work with.. 3.2.1 The Default Boot Menu. Your default boot menu will vary slightly depending upon your version of FreeBSD and whether you chose to install the boot menu when you installed the system. Let's start with the most vanilla boot prompt and work our way up from there. In this scenario, you'll see this message as your system boots: Hit [Enter] to boot immediately, or any other key for command prompt. Booting [/boot/kernel/kernel] in 10 seconds.... FreeBSD 5.1 introduced a quasi-graphical boot menu that includes a picture of Beastie and the following options: Welcome to FreeBSD!. 1. Boot FreeBSD [default] 2. Boot FreeBSD with ACPI disabled 3. Boot FreeBSD in Safe Mode 4. Boot FreeBSD in single user mode 5. Boot FreeBSD with verbose logging 6. Escape to loader prompt 7. Reboot. Select option, [Enter] for default.
(77) < Day Day Up > < Day Day Up >.
(78) Hack 25 Protect the Boot Process. Thwart unauthorized physical access to a system.. Creating a snazzy boot environment for users is one thing. However, when it comes to booting up servers, your mind automatically shifts gears to security mode. Your goal is to ensure that only a very precious few on very rare occasions ever see the boot process on a server. After all, the golden rule in security land is "physical access equals complete access.". Here's a prime example—consider recovering from an unknown or forgotten root password. Go into the server closet, reboot that system, and press a key to interrupt the boot process to change the password. A few moments later, the system continues to boot as normal. This can be a real lifesaver if an admin leaves without divulging the root password. However, consider the security implications of an unauthorized user gaining physical access to that server: instant root access!. 3.3.1 Limiting Unauthorized Reboots. Let's start by ensuring that regular users can't reboot the system either inadvertently or maliciously. By default, if a user presses Ctrl-Alt-Delete, the system will clean up and reboot. Typically this isn't an issue for servers, as most administration is done remotely and the server is safely locked away in a server closet. However, it can wreak havoc on workstations, especially if the user is used to working in a Windows environment and has become accustomed to pressing Ctrl-Alt-Delete. It's also worthwhile disabling on a server, as it ensures that a person has to first become the superuser in order to issue the reboot command.. If you're logged into a remote machine over SSH and try Ctrl-Alt-Delete, it will affect your own machine, not the remote machine. reboot works well over the network, though.. Disabling this feature requires a kernel rebuild. (See [Hack #54] for.
(79) < Day Day Up > < Day Day Up >.
(80) Hack 26 Run a Headless System. For those times when you want to run a system "headless.". Sometimes it is a simple matter of economy. Perhaps you've managed to scrounge up another system, but you don't have enough monitors, keyboards, or mice to go around. You also don't have the budget to purchase either those or a KVM switch. Sometimes it is a matter of security. Perhaps you're introducing a PC to a server closet and your physical security policy prevents server closet devices from being attached to monitors, keyboards, and mice.. Before you can run a system "headless," you need to have an alternative for accessing that system. Once you've removed input and output peripherals, your entry point into the system is now either through the network card or a serial port.. Going in through the network card is the easiest and is quite secure if you're using SSH. However, you should also consider a plan B. What if for some reason the system becomes inaccessible over the network? How do you get into the system then? Do you really want to gather up a spare monitor, keyboard, and mouse and carry them into the server closet?. A more attractive plan B may be to purchase a null modem cable as insurance. This is a crossed serial cable that is designed to go from one computer's serial port to another computer's serial port. This type of cable allows you to access a system without going through the network, which is a real lifesaver when the system isn't responding to the network. You can purchase this type of cable at any store that sells networking cables.. Your last consideration is whether the system BIOS will cooperate with your plan. Most newer BIOSes will. Many have a CMOS option that can be configured to disable "halt on errors." It's always a good idea to check out your available CMOS options before you start unplugging your peripherals.. 3.4.1 Preparing the System. I've just installed a new FreeBSD 5.1 system. Since I didn't have a null.
(81) < Day Day Up > < Day Day Up >.
(82) Hack 27 Log a Headless Server Remotely. More on headless systems, but this time from the NetBSD perspective.. We've already seen in [Hack #26] that it's important to have an alternative method for connecting to a headless server. It's also important to be able to receive a headless system's console messages. This hack will show how to configure both on a NetBSD system.. 3.5.1 Enabling a Serial Console. If you have another machine close to your headless server, it may be convenient to enable the serial console so that you can connect to it using a serial communication program. tip, included in the base system, and minicom , available through the packages collection, allow you to handle the server as if you were working on a real physical console.. To enable the serial console under NetBSD, simply tell the bootblocks to use the serial port as the console; they will configure the kernel on the fly to use it instead of the physical screen. You also need kernel support for the serial port device, which is included in the default GENERIC kernel.. However, changing the bootblocks configuration is a bit tricky because you need write permissions to the raw root device. As we are talking about a server, I assume the securelevel functionality is enabled; you must temporarily disable it by adding the options INSECURE line to your kernel. While in the kernel configuration file, double-check that it includes serial port support. Then, recompile your kernel.. Once you have access to the raw partition, update the bootblocks using the installboot utility. The process depends on the NetBSD version you are using.. If you are running 2.0 or higher, use the command shown next. Replace the bootxx_ffsv1 file with the one that matches your root filesystem type; failure to do so will render your system unbootable. # /usr/sbin/installboot -o console=com0 /dev/rwd0a /usr/mdec/bootxx_ffsv1. If you are running 1.6, use the following command instead:.
(83) < Day Day Up > < Day Day Up >.
(84) Hack 28 Remove the Terminal Login Banner. Give users the information you want them to receive when they log in.. The default login process on a FreeBSD system produces a fair bit of information. The terminal message before the login prompt clearly indicates that the machine is a FreeBSD system. After logging in, a user will receive a copyright message and a Message of the Day (or motd), both of which contain many references to FreeBSD.. This may or may not be a good thing, depending upon the security requirements of your network. Your organization may also require you to provide legal information regarding network access or perhaps a banner touting the benefits of your corporation. Fortunately, a few simple hacks are all that stand between the defaults and your network's particular requirements.. 3.6.1 Changing the Copyright Display. Let's start with the copyright information. That's this part of the default login process: Copyright (c) 1992-2003 The FreeBSD Project. Copyright (c) 1979, 1980, 1983, 1986, 1988, 1989, 1991, 1992, 1993, 1994 The Regents of the University of California. All rights reserved.. To prevent users from seeing this information, simply: # touch /etc/COPYRIGHT. 3.6.2 Changing the Message of the Day. Technically, you could add your own information to /etc/COPYRIGHT instead of leaving it as an empty file. However, it is common practice to put your information in /etc/motd instead. The default /etc/motd contains very useful information to the new user, but it does get rather old after a few hundred logins.. You can edit /etc/motd to say whatever suits your purposes—anything from your favorite sci-fi excerpt to all the nasty things that will happen.
(85) < Day Day Up > < Day Day Up >.
(86) Hack 29 Protecting Passwords With Blowfish Hashes. Take these simple steps to thwart password crackers.. All good administrators know that passwords can be a weak link in the security chain. A malicious and determined user armed with a password cracker could conceivably guess enough of your network's passwords to access unauthorized resources.. 3.7.1 Protecting System Passwords in General. Fortunately, you can make a password cracker's life very difficult in several ways. First, educate your users to choose complex, hard-to-guess passwords that are meaningful enough for them to remember. This will thwart dictionary password crackers [Hack #30], which use lists of dictionary and easy-to-guess words.. Second, be aware of who has superuser privileges and who has the right to backup /etc. This directory contains the two password databases that are required to run a brute-force password cracker. As the name implies, this type of cracker will eventually guess every password in your password databases as it systematically tries every possible keyboard combination. Your best protection from this type of cracker is to prevent access to those password databases. This includes locking up your backup tapes and monitoring their access.. It is also a good idea to increase the amount of time it would take a brute-force cracker to crack a password database. FreeBSD, like most Unix systems, adds a magic bit of randomness—known as a salt —to the password when it is stored in the password database. The upshot is that a password cracker may have to try up to 4,096 different combinations for each and every password it tries to guess.. Using a strong algorithm to protect your passwords can also slow down a brute-force cracker. FreeBSD supports a hard-to-crack algorithm known as Blowfish. One of the first things I do after a FreeBSD install is to configure the password database to use Blowfish. While it is easier to do this before you create your users, it is still worth your while to implement it after you've created your user accounts.. 3.7.2 Protecting System Passwords with Blowfish.
(87) < Day Day Up > < Day Day Up >.
Figure

Outline
Related documents
AO: Arbeitsgemeinschaft für Osteosynthesefragen; CMS: Coleman Methodology Scoring; DI: Deep Infection; KOOS: Knee injury and Osteoarthritis Outcome Score; LOE: Level of Evidence;
Class Formation," Capitalism and Social Democracy. Cambridge: Cambridge University Press. Wright, Erik Olin.. December 3, 1987 Eric Hobsbawmls Visit. The Historical Formation
The present analysis extended the use of this Bayesian framework to fit the model against hypoxic volume data and examined how parameter estimation and predictive uncertainty can
ANCOVA: Analysis of covariance; ANOVA: Analysis of variance; BF: Biceps femoris; CIO: Contralateral side internal oblique; Dm: Maximal radial displacement; ECA: Enhanced
Predicting risk factors of total hip arthroplasty conversion after concentrated autologous bone marrow aspirate transplantation for the treatment of idiopathic osteonecrosis of
Therefore, GPTs need to have sufficient knowledge and skills to address the rela- tion between MSDs and the patient ’ s work, and to refer the patient (if needed) to other
outcomes of pyogenic spondylodiscitis patients treated with both early surgery and antibiotics who received surgi- cal treatment immediate after confirming the diagnosis
Archive and access stale data for research.. Be
