Introduction to Java Programming
FOREWORD
I originally wrote this document for the needs of the Java Basics course at Arcada Polytechnic in spring 1999. The document has hardly been updated at all since then, so it remains on the level of Java version 1.1. Despite this, it should be quite good as an introductory book to Java programming. Since I had been working very intensively with Java programming for over two years in 1999, I have tried to include as many practical issues as possible that Java programmers are faced with.
In the future, I might update the book so that it would correspond to recent evolution of the Java language. That way it would serve its original purpose, i.e. give essential skills in Java programming without necessarily having to buy an expensive book.
Table of Contents
1. What is java ...5
1.1 Different kinds of Java applications ...5
1.2 Platform independence ...9
1.3 History of Java...10
2. Java development tools...13
2.1 The Java Development Kit (JDK) ...13
2.2 Online documentation...17
3. Java syntax...18
3.1 Variable declarations ...18
3.2 Arrays ...18
3.3 Flow control...20
3.4 Standard input and output...21
3.5 Programming style...22
4. Classes and objects ...23
4.1 Class declarations ...24
4.2 Class variables and instance variables...25
4.3 Method definitions...26
4.4 Creating and referencing objects ...27
4.5 Garbage collection...29
4.6 Java Bank Account ...29
4.7 Class hierarchies and inheritance ...31
4.8 How to declare and use global constants and variables...33
5. Applets...35
5.1 Passing parameters to applets from a HTML page...35
5.3 Sound effects ...45
5.4 Double-buffered animation...47
6. User interaction...49
6.1 Reacting to a user click inside the applet display area ...49
6.2 User interface elements ...49
6.3 Window-related user interface elements ...50
7. Window layout ...52
7.1 Window layout managers ...52
7.2 The "null" layout...52
7.3 Dialog windows...54
8. File reading and writing...56
8.1 File dialogs for opening and saving files...56
8.2 Reading and writing text files...57
8.3 Reading a file using a URL ...58
8.4 Other input/output classes ...60
8.5 The “File” class ...60
1.
What is java
Java is:
• A new Object Oriented Programming Language developed at Sun Microsystems.
• Easier to learn than most other Object Oriented programming languages, since it has collected the best parts of the existing ones.
• A language that is standardized enough so that executable applications can run on any (in principle) computer that contains a Virtual Machine (run-time environment).
• Virtual machines can be embedded in web browsers (such as Netscape Navigator, Microsoft Internet Explorer, and IBM WebExplorer) and operating systems.
• A standardized set of Class Libraries (packages), that support creating graphical user interfaces, controlling multimedia data and communicating over networks.
• A programming language that supports the most recent features in computer science at the programming language level.
Java is not:
• Slower than any other Object Oriented language. Java applications can always be compiled to native code and run as fast as any other program.
• 100% compatible yet, since the same application does not always look the same on all platforms due to virtual machine implementation bugs and differences.
1.1 Different kinds of Java applications
Java applications can be of several kinds. The three main ones treated here are:
• Programs with a textual interface.
• Applets used in Internet browsers.
• Windowing applications that use a graphical user interface.
Example 1. Simple text interface application (compiled and run)
public class HelloWorld {
public static void main(String argv[]) {
System.out.println("Hello, world!"); }
}
The first line “public class HelloWorld” defines a “class” that is called HelloWorld.
Java is a pure object oriented language, so everything has to be contained in classes (no global functions like in “C” or C++).
”public static void main(String argv[])” is the standard declaration for a
program entry point in Java. Any class may contain a ”main” function, so the same program may have several program entry points. This is useful for test and debugging purposes.
”System.out.println("Hello, world!");” just writes out the text that we want
onto the standard output. ”System” is a pre-defined class that contains the member ”out”,
which is the object that corresponds to the standard output. ”println” is a method of this object that takes the text to write out as a parameter. The resulting output is the given text followed by a newline character. These concepts will be explained in detail further on.
To compile this program, we first save it as a file named ”HelloWorld.java”. In fact, the
file name always has to be the same as the class name for a public class and it has to have the extension ”.java”.
Then, if we are in the same directory as the saved file, we can compile it with the DOS command ”javac HelloWorld.java” (if the Java development environment is set up
correctly).
We run it with the command line ”java HelloWorld” (if we are still in the same
Example 2. Simple applet (compiled and run)
import java.awt.*;
import java.applet.Applet;
public class HelloWorldApplet extends Applet {
public void paint(Graphics g) {
g.drawString("Hello, world!", 0, 25); }
}
The corresponding HTML page looks like this:
<html> <head>
<title>Hello World Example for the Java Basics Course</title> </head>
<body>
<h1>Hello World Example for the Java Basics Course</h1> <hr>
<applet code=HelloWorldApplet.class width=100 height=50>
alt="Your browser understands the <APPLET> tag but isn't running the applet, for some reason."
Your browser is completely ignoring the <APPLET> tag! </applet>
<hr>
<a href="HelloWorldApplet.java">The source</a>. </body>
</html>
Example 2 shows a very simple applet, that just writes out “Hello, world!” in the
HTML page shown. The resulting page is shown in Figure 1.
The first two lines, “import java.awt.*;” and “import java.applet.Applet;” are for including external libraries, just like “.h”-files in “C”
and C++.
Then we define the class “HelloWorldApplet” that is a derived class from the Applet
class, which is indicated by the words “extends Applet” at the end of the line. A derived
class is a class that inherits from the behaviour of its’ base class. The Applet class already contains most of the program code for executing the applet, so we only need to redefine the behaviour that we need. In this case, we only override the method “public void paint(Graphics g)” with our own behaviour.
“g.drawString("Hello, world!", 0, 25);” draws the given string at the given
Figure 1. Simple applet screen.
The applet is included in an HTML page using the ”applet” tag. It takes a number of
arguments, which are:
• code: name of the “.class” file that contains the compiled applet.
• width, height: width and height of the display area reserved for the applet.
• alt: a text to show if the browser is not capable of executing the applet.
Example 3. Simple “app-applet” (compiled and run)
import java.awt.*;
import java.applet.Applet;
public class HelloWorldFrame extends Applet {
public static void main(String argv[]) {
Frame f;
f = new Frame();
f.setLayout(new GridLayout()); f.add(new HelloWorldFrame()); f.setSize(100, 100);
f.show(); }
public void paint(Graphics g) {
g.drawString("Hello, world!", 0, 25); }
}
Example 3 shows how to make the applet executable as an independent application (i.e. without any need for an Internet browser). The trick is to create a normal program entry point, which creates a window (a “Frame” object) that the applet can be displayed in.
“Frame f;” declares a variable f that is a reference to a Frame object. “f = new Frame();” creates a new “Frame” object and makes “f” reference it. The following lines
set up some characteristics of the frame, adds the “HelloWorldFrame” applet to it and
then displays the frame.
This kind of an application is often called an “app-applet” since it may be included as an applet in a HTML page or it may be run as an independent application. If no applet behaviour is needed, then the “HelloWorldFrame” could be derived from the “Panel” base class,
for instance.
1.2 Platform independence
Platform independence means that the same (compiled) program can be executed on any computer.
This Java virtual machine can also be incorporated or embedded into the kernel of the operating system. Java virtual machines nowadays exist for most operating systems.
[image:10.595.186.413.213.265.2]We call the JVM a virtual machine because the Java compiler produces compiled code whose target machine is this virtual machine instead of being a physical processor or computer. A Java program is said to be compiled to byte-codes, whose target architecture is the Java Virtual Machine, as illustrated by Figure 2.
Figure 2. Compilation of a Java program to byte-codes and executing it with the Java VM.
Figure 2 also shows the development process a typical Java programmer uses to produce byte codes and execute them. The first box indicates that the Java source code is located in a “.java” file, which is processed with a Java compiler called “javac”. The Java compiler
produces a file called a “.class” file, which contains the byte code. The “.class” file is
then loaded across the network or loaded locally on your machine into the execution environment on that platform. Inside that environment is the Java virtual machine, which interprets and executes the byte code.
1.3 History of Java
1990 – 1993: James Gosling and others at Sun were working on a project that needed a new programming language. Their project was called *7 (Star Seven) and its’ goal was developing a universal system for small, personal digital assistance in set top boxes.
”Oak” was the original name of the language developed, named after the tree outside James Gosling's office. But Oak turned out to be an existing programming language, so Sun named it Java, after many visits to a local coffee shop! Java is not an acronym. It is a trademark of Sun Microsystems.
1993 – 1995: World Wide Web (WWW) emerged and made Sun develop a web browser that was originally named WebRunner and later HotJava. HotJava was presented to various companies, including Netscape Communications, who incorporated it in their product.
1997 - : Java becomes increasingly popular and most operating systems provide a Java Virtual Machine. Java begins to be used for application develoment, not only for applets. Microsoft understands the threat that Java represents and tries to ”pollute” the language in order to take it over.
Java was already from the start meant to be multi-platform. It was also intended to be very light-weight, especially concerning the size of the compiled programs and the size of the virtual machine. These are the main reasons for its’ suitability for WWW applications.
Java shares many characteristics of the two most important existing object oriented programming languages, which are Smalltalk and C++. Characteristics common with Smalltalk are:
• Similar object model (single-rooted inheritance) hierarchy, access to objects via reference only, ...).
• Compiled to byte-code (initially interpreted).
• Dynamic memory layout plus garbage collection.
• Simple inheritance.
Common characteristics with C++ are:
• Same syntax for expressions, statements, and control flow.
• Similar OO structural syntax (classes, access protection, constructors, method declaration, ...).
What makes Java more interesting than both these languages is that it has borrowed all the best ideas in Smalltalk and avoided the bad ideas in C++, which make C++ a very difficult language to learn.
Java is still a very young language. This is the reason why there exists several specification levels of the language:
• 1.0 - 1.0.2: Appeared in 1995. Contained the complete specification of the language and a class library for the most essential things.
Java takes a direction where it provides all the functionalities that are normally provided by the operating system. The Java virtual machines become very rapid by version 1.1.7A. Java Beans are specified and supported.
• Java 2: Appeared in December 1998. New interface libraries and several improvements, especially in handling multimedia and distributed computing. Unfortunately, this version seems to be very slow (at least the beta versions tested).
2. Java development tools
Sun is the main distributor of Java development tools. All the basic tools needed are still free.
General information about Java and the corresponding development tools may be found at the address http://www.javasoft.com.
2.1 The Java Development Kit (JDK)
The Java Development Kit (JDK) is the minimal file you need to download in order to develop in Java. The version that is meant for the Windows environment contains an automatic installer that takes care of the installation. Only setting up the Windows PATH may require some manual intervention.
The JDK contains everything you need to develop general-purpose programs in Java:
• Base Tools
• javac: The Java Language Compiler that you use to compile programs written in the Java(tm) Programming Language into bytecodes.
• java: The Java Interpreter that you use to run programs written in the Java(tm) Programming Language.
• jre: The Java Runtime Interpreter that you can use to run Java applications. The jre tool is similar to the java tool, but is intended primarily for end users who do not require all the development-related options available with the java tool.
• jdb: The Java Language Debugger that helps you find and fix bugs in Java(tm) programs.
• javah: Creates C header files and C stub files for a Java(tm) class. These files provide the connective glue that allow your code written in the Java Programming Language to interact with code written in other languages like C.
• javap: Disassembles compiled Java(tm) files and prints out a representation of the Java bytecodes.
• javadoc: Generates API documentation in HTML format from Java(tm) source code. Also see Writing Doc Comments for Javadoc.
• RMI Tools
• rmic: Generates stub and skeleton class files for Java objects implementing the java.rmi.Remote interface.
• rmiregistry: Starts a remote object registry on a specified port. The remote object registry is a bootstrap naming service which is used by RMI servers.
• serialver: Returns the serialVersionUID for one or more classes.
• Internationalization Tools
• native2ascii: Converts non-Unicode Latin-1 (source code or property) files to Unicode Latin-1.
• JAR Tool
• jar: Combines multiple files into a single Java Archive (JAR) file.
• Digital Signing Tool
• javakey: Generates digital signatures for archive files and manages the database of entities and their keys and signatures.
• Environment Variables
• CLASSPATH: Tells the Java Virtual Machine and other Java applications where to find the class libraries.
If you have developed an application in Java and want to deploy it, you need to download the
Java Runtime Environment (JRE), which contains only what is necessary for running a Java application (JVM and libraries), but no development tools. It may be freely distributed with your application.
It is possible to use the JDK as the only development environment for any development project. It is, however, useful to create straight away at least the following two script files for each project:
• makeit.bat: Contains the command line for compiling the whole project. It may be useful to associate this with using various "make" tools for project management.
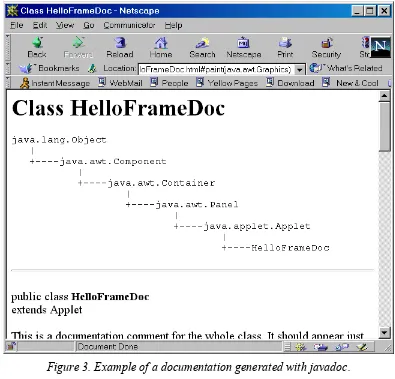
It is also useful to have a script file for generating the program documentation with javadoc. Javadoc uses special documentation comments in the program for creating an HTML documentation that is identical to the one that comes with the JDK.
Example 4. Inserting documentation comments (compiled and run)
import java.awt.*;
import java.applet.Applet;
/**
* This is a documentation comment for the whole class. It should * appear just before the class definition.
* So, HelloFrameDoc is a class for demonstrating how to use * the javadoc tool.
* <B>Creator</B>: Kary FRÄMLING. */
public class HelloFrameDoc extends Applet {
/**
* This is a documentation comment for the testField * variable.
*/
public int testField;
/**
* This is a documentation comment for the main() function. * The first phrase of the comment is used as an introduction * and the rest in the detailed description.
*/
public static void main(String argv[]) {
Frame f;
f = new Frame();
f.setLayout(new GridLayout()); f.add(new HelloFrameDoc()); f.setSize(100, 100); f.show(); } /**
* This is a documentation comment for the paint() function. * There are special codes for documenting parameters, return * values and so on, but you can look at the Sun documentation * about javadoc for more details. For instance:
* @param g The Graphics object to draw to. * @return Nothing at all, it is void!
*/
public void paint(Graphics g) {
g.drawString("Hello, world!", 0, 25); }
}
javac HelloFrameDoc.java
Then we generate the documentation with the command (-d HelloFrameDoc means that the documentation will be generated in the "HelloFrameDoc" directory):
javadoc -d HelloFrameDoc HelloFrameDoc.java
Then we can start studying the documentation starting from the file " tree.html" (Figure
[image:16.595.99.494.259.638.2]3), for instance. We can notice that the generated documentation contains a lot of interesting information even for the programmer himself, like the class tree of his own classes, what methods are overloaded in what classes and so on.
Figure 3. Example of a documentation generated with javadoc.
For getting the images in the generated pages to display, it is enough to copy the "C:\jdk1.1.7A\docs\api\images" (for JDK 1.1.7A) directory into the
"HelloFrameDoc" directory.
editor, a graphical debugger and project management, which all may contribute to programming more efficiently.
2.2 Online documentation
An online Java and JDK documentation is available for download at the same place as the JDK. This is a javadoc-generated HTML documentation for the entire standard class library of Java.
In the current versions, it is a ZIP file that should be uncompressed into the appropriate directory. For JDK1.1.7B, this would normally be the directory "C:\jdk1.1.7B\docs".
The starting point for the documentation is the file "index.html" that is found in this
directory.
Experience has shown that this documentation is very practical to use for programming projects. It shows all inheritance relations between the classes, all class methods and their description and all class variables. There is also an index to class and method names.
3. Java Syntax
Java syntax is very close to that of "C" and C++. This is true for
• Comments (+ documentation comment).
• Variable names, declarations and initialisations.
• Most keywords, with a few new ones.
• Control flow ("if", "while", "for", ...)
• etc.
3.1 Variable declarations
Standard primitive types in Java:
boolean true or false
char 16 bit character, coded using Unicode 1.1.5 byte 8 bit signed integer, using 2's complement short 16 bit signed integer, using 2's complement int 32 bit signed integer, using 2's complement long 64 bit signed integer, using 2's complement float floating point real number, 32 bit IEEE 754-1985 double floating point real number, 64 bit IEEE 754-1985
Variable declarations consist of three parts: modifiers, followed by a type, followed by a list of identifiers. The modifiers are optional, but the type and list of identifiers is not.
Example: public int a, b, c; // "public" is a modifier.
Variables may be initialised as in "C", e.g. "int a = 0;"
3.2 Arrays
Arrays are NOT declared as in "C". To declare an array of integers, we would write "int[] ia;". This means that ia is a reference (compare with reference and pointer in "C" and
C++) to an array of integers.
In order to actually create the array at the same time, we would write:
int[] ia = new int[3];
Example 5. Table initialisation and index exceptions (compiled and run)
public class TblExample {
public static void main(String argv[]) {
int i;
int[] itab1 = {10, 20, 30}; // Table initialisation.
for ( i = 0 ; i < itab1.length ; i++ ) System.out.println(itab1[i]);
// Create an "IndexOutOfBoundsException" here. for ( i = 0 ; i <= itab1.length ; i++ )
System.out.println(itab1[i]);
System.out.println("We got away from the Exception!"); }
}
Screen output:
10 20 30 10 20 30
java.lang.ArrayIndexOutOfBoundsException at TblExample.main(Compiled Code)
Example 5 shows how tables can be initialized in Java. A VERY IMPORTANT improvement in Java compared to languages like "C" and C++ is that tables "know" themselves how big they are. This is why we can get the length of the table with "itabl1.length".
Just like in "C", table indexes start from 0. That is why the second loop goes too far.
Invalid table indexes are automatically detected in Java. When this occurs, we say that an exception occurred. In programming terms we call this throwing an exception.
If an exception occurs in a program that does not handle it, then the program exits immediately. If our program wants to handle exceptions graciously, we could define an
// Create an "IndexOutOfBoundsException" here. try {
for ( i = 0 ; i <= itab1.length ; i++ ) System.out.println(itab1[i]);
}
catch ( IndexOutOfBoundsException e ) { System.out.println("We caught it!"); }
There are a lot of pre-defined exception classes in Java and the programmer may define new ones. This will be treated more in detail later, but this is a very important feature in the Java language, which makes Java programs much more stable than "C" or C++ programs, for instance.
3.3 Flow control
Flow controls which have an identical syntax to that of "C" are:
• if-else
• switch-case
• while
• do-while
• for
• break, continue, return
But there is no “goto” statement! Instead, Java proposes labelled breaks, as shown in the
following example.
Example 6. Labelled breaks (compiled and run)
public class LabelledBreak {
public static void main(String argv[]) {
brkpnt:for ( int i = 0 ; i < 10 ; i++ ) { for ( int j = 0 ; j < 10 ; j++ ) {
if ( j == 3 ) break brkpnt;
System.out.println("i = " + i + ", j = " + j); }
} } }
i = 0, j = 0 i = 0, j = 1 i = 0, j = 2
If we would have an ordinary “break;” in Example 6, then we would go through the outer
loop 10 times and through the inner one 3 times for each outer loop repetition. However, the labelled break breaks the outer loop straight away and we do not even finish the first repetition of the outer loop.
3.4 Standard input and output
The global class "System" contains the fields "in", "out" and "err", which correspond to standard input, standard output and standard error. Using these is illustrated by the following example:
Example 7. Using standard input and output in Java (compiled and run)
import java.io.*;
/**
* Example showing the use of standard input and output. */
class StdioExample {
public static void main(String args[]) throws IOException {
int n;
BufferedReader stdin =
new BufferedReader(new InputStreamReader(System.in));
System.out.print("Enter an integer: "); // System.out.flush();
n = Integer.parseInt(stdin.readLine());
System.out.println("Square: " + n*n + " Cube: " + n*n*n); }
}
Program output:
Enter an integer: 9 Square: 81 Cube: 729
"System.in" is an object of class "InputStream". This class offers very basic reading
capabilities, which is the reason why we "embed" it into an "InputStreamReader" and
The commented line "System.out.flush();" might be necessary on some systems,
where the standard output is buffered. In that case the display might be deferred and not occur until the buffer is full.
"n = Integer.parseInt(stdin.readLine());" is one possibility to convert a
string into an integer. See what happens if you do not feed in an integer!
Integer is a standard Java class, which contains a (static) member function called
"parseInt()" that converts the given argument string into an integer and returns the value.
"System.out.println()" always flushes the output stream automatically.
"throws IOException" in the method declaration means that the method might throw an
exception of type IOException. This exception might occur in the call to "readLine()"
and since we do not catch it, we just pass it on.
3.5 Programming style.
It is highly recommended to use the same programming conventions that have been used by Sun in their class libraries. This means:
• Indentation.
• Class names (ThisIsAClassName).
• Constant names (THIS_IS_A_CONSTANT).
• Class variable/field names (thisIsAClassMemberVariable).
• Method names (thisIsAMethodName).
• Function parameter names (thisIsAFunctionParameter).
• Local variable names (this_is_a_local_variable). This does not seem to be used by Sun, but is highly recommended to increase program readability.
4. Classes and Objects
A class is a template that defines how an object will look and behave once instantiated.
In this course, we will use cars as an example of a system with various objects that interact with each other. A car contains subsystems which may be considered as objects, such as:
• Injection system.
• Ignition system.
• Breaking system (including ABS).
• Steering system.
• Others (have a look at your car's fuse boxes to get an idea).
A class corresponds to the factory or machine that produces these subsystems. Once these subsystems are installed in a car, they become objects that communicate through well-defined protocols in such a way that (hopefully) makes the car work and makes it possible to drive with it.
In Object Oriented Programming (OOP), methods implement the communication protocol between the objects.
Only some of all the methods are visible to other objects. These are the public methods.
We also have private methods and private variables, which are only visible to the object itself. These are used for the internal operations of the object.
This is called encapsulation in OOP. In a car, it means that there is no way for one subsystem to interfere with the internal functioning of another one. This is natural, since there is no way why the injection system should have access to the private calculations of the ABS system, for instance.
We may also have private classes. The ABS system might, for instance, be a private class to the breaking subsystem. It would then be directly accessible only to the breaking subsystem.
The third classical concept in OOP is polymorphism, which means that we may have several methods which the same name, but with different parameters. This means that the actual behavior of the method depends on the kind of data that it works on. An example of this is the "toString()" method that is defined for all classes in Java and gives a textual description of the object, no matter what the type of the object is.
4.1 Class declarations
A class declaration has the following syntax:
[public, private or protected] class <classname> [extends <baseclassname>] [implements <classname, classname, …>]
{
/* Variable and method declarations. */ }
Example: A minimal class definition for a bank account.
public class BankAccount {
} // No semicolon
A minimal class declaration just contains the keyword “class” and the classname. A class is
private by default, which is usually not very useful. If it should not be private, the class declaration should be preceded either by the keyword “public” or the keyword
“protected”.
A public class is visible in the entire program. A protected class is accessible only to classes in the same package (more about packages later). In both cases, the class definition has to be in a file of its’ own, which has the same name as the class (case sensitive!) and the extension “.java”.
If the class is derived from another class, then we add “extends <baseclassname>” to
indicate the base class to use. There may be only one base class.
If there is no "extends" statement, then the class has the "Object" class as its' base class.
In Java, the class "Object" is the root of the class hierarchy, so it is the ultimate base class
for all classes.
Attention! There is no semicolon after the closing bracket in Java, which is a difference from “C” structures and C++ classes.
4.2 Class variables and instance variables
Every object stores its' state in its' instance variables. For a bank account, instance variables could be "balance" and "id". There may also be instant variables that are set to constant
values (like "#define" or "const" in "C").
Example: Class definition with instance variables and constants.
public class BankAccount {
// Class variable
public static int nextID = 100;
// Instance variables private double balance; private int id;
// Constant value
private final int PREFERENCE_CLIENT_LIMIT = 10000; }
All variable declarations are private unless specified otherwise (so the "private" keywords
in the example are not necessary).
The keyword "final" signifies that we define a constant value.
Public variables are accessible from any other object in the application. Protected variables are only accessible to the classes in the same class package.
Class variables are indicated with the keyword "static". Class variables can be used
directly through the class name, e.g. "BankAccount.nextID". So, this is a property of the
class itself, not a property of the objects of this class (it is, however, directly accessible to instance methods).
Example: Static initialisation block.
static { nextID = 0; }
4.3 Method definitions
Methods are functions that are associated to a class (class methods) or the objects of a class (instance methods).
There is a special kind of method that is called a constructor method. This is a method that is called when a new object is created using the “new” keyword. A constructor initialises the
newly created object, which mainly means that it sets up values for the object’s instance variables. There may be several constructors in the same class.
Example: Constructors for the “BankAccount” class.
public BankAccount() { this(0.0) ; }
public BankAccount( double initBal ) { balance = initBal; id = newID(); }
The name of a constructor function is always the same as the class name and there is no return type, but it should be declared public.
There are two constructors for the class “BankAccount”. The first one is the default one, which takes no parameters. This one is used in a call like “BankAccount ba = new BankAccount()”. The only thing that it does is to call the other constructor, which takes
an initial balance as a parameter.
The second constructor sets the balance of the new “BankAccount” object to the value passed as a parameter and affects it a new ID.
Normal method declarations consist of an access specifier (“public”, “protected” or
“private”), a return type, the name of the method and the list of parameters and their type.
There may be class methods and instance methods.
Access to methods is determined in the same way as for variables.
“newID” is a class method that returns the next unused account ID. This method has to be a
Example: The class method newID.
private static int newID() { return nextID++; }
A class method may be accessed from an object of another class (if it is not private) simply by writing the class name, a dot and the name of the method (e.g. “BankAccount.newID” if
“newID” would not be private).
Just like instance variables, instance methods can only be accessed through an object. So, if we have an object “ba” of class “BankAccount”, we could access the method “balance”
by writing “ba.balance()”.
Example: Instance methods of ”BankAccount”.
public double balance() { return balance; } public int id() { return id; }
public void withdraw(double amt) { balance -=amt; } public void deposit(double amt) { balance +=amt; }
public String toString()
{ return super.toString() + "(id:" + id + ", bal:" + balance + ")" ; }
4.4 Creating and referencing objects
What happens in Java when we use the operator “new” is that the virtual machine reserves enough memory for containing all the data of the newly created object. The result of the operation is a reference to the newly created object.
In Java, all objects are situated in “global memory”. This means that we do not need to worry about stack handling and “copy constructors” in the same way as in C++.
Example: Object creation and referencing (compiled).
public class ObjCreationExample {
public ObjCreationExample firstObject, secondObject;
public static void main(String args[]) {
ObjCreationExample object1 = new ObjCreationExample(); ObjCreationExample object2 = new ObjCreationExample(); ObjCreationExample object3 = new ObjCreationExample(); ObjCreationExample object4 = new ObjCreationExample(); ObjCreationExample object5 = new ObjCreationExample(); ObjCreationExample object6 = new ObjCreationExample(); object1.firstObject = object3;
object1.secondObject = object5; object2.firstObject = object4; }
}
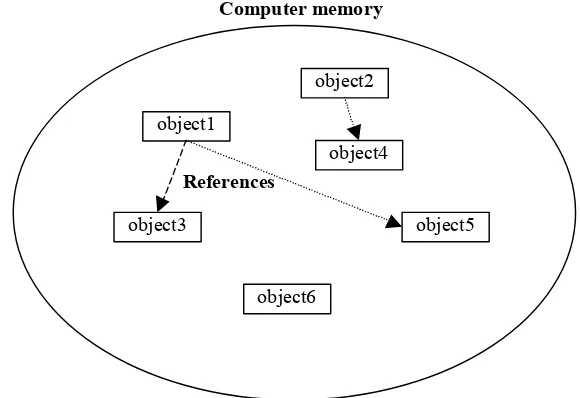
This example sets up the “object space” shown in Figure 4, which shows the objects that we created and the reference links that we set up. In fact, what we have set up is a minimal kind of “linked list” (quite uncompleted here), where one object has a link to the next one and so on.
Computer memory
object1
object2
object3
object4
object6
object5
[image:28.595.150.440.399.598.2]References
Figure 4. Illustration of "object space".
Java contains an operator which allows us to check the class that an object belongs to, “instanceof”. So, the test “object1 instanceof ObjCreationExample” is
true in the preceding example, while “object1 instanceof Point” is false.
All objects are uniquely identified by their address. The memory address is different if you have different pieces of data.
4.5 Garbage collection
In Java, there is no “delete” keyword. It is not necessary thanks to garbage collection.
Garbage collection means that there is an automatic functionality that regularly goes through the object space and checks which objects are still referenced and which are not. Those which are no longer referenced are unusable for the program, so it is safe to liberate the space they use.
In the example of the previous chapter, all the objects would be automatically deleted once we exit from the “main” function (well, they would anyway since we exit the program). This is because all the variables that reference them are local to the main-function, so they no longer exist once we return from main. And since these references no longer exist, there is no reason to keep all these objects in memory.
Having no “delete” operator, there is no destructor function in Java neither (unlike C++).
However, if there are any non-Java resources used by the object that have to be liberated (a communications port reserved by the object, for instance), there may be a “finalize()”
method, that is called before the object is destroyed by garbage collection.
Garbage collection was also used in Smalltalk from the start.
4.6 Java Bank Account
Example 8. Complete BankAccount example (compiled and run)
public class BankAccount {
// Class variable
public static int nextID = 100;
// Instance variables private double balance; private int id;
// Constant value
private final int PREFERENCE_CLIENT_LIMIT = 10000;
public BankAccount () { this(0.0) ; }
public BankAccount( double initBal ) { balance = initBal; id = newID(); }
public double balance() { return balance; } public int id() { return id; }
public void withdraw(double amt) { balance -=amt; } public void deposit(double amt) { balance +=amt; }
public String toString()
{ return super.toString() + "(id:" + id + ", bal:" + balance + ")" ; }
// Class method
private static int newID() { return nextID++; }
// Another "special" class method
public static void main(String args[]) {
BankAccount a=new BankAccount(15.25); BankAccount b=new BankAccount();
System.out.println("a=" + a.toString() ); System.out.println("b=" + b.toString() );
a.withdraw(5.50); b.deposit(125.99);
System.out.println("a=" + a); System.out.println("b=" + b);
System.exit(0); }
} // no semi-colon Screen output:
a=BankAccount@1cc803(id:100, bal:15.25) b=BankAccount@1cc802(id:101, bal:0.0) a=BankAccount@1cc803(id:100, bal:9.75) b=BankAccount@1cc802(id:101, bal:125.99)
This name is fixed; you have to use that name. It is the function that is used in the operation “System.out.println("a=" + a);” that writes out a string describing the object.
It cannot take any parameters and it must return a String value.
If we look a little closer at the toString method, we notice something like “super.toString”. The word “super” is a keyword in the Java language, and it says
that the super class' “toString” is going to be invoked.
Since we have not defined any superclass for “BankAccount”, the class “Object” is
implicitly used as base class.
The “toString” method of class “Object” actually returns the class name, @, and then
the address of the object. You don’t have to use super.toString if you don't want to; it's there only if you need it. This also guarantees that you can use the string concatenation operator “+” for all objects.
At the end, the “System.exit(0)” statement means to stop the Java virtual machine right now with an exit value of 0. This statement is not necessary here, in fact, but it is very useful for exiting the program in severe error situations.
4.7 Class Hierarchies and Inheritance
When developing an object oriented program, it is essential to use existing class libraries as much as possible, since it reduces the programming work needed and simplifies maintenance.
Example 9. Circle drawing using a class derived from the standard “Point” class (compiled and run).
import java.awt.*;
import java.applet.Applet;
public class CircleExample extends Applet {
private final int RADIUS_INCREMENT = 6;
private MyPoint myPoint1, myPoint2, myPoint3;
public static void main(String argv[]) {
Frame f;
f = new Frame();
f.setLayout(new GridLayout()); f.add(new CircleExample()); f.setSize(250, 200);
}
CircleExample() {
myPoint1 = new MyPoint(20);
myPoint2 = new MyPoint(50, 50, 10); }
public void paint(Graphics g) {
myPoint1.drawIt(g);
myPoint2.setLocation(50, 50); myPoint2.drawIt(g);
// Then we use some information about our size to draw a // centered figure.
Dimension d = size(); int r = 1;
myPoint3 = new MyPoint(d.width/2, d.height/2, r); myPoint3.setFilled(false);
while ( r <= Math.sqrt(d.width*d.width + d.height*d.height) ) { myPoint3.drawIt(g);
r += RADIUS_INCREMENT; myPoint3.setRadius(r); }
} }
class MyPoint extends Point {
private int radius;
private boolean isFilled = true;
MyPoint(int r) {
radius = r; }
MyPoint(int x, int y, int r) {
super(x, y); radius = r; }
public void setRadius(int r) {
radius = r; }
public void drawIt(Graphics g) {
if ( isFilled )
g.fillOval(x - radius, y - radius, 2*radius, 2*radius); else
g.drawOval(x - radius, y - radius, 2*radius, 2*radius); }
public void setFilled(boolean b) {
}
[image:33.595.222.372.129.247.2]This program gives the window shown in Figure 5.
Figure 5. Window of the CircleExample program.
In Example 9 we have used the standard class "Point" as a base class for our own class
"MyPoint" (it should actually have been called "Circle" or simething alike).
This means that "MyPoint" inherits some useful properties and methods, like a constructor for setting the initial position and a "setLocation()" method for changing it.
Also notice that "MyPoint" is a private class. This is sufficient since it is a class that is used only by the class "CircleExample" and since it is defined in the same source file as
"CircleExample".
4.8 How to declare and use global constants and variables
The only things that are "global" in Java are classes. So it is impossible to declare global constants or variables anywhere you like as you would in "C" or C++.
Since having global constants and variables is very useful in most industry-scale applications, there is a very convenient workaround for the problem.
One solution is to define a few special classes, which contain these constant declarations and variables as static members.
Example: Classes for global constants, variables and functions.
public class GlobalConstants {
public static int A_GLOBAL_CONSTANT = 10; ...
}
public class GlobalVariables {
public static int aGlobalVariable; ...
}
public class GlobalFunctions {
public static void aGlobalFunction(int val1, int val2) {} ...
}
Now these are accessible from anywhere in the program as "GlobalConstants.
A_GLOBAL_CONSTANT", "GlobalVariables.aGlobalVariable" and
"GlobalFunctions.aGlobalFunction(...)".
5. Applets
Most Java applications are still applets, i.e. usually small applications that are run inside a WWW browser like Netscape Navigator or Microsoft Internet Explorer.
Their main purposes are to present information in a user friendly and interactive way.
They are also used for animating Internet pages just in order to make them more interesting.
5.1 Passing parameters to applets from a HTML page
Applet behaviour may be parameterised by passing parameters to them in the <applet> tag
Example 10. Passing parameter values from HTML to an Applet (compiled and run)
import java.awt.*;
import java.applet.Applet;
public class AppletParam extends Applet {
private final String DEFAULT_TEXT =
new String("No text parameter!"); private final int DEFAULT_COUNT = 1;
private String theString; private int repCount;
public void init() {
// First parameter is the string to show. String p1 = getParameter("Text");
if ( p1 != null ) theString = p1; else theString = DEFAULT_TEXT;
// Second parameter is the number of repetitions. String p2 = getParameter("Count");
if ( p2 != null ) repCount = new Integer(p2).intValue(); else repCount = DEFAULT_COUNT;
}
public void paint(Graphics g) {
int i, y;
for ( i = 0, y = 10 ; i < repCount ; i++, y += 20 ) { g.drawString(theString, 0, y);
} } }
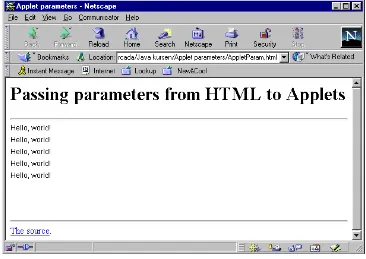
This applet takes the text string to draw and the number of times to draw it as parameters.
We get the values of these parameters with the method “getParameter(“<paramName>”)”, where “<paramName>” is the name of the
parameter. This method is defined in the Applet class.
<html> <head>
<title>Applet parameters</title> </head>
<body>
<h1>Passing parameters from HTML to Applets</h1> <hr>
<applet code=AppletParam.class width=350 height=150> <param name=Text value="Hello, world!">
<param name=Count value="5">
alt="Your browser understands the <APPLET> tag but isn't running the applet, for some reason."
Your browser is completely ignoring the <APPLET> tag! </applet>
<hr>
<a href="AppletParam.java">The source</a>. </body>
[image:37.595.114.480.310.569.2]</html>
Figure 6. Netscape Navigator window for applet parameter passing example.
The “init()” method is a special method that is always called by the browser when the
applet is loaded. So this is where the applet initialises instance variables, opens files etc.
There is already an empty “init()” method defined in the class Applet. What we did here
was just to overload it and do what we needed to do.
5.2 Animation
Example 11. Showing an image in an applet (compiled and run).
/**
* Simple applet that just displays an image. */
import java.awt.*;
import java.applet.Applet;
public class AnimationExample1 extends Applet {
privateImage animImage;
public void init() {
// Read in the image to display.
animImage = getImage(getDocumentBase(), "anim1.jpg"); }
public void paint(Graphics g) {
// Just draw the image if we have finished loading it. if ( animImage != null ) {
g.drawImage(animImage, 0, 0, this); }
} }
As in the previous example, we again have a “init()” method. This time it loads the image
[image:38.595.160.437.448.724.2]that we want to display.
We leave it up to the reader to construct the corresponding HTML page.
Now we make the caveman move, we will first add a “Point” (standard Java object) to the instance variables of our class, which memorises the current position of the caveman:
private Point imgPos = new Point(0, 0);
Then we modify the “paint()” method to look like this:
public void paint(Graphics g) {
int imgw, imgh; Dimension d = size();
if ( animImage != null ) {
imgw = animImage.getWidth(this); imgh = animImage.getHeight(this);
if ( imgw == -1 || imgh == -1 ) return;
// This loop is not a very good idea!!! while ( true ) {
g.drawImage(animImage, imgPos.x, imgPos.y, this); imgPos.x = (imgPos.x + 1)%d.width;
imgPos.y = (imgPos.y + 1)%d.height; }
} }
This is a very simple way of getting the caveman to glide down from the upper left corner of the applet display area towards the lower right corner.
Doing an animation like this is not a good idea!!! What happens now is that our applet is in an eternal loop, which means that it is no longer capable of reacting to events coming from outside. This means that it is not notified about display area size changes, nor any other user interaction.
In order to do this correctly, we have to use a thread which is activated on regular intervals and which avoids our applet to get blocked.
We will speak more about threads later. For now it is enough to know that a thread is a process that gets execution time on regular intervals and has a certain time to do it.
What our thread will do is to regularly “kick” our applet and make it move the animation forward.
private ThreadanimThread;// We use a Thread object for animation!
We have already seen the “init()” method that gets called before an applet starts
executing. We also have two other special methods, “start()” and “stop()”.
The browser calls the “start()” method straight after having called the “init()”
method. “start()” also gets called each time that the browser gets to a page where the
applet is included.
“stop()” is called each time the browser exits from a page that contains the applet.
For our animation example, we obviously have to have an “init()” method that sets up our
thread object, a “start()” method that starts the animation and a “stop()” method which
stops it. These three methods now look like this:
public void init() {
animImage = getImage(getDocumentBase(), "anim1.jpg"); setBackground(Color.white);
}
public void start() {
animThread = new Thread(this); animThread.start();
}
public void stop() {
animThread.stop(); }
// This is the method that makes the animation work correctly! public void run()
{
Dimension d;
while ( true ) { d = size();
if ( d != null ) {
imgPos.x = (imgPos.x + 1)%d.width; imgPos.y = (imgPos.y + 1)%d.height; repaint();
}
try { Thread.sleep(10); } catch ( InterruptedException e ) {} }
}
“Thread.sleep(10)” determines the animation speed by pausing the animation during
10 ms. Exception handling is compulsory in this case, so we have to have a try-catch here.
Now we have moved the animation logic into the “run()” method instead of having it in the
“paint()” method. The new “paint()” method looks like this:
public void paint(Graphics g) {
int imgw, imgh;
if ( animImage != null ) {
imgw = animImage.getWidth(this); imgh = animImage.getHeight(this);
if ( imgw == -1 || imgh == -1 ) return;
g.drawImage(animImage, imgPos.x, imgPos.y, this); }
}
Java is a language that has a strict type control. This is why our class has to implement a standard interface called “Runnable” in order to compile (more about interfaces later). We
have to change our class declaration line to look like this:
public class AnimationExample3 extends Applet implements Runnable
The “implements” keyword means that our class contains all the methods required by the
“Runnable” interface.
Now our applet works correctly. It even wipes out the previous image of the caveman, so that we don’t get a “trace”.
However, we notice that it flickers a lot, so we will try to reduce this. The reason for this flickering is that each time we call the standard “repaint()” method, it first clears the
entire applet display area before calling our “paint()” method. So we override the default
public void update(Graphics g) {
paint(g); }
We will also make the caveman turn while he is moving, which requires quite a few modifications. We start by having an image display rectangle instead of just a point:
private Rectangle imgRect = null; // Rectangle instead of Point.
We modify the “drawImage()” call in our “paint()” method correspondingly, so that it
scales the image on the fly to fit into the correct rectangle:
g.drawImage(animImage, imgRect.x, imgRect.y,
imgRect.x + imgRect.width, imgRect.y + imgRect.height, 0, 0, imgw, imgh, this);
Our “run()” method has now grown a lot bigger:
public void run() {
int imgw, imgh; Dimension d;
while ( true ) { d = size();
if ( d != null ) {
if ( animImage != null ) {
imgw = animImage.getWidth(this); imgh = animImage.getHeight(this); if ( imgw != -1 && imgh != -1 ) {
if ( imgRect == null ) {
imgRect = new Rectangle(0, 0, imgw, imgh); }
else {
imgRect.x = (imgRect.x + 1)%d.width; imgRect.y = (imgRect.y + 1)%d.height; if ( imgRect.width == -imgw )
imgRect.width = imgw; else imgRect.width--; } repaint(); } } }
try { Thread.sleep(10); } catch ( InterruptedException e ) {} }
}
Asynchronous image loading is extremely useful for internet purposes, where image loading might be long and where there may be several images to display in the same page.
We notice that the flicker disappeared, but now there is no longer anything that would clear the previous image.
What we do, is that we memorise the previous display rectangle of the caveman image and clear only that instead of clearing the entire applet display area. For doing this, we first need a new instance variable that stores the old rectangle:
private Rectangle oldRect = null; // Needed for clearing.
Then we add the following code into our “paint()” method just before the call to
“drawImage()” for clearing the previous rectangle:
if ( oldRect == null ) {
oldRect = new Rectangle(imgRect); }
else {
if ( oldRect.width > 0 )
g.clearRect(oldRect.x, oldRect.y, oldRect.width, oldRect.height); else
g.clearRect(oldRect.x + oldRect.width, oldRect.y, -oldRect.width, oldRect.height);
oldRect.setBounds(imgRect); }
Our final touch to the animation is to make the caveman bounce against the borders of the applet display area. This means modifying the “run()” method accordingly. Example 12
shows the entire applet code.
Example 12. Animation example with a turning image that bounds against the sides of the applet display area (compiled and run).
import java.awt.*;
import java.applet.Applet;
public class AnimationExample5 extends Applet implements Runnable {
private Image animImage;
private Rectangle imgRect = null;
private Rectangle oldRect = null; // Needed for clearing. private Thread animThread;
public void init() {
animImage = getImage(getDocumentBase(), "anim1.jpg"); setBackground(Color.white);
public void start() {
animThread = new Thread(this); animThread.start();
}
public void stop() {
animThread.stop(); }
public void paint(Graphics g) {
int imgw, imgh;
if ( animImage != null ) {
imgw = animImage.getWidth(this); imgh = animImage.getHeight(this);
if ( imgw == -1 || imgh == -1 ) return;
// Here we clear what has to be cleared from previous // animation step.
if ( oldRect == null ) {
oldRect = new Rectangle(imgRect); }
else {
if ( oldRect.width > 0 )
g.clearRect(oldRect.x, oldRect.y, oldRect.width, oldRect.height); else
g.clearRect(oldRect.x + oldRect.width, oldRect.y, -oldRect.width, oldRect.height);
oldRect.setBounds(imgRect); }
g.drawImage(animImage, imgRect.x, imgRect.y, imgRect.x + imgRect.width,
imgRect.y + imgRect.height, 0, 0, imgw, imgh, this);
} }
public void update(Graphics g) {
paint(g); }
public void run() {
int imgw, imgh;
int xincr = 1, yincr = 1, wincr = -1; Dimension d;
while ( true ) { d = size();
if ( d != null && animImage != null ) { imgw = animImage.getWidth(this); imgh = animImage.getHeight(this); if ( imgw != -1 && imgh != -1 ) {
if ( imgRect == null ) {
else {
if ( imgRect.x >= d.width || imgRect.x + imgRect.width >=
d.width ) xincr = -1; if ( imgRect.y + imgRect.height >=
d.height ) yincr = -1; if ( imgRect.x <= 0 ||
imgRect.x + imgRect.width <= 0 ) xincr = 1;
if ( imgRect.y <= 0 ) yincr = 1; if ( imgRect.width >= imgw ) {
wincr = -1; }
else if ( imgRect.width <= -imgw ) { wincr = 1;
}
imgRect.x += xincr; imgRect.y += yincr; imgRect.width += wincr; }
repaint(); }
}
try { Thread.sleep(10); } catch (InterruptedException e) {} }
} }
The animation still flickers quite badly. We will improve this while adding a few sound effects.
5.3 Sound effects
We will add a background sound to our applet, which plays continuously. There will also be a sound when the caveman bounces against the walls.
Doing this requires that we import the standard Java class AudioClip:
import java.applet.AudioClip;
We also add two new instance variables to our class for storing the references to the two audio clips that we use:
private AudioClip bounceSnd; private AudioClip bgSnd;
In the “init()” method we add the following lines for initially loading the two sounds:
bgSnd = getAudioClip(getCodeBase(), "spacemusic.au"); bounceSnd = getAudioClip(getCodeBase(), "0.au");
bgSnd.loop();
In our “stop()” method we add lines for stopping the sounds when the browser leaves the page:
bgSnd.stop(); bounceSnd.stop();
Each time that the caveman changes his direction in the “run()” method, we call the “play()” method of the bounce sound:
bounceSnd.play();
Now we have the sound effects that we wanted, so we will work a bit more on reducing screen flicker. We do it just by clearing the borders of the old rectangle instead of clearing the entire rectangle. This is not a very sophisticated solution, but at least we reduce flicker. We introduce a new method for doing it:
private void clearOldRect(Graphics g, Rectangle newRect, Rectangle oldRect)
{
Rectangle oldr, newr;
// Flip coordinates to make it easier. if ( oldRect.width < 0 )
oldr = new Rectangle(oldRect.x + oldRect.width, oldRect.y, -oldRect.width, oldRect.height);
else
oldr = new Rectangle(oldRect); g.clearRect(oldr.x, oldr.y,
oldr.width, 4);
g.clearRect(oldr.x, oldr.y, 4, oldr.height);
g.clearRect(oldr.x + oldr.width - 4, oldr.y, 4, oldr.height); g.clearRect(oldr.x, oldr.y + oldr.height - 4, oldr.width, 4); }
Then we replace the clearing code of our “paint()” method with the following:
if ( oldRect == null ) {
oldRect = new Rectangle(imgRect); }
clearOldRect(g, imgRect, oldRect); oldRect.setBounds(imgRect);
It is possible to reduce or eliminate animation flicker in many ways. This is just one simple way of doing it.
5.4 Double-buffered animation
Another quite common way to avoid flicker in animations is to have an off screen image, where the graphical operations take place. Then this off screen image just gets copied onto the screen, which is rapid and makes the transition from one animation step to the next one very fluent.
What we need to do first is to declare an instance variable to contain the off-screen image:
private Image offscreen = null;
As usual, we set it to null so that we can easily test if it has been initialised or not.
We set up the off-screen image in the “run()” method:
while ( true ) { d = size();
if ( d != null && animImage != null ) {
// Set up offscreen buffer. if ( offscreen == null )
offscreen = createImage(d.width, d.height);
imgw = animImage.getWidth(this); …
“createImage()” is a method that is defined in the “Component” class that is one of the
base classes of “Applet”. What we do here is to set up an off-screen image of exactly the
same size as the applet display area.
An applet is an easy case, since the size of its’ display area never changes. It would be more complex for a normal window.
public void paint(Graphics g) {
int imgw, imgh; Graphics offscreen_g;
if ( animImage == null || offscreen == null ) return;
offscreen_g = offscreen.getGraphics();
imgw = animImage.getWidth(this); imgh = animImage.getHeight(this);
if ( imgw == -1 || imgh == -1 ) return;
// Clear the needed areas of old display. if ( oldRect == null ) {
oldRect = new Rectangle(imgRect); }
clearOldRect(offscreen_g, imgRect, oldRect); oldRect.setBounds(imgRect);
offscreen_g.drawImage(animImage, imgRect.x, imgRect.y, imgRect.x + imgRect.width, imgRect.y + imgRect.height, 0, 0, imgw, imgh, this);
g.drawImage(offscreen, 0, 0, this); }
We first check that we have both a valid animated image and a valid off-screen.
“getGraphics()” is a method defined in the class “Image”. The call
“offscreen.getGraphics();” returns a “Graphics” object which allows us to draw
into the image just like we would draw onto the computer screen.
Then all drawing which previously went directly to the screen now goes into the off-screen image.
The final call to “drawImage()” just copies the off-screen image onto the screen. This is a
very rapid and flicker-free operation since it happens scanline by scanline, so it is difficult to see the transition.
We could even use clearing of the entire old image area again, instead of just clearing the borders. Just clearing the borders sometimes runs into synchronisation problems and “leaves behind” a small part of the image.
This change only slightly affects animation speed. Animation speed depends on the delay that we define in the call to “ Thread.sleep()”. However, if the animation itself is slower
6. User Interaction
User interaction has changed greatly from version 1.0.x to 1.1.x. This especially concerns the handling of events.
The new model is much more flexible and simplifies writing well-structured, modular programs. Although version 1.1.x virtual machines have become a great majority, we will stick to the 1.0.x event model in this course. This is to be sure that our applets will work fine even with older internet browsers.
6.1 Reacting to a user click inside the applet display area
All we need to do in order to react to a mouse click inside the applet display area is to override the “mouseDown()” method:
public boolean mouseDown(Event evt, int x, int y) {
imgRect.x += imgRect.width; imgRect.width = -imgRect.width; return true;
}
Here we are still working with our animation example from the previous chapter.
What we do is that we flip around the caveman each time that the user clicks inside the applet display area.
It might be a good idea to add the “synchronized” (more about this together with threads)
keyword to the method declaration. This would make our class “thread-safe”. What could happen now, is that if the execution of the “mouseDown()” method is not finished when the
animation thread interrupts it, we might just be in the middle of the turning operation, when we already have to repaint.
In the current case, there is no big danger. The caveman always ends up by being flipped correctly. But in more complex situations, the program may end up in a weird state and start to behave strangely.
6.2 User interface elements
For this chapter, we will use the existing course at “http://developer.java.sun.com/developer/onlineTraining/GUI/AWT
Accessing this course requires registering to the Java Developer Connection (JDC), which (at least for the moment) is free.
Only the chapters that are grouped together under the title “Widgets” are considered here.
6.3 Window-related user interface elements
Menus are connected to a certain window (or a certain application on some operating systems), so we could say that a menu belongs to a window.
Actually, a window has a menu bar, from which the various menus can be accessed.
Usually, a window also has some buttons for closing it, activating it, minimising, maximising and restoring it etc. Various events are generated and sent to the window when the user uses one of these.
Example 13 shows how to add a menu bar and menus to a window and how to handle the window closing event.
It is generally a good idea to subclass the "Frame" class if the application uses menus, since
menu events end up in the "action()" method of the frame that contains them.
Menus are organised in a hierarchical fashion. First, there is a "MenuBar" object associated
with the frame. This menu bar contains "Menu" object. Menus contain "MenuItem",
"CheckboxMenuItem" or other "Menu" objects (for creating submenus).
It is also possible to associate menu shortcuts to menu items.
Example 13. Menu and window event handling (compiled and run)
import java.awt.*;
class MenuExampleFrame extends Frame {
MenuBarmyMenubar;
Menu fileMenu, testMenu;
public static void main(String argv[]) {
MenuExampleFrame f = new MenuExampleFrame("Menu example");
f.pack(); f.show(); }
MenuExampleFrame(String title) {
Menu sub_menu;
// Just so we get a size. Canvas c = new Canvas(); c.resize(300, 100); add(c);
// Set up the menus.
myMenubar = new MenuBar(); fileMenu = new Menu("File"); testMenu = new Menu("Test");
fileMenu.add(new MenuItem("New")); fileMenu.add(new MenuItem("Open..."));
fileMenu.add(new MenuItem("Save", new MenuShortcut('s'))); fileMenu.add(new MenuItem("Close"));
fileMenu.add(new MenuItem("-")); fileMenu.add(new MenuItem("Exit"));
testMenu.add(new CheckboxMenuItem("test1")); sub_menu = new Menu("SubMenu");
testMenu.add(sub_menu); sub_menu.add(new CheckboxMenuItem("test2")); sub_menu.add(new CheckboxMenuItem("test3")); myMenubar.add(fileMenu); myMenubar.add(testMenu); setMenuBar(myMenubar); }
/** Catch menu events. */
public boolean action(Event evt, Object what) {
if ( evt.arg.equals("Exit") ) System.exit(1); if ( evt.target instanceof CheckboxMenuItem )
System.out.println(((CheckboxMenuItem)
evt.target).getState()); else
System.out.println(evt.arg); return super.action(evt, what); }
/** Catch window events. */
public boolean handleEvent(Event evt) {
if ( evt.id == Event.WINDOW_DESTROY ) System.exit(1);
return super.handleEvent(evt); }
}
Window events are sent to the "handleEvent()" method. The type of the event can then
be tested against some event codes that are defined in the "Event" class.
It is usually a good idea to call the super-class' method for all standard event handling methods ("super.handleEvent(evt)" for instance). Otherwise we might interrupt the
event propagation chain. If we forget to do this for "handleEvent()", for instance, then
7. Window Layout
Java applications should run in a similar way on any operating system. This means that the user interface should look about the same in all cases.
Unfortunately, different operating systems do not use exactly the same fonts, do not have the same window border widths or there might be other differences. All these factors make it difficult to know exactly how big our user interface should be and where they should be positioned.
Java window layout managers are used for avoiding these problems. The programmer just defines some rules for the positioning and sizing of the elements in relation to each other and/or to the window and the manager respects this as well as possible.
7.1 Window layout managers
For this chapter, we will use the existing course at “http://developer.java.sun.com/developer/onlineTraining/AWT/AWT .html”. This is a public course, which is accessible through links in the JDK documentation.
Accessing this course requires registering to the Java Developer Connection (JDC), which (at least for the moment) is free.
Only the chapters that are grouped together under the titles “Layout Managers”, "Nested Panels", "Events", "Colors" and "Fonts" are considered here.
7.2 The "null" layout