Deep into Pharo
Alexandre Bergel
Damien Cassou
This book is available as a free download from:
http://deepintopharo.com
Copyright © 2013 by Alexandre Bergel, Damien Cassou, Stéphane Ducasse and Jannik Laval.
The contents of this book are protected under Creative Commons Attribution-ShareAlike 3.0 Unported license.
You are free:
to Share — to copy, distribute and transmit the work
to Remix — to adapt the work
Under the following conditions:
Attribution. You must attribute the work in the manner specified by the author or licensor (but not in any way that suggests that they endorse you or your use of the work).
Share Alike. If you alter, transform, or build upon this work, you may distribute the resulting work only under the same, similar or a compatible license.
• For any reuse or distribution, you must make clear to others the license terms of this work. The best way to do this is with a link to this web page:creativecommons.org/licenses/ by-sa/3.0/
• Any of the above conditions can be waived if you get permission from the copyright holder.
• Nothing in this license impairs or restricts the author’s moral rights.
Your fair dealing and other rights are in no way affected by the above. This is a human-readable summary of the Legal Code (the full license):
creativecommons.org/licenses/by-sa/3.0/legalcode
Published by Square Bracket Associates, Switzerland.http://SquareBracketAssociates.org ISBN 978-3-9523341-6-4
Contents
1 Preface 1
I
Libraries
2 Zero Configuration Scripts and Command-Line Handlers 7
2.1 Getting the VM and the Image . . . 7
2.2 Getting the VM only . . . 9
2.3 Handling command line options . . . 9
2.4 Anatomy of a handler . . . 12
2.5 Using ZeroConf script with Jenkins . . . 13
2.6 Chapter summary. . . 14
3 Files with FileSystem 15 3.1 Getting started . . . 15
3.2 Navigating a file system . . . 16
3.3 Opening read and write Streams . . . 19
3.4 Renaming, copying and deleting files and directories . . . . 20
3.5 The main entry point: FileReference . . . 21
3.6 Looking at FileSystem internals . . . 27
3.7 Chapter summary. . . 29
4 Sockets 31 4.1 Basic Concepts . . . 31
4.2 TCP Client . . . 33
4.4 SocketStream . . . 43
4.5 Tips for Networking Experiments . . . 48
4.6 Chapter summary. . . 49
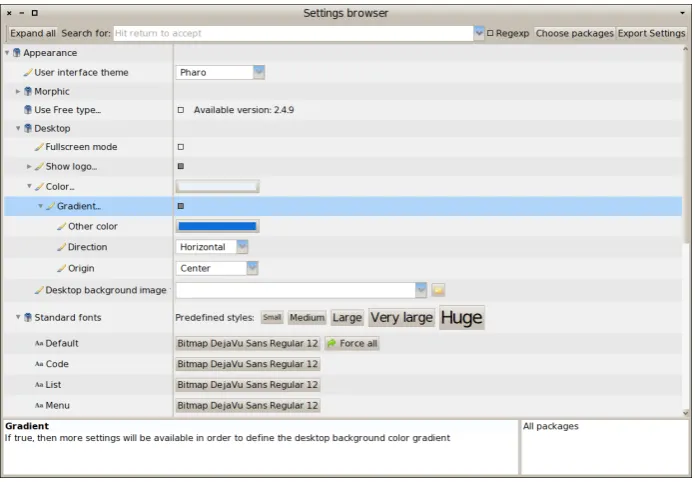
5 The Settings Framework 51 5.1 Settings architecture . . . 51
5.2 The Settings Browser. . . 53
5.3 Declaring a setting . . . 56
5.4 Organizing your settings . . . 61
5.5 Providing more precise value domain . . . 65
5.6 Launching a script . . . 68
5.7 Start-up actions management . . . 69
5.8 Extending the Settings Browser . . . 71
5.9 Chapter summary. . . 75
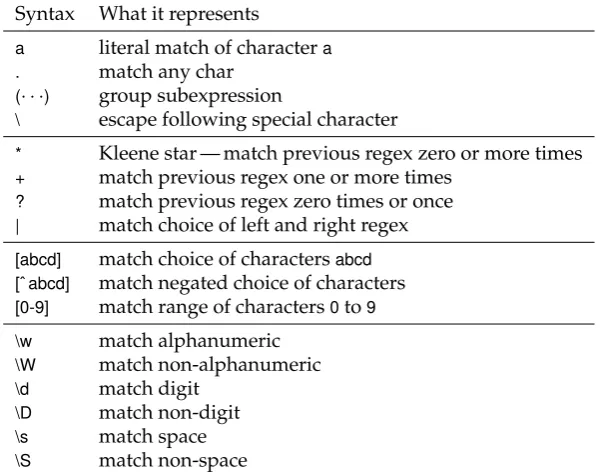
6 Regular Expressions in Pharo 77 6.1 Tutorial example — generating a site map . . . 78
6.2 Regex syntax . . . 85
6.3 Regex API . . . 90
6.4 Implementation notes by Vassili Bykov . . . 96
6.5 Chapter summary. . . 97
II
Source Management
7 Versioning Your Code with Monticello 101 7.1 Basic usage . . . 1027.2 Exploring Monticello repositories . . . 113
7.3 Advanced topics . . . 115
7.4 Getting a change set from two versions . . . 120
7.5 Kinds of repositories . . . 121
7.6 The .mcz file format . . . 124
7.7 Chapter summary. . . 126
8.2 What is Gofer? . . . 132
8.3 Using Gofer . . . 133
8.4 Gofer actions . . . 135
8.5 Some useful scripts . . . 141
8.6 Chapter summary. . . 144
9 Managing Projects with Metacello 147 9.1 Introduction . . . 147
9.2 One tool for each job . . . 148
9.3 Metacello features. . . 149
9.4 A simple case study . . . 151
9.5 Loading a Metacello Configuration . . . 154
9.6 Managing dependencies between packages . . . 155
9.7 Baselines . . . 157
9.8 Groups. . . 160
9.9 Dependencies between projects . . . 163
9.10 About dependency granularity . . . 169
9.11 Executing code before and after installation . . . 171
9.12 Platform specific package . . . 172
9.13 Milestoning development: symbolic versions . . . 176
9.14 Load types . . . 181
9.15 Conditional loading . . . 183
9.16 Project version attributes . . . 185
9.17 Chapter summary. . . 186
III
Frameworks
10 Glamour 191 10.1 Installation and first browser . . . 19110.2 Presentation, Transmission and Ports . . . 194
10.3 Composing and Interaction . . . 200
10.4 Chapter summary. . . 207
11.2 Roassal core model . . . 212
11.3 Detailing shapes . . . 218
11.4 Edges: linking elements . . . 221
11.5 Layouts . . . 224
11.6 Events and Callbacks . . . 230
11.7 The interaction hierarchy . . . 231
11.8 Understanding a View’s Camera . . . 234
11.9 Beyond Pharo . . . 238
11.10 Chapter summary. . . 239
12 Scripting Visualizations with Mondrian 241 12.1 Installation and first visualization . . . 241
12.2 Starting with Mondrian. . . 242
12.3 Visualizing the Collection framework . . . 247
12.4 Reshaping nodes . . . 248
12.5 Multiple edges . . . 249
12.6 Colored shapes . . . 251
12.7 More on colors . . . 252
12.8 Popup view . . . 253
12.9 Subviews . . . 255
12.10 Forwarding events . . . 256
12.11 Events . . . 257
12.12 Interaction . . . 257
12.13 Chapter summary. . . 259
IV
Language
13 Handling Exceptions 263 13.1 Introduction . . . 26313.2 Ensuring execution . . . 264
13.3 Handling non-local returns . . . 265
13.4 Exception handlers . . . 266
13.5 Error codes — don’t do this! . . . 268
13.7 Signaling an exception . . . 271
13.8 Finding handlers . . . 273
13.9 Handling exceptions . . . 275
13.10 Comparingouterwithpass. . . 281
13.11 Exceptions andensure:/ifCurtailed:interaction . . . 282
13.12 Example: Deprecation . . . 284
13.13 Example: Halt implementation . . . 285
13.14 Specific exceptions . . . 286
13.15 When not to use exceptions . . . 288
13.16 Exceptions implementation . . . 289
13.17 Ensure:’s implementation . . . 295
13.18 Chapter summary. . . 300
14 Blocks: a Detailed Analysis 303 14.1 Basics . . . 304
14.2 Variables and blocks . . . 306
14.3 Variables can outlive their defining method . . . 313
14.4 Returning from inside a block . . . 314
14.5 Contexts: representing method execution . . . 320
14.6 Message execution . . . 323
14.7 Chapter conclusion . . . 326
15 Exploring Little Numbers 329 15.1 Power of 2 and Numbers . . . 329
15.2 Bit shifting is multiplying by 2 powers . . . 331
15.3 Bit manipulation and access . . . 333
15.4 Ten’s complement of a number . . . 335
15.5 Negative numbers . . . 336
15.6 Two’s complement of a number . . . 337
15.7 SmallIntegers in Pharo . . . 340
15.8 Hexadecimal . . . 342
16 Fun with Floats 345
16.1 Never test equality on floats . . . 345
16.2 Dissecting a Float . . . 347
16.3 With floats, printing is inexact . . . 351
16.4 Float rounding is also inexact . . . 352
16.5 Fun with inexact representations . . . 353
16.6 Chapter summary. . . 354
V
Tools
17 Profiling Applications 357 17.1 What does profiling mean? . . . 35717.2 A simple example . . . 358
17.3 Code profiling in Pharo . . . 359
17.4 Read and interpret the results . . . 362
17.5 Illustrative analysis . . . 367
17.6 Counting messages . . . 369
17.7 Memorized Fibonacci . . . 369
17.8 SpaceTally for memory consumption per Class . . . 371
17.9 Few advices . . . 372
17.10 How MessageTally is implemented? . . . 372
17.11 Chapter summary. . . 373
18 PetitParser: Building Modular Parsers 375 18.1 Writing parsers with PetitParser . . . 375
18.2 Composite grammars with PetitParser . . . 384
18.3 Testing a grammar . . . 389
18.4 Case Study: A JSON Parser . . . 391
18.5 PetitParser Browser . . . 397
18.6 Packrat Parsers . . . 409
18.7 Chapter summary. . . 409
Chapter 1
Preface
“Smalltalk is well known as an excellent tool for agile and exploratory programming. In this book the authors present a new dialect of Smalltalk called Pharo that has been specifically designed for inventive developers. The authors are key members of the Pharo team and accom-plished Object Oriented educators, researchers and designers. Numer-ous Smalltalk projects from the authors and others have been ported to Pharo. Enjoy Deep Into Pharo”
- Dave Thomas1
-Using a programming language is so far the most convenient way for a human to tell a computer what it should do. Pharo is an object-oriented programming language, highly influenced by Smalltalk. Pharo is more than a syntax and a bunch of semantics rules as most programming languages are. Pharo comes with an extensible and flexible programming environ-ment. Thanks to its numerous object-oriented libraries and frameworks, Pharo shines for modeling and visualizing data, scripting, networking and many other ranges of applications.
The very light syntax and the malleable object model of Pharo are com-monly praised. Both early learners and experienced programmers enjoy the “everything is an object” paradigm. The simplicity and expressiveness of Pharo as well as a living environment empowers programmers with a won-derful and unique experience.
Deep into Pharo is the second volume of a book series initiated with Pharo by Example2. Deep into Pharo, the book you are reading,
accompa-1David (http://www.davethomas.net) is a well-known figure in modern software development and object technology. Thomas is perhaps best known as the founder and past CEO of Object Technology International, Inc., now IBM OTI Labs. OTI was responsible for initial development of the Eclipse open source IDE and the Visual Age Java development environment.
nies the reader for a fantastic journey into exciting parts of Pharo. It covers new libraries such as FileSystem, frameworks such as Roassal and Glamour, complex of the system aspects such as exceptions and blocks.
The book is divided into 5 parts and 17 chapters. The first part deals with truly object-oriented libraries. The second part is about source code management. The third part is about advanced frameworks. The fourth part covers advanced topics of the language, in particular exception, blocks and numbers. The fifth and last part is about tooling, including profiling and parsing.
Pharo is supported by a strong community that grows daily. Pharo’s community is active, innovative, and is always pushing limits of software engineering. The Pharo community consists of software engineering soft-ware, casual programmers but also high-level consultants, researchers, and teachers. This book exists because of the Pharo community and we naturally dedicate this book to this group of people that many of us consider as our second family.
Acknowledgments
We would like to thank various people who have contributed to this book. In particular, we would like to thank:
• Camillo Bruni for his participation in the Zero Configuration chapter.
• Noury Bouraqadi and Luc Fabresse for the Socket chapter.
• Alain Plantec for his effort in the Setting Framework chapter and his effort to integrate it into Pharo.
• Oscar Nierstrasz for writing and co-editing some chapters such as Regex and Monticello.
• Dale Henrichs and Mariano Martinez Peck for their participation in the Metacello chapter.
• Tudor Doru Girba for the Glamour chapter and the first documenta-tion.
• Clément Bera for his effort on the Exception chapter.
• Nicolas Cellier for his participation in the Fun with Floats chapter.
• Jan Kurs and Guillaume Larcheveque for their participation in the Pe-titParser chapter.
• Colin Putney for the initial version of FileSystem and Camillo Bruni for his review of FileSystem and his rewrite of the Pharo Core.
• Vanessa Peña for her participation in the Roassal and Mondrian chap-ters.
• Renato Cerro for his help in proofreading and editing.
• You, for your questions, support, bug fixes, contribution, and encour-agement.
We would like to also thank Hernan Wilkinson and Carlos Ferro for their reviews, Nicolas Cellier for the feedback on the number chapter, and Vassili Bykov for permission to adapt his Regex documentation
We thank Inria Lille Nord Europe for supporting this open-source project and for hosting the web site of this book. We also thank Object Profile for sponsoring the cover.
And last but not least, we also thank the Pharo community for its enthu-siastic support of this project, and for informing us of the errors found in the first edition of this book.
Part I
Chapter 2
Zero Configuration Scripts
and Command-Line
Handlers
with the participation of:
Camillo Bruni([email protected])
Weren’t you fed up not be able to install Pharo from a single command line or to pass it arguments? Using a nice debugger and an interactive envi-ronment development does not mean that Pharo developers do not value au-tomatic scripts and love the command line. Yes we do and we want the best of both worlds! We really wanted it to free our mind of retaining arbitrary information. A zero configuration is a script that automatically downloads everything you need to get started. Since version 2.0, Pharo also supports a way to define and handle command line arguments.
This chapter shows how to get the zeroconf scripts for Pharo as well as how you can pass arguments to the environment from the command-line.
2.1
Getting the VM and the Image
First here is a way to download a zero configuration script to download the latest 2.0 Pharo image and vm.
wget get.pharo.org/20+vm
To execute the script that we just downloaded, you should change its permissions usingchmod a+xor invoke it via bash as follows.
Configurations. There is a plethora of configurations available. The URL for each script can be easily built from an image version and a vm following the expression:get.pharo.org/$IMAGE+$VM
Possible values for$IMAGEare:12 13 14 20 30 stable alpha
Possible values for$VMare:vm vmS vmLatest vmSLatest
Of course, one can just download an image as wellget.pharo.org/$IMAGEor just the VMget.pharo.org/$VM
Looking at the help. Now let’s have a look at the script help.
bash 20+vm--help
The help says that the 20+vm command downloads the current virtual machine and puts it into the pharo-vm folder. In addition, it creates several scripts: pharoto launch the system,pharo-uia script to launch the image in UI mode. Finally, it also downloads the latest image and changes files.
This script downloads the latest Pharo 20 Image. This script downloads the latest Pharo VM.
The following artifacts are created:
Pharo.changes A changes file for the Pharo Image
Pharo.image A Pharo image, to be opened with the Pharo VM
pharo Script to run the downloaded VM in headless mode
pharo-ui Script to run the downloaded VM in UI mode
pharo-vm/ Directory containing the VM
Grabbing and executing it. If you just want to directly execute the script you can also do the following
wget-O-get.pharo.org/20+vm | bash
The option-O-will output the downloaded bash file to standard out, so we can pipe it tobash. If you do not like the log of web, use--quiet.
wget--quiet-O-get.pharo.org/20+vm | bash
2.2
Getting the VM only
You can also use different scripts. For exampleget.pharo.org/vmonly down-loads the latest vm.
wget-O-get.pharo.org/vm | bash
As any script you can always check its help message.
This script downloads the latest Pharo VM. The following artifacts are created:
pharo Script to run the downloaded VM in headless mode
pharo-ui Script to run the downloaded VM in UI mode pharo-vm/ Directory containing the VM
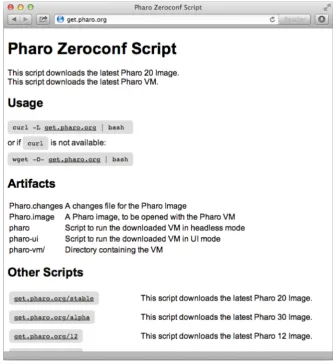
Figure 2.1 shows the list of scripts available that you can get at
http://get.pharo.org.
2.3
Handling command line options
We have a brand new and nice way to handle command line arguments. It is self-documented and easily extendable. Let us have a look at how the command line is handled. As usual we will start by showing you how to find your way alone.
How to find our way
Because we highly value self-documentation, just use the--helpoption to get an explanation.
./pharo Pharo.image--help
It will produce the following output.
Usage: [<subcommand>] [--help] [--copyright] [--version] [--list]
--help print this help message
--copyright print the copyrights
--version print the version for the image and the vm
--list list a description of all active command line handlers <subcommand> a valid subcommand in--list
Documentation:
A DefaultCommandLineHandler handles default command line arguments and options. The DefaultCommandLineHandler is activated before all other handlers.
Figure 2.1: All the scripts are available athttp://get.pharo.org.
System version and handler list
Two of the default options are importantversionsandlist. Let us have a look at them now.
Getting system version. A typical and important command line option is
--version. Please use it when you report bugs and deviant behavior.
./pharo Pharo.image--version
M: NBCoInterpreter NativeBoost-CogPlugin-IgorStasenko.15 uuid: 44b6b681-38f1
NBCogit NativeBoost-CogPlugin-IgorStasenko.15 uuid: 44b6b681-38f1-4a9e-b6ee
-8769b499576a Dec 18 2012
git://gitorious.org/cogvm/blessed.git Commit: 452863
bdfba2ba0b188e7b172e9bc597a2caa928 Date: 2012-12-07 16:49:46 +0100 By:
Esteban Lorenzano <[email protected]> Jenkins build #5922
The--versionargument gives the version of the virtual machine. If you
wish to obtain the version of the image, then you need to open the image, use the World menu, and select About.
List of available handlers. The command line option--listlists of the cur-rentoption handlers. This list depends on the handlers that are currently loaded in the system. In particular, it means that you can simply add a han-dler for your specific situation and wishes.
The following list shows the available handlers.
./pharo Pharo.image--list
Currently installed Command Line Handlers:
st Loads and executes .st source files
Fuel Loads fuel files
config Install and inspect Metacello Configurations from the command line
save Rename the image and changes file
test A command line test runner
update Load updates
printVersion Print image version
eval Directly evaluates passed in one line scripts
Loading Metacello Configuration. To get some explanation about the use of the config option, just request its associated help as follows:
./pharo Pharo.image config--help
Note that this help is the one of the associated handler, not one of the command line generic system.
Usage: config [--help] <repository url> [<configuration>] [--install[=<version>]] [
--group=<group>] [--username=<username>] [--password=<password>]
--help show this help message
<repository url> A Monticello repository name <configuration> A valid Metacello Configuration name <version> A valid version for the given configuration
<group> A valid Metacello group name
Examples:
# display this help message pharo Pharo.image config
# list all configurations of a repository
pharo Pharo.image config $MC_REPOS_URL
# list all the available versions of a confgurtation
pharo Pharo.image config $MC_REPOS_URL ConfigurationOfFoo
# install the stable version
pharo Pharo.image config $MC_REPOS_URL ConfigurationOfFoo--install
#install a specific version '1.5'
pharo Pharo.image config $MC_REPOS_URL ConfigurationOfFoo--install=1.5
#install a specific version '1.5' and only a specific group 'Tests'
pharo Pharo.image config $MC_REPOS_URL ConfigurationOfFoo--install=1.5
--group=Tests
2.4
Anatomy of a handler
As we mentioned, the command line mechanism is open and can be ex-tended. We will look now how at the handler for the eval option is defined.
Evaluating Pharo Expressions. You can use the command line to evaluate expressions as follows:./pharo Pharo.image eval '1+2'
./pharo Pharo.image eval--help
Usage: eval [--help] <smalltalk expression>
--help list this help message
<smallltalk expression> a valid Smalltalk expression which is evaluated and the result is printed on stdout
Documentation:
A CommandLineHandler that reads a string from the command line, outputs the evaluated result and quits the image.
This handler either evaluates the arguments passed to the image: $PHARO_VM my.image eval 1 + 2
or it can read directly from stdin:
Now the handler is defined as follows: First we define a subclass of Com-mandLineHandler. HereBasicCodeLoaderis a subclass ofCommandLineHandler
andEvaluateCommandLineHandleris a subclass ofBasicCodeLoader.
BasicCodeLoader subclass: #EvaluateCommandLineHandler instanceVariableNames: ''
classVariableNames: '' poolDictionaries: ''
category: 'System-CommandLine'
We then define thecommandNameon the class side as well as the method
isResponsibleFor:.
EvaluateCommandLineHandler class>>commandName ^ 'eval'
EvaluateCommandLineHandler class>>isResponsibleFor: commandLineArguments "directly handle top-level-e and--evaluate options"
commandLineArguments withFirstArgument: [ :arg| (#('-e' '--evaluate') includes: arg)
ifTrue: [ ^ true ]].
^ commandLineArguments includesSubCommand: self commandName
EvaluateCommandLineHandler class>>description ^ 'Directly evaluates passed in one line scripts'
Then we define the methodactivatewhich will be executed when the op-tion matches.
EvaluateCommandLineHandler>>activate self activateHelp.
self arguments ifEmpty: [ ^ self evaluateStdIn ]. self evaluateArguments.
self quit.
In particular we define a class comment since this is this class comment that will be printed when the help is requested.
If you want your image saved at the end of an evaluation script, use the
--saveoption just aftereval.
2.5
Using ZeroConf script with Jenkins
For example here is the command that we use in Jenkins for the project XMLWriter (which is hosted on PharoExtras).
# Jenkins puts all the params after a / in the job name as well :( export JOB_NAME=`dirname $JOB_NAME`
wget--quiet-O-get.pharo.org/$PHARO+$VM | bash
./pharo Pharo.image save $JOB_NAME--delete-old
./pharo $JOB_NAME.image--version > version.txt
REPO=http://smalltalkhub.com/mc/PharoExtras/$JOB_NAME/main
./pharo $JOB_NAME.image config $REPO ConfigurationOf$JOB_NAME--install=
$VERSION--group='Tests'
./pharo $JOB_NAME.image test--junit-xml-output"XML-Writer-.*"
zip-r $JOB_NAME.zip $JOB_NAME.image $JOB_NAME.changes
2.6
Chapter summary
Chapter 3
Files with FileSystem
with the participation of:
Max Leske([email protected])
The library for dealing with files in Pharo is called FileSystem. It offers an expressive and elegant object-oriented design. This chapter presents the key aspects of the API to cover most of the needs one may have.
FileSystem is the result of long and hard work from many people. FileSys-tem was originally developed by Colin Putney and the library is distributed under the MIT license, as for most components of Pharo. Camillo Bruni made some changes to the original design. Camillo Bruni integrated it into Pharo with the help of Esteban Lorenzano and Guillermo Polito. This chap-ter would not exist without the previous work of all the contributors of FileSystem. We are grateful to all of them.
3.1
Getting started
The framework supports different “kinds” of filesystems that are inter-changeable and may transparently work with each other. The probably most common usage of FileSystem is to directly work with files stored on your hard-drive. We are going to work with that one for now.
The classFileSystemoffers factory class-methods to offer access to differ-ent filesystems. Sending the messagedisktoFileSystem, returns a file system as on your physical hard-drive. Sendingmemory creates a new file system stored in memory image.
| working |
working := FileSystem disk workingDirectory.
working := FileSystem disk workingDirectory class
−→ FileReference
The message workingDirectory above returns a reference to the directory containing your Pharo image. A reference is an instance of the class
FileReference. References are the central objects of the framework and
pro-vide the primary mechanisms for working with files and directories. FileSystem defines four classes that are important for the end-user:
FileSystem,FileReference,FileLocator, andFileSystemDirectoryEntry. FileSystem of-fers factory methods to create a new file system. AFileReferenceis a reference to a folder or a file and offers methods to navigate and perform operations.
AFileLocatoris a late binding reference. When asked to perform concrete
op-eration, a file locator looks up the current location of the origin, and resolve the path against it. AFileSystemDirectoryEntryallows one to get the additional information of a file or a directory. These classes belong to the ’FileSystem-Core’ package, and are explained below in the chapter.
You should not use platform specific classes such as UnixStore or
WindowsStore, these are internal classes. All code snippets below work on
FileReferenceinstances.
3.2
Navigating a file system
Now let’s play with FileSystem.
Immediate children. To list the immediate children of your working direc-tory, execute the following expression:
| working |
working := FileSystem disk workingDirectory. working children.
−→ anArray(File @ /Users/ducasse/Workspace/FirstCircle/Pharo/20/.DS_Store File
@ /Users/ducasse/Workspace/FirstCircle/Pharo/20/ASAnimation.st ...)
Notice thatchildrenreturns thedirectfiles and folders. To recursively ac-cess all the children of the current directory you should use the message
allChildrenas follows:
working allChildren.
'/Users/ducasse/Workspace/FirstCircle/Pharo/20' asFileReference
Note that no error is raised if the string does not point to an existing file. You can however check whether the file exists or not:
'foobarzork' asFileReference exists
−→ false
All ’.st’ files. Filtering is realized using standard pattern matching on file name. To find all st files in the working directory, simply execute:
working allChildren select: [ :each | each basename endsWith: 'st' ]
Thebasenamemessage returns the name of the file from a full name (i.e.,
/foo/gloops.taz basenameis'gloops.taz').
Accessing a given file or directory. Use the slash operator to obtain a ref-erence to a specific file or directory within your working directory:
| working cache |
working := FileSystem disk workingDirectory. cache := working / 'package-cache'.
Getting to the parent folder. Navigating back to the parent is easy using
theparentmessage:
| working cache |
working := FileSystem disk workingDirectory. cache := working / 'package-cache'. parent := cache parent.
parent = working −→ true
Accessing directory properties. You can check the various properties of an element. For example, in the following we try with the cache directory by executing the following expressions:
cache exists. −→ true
cache isSymLink."ask if it is a symbolic link" −→ false
cache isFile. −→ false
cache isDirectory. −→ true
cache basename. −→ 'package-cache'
−→ '/Users/ducasse/Workspace/FirstCircle/Pharo/20/package-cache' cache parent fullName
−→ '/Users/ducasse/Workspace/FirstCircle/Pharo/20/'
The methods exists, isFile, isDirectory, and basename are defined on the
FileReferenceclass. Notice that there is no message to get the path without
the basename and that the idiom is to useparent fullNameto obtain it. The messagepath returns a Path object which is internally used by FileSystem and is not meant to be publicly used.
Note that FileSystem does not really distinguish between files and folders which often leads to cleaner code and can be seen as an application of the Composite design pattern.
Querying file entry status. To get additional information about a filesys-tem entry, we should get anFileSystemDirectoryEntryusing the messageentry. Note that you can access the file permissions. Here are some examples:
cache entry creation. −→ 2012-04-25T15:11:36+02:00
cache entry creationTime −→ 2012-04-25T15:11:36+02:00
cache entry creationSeconds −→ 3512812296 2012-08-02T14:23:29+02:00
cache entry modificationTime −→ 2012-08-02T14:23:29+02:00
cache entry size. −→ 0 (directories have size 0)
cache entry permissions −→ rwxr-xr-x
cache entry permissions class −→ FileSystemPermission
cache entry permissions isWritable −→ true
cache entry isFile −→ false
cache entry isDirectory −→ true
Locations. The framework also supports locations, late-bound references that point to a file or directory. When asking to perform a concrete operation, a location behaves the same way as a reference. Here are some locations.
FileLocator desktop. FileLocator home.
FileLocator imageDirectory. FileLocator vmDirectory.
3.3
Opening read and write Streams
To open a stream on a file, just ask the reference for a read- or write-stream using the messagewriteStreamorreadStreamas follows:
| working stream |
working := FileSystem disk workingDirectory. stream := (working / 'foo.txt') writeStream. stream nextPutAll: 'Hello World'.
stream close.
stream := (working / 'foo.txt') readStream.
stream contents. −→ 'Hello World'
stream close.
Please note that writeStream overrides any existing file and readStream
throws an exception if the file does not exist. Forgetting to close stream is a common mistake, for which even advanced programmers regularly fall into. Closing a stream frees low level resources, which is a good thing to do. The messagesreadStreamDo: and writeStreamDo: frees the programmer from explicitly closing the stream. Consider:
| working |
working := FileSystem disk workingDirectory.
working / 'foo.txt'writeStreamDo:[ :stream | stream nextPutAll: 'Hello World' ]. working / 'foo.txt'readStreamDo:[ :stream | stream contents ].
Keep in mind that file may be easily overridden without giving any warn-ing. Consider the following situation:
| working |
working := FileSystem disk workingDirectory.
working / 'authors.txt' readStreamDo: [ :stream | stream contents ].
−→ 'stephane alexandre damien jannik'
The fileauthors.txtmay be simply overridden with:
FileSystem disk workingDirectory / 'authors.txt'
writeStreamDo: [ :stream | stream nextPutAll: 'bob joe'].
Reading back the file may give an odd result:
| working |
working := FileSystem disk workingDirectory.
working / 'authors.txt' readStreamDo: [ :stream | stream contents ].
−→ 'bob joee alexandre damien jannik'
| stream |
stream := FileSystem diskopenFileStream:'authors.txt'writable:true. stream nextPutAll: 'stephane alexandre damien jannik'.
Have a look at the streams protocol ofFileReferencefor other convenience methods.
3.4
Renaming, copying and deleting files and
di-rectories
Files may be copied and renamed using the messagescopyTo:andrenameTo:. Note that whilecopyTo: tasks as argument another fileReference, renameTo:
takes a path, pathname or reference.
| working |
working := FileSystem disk workingDirectory.
working / 'foo.txt' writeStreamDo: [ :stream | stream nextPutAll: 'Hello World' ]. working / 'foo.txt'copyTo:(working / 'bar.txt').
| working |
working := FileSystem disk workingDirectory.
working / 'bar.txt' readStreamDo: [ :stream | stream contents ].
−→ 'Hello World'
| working |
working := FileSystem disk workingDirectory. working / 'foo.txt'renameTo:'skweek.txt'.
| working |
working := FileSystem disk workingDirectory.
working / 'skweek.txt' readStreamDo: [ :stream | stream contents ].
−→ 'Hello World'
Directory creation. To create a directory, use the messagecreateDirectoryas follows:
| working |
working := FileSystem disk workingDirectory. backup := working / 'cache-backup'. backup createDirectory.
backup isDirectory. −→ true backup children.
Copy everything. You can copy the contents of a directory using the
mes-sagecopyAllTo:. Here we copy the complete package-cache to the backup
di-rectory usingcopyAllTo::
cachecopyAllTo:backup.
Note that before copying the target directory is created if it does not exist.
Deleting. To delete a single file, use the messagedelete:
(working / 'bar.txt')delete.
To delete a complete directory tree (including the receiver) usedeleteAll. Be careful to not delete the wrong folder though.
backupdeleteAll.
3.5
The main entry point: FileReference
While FileSystem is based on multiple concepts and classes such as
FileSystem,PathandFileReference. FileReferenceis the most important for an
end-user. FileReferenceoffers a set of operations to manipulate files. So far, we have seen some basic operations. This section covers the more elaborated operations.
At the design level, a file reference (FileReference) combines two low-level entities: a path (Path) and a filesystem (FileSystem) into a single object which provides a simple protocol to manipulate and handle files. AFileReference
implements many operations ofFileSystem(both are largely polymorphic), but without the need to track paths and filesystem separately.
FileReference information access
Once given a file reference you can access usual information using messages
basename,base,extensions...
| pf |
pf := (FileSystem disk workingDirectory / 'package-cache' ) children second.
−→ /Users/ducasse/Pharo/PharoHarvestingFixes/20/package-cache/AsmJit
-IgorStasenko.66.mcz pffullName
−→ '/Users/ducasse/Pharo/PharoHarvestingFixes/20/package-cache/AsmJit
-IgorStasenko.66.mcz' pfbasename
pfbasenameWithoutExtension
−→ 'AsmJit-IgorStasenko.66'
pfbase
−→ 'AsmJit-IgorStasenko'
pfextension
−→ 'mcz'
pfextensions
−→ an OrderedCollection('66' 'mcz')
Indicators. FileSystem introduces the notion of file reference indicators. An indicator is a visual clue conveying the type of the reference. For now three kind of indicators are implemented,'?'for a non existing reference,'/'
for a directory, and the empty string for a file. FileReferencedefines the
mes-sagebasenameWithIndicatorthat takes advantage of indicators. The following
expressions show its use.
pf basenameWithIndicator
−→ 'AsmJit-IgorStasenko.66.mcz'
pf parent basename
−→ 'package-cache'
pf parentbasenameWithIndicator
−→ 'package-cache/'
Path. When there is a need to access a portion of a path, the message
pathSegments returns the full name cut into path elements, as strings.
Re-member that from a design point of view, strings are considered as “dead” objects, so it is often better to deal with the real objects for example using the
pathmessage.
pf pathSegments
−→ #('Users' 'ducasse' 'Pharo' 'PharoHarvestingFixes' '20' 'package-cache' ' AsmJit-IgorStasenko.66.mcz')
pf path
−→ Path / 'Users' / 'ducasse' / 'Pharo' / 'PharoHarvestingFixes' / '20' / 'package
-cache' / 'AsmJit-IgorStasenko.66.mcz'
Sizes. FileReference provides also some way to access the size of the file.
pf humanReadableSize
−→ '182.78 kB'
pf size
File Information. You can get limited information about the file entry itself using creationTime and permissions. To get the full information you should access the entry itself using the messageentry.
| pf |
pf := (FileSystem disk workingDirectory / 'package-cache' ) children second. pf creationTime.
−→ 2012-06-10T10:43:19+02:00
pf modificationTime.
−→ 2012-06-10T10:43:19+02:00
pf permissions −→ rw-r--r
--Entries are objects that represent all the metadata of a single file.
| pf |
pf := (FileSystem disk workingDirectory / 'package-cache' ) children second. pfentry
pf parent entries
"returns all the entries of the children of the receiver"
Operating on files
There are several operations on files.
Deleting. delete,deleteAll,deleteAllChildren, all delete the receiver and raise an error if it does not exist. deletedeletes the file,deleteAlldeletes the directory and its contents ,deleteAllChildren(which only deletes children of a directory). In addition,deleteIfAbsent:executes a block when the file does not exist.
FinallyensureDeletedeletes the file but does not raise error if the file does not exist. SimilarlyensureDeleteAllChildren,ensureDeleteAlldo not raise excep-tion when the receiver does not exist.
(FileSystem disk workingDirectory / 'paf')delete.
−→ error
(FileSystem disk workingDirectory / 'fooFolder')deleteAll.
−→ error
(FileSystem disk workingDirectory / 'fooFolder') ensureCreateDirectory. (FileSystem disk workingDirectory / 'fooFolder')deleteAll.
(FileSystem disk workingDirectory / 'paf')deleteIfAbsent:[Warning signal: 'File did not exist'].
(FileSystem disk workingDirectory / 'fooFolder2')deleteAllChildren.
(FileSystem disk workingDirectory / 'fooFolder2') ensureCreateDirectory. (FileSystem disk workingDirectory / 'fooFolder2')deleteAllChildren.
Creating Directory. createDirectorycreates a new directory and raises an er-ror if it already exists. ensureCreateDirectory verifies that the directory does not exist and only creates it if necessary. ensureCreateFilecreates if necessary a file.
(FileSystem disk workingDirectory / 'paf' )createDirectory.
[(FileSystem disk workingDirectory / 'paf' )createDirectory]on: DirectoryExists do: [:ex| true].
−→ true
(FileSystem disk workingDirectory / 'paf' )delete.
(FileSystem disk workingDirectory / 'paf' )ensureCreateDirectory. (FileSystem disk workingDirectory / 'paf' )ensureCreateDirectory. (FileSystem disk workingDirectory / 'paf' )isDirectory.
−→ true
Moving/Copying files around. We can move files around using the
mes-sagemoveTo:which expects a file reference.
(FileSystem disk workingDirectory / 'targetFolder') exist
−→ false
(FileSystem disk workingDirectory / 'paf') exist
−→ false
(FileSystem disk workingDirectory / 'paf' )moveTo:(FileSystem disk workingDirectory / ' targetFolder')
−→ Error
(FileSystem disk workingDirectory / 'paf' ) ensureCreateFile.
(FileSystem disk workingDirectory / 'targetFolder') ensureCreateDirectory.
(FileSystem disk workingDirectory / 'paf' )moveTo:(FileSystem disk workingDirectory / ' targetFolder' / 'paf').
(FileSystem disk workingDirectory / 'paf' ) exists.
−→ false
(FileSystem disk workingDirectory / 'targetFolder' / 'paf') exists. −→ true
Besides moving files, we can copy them. We can also use copyAllTo: to copy files. Here, we copy the files contained in the source folder to the target one.
The argument must be a reference that does not exist; it will be created by the copy.
(FileSystem disk workingDirectory / 'sourceFolder') createDirectory. (FileSystem disk workingDirectory / 'sourceFolder' / 'pif') ensureCreateFile. (FileSystem disk workingDirectory / 'sourceFolder' / 'paf') ensureCreateFile. (FileSystem disk workingDirectory / 'targetFolder') createDirectory.
(FileSystem disk workingDirectory / 'sourceFolder')copyAllTo:(FileSystem disk workingDirectory / 'targetFolder').
(FileSystem disk workingDirectory / 'targetFolder' / 'pif') exists. −→ true
(FileSystem disk workingDirectory / 'targetFolder' / 'paf') exists. −→ true
The messagecopyAllTo:can be used to copy a single file too:
(FileSystem disk workingDirectory / 'sourceFolder') ensureCreateDirectory. (FileSystem disk workingDirectory / 'sourceFolder' / 'pif') ensureCreateFile. (FileSystem disk workingDirectory / 'sourceFolder' / 'paf') ensureCreateFile. (FileSystem disk workingDirectory / 'targetFolder') ensureCreateDirectory.
(FileSystem disk workingDirectory / 'sourceFolder' / 'paf')copyAllTo:(FileSystem disk workingDirectory / 'targetFolder' / 'paf').
(FileSystem disk workingDirectory / 'targetFolder' / 'paf') exists.
−→ true.
(FileSystem disk workingDirectory / 'targetFolder' / 'pif' ) exists.
−→ false
Locator
Locators are late-bound references. They are left deliberately fuzzy, and are only resolved to a concrete reference when some file operation is performed. Instead of a filesystem and path, locators are made up of an origin and a path. An origin is an abstract filesystem location, such as the user’s home directory, the image file, or the VM executable. When it receives a message likeisFile, a locator will first resolve its origin, then resolve its path against the origin.
Locators make it possible to specify things like "an item named ’package-cache’ in the same directory as the image file" and have that specification remain valid even if the image is saved and moved to another directory, pos-sibly on a different computer.
locator := FileLocator imageDirectory / 'package-cache'.
locator printString. −→ ' {imageDirectory}/package-cache'
locator resolve. −→ /Users/ducasse/Pharo/PharoHarvestingFixes/20/
package-cache
locator isDirectory. −→ true
The following origins are currently supported:
• imageDirectory- the directory in which the image resides
• image- the image file
• changes- the changes file
• vmBinary- the executable for the running virtual machine
• vmDirectory- the directory containing the VM application (may not be
the parent ofvmBinary)
• home- the user’s home directory
• desktop- the directory that holds the contents of the user’s desktop
• documents - the directory where the user’s documents are stored (e.g.
’/Users/colin/Documents’)
Applications may also define their own origins, but the system will not be able to resolve them automatically. Instead, the user will be asked to man-ually choose a directory. This choice is then cached so that future resolution requests will not require user interaction.
absolutePath vs. path. The message absolutePathreturns the absolute path of the receiver. When the file reference is not virtual the messagespathand
absolutePathprovide similar results. When the file is a late bound reference
(instance ofFileLocator),absolutePathresolves the file and returns the absolute path, whilepathreturns an unresolved file reference as shown below.
(FileLocator image parent / 'package-cache') path
−→ {image}/../package-cache
(FileLocator image parent / 'package-cache') absolutePath −→ Path / 'Data' / 'Downloads' / 'Pharo-2.0' / 'package-cache'
(FileLocator image parent / 'package-cache') absolutePath −→ Path / 'Data' / 'Downloads' / 'Pharo-2.0' / 'package-cache'
3.6
Looking at FileSystem internals
At that stage, you should be able to comfortably use FileSystem to cover your need file handing. This section is about the internal components of FileSystem. It goes over important implementation details, which will surely interest readers willing to have a new kind of file system, for example on a data base or a remote file system.
FileReference = FileSystem + Path
Paths and filesystems are the lowest level of the FileSystem API. A
FileReferencecombines a path and a filesystem into a single object which
pro-vides a simpler protocol for working with files as we show in the previous section. References implement the path protocol with methods like/,parent
andresolve:.
FileSystem
A filesystem is an interface to access hierarchies of directories and files. "The filesystem," provided by the host operating system, is represented by
DiskStoreand its platform-specific subclasses. However, the user should not
access them directly but instead use FileSystem as we showed previously. Other kinds of filesystems are also possible. The memory filesystem pro-vides a RAM disk filesystem where all files are stored as ByteArrays in the image. The zip filesystem represents the contents of a zip file.
Each filesystem has its own working directory, which is used to resolve any relative paths that are passed to it. Some examples:
fs := FileSystem memory.
fs workingDirectoryPath: (Path / 'plonk'). griffle := Path / 'plonk' / 'griffle'.
nurp := Path * 'nurp'. fs resolve: nurp.
−→ Path/plonk/nurp
fs createDirectory: (Path / 'plonk'). −→ "/plonk created" (fs writeStreamOn: griffle) close. −→ "/plonk/griffle created"
fs isFile: griffle. −→ true
fs isDirectory: griffle. −→ false
fs copy: griffle to: nurp. −→ "/plonk/griffle copied to /plonk/nurp"
fs exists: nurp. −→ true
fs delete: griffle. −→ "/plonk/griffle"deleted
fs isFile: griffle. −→ false
Path
Paths are the most fundamental element of the FileSystem API. They rep-resent filesystem paths in a very abstract sense, and provide a high-level protocol for working with paths without having to manipulate strings. Here are some examples showing how to define absolute paths (/), relative paths (*), file extension (,), parent navigation (parent). Normally you do not need to use Path but here are some examples.
| fs griffle nurp |
fs := FileSystem memory.
griffle := fs referenceTo: (Path / 'plonk' / 'griffle'). nurp := fs referenceTo: (Path * 'nurp').
griffle isFile.
−→ false
griffle isDirectory.
−→ false
griffle parent ensureCreateDirectory. griffle ensureCreateFile.
griffle exists & griffle isFile. −→ true
griffle copyTo: nurp. nurp exists.
−→ true griffle delete
"absolute path"
Path / 'plonk' / 'feep' −→ /plonk/feep
"relative path"
Path * 'plonk' / 'feep' −→ plonk/feep
"relative path with extension"
Path * 'griffle' , 'txt' −→ griffle.txt
"changing the extension"
Path * 'griffle.txt' , 'jpeg' −→ griffle.jpeg
"parent directory"
(Path / 'plonk' / 'griffle') parent −→ /plonk
"resolving a relative path"
(Path / 'plonk' / 'griffle') resolve: (Path * '..' / 'feep')
−→ /plonk/feep
"resolving an absolute path"
(Path / 'plonk' / 'griffle') resolve: (Path / 'feep')
"resolving a string"
(Path * 'griffle') resolve: 'plonk' −→ griffle/plonk
"comparing"
(Path / 'plonk') contains: (Path / 'griffle' / 'nurp')
−→ false
Note that some of the path protocol (messages like/,parentandresolve:) are also available on references.
Visitors
The above methods are sufficient for many common tasks, but application developers may find that they need to perform more sophisticated opera-tions on directory trees.
The visitor protocol is very simple. A visitor needs to implementvisitFile:
andvisitDirectory:. The actual traversal of the filesystem is handled by a guide.
A guide works with a visitor, crawling the filesystem and notifying the vis-itor of the files and directories it discovers. There are three Guide classes,
PreorderGuide,PostorderGuideandBreadthFirstGuide, which traverse the
filesys-tem in different orders. To arrange for a guide to traverse the filesysfilesys-tem with a particular visitor is simple. Here’s an example:
BreadthFirstGuide show: aReference to: aVisitor
The enumeration methods described above are implemented with visi-tors; seeCopyVisitor,DeleteVisitor, andCollectVisitorfor examples.
3.7
Chapter summary
FileSystem is a powerful and elegant library to manipulate files. It is a fun-damental part of Pharo. The Pharo community will continue to extend and build it. The classFileReferenceis the most important entry point to the frame-work.
• FileSystem offers factory class methods to build file systems on hard
disk and in memory.
• FileReferenceis a central class in the framework which represents a file
or a folder. A file reference offers methods to operate on a file and navigate within a file system.
• Creating a file and writing in it is as simple as: (FileSystem disk workingDirectory / 'foo.txt') writeStreamDo: [ :stream | stream nextPutAll: 'Hello World' ].
• FileLocatoris a late binding reference, useful when the file location in a
hard disk depends on the running context.
• FileSystemDirectoryEntryoffers a large set of low level detail for a given
Chapter 4
Sockets
written by:
Noury Bouraqadi([email protected])
Luc Fabresse([email protected])
Modern software often involve multiple devices that collaborate through a network. The basic approach to set up such collaborations is to use sock-ets. A typical use is in the World Wide Web. Browsers and servers interact through sockets that carry HTTP requests and responses.
The concept of socket was first introduced by researchers from University of Berkeley in the 1960s. They defined the first socket API for the C program-ming language in the context of Unix operating systems. Since then, the concept of socket spread out to other operating systems. Its API was ported to almost all programming languages.
In this chapter, we present the API of sockets in the context of Pharo. We first show through some examples how to use sockets for building both clients and servers. The notion of client and server are inherent in sockets: a server waits for requests emitted by clients. Then, we introduceSocketStream
and how to use it. In practice, one is likely to use SocketStream instead of plain sockets. The chapter ends with a description of some unix networking utilities that are useful for experimenting.
4.1
Basic Concepts
Socket
through at least one socket (see Figure 4.1). A socket can then be defined as aplug on a communication network.
Figure 4.1: Inter-Process Remote Communication Through Sockets
Sockets are used to establish a bidirectional communication: they allow both sending and receiving data. Such interaction can be done according to communication protocols which are encapsulated by sockets. On the Inter-net and other Inter-networks such as etherInter-net LANs1, two basic protocols widely
used areTCP/IPandUDP/IP.
TCP/IP vs. UDP/IP
TCP/IP stands forTransmission Control Protocol / Internet Protocol(TCP for short). TCP use guarantees a reliable communication (no data loss). It re-quires that applications involved in the communication get connected before actually communicating. Once a connection is established interacting parties can send and receive an arbitrary amount of bytes. This is often referred to as astream communication. Data reach the destination in the same order of their sending.
UDP/IP stands for User Datagram Protocol / Internet Protocol (UDP for short). Datagrams are chunks of data whose size cannot exceed 64KB. UDP is an unreliable protocol for two reasons. First, UDP does not guarantee that datagrams will actually reach their destination. The second reason is that the reception order of multiple datagrams from a single sender to the re-ceiver may arrive in an arbitrary order. Nevertheless, UDP is faster than TCP since no connection is required before sending data. A typical use of UDP is “heart-beating” as used in server-based social application, where clients need to notify the server of their status (e.g., Requesting interactions, or be-ing Invisible).
In the remainder of this chapter we will focus on TCP Sockets. First, we show how to create a client socket, connect it to a server, exchange data and close the connection (Section 4.2). This lifecycle is illustrated using examples
showing the use of client sockets to interact with a web server. Next, Sec-tion 4.3 presents server sockets. We describe their life-cycle and how to use them to implement a server that can handle concurrent connections. Last, we introduce socket streams in Section 4.4. We give an overview of their benefits by describing their use on both client and server side.
4.2
TCP Client
We callTCP clientan application that initiates a TCP connection to exchange data with another application: theserver. It is important to mention that the client and the server may be developed in different languages. The life-cycle of such a client in Pharo decomposes into 4 steps:
1. Create a TCP socket.
2. Connect the socket to a server.
3. Exchange data with the server through the socket.
4. Close the socket.
Create a TCP Socket
Pharo provides a single socket class. It has one creation method per socket type (TCP or UDP). To create a TCP socket, you need to evaluate the follow-ing expression:
Socket newTCP
Connect a TCP Socket to some Server
To connect a TCP Socket to a server, you need to have the object representing the IP address of that server. This address is an instance of SocketAddress
. A handy way to create it is to useNetNameResolver that provides IP style network name lookup and translation facilities.
Script 4.1 provides two examples of socket address creation. The first one creates an address from a string describing the server name ('www.esug.org'), while the second does the creation from a string representing the IP address of the server ('127.0.0.1'). Note that to use theNetNameResolveryou need to have your machine connected to a network with a DNS2, which is likely the
case. The only exception is for retrieving the local host address, i.e.127.0.0.1
which is the generic address to refer to the machine that runs your software (Pharo here).
Script 4.1:Creating a Socket Address
| esugAddress localAddress |
esugAddress := NetNameResolver addressForName: 'www.esug.org'. localAddress := NetNameResolver addressForName: '127.0.0.1'.
Now we can connect our TCP socket to the server as shown in Script 4.2. MessageconnectTo:port:attempts to connect the socket to the server using the server address and port provided as parameters. The server address refers to the address of the network interface (e.g. ethernet, wifi) used by the server. The port refers to the communication endpoint on the network interface. Each network interface has for each IP transport protocol (e.g. TCP, UDP) a collection of ports that are numbered from 0 to 65535. For a given protocol, a port number on an interface can only be used by a single process.
Script 4.2:Connecting a TCP Socket to ESUG Server.
| clientSocket serverAddress | clientSocket := Socket newTCP.
serverAddress := NetNameResolver addressForName: 'www.esug.org'. clientSocket
connectTo: serverAddress port: 80; waitForConnectionFor: 10. clientSocket isConnected
−→ true
TheconnectTo:port:message returns immediately after issuing the request
to connect the socket to the system (through a primitive call). Message
waitForConnectionFor: 10suspends the current process until the socket is
con-nected to the server. It waits at most,10seconds as requested by the param-eter. If the socket is not connected after 10 seconds, theConnectionTimedOut
exception is signaled. Otherwise, the execution can proceed by evaluating the expressionclientSocket isConnectedwhich answerstrue.
Exchange Data with Server
Script 4.3:Exchanging Data with some Server through a TCP Socket.
| clientSocket data |
..."create and connect the TCP clientSocket" clientSocket sendData: 'Hello server'. data := clientSocket receiveData. ..."Process data"
Script 4.3 shows the protocol to send and receive data through a client socket. Here, we send the string'Hello server!'to the server using thesendData:
message. Next, we send thereceiveDatamessage to our client socket to read the answer. Note that reading the answer is blocking, meaning receiveData
returns when a response has been read. Then, the contents of variabledatais processed.
Script 4.4:Bounding the Maximum Time for Data Reception.
|clientSocket data|
..."create and connect the TCP clientSocket" [data := clientSocket receiveDataTimeout: 5. ..."Process data"
] on: ConnectionTimedOut do: [ :timeOutException |
self
crLog: 'No data received!';
crLog: 'Network connection is too slow or server is down.']
Note that by using receiveData, the client waits until the server ei-ther sends no more data, or closes the connection. This means that the client may wait indefinitely. An alternative is to have the client signal a
ConnectionTimedOutexception if client had waited for too long as shown in
Script 4.4. We use messagereceiveDataTimeout:to ask the client socket to wait for 5 seconds. If data is received during this period of time, it is processed silently. But if no data is received during the 5 seconds, aConnectionTimedOut
is signaled. In the example we log a description of what happened.
Close a Socket
A TCP socket remains alive while devices at both ends are connected. A socket is closed by sending the messagecloseto it. The socket remains con-nected until the other side closes it. This may last indefinitely when there is a network failure or when the other side is down. This is why sockets also accept the destroy message, which frees system resources required by the socket.
closeAndDestroy: secondswhich takes as a parameter the duration to wait be-fore destroying the socket.
Script 4.5:Interaction with a Web Site and Cleanup.
| clientSocket serverAddress httpQuery htmlText | httpQuery := 'GET / HTTP/1.1', String crlf,
'Host: www.esug.org:80', String crlf, 'Accept: text/html', String crlfcrlf.
serverAddress := NetNameResolver addressForName: 'www.esug.org'. clientSocket := Socket newTCP.
[ clientSocket
connectTo: serverAddress port: 80; waitForConnectionFor: 10. clientSocket sendData: httpQuery.
htmlText := clientSocket receiveDataTimeout: 5. htmlText crLog ] ensure: [clientSocket closeAndDestroy].
To summarize all steps described so far, we use the example of getting a web page from a server in Script 4.5. First, we forge a HTTP3query. The string corresponding to our query starts with theGETkeyword, followed by a slash saying that we are requesting the root file of the server, as specified in the protocolHTTP/1.1. The second line includes the name of the web server and its port. The third and last line of the HTTP query refers to format ac-cepted by our client. Since, we intend to display the result of our query on
theTranscript, we state in the HTTP query (see line beginning withAccept:)
that our client accepts texts with html format.
Next, we retrieve the IP address of the www.esug.org server. Then, we create a TCP socket and connect it to the server. We use the IP address we got from the previous step and the default port for web servers: 80. The connection should be established in less than 10 seconds (waitForConnectionFor:
10), otherwise we get aConnectionTimedOutexception.
After sending the http query (clientSocket sendData: httpQuery), we read the received html text that we display from the socket. Note that the we ask the socket to wait at most 5 seconds for the answer from the server (clientSocket
receiveDataTimeout: 5). On timeout, the socket answers an empty socket.
Finally, we close the socket and free related resources (clientSocket
closeAndDestroy). We ensure the cleanup by means of theensure:message sent
to the block that performs socket connection and data exchange with the web server.
4.3
TCP Server
Now, let us build a simple TCP server. ATCP Serveris an application that awaits TCP connections from TCP clients. Once a connection is established, both the server and the client can send a receive data in any order. A big difference between the server and the client is that the server uses at least two sockets. One socket is used for handling client connections, while the second serves for exchanging data with a particular client.
TCP Socket Server Life-cycle
The life-cycle of a TCP server has 5 steps:
1. Create a first TCP socket labelledconnectionSocket.
2. Wait for a connection by makingconnectionSocketlisten on a port.
3. Accept a client request for connection. As a result,connectionSocketwill build a second socket labelledinteractionSocket.
4. Exchange data with the client throughinteractionSocket. Meanwhile,
connectionSocketcan continue to wait for a new connection, and possi-bly create new sockets to exchange data with other clients.
5. CloseinteractionSocket.
6. CloseconnectionSocketwhen we decide to kill the server and stop ac-cepting client connections.
Figure 4.2: Socket Server Concurrently Servers Multiple Clients
while exchanging data with possibly multiple clients through multiple in-teractionSockets(one per client). In the following, we first illustrate the socket serving machinery. Then, we describe a complete server class and explain the server life-cycle and related concurrency issues.
Serving Basic Example
We illustrate the serving basics through a simple example of an echo TCP server that accepts a single client request. It sends back to clients whatever data it received and quits. The code is provided by Script 4.6.
Script 4.6:Basic Echo Server.
| connectionSocket interactionSocket receivedData | "Prepare socket for handling client connection requests" connectionSocket := Socket newTCP.
connectionSocket listenOn: 9999 backlogSize: 10.
"Build a new socket for interaction with a client which connection request is accepted" interactionSocket := connectionSocket waitForAcceptFor: 60.
"Get rid of the connection socket since it is useless for the rest of this example" connectionSocket closeAndDestroy.
"Get and display data from the client"
receivedData := interactionSocket receiveData. receivedData crLog.
"Send echo back to client and finish interaction" interactionSocket sendData: 'ECHO: ', receivedData. interactionSocket closeAndDestroy.
First, we create the socket that we will use for handling incoming con-nections. We configure it to listen on port 9999. ThebacklogSizeis set to 10, meaning that we ask the Operating System to allocate a buffer for 10 connec-tion requests. This backlog will not be actually used in our example. But, a more realistic server will have to handle multiple connections and then store pending connection requests into the backlog.
Once the connection socket (referenced by variableconnectionSocket) is set up, it starts listening for client connections. ThewaitForAcceptFor: 60message makes the socket wait connection requests for 60 seconds. If no client at-tempts to connect during these 60 seconds, the message answersnil. Other-wise, we get a new socketinteractionSocketconnected the client’s socket. At this point, we do not need the connection socket anymore, so we can close it
Since the interaction socket is already connected to the client, we can use it to exchange data. MessagesreceiveDataandsendData:presented above (see Section 4.2) can be used to achieve this goal. In our example, we wait for data from the client and next display it on theTranscript. Lastly, we send it back to the client prefixed with the'ECHO: 'string, finishing the interaction with the client by closing the interaction socket.
There are different options to test the server of Script 4.6. The first simple one is to use thenc (netcat) utility discussed in Section 4.5. First run the server script in a workspace. Then, in a terminal, evaluate the following command line:
echo"Hello Pharo"| nc localhost 9999
As a result, on theTranscriptof the Pharo image, the following line should be displayed:
Hello Pharo
On the client side, that is the terminal, you should see:
ECHO: Hello Pharo
A pure Pharo alternative relies on using two different images: one that runs the server code and the other for client code. Indeed, since our exam-ples run within the user interaction process, the Pharo UI will be frozen at some points, such as during thewaitForAcceptFor:. Script 4.7 provides the code to run on the client image. Note that you have to run the server code first. Otherwise, the client will fail. Note also that after the interaction, both the client and the server terminate. So, if you want to run the example a second time you need to run again both sides.
Script 4.7:Echo Client.
| clientSocket serverAddress echoString |
serverAddress := NetNameResolver addressForName:'127.0.0.1'. clientSocket := Socket newTCP.
[ clientSocket
connectTo: serverAddress port: 9999; waitForConnectionFor: 10.
clientSocket sendData: 'Hello Pharo!'.
echoString := clientSocket receiveDataTimeout: 5. echoString crLog.
Echo Server Class
We define here the EchoServer class that deals with concurrency issues. It handles concurrent client queries and it does not freeze the UI. Figure 4.3 shows an example of how theEchoServerhandles two clients.
Figure 4.3: Echo Server Concurrently Serving Two Clients
As we can see in the definition labelled class 4.8, theEchoServerdeclares three instance variables. The first one (connectionSocket) refers to the socket used for listening to client connections. The two last instance variables
(isRunning holding a boolean andisRunningLockholding a Mutex) are used to
manage the server process life-cycle while dealing with synchronization is-sues.
Class 4.8:EchoServerClass Definition
Object subclass: #EchoServer
instanceVariableNames: 'connectionSocket isRunning isRunningLock' classVariableNames: ''
poolDictionaries: ''
category: 'SimpleSocketServer'
TheisRunninginstance variable is a flag that is set totruewhile the server
is running. As we will see below, it can be accessed by different processes. Therefore, we need to ensure that the value can be read in presence of multi-ple write accesses. This is achieved using a lock (isRunningLockinstance vari-able) that guarantees thatisRunningis accessed by only by a single process each time.
Method 4.9:TheEchoServer»isRunningRead Accessor
EchoServer»isRunning
Method 4.10:TheEchoServer»isRunning:Write Accessor
EchoServer»isRunning: aBoolean
isRunningLock critical: [ isRunning := aBoolean ]
Accesses to the flag are only possible through accessor methods (method 4.9 and method 4.10). Thus, isRunning is read and written inside blocks that are arguments of messagecritical:sent toisRunningLock. This lock is an instance ofMutex(see method 4.11). When receiving acritical:message, a mutex evaluates the argument (a block). During this evaluation, other pro-cesses that send acritical:message to the same mutex are suspended. Once the first block is done, the mutex resumes a suspended process (the one that was first suspended). This cycle is repeated until there are no more suspended processes. Thus, the mutex ensures that theisRunningflag is read and wrote sequentially.
Method 4.11:TheEchoServer»initializeMethod
EchoServer»initialize super initialize.
isRunningLock := Mutex new. self isRunning: false
To manage the life-cycle of our server, we introduced two methods
EchoServer»start and EchoServer»stop. We begin with the simplest one
EchoServer»stopwhose definition is provided as method 4.12. It simply sets
theisRunning flag to false. This will have the consequence of stopping the
serving loop in methodEchoServer»serve(see method 4.13).
Method 4.12:TheEchoServer»stopMethod
EchoServer»stop self isRunning: false
Method 4.13:TheEchoServer»serveMethod
EchoServer»serve [ [ self isRunning ]
whileTrue: [ self interactOnConnection ] ] ensure: [ connectionSocket closeAndDestroy ]
The activity of the serving process is implemented in the servemethod (see method 4.13). It interacts with clients on connections while theisRunning
Method 4.14:TheEchoServer»startMethod
EchoServer»start isRunningLock critical: [
self isRunning ifTrue: [ ^ self ]. self isRunning: true].
connectionSocket := Socket newTCP.
connectionSocket listenOn: 9999 backlogSize: 10. [ self serve ] fork
The creation of the serving process is the responsibility of method
EchoServer»start(see the last line of method 4.14). TheEchoServer»startmethod
first checks wether the server is already running. It returns if theisRunning
flag is set totrue. Otherwise, a TCP socket dedicated to connection handling is created and made to listen on port 9999. The backlog size is set to 10 that is -as mentioned above- the system that allocates a buffer for storing 10
pend-ing client connection requests. This value is a trade-off that depends on how fast the server is (depending on the VM and the hardware) and the maxi-mum rate of client connections requests. The backlog size has to be large enough to avoid losing any connection request, but not too big, to avoid wasting memory. FinallyEchoServer»startmethod creates a process by send-ing theforkmessage to the[ self serve ]block. The created process has the same priority as the creator process (i.e., the one that performs theEchoServer»start
method, the UI process if you have exec