Get Smart! at :
www.GetPedia.com
*More than 150,000 articles for
DUMMIES
*Learn how almost everything
works
Microsoft
®
Office
Excel
2003
Guy Hart-Davis
McGraw-Hill
/Osborne
McGraw-Hill
/Osborne
2100 Powell Street, 10th Floor
Emeryville, California 94608
U.S.A.
To arrange bulk purchase discounts for sales promotions, premiums, or fund-raisers, please contactMcGraw-Hill/Osborne at the above address. For information on translations or book distributors outside the U.S.A., please see the International Contact Information page immediately following the index of this book.
How to Do Everything with Microsoft Office Excel 2003
Copyright © 2003 by The McGraw-Hill Companies. All rights reserved. Printed in the United States of America. Except as permitted under the Copyright Act of 1976, no part of this publication may be reproduced or distributed in any form or by any means, or stored in a database or retrieval system, without the prior written permission of publisher, with the exception that the program listings may be entered, stored, and executed in a computer system, but they may not be reproduced for publication.
1234567890 FGR FGR 019876543 ISBN 0-07-223071-1
Publisher Brandon A. Nordin
Vice President &
Associate Publisher Scott Rogers Acquisitions Editor Katie Conley Senior Project Editor LeeAnn Pickrell Acquisitions Coordinator Athena Honore Technical Editor Karen Weinstein
Copy Editor Emily Wolman
Proofreader Marian Selig
Indexer James Minkin
Composition Carie Abrew, Tabi Cagan, George T. Charbak
Illustrators Kathleen Fay Edwards, Melinda Moore Lytle, Michael Mueller, Lyssa Wald Series Design Mickey Galicia
Cover Series Design Dodie Shoemaker Cover Illustration Eliot Bergman
This book was composed with Corel VENTURA™ Publisher.
Information has been obtained byMcGraw-Hill/Osborne from sources believed to be reliable. However, because of the possibility of human or mechanical error by our sources,McGraw-Hill/Osborne, or others,McGraw-Hill/Osborne does not guarantee the accuracy, adequacy, or completeness of any information and is not responsible for any errors or omissions or the results obtained from the use of such information.
Contents
Acknowledgments . . . xiv
Introduction . . . xv
PART I
Get Started with Excel and Create Worksheets
CHAPTER 1Get Started with Excel . . . .
3
Start Excel . . . 4
Use or Hide the Task Pane . . . 7
Understand the Excel Screen . . . 9
Understand Worksheets and Workbooks . . . 10
Open an Existing Workbook . . . 11
Open a Workbook from the Getting Started Task Pane . . . 11
Open a Workbook from the Open Dialog Box . . . 12
Open a Recently Used Workbook from the File Menu . . . 13
Open a Workbook from Windows Explorer or Your Desktop . . . . 13
Open Other Formats of Spreadsheet in Excel . . . 14
Navigate in Workbooks and Worksheets . . . 14
Navigate to the Worksheet You Need . . . 14
Navigate to Cells and Ranges in a Worksheet . . . 15
Select Objects . . . 16
Select Cells and Ranges of Cells . . . 16
Select Worksheets in a Workbook . . . 21
Get Help with Excel . . . 21
CHAPTER 2
Configure Excel to Suit Your Working Needs . . . .
25
Improve Your View with Splits, Extra Windows, Hiding, Zooming, and Freezing . . . 26
Split the Excel Window to Show Separate Parts at Once . . . 26
Open Extra Windows to Work in Different Areas of a Worksheet . . 27
Arrange Open Windows . . . 28
Hide a Window . . . 30
Zoom In and Out . . . 30
Use Freezing to Keep Key Rows and Columns Visible . . . 31
Set Options to Make Excel Easier to Use . . . 32
Choose View Options to Customize Excel’s Visual Appearance . . 33
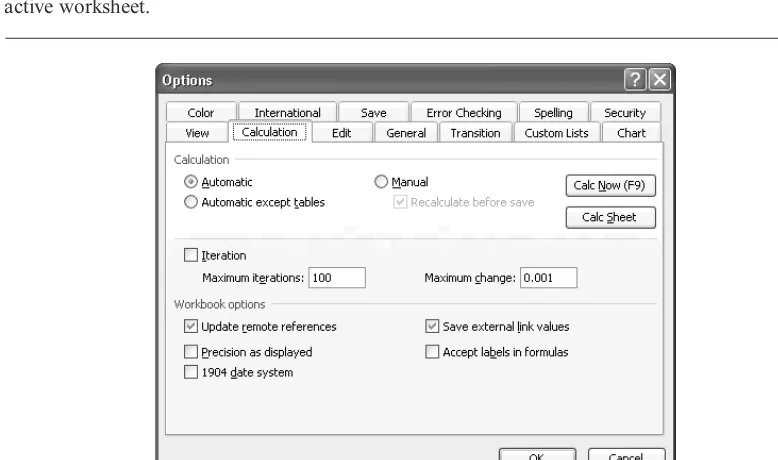
Understand (and Maybe Choose) Calculation Options . . . 35
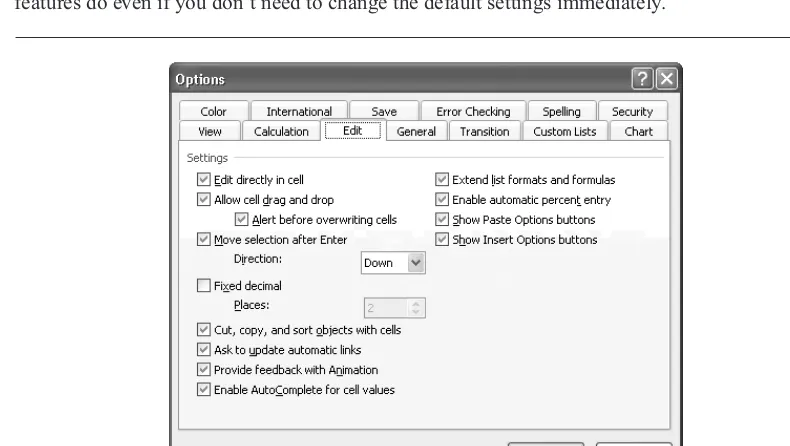
Set Edit Options to Fine-Tune Editing Maneuvers . . . 37
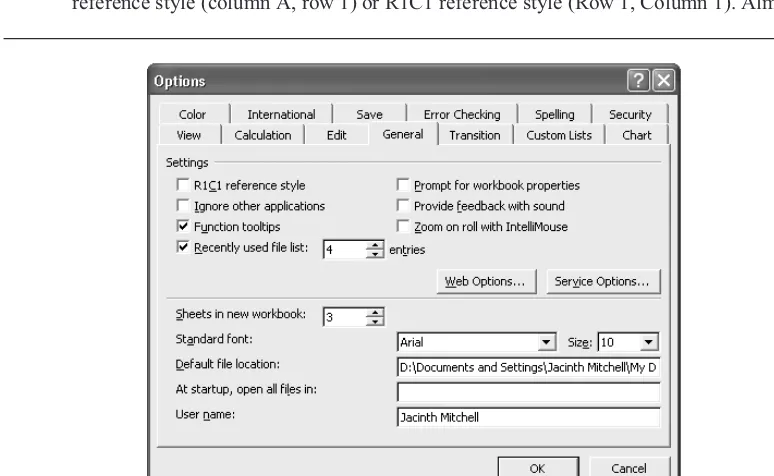
Choose General Options . . . 39
Choose Suitable Save Options . . . 40
Choose Transition Options . . . 42
Set Spelling Options . . . 42
Load and Unload Add-Ins . . . 44
Configure AutoCorrect to Save Time and Effort . . . 44
Configure AutoCorrect’s Basic Settings . . . 45
Create and Delete AutoCorrect Entries . . . 47
Undo an AutoCorrect Correction . . . 48
CHAPTER 3
Create Spreadsheets and Enter Data
. . . .
51
Create a New Workbook . . . 52
Create a New Blank Workbook . . . 53
Create a New Workbook Based on an Existing Workbook . . . 53
Create a New Workbook Based on a Template . . . 54
Save a Workbook . . . 58
Save a Workbook for the First Time . . . 58
Save Changes to a Previously Saved Workbook . . . 60
Save a Workbook Under a Different Name . . . 60
Save a Workbook in a Different Format . . . 61
Enter Property Information for a Workbook . . . 61
Save the Entire Workspace . . . 64
Create Your Own Templates . . . 64
Understand What Templates Are and What They’re For . . . 65
Understand Where Templates Are Stored . . . 65
Create and Save a Template . . . 65
Enter Data in Worksheets . . . 66
Enter Data Manually . . . 66
Undo an Action . . . 67
Redo an Undone Action . . . 69
Enter Data Using Drag and Drop . . . 69
Enter Data with Paste, Paste Options, and Paste Special . . . 70
Link Data Across Worksheets or Across Workbooks . . . 72
Use AutoFill to Enter Data Series Quickly . . . 73
Create Custom AutoFill Lists . . . 74
Use Find and Replace . . . 75
Recover Your Work If Excel Crashes . . . 76
Recover a Workbook from an AutoRecover File . . . 79
CHAPTER 4
Format Worksheets for Best Effect . . . .
81
Add, Delete, and Manipulate Worksheets . . . 82
Add, Delete, Hide, and Redisplay Worksheets . . . 82
Move and Copy Worksheets . . . 83
Rename a Worksheet . . . 84
Format Cells and Ranges . . . 85
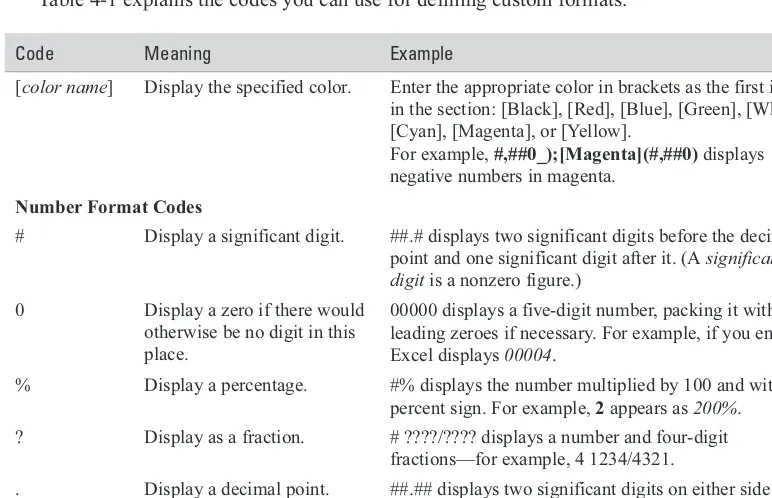
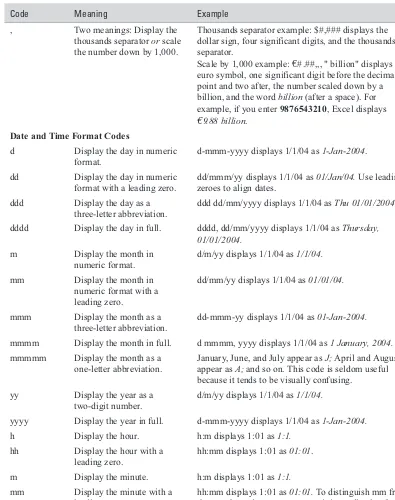
Apply Number Formatting . . . 86
Understand Excel’s Number Formats . . . 86
Apply Visual Formatting . . . 93
Format Rows and Columns . . . 95
Use Conditional Formatting . . . 97
Use AutoFormat to Apply Canned Formatting Quickly . . . 98
Use Styles . . . 99
CHAPTER 5
Add Graphics and Drawings to Worksheets . . . .
103
Understand How Excel Handles Graphical Objects . . . 104
Insert Clip Art in Worksheets . . . 105
Work with Shapes, AutoShapes, and WordArt . . . 109
Add Basic Shapes . . . 110
Add AutoShapes . . . 110
Add WordArt Objects to Worksheets . . . 112
Add Text to an AutoShape . . . 114
Format a Drawing Object . . . 114
Position Drawing Objects . . . 119
Layer Drawing Objects . . . 120
Use Text Boxes to Position Text Wherever You Need It . . . 120
Add Graphics to Worksheets . . . 121
Use the Picture Toolbar . . . 121
Crop a Picture . . . 121
Import Pictures from Scanners and Cameras . . . 122
Add Diagrams to Worksheets . . . 123
Create Basic Diagrams with the Diagram Applet . . . 124
Create Organization Charts . . . 126
CHAPTER 6
Check, Lay Out, and Print Worksheets . . . .
129
Check the Spelling in Worksheets . . . 130
Run a Spell Check . . . 131
Set the Print Area . . . 133
Set the Print Area Using the Set Print Area Command . . . 134
Set the Print Area from the Page Setup Dialog Box . . . 134
How Excel Handles the Print Area . . . 135
Change or Clear the Existing Print Area . . . 135
Specify the Paper Size and Orientation . . . 135
Scale the Printout to Fit the Paper . . . 135
Use Print Preview to See How the Printout Will Look . . . 136
Add Effective Headers and Footers to Worksheets . . . 138
Set and Adjust Page Breaks . . . 140
Set a Manual Page Break . . . 140
Remove a Manual Page Break . . . 140
Use Page Break Preview to Reposition Automatic Page Breaks . . 140
Remove All Page Breaks from the Active Worksheet . . . 140
Check and Change Margins . . . 141
Choose Which Items to Include in the Printout . . . 143
Repeat Row Titles or Column Titles on Subsequent Pages . . . 144
Print Worksheets . . . 144
Print Instantly with the Default Settings . . . 144
Control Printing Using the Print Dialog Box . . . 145
PART II
Calculate, Manipulate, and Analyze Data
CHAPTER 7Perform Calculations with Functions . . . .
149
Understand Functions . . . 150
Understand the Components of a Function . . . 150
Enter Functions in Worksheets . . . 151
Type a Function Directly into a Cell . . . 151
Use the AutoSum Drop-Down Menu . . . 153
Use the Insert Function Dialog Box . . . 154
Nest One Function Inside Another Function . . . 155
Edit a Function in a Worksheet . . . 156
Monitor Calculations with the Watch Window . . . 156
Examples of Functions in Action . . . 157
Database Functions . . . 157
Date and Time Functions . . . 157
Financial Functions . . . 158
Logical Functions . . . 159
Information Functions . . . 160
Lookup and Reference Functions . . . 161
Mathematical and Trigonometric Functions . . . 161
Statistical Functions . . . 161
Text Functions . . . 162
CHAPTER 8
Create Formulas to Perform Custom Calculations . . . .
165
Understand Formula Components . . . 166
Operands . . . 166
Operators . . . 167
Understand and Change Operator Precedence . . . 168
Control Excel’s Automatic Calculation . . . 169
Understand How Excel Handles Numbers . . . 169
Refer to Cells and Ranges in Formulas . . . 169
Refer to Other Worksheets and Other Workbooks in Formulas . . . 170
Try Entering a Formula . . . 171
Use Range Names and Labels in Formulas . . . 172
Use Absolute, Relative, and Mixed References in Formulas . . . 173
Work with Array Formulas . . . 174
Display Formulas in a Worksheet . . . 175
Hide Formulas from Other Users . . . 175
Troubleshoot Formulas . . . 176
Understand and Fix Basic Errors in Formulas . . . 177
Fix Formatting, Operator Precedence, and Range-Change Errors . 177 Understand Formula AutoCorrect and How to Use It . . . 178
Configure Error-Checking Options . . . 178
Audit Formulas and Check for Errors Manually . . . 179
CHAPTER 9
Organize Data with Excel Databases
. . . .
187
Understand What an Excel Database Is . . . 188
Enter Data in a Database . . . 189
Enter Data by Using Standard Techniques . . . 190
Enter and Edit Data with Data Entry Forms . . . 190
Sort a Database . . . 192
Prepare to Sort a Database . . . 192
Perform a Quick Sort by a Single Field . . . 192
Perform a Multifield Sort for Finer Sorting . . . 193
Sort by a Custom Sort Order . . . 193
Find and Replace Data in a Database . . . 194
Filter a Database to Find Records That Match Criteria . . . 194
Perform Quick Filtering with AutoFilter . . . 194
Create Custom Filters . . . 196
Link an Excel Worksheet to an External Database . . . 198
Link to a Database with the Query Wizard . . . 199
Customize a Query with MS Query . . . 204
Perform Web Queries . . . 206
CHAPTER 10
Outline and Consolidate Worksheets . . . .
209
Use Outlining to Create Collapsible Worksheets . . . 210
Create a Standard Outline Automatically . . . 212
Chose Custom Settings for Outlining . . . 212
Create an Outline Manually . . . 213
Expand and Collapse the Outline . . . 214
Change the Outlined Area After Adding or Deleting Material . . . 214
Toggle the Display of the Outline Symbols . . . 215
Remove an Outline from a Worksheet . . . 216
Consolidate Multiple Worksheets into One Worksheet . . . 216
Consolidate Worksheets by Their Position . . . 217
Consolidate Worksheets by Category . . . 220
Update an Existing Consolidation . . . 221
Change an Existing Consolidation . . . 222
CHAPTER 11
Analyze Data Using PivotTables and PivotCharts . . . .
223
Understand PivotTables . . . 224
Create a PivotTable Framework Using the PivotTable and PivotChart Wizard . . . 225
Create the PivotTable on the Framework . . . 228
Change, Format, and Configure the PivotTable . . . 230
Change the PivotTable . . . 230
Use the PivotTable Toolbar . . . 231
Format a PivotTable . . . 232
Change a Field to a Different Function . . . 232
Choose PivotTable Options to Configure a PivotTable . . . 233
Create PivotCharts from PivotTables . . . 236
Create a Conventional Chart from PivotTable Data . . . 237
CHAPTER 12
Solve Problems by Performing What-If Analysis . . . .
239
Create Data Tables to Assess the Impact of Variables . . . 240
Create a Single-Variable Data Table . . . 240
Add Further Formulas to a Data Table . . . 243
Create a Two-Variable Data Table . . . 244
Change, Copy, or Move a Data Table . . . 245
Clear a Data Table . . . 246
Explore Alternative Data Sets with Scenarios . . . 246
Create the Worksheet You Want to Manipulate with Scenarios . . . 246
Open the Scenario Manager Dialog Box . . . 247
Create a Scenario for Your Starting Point . . . 248
Add Further Scenarios . . . 250
Edit and Delete Existing Scenarios . . . 250
Switch from One Scenario to Another . . . 251
Merge Scenarios into a Single Worksheet . . . 251
Create Reports from Scenarios . . . 252
Solve Problems with Goal Seek . . . 254
Use the Solver to Manipulate Two or More Values . . . 255
PART III
Share, Publish, and Present Data
CHAPTER 13Create Effective Charts to Present Data Visually . . . .
261
Understand the Basics of Excel Charts . . . 262
Create a Chart with the Chart Wizard . . . 264
Contents
ix
Choose the Right Type of Chart for Your Data . . . 267
Edit Charts to Produce the Best Effect . . . 268
Use the Chart Toolbar . . . 268
Select Objects in a Chart . . . 269
Configure Chart Options . . . 269
Change the Chart Type . . . 270
Change a Chart’s Source Data . . . 271
Change the Plotting Order of the Data Series . . . 271
Toggle a Chart Between Embedded and Chart Sheet . . . 272
Configure and Change the Scale of an Axis . . . 272
Format Charts . . . 274
Resize a Chart . . . 274
Format the Chart Area . . . 274
Liven Up Charts with Patterns, Fills, and Pictures . . . 276
Format Different Data Series Using Different Chart Types . . . 279
Format Individual Chart Elements . . . 280
Show Future Projections with Different Formatting . . . 281
Copy Formatting from One Chart to Another . . . 281
Unlink a Chart from Its Data Source . . . 282
Print Charts . . . 283
Create Custom Chart Types for Easy Reuse . . . 284
CHAPTER 14
Share Workbooks and Collaborate with Colleagues . . . .
287
Share a Workbook by Placing It on a Shared Drive . . . 288
Configure Sharing on a Workbook . . . 290
Resolve Conflicts in Shared Workbooks . . . 293
Turn Off Sharing and Remove a User from a Shared Workbook . . 294
RestrictData and Protect Workbooks . . . 295
Check Data Entry for Invalid Entries . . . 295
Protect Cells, a Worksheet, or a Workbook . . . 298
Allow Users to Edit Ranges in a Protected Worksheet . . . 301
Protect a Workbook with Passwords . . . 303
Work with Comments . . . 304
Add a Comment to a Cell . . . 304
Display and Hide the Comments in a Worksheet . . . 305
Edit and Format Comments . . . 305
Delete a Comment . . . 306
Use Excel’s Reviewing Toolbar to Navigate Among Comments . . 306
Send Workbooks via E-mail . . . 307
Send a Workbook for Review . . . 307
Receive and Return a Workbook Sent for Review . . . 308
Receive a Workbook Sent As an Attachment . . . 309
Send a Worksheet in a Message . . . 310
Receive a Worksheet in a Message . . . 310
Route a Workbook Around a Group of People . . . 310
Receive a Routed Workbook . . . 312
Track the Status of a Routed Workbook . . . 313
Track Changes to a Workbook . . . 313
Turn On and Configure Change Tracking . . . 313
Work with Change Tracking On . . . 314
Review Tracked Changes . . . 315
Merge Workbooks Together . . . 316
Prepare Workbooks for Merging . . . 316
Merge the Workbooks with the Master Workbook . . . 317
CHAPTER 15
Using Excel’s Web Capabilities . . . .
319
Understand Saving Directly to an Intranet Site or Internet Server . . . 320
Choose Web Options to Control How Excel Creates Web Pages . . . 321
Choose Options on the General Tab . . . 321
Choose Options on the Browsers Tab . . . 321
Choose Options on the Files Tab . . . 322
Choose Options on the Pictures Tab . . . 323
Choose Options on the Encoding Tab . . . 323
Choose Options on the Fonts Tab . . . 324
Understand HTML, Round Tripping, and Web File Formats . . . 324
Save a Worksheet or Workbook As a Web Page . . . 325
Work in an Interactive Web Workbook . . . 330
Understand and Use Excel’s XML Capabilities . . . 332
What XML Is . . . 332
What XML Is For . . . 332
The Benefits XML Offers . . . 333
What You’re Likely to Do with XML Files . . . 334
Work with XML Files in Excel . . . 334
Create XML Files in Excel . . . 336
CHAPTER 16
Use Excel with the Other Office Applications . . . .
345
Transfer Data Using the Clipboard and Office Clipboard . . . 346
Embed and Link Objects . . . 347
Understand the Differences Between Embedding and Linking . . . 347
Understand the Advantages and Disadvantages of Embedding and Linking . . . 348
Choose When to Embed and When to Link . . . 348
Verify Whether an Object Is Linked or Embedded . . . 349
Embed or Link an Object . . . 349
Edit an Embedded Object . . . 353
Edit a Linked Object . . . 353
Contents
xi
Edit, Update, and Break Links . . . 354
Insert Excel Objects in Word Documents . . . 357
Insert a Chart in a Word Document . . . 357
Insert Cells in a Word Document . . . 359
Use an Excel Database As the Data Source for a Word Mail Merge 361 Insert Excel Objects in PowerPoint Presentations . . . 363
Insert a Chart in a PowerPoint Slide . . . 363
Insert a Range of Cells in a PowerPoint Slide . . . 363
Insert Word Objects in Worksheets . . . 365
Insert PowerPoint Objects in Worksheets . . . 365
PART IV
Customize and Automate Excel
CHAPTER 17Customize Excel’s Interface . . . .
369
Choose Toolbar and Menu Options . . . 370
Customize Toolbars . . . 372
Understand Excel’s Many Toolbars . . . 372
Display, Hide, and Reposition Toolbars . . . 373
Customize a Toolbar . . . 373
Copy a Custom Toolbar to a Workbook . . . 379
Customize Menus and Menu Bars . . . 380
Customize a Menu or a Menu Bar by Using the Customize Dialog Box 380 Customize a Menu or a Menu Bar by Using the Rearrange Commands Dialog Box . . . 381
Reset a Menu to Its Default Settings . . . 383
Change the Appearance of a Toolbar Button, Menu Item, or Menu . . . 384
CHAPTER 18
Use Macros to Automate Tasks . . . .
387
Understand What Macros Are and What They’re For . . . 388
Configure Excel’s Macro Virus–Protection Features . . . 389
Understand and Set Security Levels . . . 389
Understand Digital Signatures . . . 394
Record a Macro Using the Macro Recorder . . . 396
Test and Run a Macro . . . 399
Run a Macro from the Macro Dialog Box . . . 399
Create a Toolbar Button or Menu Item to Run a Macro . . . 400
Assign a Key Combination or Description to a Macro . . . 402
Assigning a Macro to an Object . . . 402
Delete a Macro . . . 403
APPENDIX
Keyboard Shortcuts . . . .
405
About the Author
Guy Hart-Davisis the author of more than 20 computer books on subjects as varied as Microsoft Office, Windows XP, Visual Basic for Applications, and MP3 and digital audio. His most recent books includeHow to Do Everything with Your iPodandOffice 2003: The Complete Reference
(as a coauthor).
xiv
Acknowledgments
My thanks go to the following people for making this book happen:
■
Katie Conley for asking me to write this book and for handling the acquisitions and development■
Karen Weinstein for performing the technical review and providing helpful suggestions and encouragement■
LeeAnn Pickrell for coordinating the project■
Emily Wolman for editing the text with great care■
Carie Abrew, Tabi Cagan, and George T. Charbak for laying out the pages■
Marian Selig for proofreading the book■
James Minkin for creating the index■
Roger Stewart for lurking in the background offering wit and wisdomIntroduction
The most widely used spreadsheet application in the world, Excel is a key part of the Microsoft Office suite of applications. You can use Excel for anything from a small spreadsheet of household finances to monster databases of all your company’s products, customers, and sales. You can use Excel either on its own or together with the other Office applications.
Excel 2003 builds on the many previous versions of Excel to deliver powerful functionality and many new features along with a slick and easy-to-use interface. If you’re new to Excel, you’ve got a large amount to learn. If you’re coming to Excel 2003 as an experienced user of earlier versions, you’ve still got plenty to learn. But either way, this book will get you up to speed quickly.
Who Is This Book For?
This book is designed to help beginning and intermediate users get the most out of Excel 2003 in the shortest possible time. If you fall into either of those categories, you’ll benefit from this book’s comprehensive coverage, focused approach, and helpful advice. If you’re an Excel expert seeking super-advanced coverage, look elsewhere.
What Does This Book Cover?
Here’s what this book covers:■
Chapter 1, “Get Started with Excel,” shows you how to launch Excel in the many ways that Windows provides and how to navigate the main components of the Excel screen. You’ll also learn what workbooks and worksheets are, how to select objects, and how to get help on using Excel.■
Chapter 2, “Configure Excel to Suit Your Working Needs,” discusses how to improve your view of worksheets by splitting the view, displaying extra windows, hiding and redisplaying windows, zooming the view, and freezing particular rows and columns so they never move while everything else scrolls. You’ll learn how to set the most important of Excel’s many options to customize its behavior, how to load add-ins when you need the extra functionality they provide, and how to configure AutoCorrect to save you time and effort.■
Chapter 3, “Create Spreadsheets and Enter Data,” starts by explaining how to create a new workbook in any of several convenient ways and how to save it, and then shows you how to create your own templates to use as the basis for future worksheets. You’ll also find out how to enter data in your worksheets manually and by using Excel’s AutoFill feature, how to use Excel’s Find and Replace features, and how to recover your work if Excel crashes.■
Chapter 4, “Format Worksheets for Best Effect,” discusses how to manipulate the worksheetsin a workbook, and then moves on to cover formatting cells and ranges using the many types of formatting that Excel supports.
■
Chapter 5, “Add Graphics and Drawings to Worksheets,” shows you how to add visual impact to your worksheets by including pictures, shapes, diagrams, and other graphical objects. This chapter also explains how Excel’s drawing layer handles graphical objects and how you can position, resize, and format objects.■
Chapter 6, “Check, Lay Out, and Print Worksheets,” explains how to get your worksheets into shape for printing and how to print them. Topics covered include checking spelling, setting the print area, specifying the paper size and orientation, creating headers and footers, and using Print Preview to avoid wasting paper. You’ll also learn to set and adjust page breaks and specify which extra items to include in the printout.■
Chapter 7, “Perform Calculations with Functions,” covers what functions are and how you enter them in your worksheets. You’ll also learn about the nine categories of functions that Excel provides, with examples of some of the most useful functions in each category.■
Chapter 8, “Create Formulas to Perform Custom Calculations,” starts by teaching youthe basics of formulas in Excel and the components from which formulas are constructed. After that, you’ll learn how Excel handles numbers, and how to create both regular formulas and array formulas. The end of the chapter shows you how to troubleshoot formulas when they don’t work correctly.
■
Chapter 9, “Organize Data with Excel Databases,” shows you how to create Excel databases, enter data, and sort and filter the data to find the information you need. This chapter also covers how to link an Excel worksheet to an external database (for example, an Access database) so that you can extract data to an Excel worksheet and manipulate it there, and how to perform web queries to bring web data into worksheets.■
Chapter 10, “Outline and Consolidate Worksheets,” discusses how to outline a worksheet so that you can collapse it to show only the parts you need and how to consolidate multiple worksheets into a single worksheet. Both outlining and consolidation can save you welcome amounts of time.■
Chapter 11, “Analyze Data Using PivotTables and PivotCharts,” explains how to use Excel’s powerful PivotTables and dynamic PivotCharts to manipulate your data so that you can draw conclusions from it. You’ll also learn how to create a conventional (static) chart from PivotTable data.■
Chapter 12, “Solve Problems by Performing What-If Analysis,” discusses how to create data tables that enable you to assess what impact one or two variables have on a calculation.This chapter then describes how to use Excel’s scenarios to explore the effects of alternative data sets within the same worksheet, how to solve one-variable problems using Goal Seek, and how to use the Solver to solve multi-variable problems.
■
Chapter 13, “Create Effective Charts to Present Data Visually,” covers how to use Excel’s chart features to create compelling charts. You’ll learn how to create charts by using the Chart Wizard, how to choose the right type of chart for your data, and how to edit and format charts to give them the effect you need. You’ll also learn how to copy formatting you’ve applied to one chart to another chart, how to unlink a chart from its data source, how to print your charts, and how to add custom chart types to Excel’s existing types.■
Chapter 14, “Share Workbooks and Collaborate with Colleagues,” explains the range of features that Excel provides for sharing workbooks, protecting them from types of changes you don’t want others to make, and collecting and reviewing input from your colleagues to produce a final version of a workbook. Among other things, you’ll learn how to work with comments, how to send workbooks via e-mail, how to track changes to a workbook, and how to merge multiple workbooks into a single workbook.■
Chapter 15, “Using Excel’s Web Capabilities,” describes Excel’s key features for creating and working with Web data. You’ll learn when to save files directly to intranet sites and Internet servers, how to save a worksheet or workbook as a web page, how to configure Excel’s web options, and how to work in an interactive web workbook. If your company uses XML for data exchange, you can also learn how to use Excel’s powerful XML capabilities, including external schemas.■
Chapter 16, “Use Excel with the Other Office Applications,” discusses how to transfer data smoothly and easily among Excel and the other Office applications (such as Word and PowerPoint). This chapter starts by discussing data transfer via the Clipboard, then covers embedding and linking, two different technologies for including a part of one document in another document. The end of the chapter explains how to insert Excel objects in Word documents and PowerPoint presentations, and how to insert Word objects and PowerPoint objects in worksheets.■
Chapter 17, “Customize Excel’s Interface,” describes how to customize Excel’s toolbars and menus to put the commands you need at your fingertips while maximizing the amount of space available onscreen. This chapter is short, but it can save you considerable time and effort, so it’s worth a visit.■
Chapter 18, “Use Macros to Automate Tasks,” explains how to use Office’s built-in Macro Recorder feature to record macros (sequences of commands) so you can perform them automatically later. To use macros, you must configure Excel’s macro virus–protection mechanism, so you’ll learn about that in this chapter as well.■
The Appendix lists the keyboard shortcuts you can use to make Excel do your bidding without touching the mouse.Excel 2003 runs on Windows XP and Windows 2000 (not on Windows Me, Windows 9x, or Windows NT). The illustrations in this book show how Excel looks with Windows XP’s default interface, which is somewhat different than Windows 2000’s interface. Looks aside, Excel’s functionality is the same on both Windows XP and Windows 2000. However, you sometimes need to use different commands when working in Windows itself. For example, Windows XP’s default Start menu is laid out differently than Windows 2000’s Start menu, so where in Windows XP you launch Excel by choosing Start | All Programs | Microsoft Office | Microsoft Office Excel 2003, in Windows 2000 you choose Start | Programs | Microsoft Office | Microsoft Office Excel 2003.
Conventions Used in This Book
To make its meaning clear without using far more words than necessary, this book uses a number of conventions, three of which are worth mentioning here:
■
Note, Tip, and Caution paragraphs highlight information you should pay extra attention to.■
The pipe character or vertical bar denotes choosing an item from a menu. For example,“choose File | Open” means that you should pull down the File menu and select the Open item. Use the keyboard, mouse, or a combination of the two as you wish.
■
Most check boxes have two states:selected(with a check mark in them) andcleared(without a check mark in them). This book tells you toselecta check box orcleara check box rather than “click to place a check mark in the box” or “click to remove the check mark from the box.” (Often, you’ll be verifying the state of the check box, so it may already have the required setting—in which case, you don’t need to click at all.) Some check boxes have a third state as well, in which they’re selected but dimmed and unavailable. This state is usually used for options that apply to only part of the current situation.
This book assumes you’re using Internet Explorer rather than another browser. Given that Internet Explorer currently enjoys a market share of more than 95 percent at this writing (according to OneState.com, a web analytics firm), that’s probably a reasonable assumption. But if you’re using another browser, you’ll see different behavior when you take an action that causes Excel to access your default browser.
How to…
■
Start Excel manually or automatically■
Use or hide the task pane■
Understand the components of the Excel screen■
Understand the basics of worksheets and workbooks■
Open an existing workbook■
Open other formats of spreadsheet file in Excel■
Navigate in workbooks and worksheets■
Select cells, ranges, and other objects■
Get help with ExcelE
xcel is a powerful spreadsheet application for organizing, calculating, summarizing, and presenting data. Coming to grips with Excel involves a bit of a learning curve, but you’ll find that your experience with other Windows applications helps you get the hang of things quickly.In this chapter, you’ll see how to navigate the Excel screen and understand its components. You’ll learn the basics of worksheets (the spreadsheet pages that Excel uses) and workbooks (files that contain worksheets), how to open existing workbooks, and how to navigate through them and select objects in them. At the end of the chapter, you’ll learn how to use Excel’s built-in help features to find information you need.
Start Excel
The basic way to start Excel is to choose Start | All Programs | Microsoft Office | Microsoft Office Excel 2003. When it opens, Excel creates a new blank workbook containing three worksheets. By default, Excel displays the Getting Started task pane when you launch it. You can dismiss the task pane by clicking its Close button (the×button).
If you want to start Excel and open an existing workbook at the same time so that you can work in that workbook, start Excel in either of these ways:
■
Choose Start | My Recent Documents and select the workbook from the My Recent Documents submenu.If the My Recent Documents item doesn’t appear on your Start menu, right-click the Start button and choose Properties to display the Taskbar and Start Menu Properties dialog box. Click the upper Customize button to display the Customize Start Menu dialog box. On the Advanced tab, select the List My Most Recently Opened Documents check box. Click the OK button in each dialog box to close that dialog box.
■
Double-click the icon for an existing workbook in a Windows Explorer window or on your desktop.For instructions and illustrations, this book uses a default configuration of Windows XP as the operating system on which Excel is running. If you’re using Windows 2000 Professional, the user interface will look a little different, because Windows 2000 uses a different color scheme by default and doesn’t support the round upper corners on windows and dialog boxes that Windows XP uses by default. More important, Windows 2000’s Start menu is arranged a little differently than Windows XP’s default Start menu. For example, Windows 2000 has a Programs menu rather than an All Programs menu, so to start Excel in Windows 2000, you choose Start | Programs | Microsoft Office | Microsoft Office Excel 2003 rather than Start | All Programs | Microsoft Office | Microsoft Office Excel 2003.
CHAPTER 1:
Get Started with Excel
5
1
Start Excel Easily and Often
If you start Excel more frequently than most other applications, Windows XP automatically places a shortcut to Excel on the most frequently used applications section of the Start menu, as shown here. You can then start Excel by choosing Start | Microsoft Office Excel 2003.
Most Frequently Used Applications
That makes launching Excel easier—but you can make it even easier by pinning Excel to the pinned items section of the Start menu, so that it always appears there no matter which applications you launch most frequently. To pin Excel, choose Start | All Programs | Microsoft Office to display the submenu, right-click the Microsoft Office Excel 2003 item, and choose Pin to Start Menu from the shortcut menu. (If there’s an icon for Excel on the most frequently used programs section of the Start menu, you can right-click that icon instead of displaying the Microsoft Office submenu.)
If you use Excel in every Windows session, consider configuring Windows to launch Excel automatically each time you log on to Windows. Doing this makes the logon process take a few seconds longer, but it saves you the trouble of launching Excel manually.
To configure Windows to launch Excel automatically when you log on, follow these steps:
1. Choose Start | All Programs | Microsoft Office to display the Microsoft Office submenu.
2. Right-click the Microsoft Office Excel 2003 item and choose Copy from the shortcut menu to copy it to the Clipboard.
3. Choose Start | Run to display the Run dialog box.
4. Type%userprofile%\Start Menu\Programs\Startup. (%userprofile% is a system variable that returns the path to your user profile folder—the folder that contains your My Documents folder and the folders in which your settings are stored.)
5. Click the OK button. Windows opens the Startup folder, which contains shortcuts to applications that run when you log on to Windows.
6. Right-click in the Startup folder and choose Paste from the shortcut menu to paste a copy of the Excel shortcut into the folder.
7. Click the Close button (the×button) or choose File | Close to close the Windows Explorer window.
If you’re using Windows XP Professional in a corporate environment, an administrator may have prevented you from customizing your startup group. If this is the case, you’ll need to have an administrator customize the startup group for you.
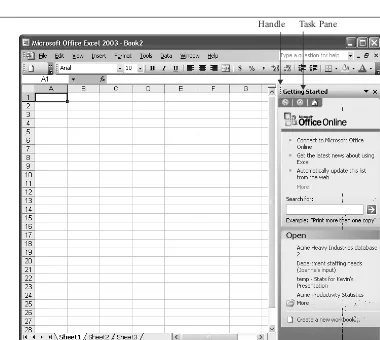
Use or Hide the Task Pane
By default, Excel displays the Getting Started task pane (Figure 1-1) when you launch the application. The task pane’s default position is to bedocked(attached) to the right side of the Excel window, but you can drag it by the handle to any other edge of the window to dock it there if you prefer. Alternatively, you can display the task pane floating free anywhere in the Excel window by dragging it away from the side of the window to which it’s currently docked.
When the task pane is docked, you can resize it by dragging the border on its open side to change its width or depth. When the task pane is floating free, you can resize it by dragging any side or corner.
If you’ve used any of the Office XP applications (or any of the other Office 2003 applications), you’ll be familiar with task panes; if you’re coming to Excel 2003 fresh or from Office 2000 or an earlier version, task panes should be a welcome addition to the interface. The task pane area can
CHAPTER 1:
Get Started with Excel
7
[image:27.612.86.466.261.601.2]1
FIGURE 1-1 When you launch Excel and create a new workbook, Excel displays the Getting Started task pane by default.
display any one of a variety of different task panes built into Excel. I’ll introduce these task panes briefly in a moment and then discuss each one in detail in the part of the book that covers the functionality that the task pane provides.
Each task pane draws together previously disparate functions that are commonly needed for a particular group of tasks. For example, the Getting Started task pane (which you can see in Figure 1-1) lets you open recently used files (instead of having to use the File menu or the Open dialog box), create a new workbook, or search Microsoft Office Online. Once you’ve taken an action from the Getting Started task pane or an action that removes the need for the Getting Started task pane, Excel hides the task pane.
Whether you find the Getting Started task pane useful or an irritating waste of screen real estate depends on how you work (and perhaps your temperament). You can control the task pane manually as follows:
■
Click the Close button (the×button) to dismiss the task pane.■
Choose View | Task Pane or pressCTRL-F1to toggle the display of the task pane. Excel displays the task pane you last used in the current session. If you haven’t used a task pane in this session, Excel displays the Getting Started task pane.■
To prevent Excel from displaying the Getting Started task pane when you launch Excel, choose Tools | Options, clear the Startup Task Pane check box on the View tab of the Options dialog box, and click OK.Excel displays the other task panes when they’re needed. For example, Excel displays the Clipboard task pane when you copy or cut two items in succession without pasting the first item.
You can also display most of the task panes manually by using the drop-down menu of whichever task pane is currently displayed. There are several exceptions that don’t appear on this menu. For example, you can’t display the two file-search task panes (the Basic File Search task pane and the Advanced File Search task pane) from the menu; instead, display them by choosing File | File Search and then, if necessary, clicking the Advanced File Search link or the Basic File Search link in the task pane. Another exception is the Document Recovery task pane, which appears only when you’ve restarted Excel after a crash or after closing it with Microsoft Office Application Recovery.
Most of the task panes are available most of the time when you’re working in a workbook in Excel, but some are available only for specific files. When a task pane isn’t available, it appears dimmed in the list. For example, the Template Help task pane is available only when you’re working in a Smart Document that has custom help attached.
Excel also offers these task panes:
■
Excel Help Enables you to search the local help files and (if you have an Internet connection available) the Microsoft Office Online support site. This task pane alsoCHAPTER 1:
Get Started with Excel
9
1
contains links for accessing additional content on Microsoft Office Online. You can also display this task pane by choosing Help | Microsoft Office Excel Help or by pressingF1.
■
Search Results After you begin a file search (by choosing File | File Search and specifying the details in the Basic File Search task pane or the Advanced File Search task pane), Excel displays the Search Results pane to show the results of the ongoing search. You can continue working on open workbooks while the search is under way.■
Clip Art Enables you to search for graphics files organized by collection, file type, and location. You can also display this task pane by choosing Insert | Picture | Clip Art.■
Research You can search specified encyclopedias, thesauruses, and translation tools for more information about selected words. You can also display this task pane by clicking the Research button on the Standard toolbar or choosing Tools | Research.■
Clipboard The Office Clipboard can hold up to 24 items copied or cut from any Office application. You can then paste these items elsewhere. You can also display this task pane by choosing Edit | Office Clipboard.■
New Workbook Offers workbook-creation options based on various formats or templates. You can also display this task pane by choosing File | New.■
Template Help Displays custom help content included in the template that’s attached to the document you’re currently using.■
Shared Workspace Provides features for sharing a central copy of a document with others from a SharePoint Team Services web site.■
Document Updates This feature works with the Shared Workspace, enabling you to get the most recent version of the workbook from the server.■
XML Source Displays the XML schema attached to the currently displayed XML file. You can map schema elements to parts of the worksheet by dragging them to the worksheet. You can also display this task pane by choosing Data | XML | XML Source.Once you’ve moved from one task pane to another, you can retrace your steps by clicking the Back button, and go forward again by clicking the Forward button. Click the Home button to display the Getting Started task pane.
Understand the Excel Screen
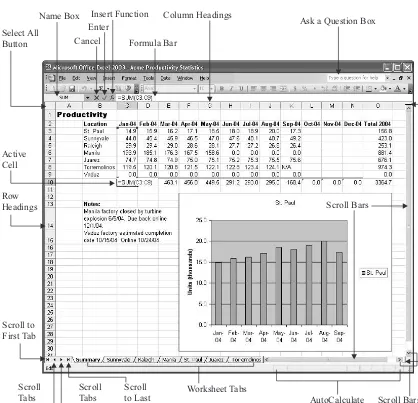
Understand Worksheets and Workbooks
[image:30.612.57.475.102.505.2]Excel’s basic unit is theworksheet, a grid of cells in which you enter data. Each worksheet consists of 256 columns and 65,536 rows. The intersection of each row and column is a cell, so each worksheet contains 16,777,216 cells.
FIGURE 1-2 The Excel application window with a workbook open and a worksheet displayed
Select All Button
Name Box
Cancel Enter
Insert Function
Formula Bar
Column Headings
Ask a Question Box
Split Boxes Scroll Bars
Active Cell
Row Headings
Scroll to First Tab
Scroll Tabs Left
Scroll Tabs Right
Worksheet Tabs
AutoCalculate Scroll
to Last Tab
Scroll Bars
By default, Excel uses the A1 reference scheme to refer to columns, rows, and cells:
■
Columns are designated by letters: A to Z for the first 26 columns, AA to AZ for the next 26 columns, then BA to BZ, and so on. The last column is IV.■
Rows are numbered from 1 to 65536.■
Cells are designated by column and row. The first cell on a worksheet is cell A1, and the last cell is IV65536. This designation is called thecell address.Instead of A1, Excel can also use the R1C1 reference format, which uses the letterRand a number to indicate the row and the letterCand a number to indicate the column. For example, cell B2 is R2C2 in R1C1 reference format. You can change to R1C1 format on the General tab of the Options dialog box (Tools | Options).
Excel saves worksheets inworkbookfiles. These files use the Microsoft Excel Worksheet file format, which has the .XLSfile extension. Each workbook can contain either one or more worksheets. By default, new workbooks contain three worksheets and can contain up to 256 worksheets. The worksheets are named Sheet1, Sheet2, and so on. You can change these names as needed.
Workbooks make it easy to keep related information on separate sheets that you can access quickly. For example, you might use a separate worksheet to track the sales results for each of your company’s sales territories. As you’ll see shortly, Excel provides features for entering the same data on multiple worksheets simultaneously, so you can quickly create a group of worksheets that contain the same basic information—for example, the layout of those sales results and associated information. On the top sheet of the workbook, you might put a summary worksheet that presented an executive overview of the sales results. Excel lets you create formulas that link from one worksheet to another, so the sales-territory worksheets could automatically update the summary worksheet.
See “Divide Data Among Workbooks and Worksheets,” in Chapter 3, for guidelines on how to divide your data.
Open an Existing Workbook
Excel offers a variety of ways to open an existing workbook—from the Getting Started task pane, the Open dialog box, the File menu, a Windows Explorer window, or the Desktop. And those are only the conventional means of opening a workbook. (I won’t discuss the unconventional means here.)
Open a Workbook from the Getting Started Task Pane
The newest way of opening a workbook is by using the Getting Started task pane, which displays a brief list of the workbooks you’ve used recently. Click a link to open the workbook, or click the Open link to display the Open dialog box (discussed next).
CHAPTER 1:
Get Started with Excel
11
If you have the Getting Started task pane displayed by default, this can be a convenient way of opening recently used files. (If not, the recently used list at the bottom of the File menu is more convenient.) But if you do have this task pane displayed all the time, you’re probably wasting precious screen space. So your chances of finding the Getting Started task pane a key way of opening a workbook seem destined to remain slim.
Open a Workbook from the Open Dialog Box
The most conventional way of opening an existing workbook is to use the Open dialog box. To do so, follow these steps:
1. Click the Open button on the Standard toolbar or the Open link in the Getting Started task pane, or choose File | Open, or pressCTRL-O, to display the Open dialog box:
2. Navigate to the folder that contains the workbook:
■
Use the My Recent Documents button on the Places bar to display a list of your recently opened workbooks.■
Use the other buttons on the Places bar to quickly access your desktop, My Documents folder, My Computer folder, or My Network Places folder as necessary.■
Navigate up and down the folder tree as usual.3. Select the workbook. If the Open dialog box doesn’t show the workbook file, you may need to choose a different filter in the Files of Type drop-down list. The default filter is All Microsoft Excel Files, which displays all the file types that Excel claims as its own.
4. Click the Open button to close the Open dialog box and open the workbook.
Know When to Use the Alternate Open Commands
As well as opening the workbook for editing, the Open dialog box also enables you to open the workbook in the following ways by clicking the drop-down button on the Open button and choosing the action from the resulting menu:
■
Open Read Only Opens the workbook in a read-only format, which prevents you from saving changes to this copy of the file. You can save changes by using a Save As command to save the workbook under a different file name or path. Use this command when you need to ensure that you don’t unthinkingly save changes to a workbook that you’re not supposed to change. (If an administrator or another user decides to allow you to view their workbooks but not change them, Excel enforces the read-only status automatically when you try to open the workbook.)■
Open As Copy Opens a copy of the workbook under the name Copy (1) offilename— for example, Copy (1) of Project Budget.xls. This command can be useful for quickly creating a copy of the workbook, but renaming the copy from its default name is cumbersome: even if you use a Save As command to save the copy under a different name, you’ll need to subsequently delete the Copy (1) Of file so as not to leave it lying around.■
Open in Browser Opens the file in your computer’s default browser (for example, Internet Explorer). This command is available only for HTML files.■
Open and Repair Opens the workbook and attempts to repair the damage it has sustained. With luck, you’ll rarely need to use this command.Open a Recently Used Workbook from the File Menu
The bottom of the File menu lists the workbooks you’ve used most recently. You can open one of these workbooks by displaying the File menu (for example, pressALT-F) and choosing the appropriate entry.
By default, Excel lists your four most recently used workbooks. You can change this number by setting the Recently Used File List Entries text box on the General tab of the Options dialog box (Tools | Options).
Open a Workbook from Windows Explorer or Your Desktop
You can open a workbook directly from a Windows Explorer window (or from your desktop) by double-clicking it. This technique is useful for files you’ve chosen to store on your desktop and when you’ve just used Windows Explorer to find, move, or copy a file. By opening the folder directly from Windows Explorer, you avoid having to navigate in the Open dialog box to the folder.
Another advantage is that when you open a workbook in this way, Excel doesn’t change the working directory to the folder that contains the workbook. So the next time you display the Open dialog box, it still displays the folder from which you last opened a workbook using the dialog box.
CHAPTER 1:
Get Started with Excel
13
Open Other Formats of Spreadsheet in Excel
If you’ve used another spreadsheet application before migrating to Excel, you may need to transfer data from your old spreadsheets to Excel. To help you do so, Excel includes filters for converting data from other formats, such as Lotus 1-2-3, Quattro Pro, Microsoft Works, and dBASE, not to mention files in earlier Excel formats (for example, Excel 95 or Excel 97) and XML.
Excel can also open text files in widely used formats, such as comma-separated values (CSV)—a format that uses commas to denote the divisions between data fields. To get data from applications such as address books or organizers into an Excel worksheet, you’ll often need to export the data to a CSV file and then open that file in Excel. Similarly, if Excel doesn’t have a converter for a spreadsheet file that you need to open, use the application that created the file to save a copy in CSV format, then open that copy in Excel.
To convert a file, open it via the Open dialog box as usual. Use the Files of Type drop-down list to specify the type of file you want to display in the main list box. If the type of file doesn’t appear in the list, select the All Files item to display all files—but be warned that Excel probably won’t be able to convert the file. If it can’t, Excel displays a message such as this, claiming the file format is not valid:
“Not valid” almost always means that Excel doesn’t have a converter for the file format. (On rare occasions, you may find that the file has become corrupted and useless, giving Excel a valid complaint.) When this happens, open the file in the application that created it (or an application that does have a converter), export the data to a CSV file, and then import that file into Excel.
Navigate in Workbooks and Worksheets
After creating a new workbook or opening an existing workbook, you’ll need to navigate to the worksheet on which you want to work. You’ll then need to navigate on that worksheet to access the right cells or ranges.
Like almost all other Windows applications, Excel supports navigating with both the mouse and the keyboard. For most purposes, the mouse is quicker and faster than the keyboard.
Navigate to the Worksheet You Need
To move to another worksheet with the mouse, click its tab. If necessary, use the scroll buttons (shown with labels in the following illustration) to make the tab appear in the list.
Excel offers these keyboard shortcuts for navigating among and selecting worksheets:
Action Keyboard Shortcut
Move to the next worksheet CTRL-PAGEDOWN
Move to the previous worksheet CTRL-PAGEUP
Select the current and next worksheets CTRL-SHIFT-PAGEDOWN
Select the current and previous worksheets CTRL-SHIFT-PAGEUP
Navigate to Cells and Ranges in a Worksheet
Most people find the mouse the easiest way of navigating in worksheets:
■
Click a worksheet or cell to access it.■
Use the horizontal and vertical scroll bars and scroll boxes to scroll to different areas of the worksheet.But you can also navigate easily by using the arrow keys (↑, ↓, ←,and→) and keyboard shortcuts. Keyboard shortcuts are especially effective when you’re working in a large worksheet that requires extensive scrolling to navigate.
These are the most useful keyboard shortcuts:
Action Keyboard Shortcut
Move to the specified edge of the data region CTRL-↑, -↓, -←, or -→ Move to the first cell in the row HOME
Move to the first cell in the worksheet CTRL-HOME
Move to the last cell ever used in the worksheet CTRL-END
Move down one screen PAGEDOWN
Move up one screen PAGEUP
Move to the right by one screen ALT-PAGEDOWN
Move to the left by one screen ALT-PAGEUP
Scroll the workbook to display the active cell CTRL-BACKSPACE
CHAPTER 1:
Get Started with Excel
15
1
Scroll to First Tab
Active Tab (with underline) Scroll
Tabs Left
Scroll Tabs Right
You can move to a specific cell by typing its address in the Name box and pressingENTER.
Select Objects
After navigating to the right areas of the appropriate worksheets, you select objects (such as cells and ranges) so that you can work with them. You can select most objects with either the mouse or the keyboard.
Select Cells and Ranges of Cells
Much of your work in Excel will be withrangesof cells. Excel supports ranges of both contiguous and noncontiguous cells:
■
A range of contiguous cells is a rectangle of cells defined by the starting and ending cell addresses, separated by a colon. For example, the range C3 to E5 (shown on the left in Figure 1-3) consists of a block of nine cells.Technically, a range can consist of a single cell, but most people understand ranges to have two or more cells.
■
A range of noncontiguous cells consists of a collection of cell addresses separated by commas. For example, a range consisting of the cells B3, B5, B7, and B9 (as shown on the right in Figure 1-3) would be represented as B3,B5,B7,B9. Ranges of noncontiguous cells can include ranges of contiguous cells—for example, B3,B5:B7,B9.You can select objects in worksheets by using the mouse, the keyboard, or both. These are the basic techniques you need to know:
■
To select a cell, click it, or use the arrow keys to move the active cell outline to it.■
To select a row or column, click its heading. PressSHIFT-SPACEto select the row orCTRL-SPACEto select the column that the active cell is in.
■
To select a contiguous range of cells, click the cell at one corner of the range and then drag to the other corner. You can drag in any direction—up, down, sideways, or diagonally. This technique works best when the full range of cells appears on screen. If you need to scroll the window to reach the end of the range, you may overrun the far corner of the range. In this case, use the next technique instead.■
To select a contiguous range of cells, click the cell at one corner of the range, scroll if necessary to display the far corner of the range, hold downSHIFT, and click. This technique works well for ranges that run beyond the current window.■
To make multiple selections, make the first selection, hold downCTRL, and then make the other selections.CHAPTER 1:
Get Started with Excel
17
1
To select all the cells in the active worksheet, click the Select All button, the unmarked button at the intersection of the column headings and row headings.
You can also select cells and ranges by using the names assigned to them, and by using the Go To dialog box and the Go To Special dialog box. The next two sections discuss these techniques.
Assign a Name to a Range
To make a range easier to access and identify quickly, you can assign a name to it. You can then select the range easily by using the Name box’s drop-down list or the Go To dialog box, quickly apply formatting to the range, and use the range’s name in calculations rather than having to specify their addresses.
To assign a name to a range, follow these steps:
1. Select the range.
2. Choose Insert | Name | Define to display the Define Name dialog box (shown here with a name added).
3. Type the name in the Names in Workbook text box.
FIGURE 1-3 Ranges can be either contiguous (left) or noncontiguous (right).
4. To create just this name and dismiss the dialog box, click the OK button. To create other names, click the Add button, enter a new name, click the Collapse Dialog button and use the mouse to identify the range, and click the Add button again. (See the sidebar “Use the Collapse Dialog Buttons to Specify Ranges,” following, for a demonstration of using the Collapse Dialog buttons.)
5. Click the Close button to close the Define Name dialog box.
To delete a range name from a workbook, follow these steps:
1. Choose Insert | Name | Define to display the Define Name dialog box.
2. Select the name in the Names in Workbook list box.
3. Click the Delete button.
4. Click the Close button to close the Define Name dialog box.
You can also name a range by selecting it, clicking in the Name box, typing the name for the range, and pressingENTER. However, using the Define Name dialog box lets you more easily see which other range names you’ve defined, which can help you implement an orderly naming scheme and avoid duplicating names.
Use the Collapse Dialog Buttons
to Specify Ranges
Many of Excel’s dialog boxes require you to specify the range to affect. In some cases, you can enter the range automatically by selecting the range before displaying the dialog box. Alternatively, you can type the range, but it’s easy to get the address wrong. So these dialog boxes contain one or more Collapse Dialog buttons to help you specify the range by selecting it on the worksheet. Use any Collapse Dialog button as follows:
1. Display a dialog box that contains one or more Collapse Dialog buttons. The Conditional Formatting dialog box, shown here (and discussed in “Use Conditional Formatting,” in Chapter 4), uses one or more pairs of Collapse Dialog buttons:
Select Ranges by Using the Go To Dialog Box and the Go To
Special Dialog Box
For selecting ranges and cells with specific contents, Excel provides the Go To dialog box and the Go To Special dialog box. The Go To dialog box (shown on the left in Figure 1-4; choose Edit | Go To or pressCTRL-G) largely duplicates the functionality of the Name box, but it also offers you quick access to unnamed ranges you’ve worked with recently—if you can identify them by their addresses.
CHAPTER 1:
Get Started with Excel
19
1
2. Click the Collapse Dialog button to reduce the dialog box to its bare bones.
3. Select the cell or range in the worksheet. Excel enters the cell or range address in the dialog box. This illustration shows the reduced version of the Conditional Formatting dialog box and a selection being made:
4. Click the Collapse Dialog button again to restore the dialog box.
The Go To Special dialog box (shown on the right in Figure 1-4) tends to be of more interest than the Go To dialog box, as it enables you to easily select cells that match specific criteria, such as containing comments, conditional formats, or data validation.
To display the Go To Special dialog box, click the Special button in the Go To dialog box. Choose the appropriate options (discussed below) and click the OK button to select the cells with those characteristics. You can then move through the range of cells selected by usingENTER,
SHIFT-ENTER,TAB, andSHIFT-TAB.
Table 1-1 explains the options that the Go To Special dialog box offers.
Option Explanation
Comments Cells that contain comments.
Constants Cells that contain constant data (text, numbers, or dates) rather than formulas. Select or clear the Numbers check box and Text check box under Formulas to specify whether to include numbers and text in the search.
Formulas Cells that contain formulas rather than constant data. (In other words, the cell’s contents begin with =.) Select or clear the Numbers check box, Text check box, Logicals check box, and Errors check box to specify whether to include numbers, text, logical values (TRUE or FALSE), and error values, respectively. For example, you might use this option button to check all your formulas or to quell errors.
Blanks Cells that contain no data or formatting. Excel excludes cells after the last cell in the worksheet that contains data.
Current Region The active cell and all cells around it up to the first blank row and blank column in each direction.
Current Array The active cell and the array it’s in.
Objects Objects such as text boxes, charts, AutoShapes, and other objects (for example, sounds).
Row Differences Cells within the selected range whose contents are different from the contents of the comparison cells you specify. Select the range to evaluate, click a cell in the comparison column to make it active, then select this option button in the Go To Special dialog box.
Column Differences Cells within the selected range whose contents are different from the contents of the comparison cells you specify. Select the range to evaluate, click a cell in the comparison row to make it active, then select this option button in the Go To Special dialog box.
Precedents Cells to which the active cell refers. Under the Dependents option button, select the Direct Only option button (the default) or the All Levels option button to specify whether to select direct references only or indirect references as well. Dependents Cells that refer to the active cell. Select the Direct Only option button (the
default) or the All Levels option button to specify whether to select direct references only or indirect references as well.
TABLE 1-1 Go To Special Dialog Box Options
CHAPTER 1:
Get Started with Excel
21
1
Select Worksheets in a Workbook
You can select worksheets in a workbook as follows:
■
Click a worksheet’s tab to select it.■
SHIFT-click another worksheet’s tab to select all the worksheets between the currently selected worksheet and the one you click.■
CTRL-click another worksheet’s tab to add that worksheet to the selection, orCTRL-click a selected worksheet’s tab to remove it from the selection.When multiple worksheets are selected, Excel displays[Group]in the title bar to remind you.
Excel also offers two keyboard shortcuts for selecting worksheets:
■
PressCTRL-SHIFT-PAGEDOWNto select the current and next worksheets.■
PressCTRL-SHIFT-PAGEUPto select the current and previous worksheets.Get Help with Excel
You can get help from Excel in either of the following ways:
■
Type a question (or some keywords) in the Ask a Question box at the right end of the menu bar and pressENTER. Excel searches the local help files and Microsoft’s web site (if an Internet connection is available), and displays the results in the Search Results task pane. Click a link to display Microsoft Excel Help in the Windows Help engine.■
PressF1or choose Help | Microsoft Excel Help to display the Excel Help task pane (shown next on the left). Enter a search word or phrase in the Search text box, and thenOption Explanation
Last Cell The last cell ever used in the active worksheet.
Visible Cells Only Cells that are visible—not hidden. Use this option to avoid pasting hidden rows or columns along with visible rows and columns. Select the range, display the Go To Special dialog box, select this option, then copy the range. Conditional Formats Cells that have conditional formatting applied. (“Use Conditional
Formatting,” in Chapter 4, explains conditional formatting.) Under the Data Validation option, choose the All option button (the default) to select all cells. Select the Same option button to select only those that match the active cell. Data Validation Cells that contain data validation rules. Choose the All option button (the
default) to select all cells. Select the Same option button to select only those that match the active cell.
pressENTERor click the Start Searching button. Click one of the search results in the Search Results pane (shown here on the right) to display it in the Windows Help engine.
Customize Excel’s Online Content
Settings
To customize the online content settings that Excel uses, follow these steps:
1. PressF1or choose Help | Microsoft Excel Help to display the Excel Help task pane.
CHAPTER 1:
Get Started with Excel
23
1
2. Click the Online Content Settings link in the See Also section to display the Online Content section of the Service Options dialog box:
3. Choose the appropriate settings for your needs: