3DP Benchmark Model for Evaluation of Dimensional Accuracy Against a
Pre-Existing Product
A. AIR1 and A. WODEHOUSE1
1Design Manufacture & Engineering Management, University of Strathclyde, Glasgow, UK [email protected], [email protected]
ABSTRACT
In terms of building intricate features or complex parts, consumer 3D Printers have their limitations due to overall lower resolution and accuracy. This paper deals with the development, manufacture and testing of a benchmarking model, that can help evaluate the dimensional accuracy of 3D printers. The aim of this being to test the 3D printed model against a real-world product equivalent, that is universally recognised and accessible – a LEGO® brick
– using its interlocking function as a test with an entertaining element. The methodology is demonstrated with a case study based on a Material Extrusion 3D Printer with measurements determined by a Coordinate Measure Machine to ensure high accuracy readings of the benchmarking model and the real-world product equivalent it is to be tested against.
KEYWORDS: Calibration Printing Test, Benchmarking 3D Model, Consumer-Level 3DP, Material Extrusion, Fused Deposition Modelling, Dimensional Accuracy
1. INTRODUCTION
3D printing (3PD) is gaining more widespread usage, with falling costs and operational simplicity making the technology more accessible in the consumer market [1]. The most popular consumer 3DP devices are of the Material Extrusion (ME) variety. However, these devices can have their limitations in terms of building more intricate features or complex parts, due to their lower resolution and accuracy [2]. In 3DP, calibration is key. Lack of correct printer calibration will result in prints which may be considered to have unsatisfactory geometry and dimensions. Because of this a variety of 3DP benchmark model designs have appeared in recent years, to help users test the quality of their printer and flag any issues that require device re-calibration [3,4]. The aim of the current work was to provide an entertaining 3D benchmarking model for testing the dimensional accuracy of desktop 3DP devices, with applications as an object that can be effectively integrated into a pre-existing product assembly.
1.1 Benchmark models in 3DP
Benchmarking models are tools that can be developed to test a 3D printer’s parameters such as dimensional accuracy, resolution and alignment. A well calibrated printer will show stronger results with fewer issues. The main forms of benchmarking tests are [3]:
Dimensional Accuracy (DA) - Precision in relation to the digital CAD model.
Bridging - Printed flat sections that span between two supports or anchor points.
XY Ringing - Vibrations that cause oscillations on the surface of the prints.
Z-axis Alignment - Tests the alignment and accuracy of the vertical features
Our focus for a new benchmarking model will be DA with the aim of creating a model that can be tested against, and interact with, an easily accessible pre-existing product (or PEP), that has not itself been 3D Printed. Benchmarking models with a similar form of print testing exist, however these models require PEPs that are non-universal or difficult to access [3,4].
2. METHODOLOGY
A LEGO® brick was chosen as the PEP to test our benchmarking model due to its accuracy,
consistency, functionality and global availability making it easily accessible to all and suitable as a universal (non-3DP) product. It was used to test the accuracy and build qualities of intricate prints on 3D printers. LEGO® bricks are readily found all over the world and every brick
produced since 1958, will perfectly fit one manufactured now [5]. The emotional attachment people have for assembling them, creates an entertaining prospect for users to receive instant feedback for 3DP quality, simply by interlocking a 3DP benchmark brick (BMB) with the PEP.
2.1 Software and Equipment
An ME consumer-level printer, the MakerBot Replicator 2X, was applied in the current study. This device is characterised by a layer resolution of up to 100µm, deposition speed of 175mm/s and has a heated print bed. Many features of the printer are user-adjustable, including the precise width of the filament used and alternating speeds/temperatures for different sections of the build [6]. ABS was used as the workpiece material, the same material used for official LEGO® bricks, but not in the same granule form [5]. The recommended software for this device
is MakerBot Desktop [7]. The printers input file for this study would require high DA in relation to the PEP. This would ensure effective interlocking of the benchmarking brick (BMB) with a real LEGO® brick, showing its validity as a basic benchmarking test. Dimensions were
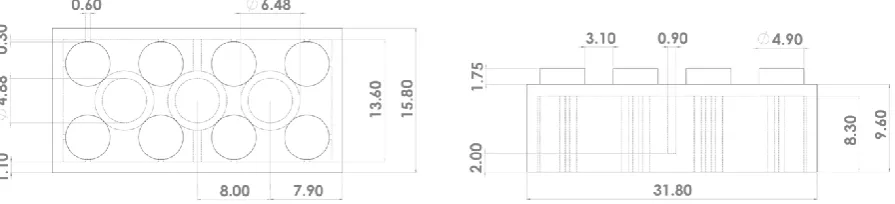
[image:2.595.77.525.639.741.2]taken from the PEP using a Coordinate Measure Machine (CMM), with accuracy of up to 1.7µm [8]. For that purpose, a workpiece was placed on the machine table, and a probe was used to identify the workpiece geometry by measuring different points on it and mapping the X, Y, Z coordinates. An accurate CAD model of the BMB was then generated (Fig. 1).
The produced CAD models were first converted to STL files, which were then imported into MakerBot Desktop, where they were manipulated into a coordinated toolpath specific to the Replicator 2X. These instructions were formatted in a standardized g-code file which is used by machine tools around the world [9].
2.2 Key factors of benchmarking test print
[image:3.595.69.526.279.369.2]A variety of parameters can affect prints; thus, the field of the study requires limitations. The key factors and optimal print orientation, which were concluded as having the most significant effect on the dimensional accuracy and overall quality of prints, are based on previous studies [10,11,12] and the authors knowledge of the given 3D printer. These are listed in Table 1.
Table 1: Key factors with significant affect on DA and overall print quality (a) orientation (b)
3. EXPERIMENT & RESULTS
Benchmarking 3D prints where recorded on a spreadsheet, collecting data on the settings for each print and its result, with the aim to identify the ideal/optimal settings and design for the BMB. In the first print, all default settings were applied followed by later corrections. DA was the primary focus of this experiment. Our theory was that the best way to test the BMB would be for it to successfully interlock with a real LEGO® brick of a similar design. In cases of
successful achievement, the ME printer could be assumed well calibrated and of an acceptable printing quality. The accepted tolerance was set at +/- 200µm for the 400µm nozzle. Additionally, we would also be looking for the BMB to test certain other features including: Z-axis Alignment; traces of XY Ringing; and Bridging.
3.1 Dimensional Accuracy
Initially, any attempt to print the BMB without a raft was proved to be difficult due to warping. Insufficient temperatures were concluded to cause the ABS rapid cooling and lack of proper adherence to the build platform. This led to the Building Platform Temperature increase from 110°C to 120°C [10,11]. Additionally, the First Layer Print Speed was reduced from 30mm/s
to 5mm/s and Filament Cooling Fan Speed was also disabled to maintain the heated temperature for this early stage of the build [10,11]. These adjustments proved to be successful (Fig. 2) and crucially allowed for the BMB to be printed independently of any rafts.
Figure 2: Warped BMB (left) compared to BMB with warping issue resolved (right)
The initial design intended the vertical walls to be 1.10mm wide and solid, but they were being printed hollow (Fig. 3a), which affected the BMBs interlocking test function. This was due an incompatibility with the ME printer. Creation of a solid 1.10mm wall would have required the layered ABS to overlap itself by 0.1mm. This was resolved by creating wall widths in the design that were a multiple of the nozzle size [10], requiring dimensional changes to the CAD model as per. As the standard nozzle diameter of the Replicator 2X is 0.4mm [6], a new wall thickness of 0.8mm or 1.2mm would’ve been suitable, however 1.2mm would compromise the DA of the inner ribs, making 0.8mm more ideal (Fig. 3a). The resulting prints entailed of stronger, solid walls with all crucial dimensions that facilitate the interlocking function preserved (Fig.3b,3c). Shrinkage of the cooled ABS was another issue for the walls, creating a concave geometry. Disabling the Inset and Outset Cooling Fans was a successful solution [12].
[image:4.595.125.474.388.461.2]
Figure 3: 1.1mm vs 0.8mm walls (a) PEP/BMB interlocking (b) new wall/rib dimensions (c).
3.2 Bridging
The roof on the BMB design was initially considered to be ideal for testing the basic bridging capabilities of an ME 3D Printer. However, a problem developed due to the 0.8mm wide walls not presenting a large enough area for the bridging to be securely anchored to (Fig. 4a). The CAD file was edited to include a 2mm fillet in the walls and roof joint area, to increase the surface area where bridges could be anchored by 335%. Immediate results of the introduced changes were noticed in its first print, displaying no visible bridging errors (Fig. 4a,b).
Figure 4: Before/after fillets (a) resulting topside bridging (b) Filleted areas highlighted (c)
b.
a. c.
[image:4.595.115.478.668.743.2]3.3 Overhangs
The original design for the BMB did not include a feature test for overhangs, however it became necessary to increase its viability as a benchmarking model. This required the addition of a fillet between the vertical walls and roof. This was initially set at 1mm, with test prints showing improvements, yet still some inefficiencies in bridging. To counter this, the fillets were increased to 2mm, allowing extra surface area for the bridges to anchor to. This aided the bridging feature greatly, but also gave our benchmarking tool the capacity to test basic overhangs, which were successfully produced as previously seen in Figures 4a and b.
3.4 Other test feature results
Z-axis Alignment – The designs external walls, underside tubing and top-side studs incorporate a test for 3DP z-axis alignment. If the walls on the x-axis are not level, this will cause unexpected variations in the print meaning the device may need to be re-calibrated [10,12]. On two occasions, the BMB correctly prompted us to re-calibrate the shared device.
XY Ringing -Ringing is commonly caused by the extruder travelling too quickly for the print being built [10,12]. This appeared on several of our early prints and was simply resolved by reducing the printers XY Travel Speed from 150mm/s to 100mm/s.
4. CONCLUSIONS
The aim of this work was to design and develop a new and simple, yet entertaining form of benchmarking model. One that could be used to test basic printer dimensional accuracy (DA) and print quality through interaction with a pre-existing universally accessible object. Data gathered from this study identified several promising features in the design, with focus on its interlocking assembly function with a real LEGO® brick to test DA. If a printed BMB
successfully interlocks with the real LEGO® brick, then the user’s 3D Printer can be deemed
to have adequate DA. The geometries, measurements and print settings of the design were further developed to add to the printing features that could also be benchmarked through it, including bridging, overhangs, Z-axis alignment and XY ringing. The authors do not believe that this is the solution to a perfect all-round benchmarking model. For that purpose, further development of the design will be required to enhance and potentially exaggerate some aspects such as overhangs and bridging. Currently, it is a basic print that is unique in its ability to test for DA, through an entertaining and simple, yet perceptive technique. After all, LEGO®
assemblies are in themselves a nostalgic, general form of additive manufacturing.
ACKNOWLEDGEMENTS
LEGO® is a trademark of the LEGO Group of companies which does not sponsor, authorize or
REFERENCES
[1] T. Campbell, C. Williams, O. Ivanova and B. Garrett, “Could 3D Printing Change the World?”, 2011, Atlantic Council, pp.4-5 [online report]. Available:
http://www.cbpp.uaa.alaska.edu/afef/Additive%20MFG%20.pdf
[2] “3D Printing Technology Comparison: FDM vs. SLA vs. SLS”, Formlabs, 2017. [Online]. Available: https://formlabs.com/blog/fdm-vs-sla-vs-sls-how-to-choose-the-right-3d-printing-technology/ [Accessed: 25- Jan- 2019].
[3] W. Hipolite, "Designer Creates an All-in-One Solution for Testing & Calibrating Your 3D Printer", 3DPrint.com, 2015. [Online]. Available:
https://3dprint.com/48922/3d-printer-calibrating-test/ [Accessed: 16- Jan- 2019].
[4] S.J. Grunewald, “Ten 3D Printable Calibration & Test Print Things”, 3DPrint.com, 2018. [Online]. Available: https://3dprint.com/207828/103dp-calibration-test-prints/ [Accessed: 13- Dec- 2018].
[5] The LEGO Group, “LEGO Bricks in The Making”, 2017. [Online Video]
[6] MakerBot Industries, “MakerBot Replicator 2X”, 2013, pp.7-8. [Online]. Available: http://downloads.makerbot.com/replicator2/MakerBot_Replicator2_brochure.pdf
[7] "Using MakerBot Desktop", Support.makerbot.com. [Online]. Available: https://support.makerbot.com/learn/makerbot-desktop-software/using-makerbot-desktop/using-makerbot-desktop_12192 [Accessed: 13- Dec- 2018].
[8] Crysta-apex S Series. Mitutoyo, 2019, pp.1-2, 4. [Online]. Available:
https://www.mitutoyo.com/wp-content/uploads/2013/01/2097_CRYSTA_ApexS.pdf
[9] M. Burns, Automated fabrication. Englewood Cliffs, N.J.: PTR Prentice Hall, 1993. In "The StL Format", Fabbers.com, 2019. [Online]. Available:
http://www.fabbers.com/tech/STL_Format [Accessed: 14- Jan- 2019].
[10] “Print Quality Troubleshooting Guide | Simplify3D Software”, Simplify3d.com, 2019. [Online]. Available:
https://www.simplify3d.com/support/print-quality-troubleshooting/ [Accessed: 14- Jan- 2019].
[11] H. Bhavnagarwala, “ABS Print & Bed Temperature – All You Need to
Know”, All3DP, 2018. [Online]. Available: https://all3dp.com/2/abs-print-bed-temperature-all-you-need-to-know/ [Accessed: 04- Jan- 2019].