PowerPoint
2003
Ellen Finkelstein
McGraw-Hill/Osborne
2100 Powell Street, 10
thFloor
Emeryville, California 94608
U.S.A.
To arrange bulk purchase discounts for sales promotions, premiums, or fund-raisers, please contactMcGraw-Hill/Osborne at the above address. For information on translations or book distributors outside the U.S.A., please see the International Contact Information page immediately following the index of this book.
How to Do Everything with Microsoft
®Office PowerPoint
®2003
Copyright © 2003 by The McGraw-Hill Companies. All rights reserved. Printed in the United States of America. Except as permitted under the Copyright Act of 1976, no part of this publication may be reproduced or distributed in any form or by any means, or stored in a
database or retrieval system, without the prior written permission of publisher, with the exception that the program listings may be entered, stored, and executed in a computer system, but they may not be reproduced for publication.
1234567890 CUS CUS 019876543
ISBN 0-07-222972-1
Publisher Brandon A. Nordin
Vice President &
Associate Publisher Scott Rogers Acquisitions Editor Margie McAneny
Project Editor Carolyn Welch
Acquisitions Coordinator Tana Allen
Technical Editor Geetesh Bajaj
Copy Editor Carolyn Welch
Proofreader Claire Splan
Indexer Claire Splan
Composition George Toma Charbak, Tara A. Davis, Kelly Stanton-Scott Illustrators Kathleen Fay Edwards, Melinda Moore Lytle, Lyssa Wald
Series Design Mickey Galicia
Cover Series Design Dodie Shoemaker Cover Illustration Eliot Bergman
This book was composed with Corel VENTURA™ Publisher.
Information has been obtained byMcGraw-Hill/Osborne from sources believed to be reliable. However, because of the possibility of human or mechanical error by our sources,McGraw-Hill/Osborne, or others,McGraw-Hill/Osborne does not guarantee the accuracy, adequacy, or completeness of any information and is not responsible for any errors or omissions or the results obtained from the use of such information.
HowTo-Tght (8)/ How to Do Everything with Microsoft Office PowerPoint 2003 / Finkelstein / 222972-1 / Chapter 1 Blind Folio1:ii Color profile: Generic CMYK printer profile
About the Author
Ellen Finkelsteinhas written several computer books on AutoCAD, PowerPoint, and Flash. Her previous book on PowerPoint wasHow to Do Everything with PowerPoint 2002. She writes numerous articles, especially on AutoCAD and PowerPoint, including a quarterly article, “Creative Techniques,” in Presentations magazine. Ellen provides consulting on web site and presentation content. She maintains a web site of AutoCAD, PowerPoint, and Flash tips and techniques at http://www.ellenfinkelstein.com.
About the Technical Editor
Geetesh Bajaj, based in India, is a Microsoft PowerPoint MVP (Most Valuable Professional). He runs the Indezine.com and PowerPointed.com sites that contain extensive PowerPoint-related content including reviews, tutorials, and a bi-weekly PowerPoint Ezine. He’s also a contributing editor for Presentations magazine.
HowTo-Tght (8)/ How to Do Everything with Microsoft Office PowerPoint 2003 / Finkelstein / 222972-1 / Front Matter Blind FolioFM:iv Color profile: Generic CMYK printer profile
Contents
Acknowledgments . . . xii
Introduction . . . xiii
PART I Create a Presentation CHAPTER 1 Get Started with Presentations . . . . 3
Get Your Message Across . . . 4
Open a Presentation . . . 5
Start PowerPoint . . . 6
Use the Getting Started Task Pane . . . 6
Use the Open Dialog Box . . . 8
View a Presentation . . . 11
Look at the Screen . . . 11
Get the Most out of the Toolbars and Menus . . . 13
Use the Appropriate View . . . 14
Move Around a Presentation . . . 19
Use the Task Panes . . . 19
Get Help When You Need It . . . 19
Save a Presentation . . . 20
Save So You Can Find It Fast Next Time . . . 23
Back Up Your Presentations . . . 23
Summary . . . 24
CHAPTER 2 Create Your First Presentation . . . . 25
Create Your Presentation . . . 26
Use the AutoContent Wizard . . . 27
Choose a Background Design . . . 29
Start from Scratch . . . 32
Start a New Presentation from an Existing One . . . 32
Lay Out a Slide with AutoLayouts . . . 32
Complete the Presentation Structure . . . 35
Structure a Presentation from an Outline . . . 36
Understand Outlines . . . 37
Create an Outline in PowerPoint . . . 38
Import an Outline . . . 42
Add Text to a Presentation . . . 45
Use Text Placeholders . . . 46
Create Text Boxes . . . 47
Place Text in AutoShapes . . . 49
Use WordArt . . . 50
Eliminate Spelling and Style Errors . . . 54
Check Spelling . . . 54
Use the Style Checker . . . 55
Find Synonyms . . . 57
Create a Summary Slide . . . 58
Complete a Presentation: Tutorial . . . 59
Develop the Framework . . . 59
Add Slides . . . 61
Add a Chart . . . 62
Move a Slide . . . 64
Add Animation . . . 65
View the Slide Show . . . 65
Summary . . . 66
CHAPTER 3 Edit Text . . . . 67
Edit for Clarity . . . 68
Move and Copy Text . . . 69
Use the Clipboard Task Pane . . . 70
Edit Placeholder Text . . . 71
Edit Text in AutoShapes and Text Boxes . . . 76
Edit WordArt Text . . . 78
Add Symbols . . . 79
Use AutoCorrect . . . 80
Act on Data with Smart Tags . . . 82
Choose Text with Style . . . 84
Use the Right Font for the Message . . . 84
Make a Font Bigger or Smaller . . . 85
Add, Delete, and Rearrange Slides . . . 89
Work in Slide Sorter View . . . 89
Import Slides from Other Presentations . . . 90
Keep a Slide Library . . . 92
Summary . . . 93
CHAPTER 4 Format Bullets and Paragraphs . . . . 95
Create a Bulleted List . . . 96
Choose a Bullet Type . . . 96
Set Bullet Size and Color . . . 97
Use an Image as a Bullet . . . 99
Create Numbered Lists . . . 101
Work with Paragraphs . . . 103
Understand Paragraph Formatting . . . 103
Use the Ruler . . . 104
Indent Text . . . 106
Set Tabs . . . 108
vi
How to Do Everything with Microsoft Office PowerPoint 2003
HowTo-Tght (8)/ How to Do Everything with Microsoft Office PowerPoint 2003 / Finkelstein / 222972-1 / Front Matter Color profile: Generic CMYK printer profile
Align Text . . . 109
Set Line Spacing . . . 111
Summary . . . 113
PART II Add Multimedia Elements to Your Presentation CHAPTER 5 Add Art and Graphic Objects . . . . 117
Create an Impact with Graphics . . . 118
Use Clip Art . . . 120
Find Art in the Clip Organizer . . . 120
Create Your Own Clip Art Collection . . . 123
Insert Picture Files . . . 126
Create a Photo Album . . . 126
Edit Pictures . . . 128
Use PowerPoint’s Basic Tools . . . 128
Use the Picture Toolbar . . . 130
Edit Graphic Files . . . 139
Create Drawing Objects . . . 142
Use the Draw Toolbar . . . 142
Insert AutoShapes . . . 142
Format Drawing Objects . . . 149
Edit Drawing Objects . . . 152
Select Objects . . . 152
Group and Ungroup Objects . . . 153
Reorder Objects . . . 154
Move Objects . . . 154
Duplicate Objects . . . 154
Delete Objects . . . 154
Resize and Scale Objects . . . 156
Rotate and Flip Objects . . . 156
Edit Points . . . 157
Edit Connectors . . . 157
Change One AutoShape to Another . . . 158
Lay Out Your Slides with Precision . . . 158
Use the Rulers . . . 158
Use Guides . . . 158
Snap to the Grid and to Objects . . . 159
Constrain Shape and Direction . . . 160
Nudge Objects . . . 161
Align and Distribute Objects . . . 161
Tips on Design and Layout . . . 162
Make Text Simple and Consistent . . . 162
Follow a Simple Plan . . . 163
Consider Color and Rhythm . . . 163
Summary . . . 164
CHAPTER 6 Work with Colors, Borders, Fills, and 3-D Effects . . . . 165
Choose a Color Scheme . . . 167
Create Your Own Color Scheme . . . 169
Change Backgrounds . . . 172
Create Gradient Backgrounds . . . 174
Create Texture Backgrounds . . . 175
Create Pattern Backgrounds . . . 176
Create Picture Backgrounds . . . 176
Format Lines and Borders . . . 179
Work with Fills . . . 181
Change Fill Color . . . 181
Format Fills in the Dialog Box . . . 182
Create 3-D Effects . . . 183
Create Shadows . . . 183
Use the Shadow Settings . . . 184
Create 3-D Shapes . . . 186
Control 3-D Settings . . . 187
Summary . . . 190
CHAPTER 7 Coordinate Presentations with Slide Masters . . . . 191
Understand the Slide Master . . . 192
Enter Slide Master View . . . 193
Manage Slide Masters . . . 194
Change the Background and Color Scheme . . . 195
Format Headings and Bulleted Text . . . 195
Add Placeholders . . . 196
Add Repeating Objects and Animation . . . 196
Add a Footer . . . 197
Make Exceptions . . . 200
Understand the Title Master . . . 201
Enter Title Master View . . . 201
Format Title Slides . . . 202
Understand the Handout Master . . . 203
Enter Handout Master View . . . 203
Format the Handout Master . . . 204
Understand the Notes Master . . . 205
Enter Notes Master View . . . 206
Format the Notes Master . . . 206
Set Page Size . . . 207
Create Your Own Design Templates . . . 207
Summary . . . 210
CHAPTER 8 Incorporate Graphs, Tables, and Organization Charts . . . . 211
Present Data Simply . . . 212
Add Graphs to a Slide . . . 213
Enter Data on the Datasheet . . . 214
Import Data . . . 216
Choose the Right Chart Type . . . 217
Format a Chart . . . 225
viii
How to Do Everything with Microsoft Office PowerPoint 2003
HowTo-Tght (8)/ How to Do Everything with Microsoft Office PowerPoint 2003 / Finkelstein / 222972-1 / Front Matter Color profile: Generic CMYK printer profile
Insert a Chart from Microsoft Excel . . . 232
Present Data in a Table . . . 233
Create a Table . . . 233
Import a Table . . . 235
Format a Table . . . 236
Work with Diagrams . . . 238
Format a Diagram . . . 239
Format an Organization Chart . . . 241
Summary . . . 243
CHAPTER 9 Add Animation to a Presentation . . . . 245
Create Professional Animation . . . 246
Animate Text and Objects . . . 246
Use Animation Schemes for Quick Results . . . 247
Use Custom Animation for Maximum Control . . . 248
Animate Charts and Diagrams . . . 259
Add Animated GIF Files . . . 261
Add Flash Animation to a Slide . . . 261
Transition from Slide to Slide . . . 263
Use Transitions Wisely . . . 263
Choose the Ideal Transition Style . . . 264
Summary . . . 267
CHAPTER 10 Use Multimedia . . . . 269
Create a Mood with Sounds and Music . . . 270
Insert Sound or Music Files . . . 270
Specify Play Settings . . . 272
Use Media Clips . . . 274
Add a CD Soundtrack . . . 276
Show Movies with Video Clips . . . 278
Record Narration . . . 282
Use Microsoft Producer . . . 284
Add Content to Producer . . . 284
Summary . . . 287
PART III Manage and Convey a Presentation CHAPTER 11 Interact with Others . . . . 291
Add Flexibility with Hyperlinks . . . 292
Create Hyperlinks . . . 292
Create an E-mail from a Slide . . . 297
Edit Hyperlinks . . . 298
Use Action Buttons to Control Navigation . . . 298
Navigate Within a Presentation . . . 299
Use Action Settings . . . 301
Move Data . . . 302
Use the Clipboard and Drag-and-Drop . . . 302
Insert OLE Objects . . . 305
Link Objects . . . 305
Manage Files . . . 306
Collaborate with Others . . . 309
Share and Send a Presentation . . . 309
Review a Presentation . . . 311
Compare and Merge a Presentation . . . 312
Collaborate Online . . . 315
Create Discussions on a Presentation . . . 315
Summary . . . 316
CHAPTER 12 Display a Presentation on the World Wide Web . . . . 317
Show Presentations on the Web . . . 318
Use PowerPoint to Create Web Pages . . . 318
Create a Viewer-Controlled Presentation . . . 319
Publish a Presentation to the Web . . . 322
Save a Presentation to an FTP Site . . . 326
Test Your Web Site . . . 327
Summary . . . 328
CHAPTER 13 Customize PowerPoint . . . . 329
Customize PowerPoint’s Options . . . 330
Use the Options Dialog Box . . . 330
Use the AutoCorrect Dialog Box . . . 336
Configure Voice Recognition . . . 337
Customize Menus . . . 338
Create Your Own Menus . . . 338
Modify Existing Menus . . . 340
Work with Shortcut Menus . . . 341
Customize Toolbars . . . 344
Manage Toolbars . . . 344
Add and Remove Toolbar Buttons . . . 345
Create a New Toolbar . . . 346
Create Toolbar Buttons . . . 348
Work with Macros . . . 350
Record a Macro . . . 351
Use a Macro . . . 352
Manage Macros . . . 354
Program with VBA . . . 355
Understand the Object Model . . . 356
Use Methods and Properties . . . 358
Use VBA in Your Presentations . . . 359
Summary . . . 367
CHAPTER 14 Prepare to Deliver Your Presentation . . . . 369
Decide on the Best Slide Format . . . 370
Print Handouts . . . 370
Use 35mm Slides . . . 370
x
How to Do Everything with Microsoft Office PowerPoint 2003
HowTo-Tght (8)/ How to Do Everything with Microsoft Office PowerPoint 2003 / Finkelstein / 222972-1 / Front Matter Color profile: Generic CMYK printer profile
Use Overhead Transparencies . . . 371
Present Directly from a Computer . . . 372
Run a Presentation on an Autorun CD . . . 372
Choose the Best Equipment . . . 375
Time Your Presentation . . . 379
Set the Timing . . . 379
Use Timing When You Present . . . 381
Set Slide Show Parameters . . . 382
Prepare Your Notes . . . 383
Create Slide Show Variations . . . 385
Create a Custom Show . . . 385
Edit a Custom Show . . . 386
Use a Custom Show . . . 386
Summary . . . 387
CHAPTER 15 Present Your Slide Show . . . . 389
Print and Use Handouts . . . 390
Send the Presentation to Microsoft Word . . . 391
Use PowerPoint Viewer . . . 393
Present a Slide Show with PowerPoint Viewer . . . 394
Learn Professional Presentation Skills . . . 395
Set Up the Room and Check Your Equipment . . . 396
Speak in Front of a Group . . . 397
Cope with Disasters . . . 398
Be Prepared When Using Computer Projection . . . 399
Control Your Presentation . . . 400
Mark Slides as You Present . . . 404
Use Hyperlinks and Action Buttons . . . 405
Summary . . . 405
xii
Acknowledgments
The creation of any book is a group enterprise, and this book is no exception. You would not be reading it without the contributions of many people. Some of the important contributions, such as the design, layout, production, and printing of the book, were made by people whose names I don't know, but I thank them anyway.First, I'd like to thank Margie McAneny, acquisitions editor, who offered me the opportunity to write this book. Margie was intimately involved with the book and answered my many questions patiently. Carolyn Welch, senior project editor, coordinated the editing and production of the book, including keeping track of zillions of figures and illustrations (and the difference between them), as well as editorial and production schedules. I don't know how you do it, but I'm glad you do. Geetesh Bajaj, a PowerPoint MVP (which means he knows a whole lot about PowerPoint), was my cheerful and competent technical editor. He came up with all sorts of good advice, which was incorporated into the book. Thanks, Geetesh!
Many people contributed presentations for this book. These presentations gave me real-world material to show you in the book’s figures and illustrations, and I greatly appreciate them.
Last, but certainly not least, I must thank my family for supporting me while I wrote. My husband, Evan, shopped, did countless washes, and dragged me away from the computer when I needed a break. My kids, Yeshayah and Eliyah, managed to put up with my being endlessly in front of the computer.
I love you!
HowTo-Tght (8)/ How to Do Everything with Microsoft Office PowerPoint 2003 / Finkelstein / 222972-1 / Front Matter Blind FolioFM:xii Color profile: Generic CMYK printer profile
Introduction
Microsoft PowerPoint 2003 is a presentation program, which means that you create presentations that you develop and show on your computer. Presentations are like slide shows, but no physical slides are necessary. While almost all computer users are familiar with word processing programs and many know what a spreadsheet is all about, many computer users have never used a presentation program.All that is changing. The use of presentation programs is increasing geometrically. While design professionals once created most presentations, presentation programs such as PowerPoint have now made it easy for anyone to create an attractive, effective presentation in a few minutes. There are enough special features—such as clip art, sound files, and animation effects—to help you create a professional-looking presentation if you want to invest a little more time.
PowerPoint is the most popular presentation program available. PowerPoint 2003, an integral part of the Microsoft Office XP suite, has been updated to provide greater ease of use and a number of new features. Here is a partial list:
■
New design templates■
Normal view as the default interface layout■
Task panes to make commonly used commands more available■
Numerous improvements in graphic capabilities, such as more flexible transparency, image rotation, image compression, a new Clip Organizer, diagrams, and the ability to save anything on your slide as a separate image file■
More new animation types, including animation along a path and a timeline■
New slide transitions■
Multiple slide masters■
Print preview■
Document recovery and password protection■
Improved web and HTML features■
Smart tags to apply formatting and layout automatically (or let you reverse the feature)■
More collaboration featuresWhether you’re a new PowerPoint user or are trying to hone your existing skills, you’ll find plenty about all of PowerPoint’s features and how to use them to get professional results.
What’s Special About This Book
How to Do Everything with Microsoft Office PowerPoint 2003covers all the features you need to make using PowerPoint easy and productive, and then goes further to explain how to make your presentations truly professional. It includes tips, shortcuts, and notes to give you the extra edge you need to create presentations that communicate. Special How To and Did You Know boxes add information beyond the usual content of a book on PowerPoint.
I have designed this book to include not only the specific features of PowerPoint 2003, but also a great deal of information about designing and presenting slide shows that deliver the message effectively. You will see information on the use of color, laying out a slide, rehearsing, and many other related topics that directly affect the success of your presentation.
Who Needs This Book
I have designed this book for beginning and intermediate users who are familiar with Microsoft Windows. If you are just starting to use PowerPoint,How to Do Everything with Microsoft Office PowerPoint 2003
explains the basics of presentation programs and brings you through the creation of your first complete presentation by Chapter 2. If you have already used PowerPoint but want to expand your skills, this book provides you with everything you need to know about PowerPoint and about creating presentations.
This book starts out with the basics and then presents the rest of PowerPoint’s many features systematically and comprehensively. If you read it from cover to cover, it will bring you to an intermediate-to-advanced level of knowledge and skill.
How This Book Is Organized
The overall organization ofHow to Do Everything with Microsoft Office PowerPoint 2003is from simple to complex, from wholeness to specifics, and from start to finish.
Chapters 1 through 4 provide you with the basics you need to use PowerPoint. By Chapter 2, you know how to create a complete presentation using the AutoContent Wizard. Chapter 2 also demonstrates how to choose a background design and start a presentation from scratch. Chapters 3 and 4 explain how to edit a presentation as well as format bullets and paragraphs.
Chapters 5 through 10 describe how to add graphics, tables, and charts to a slide, including how to work with colors, borders, fills, and 3-D effects. I explain how to include repeating elements and how to make sure that all the slides in a presentation have a unified appearance. Finally, I discuss animation, slide transition effects, and multimedia—the use of sound and video.
Chapters 11 through 15 bring your presentation out of PowerPoint and into the rest of the world where it must inevitably go. I explain how to incorporate data from other applications, how to develop a presentation collaboratively, how to display a presentation on the Internet, and how to customize PowerPoint. I end the book with two chapters detailing the actual presentation process, including how to time and rehearse your presentation, use projection equipment, and actually deliver your slide show.
How to Use This Book
If you are a beginner, you should start from the beginning and read until you have enough information to create your presentation. Try out the features as you read. If you need to create a specific presentation, start creating it from the very first chapter. As you continue reading, you can improve and refine your
presentation, using the chapters that cover the features you need.
If you have used PowerPoint before but want to improve your skills and increase your knowledge, scan the Note icons throughout the book because many of them highlight new features. You can then go directly to the chapters that contain the topics you need.
How to Contact the Author
Please contact me if you don’t understand the material in the book or find any errors. You can contact me at [email protected]. However, note that I can’t provide technical support for PowerPoint. Also, I welcome you to visit my web site at http://www.ellenfinkelstein.com.
Have Fun!
PowerPoint is great fun to use! However you use this book, enjoy the process and the satisfaction you will get from creating effective, professional presentations.
xiv
How to Do Everything with Microsoft Office PowerPoint 2003
HowTo-Tght (8)/ How to Do Everything with Microsoft Office PowerPoint 2003 / Finkelstein / 222972-1 / Front Matter Color profile: Generic CMYK printer profile
HowTo-Tght (8)/ How to Do Everything with Microsoft Office PowerPoint 2003 / Finkelstein / 222972-1 / Chapter 1 Blind Folio1:2 Color profile: Generic CMYK printer profile
Composite Default screen
How to…
■
Get your message across■
Open a presentation■
View a presentation■
Get help when you need it■
Save a presentationM
icrosoft PowerPoint is all about effective communication. PowerPoint gives you the tools you need to create a professional-quality presentation. No longer do you need to spend big bucks for a graphic artist or a slide bureau to create presentations for you. You can do it yourself. This book provides extensive coverage of PowerPoint features that will help you whether you are a beginner or an advanced user.Get Your Message Across
Microsoft PowerPoint 2003 is a presentation program. Apresentation programcreates slide shows, which you can then show on a screen or monitor directly from your computer. A PowerPoint file is called apresentation,and the individual unit of a presentation is aslide.Each slide is equivalent to a page, as shown in the slide show pictured in Figure 1-1.
PowerPoint 2003 is light-years ahead of the traditional individual 35mm slides or overhead transparencies of yesteryear. For example, you can
■
Add graphics, sound, music, animations, and short video clips to maximize your impact.■
Instantly make changes (as in any computer document).■
Animate text or other objects to emphasize your point.■
Create transition effects from one slide to another.■
Change the color scheme or background for an entire presentation or for a single slide.■
Add graphs (charts), tables, and diagrams to make your point visually and clearly.■
Create interactive and automatically looping slide shows—ideal when presenting at conventions and/or using a kiosk.■
Save your presentation in HTML format and publish it on the Internet or an intranet.■
Create an autorun CD of your presentation that can play on systems with no PowerPoint installed.The purpose of a presentation is to communicate. Of course, you can also communicate with your word processing documents. Even your spreadsheets communicate something from their numbers. But in a presentation, the process of conveying the message is the point. You use
4
How to Do Everything with Microsoft Office PowerPoint 2003
HowTo-Tght (8)/ How to Do Everything with Microsoft Office PowerPoint 2003 / Finkelstein / 222972-1 / Chapter 1 Color profile: Generic CMYK printer profile
words, art, shapes, color, sound, and special effects to maximize the effectiveness of your message. It’s calledmultimedia,and it’s a hot, growing field. You may have never used multimedia tools before, but with PowerPoint, you easily get professional results. And with a little practice, you will soon be creating exciting, compelling presentations.
Because it is now so easy to create great presentations, the number of PowerPoint users has skyrocketed in the last decade. PowerPoint presentations are everywhere, but customers, managers, and peers expect an ever-higher level of professionalism in the quality of the presentations they see.
Open a Presentation
Opening a presentation, whether new or existing, is easy using the task pane that was introduced in PowerPoint 2002. The old method hasn’t disappeared, though. The skills you learn in this
1
FIGURE 1-1 A presentation consists of a series of slides.
The Impact of Multimedia
6
How to Do Everything with Microsoft Office PowerPoint 2003
HowTo-Tght (8)/ How to Do Everything with Microsoft Office PowerPoint 2003 / Finkelstein / 222972-1 / Chapter 1
section don’t show up on your slides, but they do make your life a lot easier—and make creating your presentation a lot smoother.
Start PowerPoint
The first step is to open PowerPoint. An easy way to open PowerPoint is to double-click a desktop shortcut. If you don’t already have a desktop shortcut for PowerPoint, here’s how to create one:
1. Go to Start | (All) Programs | Microsoft Office and highlight Microsoft PowerPoint (without clicking it).
2. Right-click Microsoft PowerPoint, and choose Copy.
3. Right-click on the desktop and choose Paste.
4. Double-click the shortcut to open PowerPoint.
Of course, if you don’t like shortcuts, you can open the PowerPoint icon by selecting Start | Programs | Microsoft Office | Microsoft PowerPoint.
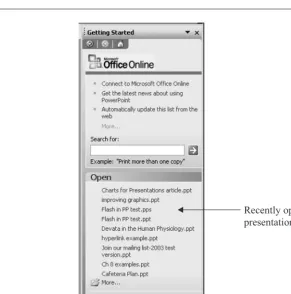
Use the Getting Started Task Pane
Once you have opened PowerPoint, you see the Getting Started task pane shown in Figure 1-2, which segues you to the world of PowerPoint. The Getting Started task pane is one of several task panes that help you complete tasks more easily.
The Getting Started task pane is new for PowerPoint 2003.
The Getting Started task pane has the following features:
■
To open an existing presentation that you have recently used, click its name beneath the Open list.■
To start a new presentation, click Create a New Presentation.■
To find templates on Microsoft’s web site, click Templates on Microsoft.com.Click More under the Open list to display the Open dialog box, discussed in the next section. You can use the top portion of the Getting Started task pane to search for information and news on Microsoft’s web site.
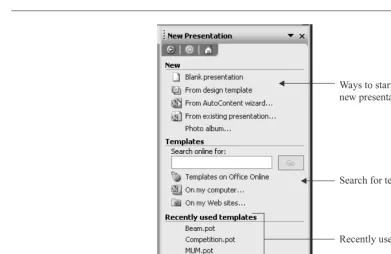
When you click Create a New Presentation, the New Presentation task pane appears, shown in Figure 1-3. The New Presentation task pane has tools for creating a new presentation, as its name suggests.
The New Presentation pane lists five ways to start a new presentation:
■
Choose Blank Presentation to start from scratch.1
■
Choose From Design Template to select one of PowerPoint’s many backgrounds (templates). You can then start creating your presentation.■
Choose From AutoContent Wizard to get assistance in organizing the content, that is, the text of your presentation.■
Choose From Existing Presentation section to choose an existing presentation and then use it to create a new presentation file. This method is similar to opening an existing presentation and choosing File | Save As.■
Choose Photo Album to create a presentation made up of photos or other graphics. (See Chapter 5 for details.) [image:23.612.157.448.93.387.2]These options are covered in detail in Chapter 2, where you learn how to create a new presentation.
FIGURE 1-2 The Getting Started task pane offers a simple way to open a presentation.
Recently opened presentations
8
How to Do Everything with Microsoft Office PowerPoint 2003
HowTo-Tght (8)/ How to Do Everything with Microsoft Office PowerPoint 2003 / Finkelstein / 222972-1 / Chapter 1
When you’re done with the task pane, click the Close box if you need the space to see your presentation. See “Use the Task Panes” later in this chapter for more information on task panes.
Use the Open Dialog Box
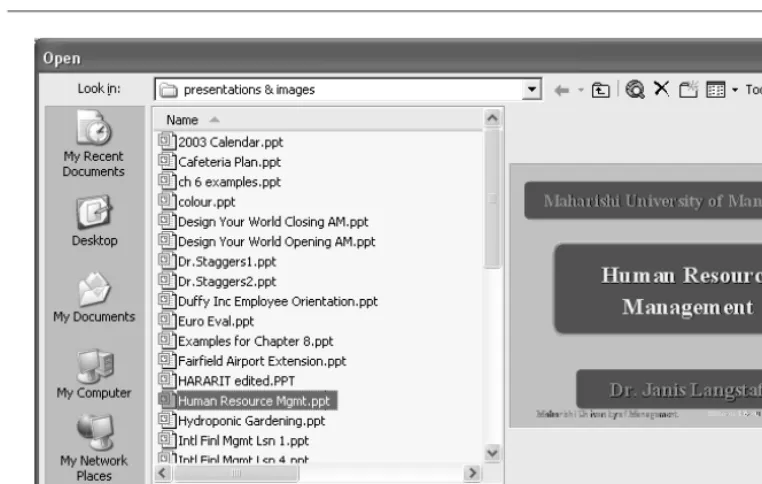
Another way to open an existing presentation is to click the Open button, shown here, to display the Open dialog box, shown in Figure 1-4 using the Preview view. Locate your presentation in the Look In drop-down list box, click the presentation, and click Open. Your presentation opens, displaying the last saved slide and view so you can pick up right where you left off.
Use the Places Bar for Document Management
Down the left side of the Open dialog box are five buttons that can help you find presentations and supporting files more quickly. Together, these buttons are called theplaces bar.The following list describes each button:
[image:24.612.73.465.91.345.2]■
My Recent Documents This button shows the most recently opened presentations. The History list is composed of shortcuts from the Recent subfolder, which is a subfolder in your Windows folder. If you keep presentations and supporting files allFIGURE 1-3 Use the New Presentation task pane when you want to create a new presentation.
Ways to start a new presentation
Search for templates
Recently used templates Color profile: Generic CMYK printer profile
1
over your hard disk, the History button can be a savior when you’re trying to find a file fast. Don’t forget that the Home task pane also lists your most recently used presentations. It doesn’t show as many, but if you can find a presentation there, you can skip the entire step of using the Open dialog box.
■
Desktop Click Desktop to display the shortcuts and files you have placed on your desktop. Some users keep shortcuts to their current projects on their desktop so they can open them immediately with a double-click.■
My Documents This button shows you the contents of the My Documents folder. In this folder, you can collect the documents you are currently using for easy access. When you first open PowerPoint, My Documents is the default folder for opening and saving presentations. Unlike the Recent folder, you have to purposefully save and place files in My Documents.■
My Computer The Open dialog box displays your drives so you can navigate to your presentation from any drive from there. [image:25.612.71.452.96.338.2]■
My Network Places This button shows you the contents of the network to which you are connected (if any). You can then open a presentation from the network.10
How to Do Everything with Microsoft Office PowerPoint 2003
HowTo-Tght (8)/ How to Do Everything with Microsoft Office PowerPoint 2003 / Finkelstein / 222972-1 / Chapter 1
Of course, you may organize your presentations in other locations. In that case:
1. Click the arrow to the right of the Look In drop-down list box.
2. Navigate to your presentation.
3. Click the desired presentation.
4. Choose Open.
Instead of steps 3 and 4, you can double-click the presentation to open it.
Use the Open Options
You have some hidden options for opening a presentation. Two of them are especially useful if you are working on a networked computer. To use the new Open options, click the drop-down arrow next to the Open button. You have the following options:
■
Open Read-Only This option opens a presentation but doesn’t allow you to make any changes. However, you can choose File | Save As to save the presentation under another name or in another location. Use this option when you are working on a network and someone else is currently working on the same presentation.■
Open As Copy This option creates a duplicate of the presentation you choose in the same folder as the original and opens the duplicate. You can then make any changes you need.■
Open In Browser With this option, you can open a presentation saved in HTML format in your web browser.Customize the Default File Location
If you often work from one folder, you may wish to make it the default folder for the Open and Save dialog boxes. No longer will you have to navigate to your presentations and other files on your hard disk or network. Whenever you want to open or save a presentation, your preferred folder will be active in the dialog box.
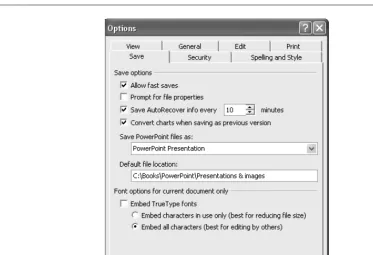
To set the default folder, choose Tools | Options, and click the Save tab, shown in Figure 1-5. In the Default File Location text box, type the path for the default folder you want. For example, typec:\presentations. Click OK.
Use a Presentation from the McGraw-Hill/Osborne Web Site
If you would like to practice the skills in this chapter but don’t have a presentation to work with, you can download a sample presentation from the McGraw-Hill/Osborne web site. Agentha.ppt
1
is a simple presentation (about the advantages of investing in a fictional location) that you can easily work with. Go to http://www.osborne.com and click the Free Code link.
View a Presentation
Understanding PowerPoint’s window and views helps you accomplish all your tasks more quickly. If you are familiar with PowerPoint 2002, you will feel comfortable immediately. If you have just upgraded from an earlier version, you will find some significant changes.
Look at the Screen
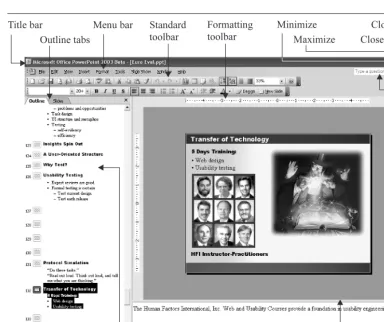
[image:27.612.81.455.97.352.2]Figure 1-6 shows the PowerPoint screen and its elements. To understand the elements in this figure, refer to the bulleted list that follows the figure.
■
The title bar tells you that you are in PowerPoint and displays the name of your presentation.■
The menu bar contains the commands you give PowerPoint.■
The Standard toolbar contains many of the most often used commands.■
The Formatting toolbar contains mostly common commands for formatting text.■
The application Minimize button allows you to reduce the application window to a button on the Windows taskbar.■
The application Maximize button allows you to make the application window smaller. Click it again to make the application window fill the entire screen.■
The application Close button allows you to close both the presentation and PowerPoint.12
How to Do Everything with Microsoft Office PowerPoint 2003
[image:28.612.77.462.89.411.2]HowTo-Tght (8)/ How to Do Everything with Microsoft Office PowerPoint 2003 / Finkelstein / 222972-1 / Chapter 1
FIGURE 1-6 The PowerPoint screen. The Standard and Formatting toolbars have been placed on two separate rows so you can see them completely.
Title bar Menu bar Standard
toolbar
Formatting toolbar
Minimize
Maximize Close application Close presentation Slide pane Scroll bar Previous Slide Next Slide Notes pane Drawing toolbar View buttons Outline pane Outline tabs Status bar Help Color profile: Generic CMYK printer profile
■
The presentation Close button closes the presentation but not PowerPoint.■
The Type a Question For Help text box allows you to type a question to find help.■
The ruler helps you lay out your slide with precision and format text, especially bulleted text.■
The Slide pane shows the current slide.■
The scroll bars let you move backward and forward through your presentation.■
The Previous Slide button allows you to move to the previous slide.■
The Next Slide button allows you to move to the next slide.■
The Notes pane shows speaker notes that you have created.■
The status bar tells you which number slide is displayed, as well as the total number of slides, such as Slide 24 of 31. The status bar also displays the name of thedesign template, or background.■
The Drawing toolbar contains commands for creating and editing graphics.■
View buttons let you change views. Views are covered later in this chapter in the “Use the Appropriate View” section.■
The Outline pane shows your bulleted text or thumbnails of your slides.The Outline pane has two tabs. The Outline tab displays the text on your slide and is a good way to organize the text content of your presentation. The Slides tab displays thumbnails of your slides so you can quickly find the slide you want.
Get the Most out of the Toolbars and Menus
You use the toolbars and menus to tell PowerPoint what you want to do with your presentation. When you first open PowerPoint, the Standard and Formatting toolbars are on the same row. Some of the buttons may not have room to be displayed. You can click the down arrow at the right of each toolbar to find them. A subtlegrab barat the left side of each toolbar enables you to drag the toolbar to a new location.
If you put the Formatting toolbar on its own row, beneath the Standard toolbar, you can see most, if not all, the buttons. You lose only a little real estate on your screen.
You can customize the toolbars any way you like. For further options, see Chapter 14. The buttons on the toolbars are discussed elsewhere in this book, in their appropriate chapters. For now, you just need to know these two simple features to make you a toolbar pro:
■
Adding or removing toolbar buttons■
Displaying toolbarsAdd or Remove Toolbar Buttons
Follow these steps to add or remove toolbar buttons. To add other buttons or create your own toolbars, see Chapter 14.
1. Click the down arrow at the right side of the toolbar. (The ToolTip says Toolbar Options.)
2. Move the mouse over the Add or Remove Buttons command, then over the name of the toolbar. A list of possible buttons drops down. Buttons currently displayed are checked. At the bottom of the list are other common buttons for that toolbar.
3. Click the button you want to add or remove.
4. Click anywhere off the toolbar to close the button list.
Display Toolbars
PowerPoint has additional toolbars that you can use. To display one or more of these toolbars, just right-click any visible toolbar to reveal a flyout menu with a list of toolbars.
To display a toolbar, click any unchecked toolbar on the list. To hide a toolbar, click any checked toolbar. These toolbars are discussed throughout the book wherever they apply.
Use the Appropriate View
PowerPoint offers three ways to view a presentation. You choose a view based on what you are doing. Using the appropriate view provides the frictionless flow you need to get your work done.
14
How to Do Everything with Microsoft Office PowerPoint 2003
HowTo-Tght (8)/ How to Do Everything with PowerPoint 2003 / Finkelstein / 222972-1 / Chapter 1 Color profile: Generic CMYK printer profile
Most commonly, you change views using the buttons at the bottom-left corner of your screen, just above the Drawing toolbar and the status bar. The view buttons are shown here:
If you are upgrading from PowerPoint 2000 or earlier, you’ll notice that Slide view and Outline view are gone. Normal view takes their place.
If you want, you can choose a view from the View menu.
Use Normal View
Normal view, shown in Figure 1-7, combines a large view of an individual slide, speaker notes beneath the slide, and your choice of an outline of the text of the presentation or thumbnail
1
Slide Show Slide Sorter
Normal
images of the slides along the left side of the screen. Each section of the view is called apane. Each pane has a scroll bar if it cannot display all the material so you can scroll to any part of the presentation.
Text created in a text box is not included in the text outline. It is treated as a graphic object. See Chapter 2 for details.
Use Normal view when you are creating or editing a slide, organizing and writing text, or creating notes for the presenter to refer to when showing the presentation—which is most of the time!
You can resize any of the panes in Normal view. Place the mouse over a pane border, then click and drag in either direction. For example, if you are working with the outline, make the Outline pane wider.
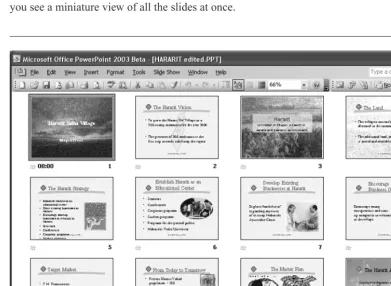
Use Slide Sorter View
Slide Sorter view is quite different from Normal view. In Slide Sorter view, shown in Figure 1-8, you see a miniature view of all the slides at once.
16
How to Do Everything with Microsoft Office PowerPoint 2003
[image:32.612.75.466.311.597.2]HowTo-Tght (8)/ How to Do Everything with PowerPoint 2003 / Finkelstein / 222972-1 / Chapter 1
FIGURE 1-8 Slide Sorter view
Slide Sorter view is great when adding, deleting, and changing the order of your slides. You can also add timing and transition effects from one slide to the next. Therefore, when you switch to Slide Sorter view, PowerPoint displays a different Formatting toolbar, showing slide transitions, animation effects, etc.
To quickly switch from Slider Sorter view to Normal view, double-click any slide.
For details on adding, deleting, and moving slides, see Chapter 3. Transitions and animation are covered in Chapter 9, and timing is explained in Chapter 15.
Use Slide Show View
Slide Show view lets you look at your presentation like you would see it during an actual show. As you can see in Figure 1-9, the slide takes up the entire screen.
Here’s where you get to see the results of all your labor! Use Slide Show view to evaluate the results of your work and rehearse what you are going to say. Of course, you also use Slide Show view when you actually deliver your presentation in front of an audience. Preparing for a presentation is the subject of Chapter 15, but here are the basic techniques for moving around in Slide Show view. It is important to know these techniques because there are no menus, toolbars, or other obvious navigation tools.
■
PressESCto leave Slide Show view and return to your last view.■
Click the mouse to move to the next slide (or the next animation effect). When you click the last slide, you see a black screen. Click again to automatically return to your last view.1
■
Click the icons at the lower-left corner or right-click to open the pop-up menu. These menus let you navigate to other slides, take notes or minutes, mark on the slide (temporarily) with an electronic pen as you present, change how the pointer looks and works, black out the slide, and end the show.Use Notes Page View
To enter Notes Page view you need to use the menu; choose View | Notes Page. It’s helpful to print out notes to use for reference while presenting. Chapter 16 gives details on printing notes and handouts. Each page contains one slide and the speaker’s notes for that slide. Figure 1-10 shows a slide in Notes Page view.
18
How to Do Everything with Microsoft Office PowerPoint 2003
HowTo-Tght (8)/ How to Do Everything with Microsoft Office PowerPoint 2003 / Finkelstein / 222972-1 / Chapter 1
FIGURE 1-10 Notes Page view
1
Notes are designed to support you as you present. However, you can also use them to write notes to yourself as you create your presentation or to include comments on the presentation for your boss, colleagues, or clients. Use your imagination, and you’ll find many uses for notes in your presentations.
Move Around a Presentation
Quick navigation through a presentation is always the hallmark of a pro. Here are some techniques:
■
To move to a different slide, simply click the slide if it is visible, either in Slide Show view or on the thumbnail view of the Outline pane. You can also click the slide number in the Outline view of the Outline pane.■
Use the scroll bar in any pane. For example, to scroll through slides, use the Slide pane scroll bar. As you drag the scroll bar, a ToolTip tells you which slide you’re up to. Stop when you reach the one you want.■
Use the Previous Slide and Next Slide buttons. (See Figure 1-6 earlier in this chapter.)■
PressCTRL-HOMEto move to the beginning of the presentation andCTRL-ENDto move to the end of the presentation.Use the Task Panes
Task panes, introduced in PowerPoint 2002, place a set of commands and options in one location to help you accomplish certain tasks more easily. PowerPoint 2003 has 16 task panes, several of them new for PowerPoint 2003. Although the pre-2002 dialog boxes and menu commands still exist, once you get used to the task panes, you’ll usually find them more convenient.
Choose View | Task Pane to open a task pane. The task pane you last used appears. To change the task pane, use the down arrow at the upper-right corner and choose a task pane from the list. The individual task panes are discussed throughout this book as their tasks are covered.
If your screen is big enough, you can drag the pane to the right of the PowerPoint window and keep it open all the time.
Get Help When You Need It
No matter how familiar you are with PowerPoint, you will use the Help feature at some time or other. You can access Help in three ways. This simplest way is to use the Help text box, shown here. Click the box, type a question or a few keywords, and pressENTER.
To customize how the assistant works, click it, and click Options. To turn off the assistant completely, clear Use the Office Assistant. Select the same box to turn the assistant back on.
Finally, you can use the Help menu to get help. Choose Help | Microsoft PowerPoint Help, which is equivalent to pressingF1. The Microsoft PowerPoint Help task pane appears. Type a question in the Search text box and pressENTERor click the arrow button.
Whichever method you use, you get a list of related topics. Click the topic that seems most helpful, and the Help window opens.
At the bottom of the list of topics is a “Can’t Find It?” heading, where you can find a link that offers search tips and another link that takes you to the Microsoft newsgroups where you can pose your question to other PowerPoint users. A second heading, “Other Places to Look,” provides links that open the Clip Art and Research task panes and a link to Microsoft Office Support.
To close Help, click its Close button at the upper-right corner of the Help window.
Save a Presentation
You should save your presentation often as you work. As you have no doubt experienced, your computer system can crash or freeze—often destroying your most recent work. You should be especially careful to save before you print, switch to another application, or leave your computer to take a break.
PowerPoint 2003 (and all of Microsoft Office) contains a feature that helps save your work when your computer crashes. When you open PowerPoint again, the presentation is automatically displayed in a special Document Recovery task pane.
The first time you save a new presentation, PowerPoint opens the Save As dialog box so you can name your presentation. Until then, your presentation is called Presentation1 (or a higher number if you have created more than one new presentation in a session). Figure 1-11 shows the Save As dialog box.
Remember, organizing your presentations and related files such as graphic files, sounds, and so on makes it a lot easier later when you need to find them. The following steps explain how to save a presentation for the first time using the Save As dialog box.
1. Use the places bar to save your presentation in one of the standard locations. If you don’t use the places bar, click the Save In drop-down list to navigate to the desired folder.
2. Type the presentation’s name in the File Name text box.
3. To save your presentation in another format, click the Save as Type drop-down box to choose the preferred type of document.
4. Click Save.
20
How to Do Everything with Microsoft Office PowerPoint 2003
HowTo-Tght (8)/ How to Do Everything with Microsoft Office PowerPoint 2003 / Finkelstein / 222972-1 / Chapter 1 Color profile: Generic CMYK printer profile
For a discussion of the places bar, see “Use the Places bar for Document Management,” earlier in this chapter.
PowerPoint 2003 (as well as all of Office) uses the same file format as PowerPoint 2002. As a result, you will find it easy to share presentations with colleagues who have not yet upgraded.
The Save as Type drop-down list offers a number of options for saving presentations, as explained in Table 1-1.
1
FIGURE 1-11 The Save As dialog box
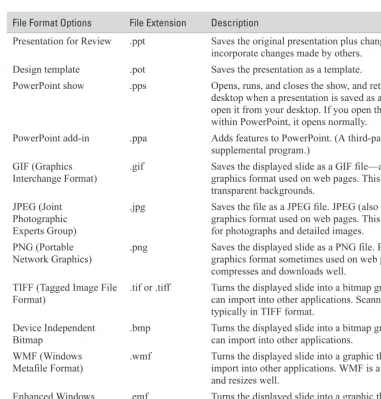
File Format Options File Extension Description
Presentation .ppt The default.
Single File Web Page .mht or .mhtml Saves an entire web site in one file.
Web page .htm or .html Lets you display your presentation on the Internet. HTML documents can be read by an Internet browser. Drawing objects are converted to GIF files.
PowerPoint 95 .ppt Saves in PowerPoint 95 format; not able to be opened in later versions.
PowerPoint 97-2003 & 95 Presentation
.ppt Saves in a format able to be opened in PowerPoint 95 and earlier versions by including both 95 and 97-2003 formats.
You also use the Save As dialog box (File | Save As) any time you want to save a copy of a presentation under a new name or in a new location. If your presentation is a read-only file, meaning that you cannot make changes to it, you also use Save As to save the file under a new name.
22
How to Do Everything with Microsoft Office PowerPoint 2003
HowTo-Tght (8)/ How to Do Everything with Microsoft Office PowerPoint 2003 / Finkelstein / 222972-1 / Chapter 1
File Format Options File Extension Description
Presentation for Review .ppt Saves the original presentation plus changes so you can incorporate changes made by others.
Design template .pot Saves the presentation as a template.
PowerPoint show .pps Opens, runs, and closes the show, and returns you to the desktop when a presentation is saved as a show and you open it from your desktop. If you open the file from within PowerPoint, it opens normally.
PowerPoint add-in .ppa Adds features to PowerPoint. (A third-party supplemental program.)
GIF (Graphics Interchange Format)
.gif Saves the displayed slide as a GIF file—a common graphics format used on web pages. This format supports transparent backgrounds.
JPEG (Joint Photographic Experts Group)
.jpg Saves the file as a JPEG file. JPEG (also called JPG) is a graphics format used on web pages. This format is best for photographs and detailed images.
PNG (Portable Network Graphics)
.png Saves the displayed slide as a PNG file. PNG is a graphics format sometimes used on web pages. It compresses and downloads well.
TIFF (Tagged Image File Format)
.tif or .tiff Turns the displayed slide into a bitmap graphic that you can import into other applications. Scanned images are typically in TIFF format.
Device Independent Bitmap
.bmp Turns the displayed slide into a bitmap graphic that you can import into other applications.
WMF (Windows Metafile Format)
.wmf Turns the displayed slide into a graphic that you can import into other applications. WMF is a vector format and resizes well.
Enhanced Windows Metafile
.emf Turns the displayed slide into a graphic that you can import into other applications. EMF is an enhanced vector format that resizes well.
Outline/Rich Text Format
[image:38.612.78.459.90.489.2].rtf Saves just the text of your presentation with most of its formatting so you can import it into a word processing (or other) application.
TABLE 1-1 File Format Options for Saving Presentations(continued)
1
After the first save, click Save on the Standard toolbar to save your presentation. PowerPoint saves only the changes you made since your last save. Saving only the changes takes less time, but the size of the file is larger.
Save So You Can Find It Fast Next Time
As you know by now, good file organization is definitely an advantage when you need to find your presentations, graphic files, text files, sounds, etc. The following tips provide efficient ways to find your presentations.
Add a Presentation to the My Documents Folder
As explained earlier in the “Use the Places Bar for Document Management” section of this chapter, you can use the My Documents folder to store files you use often. (For example, you might use your company’s logo for every presentation you create.) The next time you want to open it, you can use the My Documents button on the places bar to find it quickly.
Customize Where and How a Presentation Is Saved
By default, when you first save a presentation, the Save As dialog box opens with the My Documents folder displayed in the Save In box. If you change the location, the presentation is, of course, saved in your chosen location each time you click the Save button. However, the next time you start a new presentation in the same session (without closing PowerPoint), the Save As dialog box displays the last location you chose.
If you want the Save As dialog box to open with another folder of your choice, you can change the default file location, as explained in the section “Customize the Default File Location,” earlier in this chapter.
You can also specify a default file format for saving presentations. By default, PowerPoint saves your files as PowerPoint 2003 presentations. However, you can save your presentations in an earlier format. Choose Tools | Options, and click the Save tab. In the Save PowerPoint Files As drop-down list, choose the file format you want.
Back Up Your Presentations
No discussion of saving would be complete without explaining the importance of backing up, or archiving,your work. If you care about your work, back it up. While most computer users are accustomed to backing up files to floppy disks, many presentations are too large to fit on a disk, which holds a maximum of 1.44MB. There are many other options. Here are a few:
■
Tape drives are fairly inexpensive and are large enough to back up an entire hard disk.■
If you have a lot of presentations, a read/write CD-ROM drive lets you save your presentations to a CD-ROM.■
Optical drives have a long life and resist accidental erasure. Use them for long-term archiving, perhaps offsite.■
External portable hard drives ranging from 20 to 120 GB in storage allow quick and affordable backup.■
If you have broadband access, web storage can serve as a secondary backup.The main point is not to walk away from your computer at the end of a day without backing up your day’s work.
Summary
In this chapter, you learned the basics of PowerPoint: how to open a PowerPoint presentation, organize and find your presentations, view presentations most effectively, move around a presentation, get help, and save a presentation. In the next chapter, you get started with actually creating PowerPoint presentations.
24
How to Do Everything with Microsoft Office PowerPoint 2003
HowTo-Tght (8)/ How to Do Everything with Microsoft Office PowerPoint 2003 / Finkelstein / 222972-1 / Chapter 1 Color profile: Generic CMYK printer profile
How to…
■
Use the AutoContent Wizard■
Choose a background design■
Choose a slide layout■
Structure a presentation■
Write or import a text outline■
Use placeholders for text■
Place text in text boxes and AutoShapes■
Create fancy text effects with WordArt■
Eliminate spelling and style errors■
Create a summary slide■
Complete a presentation: tutorialA
fter learning the basics of PowerPoint in Chapter 1, you are now ready to create a great presentation. Creating a presentation involves a combination of preparing the text content and adding visual appeal. In this chapter, I explain how to structure the content of a presentation. You can also complete the quick tutorial to get a feel for the process of creating an entire presentation.Create Your Presentation
You can create a presentation in PowerPoint using four methods. Your choice should depend on how independently you want to work:
■
Use the AutoContent Wizard for professional help creating your text outline. This option provides the most support and structure. However, as you’ll see, this method still requires a good deal of work on your part to customize the presentation to your needs.■
Choose a design template to create a background. PowerPoint’s design templates include not only backgrounds, but also text styles and color schemes. For the content of the presentation, you’re on your own.■
Start with a blank presentation when you want to work from scratch and create both the text and the background yourself.■
Use an existing presentation when you want to create a presentation that resembles an existing one.The New Presentation task pane offers you these four options in the New section. Refer back to Figure 1-3 in Chapter 1 for an explanation of this task pane.
26
How to Do Everything with Microsoft Office PowerPoint 2003
HowTo-Tght (8)/ How to Do Everything with Microsoft Office PowerPoint 2003 / Finkelstein / 222972-1 / Chapter 2
Use the AutoContent Wizard
The AutoContent Wizard cannot divine exactly what you need to say. Rather, it provides a general structure and suggested topics. Most professionals ignore it because, in most cases, a presentation needs to be designed individually, rather than from canned content. Rarely can the AutoContent presentations even come close to fulfilling your needs.
Then when should you use the AutoContent Wizard? The answer is when your needs loosely match one of the presentations and/or you need a presentation on very short notice. Or you may be the type of person who needs help organizing your ideas. Finally, you can use it as a learning tool, a training exercise to help you ask the right questions and clarify how to unfold a mature PowerPoint presentation. The complete presentations included with PowerPoint’s AutoContent Wizard have been created by professionals to thoroughly cover a topic. You just need to replace the text with the specifics applicable to your situation. PowerPoint offers the following topics:
■
General Generic, Recommending a Strategy, Communicating Bad News, Training, Brainstorming Session, and Certificate■
Corporate Business Plan, Financial Overview, Company Meeting, Employee Orientation, Group Home Page, and Company Handbook■
Projects Project Overview, Reporting Progress or Status, and Project Post-Mortem■
Sales/Marketing Selling a Product or Service, Marketing Plan, and Product/Services OverviewTo start, click AutoContent Wizard in the New Presentation task pane to open the title screen of the wizard. Click Next. On the next screen of the wizard, choose a presentation type and a specific topic. Click Next. Here you see the topics available for the Corporate type of presentation.
Click Add to add an existing presentation to the list. You can use this feature to place in the AutoContent Wizard boilerplate presentations or presentation outlines that you use often. Click Remove to remove presentations that you know you will never use.
The next screen asks you for the type of output, as you see here. Choose how you will display the presentation to your audience to get the right size and format. Then click Next.
The next screen offers you some specific options for creating the presentation, as shown here. Enter a title for the entire presentation and any information that you want to appear on each slide. You can change any of these options later.
PowerPoint creates an entire presentation once you click Finish. In Figure 2-1, you see a complete presentation created with the AutoContent Wizard. The title slide has been customized to suit the company’s needs.
Look at the outline in the Outline pane in Figure 2-1. It covers all the topics most companies need for an employee orientation but includes no specifics. Once you have created a presentation with the AutoContent Wizard, you need to edit the text for your specific situation and needs. (Chapter 3 covers editing text.) Nevertheless, it is a complete slide show with text and background, and may include other features such as footnotes, animation, etc. The slide show in Figure 2-1
28
How to Do Everything with Microsoft Office PowerPoint 2003
HowTo-Tght (8)/ How to Do Everything with Microsoft Office PowerPoint 2003 / Finkelstein / 222972-1 / Chapter 2
includes today’s date and the slide number at the bottom of each slide. In addition, transitions and animation have been added to the slides. (Chapter 9 covers transitions and animation.) You can use the information in the rest of this book to finalize the presentation.
For creating a complete presentation quickly, there’s nothing like the AutoContent Wizard. However, you will always need to customize your content.
Choose a Background Design
Let’s say that you don’t need any help with the text. You know exactly what you want to say and may already have prepared an outline. (Outlines are covered in the “Structure a Presentation from an Outline” section, later in this chapter.) In this case, choose a design template to create a new presentation.
To create a presentation from a design template, choose From Design Template in the New Presentation task pane and click OK. The task pane automatically switches to show you the
2
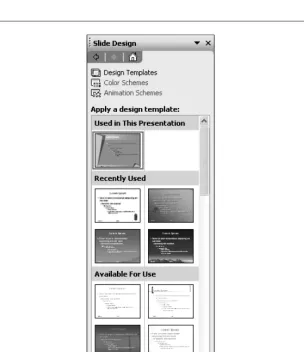
Slide Design task pane, displaying currently used, recently used, and available design templates, as shown in Figure 2-2.
Since PowerPoint 2002, you can use as many design templates as you wish, by applying any design template to selected slides only. However, don’t go overboard! Stick to one or two design templates.
Use the scroll bar to view all the design templates until you find one you like. As you pass your mouse over a template preview, a down arrow appears. Click the arrow and choose one of the options:
■
Apply to Master Appears as an option only if you have more than one design template in your presentation. Select a slide and choose this option to apply the design template to all the slides using the design template of the selected slide. See Chapter 7 for a full explanation of masters.■
Apply to All Slides Applies the design template to all existing slides in the presentation. If all your slides use one template, you can simply click the desired template to apply it to all the slides.30
How to Do Everything with Microsoft Office PowerPoint 2003
HowTo-Tght (8)/ How to Do Everything with Microsoft Office PowerPoint 2003 / Finkelstein / 222972-1 / Chapter 2
The Importance of Design Templates
Design templatesare backgrounds for your slides. Abackgroundcomprises both a colored background and design elements that appear on every slide. The template also includes other features such as a color scheme, bullet design, specific fonts, and font sizes. You can also add text animation to the template. Using a design template creates a unified look for your entire presentation.
Many new templates are available from the Templates Web site. To find them, scroll down to the bottom of the templates in the Slide Design–Design Templates task pane and click the Design Templates on Microsoft.com link.
The truth is that if you hire outside professionals to make a slide show for you, they always create a background design from scratch. However, you can often find an appropriate design template that will give your presentation a professional look. Your choice of design template has a powerful effect on the impact of your presentation.Chapters 5, 6, and 7 are packed with helpful information and tips on graphic layout, color, and visual effects that can help you decide the best design template to use. Refer to Chapter 7 for details on creating your own design template.
■
Apply to Selected Slides Applies the design template to a selected slide or group of slides. You can select one or more slides in the Outline pane. If you are working in the Slide pane, the displayed slide is selected.■
Show Large Previews Increases the size of the thumbnail previews so you can see them better.Use the Slides tab in the Outline pane to check the results when you are applying a design template to slides. You can quickly see which slides are affected by the change.
[image:47.612.148.452.219.571.2]2
32
How to Do Everything with Microsoft Office PowerPoint 2003
HowTo-Tght (8)/ How to Do Everything with Microsoft Office PowerPoint 2003 / Finkelstein / 222972-1 / Chapter 2
Start from Scratch
The third method of creating a new presentation is to start with a blank presentation. Choose Blank Presentation from the New section of the New Presentation task pane.
The main reason to start with a blank presentation is to create your own background design rather than use one of PowerPoint’s design templates. Once you have created a design, creating a presentation from scratch is no different from using a design template. However, you can attach one of PowerPoint’s design templates to your presentation at any time, using the Slide Design task pane as explained previously. Chapter 7 outlines the steps for creating your own design template.
The blank presentation comes with a number of default settings, such as the size of the title text, the type of bullets, and the color scheme. You can change these settings if you want to customize the blank presentation template for your own needs. You might also want to add actual content, such as your company’s logo. These changes will affect all future presentations that you create using the Blank Presentation option. Here’s how:
1. Create any presentation with the settings and/or content that you want.
2. Choose File | Save As.
3. In the Save as Type drop-down list, choose Design Template.
4. In the File Name box, typeBlank Presentation.
5. Click Save.
6. Click Yes in the confirmation message box that PowerPoint displays.
Start a New Presentation from an Existing One
The fourth way to start a new presentation is to base it on an existing presentation. Follow these steps:
1. Click From Existing Presentation in the New Presentation task pane.
2. In the New from Existing Presentation dialog box, choose the presentation you want to use as the basis for your new presentation.
3. Click Create New.
You now have a new, unnamed presentation that is an exact duplicate of the original presentation. If you find yourself in slide master view, click Close on the Slide Master View toolbar. Save the presentation to name it.
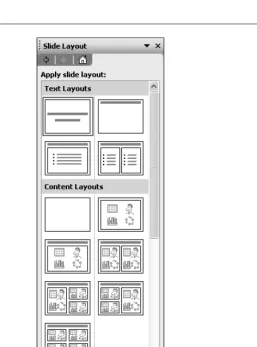
Lay Out a Slide with AutoLayouts
Once you choose a design template or start a blank presentation, PowerPoint displays one slide on the screen, usually a title slide, containing space for you to enter the title of the presentation. You can start by designing this slide with its current layout or change the layout of the slide. Also, for each new slide you create, you need to choose a layout. Alayout—or AutoLayout— specifies how the text, graphics, or other elements are laid out on the slide. PowerPoint comes