TE
AM
FL
Y
Microsoft
®
Complete Reference/ Microsoft Office Access 2003: TCR / Anderson / 222917-9 Blind Folioii
About the Author
Virginia Andersenbecame a writer and consultant after retiring from her defense contracting career. Since then, she has written over 35 books about personal-computer-based applications, including database management, word processing, and spreadsheet analysis. Virginia spent nearly 15 years teaching computer science, mathematics and systems analysis at the graduate and undergraduate levels at several southern California universities. During her years as a programmer/systems analyst, Virginia used computers for many diverse projects, including lunar mapping for the Apollo astronauts’ landing, reliability engineering, undersea surveillance, weapon system simulation, and naval communications. She has also recently published her memoirs, “Digital Recall: Computers Aren’t the Only Ones with Memory” describing many of these hands-on experiences.
Complete Reference/ Microsoft Office Access 2003: TCR / Anderson / 222917-9 Blind Folioii Color profile: Generic CMYK printer profile
Microsoft
®
Office
Access 2003:
The Complete Reference
Virginia Andersen
McGraw-Hill/Osborne
McGraw-Hill/Osborne 2100 Powell Street, 10th Floor Emeryville, California 94608 U.S.A.
To arrange bulk purchase discounts for sales promotions, premiums, or fund-raisers, please contactMcGraw-Hill/Osborne at the above address. For information on translations or book distributors outside the U.S.A., please see the International Contact Information page immediately following the index of this book.
Microsoft®Office Access 2003: The Complete Reference
Copyright © 2003 by The McGraw-Hill Companies. All rights reserved. Printed in the United States of America. Except as permitted under the Copyright Act of 1976, no part of this publication may be reproduced or distributed in any form or by any means, or stored in a database or retrieval system, without the prior written permission of publisher, with the exception that the program listings may be entered, stored, and executed in a computer system, but they may not be reproduced for publication.
1234567890 DOC DOC 019876543
Book p/n 0-07-222918-7 and CD p/n 0-07-222919-5 parts of
ISBN 0-07-222917-9
Publisher
Brandon A. Nordin
Vice President & Associate Publisher Scott Rogers Acquisitions Editor Megg Morin Project Editor Elizabeth Seymour Acquisitions Coordinators Tana Allen, Athena Honore
Technical Editor
Margaret Levine Young
Copy Editor Marcia Baker
Proofreaders
Marian Selig, Susan Carlson Greene
Indexer Jack Lewis
Composition
Carie Abrew, Tara A. Davis, Lucie Ericksen
Illustrators
Kathleen Fay Edwards,
Melinda Moore Lytle, Lyssa Wald
Series Design
Peter F. Hancik, Lyssa Wald
This book was composed with Corel VENTURA™Publisher.
Information has been obtained byMcGraw-Hill/Osborne from sources believed to be reliable. However, because of the possibility of human or mechanical error by our sources,McGraw-Hill/Osborne, or others,McGraw-Hill/Osborne does not guarantee the accuracy, adequacy, or completeness of any information and is not responsible for any errors or omissions or the results obtained from the use of such information.
Complete Reference/ Microsoft Office Access 2003: TCR / Anderson / 222917-9 / Front Matter Blind FolioFM:iv Color profile: Generic CMYK printer profile
Contents at a Glance
Part I
Getting Started
1 Quick Tour of Microsoft Office Access 2003 . . . 3
2 The World of Relational Databases . . . 27
3 Creating a Database . . . 41
4 Creating and Modifying Tables . . . 57
5 Relating Tables . . . 95
6 Entering and Editing Data . . . 113
Part II
Retrieving and Presenting Information
7 Sorting, Filtering, and Printing Records . . . 1598 Extracting Information with Queries . . . 179
9 Creating Advanced Queries . . . 221
10 Creating Form and Report Designs . . . 245
11 Using the Form Wizard . . . 283
12 Customizing Forms . . . 307
13 Using the Report Wizard . . . 345
14 Customizing Reports . . . 375
Part III
Improving the Workplace
16 Customizing the Workplace . . . 437
17 Improving Database Performance . . . 461
18 Understanding Events and the Event Model . . . 481
19 Automating with Macros . . . 497
20 Customizing Menus and Toolbars . . . 525
21 Creating Custom Switchboards and Dialog Boxes . . . 553
Part IV
Sharing Data with Others
22 Exchanging Database Objects and Text . . . 58523 Exchanging Data with Outside Sources . . . 609
24 Sharing with Multiple Users . . . 629
25 Securing a Database . . . 643
A Converting to Access 2003 . . . 667
B What’s on the CD . . . 675
Index . . . 679
vi
M i c r o s o f t O f f i c e A c c e s s 2 0 0 3 : T h e C o m p l e t e R e f e r e n c eComplete Reference/ Microsoft Office Access 2003: TCR / Anderson / 222917-9 / Front Matter Color profile: Generic CMYK printer profile
Contents
Acknowledgments . . . xxiii
Introduction . . . xxv
Part I
Getting Started
1 Quick Tour of Microsoft Office Access 2003 . . . . 3Starting Access and Opening a Database . . . 3
Touring the Access Window . . . 4
Opening a Database . . . 5
Touring the Database Window . . . 9
Looking at Menu Options and Toolbar Buttons . . . 12
Using Shortcut Menus . . . 14
Opening a Table . . . 15
Touring the Datasheet View . . . 16
Looking at a Subdatasheet . . . 18
Looking at Data in a Form . . . 19
Looking at the Wizards . . . 21
Getting Help . . . 21
Asking a Question . . . 22
Using the Microsoft Access Help Task Pane . . . 23
Asking the Office Assistant . . . 25
Asking What’s This? . . . 26
Getting Help with What You’re Doing . . . 26
2 The World of Relational Databases . . . . 27
What Is a Relational Database? . . . 27
Purpose of Relationships . . . 28
Types of Relationships . . . 29
Referential Integrity . . . 30
Defining Database Objects . . . 32
Inspecting the Sample Database . . . 33
Looking at the Data Distribution . . . 33
Viewing Table Relationships . . . 34
The Payoff . . . 36
A Custom Form . . . 36
A Custom Report . . . 38
Summary . . . 39
3 Creating a Database . . . . 41
Designing the Database . . . 41
Introducing Home Tech Repair . . . 42
Determining Goals of the Database . . . 42
Distributing the Data . . . 42
Specifying Key Fields and Relationships . . . 46
Completing the Database . . . 47
Using the Database Wizard . . . 48
Previewing the Database Templates . . . 48
Stepping Through the Wizard . . . 49
Running the New Application . . . 53
Starting with a Blank Database . . . 55
Summary . . . 56
4 Creating and Modifying Tables . . . . 57
Creating a New Table Structure with the Table Wizard . . . 57
Adding Fields . . . 58
Setting the Primary Key . . . 59
Relating to Existing Tables . . . 61
Creating a New Table from Scratch . . . 63
Touring the Table Design View . . . 63
Adding Fields . . . 63
Choosing a Primary Key . . . 75
Creating Other Indexes . . . 77
Saving the Table Design . . . 78
viii
M i c r o s o f t O f f i c e A c c e s s 2 0 0 3 : T h e C o m p l e t e R e f e r e n c eComplete Reference/ Microsoft Office Access 2003: TCR / Anderson / 222917-9 / Front Matter Color profile: Generic CMYK printer profile
Modifying the Table Design . . . 79
Switching Table Views . . . 79
Adding/Deleting Fields . . . 80
Changing the Field Order . . . 81
Changing a Field Name or Type . . . 81
Changing a Field Size . . . 83
Modifying or Deleting the Primary Key . . . 83
Ensuring Data Validity . . . 84
Defining Field Validation Rules . . . 85
Defining a Record Validation Rule . . . 87
Requiring an Entry and Preventing Duplicates . . . 88
Handling Blank Fields . . . 88
Assigning a Default Value . . . 89
Copying an Existing Table Structure . . . 91
Setting Table Properties . . . 92
How to Change the Default Table Design Properties . . . 92
Summary . . . 93
5 Relating Tables . . . . 95
Defining a Relationship . . . 95
Ready-Made Relationships . . . 96
Using the Relationships Window . . . 96
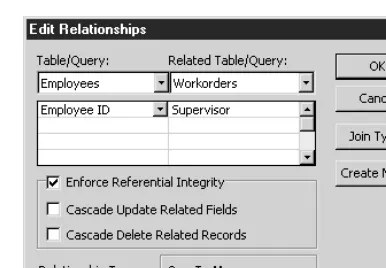
Viewing and Editing Relationships . . . 106
Viewing Existing Relationships . . . 107
Modifying or Deleting a Relationship . . . 107
Changing a Table Design from the Relationships Window . . 108
Printing the Relationships . . . 109
Summary . . . 110
6 Entering and Editing Data . . . . 113
Entering New Data . . . 113
Copying and Moving Data . . . 115
Inserting Pictures . . . 118
Inserting Hyperlinks . . . 120
Customizing Data Entry . . . 125
Adding Custom Input Masks . . . 125
Changing the Datasheet Appearance . . . 135
Displaying Subdatasheets . . . 136
Moving and Resizing Columns and Rows . . . 137
Freezing and Hiding Columns . . . 139
Changing the Font . . . 141
Changing Grid Lines and Cell Appearance . . . 141
Setting Datasheet Default Options . . . 143
Changing Table Definition in Datasheet View . . . 144
Inserting a Subdatasheet . . . 144
Inserting/Deleting a Column . . . 145
Changing Field Names . . . 146
Editing Record Data . . . 146
Selecting Records and Fields . . . 146
Locating Records . . . 147
Finding and Replacing Data . . . 151
Deleting Data . . . 153
Using the Spelling Checker and AutoCorrect . . . 153
Printing Table Data . . . 154
Summary . . . 155
Part II
Retrieving and Presenting Information
7 Sorting, Filtering, and Printing Records . . . . 159Sorting Records . . . 159
Sorting on a Single Field . . . 159
Sorting by Two or More Fields . . . 161
Saving the Sort Order . . . 162
Filtering Records . . . 162
Filtering By Selection . . . 163
Using an Exclusion Filter . . . 165
Filtering By Form . . . 165
Optimizing Filter By Form . . . 172
Filtering For . . . 173
Filtering with Advanced Filter/Sort . . . 174
Modifying a Filter . . . 175
Saving a Filter . . . 175
Removing and Deleting Filters . . . 176
x
M i c r o s o f t O f f i c e A c c e s s 2 0 0 3 : T h e C o m p l e t e R e f e r e n c eComplete Reference/ Microsoft Office Access 2003: TCR / Anderson / 222917-9 / Front Matter Color profile: Generic CMYK printer profile
Composite Default screen
TE
AM
FL
Y
Printing Table Data . . . 177
Summary . . . 178
8 Extracting Information with Queries . . . . 179
How Do Queries Work? . . . 179
Access Query Categories . . . 180
When to Use a Filter and When to Use a Query . . . 180
Creating Select Queries . . . 182
Using the Simple Query Wizard . . . 182
Touring the Query Design Window . . . 184
Without the Wizard . . . 187
Relating Multiple Tables in a Query . . . 189
Adding/Removing Fields . . . 191
Running and Saving the Query . . . 192
Hiding/Showing Fields . . . 194
Specifying the Record Order . . . 194
Showing Highest or Lowest Values . . . 195
Adding Selection Criteria . . . 196
Using Wildcards and Operators . . . 197
Using a Single Criterion . . . 199
Using Multiple Criteria . . . 200
Getting Help from the Expression Builder . . . 202
Handling Blank Fields . . . 204
Setting Query Properties . . . 204
Modifying a Query . . . 205
Inserting a Field and Changing the Field Order . . . 205
Changing Field Properties . . . 205
Performing Calculations in a Query . . . 207
Adding a Calculated Field . . . 207
Summarizing with the Wizard . . . 209
Summarizing with Aggregate Functions . . . 210
Creating Special Queries with the Query Wizard . . . 214
Creating a Find Duplicates Query . . . 214
Creating a Find Unmatched Query . . . 215
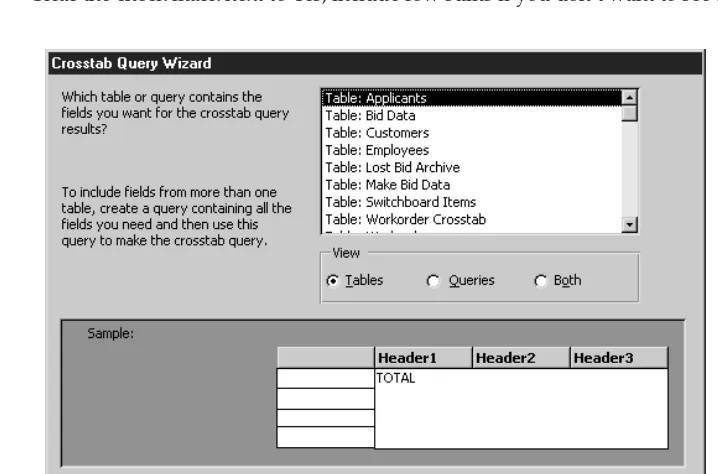
Creating a Crosstab Query . . . 216
Printing the Query Results . . . 219
Deleting a Query . . . 220
9 Creating Advanced Queries . . . . 221
Creating Special Purpose Queries . . . 221
Parameter Queries . . . 221
AutoLookup Queries . . . 225
Designing Action Queries . . . 226
Update Query . . . 227
Append Query . . . 231
Delete Query . . . 233
Make-Table Query . . . 234
Introducing Structured Query Language . . . 236
Looking at SQL Statements . . . 236
SQL Conventions and Syntax . . . 238
Creating a Subquery . . . 241
Defining a Criterion . . . 241
Defining a New Field . . . 242
Summary . . . 243
10 Creating Form and Report Designs . . . . 245
Deciding Which Database Object . . . 245
Describing the Common Design Elements . . . 246
Choosing a Record Source . . . 246
Understanding Controls . . . 246
Form and Report Design Properties . . . 247
Working in the Design Window . . . 249
Touring the Form Design Window . . . 249
Starting a New Design . . . 254
Adding Controls . . . 255
Modifying Controls . . . 261
Selecting Controls and Other Objects . . . 261
Moving and Resizing Controls . . . 263
Aligning and Spacing Controls . . . 265
Using Property Sheets . . . 266
Using the Formatting Toolbar . . . 269
Formatting Conditionally . . . 270
Changing a Control Type . . . 272
Deleting Controls . . . 273
Adding Other Objects and Special Effects . . . 273
Linking vs. Inserting Objects . . . 273
xii
M i c r o s o f t O f f i c e A c c e s s 2 0 0 3 : T h e C o m p l e t e R e f e r e n c eComplete Reference/ Microsoft Office Access 2003: TCR / Anderson / 222917-9 / Front Matter Color profile: Generic CMYK printer profile
Adding Bound Objects . . . 274
Adding an Unbound Object . . . 274
Adding a Picture . . . 275
Changing Form and Report Properties . . . 277
Changing the Record Source . . . 277
Applying Filters and Sort Orders . . . 278
Resizing a Form or Report . . . 278
Using AutoFormat . . . 279
Adding a Background Picture . . . 280
Adding a New Object to a Group . . . 281
Summary . . . 282
11 Using the Form Wizard . . . . 283
Creating a New Form Design . . . 283
Designing the Form . . . 283
Starting a New Form . . . 285
Choosing an AutoForm . . . 286
Selecting the Form Data . . . 287
Choosing the Form Layout and Style . . . 289
Modifying the Form Design . . . 291
Looking at Some of the Form Properties . . . 291
Changing Form Sections . . . 292
Moving and Adding Controls . . . 294
Sorting and Filtering Data in a Form . . . 297
Using the Form for Data Entry . . . 298
Sizing the Form . . . 299
Navigating in the Form . . . 299
Changing the Tab Order . . . 300
Locating Records . . . 302
Viewing Multiple Records . . . 302
Printing the Form . . . 303
Looking at the Other Wizards . . . 303
Creating a Hierarchical Form from Related Tables . . . 304
Summary . . . 306
12 Customizing Forms . . . . 307
Starting a New Custom Form . . . 307
Adding Yes/No Controls . . . 312
Adding User-Interactive Controls . . . 315
Creating a Multiple-Page Form . . . 320
Using the Page Break Control . . . 320
Adding a Tab Control . . . 321
Customizing a Tab Control . . . 323
Adding Special Controls . . . 323
Adding Calculated Controls . . . 324
ActiveX Controls . . . 327
Introducing the Police Department Database . . . 330
Adding a Subform . . . 332
With the Subform Wizard . . . 333
Without the Subform Wizard . . . 335
Using the Hierarchical Form . . . 335
Modifying a Subform . . . 336
Linking and Synchronizing Forms . . . 337
Adding Custom Help . . . 339
Custom Control Tips . . . 340
Status Bar Messages . . . 340
Validating or Restricting Data in Forms . . . 341
Validating with Properties . . . 341
Validating with Events . . . 342
Summary . . . 343
13 Using the Report Wizard . . . . 345
Creating a New Report Design . . . 345
What Is the Purpose of the Report? . . . 345
Selecting, Sorting, and Grouping the Data . . . 346
Starting a Report . . . 348
Choosing an AutoReport . . . 349
Using the Report Wizard . . . 350
Previewing the Report . . . 358
Working in the Print Preview Window . . . 359
Using the Layout Preview . . . 361
Printing the Report . . . 362
Running Page Setup . . . 362
Modifying the Report Design . . . 364
Touring the Report Design Window . . . 364
xiv
M i c r o s o f t O f f i c e A c c e s s 2 0 0 3 : T h e C o m p l e t e R e f e r e n c eComplete Reference/ Microsoft Office Access 2003: TCR / Anderson / 222917-9 / Front Matter Color profile: Generic CMYK printer profile
Examining Report Sections . . . 364
Setting Report and Section Properties . . . 365
Placing and Adjusting Controls . . . 366
Changing the Report Style . . . 366
Adding Page Numbers and Date/Times . . . 367
Adding Page Breaks . . . 370
Saving the Report Design . . . 370
Using Report Snapshots . . . 370
Creating a Report Snapshot . . . 371
Viewing the Report Snapshot . . . 372
Sending the Report Snapshot . . . 373
Summary . . . 373
14 Customizing Reports . . . . 375
Creating a New Report Design . . . 375
Adding Headers and Footers . . . 376
Customizing with Special Controls . . . 378
Basing a Report on a Parameter Query . . . 381
Sorting and Grouping Records in a Report . . . 384
Changing the Sort Order . . . 385
Adding Group Sections . . . 385
Customizing Group Headers and Footers . . . 387
Adding Summaries and Running Totals . . . 388
Applying the Finishing Touches . . . 390
Modifying and Adding Groups . . . 390
Adding a Subreport . . . 395
Creating a Subreport Control . . . 395
Inserting an Existing Subreport . . . 397
Linking the Report and Subreport . . . 398
Modifying a Subreport Control . . . 399
Designing a Multiple-Column Report . . . 400
Grouping Records in a Multiple-Column Report . . . 401
Printing Mailing Labels and Envelopes . . . 402
Using the Label Wizard . . . 403
Manipulating Text Data . . . 405
Printing Addresses on Envelopes . . . 406
15 Creating Charts and Graphs . . . . 409
Creating a New Chart . . . 409
The Anatomy of a Chart . . . 410
Selecting the Data for the Chart . . . 413
Using the Access Chart Wizard . . . 413
Printing and Saving the Chart . . . 417
Linking to Record Data . . . 418
Adding an Existing Chart . . . 420
Modifying the Chart . . . 420
Modifying with Access . . . 420
Editing with Microsoft Graph . . . 425
Summary . . . 434
Part III
Improving the Workplace
16 Customizing the Workplace . . . . 437Personalizing the Workplace . . . 437
Rearranging Icons . . . 437
Creating a Shortcut . . . 439
Setting Workplace Options . . . 439
Setting Some Command Bar Default Options . . . 453
Creating Custom Groups . . . 455
Changing the Way Access Starts . . . 455
Modifying the Office Assistant . . . 458
Showing and Hiding . . . 458
Setting Office Assistant Options . . . 458
Choosing a Different Assistant . . . 460
Summary . . . 460
17 Improving Database Performance . . . . 461
Optimizing a Database . . . 461
Using the Analyzer Wizards . . . 461
Optimizing Tables and Queries . . . 467
Working with Linked Tables . . . 469
Optimizing Filter By Form . . . 469
Optimizing Forms and Reports . . . 469
Optimizing Controls . . . 471
Avoiding Errors . . . 472
xvi
M i c r o s o f t O f f i c e A c c e s s 2 0 0 3 : T h e C o m p l e t e R e f e r e n c eComplete Reference/ Microsoft Office Access 2003: TCR / Anderson / 222917-9 / Front Matter Color profile: Generic CMYK printer profile
Backing Up and Restoring a Database . . . 474
Compacting and Repairing a Database . . . 475
Documenting a Database . . . 477
Summary . . . 479
18 Understanding Events and the Event Model . . . . 481
What Are Events? . . . 481
Types of Events . . . 482
Understanding the Sequence of Events . . . 487
Form Control Events . . . 488
Form Record Events . . . 489
Form and Subform Events . . . 490
Keystrokes and Mouse Click Events . . . 492
Report and Report Section Events . . . 493
Setting Event Properties . . . 494
Summary . . . 495
19 Automating with Macros . . . . 497
How Do Macros Work? . . . 497
Creating a Macro . . . 498
Touring the Macro Window . . . 498
Creating a Simple Macro . . . 500
Choosing Actions . . . 501
Setting Action Arguments . . . 502
Testing and Debugging a Macro . . . 502
Starting the Macro . . . 503
Stepping Through a Macro . . . 504
Modifying a Macro . . . 504
Adding Conditions to a Macro . . . 505
Running a Macro with a Condition . . . 506
Choosing Between Two Actions . . . 506
Assigning a Macro to an Event Property . . . 507
Deciding Which Event to Use . . . 508
Some Common Uses for Macros . . . 509
Displaying a Message Box . . . 509
Validating Data . . . 510
Filtering Records . . . 511
Changing the Flow of Operations . . . 516
Nesting Macros . . . 519
Create a Macro Group . . . 520
Assigning AutoKeys . . . 520
Documenting Macros . . . 522
Creating an AutoExec Macro . . . 523
Summary . . . 523
20 Customizing Menus and Toolbars . . . . 525
Using Access Command Bars . . . 525
Showing/Hiding Built-in Toolbars . . . 527
Showing/Hiding Toolbar Buttons . . . 528
Moving/Resizing Command Bars . . . 530
Changing Menu and Toolbar Options . . . 531
Customizing Command Bars . . . 532
Creating a Global Toolbar . . . 533
Creating Custom Toolbars and Menu Bars . . . 533
Attaching a Custom Command Bar to an Object . . . 541
Specifying Global Command Bars . . . 542
Deleting a Custom Command Bar . . . 543
Modifying Command Bars . . . 543
Moving Controls . . . 545
Adding and Deleting Controls . . . 545
Modifying a Selected Control . . . 545
Restoring Built-in Command Bars . . . 551
Summary . . . 552
21 Creating Custom Switchboards and Dialog Boxes . . . . 553
Creating Switchboards . . . 553
Using the Switchboard Manager to Create Switchboards . . . 554
Modifying the Switchboard . . . 562
Creating a Switchboard from Scratch . . . 565
Copying the Button Event Procedure . . . 567
Creating a Custom Dialog Box . . . 571
Designing the Form . . . 572
Creating and Attaching the Macros . . . 575
Setting Form Properties and Style . . . 576
xviii
M i c r o s o f t O f f i c e A c c e s s 2 0 0 3 : T h e C o m p l e t e R e f e r e n c eComplete Reference/ Microsoft Office Access 2003: TCR / Anderson / 222917-9 / Front Matter Color profile: Generic CMYK printer profile
Creating a Dialog Box for User Input . . . 579
Setting the Input Form Properties . . . 580
Creating the Macros . . . 580
Modifying the Query . . . 580
Summary . . . 581
Part IV
Sharing Data with Others
22 Exchanging Database Objects and Text . . . . 585Copying Objects Among Access Databases . . . 585
Copy-and-Paste . . . 586
Drag-and-Drop . . . 587
Importing or Linking Access Data . . . 587
Importing Objects . . . 588
Setting Import Options . . . 590
Linking Access Tables . . . 591
Importing or Linking to Other Data Sources . . . 592
Using Data from dBASE or Paradox . . . 593
Importing and Linking Text Files . . . 594
Using Delimited Text Files . . . 595
Using Fixed-Width Text Files . . . 599
Changing Import Specifications . . . 600
Using Linked or Imported Tables . . . 600
Renaming a Linked Table in Access . . . 601
Changing Linked Table Properties . . . 601
Updating Links with the Linked Table Manager . . . 602
Unlinking Tables . . . 603
Exporting to an Existing Access Database . . . 604
Exporting to Another Database Format . . . 605
Exporting to Text Files . . . 606
Summary . . . 608
23 Exchanging Data with Outside Sources . . . . 609
Copying or Moving Records . . . 609
Copying or Moving Data from a Word Processor . . . 609
Copying or Moving Records from Access to
Another Application . . . 612
Saving Access Output as an External File . . . 612
Working with Word . . . 614
Saving in Rich Text Format . . . 614
Saving an Access Table or Query as a Mail Merge Data Source . . . 614
Publishing with Word . . . 615
Using Merge It with Microsoft Word . . . 616
Working with Excel . . . 618
Importing from and Linking to Excel Spreadsheets . . . 618
Exporting a Table or Query to Excel . . . 622
Using Analyze It with Microsoft Excel . . . 623
Working with HTML Documents . . . 624
Importing Data from HTML Documents . . . 624
Exporting Data to HTML Documents . . . 625
Mailing Access Objects . . . 625
Summary . . . 627
24 Sharing with Multiple Users . . . . 629
Sharing a Database on a Network . . . 629
Sharing an Entire Database . . . 630
Splitting the Database . . . 630
Preventing Exclusive Access . . . 633
Replicating a Database . . . 634
Database Administration in a Multiuser Environment . . . 635
Controlling Data Editing . . . 636
Minimizing Conflicts . . . 638
Updating Records with Refresh and Requery . . . 639
Editing Shared Database Objects . . . 640
Summary . . . 641
25 Securing a Database . . . . 643
Securing a Database with a Password . . . 643
Securing a Multiple-User Database . . . 645
Understanding the User-Level Security Model . . . 645
What Is Needed to Secure a Database? . . . 647
Securing a Database with the User-Level Security Wizard . . 647
xx
M i c r o s o f t O f f i c e A c c e s s 2 0 0 3 : T h e C o m p l e t e R e f e r e n c eComplete Reference/ Microsoft Office Access 2003: TCR / Anderson / 222917-9 / Front Matter Color profile: Generic CMYK printer profile
Composite Default screen
TE
AM
FL
Y
Creating a Workgroup Without the Wizard . . . 652 Assigning or Changing Permissions and Ownerships . . . 659 Securing a Replicated Database . . . 662 Removing User-Level Security . . . 662 Other Security Measures . . . 663 Encoding and Decoding a Database . . . 664 Hiding Database Objects . . . 665 Summary . . . 666
A Converting to Access 2003 . . . . 667 Deciding on a Conversion Strategy . . . 667 Converting a Database . . . 668 Converting a Workgroup Information File . . . 669 Converting a Secured Database . . . 669 Converting a Replicated Database . . . 670 Enabling a Database . . . 670 Sharing a Database Across Several Access Versions . . . 672 Converting from Access 2002–2003 to Access 97 . . . 672 Converting from Access 2002–2003 to Access 2000 . . . 673
B What’s on the CD . . . . 675 Instructions for Using the Access Quick Reference on the CD-ROM 675 Instructions for Using the Access Database Files on the CD-ROM . . . 676
Complete Reference/ Microsoft Office Access 2003: TCR / Anderson / 222917-9 Blind Folioxxii Color profile: Generic CMYK printer profile
Composite Default screen
Acknowledgments
R
evising this book for the third edition was a pleasure, due especially to working with the talented and highly professional Osborne editorial and production staff. Megg Morin, my Acquisitions Editor, is not only an efficient and professional member of Osborne’s staff—I also consider her a good friend. I would also like to thank Tana Allen and Athena Honore for their efforts on behalf of this complex book. I appreciate Elizabeth Seymour for seeing this project through as my project editor. Margaret Levine Young, as the technical editor, applied her keen eye and clear understanding of the subject matter.I would also like to express my appreciation to the production staff.
Thanks go, too, to the Coronado Police Department for sharing its Access database with me and my readers, as well as to my friends and neighbors who posed good-naturedly for the badge photos you can see in one of the databases. They tell me it’s a good thing I’m a writer, not a photographer.
I also owe a big debt of gratitude to my literary agent of many years, Matt Wagner of Waterside Productions, for his continuing support and encouragement.
Complete Reference/ Microsoft Office Access 2003: TCR / Anderson / 222917-9 Blind Folioxxiv Color profile: Generic CMYK printer profile
Composite Default screen
Introduction
A
successful database is efficient, quick, accurate, and easy to use. This book shows you how to create just such a database with Microsoft Office Access 2003. The clearly written explanations of the database processes present exactly what you need to create an Access object or present information. The step-by-step exercises that follow the explanations further enhance your understanding by illustrating exactly how to complete the process successfully. The many tips, notes, and cautions help guide you to faster and better database management.Whom Is This Book For?
This book is the ideal resource for anyone currently using Microsoft Office Access 2003 or who wants to learn how to use it. In planning this book, I envisioned it in the form of a large triangle, with the base scaled from the beginning user at the left end to advanced user at the right end. This book has enough material to get even the newest user of Access started with relational database management and has enough at the other end to help advanced users wade into the depths of customizing the Access workplace and designing special user interactive tools.
This book is also intended for the users of the other Office applications, such as Word and Excel, who need to know how to interface with Access. With the boundaries between the programs rapidly vanishing, use of Access isn’t limited to database managers. All the Office members can now interact with each other smoothly and with little translation.
What’s in This Book?
This book is organized so you can progress at your own pace beginning with basic database and Access principles, and followed by increasingly advanced topics. The book is divided into four parts, each focusing on a specific aspect of Access database management.
Part I: Getting Started
Part I takes a quick tour of Microsoft Office Access 2003 and examines the concept of relational databases. Many tips are included to help you design an efficient database that is easy to maintain and can ensure data integrity. In Part I, the reader creates and relates tables, and then enters data into them. Several methods of validating new data are investigated and means of presenting data for editing are also addressed.
Part II: Retrieving and Presenting Information
Part II is concerned with retrieving information with filters and queries, as well as presenting that information in forms and reports. This important set of chapters includes how to create expressions to extract exactly the information you want. Five chapters are devoted to creating form and report designs (including synchronized data entry forms), creating reports that summarize grouped information, and even printing mailing labels in conjunction with Word 2003. The final chapter in this part describes how to create charts and graphs to include in forms and reports.
Part III: Improving the Workplace
Part III is a little more advanced and discusses customizing the workplace with special toolbars, menus, and dialog boxes for the more interactive applications. Several important means of optimizing Access performance are included in this part. Part III also introduces programming techniques with chapters about using macros, as well as understanding events and when events occur.
Part IV: Exchanging Data with Others
Part IV discusses the important topic of exchanging information with other users of Access and with other applications. Importing and exporting information in many forms, including text, is an integral part of developing a complete user application. This part also covers using Access in a multiple-user environment and investigates measures to ensure information security.
xxvi
M i c r o s o f t O f f i c e A c c e s s 2 0 0 3 : T h e C o m p l e t e R e f e r e n c eComplete Reference/ Microsoft Office Access 2003: TCR / Anderson / 222917-9 / Front Matter Color profile: Generic CMYK printer profile
In Every Chapter
Every chapter is constructed to include basic learning tools, such as the following:
• Complete explanations of all processes involved in the creation and management of effective relational databases
• Numbered, step-by-step exercises with illustrations and explanations of each step
• Many tips, notes, and cautions that add shortcuts for many of the activities and pinpoint potential pitfalls
• A summary at the end of each chapter that reviews the material covered and highlights the more important topics discussed in that chapter
Quick Reference
In addition to the chapter material, this book includes a Quick Reference section on the accompanying CD. The Quick Reference contains complete lists and descriptions of elements of Microsoft Office Access 2003 database design and maintenance. This reference serves as an immediate resource for any details in question. It can save time when you need a specific piece of information by presenting concise lists and tables you can jump directly to without having to browse through the more descriptive chapter material in the book itself.
What’s on the Companion CD?
Appendix B presents a thorough explanation of the contents of the CD that accompanies this book. This appendix explains how to install the Access databases on your computer and how to look up specific information in the Quick Reference.
The CD includes the following:
• The Quick Reference lookup resource
• The complete Home Tech Repair database
• A set of tables to use as the basis for creating the Home Tech Repair database
• The complete Police database
• A set of tables to use as the basis for creating the Police database
• Scanned image files required by the two databases
Conventions Used in This Book
N
OTEOTE This is a note. Notes further define terms used in the text or point you in the direction of more information about the subject under discussion.T
IPIP This is a tip. Tips often provide shortcuts to the process under discussion or offer useful pieces of advice about how to make better use of Access 2003.C
AUTIONAUTION This is a caution. Cautions warn you to be careful when you’re about to make crucial decisions or take risky steps. Access tries hard not to put you in harm’s way, but this does happens now and then. I post a caution for you when this does happen.This is an example of the margin icons that often accompany a step in the numbered exercises in this book. The margin icons illustrate the toolbar button you need to click to accomplish the activity under way.
What’s New in Microsoft Office Access 2003?
This book attempts to show you the new look and feel that comes with Microsoft Office Access 2003. There are the many time-saving and user-friendly features that make Microsoft Office Access 2003 a total database management system.
Some of the new features in Microsoft Office Access 2003 apply to database design; others apply to creating database objects or to customizing the workplace itself. Here are some of the more significant improvements covered in this book:
• The new and improved task panes that include Getting Started, Help, Search Results, and Research give Access 2003 a new, more flexible and interactive look.
• An automatic error checking system helps you detect and fix common errors in forms and reports. When you enable error-checking, you can see the reason for the error and some suggestions for correcting it.
• You now have more control over the Name AutoCorrect feature so you can undo the automatic corrections, if necessary.
xxviii
M i c r o s o f t O f f i c e A c c e s s 2 0 0 3 : T h e C o m p l e t e R e f e r e n c eComplete Reference/ Microsoft Office Access 2003: TCR / Anderson / 222917-9 / Front Matter
Sidebars
This is a sidebar. Sidebars are set somewhat apart from the normal text and include information related to the current subject, but that doesn’t necessarily fit in the flow of information. Rather than interrupt the flow, I set the sidebars aside where you can return later to read this tangential information in detail.
• When you modify a field property that is inherited by a control in a form or report, Access displays an option to update the property of all or only a few of the controls that are bound to that field.
• You can view the interdependencies among Access objects. You can ask to see what objects depend on the object you selected or see what objects your selected object relies on.
These are just a few of the new features you will see when you get to work on your database with Microsoft Office Access 2003.
Got Comments?
During my years spent teaching at the University of Southern California, I discovered, to my dismay, that I often learned as much from my students as I hoped they would learn from me. With this philosophy in mind, I invite you to share with me any new tricks or clever shortcuts you’ve devised. Please e-mail them to me at[email protected]. In fact, I would enjoy hearing any comments, good and bad, you might have about the book or the databases I have developed as examples. Only by tapping fresh minds can I hope to make these books better and better.
Complete Reference/ Microsoft Office Access 2003: TCR / Anderson / 222917-9 Blind Folioxxx Color profile: Generic CMYK printer profile
Composite Default screen
This page intentionally left blank
TE
AM
FL
Y
I
Getting Started
C
HAPTER 1Quick Tour of Microsoft Office Access 2003
C
HAPTER 2The World of Relational Databases
C
HAPTER 3Creating a Database
C
HAPTER 4 Creating and Modifying TablesC
HAPTER 5 Relating TablesC
HAPTER 6Complete Reference/ Microsoft Office Access 2003: TCR / Anderson / 222917-9 / Chapter 1 Color profile: Generic CMYK printer profile
Composite Default screen
1
Quick Tour of Microsoft
Office Access 2003
I
n this, the Information Age, we are surrounded by mountains of data. To use this data effectively, the information must be stored so it can be retrieved and interpreted with flexibility and efficiency. Microsoft Office Access 2003 is a top-notch databasemanagement system that you can use for all your information management needs—from a simple address list to a complex inventory management system. It provides tools not only for storing and retrieving data, but also for creating useful forms, reports, and interactive web data pages. All you need is a basic acquaintance with Microsoft Windows and a sense of exploration to build the database you need.
This chapter shows you how to start Microsoft Office Access 2003 and gives you a tour of the Access workplace. If you’re already an experienced user, you might want to scan the material in this chapter quickly and move on to Chapter 2 for insight into the power of the tool called a relational database.
Starting Access and Opening a Database
You can start most software built for the Windows environment in the same way: by clicking the Start button and pointing to Programs in the Start menu. Depending on how you installed Access 2003, the name might appear as a separate item in the Programs (or All Programs, if you’re using Windows XP) list or as one of the programs in the Microsoft Office menu. If you don’t see Microsoft Access in the Programs list, choose Microsoft Office, and then click Microsoft Access 2003.
When first opened, the Access main window displays a Getting Started task pane, offering you a choice of accessing Microsoft Office Online, opening one of the existing database files, or creating a new file, as shown in Figure 1-1. The Open panel contains the names of recently opened databases (your list will be different). The Access opening window is where your session with Access begins.
Touring the Access Window
The Access window shows a title bar, a menu bar, and a toolbar common to Windows programs. In addition to displaying the program name—Microsoft Access—the title bar contains buttons you can use to manipulate the window:
Complete Reference/ Microsoft Office Access 2003: TCR / Anderson / 222917-9 / Chapter 1
4
P a r t I : G e t t i n g S t a r t e dComplete Reference/ Access 2003: TCR / Anderson / 222917-9 / Chapter 1
FIGURE 1-1 The Access opening window with the Getting Star ted task pane
Minimize button
Maximize button
Close button
Status bar
Resize handle Control menu
• TheClosebutton closes the program.
• TheMaximizebutton appears only when the window is less than maximum size and enlarges the window to fill the screen.
• TheRestorebutton replaces the Maximize button when the window is maximized and returns the window to its previous reduced size.
• TheMinimizebutton reduces the window to an icon on the Windows taskbar. • TheControl Menu iconat the far-left end of the title bar opens a menu with the
commands that accomplish the same things as the other buttons. Click the Control Menu icon to open the menu.
When the window is less than maximum size, you can move it to a new position on the desktop by dragging its title bar. You can also change its height and width by dragging either its borders or the resize handle in the lower-right corner, where you see the three diagonal lines.
Most of the menu commands are dimmed and unavailable in the empty Database window. TheFilemenu offers options to create a new database, to open an existing one, or to search for a specific file. Other options, such as theToolbarsoption in the View menu, let you tailor the database workplace. All the Help menu options are available.
The buttons on the toolbar offer shortcuts to many of the commonly used menu commands. Even if a button is dimmed, you can still rest the mouse pointer on the button and see its name displayed below the button in aScreenTip(called aToolTipin earlier versions of Access). The toolbar, as well as the menu bar, presents different options, depending on the current activity.
The status bar, located at the bottom of the Access window, provides a running commentary about the ongoing task and the Access working environment. The right side of the status bar also shows boxes that indicate the presence of a filter and the status of various toggle keys such asINSERT,CAPS LOCK,SCROLL LOCK,andNUM LOCK. You’ll see some of these when you start working with a database.
Opening a Database
If the database you want to open is listed in the Getting Started task pane that appears when Access starts, you can open it by simply clicking the filename. If the one you want isn’t on the list, click More. The Open dialog box appears, as shown in Figure 1-2. (Your list of folders and files will be different.) The same dialog box appears if Access is already running when you choose File | Open or click the Open toolbar button.
The Groups pane at the left contains five buttons, which you can click to open other folders or to return to the Windows desktop.
• The top button, My Recent Documents, opens the new Recent folder that contains the name, size, type, and date of the last modification for each recently accessed database. When you click the My Recent Documents button, the Recent folder name appears in the Look in box.
• The Desktop button displays a list of the desktop components on your computer that you can move to, including such items as My Computer, My Documents, Network Neighborhood, and Online Services.
• The My Documents button (or the name of your personal default folder) shows the contents of that folder. This is the default display in the Open dialog box.
• The My Computer button displays the list of available hard disks, floppy disk drives, CD drives, and other data storage systems.
• In Windows 2000, the My Network Places button displays the folders and objects you saved in web folders. In Windows XP, you see the network drives on your LAN, as well as the names of any web folders you’ve set up.
The trick is to know where you stored your database. If you have used other applications, such as Word or Excel, you know how to find the file you want with the Open dialog box.
6
P a r t I : G e t t i n g S t a r t e dComplete Reference/ Microsoft Office Access 2003: TCR / Anderson / 222917-9 / Chapter 1
FIGURE 1-2 The Open dialog box
Search the Web
Views Tools Delete
Create new folder Up one level
To previous folder Folder list Color profile: Generic CMYK printer profile
You use the Look in box to zero in on the folder that contains the database, double-click the folder name or icon to open it, and then simply select the one you want from the list that appears in the dialog box.
The Open dialog box contains several buttons that help you find the file you want to open. You can see the name of each button by resting the mouse pointer on the button in the command bar.
The Views drop-down list includes the following options:
• Large Icons Displays the names of the files and subfolders located in the folder specified by the Look in box in rows accompanied by large type icons.
• Small Icons Displays the file and subfolder names in rows with small type icons. • List Displays the file and subfolder names in a columnar list.
• Details Displays the size, type, and date last modified for each file in the list. • Properties Displays the properties of the currently selected file, such as title,
author, and application.
• Preview Shows a preview of the file, if one is available, without opening it. • Thumbnails Creates thumbnail graphics of files in the selected folder if their file
formats permit.
• WebView Shows the web view of files in the selected folder, if available.
The Tools drop-down list includes the following options:
• Search Opens the File Search dialog box that you can use to locate a database by means other than its name.
• Delete Deletes the currently selected item. You’re always asked to confirm the deletion before Access removes the file. Same as Delete command bar button.
• Rename Enables you to change the name of the item. • Add to “My Places” Adds a shortcut to the Groups pane.
The item appears in the dialog box list when you click the My Network Places button or the Web Folders button, depending on which version of Windows you’re using.
• Map Network Drive Enables you to indicate the drive and path to a network connection.
• Properties Opens the Properties dialog box for the currently selected database.
Access Databases to see only the database files in the current folder or Microsoft Access Projects to see only the list of projects.
Once you locate the database you want to open, double-click the name or select it and click Open.
N
OTEOTE The Open button offers other ways to open the database, such as read-only, exclusive, or both. More about these options in later chapters.To start working with a database in Access 2003, let’s open the Northwind sample database that comes with Microsoft Office. The Northwind database is an order-processing application that demonstrates the power and usefulness of a relational database. Even though the purpose of the database seems straightforward enough—taking and filling orders from customers for the company products—a lot of data still must be manipulated. The database is introduced in this chapter and discussed further in Chapter 2.
To open the Northwind sample database:
1. Start Access and click More in the opening Getting Started task panel. If Access is running and you closed the Getting Started task pane, click the Open button. The Open dialog box appears.
2. Click the Look in arrow at the top of the dialog box and click C: to revert to the root directory of your hard drive. (If Access is installed on another drive, choose that one instead.)
3. In the list of folders and files in the C: directory, double-click Program Files. Program Files now appears in the Look in text box. A list of the subfolders and files in that folder shows in the window.
4. Continue to open the folders for the Program Files\Microsoft Office\Office\ Samples path. If Office 2003 is installed in a different directory, use that pathname. 5. Select Northwind and click Open. If the Northwind Traders welcoming screen
appears, click OK to close the screen.
6. If you’re greeted by the Main Switchboard, click the Display Database Window button to open the Database window (see Figure 1-3).
T
IPIP If you don’t have the Northwind database installed, you might need to reinstall Access and add the sample database. Also, if you don’t want to be greeted by the Northwind welcoming screen every time you open the database, check the Don’t show this screen again check box.8
P a r t I : G e t t i n g S t a r t e dComplete Reference/ Microsoft Office Access 2003: TCR / Anderson / 222917-9 / Chapter 1 Color profile: Generic CMYK printer profile
N
OTEOTE In the next section, a distinction is made between the Access window with the menu bar and toolbars, and the Database window that contains lists of all the objects in the database and has a separate command bar.Touring the Database Window
The Database window represents the database itself. When you close the window, you also close the database. You can see all the components of the database in the Database window. The left pane of the Database window shows a set of buttons grouped under the Objects title button. The buttons are labeled with the names of the Access database objects: Tables, Queries, Forms, Reports, Pages, Macros, and Modules.
Another title button named Groups includes buttons that open other folders, such as the Favorites folder. Groups can be quite useful if your database is used by more than one FIGURE 1-3 Viewing the Nor thwind database in the Database window
Access window Delete
Large Icons
Small Icons List
department, such as personnel and marketing. Each department can have a group of database objects they can use, such as favorite reports or data entry forms.
In Access 2003, you can define and name your own custom groups similar to the Favorites group. A user-defined group can contain any type of Access object, as well as objects from other Office applications, just like the Favorites group. When you click Groups, the Objects list collapses and the list of your custom groups appears in its place.
Before opening one of the tables in the Northwind database, let’s examine the Database window more closely. More menu commands are now available, all of which are relevant to the open database. Many more toolbar buttons are also available now that a database is open. The Database window is made up of several pages, each represented by a button in the left pane under Objects. Clicking an object button opens the page, which displays the names of any existing objects of that type. For example, if you want to see the names of all the forms you created for the database, click the Forms button in the left pane of Database window. Each object page also includes two or three “new object” shortcuts you can use to quick-start a new object design with or without the help of a wizard.
N
OTEOTE Not only can you resize the Database window by dragging its borders, you can also change the width of the left pane by dragging the divider between it and the object pages.The toolbar at the top of the Database window includes buttons to open an existing object for viewing or modification, to create a new object, or to delete an existing object. In addition, you can change how the objects are listed in the Database window.
You can list the objects using large or small icons in alphabetical order by name or another arrangement. In addition, you can show details with the object name. Each of these options is available by clicking a button on the Database window toolbar or by selecting from the View menu.
Table 1-1 describes the object list viewing options.
Figure 1-4 shows the Northwind queries displayed with the Large Icons option. The object icons in the left pane also appear larger when you choose Large Icons.
10
P a r t I : G e t t i n g S t a r t e dComplete Reference/ Microsoft Office Access 2003: TCR / Anderson / 222917-9 / Chapter 1
Option Description
Large Icons Displays a large icon above each object name, arranged alphabetically across rows.
Small Icons Displays a small icon before each object name, arranged alphabetically across rows.
List Displays a small icon before each object name, arranged alphabetically in one column. If the number of objects exceeds the table height, the list moves to a second column, and so on.
Details Displays a small icon before each object name, arranged alphabetically in a list with a description, date last modified, date created, type, and, often, the owner.
TABLE 1-1 Access Object Viewing Options
Color profile: Generic CMYK printer profile Composite Default screen
TE
AM
FL
Y
T
IPIP Notice the icon indicates the type of query. For example, the Customers and Suppliers by City query is a Union query, as specified by the joined rings icon, while the spreadsheet icon above the Quarterly Orders By Product query indicates a Crosstab query. See Chapters 8 and 9 for more information about creating and running queries.The list of tables when displayed with the Details option shows the same object properties you can view when using the Windows Explorer. The columns can be widened to see more of the detail or narrowed to hide some of the information. To resize a column, move the mouse pointer to the column divider in the header and, when it changes to a plus (+) sign with a double-pointed horizontal arrow, click-and-drag the boundary.
You can also rearrange the objects to list them in a different order. Choose View | Arrange Icons and you have a choice of arranging in alphabetical order by name (the default), by type of object, by date of creation, or by the date the object was last modified. All the arrangements are in ascending order, as you can tell from the arrows in the icons.
Each object page also has a toolbar with a set of buttons appropriate to that object type. All the object pages include the Design and New buttons. The first button depends on the object:
• TheTables, Queries, Forms,andPagespages show the Open button, which opens the selected object for data entering or editing.
• TheReportspage shows the Preview button that displays the report as it will be printed. • TheMacrospage shows the Run button that executes the selected macro.
• The first button is dimmed on the Modules page.
N
OTEOTE If you maximize the Database window, the command bar appears immediately below the Database toolbar in the Access window.In addition to the objects in the list, each object page—except the Macros and Modules pages—includes two or three shortcut items that start the process of creating a new object. For example, the Tables page, as shown earlier in Figure 1-3, has the following three items in the list:
• Create table in Design view • Create table by using wizard • Create table by entering data
More about using these features in Chapter 4.
Looking at Menu Options and Toolbar Buttons
The standard Database menu bar and toolbar appear in the Access window. Not all the options are available to all the database objects and, some, such as the Save button, aren’t available until a table or other object is opened. The Paste button is dimmed until you copy something to the clipboard. Table 1-2 describes the Database toolbar buttons and their equivalent menu commands and keyboard shortcuts, if any.
T
IPIP If you don’t see the toolbar, right-click in the menu bar and check Database in the list of available toolbars.12
P a r t I : G e t t i n g S t a r t e dComplete Reference/ Microsoft Office Access 2003: TCR / Anderson / 222917-9 / Chapter 1 Color profile: Generic CMYK printer profile
Button Button Name Menu Equivalent Shortcut Description
New File | New… CTRL-N Opens the New File task pane with options for creating databases using wizard templates or a blank database. Open File | Open… CTRL-O Opens the Open dialog box
where you can locate and open the desired database file. Save File | Save CTRL-S Saves the current object. If
not already named, prompts for a name.
File Search File | File Search (none) Opens the Basic File Search side pane, where you can specify search criteria. Print File | Print CTRL-P Prints the current object. The
button sends the document directly to the default printer. File | Print andCTRL-P open the Print dialog box.
Print Preview File | Print Preview (none) Opens the current document in the Print Preview window. Spelling Tools | Spelling F7 Checks the spelling of all text
and memo fields in the current document. If no document is open, the currently selected object is opened and the spelling is checked.
Cut Edit | Cut CTRL-X Removes selected text or object and places it on the clipboard. Copy Edit | Copy CTRL-C Copies selected text or object to
the clipboard.
Paste Edit | Paste CTRL-V Copies contents of the clipboard to the active object or window. Undo/Can’t
Undo
Edit | Undo/ Can’t Undo
CTRL-Z Reverses previous editing action. Not available if no reversible action has been taken. OfficeLinks Tools | Office Links (none) Opens a submenu with options
for linking with MS Word or MS Excel.
C
AUTIONAUTION The Undo button works with many actions, but not with all of them, so be careful. Some actions cannot be undone. When you’re about to perform an action that’s irreversible, Access displays a warning message. Take the time to read the message carefully and make sure you want to proceed.You can move the menu bar and toolbar to different locations in the window, docked at another edge or free-floating. To move either one, click the move handle located at the far-left edge of the bar (it looks like a stack of dots). Then, drag the bar away from the top of the window to another edge or leave it in the center of the window. Dragging the bar borders resizes the floating toolbar. To restore the menu bar to the top of the screen, click-and-drag the move handle. To restore the floating toolbar, drag it by its title bar to the top of the window.
Using Shortcut Menus
Shortcut menus are context-sensitive menus that appear when you click the right mouse button. The commands in the menu depend on where the mouse pointer is and what’s happening when you click the button. Click anywhere outside the menu to close it. Pressing
ENTER,ESC, orALTalso closes the shortcut menu. Only the most commonly used commands are included in the shortcut menu, but they might also include commands from several different menus on the menu bar.
14
P a r t I : G e t t i n g S t a r t e dComplete Reference/ Microsoft Office Access 2003: TCR / Anderson / 222917-9 / Chapter 1
Button Button Name Menu Equivalent Shortcut Description
Analyze Tools | Analyze (none) Opens a submenu with choices of Analyzer tools.
Code View | Code or Tools | Macro | Visual Basic Editor
ALT-F11 Opens the Visual Basic Editor window showing code for the selected object.
Microsoft Script Editor
Tools | Macro | Microsoft Script Editor
ALT-SHIFT-F11
Opens the Microsoft Script Editor window where you can add or view data access page script. Properties View | Properties ALT-ENTER Opens the General property
dialog box for selected object. Relationships Tools |
Relationships
(none) Opens the Relationships window.
New Object: AutoForm
Insert | AutoForm (none) Creates a new object of the type selected in the drop-down list. Microsoft
Access Help
Help | Microsoft Access Help
F1 Starts the MS Office Assistant.
TABLE 1-2 Database Toolbar Buttons and Corresponding Menu Options(continued)
To choose a command from a shortcut menu, click the command or type the letter underlined in the name of the command. If the command shows a right arrow, such as View in Figure 1-5, it’s a submenu. Rest the pointer on the item to open the list of commands, and then choose from the list. If the command shows an ellipsis (…) such as Import, a dialog box opens when you click it.
See Chapter 20 for information on how to customize menu bars, toolbars, and shortcut menus.
Opening a Table
To open one of the tables in the current database, double-click its name in the Tables page or select the name and click Open. The table appears with the data in rows and columns, much like a spreadsheet. This view of table data is calledDatasheet view.Figure 1-6 shows the open Northwind Orders table in Datasheet view. Each row contains a single record with information for one order. Each column contains values for one field. Each field has a unique name and contains a specific item of data, such as the customer or employee name. The column headings show the field names. When you enter data in the table, you’re putting actual values in the cells at the intersections of rows with columns.
T
IPIP Another way to open a table is to click the right mouse button on the table name in the Tables page, and then choose Open from the shortcut menu. Other commands on this menu will be useful later.The status bar at the bottom of the Access window displays the description of the current field included in the table definition. For example, if the cursor is in the first field—Order ID—the status bar displays “Unique order number.”
FIGURE 1-5
Choosing from the Database shor tcut menu
Touring the Datasheet View
You might have noticed some changes that occur in the window when you open a table. For example, the title bar of the Database window now shows the name of the open table.
N
OTEOTE If the Database window is maximized, the name appears in the Access window title bar.The menu bar includes two new options—Format and Records—that are relevant to the open table. More of the toolbar buttons are also available.
The datasheet window shows scroll bars at the right side and in the right side at the bottom. To the left of the bottom (horizontal) scroll bar is a set of navigation tools you can use to move through the records in the table. The following paragraphs give you more detail about the toolbar buttons and the scroll bars.
Looking at the Table Datasheet Toolbar
The Database toolbar has been replaced by the Table Datasheet toolbar, which has many new buttons.
T
IPIP If you right-click anywhere on the toolbar, you can see the Table Datasheet option is checked in the shortcut menu. This is a sure way to tell which toolbar is visible on the screen. You can also choose additional toolbars from the list to show in addition to, or instead of, the default toolbar.16
P a r t I : G e t t i n g S t a r t e dComplete Reference/ Microsoft Office Access 2003: TCR / Anderson / 222917-9 / Chapter 1
FIGURE 1-6 The Nor thwind Orders table in Datasheet view
Scroll bar Scroll arrow Scroll box Color profile: Generic CMYK printer profile
Several buttons on the Table Datasheet toolbar relate to activities involving table data, such as sorting, filtering, and locating.
Among the new buttons on the Table Datasheet toolbar, the only buttons with keyboard shortcuts are Find (CTRL-F), New Record (CTRL-++), and Database Window (F11).
T
IPIP If you want to reach a specific record quickly, click on the scroll box and drag it down the scroll bar. You can see the record numbers as the scroll box moves.Navigating Among Records and Fields
You can move the cursor around the records and fields in your table in several ways, including simply clicking the desired location if it’s visible. You should try them all and settle on the one that suits you best. The other methods are the following:
• Selecting from the Go To submenu on the Edit menu.
• Clicking the record navigation buttons at the bottom of the datasheet. • Using keystrokes such asTABand the arrow keys.
The Go To submenu on the Edit menu enables you to move to the first,
last, next, previous, or to an empty new record.
The record navigation buttons at the bottom of the datasheet window give you the same options as the Edit | Go To submenu. You can also enter a specific record number (if you know the number of the record you want to see) in the text box between the navigation buttons, and then pressENTER. This area also tells
you what record the cursor is in and the total number of records in the table.
Apply/Remove Filter View
Sor t Ascending
Sor t Descending
Filter By Selection
Filter By Form Find
New Record
Delete Record Database Window
Next Record
First Record
Previous Record Record Number
Last Record