Rochester Institute of Technology
RIT Scholar Works
Theses Thesis/Dissertation Collections
5-2014
Let Me Go
Keqing YuFollow this and additional works at:http://scholarworks.rit.edu/theses
This Thesis is brought to you for free and open access by the Thesis/Dissertation Collections at RIT Scholar Works. It has been accepted for inclusion in Theses by an authorized administrator of RIT Scholar Works. For more information, please [email protected].
Recommended Citation
LET ME GO
Keqing Yu
MFA Imaging Arts/Computer Animation
SCHOOL OF FILM AND ANIMATION
ROCHESTER INSTITUTE OF TECHNOLOGY
ROCHESTER, NEW YORK
MAY 2014
Stephanie Maxwell, Chair
Professor
School of Film of Animation
Dave Sluberski
Lecturer
School of Film of Animation
Daniel DeLuna
Associate Professor
ABSTRACT
This paper is about how my graduation project 3D animation short Let Me Go was
developed and produced. The whole process consists of pre-production, production and post-production. It starts with story study and development by analyzing story structure of several animation shorts. Then it talks about experience and process building story for
TABLE OF CONTENTS
ABSTRACT………2
TABLE OF CONTENTS………..………3
ANIMATION PRODUCTION PROCESS……….…….…...4
PRE-PRODUCTION………4
Story study and development...4
Story research samples………...………….……7
My story………..……….………….21
Character design………..……….………….28
Environment design……….……….………..………...29
PRODUCTION PROCESS……….…31
Rigging techniques...…...31
Rendering techniques...…...37
POST-PRODUCTION ………...38
Sound design and music…...38
INDEX………..………..39
BUDGET………39
ANIMATION PRODUCTION PROCESS
PRE-PRODUCTION
§ Story study and development
As we know, story is the key for animation film. Good animation cannot save a bad story, while a good story with bad animation will allow the audience to at least remember the story. Then how does one create a good story? Every time we talk about creating a story, as we did in my SCRIPTWRITING FOR
ANIMATION class, the formula is to begin with the Hollywood classic story structure, the three-act structure, which is Setup, Confrontation and Resolution. While we go deeper the whole structure will be divided into six basic stages.
Here I would like to reference Michael Hauge’s article Screenplay Structure – The Five Key Turning Points of All Successful Scripts. Michael Hauge is the best-selling author of Selling Your Story in 60 Seconds: The Guaranteed Way to Get Your Screenplay or Novel Read and of Writing Screenplays That Sell, a definitive reference book for the film and television industries, which is now in its 32nd printing at HarperCollins. In his article he states, “The story consists of six basic stages, which are defined by five key turning points in the plot. Not only are these turning points always the same; they always occupy the same positions in the story.” (1)
(1) Screenplay Structure – The Five Key Turning Points of All Successful Scripts, Michael Hauge,
Stage I is Setup. The first 10% is supposed to reveal your hero’s everyday life and his characteristics or identification. Then at the 10% point here is Turning Point #1, the new opportunity to let your hero start his journey. During the 10% to 25% part of the story, Stage II the New Situation, your hero will react to the new situation that results from the opportunity. At the 25% point, Turning Point #2, something happens and will transform the original desire into a specific, visible goal with a clearly defined end point. “This is the scene where your story concept is defined, and your hero’s outer motivation is revealed.” (2)
Stage III is Progress, from 25% to 50% of the story. Turing Point #3 is at the 50% point. After this point, the hero cannot return to his old life but keeps moving toward his goal. During Stage IV, from 50% to 75%, “achieving the visible goal becomes far more difficult, and your hero has much more to lose if he fails.” (2) At 75% point, Turning Point #4 – The Major Setback, “something must happen to your hero that makes it seem to the audience that all is lost.”
Chart 1
To me, the stage is more like a working process, and the turning point is like the result or an incident. And this three-act structure is for a full-length movie. Short animation, like two to five minutes, cannot possess all the elements mentioned. A story for short animation, must determine which elements we need and which we don’t need.
I have a collection of great animations, which are all less than five minutes. I analyzed them based on the story structure mentioned in my thesis to figure out what elements they include in their stories.
SETUP NEW
SITUATION
PROGRESS
HIGHER STAKES
FINAL PUSH
AFTERMATH
OPPORTUNITY 10% CHANGE 25%
VISIBLE GOAL
NO RETUR 50% SETBACK 75%
CLIMAX 90-‐99%
Story Research Samples
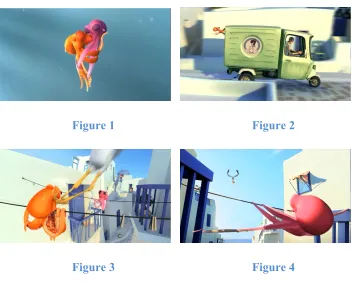
Oktapodi 2:25 minute
1. From 00:00 to 00:14 is Stage I: Setup. The story reveals several elements. World -> seafood market in a seaside town. Characters -> one octopus and his girlfriend. Relationships -> the two octopuses love each other and want to stay
together. Rule -> they mean food to humans (Figure 1).
2. No Turning Point #1: Opportunity and Stage II: New Situation, which is a
result from this opportunity.
3. Turning Point #2 happens at 00:14. Something changes (the girlfriend is
sold to a seafood restaurant and taken away). Then the boyfriend has a very visible goal – saving his girl from that restaurant on a three-wheeled
motorcycle (Figure 2).
4. Then this story doesn’t follow the structure specifically. It does have several turns, like getting away but later being caught again.
5. At 02:00 it hits the Turning Point #5: Climax. The two octopuses are free and the motorcycle runs into sea (Figure 3).
Figure 1 Figure 2
Figure 3 Figure 4
Summary
This story does have a complete Setup. It clearly defines the world, rule, ad characters and their relationships. Then at Turning Point #2: Change, it displays a specific, visible goal with a clearly defined end point. At Turning Point #5: Climax, the hero faces the biggest obstacle of the entire story, and the outer motivation is resolved. This story has a very unexpected Stage VI: Aftermath. It doesn’t mean a happy ending. Rather it means start of another adventure.
And below is the story structure chart for this animation.
Chart 2
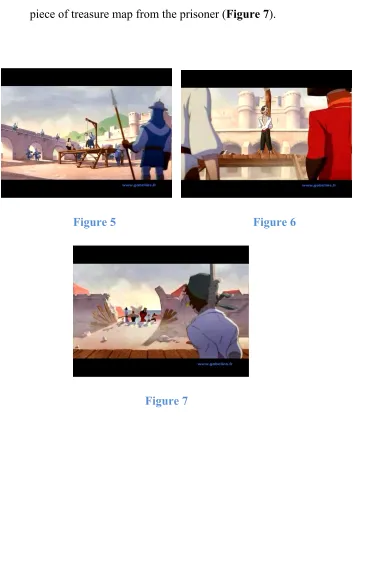
Pyrats 1:30 minute
1. From 00:00 to 00:10 is Stage I: Setup. World -> execution ground in a seaside town. Characters -> pirate prisoner and guards.
Relationships -> guard want to execute pirate prisoner. Rule -> guard kill pirate, pirate kill guard, and pirate may want to save their
mate (Figure 5).
2. Turning Point #2 is at 00:10, Change. A group of pirates attack town. Seems they have a specific, visible goal – saving his pirate mate from execution.
SETUP
WORLD, RULES, CHARACTERS, RELATIONSHIPS
CHANGE 10% SAVING GIRLFRIEND
PUSHES
CLIMAX 95%
BOTH FREE
3. Then fighting and fighting. Turning Point #5 is at 00:48, Climax. The group of pirates beat all guards and make to the execution ground (Figure 6).
[image:11.612.125.502.137.725.2]4. Then Aftermath. It turns out that they only want to get back the missing piece of treasure map from the prisoner (Figure 7).
Figure 5 Figure 6
[image:11.612.128.479.205.336.2]Summary
This story is a great example of efficient Setup. It nearly only takes 10 seconds, one shot to achieve all setup goals. It makes use of our common sense about pirate and guard to create conflict between them. Then at Turning Point #2: Change, one group of pirates shows up. It seems like they have one specific and visible goal. Then they achieve their goal and make to the execution ground at Climax. And Aftermath is a good surprise for me. It turns out that what they really want is the missing piece of treasure map in his eye patch rather than his life. Sometimes I’m little confused and think this moment is Climax. But according to the story structure we discuss here, it is not.
And below is the story structure chart for this animation.
Chart 3
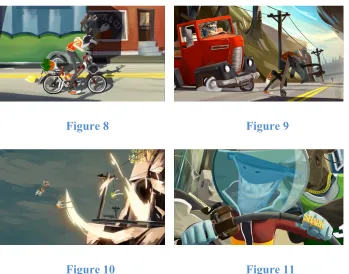
Meet Buck 4:23 minute
1. From 00:00 to 00:50 is Stage I: Setup. World -> a little town.
Characters ->Buck and his girlfriend.
Relationships -> they like each other. Rule ->Buck acts as human (Figure 8).
SETUP
CHANGE 15% SAVE MATE
PUSH
2. Turning Point #2 is at 00:50, Change. Girl’s hunter dad comes back. To him Buck means nothing but animal, meat. So he has a specific goal – hunting him down. And Buck just wants to stay alive (Figure 9).
3. Soon girl also joins their chasing. At 03:30 is Turning Point #5: Climax. One explosion. Temporarily Buck and girlfriend get rid of her father. And I think this explosion is a relief, a vent for all the tension built during the chasing for audience (Figure 10).
4. Then Aftermath. When dad once again grabs Buck, his buddies show up
[image:13.612.132.481.313.587.2](Figure 11).
Figure 8 Figure 9
Figure 10 Figure 11
Summary
This animation is a little longer than the two we mentioned before, more than four minutes. But still it’s a very short animation. Its story structure is also more similar to the three-act structure than the others.
It has very complete Setup process. At the beginning, Buck gets up from bed, and puts on the cloth. All acts like human being. Here it tells the Rules. Then he drives his motorcycle runs through the whole town, showing the world, the
environment. Then he meets girlfriend in her house. Now we know the Characters and the Relationships between them.
Then her father comes back house. The Change. Although it uses our common sense about hunter and animal, it still has a lot need to explain to audience. At first it needs to show the relationship between this man and the girl. It shows a picture of them in her birthday party (Figure 12). Then it needs to tell us her father is a hunter, an aggressive one. It uses shotguns (Figure 13) and a full wall of his trophies (Figure 14). What interesting is, all trophies are around innocent Buck, meaning dangers. At this point, hunter and Buck, both have their motivation and goals, specific and visible ones.
This story does not follow the three-act structure strictly, like having the Point of No Return or the Major Setback to build tension systematically. But it does have several turns to create some fun and tension to some degree. And that works great. I believe for short animation, so far it’s a wonderful and doable way to deal with it. Moreover, when we turn back to the other two animations we discussed above, we find out they both work in this way too.
Figure 12 Figure 13
Figure 14
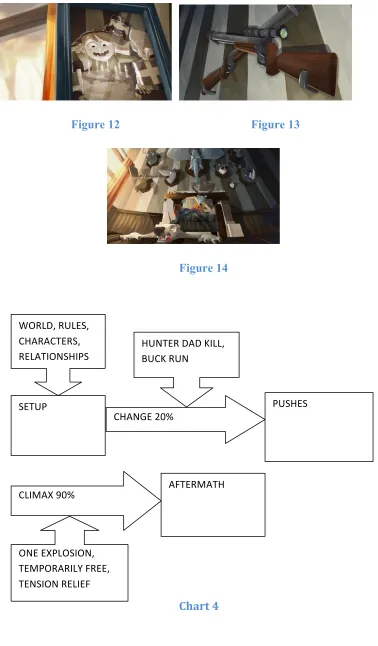
Chart 4
SETUP
WORLD, RULES, CHARACTERS, RELATIONSHIPS
CHANGE 20%
HUNTER DAD KILL, BUCK RUN
PUSHES
CLIMAX 90%
ONE EXPLOSION, TEMPORARILY FREE, TENSION RELIEF
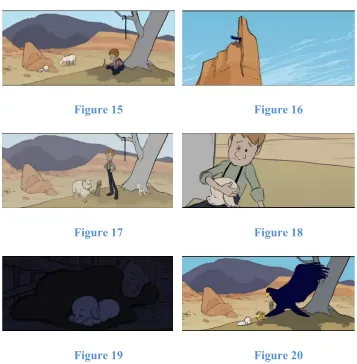
[image:15.612.126.480.72.168.2] [image:15.612.137.503.381.675.2]Eyrie 4:01 minute
1. From 00:00 to 00:40 is Stage I: Setup. World -> a little wooden house in hilly area.
Characters ->boy, grandpa and sheep. Relationships -> boy needs to take care of sheep. But obviously he doesn’t show enough responsibility to his duty. And grandpa doesn’t like his attitude. Rule ->eagle hunts sheep (Figure 15).
2. Turning Point #2 is at 00:40: Change. One sheep is taken away by a giant
eagle. Then boy has a specific and visible goal now – protecting his sheep from eagle (Figure 16).
3. From 00:40 to 01:17 is Stage III: Progress. Grandpa gives him one little weapon to fight against eagle, but the next day boy chooses his own way (Figure 17).
4. At 01:17 is Turning Point #3: No Return. Eagle still shows up and takes away the sheep. Now boy has only one little sheep left. If this little one also is taken the other day, boy would have nothing left. At this point boy has to find a way to stop eagle. He has no way to return (Figure 18).
5. From 01:17 to 02:21 is Stage IV: Higher Stakes. Boy keeps practicing with
grandpa’s gift and becomes more skilled. Then at night, he loses the qualification to sleep inside the house. He has to sleep with his little sheep (Figure 19).
6. At 02:21 is Turning Point #4: Setback. It seems like boy loses his last sheep. This event leaves boy “with only one option: he must make one, last, all-or-nothing, do-or-die effort” (Figure 20).
7. From 02:21 to 03:12 is Stage V: Final Push. Boy “must now risk everything
overwhelming, the pace has accelerated, and everything works against” him (Figure 21).
8. At 03:12 is Turning Point #5: Climax. Boy faces his mighty enemy and
beats it. And his motivation is resolved once and for all (Figure 22).
[image:17.612.124.481.267.631.2]9. Then Stage VI: Aftermath. It turns out that eagle is his grandpa. Boy proves to him that he does grow up. He receives that magic blanket from grandpa and turns into a proud eagle (Figure 23).
Figure 15 Figure 16
Figure 17 Figure 18
Figure 21 Figure 22
Figure 23
Summary
This story is a big surprise for me. Before I sat down to analyze its story structure, I never expected that this only-‐around-‐four-‐minute animation would almost possess those all elements. A great job for designing the whole structure and plots. Plus wonderful animation, no wonder this beautiful piece won gold price in 39th Student Academy Award in 2012.
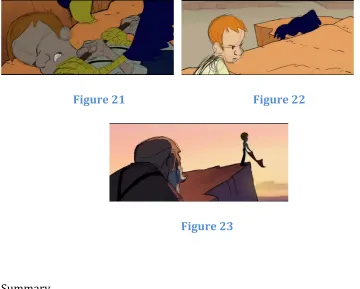
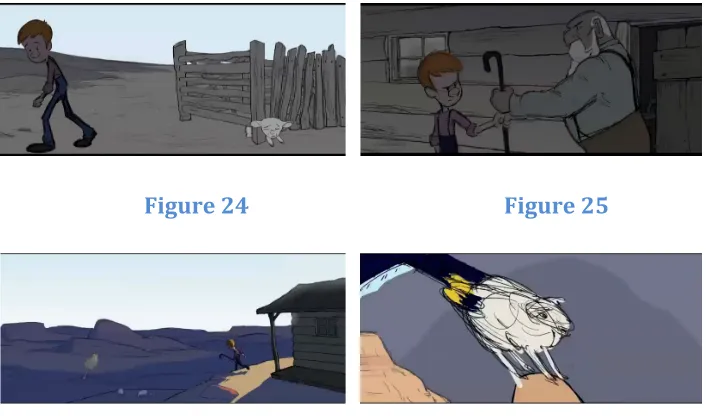
Let’s talk about its Setup process. During the first sequence, boy’s
indifference toward his sheep shows that he doesn’t like his sheep-‐caring job
(Figure 24). So, it displays to us character boy and sheep, and the most
[image:18.612.125.485.72.361.2] [image:18.612.129.481.75.152.2]Then we show Turning Point #2: Change. One giant eagle shows up and takes away one sheep (Figure 27). Now we know the Rule. And boy has his
motivation and goal.
Then the story goes through all the next stages and builds tension. And the relationships between boy and sheep, and boy and grandpa are changing along with the processes, as well. Then it hits Climax. And Aftermath.
Figure 24 Figure 25
Figure 26 Figure 27
[image:19.612.126.479.248.456.2]
Chart 5
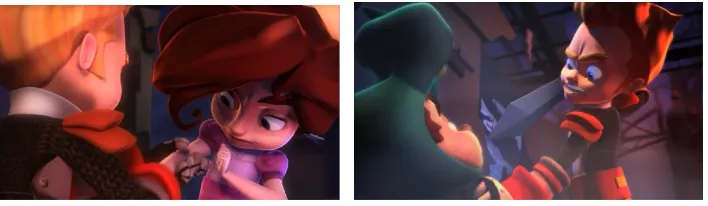
Dragon Boy 4:14 minute
1. From 00:00 to 02:10 is Stage I: Setup. World -> on the stage of one kids’ show. Characters ->dragon boy, knight, and princess. Relationships -> both dragon boy and knight likes princess. And princess
like dragon boy. Rule
->princess is supposed to be with knight.
2. At 02:10 is Turning Point #2: Change. Knight is being rude to princess. Then dragon boy has one specific and visible goal – protecting princess from knight (Figure 28).
3. Dragon boy fights back and wins applause from audience. But soon knight
catches him and tries to end him with his sword (Figure 29).
4. At 03:20 is Turning Point #5: Climax. Princess pushes down the wall set
and saves dragon boy. Knight is beaten. SETUP
CHANGE 17% PROGRESS BEAT EAGLE
NO RETURN 33% HIGHER STAKES
SETBACK 61% FINAL PUSH CLIMAX 83%
FACE EAGLE AND BEAT HIM
5. Then Stage VI: Aftermath. Dragon boy gives princess the picture flower as gift.
Figure 28 Figure 29
Summary
This story has a very long Setup process, from 00:00 to 02:10. During the first sequence, dragon boy leads us to the stage and shows the World. Then by his hand-made picture flower, the animation tells us that he likes princess. And knight shows up and he doesn’t like dragon boy. Next princess helps dragon boy
overcome the fear and get used to the atmosphere on stage. We know that they two like each other.
Then Change comes and knight offends princess. So dragon boy stands out and fights against knight. At last princess pushes down the wall set and saves dragon boy.
Chart 6
SETUP CHANGE 54% PUSH
My Story
Now back to my own thesis animation film.
I started working on the story immediately after the thesis proposal was accepted by the faculty proposal review committee, and I spent the most of time on it. I changed the story many, many times. From the first version to current one, the story is very different. But the main idea stays the same. It’s about a little girl and her stuffed toy bear, and about her loneliness and how to not to be.
Before the story study approach in a systematic way, I was totally aimless while developing my own story. On the one hand I learned about the full-length-film three-act story structure from my animation scriptwriting class and materials from the Internet;, but on the other hand I was still confused about how to develop my short animation story based on the structure. Which elements I have to keep to let my story make sense, which ones don’t need to draw into the story structure. I only knew the basic structure of Setup, Confrontation and Resolution, but I did not know how to make these three elements work.
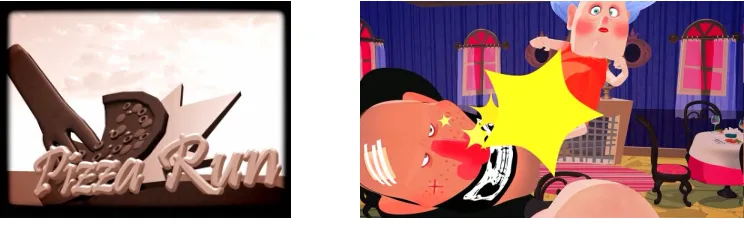
During my graduate one-quarter film production, Pizza Run, it was difficult for me to establish relative positions between characters during the plot and by using
proper shots and angles (Figure 30). When producing my graduate two-quarter
film, A Perfect Match, I also struggled with story and the effects of this struggle still hangs on today (Figure 31). In A Perfect Match there were three characters: granny, grandpa, and the robber. I tried everything to create character
identifications, their relationships with each other and their motivations and goals so that the story would make sense and allow the audience to follow the story.
Figure 30 Figure 31
Learning from my previous story experiences, I decided that in my thesis production I would limit the number of characters to only two – the girl and her stuffed toy bear. Nothing more. Then I made their identification simple, and their background story simple. The girl always stays in her house. She feels lonely but is afraid to go outside. However, bear wants to get out the house because he needs to be free of the girl who smothers him. Here lies the conflict. No more
complicated stories, as in my past works. The theme about my story is bear serves to help the girl make new friends and have contact with the outside world.
During later versions, I cut down the story length and focused on the first part when girl and bear are alone together in her bedroom and how the girl stops the bear from escaping her and leaving the house. Then, I started to build the story.
So I had a triangle: girl, bear and outside world. Bear wants to go outside, while girl is afraid to do so. When she stays in her bedroom, she feels withdrawn and very lonely. So she wants bear to stay with her always as company. The bear feels choked by her smothering treatment of him and wants to go outside away from the girl and being always in her room. Everyday life for him is boring and he has to constantly play with the girl or sit around and do nothing. He just wants to see what’s in the outside world. So, why doesn’t the girl want to go outside? Because she is afraid of the unknown outside. She doesn’t want to grow up.
In order to set up this story, at first I thought I needed to emphasize that the girl and bear had been together for a long time. The girl was very dependent on bear, while being together with the girl was too long a time for bear. These facts explain why bear wants to go outside and why the girl cannot let bear go. I planned to use a lot of photographs and drawings of bear and the little girl
About bear, is he alive or just alive in the girl’s imagination? This question took me a long time to answer. Firstly, I tried to show that bear was only alive in girl’s mind. In the animation, bear only could move on his own when girl looks to another place and not at bear. So in this way, I could say it has psychological meaning. But to communicate this idea clearly to the audience without causing any confusion was not easy. I tried several times to show bear as an imagined alive bear, but it wasn’t working. Later I suddenly had the idea that I didn’t have to this so clearly. It was animation. A stuffed toy can act like real-life-being sometimes, while it can also be just an inanimate stuff toy at other times. I thought this was acceptable to an audience, and it kept it simple.
Then how to design the climax for this story? And. how about the ending? In my story the girl risks everything to stop bear from leaving her. When bear
Then, I figured out that I could create a new ending by using color. Feedback from others made me realize that since going outside was a key element in my story, and then it was important to show why outside was better than inside. Feedback advice was very helpful, pointing out an important missing ingredient for my recipe. If I found a way to show outside was good, then I could have another reason why bear wants to go out and also why going outside could also help the girl.
I needed to figure out one way, one specific and visible way to show that the outside world was better. So using color and light came to my mind. I designed window curtains as the key item. Before bear manages to rip off the curtains, the room inside is dark and black and white, with no color. Then after the big chase inside the room and bear successfully rips off the curtain, the windows open and light comes in, bringing color to the whole room, including the girl herself. It is a dramatic and visible change in the environment and works wonderfully and is helpfully beautiful as well. And I believed I just found the climax for my story.
This also led me to pay more attention to the girl’s reaction to what had happened to her. When she sees bear getting away, she panics and tries to stop him at any cost. When she sees light comes in through the window, it is a huge change for her. But, the big change to color is not enough to sell my theme to the audience; she must accept it in her actions. She sees the light, and hides from it at the
beginning. She hesitates, but then gradually becomes curious and touches the light. When the girl touches the light for the first time, she sees color changes happen on her hand. Then she makes her decision to walk outdoors and into the light, and its magic of bringing color into her world. Accept, then magic. This gives the give girl a reason change.
the environment, the purpose was to create a self-contained child’s perfect kingdom, where the child could spend a lot of time alone and have no need to go outside. She also had a lot of book to fill her time reading.
Characters…The girl is around four to fives years old. She stays in her house and never goes out. She is afraid of the unknown in the outside world. While staying in the solitude of her bedroom, she feels lonely. She needs someone for company. That someone is her bear, a stuffed toy bear. Bear is her only and most important company, and he is with her always. He is the only one at her birthday party, and her everyday life is built around bear. But bear wants to go outside. He wants to get away.
The Rule is pretty simple. Outside, the world is tempting for bear, but very scary for the girl. Bear’s desire to be outside makes him real and has life.
Change…A question presents itself: Why change today? Why not yesterday or tomorrow? Something very special happens and offers the characters specific and visible goals to move the story forward. Before today, girl has her comfortable and adorable bedroom. She has many books to spend time on. And, most importantly, she has bear as her best friend. And bear, he also feels okay to stay inside the house since there is no way out, and he’s just a stuffed toy without desires for himself. However, everything changes suddenly. Because of a strong wind outside, the window becomes loose, which means bear may get out through it, so bear wants to try to escape. This becomes his specific goal. Realizing bear is trying get out, the girl decides to stop him at any cost. She never wants to lose her best and only friend. So, she has her goal too. And besides, at this moment we have a chance to show to audience why the girl doesn't want to get out. Knowing bear's trying to get out, she makes a threatening gesture in front of bear and tries to communicate in her desperate way that outside is dangerous. At least she believes so.
Chart 7
SETUP GIRL, BEAR
CHANGE GOALS
PROCESS
CLIMAX AFTERMATH
§ Character Design
Because the girl always stays indoors, her skin color tends to be very white, not like someone with darker skin who spends more time outside. With these this idea in mind, I made my first character design. See 3D model in Maya (Figure 32).
Figure 32 Figure 33
After designing in paper and modeling in Maya, it turned out to be vague for me and she had little distinct personality. She was cute and pretty with pink pajamas with a rabbit-carrot pattern, a pink hairpin and pink rabbit-like slippers. But, her character was not as strong as I expected it to be. At this point she looked just like every other girl. If I was going to use this character design, every personality I needed for my story would need too much explaining in the story. But the
character design was supposed to help to sell the story, to introduce the character, to show her personality as much as possible through a visual method. This was a good chance to make my story simpler. So I had to start my second design.
During my second design, I thought hoodie would be a good idea. During my first design, pajamas only meant girl stayed inside her bedroom. Nothing more. But I would like to tell what I believed was more important that she was afraid of outside world, which meant to me that she didn’t possess much sense of security. Then, the hoodie came to my mind and which tended to be a good choice for her clothing. It covered most of her body and only showed her face. In my opinion, this kind of clothing expressed that she didn’t want too much contact with the outside world. She wanted to protect herself. And she lived fine just with herself.
And that was exactly what I wanted. See 3D model in Maya (Figure 33). Then I
decided on yellow-color pajama trousers and pink sneakers, and I thought that would be enough.
§ Environment Design
I wanted girl’s bedroom more like for a princess. It was kind of magnificent and adorable. With everything she needed, she had no reason to want to leave.
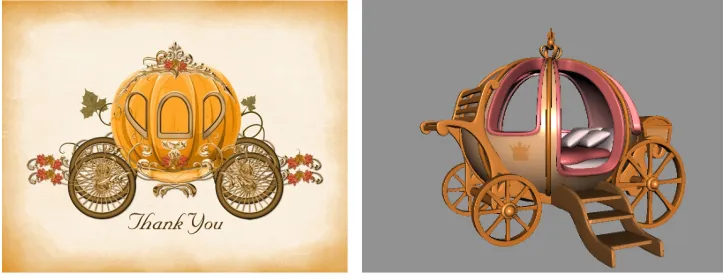
For her wardrobe, I would like to have some castle shapes. Reference image (Figure 34). It would be like a princess castle. See 3D model in Maya (Figure 35).
Then for her bed I thought a Cinderella-pumpkin-wagon-like bed would be perfect (Reference image, Figure 36). See 3D model in Maya (Figure 37). These furniture items give a strong feeling of a fairy tale.
Figure 36 Figure 37
The girl also had an adorable desk (Figure 38) and a fancy window (Figure 39).
Figure 38 Figure 39
[image:31.612.125.489.145.285.2]
PRODUCTION PROCESS
§ Rigging techniques
There are many different types of techniques for the rigging process. Usually, also some rules. You need to choose the ones that fit the needs of your animation. Not the fancy ones, but right ones. Then remember, the simpler one is always better. So I made my choices.
I. Ribbon spine joints
Since during my animation, specifically when girl chases bear around in her bedroom, it would have a lot of actions. So I would like to use ribbon technique to provide extra stretch and squash effects (Figures 40 and 41).
It’s based on Maya hair system and uses follicle nodes to place bone joints. In the hair system, those follicle nodes would distribute evenly following the shape deforming without much limitation. So it is a good choice for a cartoony style animation project.
Figure 40 Figure 41
b) Then we need joints for binding. I usually create five joints to ribbon. Snap and parent them under corresponding follicles.
c) Now we need controllers to manage them. I create two two-bone
chains, one at the top and one at the bottom. And a single one joint at the middle. So we have top, bottom and middle controllers.
d) Also we need many locators to build their functions for them. For each controller joint we create three locators, call pos, aim and up. Locator pos provides the position, like locator middle keeps inbetween top and bottom using position constraint. Locator aim keeps facing to the other using aim constraint, like top faces to bottom, bottom faces to top, and mid could face to top or bottom. And locator up provides up object for their aim constraint. So all these locators provide proper position and rotation for controller joints.
e) Now we could bind NURBS plane with controller joints. Then we
link chest and pelvis joint to the top and bottom controller bones to control them.
f) If your character may rotate her body over 360 degrees, and then you would need extra function about this ribbon. Because
limitation of aim constraint, when you rotate more than 360 degrees the rig will flip. I would use utility nodes in Maya to deal with this problem. It will calculate the rotation difference between top and bottom controller joints, then distribute evenly to all bind joints in the ribbon. From here it does the math directly so it won't cause any flip.
II. FK and IK
As rigging basic techniques, IK and FK both have their advantages and
disadvantages (Figures 42 and 43). FK works very well when you need to
animate arms or legs in perfect curves. While IK works more efficiently than FK and is very helpful when you hold something in your hand or grab onto something. For my thesis movie I believed I would need both of them. Then there is FK-IK-switch issue. During your animation process, how do you switch like from FK to IK?
Figure 42 Figure 43
[image:34.612.160.514.285.448.2]One difficult way could deal with this kind of issue. It uses some kind of complex processes to match their position during the switching process. Based on my personal experience, sometimes it works and sometimes it doesn’t.
So for my thesis project, I chose to use the easy way. I believed I could handle the switch process.
III. Facial rig structure
When I was in my Software Engineering BS program, extensibility was one of the goals professors talked about the most during the class. The main idea is to provide an interface to any extension use while minimizing the impact to existing functions.
When I interned on a 20-minute animation project as rigger, my primary duty was to fulfill all the rigging requirements on a long list. Some requirements were from animators, some were from my supervisors, and some were from directors. Not all of them knew exactly what they wanted, so the list kept changing. One week they wanted this, the next week they needed that, and the next week they wanted to get back to what they had before.
The whole experience was painful, and lacked efficiency. Every function had its own connection to every other one. One needed to change, and its own function needed to be modified, In addition, all its connections to others needed to be fixed too. When the whole system got bigger and bigger, it meant tons more work. So I tried to bring the idea of
Chart 8
The key was to utilize the additivity feature of blend shape. That meant you could add many blend shapes to a single geometry and show any effect you wanted on this geometry. So, I encapsulated every function into a single module, and output its effect to one blend shape. Then, I put all the modules’ blend shapes into a single global blend shape to show the final effect. Since every module only linked to a global blend shape, they didn’t connect to each other. If you needed to modify some module or add a new one, you only needed to worry about only it and connect it to the global blend shape. There was no work on every connection between it and all the others because there was no connection between them.
FUNCTION A FUNCTION B FUNCTION N
BLEND SHAPE GLOBAL
BLENDSHAPE A BLENDSHAPE B BLENDSHAPE N
IV. Facial rig techniques and secondary control
For facial rigging, currently there are two common techniques. One utilizes blend shape and pre-produces multiple facial expressions for animation use. The other method directly binds single-bone joints to mesh and manipulates them during the animation process. The number of joints depends on the requirement of animation detail.
Then one method was developed to combine these two ways, and make use of the advantages of both. It's called secondary control for facial rigging. It usually has primary control from blend shapes to perform facial expressions, then secondary control from joints on the face to tweak minor details on the result of blend shapes. It's very useful. It could use a blend shape to immediately achieve the expression you need, and also use joints to modify without limitation.
When turning to more technical details about how to build this secondary control, there are several things that one needs to pay attention to. At first the secondary controller attached to mesh vertex is supposed to follow the vertex’s movement. After deformed by blend shapes, the controller should still stay attached to the vertex. Usually I use plugin rivet or point-on-poly constraint in Maya to create the attachment.
We also need to deal with double-translation issue. When we move the controller to make deformation to our mesh, the controller makes translation once. However, when deformation is achieved, because of attachment, the controller moves again. So we need to fix this. I like to use expression to compensate the extra translation.
§ Rendering techniques
During the rendering process for my thesis animation, the purpose was to make the result as pretty as possible. During the process I used the technique called linear workflow.
Every image we see on our monitor has actually been manipulated already. To get a nicer look, nicer, the image is processed with gamma correction. Within our applications, such as Maya, 3DS Max, Cinema 4D, however, the space is linear, which means they treat texture and color as non-gamma-corrected. So if we directly linked our texture or color into the application, the resulting image will have mixed gamma. When you apply gamma on the final image, you double the gamma. That’s the reason why the images look like they are washed out.
POST-PRODUCTION
§ Sound effects and music
Sound effects and music always play an important part in animation, especially during an animation without any dialogue. They help to tell the story and express the needed emotions.
Nicholas Janak, a second-year animation student in SOFA, was my sound designer. He could easily understand what I needed for this film and work on it independently. That helped a lot. We first listed all sound effects we needed for the film, and then checked the sound library. If we were unlucky and could not find the desired effect, we would record it in the Foley room.
Sound effects did help a lot in the storytelling during this animation. For example, during the first shot that shows the big window, I used the sound of strong wind blowing to create the idea that the outside world is dangerous. This sound also provided the reason why the window opened for the bear. In the story, it offered a turning point and brought the story into the present.
The music provided the emotion for the film. Tim Jenkins was my composer. The first time I had contact with him, I sent him the script and detailed the emotion I needed at specific moments. Doing it this way did help a lot, not only to quickly let him understand the whole story, but it also gave him ideas and inspiration. And, this approach saved time for both of us.
INDEX
BUDGET
Working Title: Hold Start Date: May 2012
Producer: Keqing Yu End Date: May 2013
Advisor: Stephanie Maxwell Running Time: 4 minutes
Budget: $192.00 Release Format: DVD and Digital
Technique: 3D Animation
Qty Cost Total
Pre-Production
Online Tutorial 1 $270.00 $270.00
Reference Books 3 $12.00 $12.00
Research Films 7 In-Kind $0.00
Pre-Production Total $282.00
Production
Modeling/Texturing In-Kind $0.00
Animation/Rigging In-Kind $0.00
Lighting/Dynamics In-Kind $0.00
Music Composer 1 $100.00 $100.00
Sound Designer 1 $100.00 $100.00
Computer Software 1 In-Kind $0.00
2TB Hard Drive 1 In-Kind $0.00
Production Total $200.00
Post-Production
Rendering In-Kind $0.00
Compositing In-Kind $0.00
Editing In-Kind $0.00
DVDs 15 $4 $60.00
Post-Production Total $60.00
Subtotal $542.00
20% Contingency $108.40
REFERENCES
Screenplay Structure – The Five Key Turning Points of All Successful Scripts
Michael Hauge, http://www.storymastery.com/articles/30-screenplay-structure
Animation Story Writing
Bramhaa Animation, http://www.bramhaa.com/series/animation-‐storywriting