Rochester Institute of Technology
RIT Scholar Works
Theses Thesis/Dissertation Collections
12-13-2017
Virtual Notes: Projected Note-Taking System
Design
Yiran Lu
Follow this and additional works at:https://scholarworks.rit.edu/theses
This Thesis is brought to you for free and open access by the Thesis/Dissertation Collections at RIT Scholar Works. It has been accepted for inclusion in Theses by an authorized administrator of RIT Scholar Works. For more information, please [email protected].
Recommended Citation
Virtual Notes
Projected Note-Taking System Design
Yiran Lu
A Thesis Submitted in Partial Fulfillment of the
Requirements for the Degree of Masters of Fine Arts in Visual Communication Design
Rochester Institute of Technology College of Imaging Arts and Sciences School of Design
Virtual Notes
Projected Note-Taking System Design
Daniel Deluna Chief Thesis Advisor
Signature of Chief Thesis Advisor
Nancy Ciolek
Associate Thesis Advisor
Signature of Associate Thesis Advisor
Chris Jackson
Associate Thesis Advisor
Signature of Associate Thesis Advisor
Date
Date
Date Thesis for the Master of Fine Arts Degree
MFA Visual Communication Design School of Design
College of Imaging Arts and Sciences Rochester Institute of Technology
Thesis Title
Contents Page 4 5 6 11 12 29 41 42 47 51 55 56 60 62 63 107 109 111 Abstract Thesis Statement Review of Literature Process Ideation Development Project Deliverables Interactive Prototype Hardware Prototype Demo Video
Evaluation and Conclusion Evaluation Plan
Feedback and Conclusion Appendix
Copy of Proposal Survey
Abstract
Currently, traditional devices such as paper, notebooks and textbooks, and electronic devices such as computers and tablets, are the most common media people
choose to take notes on. However, there is no device designed only for note-taking with full functionalities. The project Virtual Notes is designed for people to have a much better, effortless experience on taking notes. Implemented with projector, sensor and camera, Virtual Notes offers users a projected note-taking platform. With Virtual Notes, users can take notes on desks, paper or even textbooks without actually leaving a single mark. The thesis project is undertaken independently and engaged in design research and methodologies, modeling, prototype iterations, and presentations. The project is broken into four main phases — a problem definition and research phase, an ideation / prototyping / modeling phase, a testing / critique iteration phrase, and lastly, a final development of prototype phase. The final deliverables comprise of a testable prototype and a creation of presentation materials.
Thesis Statement
This project addresses the overall problem of the
inconvenience caused by two different methods during the note-taking process. As for the traditional platform — paper, notebook or textbook, the notes are always not editable and messy if edited in several times, which takes users much more effort to recall the contents from the notes. Specifically, Some students found it preferable to take notes on the textbook for its convenience and effectiveness. As many students want to keep their textbooks clean, in consideration of collection or the condition that the textbooks are borrowed, the only way is using sticker notes, which is obviously messy and makes users easy to get lost.
The electronic platform — computers or tablets, also has lots of shortcomings. Take Evernote, the most commonly used iPad note-taking app for example. As it is restricted with iPad, the size of the note-taking area is limited. On the other hand, the cost of taking notes is much higher than traditional devices. Moreover, users can easily get distracted by other iPad apps or games when they are taking notes on the same device, which lowers the work efficiency. What is more, as the most important point, users cannot combine notes from Evernote with textbook content directly.
To solve the problems described above, the objectives of Virtual Notes functionality design are:
Make it possible and user-friendly to load, edit, save, upload and share different notes
Make it easy to write on any horizontal or vertical platform, including desk, textbook or wall
Make it possible to expand working area in a reasonable 1
Review of Literature
Design and Implementation of Low Cost Projection Based Interactive Surface
Somkuwar, Sujata, Ranjana Shendel, A. Tayal, and G.H. Raisoni
International Journal of Engineering Trends and Technology
February 2014
This article briefly introduced the technique of projection and the human interaction implemented on hand
wearable system. It showed a brief work-flow of how the projector, sensor, camera, and micro-controller worked as a system.
GoodNotes App
Time Base Technology Limited http://www.goodnotesapp.com
GoodNotes is an app is designed for iPad Pro user to take notes. It supports the Apple Pencil for pressure sensitive writing. Users can create different notebooks, just like one for each class or project – and then create individual pages within each notebook with various page styles. There’s also the ability to insert charts and images which comes in handy. GoodNotes also indexes the notes so users can quickly search them.
Livescribe Echo Smartpen Livescribe, Inc.
Review of Literature
A Virtual Keyboard Based on True-3D Optical Ranging Du, Huan, Thierry Oggier, Felix Lustenberger, and Edoardo Charbon
Proceedings of the British Machine Vision Conference, vol. 1
January 2005
This paper comprehensively introduced the system architecture and working principles during the camera catching process of virtual projection keyboard.
Algorithms for Sensor Systems
Bar-Noy, A., and Magnús M. Halldórsson Springer, 2013 edition
January 2013
This book introduced the fundamental theories and examples of wireless sensors, including the implementation and algorithms about Bluetooth.
Geometric Calibration of IR Camera Using Trinocular Vision
Yang, Rongqian, Wei Yang, Yazhu Chen, and Xiaoming Wu
Journal of Lightwave Technology December 2011
Review of Literature
Acting with Technology: Activity Theory and Interaction Design
Victor Kaptelinin and Bonnie A. Nardi The MIT Press
August 2009
This book is about developing activity theory as an approach to the investigation of information
technologies in the context of human practice. It also talked about how activity theory applied in the process of interaction design.
How Bodies Matter: Five Themes for Interaction Design Klemmer, Scott R., Björn Hartmann, and Leila
Takayama
In Conference on Designing Interactive Systems 2006
This paper drew on theories of embodiment - from psychology, sociology, and philosophy - synthesizing five themes that are particularly salient for interaction design: thinking through doing, performance, visibility, risk, and think practice. It also introduced aspects of human embodied engagement in the world with the goal of inspiring new interaction design approaches and evaluations that better integrate the physical and computational worlds.
Review of Literature
Designing for interaction: Creating innovative applications and devices. 2nd ed
Saffer, Dan New Riders August 2009
Saffer provided a plain overview of the complexities of interaction design. He introduced methodologies of creating design strategies that make the design differentiated from the competition. The book also introduced how to use design research to uncover people’s behaviors, motivations, and goals in order to design for them. It also offered interviews and case studies from industry leaders on prototyping, designing in an Agile environment, service design, ubicomp, robots, and more.
The Design of Everyday Things Donald A. Norman
Basic Books
November 5, 2013
In this entertaining and insightful analysis, cognitive scientist Donald A. Norman hails excellence of design as the most important key to regaining the competitive edge in influencing consumer behavior. Now fully
expanded and updated, with a new introduction by the author, The Design of Everyday Things is a powerful primer on how—and why—some products satisfy
Review of Literature
Behance :: Online Portfolio www. behance.net
This website showcases inspirational design examples, and lets users discover the latest work from top online portfolios by creative professionals across industries. It produces fresh inspirations and shows various design methodologies on different design fields, including interaction design, industrial design, branding and motion graphics.
Behance :: Product Design
http://www.industrialdesignserved.com
This website features top work in categories such as product design and industrial design.
Ideation Process
This project is focused on designing the interactive projected surface. The prototype device consists of a microprocessor, an IR camera, mini projector, a smart pen and flash memory. Signal and data are transmitted through Bluetooth and files can be uploaded via wifi or USB drives.
Design Concept
Microprocessor
Microprocessor works as a mini computer. It sends and receives signals and data from the projector, camera and pen.
IR Camera
The camera keeps capturing the projected interface and tells the microprocessor to display the updated interface. Mini Projector
The mini projector projects the virtual interface on any surface. It gets information from the microprocessor. Flash Disk
When the user wants to save, load or delete the note files, the microprocessor will read and write on the flash disk. Data from memory in the flash disk can upload to System Components
Ideation Process
Smart Pen
When users write with the smart pen on the projected interface, the sensor on the pen tells its position to the microprocessor.
In addition to the virtual interactive buttons on the projected interface, there are four physical buttons on the smart pen designed to integrate the whole functionalities:
Backward button: click to undo any actions. Forward button: click to redo any actions.
Select button: hold to keep in selection mode. In that mode, the user can select and move any objects or texts on the interface and also reposition or resize the interface.
[image:15.612.173.568.395.689.2]Ideation Process
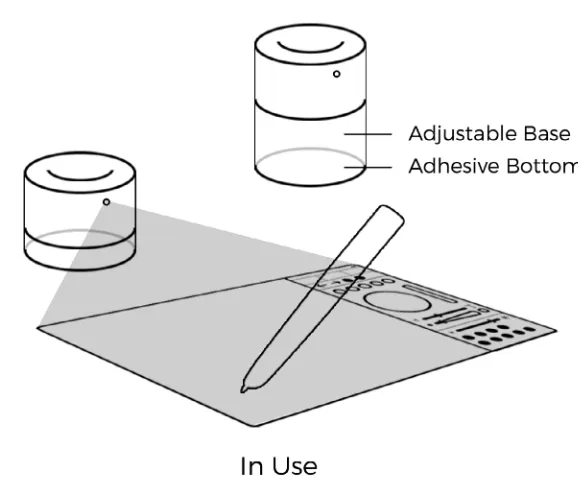
Integrated Projector
[image:16.612.223.512.291.538.2]The microprocessor, the camera, the projector and flash disk are assembled to be an integral whole, which named as “integrated projector”. As is shown below, the integrated projector has an adjustable base to fit the height of any book that user wants to take notes on and the adhesive bottom makes it easy to adhere to any horizontal or vertical surface.
Ideation Process
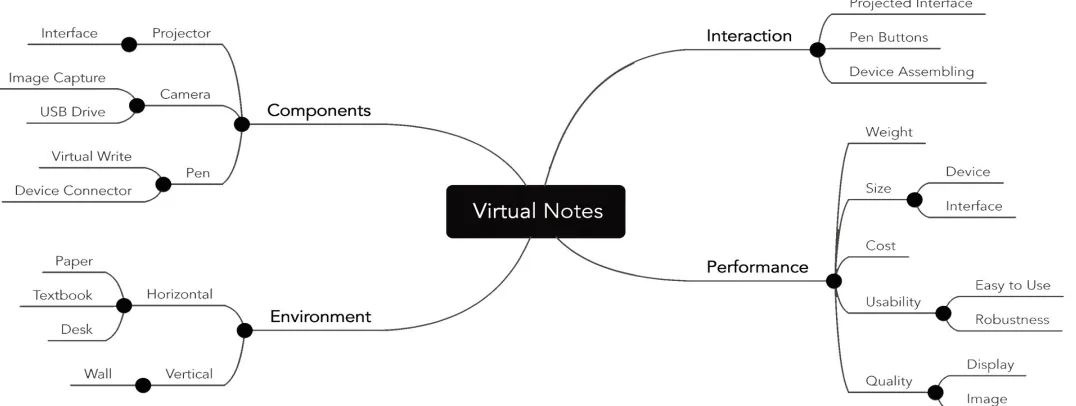
[image:17.612.41.579.290.493.2]Building mind map is the first step of project definition process. The diagram shown below is the simplified mind map.
Ideation Process
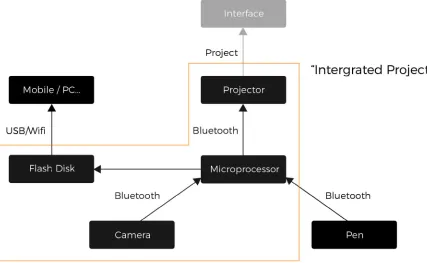
This is a simplified organizational flowchart of Virtual Notes. Microprocessor works like a computer. It sends and receives signals and data from the projector, camera and pen. When users write on the projected interface, the sensor on the smart pen tells its position to the camera and then the camera capture the interface and let the projector display the new status of the interface. When the user wants to save, load or delete the note files, the microprocessor will read and write the memory. And data from memory is able to upload to other
[image:18.612.129.556.327.590.2]devices through USB or wifi.
Ideation Process
Part I Setup and Adjustment
Take the smart pen out of the device to switch on the integrated projector. Adhere the projector to the surface and then adjust the height of the base to fit the height of the textbook.
Part II Writing and Editing
Use the smart pen to take notes and interact with the menu panel. The panel includes four main parts: file management, edit, tool selection, and settings. There is also a tutorial for the new user. Specifically, in the file management section, users can sync the note to the desired device via Bluetooth/wifi/physical connection.
Part III End
Insert the smart pen back to the device to switch off. Detach the projector from the surface.
Ideation Process
[image:20.612.57.565.139.665.2]Ideation Process
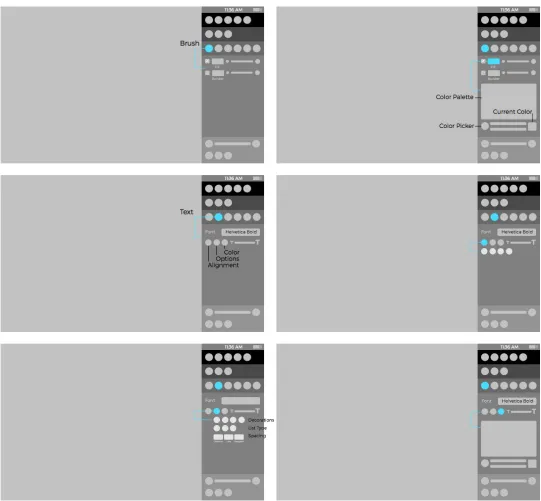
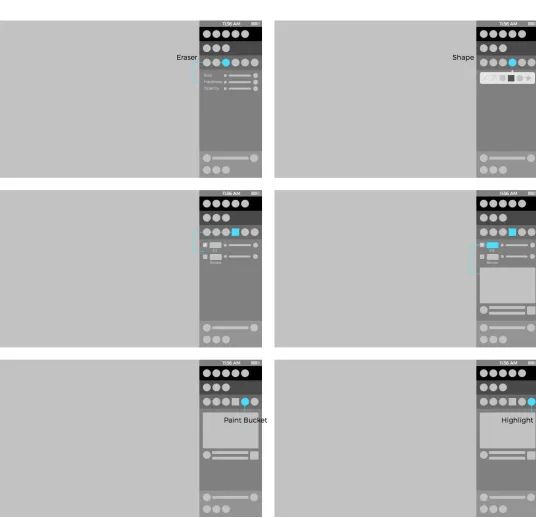
As the main part of the projected interface, the menu panel can be divided into four parts:
The first part is file panel, which includes six functions: open a new file, open an existing file, save the file, upload the file, delete the file and retrieve the file. The confirmation window will pop up once “delete” icon is tapped, and file direction window will appear on the interface once “open” icon is tapped.
The second part is edit panel. The user can go backward or forward of the action and also clear the document. The confirmation window will pop up before the “clear” function is activated.
The third part is tool panel. It consists of a color palette, which is able for the user to select colors and save the chosen color, and two resize bars to change the size of brush and text.
The last part is preferences panel. The user can adjust the brightness of the screen, select preferred theme color, and languages.
Ideation Process
Figure 6: Wireframe - Menu Divided by Functions
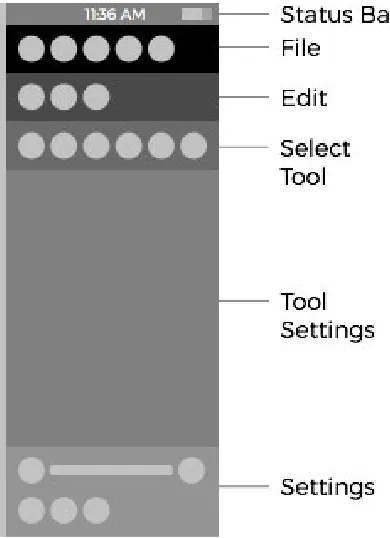
The left part is the projected surface for note taking, and the right part is the menu panel. The menu panel is divided into six parts:
Status bar: displays time and power.
File panel: create a new file, open files, save the file or save as a copy and sync the file to user’s computer. Edit panel: copy/paste items and clear the content. Select tool panel: select note-taking tools.
Tool settings panel: set parameters of the selected tool. System settings panel: adjust the brightness of the interface and select preferred languages.
Wireframe
Ideation Process
[image:23.612.34.579.126.663.2]File panel
Ideation Process
[image:24.612.35.576.154.655.2]Select tool & tool settings panel
Ideation Process
[image:25.612.38.574.140.658.2]Select tool & tool settings panel
Ideation Process
[image:26.612.240.575.160.591.2]System settings panel
Ideation Process
[image:27.612.42.572.159.663.2]Target Audience Persona 1
Ideation Process
[image:28.612.40.572.159.659.2]Target Audience Persona 2
Ideation Process
[image:29.612.40.574.160.657.2]Target Audience Persona 3
Development Process
In the previous stage, the functionalities and the whole structure of Virtual Notes had been figured out. Then in the development process, visual elements and the layout style were designed with the principle of “keep it simple“. The content was critiqued and refined iteratively before jumping into the interactive prototype design and implementation process.
Color Palette
White (#FFFFFF)
For borders, icons and text Neat and simple
Distinctive on different surfaces Green (#96FF96)
For regular icons and interactive instructions Meanings of energy and safety
Red (#FF6464)
For the warning icon Meaning of warning
# FFFFFF # 96FF96 # FF6464
Development Process
Sans serifs are always preferable for their simplified letterforms, which make them easier to recognize. Montserrat and Helvetica, as two excellent sans serif fonts, are used in this project.
Typeface for the prototype Font Name: Montserrat Light
ABCDEFGHIJK
abcdefghijk
0123456789
Typeface for title in the demo video Font Name: Montserrat Bold
ABCDEFGHIJK
abcdefghijk
0123456789
Typeface for descriptive text and slogan in the demo video
Font Name: Helvetica Neue LT Std 47 Light Condensed
ABCDEFGHIJK
abcdefghijk
Development Process
To show the icons in the interface clearly, which are designed in white color, all of them are set to black color in this document.
[image:33.612.241.575.159.483.2]Icon Development
Figure 14: Icon Design Sketches
Development Process
New
Section: File Function:
Create a new file Icon Development
Open... Section: File Function:
Open an existing file
Save
Section: File Function:
Development Process
File Saved Section: File Function:
Indicate that the current file has been saved
Icon Development
Save As... Section: File Function:
Save current file as a new file
Sync
Section: File Function:
Development Process
Help
Section: File Function:
Enter/exit help mode Icon Development
Copy
Section: Edit Function:
Copy selected object
Paste
Section: Edit Function:
Development Process
Clear
Section: Edit Function:
Clear everything on current page
Icon Development
Layer
Section: Edit Function:
View and edit layers
Locked Section: Edit Function:
Development Process
Unlocked Section: Edit Function:
Indicate that the interface has been unlocked, which means it can be resized and repositioned. Tap to get it unlocked.
Icon Development
Brush
Section: Tool Function:
Draw on current file
Text
Section: Tool Function:
Development Process
Eraser
Section: Tool Function:
erase any projected objects, color or text.
Icon Development
Paint Bucket Section: Tool Function:
Set background color of current file
Shape
Section: Tool Function:
Development Process
Highlight Section: Tool Function:
Highlight text on the physical resource (books, notes...)
Icon Development
Language Toolkit
Section: System Settings Function:
Development Process
The layout style was designed to be neat and simple since the main function of this product is taking notes. On the other hand, white was selected as the dominant color in the color palette so that the interface could be distinctive on different surfaces of any color.
[image:41.612.239.579.196.718.2]Layout Style
Interactive Prototype
[image:44.612.36.577.200.643.2]Design Implementation The interactive prototype was built in software called Flinto, which allowed the designer to activate buttons on the screen and link to any pages with various of transaction effects. The prototype could be displayed on any screen.
Interactive Prototype
Sample Screen Shots
Default Status
Interactive Prototype
Sample Screen Shots
Help Status
Interactive Prototype
Sample Screen Shots
Setting Background Color
Hardware Prototype
[image:49.612.62.576.204.599.2]Sketches
Hardware Prototype
Integrated Projector As is shown below, the integrated projector has an adjustable base to match the height of any book that the user wants to take notes on. When the smart pen is taken out of the projector, with the core of the projector adjusted to a certain minimum height, the projector would be switched on. It also has an adhesive bottom to make it easy for the integrated projector to adhere to any horizontal or vertical surface.
Hardware Prototype
[image:51.612.280.537.283.713.2]Demo Video
Figure 21: User Scenarios
The demonstration video is designed to show the interaction activities in a dynamic form. There are two users in this video, which represents the target audiences, a student, and an employee. Different scenarios were showcased in the video. It also
Demo Video
Video Screen Shots
Resizing workspace
Drawing a circle
Projecting on the wall
Evaluation and Conclusion Evaluation Plan
Evaluation Plan
40% of the audience: design students and designers They can give some suggestions on the aspects of aesthetic and design.
60% of the audience: non-design people
As Virtual Notes designed for college students and designers, it is also crucial to get feedback from people who don’t have any design background.
Audience
During the design process, testing whether all functionalities are covered and work well in the interactive prototype is crucial. Here are the functionalities that were tested:
Guide for new user Note taking
Note editing File operation
Preferences & Setting Error prevention & recovery
As a complement of the prototype, whether the demo video has explained the whole story and whether the information is clear enough were also tested.
Test Cases
Evaluation critically examines whether the project works well with the user. By collecting and analyzing information in the surveys, which are from users in different age, culture or occupation, the effectiveness of the product could be enhanced much more precisely.
User Testing
The user testing process was designed in two forms: the face-to-face interview and the survey. In the first method, interviews got started right after the users were asked to finish different test cases mentioned above. It would be precise and obvious according to their response. In the other method, it was easy to get their personal information and their feedback towards the interactive prototype and the demo video in various aspects.
Face-to-Face Interview Questions
How would you describe Virtual Notes in one sentence? How does Virtual Notes compare to physical notebooks and iPad?
On a rating scale from 1 to 10; how do you rate Virtual Notes?
What do you like most and least about Virtual Notes? Which feature (or features) of Virtual Notes are most and least important to you?
User Testing
Feedback
After collecting and analyzing feedback from all the face-to-face interviews and surveys, the author got a clearer vision of what was effective and what could be improved about the project. Here is some typical feedback:
“Really like the experience and visual style.”
According to the face-to-face interviews, more than 80% of the users indicated that they wanted to have Virtual Notes as their note-taking tool. According to the data from the surveys, 100% of the users gave 5 points to the visual style.
“Some icons are kind of misleading.”
One of the users indicated that the “open“ icon reminded them of a share button.
“Would be better if people can take notes in the interactive prototype.”
At the end of the interview, some of the users added that it would be better if the prototype is fully interactive. “Would like to see more details in the demo video.” Some of the users indicated that though the demo video provided clear instructions of how Virtual Notes worked, it would be better if the “file” operations were introduced in the video.
1
2
3
Conclusion and Refinements
Virtual Notes is a new note-taking system. The
functionalities are designed purely around the note-taking task with neat, minimal visual elements, which means people won’t get distracted while taking their notes.
However, it is not only a system design; it is a lifestyle —— free and sharing. It breaks limitations of taking notes: the size, the place, the platform, and the environment. It also helps people make their books note-free. On the other hand, Virtual Notes let people sync notes and share notes with others more conveniently.
As a system design project, Virtual Notes should be continued after the thesis show. The next steps of this project will be focusing on these aspects:
Do more research about the icon design and refine icons in the prototype.
Shoot more scenarios and add more details in the demo video so that the users could get more information
about the experience.
Developing the interactive prototype with coding and real-time simulation to make it fully interactive and let the user explore the tools on the screen.
1
2
Appendix
Copy of Proposal Survey
Virtual Notes
Thesis Proposal forthe Master of Fine Arts Degree
Submitted by: Yiran Lu
Rochester Institute of Technology College of Imaging Arts and Sciences School of Design
Thesis Committee Approval
Chief Thesis Advisor Professor Daniel Deluna
MFA Visual Communication Design
Signature of Chief Thesis Advisor Date
Associate Thesis Advisor Professor Chris Jackson
MFA Visual Communication Design
Signature of Associate Thesis Advisor Date
Associate Thesis Advisor Professor Nancy Ciolek
MFA Visual Communication Design
Table of
Content
1 2 3 3 4 4 5 7 7 7 9 11 26 26 26 27 30 32 33 34 35 36 37 38 Abstract Problem Statement Review of LiteratureAbstract
Nowadays, the traditional device such as paper, notebook or textbook and electrical device such as computer and tablet are two most common media people generally choose to take notes. However, there is no such a device designed only for the note-taking task and provide full
functionalities. The project VNO, which is short for Virtual Notes, is focused on designing for people to have a much better, effortless experience on taking notes compared to the note-taking methods mentioned above. Implemented with projector, sensor, camera and software, VNO provides user a free-range, editable note-taking environment. With VNO, users can take notes on desks, paper or even textbooks without actually leaving a single mark.
The thesis project is undertaken independently and engaged in design research and methodologies, modeling, prototype iterations and
presentations. The project is broken into four main phases — a problem definition and research phase, an ideation / prototyping, / modeling phase, a testing / critique iteration phrase, and lastly, a final development of
prototype phase. The final deliverables comprise of a testable prototype and a creation of presentation materials.
Key words: virtual reality, notes, projector system, IR camera, UI/UX, modeling, motion graphics, branding, industrial design
Problem
Statement
This project addresses the overall problem of the inconvenience caused by two different methods during the note-taking process. As for the physical device — paper, notebook or textbook, the notes are always not editable and messy if edited in several times, which takes user much more effort to recall the contents from the notes. Specifically, Some students found it preferable to take notes on textbook for its conveniency and effectiveness. As many students want to keep their textbook clean in the consideration of collection or in the condition that the textbooks are borrowed, the only way to keep the textbook clean is using sticker notes, which is obviously messy and easy to get lost. As for the electrical device — computer or
tablet, there are also lots of shortcomings. Take Evernote, the most
commonly used iPad note-taking app for example, as it is restricted with iPad, the size of the note-taking area is limited. On the other hand, the cost of taking notes is much higher than physical device. Moreover, people can easily get distracted by other iPad apps or games when taking notes on the same device, which lowers the work efficiency. What is more, as the most important point, user cannot combine notes from Evernote with textbook content directly.
To solve the problems described above, the objectives of VNO functionality design are:
1) make it possible and user-friendly to load, edit, save and upload different notes
2) make it easy to write on any horizontal or vertical platform, including desk, textbook or wall
3) make it possible to expand working area in a reasonable range 4) keep the costs to the lowest
Review of
Literature
Somkuwar, Sujata, Ranjana Shendel, A. Tayal, and G.H. Raisoni Institute of Engineering and Technology for Women, Nagpur. 2014. Design and
implementation of low cost projection based interactive surface.
International Journal of Engineering Trends and Technology 8 (10): 509-11. This article briefly introduced the technique of projection and the
human interaction implemented on hand wearable system. It showed a brief workflow of how the projector, sensor, camera and micro-controller worked as a system.
Note-taking App “GoodNotes” for iPad
GoodNotes is an app is designed for iPad Pro user to take notes. It supports the Apple Pencil for pressure sensitive writing. Users have the ability to create multiple notebooks – like one for each class or subject – and then create individual pages within each notebook with varying page styles. There’s also the ability to insert charts and images which definitely comes in handy. GoodNotes also indexes the notes so users can quickly search them.
Livescribe Echo Smartpen
The smartpen records everything the user write and hear. It can also replay the meetings or lectures simply by tapping on the notes and saves notes and audio recordings to user’s computer. It requires Echo Desktop
software for Mac or Windows, designed notebook, ink cartridges & smartpen cap (all the supplies have to be purchased before using the smartpen)
3
Review of
Literature
4
Kaptelinin, Victor, and Bonnie A. Nardi. Acting with technology: Activity theory and interaction design. Mit Press, 2006.
This book is about developing activity theory as an approach to the investigation of information technologies in the context of human
practice. It also talked about how activity theory applied in the process of interaction design.
Design Theory
Du, Huan, Thierry Oggier, Felix Lustenberger, and Edoardo Charbon. A Virtual Keyboard Based on True-3D Optical Ranging.
This paper comprehensively introduced the system architecture and working principles during the camera catching process of virtual projection keyboard.
Bar-Noy, A., and Magnús M. Halldórsson. 2013. Algorithms for sensor systems: 8th international symposium on algorithms for sensor systems, wireless ad hoc networks and autonomous mobile entities, ALGOSENSORS 2012, ljubljana, slovenia, september 13-14, 2012. revised selected papers. Vol. 7718. New York;Berlin;: Springer.
This book introduced the fundamental theories and examples of wireless sensors, including the implementation and algorithms about bluetooth.
Yang, Rongqian, Wei Yang, Yazhu Chen, and Xiaoming Wu. 2011. Geometric calibration of IR camera using trinocular vision. Journal of Lightwave
Technology 29 (24): 3797-803.
This article introduced the methodology of how to calibrate IR camera to be geometrically accurate.
5
Review of
Literature
Design Theory Design MethodologyKlemmer, Scott R., Björn Hartmann, and Leila Takayama. “How bodies matter: five themes for interaction design.” In Proceedings of the 6th conference on Designing Interactive systems, pp. 140-149. ACM, 2006.
This paper drew on theories of embodiment - from psychology, sociology, and philosophy - synthesizing five themes that are particularly salient for interaction design: thinking through doing, performance, visibility, risk, and thick practice. It also introduced aspects of human embodied
engagement in the world with the goal of inspiring new interaction design approaches and evaluations that better integrate the physical and
computational worlds.
Saffer, Dan. 2010. Designing for interaction: Creating innovative applications and devices. 2nd ed. Berkeley, CA;London;: New Riders.
Saffer provided a plain overview of the complexities of interaction design. He introduced methodologies of creating design strategies that make the design differentiated from the competition. The book also introduced how to use design research to uncover people’s behaviors, motivations, and goals in order to design for them. It also offered interviews and case studies from industry leaders on prototyping, designing in an Agile environment, service design, ubicomp, robots, and more.
6
Review of
Literature
Design
Methodology www. behance.netOnline Portfolio
This website showcases great design examples and let users discover the latest work from top online portfolios by creative professionals across industries. It produces fresh inspirations and shows various design methodologies on different design fields, including interaction design, industrial design, branding and motion graphics.
http://www.industrialdesignserved.com
7
Design
Ideation
This project is focused on designing the interactive projected surface. The prototype device consists of microprocessor, an IR camera, mini projector, a smart pen and flash memory. Signal and data is transmitted through bluetooth and files can be uploaded via wifi or USB drives.
Concept
Microprocessor
Microprocessor works as a mini computer. It send and receive signals and data from the projector, camera and pen.
IR Camera
The camera keeps capturing the projected interface and tell the microprocessor to display the updated interface.
Mini Projector
The mini projector projects the virtual interface on any surface. It gets information from the microprocessor.
Smart Pen
When users write with the smart pen on the projected interface, sensor on the pen tells its position to the microprocessor.
Flash Disk
When user want to save, load or delete the note files, the microprocessor will read and write on the flash disk. Data from the memory in the flash disk is able to upload to other device through USB or wifi.
Design
8
Design
Ideation
“Integrated Projector”
For the design ideation of product, the microprocessor, the camera, the projector and flash disk are assembled together,
which is named as “integrated projector”. As is shown below, the
integrated projector has an adjustable base to fit the height of any book that user wants to take notes on and the adhesive bottom makes it easy to adhere on any horizontal or vertical surface.
Design
9
Design
Ideation
LOGO Logo:
Concept:
VNO = Virtual Notes Branding
10
Design
Ideation
Typography LOGO
Font Name: Moon Bold
ABCDEFGHIJK
abcdefghijk
0123456789
APP Default Font
Font Name: Montserrat Light
ABCDEFGHIJK
abcdefghijk
0123456789
11
Design
Ideation
Mind Map
Building mind map is the first step of project definition process. The diagram shown below is the simplified mind map.
12
Design
Ideation
Organizational Flowchart
This is a simplified organizational flowchart of Virtual Notes. Microprocessor works as a computer. It send and receive signals and data from the
projector, camera and pen. When users write on the projected interface, sensor on the pen tells its position to the camera and then the camera capture the interface and let the projector display the new status of the interface. When user want to save, load or delete the note files, the microprocessor will read and write the memory. And data from the memory is able to upload to other device through USB or wifi.
13
Design
Ideation
User-End Process Flowchart Part I Setup and Adjustment
Take the smart pen out of the device to switch on the integrated projector. Adhere the projector to the surface and then adjust the height of the base to fit the height of the textbook.
Part II Writing and Editing
Use the smart pen to take notes and interact with the menu panel. The panel includes four main parts: file management, edit, tool selection and settings. There is also a tutorial for the new user. Specificically, in the file management section, user can sync the note to desired device via bluetooth/wifi/physical connection.
Part III End
Insert the smart pen back to the device to switch off. Detach the projector from the surface.
14
Design
Ideation
User-End Process Flowchart Content
15
Design
Ideation
Interface Wireframe
This is the wireframe of the menu panel. As is shown below, the menu has four parts.
The first part is file panel, which includes 6 functions: open a new file, open an existing file, save the file, upload the file, delete the file and retrieve the file. Confirmation window will pop up once “delete” icon is tapped and file direction window will appear on the interface once “open” icon is tapped. The second part is edit panel. User can go backward or forward of the action and also clear the document. Confirmation window will pop up once “clear” icon is tapped.
The third part is tool panel. It consists of a color palette, which is able for user to select color and save the chose color, and two resize bars to change the size of brush and text.
The last part is preferences panel. User can adjust brightness of the screen, select preferred theme color and languages.
16
Design
Ideation
Smart Pen Wireframe
Backward button: click to undo any actions. Forward button: click to redo any actions. Menu button: click to hide or show the menu.
Select button: hold to keep in selection mode. In that mode, user can select and move any objects or texts on the interface and also reposition or resize the interface.
17
Design
Ideation
Interface Wireframe
The left part is the projected surface for note taking and the right part is the menu panel. The menu panel is divided into six parts:
1. status bar: displays time and power.
2. file panel: create a new file, open files, save the file or save as a copy and sync the file to user’s computer.
3. edit panel: copy/paste items and clear the content. 4. select tool panel: select note-taking tools.
5. tool settings panel: set parameters of selected tool.
6. system settings panel: adjust brightness of the interface and select preferred languages.
18
Design
Ideation
Interface Wireframe The file panel
19
Design
Ideation
Interface Wireframe
Select tool & tool settings panel Content
20
Design
Ideation
Interface Wireframe
Select tool & tool settings panel Content
21
Design
Ideation
Interface Wireframe System settings panel Content
22
Design
Ideation
Demo Video Storyboard
The demo video combines several scenarios into a short story. Content
23
Design
Ideation
Demo Video Storyboard Content
24
Design
Ideation
Demo Video Script Content
Organization
Time Code Topic Visual Element Audio
0:00 - 0:05 Project Title logo & tagline “VNO: a new era of note taking“ 0:05 - 0:15 Ideation 3d prototype
0:15 - 0:30 Setup in a classroom, actor sit down in front of a table and take out his textbook and VNO from his backpack, then take the pen out of the device to setup
0:30 - 0:35 Setup actor opens the book and adjust height of the base & position of the interface 0:35 - 0:40 Functionalities change size &
brightness 0:40 - 0:45 Functionalities start takings
notes on book 0:45 - 1:10 Functionalities edit note, type,
25
Design
Ideation
Demo Video Script Content
Organization
Time Cide Topic Visual Element Audio
1:10 - 1:20 Error Prevention accidentally delete notes file and then retrieve 1:20 - 1:35 Functionalities save note and
upload to his PC, insert pen back 1:35 - 1:50 Error Prevention accidentally
drop VNO to floor, time stop, show product robustness, hit floor but still fine, actor smily gets it back
1:50 - 2:00 Functionalities actor goes back home, open his PC and review the notes
2:00 - 2:30 Environment use product on wall, desk, floor & ground
“You can use VNO wherever you want“ 2:30 - 2:35 Ending logo “VNO, your
26
Methodological
Design
1. Project definition 2. Talk with advisors
3. Collect information & Research 4. Brainstorming & Sketching 5. Draft designs
6. Critique and refinement (iterative step) 7. Testing
8. Finalize the design
27
Methodological
Design
28
Methodological
Design
29
Methodological
Design
30
Methodological
Design
User Scenario1
31
Methodological
Design
User Scenario3
32
Deliverables
Interactive Prototype
The interactive prototype is based on online webpages.
It gives detailed descriptions of all functions of VNO by letting user to explore numbers of interaction cases. It also gives instructions on how to prevent errors that may happen during the using process.
Demo Video
The demo video can be divided into three parts according to the contents. The first part of the video will show the design concept and ideation. For the second part, functionalities and error prevention of the prototype will be shown in the video. For the last part, it shows different environmental conditions that VNO is compatible to be used. The duration of the demo video is about 2 minutes and 40 seconds.
Device Model
33
Implementation
Strategies
Interactive Prototype 1. Concept
2. Flowchart 3. Wireframes 4. Layout 5. Prototype
6. Test and Revision
Demo Video 1. Storyboard 2. Script writing
3. Record in-use videos 4. Add prototype layout 5. Add device model 6. Combine and Render 7. Revision
34
Dissemination
The project will be disseminated on these platforms: 1. RIT MFA VCD Thesis Show
2. Behance
www.behance.net
35
Evaluation
Plan
During the design process, testing whether all functionalities are covered and works well is very important. Here is the functionalities that will be tested:
• Guide for new user • Note taking
• Note editing • File operation
• Preferences & Setting • Error prevention & recovery Test Cases
Usability Survey
Survey of the prototype usability will be conducted to students from RIT and people outside RIT. The survey will include the following criteria:
• Visibility of system status
• Match between system and the real world • User control and freedom
36
Pragmatic
Considerations
As an interaction design project, the main budget of the project will be focused on the making of demo video and the prototype evaluation. Here is the budget plan:
Acting 200
Video Recorder Rental 10
Print 20
37
38
Bibliography
1. Somkuwar, Sujata, Ranjana Shendel, A. Tayal, and G.H. Raisoni Institute of Engineering and Technology for Women, Nagpur. 2014. Design and
implementation of low cost projection based interactive surface.
International Journal of Engineering Trends and Technology 8 (10): 509-11. 2. Du, Huan, Thierry Oggier, Felix Lustenberger, and Edoardo Charbon. “A Virtual Keyboard Based on True-3D Optical Ranging.”
3. Bar-Noy, A., and Magnús M. Halldórsson. 2013. Algorithms for sensor systems: 8th international symposium on algorithms for sensor systems, wireless ad hoc networks and autonomous mobile entities, ALGOSENSORS 2012, ljubljana, slovenia, september 13-14, 2012. revised selected papers. Vol. 7718. New York;Berlin;: Springer.
4. Yang, Rongqian, Wei Yang, Yazhu Chen, and Xiaoming Wu. 2011. Geometric calibration of IR camera using trinocular vision. Journal of Lightwave Technology 29 (24): 3797-803.
5. Kaptelinin, Victor, and Bonnie A. Nardi. Acting with technology: Activity theory and interaction design. Mit Press, 2006.
6. Klemmer, Scott R., Björn Hartmann, and Leila Takayama. “How bodies matter: five themes for interaction design.” In Proceedings of the 6th conference on Designing Interactive systems, pp. 140-149. ACM, 2006. 7. www. behance.net
39
Bibliography
10. https://www.livescribe.com/en-us/smartpen/echo/ 11. https://itunes.apple.com/us/app/goodnotes-4-notes-pdf/ id778658393?mt=8
Persona Images
Bibliography
1. Somkuwar, Sujata, Ranjana Shendel, A. Tayal, and G.H. Raisoni Institute of Engineering and Technology for Women, Nagpur. 2014. Design and implementation of low cost projection based interactive surface.
International Journal of Engineering Trends and Technology 8 (10): 509-11.
2. Du, Huan, Thierry Oggier, Felix Lustenberger, and Edoardo Charbon. “A Virtual Keyboard Based on True-3D Optical Ranging.”
3. Bar-Noy, A., and Magnús M. Halldórsson. 2013. Algorithms for sensor systems: 8th international
symposium on algorithms for sensor systems, wireless ad hoc networks and autonomous mobile entities,
ALGOSENSORS 2012, ljubljana, slovenia, september 13-14, 2012. revised selected papers. Vol. 7718. New York;Berlin;: Springer.
4. Yang, Rongqian, Wei Yang, Yazhu Chen, and Xiaoming Wu. 2011.
Geometric calibration of IR camera using trinocular vision. Journal of
Lightwave Technology 29 (24): 3797-803.
5. Kaptelinin, Victor, and Bonnie A. Nardi. Acting with technology: Activity theory and interaction design. Mit Press, 2006.
6. Klemmer, Scott R., Björn Hartmann, and Leila Takayama. “How bodies matter: five themes for interaction design.” In Proceedings of the 6th
Bibliography
7. www. behance.net
8. www.industrialdesignserved.com
9. www.nngroup.com/articles/ten-usability-heuristics/ 10. https://www.livescribe.com/en-us/smartpen/echo/ 11. http://www.goodnotesapp.com
12. Saffer, Dan. 2010. Designing for interaction: Creating innovative
applications and devices. 2nd ed. Berkeley, CA;London;: New Riders.
13. Norman, Donald A., and Inc Books24x7. 2013;2002;. The design of
everyday things. Revis and expand;1;1st Basic paperback.; ed. New York:
Basic Books.