Theses Thesis/Dissertation Collections
5-22-2015
Clarifying Techniques for Unique Robotic
Surgeries
Samantha Bundy [email protected]
Follow this and additional works at:http://scholarworks.rit.edu/theses
This Thesis is brought to you for free and open access by the Thesis/Dissertation Collections at RIT Scholar Works. It has been accepted for inclusion in Theses by an authorized administrator of RIT Scholar Works. For more information, please [email protected].
Recommended Citation
A Thesis Submitted to the Faculty of
The College of Health Sciences & Technology
Medical Illustration
In Candidacy for the Degree of
MASTER OF FINE ARTS
Clarifying Techniques for Unique Robotic Surgeries
by
Samantha Bundy
Thesis Title: Clarifying Techniques for Unique Robotic Surgeries
Thesis Author: Samantha R. Bundy
Committee Members:
Chief Advisor: James Perkins, MS, MFA, CMI
Associate Advisor: Glen Hintz, MS
Associate Advisor: Khurshid Guru, MD
ABSTRACT
My thesis, Clarifying Techniques for Unique Robotic Surgeries, is a teaching tool comprised of
surgical video paired with medical illustrations. The intended learner is robot-asstisted surgeons
who are looking to expand their skills by learning new techniques and procedures that have
previously been done without robot assistance. This tool is originally the brainchild of Dr.
Khurshid Guru, a urology surgeon at Roswell Park Cancer Institute, whose skills are renowned
world-wide in the robotic surgery community. Dr. Guru has developed and used these techniques
with great success for urological cancer treatment. As a leader in his field, he was eager to share
these new methods with his colleagues via a visual teaching tool. It was the objective of my
thesis to accomplish this for two different procedures: Robot-assisted Small Bowel/Neo-Bladder
Fistula Repair and Robot-assisted Uretero-ileal Anastomosis of a Duplicated Ureter. This written
portion of my thesis discusses the details of both surgeries as well as my process of creating
TABLE OF CONTENTS
Abstract………. 3
Introduction………5
Scientific Background………..7
The Body of Work……….10
Conclusion………..19
INTRODUCTION
Clarifying Techniques for Unique Robotic Surgeries could not have existed without the guidance
of Dr. Khurshid Guru who, in addition to being a practicing surgeon and Director of Robotic
Surgery at Roswell Park Cancer Institute, is also the Program Director for the Applied
Technology Laboratory for Advanced Surgery (ATLAS). I met Dr. Guru while interning at
ATLAS and I approached him about possible projects for my thesis. After discussing my reasons
for pursuing medical illustration and the roles it can play as a tool for education, he introduced
me to two unique surgeries: Robot-assisted Small Bowel/Neo-Bladder Fistula Repair; and
Robot-assisted Uretero-ileal Anastomosis of a Duplicated Ureter. My thesis work surrounding
these surgeries had one primary goal: education through clarity. It is not the surgeries themselves,
but the use of robotic assistance that makes these procedures unique. There are certain urological
surgeries, such as the Robot-Assisted Radical Cystectomy (RARC), that are relatively well
known as robotic procedures. However, Dr. Guru performs several surgeries (including the two I
illustrated for my thesis) using robotic methods that few, if any, surgeons have attempted. Dr.
Guru firmly believes that the minimally invasive method, precision and faster recovery time
robotic surgery provides is extremely beneficial to patients (particularly those battling cancer).
This is why he is committed to pushing the boundaries of robotic surgery.
The Robot-assisted Small Bowel/Neo-Bladder Fistula Repair is a fairly unique procedure
that is only necessary when recovery from a previous urological surgery has failed. The ultimate
goal of the surgery is to separate organs that have become fused together during recuperation. In
to the area of the small intestine where it was removed. In order to achieve this separation,
surgeons must first remove massive amounts of scar tissue that have formed around the fistula.
Then after the two organs have been separated and repaired, additional measures must be taken
to assure that they will not merge again.
The Robot-assisted Uretero-ileal Anastomosis of a Duplicated Ureter is unique in that it
is not, by itself, an entire surgery. In the case of the surgery I illustrated, it was simply an
additional measure surgeons needed to take during a Cystoprostatectomy. A routine
Cytoprostatectomy involves the surgical removal of the urinary bladder and prostate. In a few
cases surgeons discover during the procedure that the patient has a duplicated ureter. That is to
say: the ureter contained two passageways leading from the kidney to the bladder. This
duplication can occur on the right, left or both ureters and is a fairly common anomaly. Even
though this minor mutation rarely causes any problems by itself, surgeons are often concerned
that duplicated ureters could create certain complications during recovery. So they often feel it is
in the patient’s best interest to reconfigure the ureter to a single lumen before attaching it to the
new bladder (again, formed from a section of the ileum).
I selected this project, and these two particular surgeries for several reasons. First, I was
really adamant about wanting to do my thesis with Roswell Park (which is why I put in time with
them over the summer on a few small projects). Having a family history of cancer and a father
who worked in cancer research for 35 years, I felt very strongly that I wanted my thesis to
directly support new innovations in cancer treatment. Coincidentally, at the time I was being
introduced to my thesis options, I was starting a surgical illustration class. I found the
illustrating the various procedures to be much more complex and challenging than many of my
previous projects. When I first entered the program and started to hypothetically discuss thesis
content, I was advised to choose something that I was passionate about, because it would make
up a significant portion of my portfolio and could potentially lead to a job doing similar work.
So, naturally, I felt that this project fulfilled that criterion. Finally, when Dr. Guru explained to
me the uniqueness of the techniques used in each surgery, his goal to pair illustrations and video
to teach other surgeons and warned me that this would be a challenging project (since no
illustrations for these surgeries already existed) I was convinced this was the project for me.
Scientific Background
Robot-assisted Small Bowel/Neo-Bladder Fistula Repair
Small Bowel/Neo-Bladder Fistula Repair, even without robotic assistance, is a fairly rare
procedure. This is because it is usually only required when recovery from a previous surgery has
gone awry. In the case of the surgery I illustrated, the patient was a 63-year-old male who had
previously undergone a Robot-radical Cystoprostatectomy. The standard procedure when
removing the bladder, at least at Roswell, is to use a section of the small intestine to construct a
“Neo-Bladder” and connect the ureters to it. However, sometime after the Cystoprostatectomy
(which included construction of a Neo-Bladder), this patient found that he was passing food
particles in his urine. This was a direct result of his Neo-Bladder migrating a little in the
abdominal cavity and adhering to his small intestine, specifically the area where tissue was
the small intestine and Neo-Bladder and this connection allowed for the aforementioned passage
of food particles.
In order to rectify this abnormal passage, a second procedure was necessary: the
Robot-assisted Small Bowel/Neo-Bladder Fistula Repair. This surgery begins with the “lysis of
adhesions”, the removal of excess scar tissue surrounding the affected area. After enough scar
tissue has been removed, the surgeon identifies the Neo-Bladder and its unintended link to the
small intestine. A dye is used to help identify the specific location of the fistula. When the
Neo-Bladder and small intestine are cut apart, a deep blue/purple liquid spills from the passageway
that connects them, indicating that the connection has be severed in the correct location.
Dissection continues until the tissues are completely separated from each other. This leaves the
small intestine with a large opening, which is quickly repaired using an instrument called a
Tri-Staple ™. Any damage to the Neo-Bladder is fixed with traditional suturing. In addition the
Neo-Bladder also undergoes a procedure called an “omental wrap”. As the name suggests, it
involves using a portion of the greater omentum to create an extra barrier between the small
intestine and Neo-Bladder, effectively preventing a reoccurrence of the fistula.
Robot-assisted Uretero-ileal Anastomosis of a Duplicated Ureter
The Robot-assisted Uretero-ileal Anastomosis of a Duplicated Ureter was not so much a major
surgery in itself, but instead a unique step that became necessary during a Robot-assisted Radical
Cystoprostatectomy. In this particular case the 73-year-old male receiving the surgery was found
to have a duplicated ureter. In other words, when the ureters were dissected away from the
renal abnormality is found in an estimated 1% of the population and is considered the most
common urological anomaly. Many times a duplicated ureter has very few symptoms (if any)
and is usually not considered to be “clinically significant” (Gatti, 2013). This begs the question:
why would it be necessary to correct the ureter duplication if it was not causing any problems?
The primary reason is demonstrated in the need for Surgery 1. You will recall from the previous
description of the circumstances surrounding the Small Bowel/Neo-Bladder Fistula Repair that
sometimes recovery from urological surgery does not go as planned. When organs and tissues
have suffered the trauma of major surgery (be it minimally invasive or not) the way they choose
to repair themselves is not always ideal. Having discovered a duplicated ureter in the midst of a
Radical Cystoprostatectomy, surgeons were immediately concerned with how this anomaly
would effect the overall recovery of the urinary system. If the duplicated ureter were to produce
too much scar tissue during recuperation it could very quickly result in blockages or infections of
this particular ureter.
The Robot-assisted Uretero-ileal Anastomosis of a Duplicated Ureter is achieved through
four fairly simple steps. After the double ureter has been identified, it is cut at the location where
the double lumens converge into a single ureter. The normal portion of the ureter is clamped and
the surgeon then incises the middle sheath (tissue dividing the lumens) on the duplicated portion,
cutting as far down into the ureter as possible. Next, the lumens are reconfigured into a single
passageway. This is achieved by turning the incised portion inside out and using sutures to tie
back the extra tissue that formed the middle sheath. By pulling the tissue tightly back against the
internal wall, surgeons hope to prevent the tissue from reforming the wall during recovery. Stents
This is a normal step in the Cystoprostatectomy but an additional stent is required in this case.
Once this reconfiguration of the ureter is completed, it is ready to be attached to the new bladder
formed by a piece of the ilium. This final step is called a Common System Uretero-Ileal
Anastomosis.
Body of Work
My role, as I stated earlier, was to illustrate the critical steps of both surgeries in a way that
clarified the video it accompanied. As far as I could tell, and according to Dr. Guru, there were
not many other illustrations being used in this specific way. He showed me some surgical videos
his staff had made in the past for similar educational purposes. The clarifying technique utilized
was to simply add a kind of glow effect to highlight specific areas of importance. This glow
effect minimally altered the original look of the anatomy and created easily distinguishable focal
points on particular areas. However, it did not add true clarity to the footage.
Dr. Guru also showed me a couple of illustrations he had used in the past for surgeon
education in urology. These happened to be done by a talented local Medical Illustrator named
John Nyquist. Beyond his 36 year career as a medical illustrator at the University at Buffalo,
John is also a member of the Certification of Medical Illustrators board, so naturally, his
illustrations were very strong. They were very accurate and truly fulfilled the ultimate goal of
clarifying the underlying anatomy. However, if a weakness existed at all it was simply that the
which was probably created in Adobe Illustrator, was beautiful and accurate, but because of its
minimalist quality, appeared very different than the anatomy itself.
I suggested to Dr. Guru that I could create something very similar for him, but would use
a more realistic style that might be easier for surgeons to absorb, since they are accustomed to
seeing the normal tissue colors and textures found in the surgical field. I didn’t want my
illustrations to look so vastly different from the original video that the transition between them
would appear abrupt and distracting to they eye. Even if I had agreed entirely with Mr. Nyquist’s
approach, the illustrations he did were not for these two new and unique surgeries. To my
knowledge there has been no prior artwork created for these particular procedures.
My plan of action going forward with this body of work was to determine 4-5 crucial
steps in each surgery. I wanted to create very realistic illustrations in Adobe Photoshop and then
superimpose them over the original anatomy to make a smooth transition. In terms of the
illustration itself, my intention was to focus on maintaining realistic colors and textures of the
tissues, while making subtle artistic changes to have the illustration appear cleaner and more
comprehensible than the natural view. A highly realistic illustration was a priority for me,
because I was dealing with an intended audience of experienced surgeons and I thought there
was no need to make things look “less gory”. If anything, since the true final product here was
actually a video, I wanted to preserve the look of the surgical field for continuity. I intended for
the transition from moving footage to a still illustration to be as seamless as possible so as not to
distract viewers from the real focus. Additionally, since I was taking a surgical illustration class
at the time, I was starting to watch footage for these surgeries. I was confident that creating
I began by reviewing the relevant anatomy and then watching each surgery multiple
times. I took notes on what appeared to be the important steps and wrote down time codes so I
could revisit those specific sections of the footage. I then sat down and discussed the contents
with Yana Hammond (the Visual Translation Specialist on staff at ATLAS), Dr. Tareq Altartir
(another urological surgeon) and on the rare occasion that he had a moment to sit with me, Dr.
Guru himself. With their input I made final decisions about which steps to select for illustrations
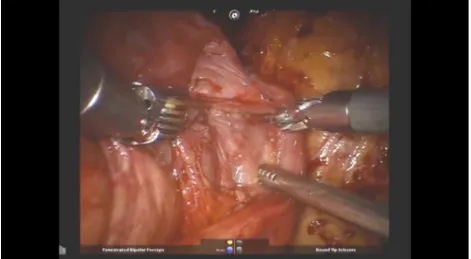
[image:13.612.89.560.355.614.2]and confirmed the different tissues and structures to be included in each step.
I took screenshots of the footage for reference (Fig. 1) and made graphite drawings of each step
(Fig. 2). When the drawings were completed, I sat down with Dr. Guru and consulted with him
about their accuracy and confirmed that they were the most important steps of the procedure.
After approval of the preliminary drawings, I began creating the digital files. I should
mention that, at this point, I had to convince Dr. Guru that the video called for highly realistic
Photoshop renderings. After having the simple line work from John Nyquist and seeing my
pencil renderings of each step, he was perfectly happy to have those illustrations overlay the
original video. After explaining how seamless the illustrations would appear in the final video (if
the original colors and textures were conserved) he agreed and allowed me to proceed with my
original plan.
I started by making a high resolution Photoshop document with the exact dimensions of
the original video. I placed both the reference screenshots and the preliminary drawings in the
file as layers to insure that the final artwork would align perfectly with the original video. The
final product was a detailed, multilayered Photoshop painting of the instruments and tissues
within each scene. Even though I had originally included the backgrounds of each scene (in my
preliminary drawings and original digital files) I reevaluated later on and decided that they were
both unnecessary and, at times, stealing focus from the central point of the step.
Throughout the process I met with Dr. Guru whenever possible and got his feedback on
the digital versions. He was continually impressed by the level of reality I was able to achieve.
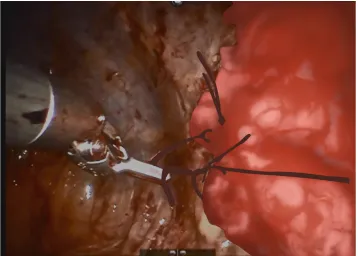
However, we continued to discuss a mutual desire to improve the clarity of each step, rather than
just making focal points brighter, more colorful or more interesting to look at. The steps of
[image:15.612.128.486.486.742.2]Surgery 1 went through several revisions in an attempt to achieve this.
Yana Hammond and I were able to meet much more frequently. We discussed the work in
person fairly often and she allowed me to send her screenshots of work in progress and provide
feedback via email and phone. I was very fortunate to have her input, as she was able to review
the artwork with me and make helpful suggestions as to which details to eliminate and where
artistic license might be taken in order to make each step more coherent. This process was a real
struggle for Surgery 1, however, after finally accomplishing the desired result I found that
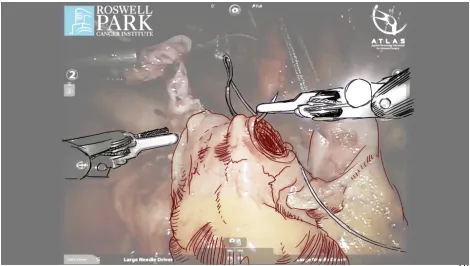
[image:16.612.114.498.365.641.2]repeating it for Surgery 2 was much easier.
Fig. 5. A final illustration for Surgery 2.
[image:17.612.71.541.465.731.2]During the face-to-face meetings with Yana and both surgeons, I was able to imitate the
“fade in”effect the illustration would have. By putting all my layers into a folder and sliding the
opacity up and down over the original screenshot, I demonstrated the way the illustration would
function in the video. Although Dr. Guru was often incredibly busy, being able to consult with
two different surgeons and an experienced medical illustrator from the same team was truly a
privilege. Having access to so much expertise insured that my final project would accomplish the
objectives as an instructional tool. I was also very happy that many of my original choices about
style, color palate and which steps to illustrate made it through to the final product.
As far as process goes, I did a significant amount of tweaking between illustrating
Surgery 1 and Surgery 2. I found that doing the graphite sketches, while very impressive to Dr.
Guru, was not a true representation as to whether or not a step was becoming more clear than it
was in the video. When I began the digital files for Surgery 2, I decided to draw digital
“sketches” directly on top of the screenshot references I took. I used these sketches to indicate
the focal points and some of the artistic changes I intended to make before starting the highly
detailed versions. This was significantly faster than making graphite drawings of each scene in
its entirety. This method also made it easier to compare to the final product since it was already
in digital form and related more directly to the video.
In addition to creating the Photoshop paintings I also did all the video editing for my thesis. I
was provided with the surgical videos at the very beginning of the project so that I could watch
the surgeries multiple times and get the screen shots I needed as reference material. However, it
were all .wmv files. This was problematic as I was using Adobe After Effects to edit and AE does
support the .wmv file type. I downloaded a free file converter called “Any Video
Converter” (from: http://www.any-video-converter.com/products/for_video_free/) and used it to
change the videos to .mov files. From here I simply dropped the files into AE and then imported
the illustration jpegs. I scrubbed through the videos locating each scene that I had chosen to
illustrate. The chosen frame was isolated by cutting the footage at the frame before and the frame
after it. Since I wanted the illustrations to be on screen for longer than a frame I changed the clip
duration from 1 frame to 5 seconds. Without the illustration overlay, this simply makes the video
look as though it’s been paused for 5 seconds. After each clip was isolated and lengthened I took
each illustration and placed it on it’s own layer above the original video. I lowered the
transparency at first to ensure a seamless match between both images and scaled the image down
accordingly. As it turns out, the screenshots I had been taking with the video displayed on full
screen were much larger than the actual video size. Once the illustrations and video were
matched up correctly I key-framed each illustration to fade in and out over the extended clip
beneath it. This gave the desired effect of the video pausing, an illustration materializing over it
and clarifying the anatomy, followed by a fade away and the video continuing on.
The file type for video output was varied. I decided to provide Dr. Guru with an .avi file
(since it is versatile and works with Windows, which seemed to be the computer of choice at
RPCI). I also included a .mp4 file in case he wanted to post the video online. Mp4 file format
reduces the file size of digital videos, with minimal loss of quality. I know Dr. Guru intended for
surgeons to see this video alongside other training materials for robotic surgery techniques at
field quite literally spans the globe, it would be foolish not to assume that eventually many of his
educational programs will probably be converted (at least partially) to online classes. To not
provide him with a file that would make this easy seems short-sighted. For myself I created
a .mov file since the actual thesis show would be using an iMac computer to stream the video
and .mov works great with the Quicktime video player that comes standard on Macs.
[image:20.612.93.492.358.634.2]CONCLUSION
When the final digital files were finished and the video editing was completed, I was very
pleased with the final product. Overall I thought the project was a success. Dr. Guru was very
happy with the final illustrations and accompanying video. Even by themselves I thought each
step looked great. As I mentioned before, it was very difficult to find the line between realism
and clarity, but by the end I was content with the balance. I was able to achieve the realistic and
engaging style I intended while keeping the illustrations clean enough to be illuminating when
paired with the footage. I believe my thesis achieved the objective of enhancing the video as an
educational tool.
That’s not to say that the entire project was without issues. Having a significantly better
understanding of both surgeries, now that the process is complete, there are definitely some
things I would do differently. First, despite having it approved again and again by Dr. Guru, I
believe that one of the steps illustrated in Surgery 1 was not necessary. As I mentioned in the
Scientific Background section, one of the steps in the Robot-assisted Small Bowel/Neo-Bladder
Fistula Repair involves the re-sealing of an opening in the small intestine using an instrument
called a Tri-Staple ™. I originally selected this step because it appeared to be a vital part of the
procedure -after all, “repair” was in the title of the procedure. While I still believe that it was an
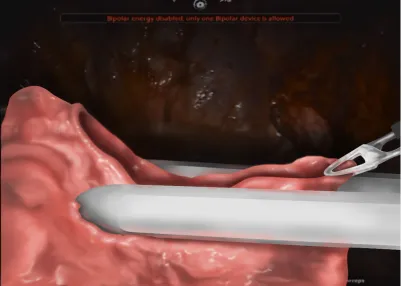
important step, I don’t believe that it needed an illustration to clarify what was happening. Since
the intended audience for the video would be mostly experienced urology surgeons, I feel it’s
Fig. 8. An illustrated step I later decided was unnecessary.
While it’s probably better to err on the side of too many illustrations, I still feel that
including an unnecessary illustration was a misstep in the project. If it had been caught in the
sketch phase, it would have allowed for the possibility to illustrate another part of the surgery
that required more clarification.
I think that the work I did for my thesis just scratched the surface in terms of the ways
digital illustrations can be paired with surgical video for education. When you consider how
quickly new surgical techniques arise, it is easy to infer that there are many new procedures and
surgical technologies that could benefit from illustration videos like the two I created. I can
think meshing highly detailed illustrations and live surgical video can communicate medical
knowledge in new and engaging ways that just can’t be achieved by a diagram in a textbook.
If I had the opportunity to do more videos like this, I would be very interested in seeing
how 3D modeling could be utilized. I think there is great potential for further clarity if I could
show organs and tissues from every possible angle. This would be somewhat dependent on
getting enough reliable references to create accurate 360 degree views. Assuming references
were available, I think it would be amazing to place 3D models over video footage and animate
them to move forward and rotate during the video. Or perhaps, instead of adding more motion to
an already complex surgical video, it may be advantageous to have models stay in place and
become semi-transparent to reveal other relevant anatomy. Since video already has 3D quality,
this may even be a better solution than what I chose to do.
The biggest challenge during this project was to find the perfect balance of realism and
clarity. Making decisions about the importance of each was done on an individual basis. I
struggled with this process at first, but found that it got easier to do with every illustration. This
is definitely something I want to continue working on. I also would like to continue to find faster
and more efficient techniques for creating illustrations in this particular context. I think if I were
given a 3rd and 4th surgery to illustrate, I would be able to complete them more quickly while
maintaining the same, or better, level of quality.
Apart from the actual opportunity to illustrate outside of a classroom, this thesis provided
me with a lot of new experiences. Actually working with medical professionals in the field
allowed me an insight into some of the common obstacles medical illustrators face in their jobs. I
you have the opportunity to work in the same office. Dr. Guru was in surgeries, with patients, in
his clinic, or out of the country so often that the staff at ATLAS actually suggested that I work in
his office because he used it so rarely. I also discovered that medical professionals often know so
little about a medical illustrator’s skill set; they sometimes don’t even know what to ask for.
Alternatively, in some cases, they think they know what they want and the illustrator may have to
politely advise them otherwise. For example, Dr. Guru was more than happy to use my
preliminary pencil drawings as finished work in the video. He also approved the aforementioned
“unnecessary” illustration more than once and only upon seeing the completed video realized
that it was probably not needed.
Having completed this process I also realize that having another illustrator to consult with
is incredibly valuable. Yana Hammond had more input and influence on the final illustrations
than both surgeons combined. I really believe that no matter how good you are at your job, it
always helps to have a second pair of eyes. This is particularly true for a long project. After you
look at the same scene over and over again, it’s easy to forget how an audience might view it.
Finally, I have ascertained that when it comes to illustrations (particularly in the context of
education) clarity is almost always a higher priority than realism.
As a new medical illustrator, creating Clarifying Techniques for Unique Robotic
Surgeries was an incredible opportunity and a true challenge. This thesis allowed me to explore
new techniques of my own and discover methods that worked and some that didn’t. Ultimately
REFERENCES
Gatti, J. (2013, September 12). Ureteral Duplication, Ureteral Ectopia, and Ureterocele.
Retrieved November 14, 2014, from http://emedicine.medscape.com/article/1017202-overview
Ghavamian, R., & Guru, K. (2013). Robot-Assisted Radical Cystectomy and Intracorporeal Ileal
Conduit. In Atlas of Laparoscopic and Robotic Urologic Oncological Surgery (pp. 134-145).
New Delhi: Jaypee Medical.