This content has been downloaded from IOPscience. Please scroll down to see the full text.
Download details:
IP Address: 143.167.30.213
This content was downloaded on 10/05/2016 at 10:03
Please note that terms and conditions apply.
The design and performance of an improved target for MICE
View the table of contents for this issue, or go to the journal homepage for more 2016 JINST 11 P05006
(http://iopscience.iop.org/1748-0221/11/05/P05006)
2016 JINST 11 P05006
Published by IOP Publishing for Sissa Medialab Received:March 24, 2016 Accepted: April 12, 2016 Published:May 5, 2016
The design and performance of an improved target for
MICE
C.N. Booth,a,1P. Hodgson,aJ. Langlands,aE. Overton,aM. Robinson,aP.J. Smith,a G. Barber,bK.R. Long,bB. Shepherd,cE. Capocci,dC. MacWatersdand J. Tarrantd
aDepartment of Physics and Astronomy, University of Sheffield,
Hounsfield Road, Sheffield S3 7RH, U.K.
bDepartment of Physics, Blackett Laboratory, Imperial College London,
Exhibition Road, London SW7 2AZ, U.K. cSTFC Daresbury Laboratory,
Keckwick Lane, Daresbury, Cheshire WA4 4AD, U.K. dSTFC Rutherford Appleton Laboratory,
Chilton, Didcot, Oxfordshire, OX11 0QX, U.K.
E-mail: [email protected]
Abstract: The linear motor driving the target for the Muon Ionisation Cooling Experiment has been redesigned to improve its reliability and performance. A new coil-winding technique is de-scribed which produces better magnetic alignment and improves heat transport out of the windings. Improved field-mapping has allowed the more precise construction to be demonstrated, and an enhanced controller exploits the full features of the hardware, enabling increased acceleration and precision. The new user interface is described and analysis of performance data to monitor friction is shown to allow quality control of bearings and a measure of the ageing of targets during use.
Keywords: Control and monitor systems online; Instrumentation for particle accelerators and storage rings - high energy (linear accelerators, synchrotrons); Overall mechanics design (support structures and materials, vibration analysis etc); Targets (spallation source targets, radioisotope production, neutrino and muon sources)
ArXiv ePrint: 1603.07143
1Corresponding author.
2016 JINST 11 P05006
Contents
1 Introduction 1
2 Stator 2
2.1 Hardware design and manufacturing 2
2.2 Quality Control 5
2.3 Field mapping 5
2.3.1 Procedure 1 5
2.3.2 Procedure 2 6
3 Controller 9
4 User interface 10
4.1 Overview of the control software 10
4.2 The Target Control Web Interface 11
5 Performance 12
5.1 Friction Measurement 13
5.2 Wear Profile and Quality Assurance 13
6 Summary 15
1 Introduction
The international Muon Ionisation Cooling Experiment, MICE, will provide an engineering demon-stration of a novel technique to reduce the phase space of a muon beam, while furnishing the facility to study a variety of materials and options for investigating the cooling process in detail [1]. The motivation for such a study derives from plans for future muon storage rings as sources of high intensity neutrino beams at the Neutrino Factory [2] and high energy lepton-antilepton colliders [3]. MICE is hosted at the 800 MeV proton synchrotron ISIS [4] at the Rutherford-Appleton Lab-oratory [5]. A custom beam-line has been constructed, supplying muons of momentum between 140 MeV/c and 240 MeV/c [6]. The muons arise from the decay of pions, which themselves derive from interactions between the accelerated proton beam and a solid titanium target. ISIS operates at 50 Hz and the target is dynamic, intercepting roughly one proton pulse a second, while being magnetically levitated out of the beam between designated pulses. High acceleration and precision of control are required in order to intercept a pulse at the end of its acceleration cycle and be clear of the beam envelope 10 ms later when the next pulse is injected.
2016 JINST 11 P05006
the target mechanism, and the need to generate the absolute minimum of abraded material (which could enter the accelerator vacuum space) due to wear have led to a programme of improvements which are reported in this publication.
Under test, some target drives showed a degradation of performance after hundreds of thousands of actuations, while others (including the device installed on the accelerator) performed perfectly for many millions of cycles. It has been suggested that poorer performance could be due to off-axis forces, due to misalignments between the stator coils in the body of the drive and permanent magnets mounted on the titanium shaft the tip of which constituted the target. The previous target mechanism employed a stator containing 24 pre-wound and potted coils which were then assembled on the tube forming the vacuum barrier and down which the shaft passed [7]. Section2describes a new con-struction technique which allows the coils to be wound and potted in situ on a special tube which also acts as a former. This not only allows greater alignment precision; it also enables tighter magnetic coupling between the coils and permanent magnets. This in turn allows higher acceleration to be achieved while reducing the coil currents and associated ohmic heating, as discussed in section5. The redesign of the coils also allows improved water cooling, details of which are given below.
Section 3 describes improvements to the control circuitry. Our previous publication [7] ex-plained how the stator coils are connected in three banks, with two being powered at any one time; the new controller allows currents to flow through all three banks simultaneously when this provides a greater driving force on the target. The user interface to the target controller has been upgraded to allow greater functionality and easier operation by both experts and other users; this is documented in section 4. The new target has been extensively tested and its performance is summarised in section5. Finally, a summary is provided in section6.
2 Stator
During the operation of the original “T Series” of targets, it was found that stator-to-stator perfor-mance varied considerably. Target T1, for example, performed well while subsequent models were less reliable. The acceleration dropped off over the life of the target and dust was created at the bearing positions. At first this was assumed to be due to a combination of bearing/shaft tolerances, bearing material and surface finish of the shaft. Over the testing period all these aspects were investigated and major improvements were made, but after these developments it was still apparent that T1 performed better that any other target. One possibility considered was that because the stator construction consisted of a series of 24 individually wound coils assembled on a stainless steel tube the coils may not share the same magnetic axis; furthermore they may not be on the mechanical axis defined by the bearings. This was subsequently investigated, as described in section2.3, and offsets were found to be present both for the coil-to-coil magnetic axis alignment and the mechanical axis alignment. In view of the success of the bearing system in T1 and the fact that the body was designed to fit with the target support frame and the control systems, it was decided to redesign the internal stator assembly whilst keeping the existing stator body. The revised design is presented below.
2.1 Hardware design and manufacturing
2016 JINST 11 P05006
2.1 Hardware design and manufacturing
During the operation of the T Series (original) it was found that the stator to stator
performance varied considerably, T1 for example performed well whereas the subsequent
models were not so reliable. The acceleration dropped off over the life of the target and dust
was created at the bearing positions. At first this was assumed to be a combination of
bearing/shaft tolerances, bearing material and surface finish of the shaft. Over the running
period all of these aspects were investigated and major improvements were made but even
with all the work it was still obvious that T1 performed better that any of the others.
One possibility put forward was that because the stator construction consisted of a series of
(24) individually wound coils assembled on a stainless steel tube they may not share the
same magnetic axis and that furthermore may not be on the mechanical axis defined by the
bearings. This was investigated, as outlined in section 2.3 and was found to be the case
both for the coil to coil magnetic axis alignment and the mechanical axis alignment. At this
point it was decided to redesign the internal stator assembly whilst keeping the stator body.
This was because there had been a lot of work carried out to improve the bearing system
and it was felt this was now a good system, also the body was designed to fit with all of the
target support frame and the control systems, all of which worked well.
To improve the coil to coil alignment a one piece mandrel was manufactured, this allowed
each coil to be wound onto it, and as each coil was wound using the same setup then it was
hoped that they would all share the same magnetic axis. This created problems that needed
addressing,
How did you wind individual coils side by side without either damaging the preceding coil
and whilst keeping the pitching exact.
How to carry out the winding leaving both tails of the coil on the outside accessible for
connection.
As the stator was being redesigned the opportunity was taken to reduce the radial clearance
between the inner bore of the coils and the outer diameter of the permanent magnets to
improve the performance. Improvements were also made to the cooling.
The following design was arrived at, see fig.x, a stator mandrel with dividing fins between
each winding to ensure the correct pitch was maintained, into this fin a slot was spark
eroded to allow the 1
stpower tail to pass to the bottom of the coil without encroaching on the
width of the coil. A 2
ndslot was cut in 3 of the fins to allow thermocouples to be embedded
into them to closely monitor the temperature inside the assembly. These fins also gave a
heat path from the bottom of the
coil to the outside diameter where
the cooling jacket was positioned.
The bobbin was produced at AC
Precision, Standlake and took
several trials before the final
procedure for manufacture was
arrived at. This was due mainly to
the fact that when such thin fins
were machined they had a
tendency to distort which made the
winding of the coil very difficult. The slots were then spark eroded at Oxford University
Physics department workshop.
Once we had the bobbin it was wound with the 24 individual coils at Rutherford Laboratory.
The wire used was 350µ square section copper wire varnished for insulation, this was
purchased from MWS Wire Industries Westlake Village CA USA. This was ordered ‘layer
Figure 1. The mandrel, showing fins to separate the coils and slots for wire connections.they would all share a common magnetic axis. This created two difficulties that needed addressing. The individual coils must be wound side by side without damaging the preceding coil and whilst keeping the pitching exact. The winding must also be carried out in such a way as to leave both tails of the coil accessible for connection.
As the stator was being redesigned the opportunity was also taken to reduce the radial clearance between the inner bore of the coils and the outer diameter of the permanent magnets mounted on the moving shaft, to improve the performance. Improvements were also made to the cooling.
The resulting design is illustrated in figure1. A stator mandrel was produced with dividing fins between each winding to ensure the correct pitch was maintained. Into each fin a slot was spark-eroded to allow the first power tail to pass to the bottom of the coil without encroaching on the width of the coil. A second slot was cut in three of the fins to allow thermocouples to be embedded in the stator to closely monitor the temperature inside the assembly. These fins also give a heat path from the bottom of the coil to the outside diameter where the cooling jacket is positioned.
2016 JINST 11 P05006
wound’ (no twist on the bobbin), this was important for the winding process. When winding
the coil each one was tested after completion both for short circuit to the body and for
internal, wind to wind shorting. Once all of the coils were wound and secured the complete
assembly was then electrically tested and only when all tests were satisfied did we proceed
with the next stage.
The 24 coils are wired in three phases, A B & C and alternate in a repeating pattern. Each
coil in a phase is connected in series with one end connected to a power lead and the other
connected to a common star point. The coils are powered in pairs by the controller and the
sequence produced creates the required motion of the target shaft. To ensure that the coils
are wired correctly, printed circuit boards were produced at Imperial College HEP electronics
lab (see Fig.x). These were attached to the bobbin and the
coils and power leads plus a lead to the star connector (to
allow individual coils to be powered in isolation) soldered
to them. The thermocouple devices were also bonded to
the bobbin. Once more electrical tests were carried out.
The next step was to fit the cooling jacket, this consisted
of 3 segments which were fitted around the bobbin and then plumbed together in series to
allow one input and one output from the stator assembly. These segments were
manufactured from copper and care was needed when fitting them that they did not damage
the coil insulation. Once the cooling jacket was fitted a potting jig was used to allow the
complete assembly to be potted under vacuum in such a way as to allow it to fit inside the
target body. The potting not only ensured that the stator was robust but it also improved the
heat path to the cooling jacket and it provided a further electrical insulation barrier.
Once potted the stator assembly was mounted inside the target body, the body had been
pre-machined to hold the stator assembly in place without axial movement as the assembly
was then Electron beam welded to ensure its vacuum seal for the ISIS beam line. The
[image:6.595.190.403.84.177.2]welding and vacuum testing took place at Electron Beam Services Ltd Hemel Hempstead.
Once the assembly was completed it was taken to Daresbury Laboratory for field mapping ,
see section 2.3
Figure 2. The printed circuit board used for power connections.
protection shell, to ensure no damage was done while winding the rest of the stator. After each coil was completed, and again when the complete assembly had been wound, electrical tests were performed as described in section2.2. Only when all tests were satisfied did construction proceed to the next stage.
As described in [7], the 24 coils are wired in three phases, A B & C in a repeating pattern. Each coil in a phase is connected in series, with one end of the phase connected to a power lead and the other connected to a common star-point. The phases are powered in pairs by the controller in the appropriate sequence to produce the required motion of the target shaft. To facilitate the correct wiring of the coils, printed circuit boards, as illustrated in figure 2, were produced at Imperial College HEP electronics lab. These boards were attached to the mandrel and then the coils and power leads soldered to them. A connection was also made directly to the star connector to allow individual coils to be powered in isolation for tests and field mapping. The thermocouple devices were also bonded to the assembly. Once more, electrical tests were carried out.
The next step was to fit the water cooling jacket. An improvement in cooling means that the coils can be operated at a higher current, to obtain more force on the permanent magnets mounted on the target shaft and so higher acceleration. Alternatively, for the original current the temperature of the coils is reduced, their resistance is lower and ohmic heating of the assembly is reduced. The previous cooling jacket consisted of a coiled copper pipe brazed to a copper sheet wrapped around the stator. Improvements have been made to both the thermal contact of the jacket with the coils and coolant flow rate through the jacket. The new cooling jacket is formed from three copper segments which are clamped to the outer diameter of the bobbin and then plumbed together in series to allow one water input and one output from the assembly. Once the cooling jacket was fitted, a potting jig was used to allow the complete assembly to be potted under vacuum in such a way as to allow it to fit inside the target body. The potting not only ensures that the stator is robust; it also improves the heat path to the cooling jacket and provides a further electrical insulation barrier. The heat transfer to the cooling segments was further enhanced by the choice of potting compound used. This incorporated nano-spheres, which both increased the thermal conductivity and the fluidity of the compound. The stator, complete with power distribution board, cooling jacket and pipes, is shown in figure3prior to potting. Tests conducted on the new stator after potting showed a significant increase in cooling capacity over the previous design, as anticipated.
2016 JINST 11 P05006
Figure 3. The stator with cooling jacket, before potting.
2.2 Quality Control
The quality control for the stator consisted of mechanical checks on components and electrical measurements as the device was assembled. Once the mandrel, onto which the coils were wound, had been machined and spark-eroded, it was surveyed by the Metrology Group at the Rutherford-Appleton Laboratory to ensure all dimensions were within tolerance. After each coil was wound, the electrical insulation was tested at 1 kV to ensure there was no breakdown between conductor and mandrel. The measured resistance of each coil served to check for shorts from turn to turn or layer to layer, as did the measurement of inductance of individual coils. The inductance of a single coil was found to be 56.2±0.9µH. A final check of the electrical properties of the coils was provided by mapping the magnetic field, as described in the next section.
2.3 Field mapping
2.3.1 Procedure 1
As indicated above, although target T1 performed well, subsequent targets did not run as smoothly and created small amounts of dust due to wear on the bearings. It was thought that the magnetic axis of the coils might not be coincident with the mechanical axis of the bearings or in the worst case the coils did not share the same axis, causing a sideways force on the bearing/shaft interface.
2016 JINST 11 P05006
2.3 Field mapping
2.3.1 Procedure 1
Although T1 performed well, subsequent targets did not run as smoothly and created dust due to wear on the bearings. It was thought that the magnetic axis of the coils was coincident with the mechanical axis of the bearings or in the worst case the coils did not share the same axis thus causing a sideways force to the bearing/shaft interface.
The initial investigations took place at the Diamond Magnet Lab at RAL (Figure 2.3.1). A 3-axis Hall probe mounted on a ‘wand’ was passed through the bore of the stator, its position controlled by linear stages. The stator was powered to around 6 A. The mechanical axis was aligned to the linear stage; this allowed the Hall probe to pass along the stator at a known transverse offset, taking field readings at set points. This was done at different offsets and enabled a Cartesian map to be drawn up and analysed. This showed that the coils did not share a common axis, i.e. they were transversely displaced with respect to each other. It also showed that the mean axis deviated from the
[image:8.595.110.490.85.216.2]mechanical axis.
Figure 2.3.1. Stator field measurements at the Diamond magnet laboratory.
Due to pressures on the Diamond laboratory, the whole operation was moved to STFC Daresbury Laboratory. The procedure was still the same – a long setup and alignment period using a surveying telescope and tweaking the stator body on a kinematic mount to align the stator bore with the long axis of the linear stages. The T series were all mapped this way, and it became apparent that the longest time was taken in the setup. This was also the most likely time to introduce errors so a rethink was required.
These measurements are detailed in the previous paper on the MICE target [7]. They were able to show that there was a transverse offset between the coils and the mechanical axis, but were only able to measure the offset to an accuracy of around 100 µm due to alignment limitations.
2.3.2 Procedure 2
The mapping lab at Daresbury has a rotation (ϑ) stage. To avoid the long tedious setup we
embedded a single-axis Hall probe into a brass shaft 15 mm in diameter, with the Hall probe offset from the centre and aligned to measure the longitudinal field component. This slides through bearings mounted into the same taper bearing mounts that the operational bearings are fitted to.
Kinematic Mount
Hall Probe Wand Linear
Stage
Figure 4. Stator field measurements at the Diamond magnet laboratory.
This was done at different offsets and enabled a field map to be drawn up and analysed. This showed that the coils indeed did not share a common axis, i.e. they were transversely displaced with respect to one-another. It also showed that the mean field axis deviated from the mechanical axis.
Due to pressures on the Diamond magnet laboratory, the whole operation was moved to the STFC Daresbury Laboratory. The procedure remained the same — a lengthy set-up and alignment period using a surveying telescope and adjustment of the stator body on a kinematic mount to align the stator bore with the long axis of the linear stages. The T series targets were all mapped in this way, and it became apparent that the longest time was taken in the set-up. This was also the most likely time to introduce errors so an alternative procedure was required. The above measurements are detailed in the previous paper on the MICE target [7]. They were able to show that there was a transverse offset between the coils and the mechanical axis, but were only able to measure the offset to an accuracy of around 100µm due to alignment limitations.
2.3.2 Procedure 2
The mapping lab at Daresbury has a rotation (θ) stage. To avoid the long tedious set-up we embedded a single-axis Hall probe into a brass shaft 15 mm in diameter, with the Hall probe offset from the centre and aligned to measure the longitudinal field component. This assembly slid through bearings mounted in the same tapered bearing-mounts that housed the bearings used when the target was in operation. This meant that without any set-up time the Hall probe was aligned with the mechanical axis. We also used theθstage to rotate the shaft probe-assembly. This allowed measurements to be taken at differentθpositions while ensuring the same radial distance from the mechanical axis.
Set-up consisted of simply mounting the stator on the kinematic mount and feeding the Hall probe shaft through the bearings. It then engaged into a double universal joint which meant that accurate alignment was not required. Figure5shows a picture of the measurement set-up.
Field mapping was carried out in two stages. Firstly, the stator’s longitudinal field profile (Bz
versusz) was measured. Secondly, the probe was moved to each peak in turn, and the shaft was ro-tated around the stator axis in order to measure the transverse field profile (Bzversusθ) for each coil.
Analysis of the field data consisted of fitting a pair of sinusoid functions to the data:
2016 JINST 11 P05006
Figure 5. The revised stator measurement rig at Daresbury Laboratory. The Hall probe shaft is shown inserted into the stator. The directions of movement are indicated with yellow arrows.
This fit was generally found to be very accurate, with very low rms residuals (typically less than 10µV, on a Hall-probe voltage level of around 600µV). TheB1term is related directly to the coil offset,d. This was modelled using Opera-3D to give an approximate formula linking coil offset to the magnitude of the first sinusoid:
B1
B0 =
a2d2+a1d+a0.
The coefficients a2, a1, and a0 were found to be 0.0166 mm−2, 0.0782 mm−1 and −2.7×10⁻⁶
respectively. TheB2term is a ‘quadrupole-like’ term and is thought to arise from a deformation of the coil. A coil with a highly elliptical shape would have a largeB2term. In all the measured data, theB2term was not large enough to cause concern.
The newest version of the stator (S3) has an additional electrical connection — the ‘star’ connector. This allows individual phases (i.e. each set of eight coil — phases A, B, C) to be connected up separately, and is of great help for measurements since it allows the field from individual coils to be distinguished more clearly.
2016 JINST 11 P05006
[image:10.595.104.494.276.477.2]Figure 6. The measured offsets of each coil for stator S3.
Figure 7. Graphic representation of the field map. The three phases (A = red, B = gold and C = silver) show slight offsets which are 120◦apart.
Table 1. Comparison of stators S1 and S3.
stator Mean coil offset Coil offset standard deviation
S1 79µm 30µm
S3 83µm 41µm
[image:10.595.157.435.573.626.2]2016 JINST 11 P05006
V
ertica
l position: x (m
m)
Phase A:
Phase B:
Phase C:
Current Flow:
0 9 18
-9
-18
[image:11.595.104.497.83.280.2]New State
Figure 8. Motor drive states, with dots and crosses indicating current flow out of and into the page, while the radial polarisation of the permanent magnets is indicated by arrows. The permanent magnets are located to deliver the maximum positive acceleration. The new state occurs between two existing states and utilises all three sets of coils.
3 Controller
In addition to hardware improvements, an improved drive method has been implemented in the target-controller’s firmware. The stator is configured with three sets of coils each wired in series. These coils are joined at a single star point. As described in [7], the motor has previously been driven by powering two sets of coils at any one time, so that current flows in through one set and out through the other; the third set of coils was unpowered. To increase performance of the mechanism a total of six new drive states have been added, which power all three sets of coils simultaneously, and these are each located between two existing states. Figure8shows a side view of the coils in one of the new drive states.
The new state effectively powers two sets of coils in parallel, while the third is driven in series. This reduces the effective resistance of the stator by a factor of three-quarters and so increases the power deposited in the stator by a factor of four-thirds, since the stator is driven from a fixed voltage source.
2016 JINST 11 P05006
Figure 9. The MICE Target Control System.
4 User interface
4.1 Overview of the control software
The user interface allowing control of the target has been completely redesigned to allow a much more flexible and maintainable code base. The various target controls (stop, start, raise, lower, etc.) are accessed via a web interface using any standard web browser. A target control PC both runs the low level target control code written in C++ and also acts as a web-server handling HTTP requests from any authorised computer. The user, usually a non-target-expert MICE operator, needs to be able to steer the target into the ISIS beam and monitor the consequent beam loss, moving the target as required to accommodate changing requirements from the shift leader and run plans.
2016 JINST 11 P05006
Figure 10. The Target Control Interface.
4.2 The Target Control Web Interface
The target control web interface (shown in figure10) is a JavaScript-generated web form displaying the key target operational parameters.
The upper section of the form displays basic status information including the target position, ac-tuation status, acac-tuation count and key interlocks. The left hand portion of the screen allows the user to set the target timing delay (the delay in milliseconds from a trigger based on the synchrotron injec-tion) and the minimum beam centre distance, BCD. These are the two key parameters allowing the steering of the target into an optimal position to produce the required particle rate while not exceeding the allowed ISIS beam loss. A further set of button controls allow the user to stop and start the target actuation and place it into park or hold states. The bottom set of control buttons allow access to expert settings and are password-protected, limiting their use to target experts. The main central section of the interface shows a customisable display of the target trajectory where the specific plots required are selectable via the box to the right. Usually the user will want to view the target position together with the beam intensity and one or more of the beam-loss values. Finally the box on the lower right of the GUI displays a set of key target parameters including the minimum BCD, the start position and integrated beam losses. The beam losses are particularly important as there is a maximum allowable beam loss set by ISIS and if this value is repeatedly exceeded MICE can trip the ISIS beam.
2016 JINST 11 P05006
Time (ms)
0
10
20
30
40
50
V
ol
ts
(
V
)
-4
-2
0
2
4
6
8
10
12
14
0
10
20
30
40
50
D
is
ta
nc
e
fr
om
B
ea
m
C
en
te
r
(m
m
)
0
10
20
30
40
50
60
70
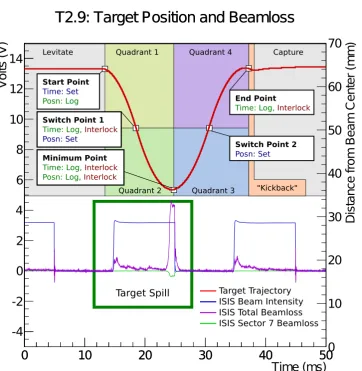
T2.9: Target Position and Beamloss
T2.9: Target Position and Beamloss
Quadrant 1
Start Point Time: Set
Posn: Log
Switch Point 1
Time: Log, Interlock Posn: Set
Minimum Point
Time: Log, Interlock
Posn: Log, Interlock
Switch Point 2 Posn: Set Levitate Quadrant 2 Quadrant 4 Quadrant 3 End Point
Time: Log, Interlock
"Kickback" Capture
[image:14.595.122.485.83.455.2]Target Spill Target Trajectory ISIS Beam Intensity ISIS Total Beamloss ISIS Sector 7 Beamloss
Figure 11. Annotated target trajectory, showing the key actuation states and the transitions between. The ISIS beam intensity and losses are shown below.
named set of machines, based on their IP addresses, are allowed to connect. Also the layout of the web form GUI is relatively simple to implement as it is created using standard JavaScript and thus updates and modifications can easily be accommodated.
5 Performance
A crucial element of the target system is the indirect monitoring of the mechanical performance, in order to observe the wear profile of the mechanism. From such observations requirements can be derived which allow “poor” targets to be identified. The mechanical performance is monitored through a change of friction, which can only be observed indirectly.
2016 JINST 11 P05006
well, which is observed as an increase in start-position width. The acceleration change is strongly affected by external factors, such as temperature, or driving voltage and the start-position width is also affected by voltage and controller configuration.
5.1 Friction Measurement
The most recent technique developed for monitoring the performance makes a measurement of the average friction observed during an actuation [11]. This can be obtained by considering the forces present in each quadrant of the target’s actuation, shown in figure11.
In the first quadrant the driving force is downwards, with friction in opposition, while the second quadrant has friction assisting the driving force to bring the system to a halt. In addition, the target is powered from a capacitor bank, the discharge of which results in a reduced driving force as a function of time in the actuation. The observed acceleration in each quadrant of the actuation is:
a1(t=tstart)=−a0exp
−t tRC
!
+F(x)−g; (5.1)
a2(t=tmin)= +a0exp −t
tRC
!
+F(x)−g; (5.2)
a3(t=tmin)= +a0exp
−t tRC
!
−F(x)−g; (5.3)
a4(t=tend)=−a0exp −t
tRC
!
−F(x)−g; (5.4)
wherea0is the absolute maximum driving acceleration,tRCis the decay time of the capacitor bank,
F(x) is the average friction andg is the acceleration due to gravity. In order to avoid the need to consider velocity-dependent characteristics, such as eddy currents, the acceleration is determined at the stationary point on the border of each quadrant.
To obtain the friction, first the acceleration of the mechanism must be measured at each stationary point. This is accomplished using a third order polynomial fit, the second derivative of which is evaluated at the stationary point. Quadrants two and three share a common stationary point, however each polynomial-fit range is over a different quadrant, hence a different value is obtained and used. The predicted values from equations (5.1) to (5.4) are then fitted to the measured values using a non-linear least squares fit.
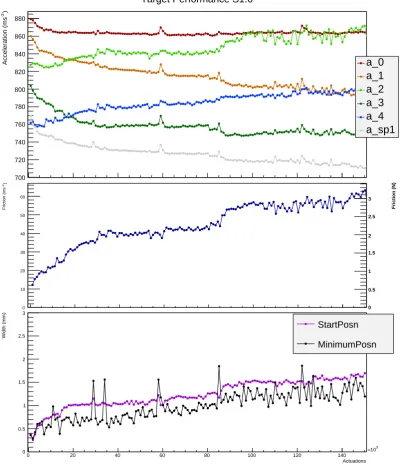
Results from this technique are shown in figure 12, for the first 150k actuations of target S1.6. The first plot shows: the absolute values of the measured accelerations (a1 toa4), the fitted
maximum acceleration (a0) and the average acceleration measured by the control system in the first quadrant (aSP1). Over time the magnitude of acceleration in quadrants 2 and 4 increased, while a decrease was observed in quadrants 1 and 3. This change is interpreted as an increase in friction, since in quadrants 2 and 4 the target is decelerating, which is shown in the middle plot of the figure. The final plot shows the measured width of both the starting and minimum positions; as expected both show an increase as the measured friction increases.
5.2 Wear Profile and Quality Assurance
2016 JINST 11 P05006
)
-2
Acceleration (ms
700 720 740 760 780 800 820 840 860 880
Target Performance S1.6
a_0 a_1 a_2 a_3 a_4 a_sp1
)
-2
Friction (ms
0 10 20 30 40 50 60
Friction (N)
0 0.5 1 1.5 2 2.5 3
Actuations
0 20 40 60 80 100 120 140
3
10
×
Width (mm)
0 0.5 1 1.5 2 2.5 3
StartPosn
[image:16.595.100.505.140.609.2]MinimumPosn
2016 JINST 11 P05006
Table 2. Summary of stator QA results, in date-descending order. P(p) = Pass(borderline). F(f) = Fail(borderline). 1 million actuations corresponds to 14.8 days of continuous running at 50/64 Hz (MS/64).
50K tests Number of
Target Friction Acceleration Width Accepted Actuations (million)
S1.8 P P P Y 8.5+
S1.7 p — P Y 1.5
S1.6 F F F N 0.9
S1.5 F F F N 0.7
S1.4 P — P Y 10
S1.3 — f P Y 1.8
S1.2 — P P Y 3.1
T1.3 — f P Y 5
T1.2 — P P Y 2
T1.1 — P P Y 3.2
T2.8 — F P Y 2.5
T2.7 — P P Y 1.3
T2.6 — P P Y 1.1
poorly performing targets and well performing targets can also be created, shown in figure13. The right-hand plot shows the performance over five million actuations; as can be seen, targets S1.5 and S1.6 were unable to reach one million and their lines terminate early. The left-hand plots show the performance during the first day of running, which is used to assess performance and predict a target’s lifetime prior to installation on the accelerator. Both S1.5 and S1.6 fall within the poor-performance region and would be rejected before being mounted on ISIS.
A summary of all target tests conducted is presented in table2. 12 targets in total have been studied, two of which failed before reaching 1 million actuations. Both the new S1 and original T1 stators have demonstrated that targets accepted by the quality assurance process have operated for over 1.8 million actuations. In addition, a number of targets have delivered in excess of 5 million acceleration cycles.
6 Summary
2016 JINST 11 P05006
Actuations
0 10000 20000 30000 40000 50000
) -2 F ric tio n (m s 0 5 10 15 20 25 30 35 40 45 50 Actuations
0 1000 2000 3000 4000 5000
3 10 × ) -2 F ric tio n (m s 0 10 20 30 40 50 60 70 80 90 100 Actuations
0 10000 20000 30000 40000 50000
) -2 A cc el er at io n C ha ng e (m s -50 -40 -30 -20 -10 0 10 20 Actuations
0 1000 2000 3000 4000 5000
3 10 × ) -2 A cc el er at io n C ha ng e (m s -100 -80 -60 -40 -20 0 20 Actuations
0 10000 20000 30000 40000 50000
W id th (m m ) 0 0.5 1 1.5 2 2.5 3 Actuations
0 1000 2000 3000 4000 5000
3 10 × W id th (m m ) 0 0.5 1 1.5 2 2.5 3
[image:18.595.92.510.79.503.2]S1.4 S1.5 S1.6 S1.7 S1.8
Figure 13. QA (left) and normal running (right) of the S1 stator. The friction, acceleration change and start-position width are shown. The yellow band indicates the unacceptable performance region and the green band identifies the ideal region. Missing acceleration-change data points are due to an analysis cut which enabled only a single start-position to be used in measuring the acceleration.
2016 JINST 11 P05006
Acknowledgments
We gratefully acknowledge the ISIS Division at the STFC Rutherford Appleton Laboratory for the warm spirit of collaboration and for providing access to laboratory space, facilities, and invaluable support. We are indebted to the MICE collaboration, which has provided the motivation for, and the context within which, the work reported here was carried out. We would like to acknowledge the contributions of AC Precision, Standlake, Electron Beam Services Ltd, Hemel Hempstead, the workshop of Oxford University Physics Department, Imperial College London’s HEP electronics lab, Dr. E. Longhi of the Diamond magnet laboratory and the Metrology Group of Rutherford Appleton Laboratory.
This work was supported by the Science and Technology Facilities Council under grant num-bers ST/H001735/1,ST/J002046/1, ST/K001337/1, ST/K00610X/1, and through SLAs with STFC-supported laboratories.
References
[1] MICE collaboration, G. Gregoire et al.,An international Muon Ionization Cooling Experiment (MICE), MICE note 167,http://mice.iit.edu/mnp/MICE0021.pdf, (2003).
[2] S. Geer,Neutrino beams from muon storage rings: characteristics and physics potential,Phys. Rev.D 57(1998) 6989[Erratum ibid.D 59(1999) 039903] [hep-ph/9712290].
[3] D. Neuffer,Multi-TeV muon colliders,AIP Conf. Proc.156(1987) 201. [4] ISIS pulsed neutron&muon source webpage,http://www.isis.stfc.ac.uk/. [5] Rutherford Appleton Laboratory (RAL) webpage,
http://www.scitech.ac.uk/About/find/RAL/introduction.aspx/.
[6] MICE collaboration, M. Bogomilov et al.,The MICE muon beam on ISIS and the beam-line instrumentation of the Muon Ionization Cooling Experiment,2012JINST7P05009
[arXiv:1203.4089].
[7] C.N. Booth et al.,The design, construction and performance of the MICE target,2013JINST 8
P03006[arXiv:1211.6343].
[8] EPICS: Experimental Physics and Industrial Control System,ICFA Beam Dyn. Newslett.47(2008). [9] R. Brun and F. Rademakers,ROOT: an object oriented data analysis framework, inProceedings
AIHENP’96Workshop, Lausanne Switzerland September 1996 [Nucl. Instrum. Meth.A 389(1997) 81].
[10] ROOT webpage,http://root.cern.ch/, (1996).