Theses Thesis/Dissertation Collections
2010
The Development and deployment of a remote
virtual lab based on Amazon Cloud for networking
courses
Emilio Nunez
Follow this and additional works at:http://scholarworks.rit.edu/theses
This Thesis is brought to you for free and open access by the Thesis/Dissertation Collections at RIT Scholar Works. It has been accepted for inclusion in Theses by an authorized administrator of RIT Scholar Works. For more information, please [email protected].
Recommended Citation
The Development and Deployment of a Remote Virtual
Lab based on Amazon Cloud for Networking Courses
By
Emilio Nunez
Thesis submitted in partial fulfillment of the requirements for the
degree of Master of Science in Networking and Systems
Administration
Rochester Institute of Technology
B. Thomas Golisano College
Of
Computing and Information Sciences
Rochester Institute of Technology
B. Thomas Golisano College
Of
Computing and Information Sciences
Master of Science in Networking and Systems Administration
Thesis Approval Form
Student Name:
Emilio Nunez
Thesis Title:
The Development and Deployment of a Remote Virtual
Lab based on Amazon Cloud for Networking Courses
MS Thesis Committee
Name
Signature
Date
Prof. Charles Border 4/22/2010
Chair
Prof. Luther Troell 4/22/2010
Committee
Prof. Arlene Estevez 4/22/2010
Thesis Reproduction Permission Form
Rochester Institute of Technology
B. Thomas Golisano College
of
Computing and Information Sciences
Master of Science in
Networking and Systems Administration
The Development and Deployment of a Remote Virtual
Lab based on Amazon Cloud for Networking Courses.
I, Emilio Nunez, hereby grant permission to the Wallace Library of the Rochester Institute of Technology to reproduce my thesis in whole or in part. Any reproduction must not be for commercial use or profit.
Copyright 2010 Emilio Nunez
Abstract
Remote virtual laboratories had been implemented using different approaches.
Universities have adopted such model mostly for the distance learners. Furthermore, such
systems have been implemented internally and used in conjunction with their physical
hands-on labs. Nevertheless, the introduction of Cloud Computing and the virtual
platform environment offered by it can serves for the creation of new type of services.
This thesis aims to use this new technology and develop a remote virtual laboratory that
can be used by students for doing their hands-on lab in the networking courses at
PUCMM.
For this purpose the services used were the Amazon Elastic Compute Cloud (Amazon
EC2) as an infrastructure provider and the VMLogix Lab Manager as the management
software for the use of the laboratory.
The paper includes the development and deployment of two labs one in Windows and the
other in Linux. Furthermore, the problems encountered and the outcomes are documented
to serve as a base implementation guide for future laboratories using the Amazon Cloud
Table of Contents
1. Introduction ... 1
2. Thesis Statement ... 2
3. Related Work ... 2
4. Technology overview ... 5
4.1 Network Connections in the Cloud ... 6
5. Proof of Concept ... 8
6. Remote Virtual Lab: Development of Laboratories ... 10
6.1 Student’s Guide to VMLogix Lab Manager ... 11
6.2 The Development of the Linux Laboratory ... 15
6.2.1 Translated Linux Laboratory Guide ... 17
6.2.2 Linux Laboratory in Action ... 20
6.3 The Development of the Windows Laboratory ... 32
6.3.1 Translated Windows Laboratory Guide ... 34
6.3.2 Windows Laboratory in Action... 37
7. Laboratories Experiences ... 56
8. Some Costs Considerations ... 57
9. Future Works ... 59
10. Conclusions ... 60
11. References ... 61
12. Appendix A – Instance Types and OS in EC2 ... 63
13. Appendix B – VMLogix Lab Manager Features ... 65
14. Appendix C – AWS Account Creation Process ... 68
15. Appendix D – Instance Creation in AWS Console ... 71
16. Appendix E - Windows Image Creation with AWS Console ... 76
17. Appendix F - Guía de Estudiantes para VMLogix Lab Manager ... 81
18. Appendix G – Guía de Laboratorio de Linux ... 85
19. Appendix H – Guía de Laboratorio de Windows... 88
Table of Figures
Figure 1 - HTTPS Access to VMLogix Lab Manager ... 7
Figure 2 - Network Connections of the Instances in the Cloud ... 7
Figure 3 - Login box for VMLogix Lab Manager ... 11
Figure 4 - Accessing Configurations Menu within Lab Manager... 12
Figure 5 - Deploy a Lab Configuration ... 12
Figure 6 - Accessing the Workspace ... 13
Figure 7 - Accessing Active Jobs ... 13
Figure 8 - Console Methods ... 14
Figure 9 - Accessing an instance with Remote Desktop ... 14
Figure 10 - Active Jobs Undeploy options... 15
Figure 11 - Network Diagram of the Linux Lab Network Connections ... 20
Figure 12 - VMLogix Lab Manager Login Screen (Linux Lab) ... 21
Figure 13 - Lab Manager Main Screen (Linux Lab) ... 21
Figure 14 - Lab Configurations (Linux Lab) ... 22
Figure 15 - Begin Job Deployment (Linux Lab) ... 22
Figure 16 - Job Deployment (Linux Lab) ... 23
Figure 17 - Job Deployment Steps (Linux Lab) ... 23
Figure 18 - Checking for VSFTPD (Linux Lab)... 24
Figure 19 - Access to Linux Server through SSH Java Console (Linux Lab) ... 24
Figure 20 - Getting VSFTPD package ... 25
Figure 21 - Installing VSFTPD ... 25
Figure 22 - Verifying Anonymous Access (Linux Lab) ... 26
Figure 23 - Internal IP Address of the Linux Server ... 26
Figure 24 - Local Test of the FTP Service (Linux Lab) ... 27
Figure 25 - Accesssing Windows Client through RDP (Linux Lab) ... 27
Figure 26 - Logon into Windows-Client (Linux Lab) ... 28
Figure 27 - Testing FTP Service through Windows-Client (Linux Lab) ... 28
Figure 28 - Checking for HTTPD Service (Linux Lab) ... 29
Figure 29 - Getting HTTPD package (Linux Lab) ... 29
Figure 30 - Installing HTTPD Package (Linux Lab) ... 30
Figure 32 - Accessing HTTP Server through Internet Explorer (Linux Lab) ... 31
Figure 33 - Undeploying Linux Lab from the Workspace ... 31
Figure 34 - Network Diagram of Windows Lab Network Connections ... 38
Figure 35 - Logon to VMLogix Lab Manager (Windows Lab) ... 38
Figure 36 - VMLogix main screen (Windows Lab) ... 39
Figure 37 - Deploying the Windows Lab in the Configurations screen ... 39
Figure 38 - Deployment process of Windows Lab ... 40
Figure 39 - Accessing Windows-Server through RDP (Windows Lab) ... 40
Figure 40 - Login to Windows-Server (Windows Lab) ... 41
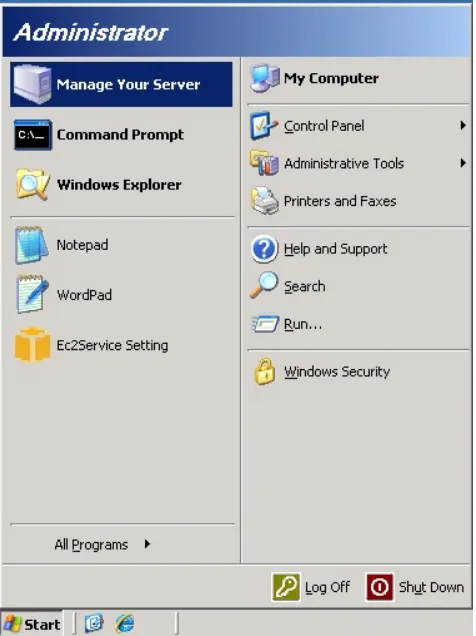
Figure 41 - Accessing the Manage Your Server (Windows Lab) ... 41
Figure 42 - Adding a Role Wizard (Windows Lab) ... 42
Figure 43 - Selecting Application Server Role for installation (Windows Lab) ... 42
Figure 44 - Selecting Additional Tools for the Application Server (Windows Lab) ... 43
Figure 45 - Summary of Selection before installing Application Server (Windows Lab) ... 43
Figure 46 - Installing and Configuring IIS (Windows Lab) ... 44
Figure 47 - Asking for the Windows Installation Discs (Windows Lab) ... 44
Figure 48 - Selecting Windows Installation Discs folder (Windows Lab) ... 45
Figure 49 - Browsing for the Installation Discs (Windows Lab) ... 45
Figure 50 - Completing Installation of IIS (Windows Lab) ... 45
Figure 51 - Finish Installation of Application Server (Windows Lab) ... 46
Figure 52 - Access the Manage Application Server (Windows Lab) ... 46
Figure 53 - Accessing the Default Web Site Properties (Windows Lab)... 47
Figure 54 - Default Web Site port (Windows Lab) ... 47
Figure 55 - Default Documents of the Default Web Site (Windows Lab) ... 48
Figure 56 - Home Directory of the Default Web Site (Windows Lab) ... 48
Figure 57 - Windows-Server Internal IP Address (Windows Lab) ... 49
Figure 58 - Login to Windows-Client (Windows Lab) ... 49
Figure 59 - Using Internet Explorer to access the HTTP Server (Windows Lab) ... 50
Figure 60 - Accessing the Add/Remove Programs (Windows Lab) ... 51
Figure 61 – Add/Remove Windows Components - Application Server (Windows Lab) ... 51
Figure 62 - Adding FTP Service (Windows Lab) ... 52
Figure 63 - Accessing IIS Manager (Windows Lab) ... 52
Figure 65 - FTP Site default port (Windows Lab) ... 53
Figure 66 - Home Directory of the Default FTP Site (Windows Lab) ... 54
Figure 67 - Access Security of the Default FTP Site (Windows Lab) ... 54
Figure 68 - Access Restrictions of the Default FTP Site (Windows Lab) ... 55
Figure 69 - Logon to Windows-Client (Windows Lab) ... 55
1.
Introduction
Universities have successfully implemented hands-on labs for many years especially in
their IT related courses. These physical labs had proven to provide the necessary
laboratory experience that those students have required. Nevertheless, the physical labs
have limitations in terms of availability, performance and costs (Stackpole). Furthermore,
a physical lab is useless when doing distance learning courses.
Different approaches have been successfully implemented to overcome these limitations
and provide to the students a laboratory experience using remote virtual labs (Border;
Leitner and Cane; Lahoud and Tang). Moreover, the use of a remote lab is not limited to
distance learning students but also can be used by local students which can benefits from
the availability and performance of this type of system. Even so, these methods require
space, some costs (not as expensive as physical labs) and support personal to maintain the
physical servers.
In recent years a new environment and services have been emerged to offer virtualization
as a service. This environment is called Cloud Computing which delivers remotely
accessible Virtual computers through the Internet.
One of the Cloud Computing providers is Amazon Web Services (AWS) which developed
a product called Amazon Elastic Compute Cloud (Amazon EC2), which “presents a true
virtual computing environment, allowing you to use web service interfaces to launch
instances with a variety of operating systems, load them with your custom application
environment, manage your network’s access permissions, and run your image using as
many or few systems as you desire” (Amazon Web Services).
The Amazon EC2 service offers a platform infrastructure for virtual computers
complemented by a robust product called Amazon Simple Storage Service (Amazon S3),
which provides storage as a web service that is available from anywhere at any time
(Amazon Web Services). This serves as a storage foundation to the virtual computers
infrastructure within Amazon EC2.
All these technologies are complemented by the use of product called VMLogix Lab
Manager Cloud Edition. This product offers a lab management solution for the Cloud.
Moreover, allows the management of users and creation of multiple lab configurations
easily accessible (VMLogix).
This thesis created the foundation for the development and deployment of a Remote
Virtual Laboratory environment based on Amazon Web Services and VMLogix Lab
Manager for the use in the networking labs at PUCMM.
2.
Thesis Statement
This thesis developed and deployed a Remote Virtual Lab, based on Amazon Web
Services and VMLogix to provide hands-on laboratories for the Networking Courses at
PUCMM.
3.
Related Work
Border (2007) in his paper, “The Development and Deployment of a Multi-User, Remote
Access Virtualization System for Networking, Security, and System Administration
Classes” presented the development and implementation of their Remote Laboratory
Emulation System (RLES). The main idea behind this thesis was the creation of Virtual
Labs for distance students. For this purpose they developed a multi user environment
consisting of Terminal Services to provide the remote access and VMWare Workstation
this method was very useful for distance learning but also they found that local students
were taking distance classes instead of local courses because of the convenience for
accommodating their time for work and study.
This thesis provided a remote laboratory using Cloud Computing based in Amazon EC2
and VMLogix Lab Manager Cloud Edition. Furthermore, the system was tested by
students from the Data Switching Lab Course at PUCMM. Moreover, the students were
satisfied by using such system because of the advantages it presents (Diaz).
According to Corter et al (2007) in their “Constructing Reality: A Study of Remote,
Hands-on and Simulated Laboratories” they made a large scale study to determine not
only the student preferences but also their learning outcomes. Furthermore, they created
labs for hands-on, simulated and remote laboratories to assess the students learning in
each case and their understanding of the subject. Moreover, they created surveys to
determine the level of satisfaction and the preference of the students.
The results from the Corter research showed the importance of the remote labs thus the
lab created in the Cloud Computing not only delivered the same experience to students
but also with added advantages in terms of management and cost.
The use of a remote virtual laboratory not only provide access to students without time
restrictions but also permits in the case of PUCMM to provide more complex and real
like environment for the students. According to Lawson and Stackpole (2006) in their
“Does a Virtual Networking Laboratory Result in Similar Student Achievement and
Satisfaction?” they conducted a research using two groups of students with a mix of
experience using physical labs and virtualization to measure the level of satisfaction and
achievement of students. They found that there was not big difference in the student’s
achievement and the issues related to the use of technology like virtualization does not
This achievement and satisfaction result was not altered by the use of the Remote Virtual
lab developed and according to Diaz (2010) research the students were satisfied using the
cloud virtual laboratory.
Another important aspect with the use of virtualized environments is the possibilities of
exploring new pedagogies methods that professors can explore to enhance the students
learning, Gaspar, Langevin (2008). In their research Gaspar et al explore the new
possibilities that the use of virtualization can provide to the professors. Furthermore, they
research was more a qualitative approach to research the benefits provided to instructors
with the use of new technologies like virtualization. In this research the more important
aspect was the ability of the students to work with this Cloud Environment while
successfully doing their regular labs and reports. Nevertheless, this platform offers more
possibilities for instructors to develop more complex and richer lab experience to
students.
According to Krichen and Lahoud (2008) in their “Remote Labs in the Online
Environment: Indicators for Success” made a study of the preferences of students using
remote labs or simulated labs. Their study investigates how these methods can improve or
maintain the same level of satisfaction and outcomes to students. They mix students with
different experience related to the use of simulation in at least one course or previous
experience with remote labs. They found that depending on the experience of students
they prefer one or another.
One key factor in this research was the actual experience of students at PUCMM. They
have never used a virtual lab or remote lab before. While they had some knowledge of
virtualization technology they only perform physical labs and simulated labs in the
campus. Nevertheless, the important part of the study was to introduce the students to
new alternatives in the lab environment that could allow the use of more complex
4.
Technology overview
Amazon Web Services (AWS) provided IT Infrastructure like compute power, storage
and databases on demand (Amazon Web Services). These services can be accommodated
depending on the business needs. This makes sense for the use of Virtual Labs in
Universities. Furthermore, these services are paid in accordance with the use. For
example, a lab could take two hours to be completed by each student. If the number of
students is twenty, they will use forty hours of the service and that’s the base cost the
university will incur.
Among the services offered by AWS is the Amazon Elastic Compute Cloud (Amazon
EC2) which provides the creation and use of virtual computers (Amazon Web Services).
A virtual computer is called an instance in the EC2 service.
Amazon EC2 offers different type of instances to accommodate the different CPU,
memory and storage requirements. The instance type is selected at the time of the
creation. Also, the image that will be executed inside the instance has to be selected. This
image is called an Amazon Machine Image (AMI) and is basically an image of an
Operating System pre-configured to execute in the EC2 environment. See appendix A for
instance type and images details.
Another service provided by AWS is the Amazon Simple Storage (S3) which provides
storage accessible through web services allowing the store of data information (Amazon
Web Services). This service allowed the creation and storage of customized AMIs for the
virtual labs providing a simple but robust storage subsystem for the laboratories.
Furthermore, this storage can be used for the creation of snapshots of virtual computers
thus made possible for students to pause and continue their work later on.
The services offered by AWS are the infrastructure for the resources required by the
these services. This limitation was overcome by the use of a virtual lab manager product,
called VMLogix Lab Manager Cloud Edition which was created as an instance within
Amazon EC2. This product provided a web environment to access the lab and permitted
the management of the Amazon EC2 platform as a virtual laboratory (VMLogix).
Among the features provided by VMLogix Lab Manager is the centralized user
management which allows the professors to assign resources to students. Furthermore,
these resources can be just the images in the form of templates to be used in the lab but
also a complete virtual lab configured with specific resources for immediate use.
Moreover, VMLogix use the AWS services platform to allow the creation of customized
templates of AMI’s which are stored in the Amazon S3 and the creation of snapshots so
students can stop their work and continue later on. See Appendix B for a complete list of
features.
All these technologies working together provided an ideal environment for the creation of
Virtual Laboratories for students working remotely.
4.1
Network Connections in the Cloud
For the interaction with this technology in the cloud two web interfaces were used. The
first one was provided by Amazon EC2 to manage the instances. This interface was not
appropriate for the use of students but offers some advantages in the creation of the
images for the laboratories. The other interface was provided by the VMLogix Lab
Manager which allowed the use of the EC2 service for doing laboratories. This Lab
Manager software was running in a Windows instance within EC2. The access to the
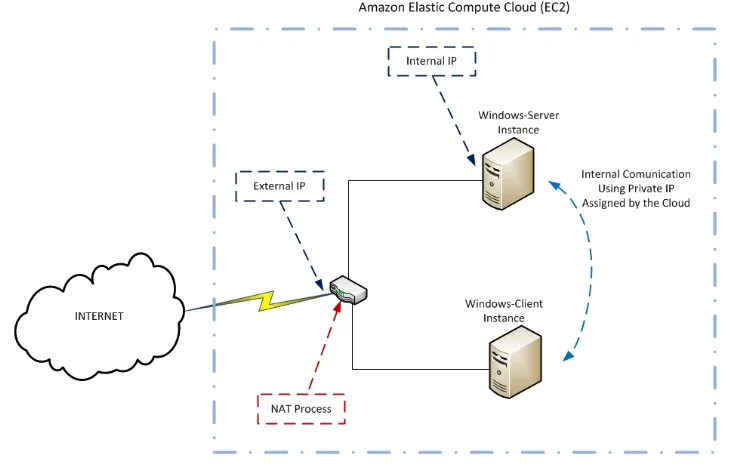
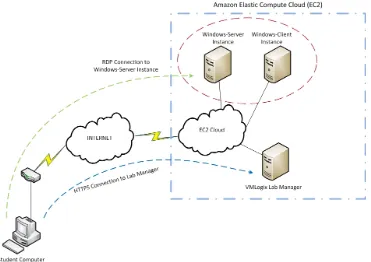
Another important aspect was the network connection of the instances within EC2. The
instances are connected through a Network Address Translation (NAT) process that
makes the environment more secure. Furthermore, the instances are assigned two
addresses one internal private address and one external public address. This permitted the
use of an Access Control Lists (ACL) with security rules to allow access to the instances.
[image:17.612.177.475.83.285.2]See image below for a network connections diagram.
Figure 1 - HTTPS Access to VMLogix Lab Manager
[image:17.612.135.501.457.690.2]5.
Proof of Concept
The creation of the remote virtual lab, using Amazon Web Services and VMLogix,
required several steps. The first step was the account creation which served to register the
services we wanted to use. After registering with AWS and getting the account then we
registered the EC2 and S3 services for the use with the lab. The use of the services
required that the account has credits. These credits were provided by AWS to the account
for one complete year because it was for educational purposes. With the account, the
services and the credit in the AWS system the next step was the registration for the
VMLogix Lab Manager. They provided one year of evaluation because was for
educational purpose. See Appendix C for details of AWS Account creation process.
When the process was completed VMLogix created an instance in EC2 in order to install
their Lab Manager solution. Furthermore, they provided the web address and a Remote
Desktop connection to access the server instance. VMLogix also stated that this instance
cannot be terminated or shutdown, because the termination of an instance in EC2 will
erase all the configurations that were in it. Nevertheless, we can restart the server in a
case that the Lab Manager services were not working properly.
The setup of the AWS and the VMLogix took around two weeks to be completed,
because the university email used was with problems and the credits for the AWS didn’t
get through it. Nevertheless, with all services activated and with enough credit the
infrastructure was in place for the creation of the Labs.
The first step was to create an instance using the AWS console interface to test how this
environment works. This provided a sense of how big the AWS Infrastructure was and
the amount of images offered to create virtual servers. Furthermore, most of the images
publically available were already customized with different applications or services.
Moreover, this result in the first issue to consider which image was the base one to be
CentOS, Fedora, Ubuntu, among others. See Appendix D for Instance Creation details
using AWS Console1.
The use of the AWS console for the initial test required the knowledge of private key
certificates and others concepts this made the console a complex environment for
students to make the Labs. Furthermore, the console was only accessible through the
account created which gives full access to the environment. Those concerns didn’t allow
the use of the console for the Labs. Nevertheless, the administrative control provided and
the simple steps required to create Windows Images made it an ideal environment for the
development of the Lab images. See Appendix E for images creation through AWS
Console.
The VMLogix environment was tested and proved more suitable for student’s labs. This
one offered more control over student’s access. The students were separated by groups in
the Lab Manager thus each student had access to different labs within the system.
Furthermore, this access control feature provided the ability to allow access to selected
images to each group. For example, a group of students could be working on labs based
on Windows Server 2003 and only has access to that image. This provided a security
layer that doesn’t allowed the students to run Virtual Machines with other images.
Nevertheless, the Lab Manager environment uses different terminologies than AWS
which resulted with some misunderstandings when was used for the first time. For
example, the environment used the word templates for referring to the Images (AMI).
Furthermore, a lab environment was created by making Configurations. These
Configurations had Roles; each role represented an Instance in EC2. However, the
templates resulted into a simple form for students make their labs because they only
provided imported AMI’s from AWS EC2. Moreover, it was easier for students to find
the image to be used for a lab in the templates than have to browse thousands of images
in EC2 repository.
6.
Remote Virtual Lab: Development of Laboratories
The idea behind the labs were that as simple as possible provided an environment for
students to learn something from real world network server applications. For this purpose
the labs created were used by students of the Data Switching Lab course at PUCMM.
This provides a real user environment to test the labs. Furthermore, the class consisted in
sixteen students with some knowledge of networking and operating systems from
previous courses. Nevertheless, this was the first time these students at PUCMM were
exposed to a remote virtual lab.
The use of modern operating systems and services like FTP and Web Server provided an
introduction for students into enterprise server application environment. The first lab
created was based in Linux more specifically CentOS 5.3 to provide an FTP Server and a
Web Server. The selection of CentOS was made because of the Enterprise focus that it
have. This OS uses the same free sources as other Enterprise OS in the market (CentOS
Project) making this Linux Distribution very stable. In this environment the students
installed and configured VSFTP for the FTP Server and Apache for the Web Server.
The second lab environment was created using Windows Server 2003. This version was
the only Windows Server image available when the lab was developed2. The students
installed and configured IIS for providing Web and FTP services.
2
More recently, AWS had made available the Windows Server 2008 image for use within EC2. Check
One important part of the labs was the Student’s Guide to VMLogix Lab Manager which
provided the steps required by the students to login and successful work with the Lab
Environment. See below for the translated Student’s Guide; for the original Spanish
version check appendix F.
6.1
Student’s Guide to VMLogix Lab Manager
This guide will show step by step how to manage the Virtual Lab for using the Virtual
Machines configurations already created by the Professor/Administrator
1- Login into the Lab Manager through the Web.
- We have to go to the main web page of the Lab Manager.
The address is: https://ec2-174-129-125-107.compute-1.amazonaws.com:8443
- In this page we have to enter our username and password. Both were provided by
the profesor at the begining of the course. After entering the login and password
we have to click in the Login button. (See image)
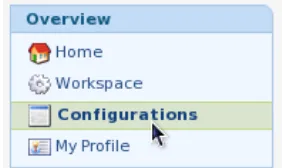
2- Show the current available Configurations.
- After entering into the Lab Manager select the option Configurations from the left
[image:21.612.208.370.447.519.2]menu pane in the web page. ( See image)
- A list of Virtual Machines configurations will be displayed. This is the list of the
current configurations that we have access. We need to deploy the configuration
that is specified in the lab guide. For this we have to put the mouse over the name
and select the Deploy with defaults option. Take in consideration that the
deployment of a configuration could take a few minutes. (See image)
3- Accessing the Deployed/Saved Configurations.
- When we deploy the configuration it can be accessed through the Workspace. The
Workspace is the area where the active configurations that are deployed can be
accessed. Furthermore, Saved and pending configurations can also be accessed.
The Workspace can be accessed through the Overview panel at the left of the
page. See image below.
[image:22.612.250.391.86.170.2]Figure 4 - Accessing Configurations Menu within Lab Manager
- For accessing the a specific Virtual Machine from the Active Jobs we only need
to click in the name of the configuration or in the small square image of the
console near the name. See image below.
- After getting inside of the selected Virtual Machine console we can access the
Console Methods to get the options available to connect to the console of the
Virtual Machine. For example, SSH Console and Guest-VNC app. See image
below.
Figure 6 - Accessing the Workspace
- If we select the SSH Console method to access the Virtual Machine then a Java
Terminal SSH console is displayed.
- If we select the VNC or the RDP method we have to download a file for making
the connection to the console. In the case of the VNC the file extension is an .lmv
with the address for connection. The RDP method uses an .rdp file with the
address for the connection. See image below.
- For accessing the Virtual Machine we should have the appropriate client installed.
The VNC requires the use of UltraVNC for Windows or we can use any other
VNC client. For the RDP there is a client installed in Windows and we can
download a RDP client for Linux.
4- Saving or Undeploying a Configuration
- We can save the state of the Configuration just by moving the mouse over the
configuration name and a small window will show different options that we can
Figure 8 - Console Methods
do. One option is the Save & Continue which allow us to save a snapshot of the
Configuration Virtual Machines and we can continue our work. The second
option is the Save & Undeploy which allow us to save the state of the
Configuration Virtual Machines and Undeploy the Configuration. The last option
allows the Undeploy and Discard the Virtual Machines in the Configuration. See
image below.
6.2
The Development of the Linux Laboratory
The development of the Linux Lab required the use of an AMI with the base Linux OS
without any Web or FTP service. Furthermore, in the EC2 image catalog were so many
different images of the same OS modified by different companies to include their own
services or applications available to the public. Nevertheless, there were some base
images of different OS including a base version of CentOS 5.3. This image was imported
into the Templates of the Lab Manager and used as a test environment for the Lab.
The image was tested and successfully provided the Lab environment required for doing
the lab. Moreover, this was a real base image without any FTP or Web service installed
just the OS with minimal services. Also, with this image available and tested within the
Lab Manager the process of creating the Lab Guide for the students was ready to begin.
The first step was to decide the type of guide for the use of students; as a result the
development of a step by step guide with some task that required the investigation of the
students was chosen. The first part of the Linux Lab was the installation and
configuration of the FTP server based on VSFTPD. This required the students’ to first
install the FTP Service using the Yum package installer. Furthermore, the instance in
AWS had full Internet connection thus allowed the students to download any package
that they needed to complete the lab.
It was required for the students to download, install and start the VSFTPD daemon in the
lab. Also, they had to configure the service using the .conf files of the application to
allow anonymous access to the FTP and made use of the service for uploading and
downloading files. Those steps were among others like the investigation of the difference
between active and passive mode in a FTP connection.
The second part of the Lab was the installation and configuration of the Web Server
using Apache. The Apache web server is the most used server in the Internet according to
Netcraft. This made it an ideal Web server application for the students to learn in the Lab.
This required the students to download and install it using the Yum Package installer and
check the content of the .conf file of the HTTPD daemon. Furthermore, the students had
to start the service and created an html file that replaced the default website that came
with Apache. Moreover, they were required to create a virtual directory that used the port
8330. Below is the translated Linux Lab Guide, for the original Spanish version see
6.2.1 Translated Linux Laboratory Guide
PONTIFICIA UNIVERSIDAD CATOLICA MADRE Y MAESTRA
FACULTAD DE CIENCIAS DE LA INGENIERIA
DEPARTAMENTO DE INGENIERIA TELEMATICA
Course: ITT-427 – Data Switching Laboratory
Title: Web and FTP Services in a Linux Server
Time Required: 2 Hours
Report:
Submit the report next week. Show screenshots of the lab steps.
In this lab the students will install and configure a Web and FTP services. These services
are essentials in todays’ enterprise network. The server will have installed a CentOS
Linux Distribution. Furthermore, the FTP services will use VSFTPD and the Web server
will use APACHE.
Read the Students’ Guide to VMLogix Lab Manager to access the Linux Lab Virtual
Machines
PART I:
A. Configure an FTP Server using VSFTPD in Linux (CentOS)
1. Connect to the console of the Linux Virtual Machine using SSH
2. Verify if vsftpd is installed
which vsftpd
3. For installing vsftpd execute the following command:
4. Verify the configuration file of the vsftpd and allow anonymous access to
the FTP server
Edit the file /etc/vsftpd/vsftpd.conf
5. Start the FTP Service using the following command:
service vsftpd start
6. Verify that the FTP server is working
Check the IP Address of the server running “ifconfig” ftp (IP Address of the Server)
Use the username “anonymous” password: “Your email address” 7. Connect to the console of the Windows Server 2003 Virtual Machine
using Remote Desktop (RDP)
Use the following credentials Username: Administrator Password: netsys
8. Open a command console
start run cmd
9. Connect to the FTP Server
ftp (IP Address of the Server)
Use the username “anonymous” and password: “your email address”
B. Research and answer the following
1. Put a Welcome Banner in the FTP Server
2. Create a user that can have Write permission in the FTP Server
3. Create a user that have Read Only permission in the FTP Server
4. Upload a file to the FTP Server
5. Download a file from the FTP Server
6. Explain the difference between the ASCII mode and the Binary mode for
7. Explain the difference between the Active and Passive mode FTP. ¿What
is the advantage of using Passive Mode?
PART II:
A. Configure a Web Server using Apache in Linux (CentOS)
1. Connect to the Linux Virtual Machine console via SSH.
2. Verify if Apache is installed
which httpd
3. For installing Apache execute the following command:
yum install httpd
4. Verify the configuration file of the Web Server
Edit the file /etc/httpd/conf/httpd.conf
5. Start the Web Server using the following command:
service httpd start
6. Verify that the Web Server is working
Check the IP Address of the server running “ifconfig” Connect to the Windows Server 2003 console via RPD
Open a browser and access the address http://IP Address of the
Server
B. Research and answer the following
1. Change the default Webpage of the Server
2. Configure the Web server to use a different port than the default port 80
3. Create a virtual directory that use the port 8330
4. Explain the different methods available to host multiple websites in the
6.2.2 Linux Laboratory in Action
The Linux lab was tested after the development. This test was made to ensure that the
guide and the lab configuration worked. The network connection to the lab was made by
accessing the Web interface of the Lab Manager. Furthermore, the steps stated in the
Student’s Guide were followed to deploy and access the virtual computers required to
make the lab. Below is a network diagram of the connections.
The connections showed in the figure represent how the students were connected to the
lab. The first connection that needs to be made is an HTTPS connection to the Lab
Manager Web Interface. The web interface required a username and a password to allow
students to login. See image below of the logon page.
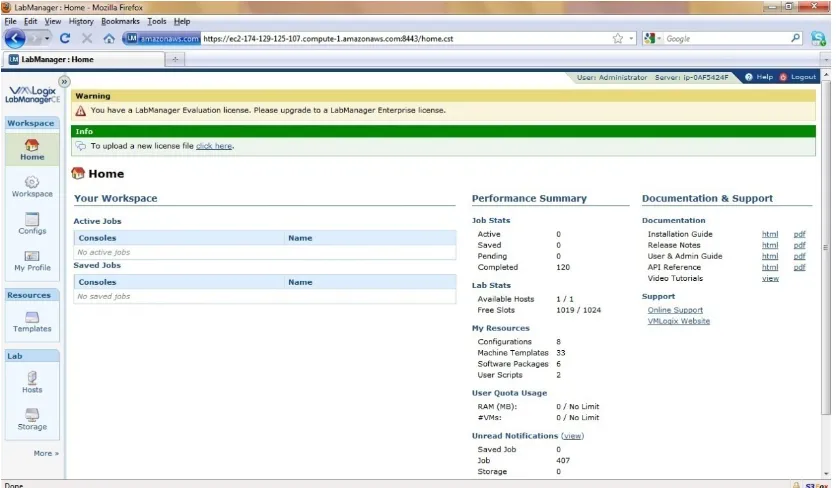
After entering the Lab Manager the main screen appears showing the home page of the
user. This page shows the statistics of the server and the status of active jobs of the user.
Furthermore, a menu panel is displayed in the left with the configurations option from
where the students deployed the lab. See images below.
Figure 12 - VMLogix Lab Manager Login Screen (Linux Lab)
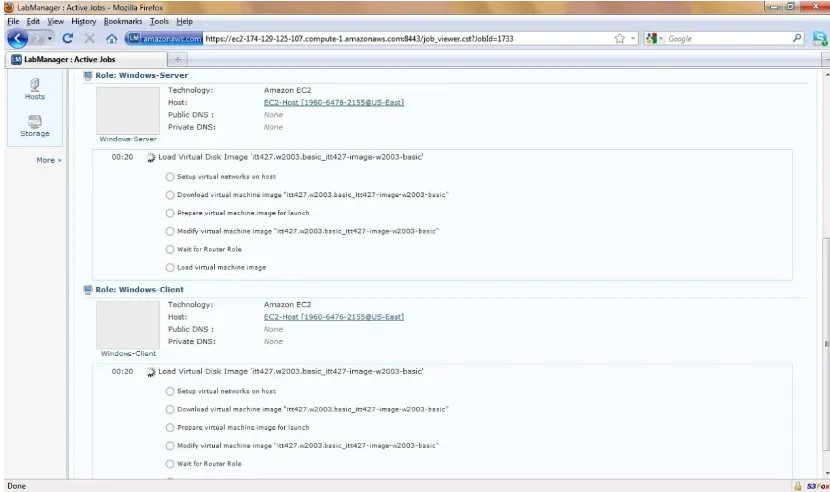
The deployment of a lab configuration took from ten to fifteen minutes. In this time the
Lab Manager requested the creation of the two instances for the lab to the EC2 system.
Moreover, this time appeared to be very long for the deployment of two Instances.
Nevertheless, the creation of those instances required the use of images stored in S3 that
need to be moved to the resources allocated dynamically for the instances. See below
some images of the deployment phase.
Figure 14 - Lab Configurations (Linux Lab)
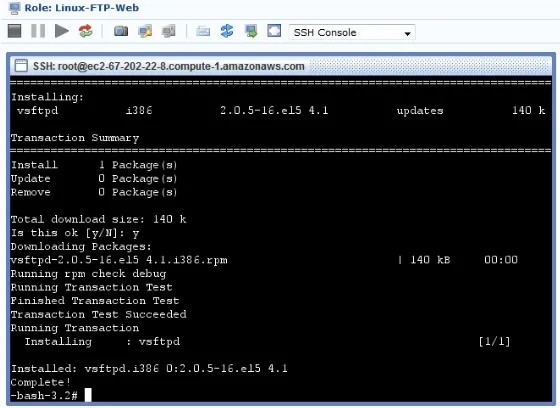
When the configuration was deployed the Linux instance was accessed using the Lab
Manager SSH interface to begin doing the laboratory. The first part of the lab required
the installation of the VSFTPD ftp service. Furthermore, the first command used from the
lab guide was to verify that the service was not already installed. After this verification
the installation and the configuration were performed. See images below.
Figure 16 - Job Deployment (Linux Lab)
Figure 18 - Access to Linux Server through SSH Java Console (Linux Lab)
Figure 20 - Getting VSFTPD package
After successfully installed the VSFTPD service the next step in the lab guide was the
verification of the anonymous access in the config file of the service. See image below.
The next step after the verification of the anonymous access was the test of the service.
Furthermore, a local test was made first then a remote test from the Windows Instance.
Both test required the use of the internal IP address of the Linux instance. See images
below.
Figure 22 - Verifying Anonymous Access (Linux Lab)
The second test was made from the Windows Instance and required the students to logon
into the Windows Server 2003 via Remote Desktop (RDP). Within this instance an FTP
session was initiated to the internal IP address of the Linux Server. See images below.
Figure 24 - Local Test of the FTP Service (Linux Lab)
Figure 26 - Logon into Windows-Client (Linux Lab)
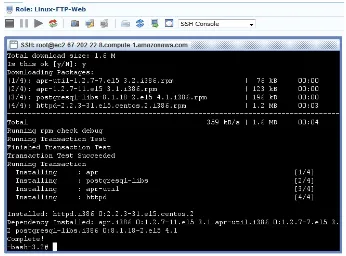
The second part consisted in the installation and configuration of the HTTPD service.
The first command used was to verify if the service was already installed in the system.
After this verification the installation and configuration was performed. See images
below.
Figure 28 - Checking for HTTPD Service (Linux Lab)
The next step after completing the installation was the use of the Windows instance to
test the HTTPD service. For this purpose a Remote Desktop connection was made to the
Windows instance and then the Internet Explorer browser was used to navigate to the
Linux server. See images below.
[image:40.612.150.496.78.334.2]Figure 30 - Installing HTTPD Package (Linux Lab)
The last step was the un-deployment of the lab configuration and release of the resources
in use. This was performed from the workspace in the Lab Manager. See images below.
[image:41.612.148.483.63.319.2]
Figure 32 - Accessing HTTP Server through Internet Explorer (Linux Lab)
6.3
The Development of the Windows Laboratory
This Lab required the use of Windows Server 2003 base image so students interacted
with the OS as if it was recently installed. Furthermore, the development of the Windows
lab required a different approach than the Linux lab. For example, in the Linux
environment installing an application to a server that has Internet access is very simple
because the package manager searches for the application installer in the Internet
repositories. Nevertheless, with Windows if we are going to install a Windows
Component that comes with the OS, like the IIS, we need the Windows installation discs.
Furthermore, in the EC2 environment there is a snapshot of the Windows Server 2003
installation discs that was available from EC2 (Amazon Web Services) but not from the
Lab Manager. This complicated the Lab development so the base image was modified
within EC2 to include the Windows installation discs in the image.
The creation of the image of Windows Server 2003 was made using the AWS Console
which provided the tools needed. Firstly, an Instance was created with the basic image of
Windows Server 2003 and then an EBS3 (Elastic Block Storage) was created using the
snapshot of the Windows Installation discs. Furthermore, with the Instance running the
EBS was attached to it thus making the storage device available to the Instance.
Moreover, within the Instance the installation files were copied to a folder in the C: drive
and also changed the Administrator password to netsys. At that point, the Instance had all
the necessary software and configurations for the Lab and the creation of the image was
possible. This was made through the AWS console using the “Create Bundle” function.
The bundle was actually the creation of an AMI (Amazon Machine Image) based on the
Instance that was running.
3
The last step, after the creation of the bundle, was the registration of the image. This
process was necessary because the image was stored in S3 when the “Create Bundle” had
finished but the image was not visible to any account because it was not registered.
The new AMI was tested, within AWS Console, with the creation of an Instance to check
the availability of the Windows Installers and the change in the administrator password.
Furthermore, the Instance worked with the netsys password and the installation files were
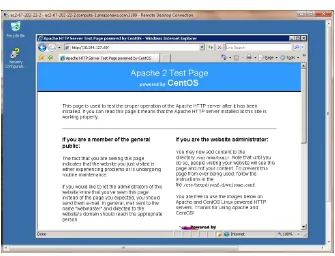
available in the C: drive. Moreover, the IIS was installed successfully and tested with the
default web page. See appendix E for Windows Image Creation process details.
The inclusion of the image into the Lab Manager was simple. Nevertheless, the image
was not available in the imports function of the templates immediately; it took about six
hours to be available. According to VMLogix the image was supposed to be available
immediately. A bug report was created to VMLogix so they could further investigate the
problem.
The lab guide was developed to make the students install and configure the IIS.
Furthermore, the students were requested to change the default web page and the web
server port. Moreover, they had to investigate how the IIS could host multiple websites.
The second part of the lab the students were required to add the FTP service to the IIS.
Also, they had to check the service status and how the service was configured by default.
Moreover, students had to test the service uploading and downloading files. See below
6.3.1 Translated Windows Laboratory Guide
PONTIFICIA UNIVERSIDAD CATOLICA MADRE Y MAESTRA
FACULTAD DE CIENCIAS DE LA INGENIERIA
DEPARTAMENTO DE INGENIERIA TELEMATICA
Course: ITT-427 – Data Switching Laboratory
Title: Web and FTP services in a Windows Server
Time Required: 2 Hours
REPORT:
Submit the report next week. Show screenshots of the lab steps.
In this lab the students will install and configure a Web and FTP services. These services
are essentials in todays’ enterprise network. This server will have installed a Windows
Server 2003. Furthermore, the Web and FTP service will be provided installing and
configuring IIS.
PART I:
A. Installing IIS in Windows Server 2003
1. Connect to the console of the Windows Virtual Machine via Remote
Desktop.
Username: Administrator Password: netsys
2. For installing IIS do the following:
Add Role -> Next
Select Application Server (IIS, ASP .NET) -> Next
Use the default parameters click next until the installation begins. When the installation ask for the Windows Installers click Browse
-> My Computer --> Local Disk (C:) --> Win2003 Sources --> Disc1
-> I386 -> Open -> OK
This last step must be repeated for each time the Installation ask
for the Windows Installer files.
At the end just click Finish.
3. Open the IIS console to verify that it was installed
Click Manage this Application Server Open IIS Manager
Local Computer -> Web Sites -> Default Web Site 4. Verify the configuration information of the default Web Site
Right Click on Default Web Site -> Properties
Identify the port number of the WebSite, check the Home Directory
and the default documents.
5. Verify that the Web Server is working
Obtain the IP Address of the server by opening a command console: Cmd -> “ipconfig”
Connect to the second Windows Virtual Machine and open a Web Browser
Go to: http://IP Address of the Server (The default web page should open)
B. Research and answer the following
1. Creates a Website that uses the port 8330 and put a web page in it.
2. Explain the different methods that exist to have multiple websites in the
PART II:
A. Install the FTP service in IIS
1. Connect to the console of the Windows Virtual Machine via Remote
Desktop.
Username: Administrator Password: netsys
2. Add the FTP Service to IIS
Start -> Control Panel -> Add or Remove Programs Add or Remove Windows Components
Select Application Server and click Details
Select Internet Information Services (IIS) and click Details Select File Transfer Protocol (FTP) Service and click OK, OK,
Next
When the installation ask for the Windows Installers click Browse
-> My Computer --> Local Disk (C:) --> Win2003 Sources --> Disc1
-> I386 -> Open -> OK
At the end just click Finish 3. Verify that the FTP server was installed
Start -> Administrative Tools -> Internet Information Services (IIS) Manager
FTP Sites
Check the state of the FTP Service.
4. Check the Configuration information of the FTP
Expand FTP Sites and Right Click in Default FTP Site
Identify the Port Number, Check the Home Directory and Verify
the security configuration of the FTP
Obtain the IP Address of the server by opening a command console: start run cmd -> “ipconfig”
Connect to the second Windows Virtual Machine via Remote Desktop (RDP)
Open a command console start run cmd
Connect to the FTP Server ftp (IP address of the server)
Username “anonymous” password: “Your email address”
B. Research and answer the following
1. Change the Welcome Banner of the FTP Server
2. Create a user that can Write to the FTP Server
3. Create a user with Read Only access to the FTP Server.
4. Upload a file to the FTP Server
5. Download a file from the FTP Server
6. ¿What we have to do to execute multiple FTP Servers in the same host?
6.3.2 Windows Laboratory in Action
The Windows Lab required some effort to make the configuration. Nevertheless, after
completing the lab configuration the lab was tested to check the guide and the proper
functioning of it. The students were required to connect to the Lab Manager to deploy the
Lab Configuration. After successfully deploying the lab, a Remote Desktop access was
available to connect to the Virtual Instances. See below a network diagram of the
The first step was the connection to the Lab Manager and login into the web page.
Furthermore, inside the Lab Manager the lab configuration was deployed so the lab
virtual instances were created. See images below.
[image:48.612.142.513.91.353.2]Figure 34 - Network Diagram of Windows Lab Network Connections
Figure 36 - VMLogix main screen (Windows Lab)
[image:49.612.121.529.392.644.2]After deploying the lab configuration the guide was followed to begin the laboratory. The
first part of the lab was the configuration of the Web Server (IIS) this was accomplished
by accessing the Windows-Server instance using Remote Desktop (RDP). See images
below.
[image:50.612.115.530.94.340.2]Figure 38 - Deployment process of Windows Lab
Figure 40 - Login to Windows-Server (Windows Lab)
Figure 42 - Adding a Role Wizard (Windows Lab)
[image:52.612.117.535.384.652.2]Figure 44 - Selecting Additional Tools for the Application Server (Windows Lab)
[image:53.612.117.534.396.667.2]The installation of the IIS required the installation discs of Windows Server 2003 that
were copied in the image C: drive so can be accessed to finish the installation process.
See images below.
[image:54.612.146.504.81.312.2]Figure 46 - Installing and Configuring IIS (Windows Lab)
Figure 49 - Browsing for the Installation Discs (Windows Lab)
Figure 48 - Selecting Windows Installation Discs folder (Windows Lab)
After the installation of IIS was finished, the next step was to check the default
configuration of the Web Server. See images below.
[image:56.612.107.543.74.363.2]Figure 51 - Finish Installation of Application Server (Windows Lab)
Figure 53 - Accessing the Default Web Site Properties (Windows Lab)
[image:57.612.115.539.400.666.2]Figure 56 - Home Directory of the Default Web Site (Windows Lab)
[image:58.612.104.537.392.659.2]After checking the default configuration the Web Server was ready to be tested. This task
was accomplished by login into the Windows-Client instance and connecting to the Web
Server internal IP address with the Internet Explorer web browser. See images below.
Figure 57 - Windows-Sever Internal IP Address (Windows Lab)
The second part of the lab required the installation of an FTP server in IIS. This was
made by modifying the default installation of IIS to add the FTP server. This also
required the installation discs of Windows Server 2003 available in the C: drive of the
[image:60.612.113.537.76.410.2]instance. See images below.
Figure 60 - Accessing the Add/Remove Programs (Windows Lab)
[image:61.612.122.527.421.671.2]After installing the FTP service the default configuration was checked. This was made
from the IIS Manager which can manage both, the Web server and the FTP server. See
[image:62.612.164.485.71.319.2]images below.
Figure 62 - Adding FTP Service (Windows Lab)
[image:62.612.163.488.431.675.2]The last step of the second part was to test the FTP server from the Windows-Client
instance. Furthermore, the command tool “ftp” was used to test the FTP server. See
[image:65.612.170.480.451.687.2]images below.
Figure 68 - Access Restrictions of the Default FTP Site (Windows Lab)
7.
Laboratories Experiences
The Amazon EC2 platform and the tools provided by it permitted the creation of the
virtual lab infrastructure. Furthermore, the use of VMLogix Lab Manager as the interface
for managing the labs provided a simple interface for the students to access their remote
virtual laboratories. Nevertheless, the creation of the labs required more knowledge of the
technologies involved. For example, the windows lab required the creation of an image
with the installation discs in a folder. This image was created using the tools provided by
Amazon EC2 and it was necesarry to follow several steps.
The Linux lab was easier to develop than the Windows because it was not neccesary to
make any modifications to the image. Nevertheless, students’ access to the SSH console
was more difficult due to some incompatibilities with the Java console. Also, The access
was problematic where sometimes after the deployment it didn’t provide the SSH as a
console method and the students had to go back to the workspace and get back into the
active job again to have access to the SSH console.
Also, according to Diaz in his “Students’ Satisfaction When Using a Remote Virtual Lab
based on Amazon EC2 for Networking Courses at PUCMM”, students’ found advantages
in the use of this laboratory environment. For example, the availability of the lab was one
of the advantages that students like most. This was because they used the lab from
anywhere and at their most convinient time.
Another advantage that students’ found was that they don’t have to worry about physical
connections that required time and effort.
The students were able to complete their lab assigment through the use of VMLogix Lab
Manager and Amazon EC2. Furthermore, the issues found didn’t stop students to
complete their lab work.
8.
Some Costs Considerations
The use of the Lab Manager consumes resources in the Cloud. The most basic resource
that consumes EC2 Instances was the Lab Manager server itself. This server was actually
a Windows Instance powered on 24/7. The server was installed in a small Instance which
cost US$ 0.12 per hour. Furthermore, running only the Lab Manager server was
consuming US$ 2.88 per day that’s made a US$ 86.4 a month (Amazon EC2) that will be
divided by all users.
This only provides the interface for using the system. We have to add the space
consumed in S3 for storing the images needed for the labs and also the usage of instances
by the students to made the lab. Furthermore, there are charges for the data in and out of
the AWS Cloud. Also, VMLogix provided their Lab Manager without costs and when
the EC2 and S3 services. Those credits provided the ability to experiment and test with
the Cloud for a complete year (AWS in Education).
The Linux lab requires the students to use a small Instance and does not required an
image stored in our S3 account. Instead a publicly available image was used.
Furthermore, the amount of time required was estimated in four hours so students could
take screenshots to presents in their reports.
The Linux Lab Costs:
Number of Students Number of Instances Estimated Hours
Rate per Instance per Hour
Total per
Instance Total
1 2 4 US$ 0.085 US$ 0.34 US$ 0.68
However, the windows labs costs were more expensive because was required to create an
image with the Windows Installers included that was stored in S3. The windows image
took 3.5 GB of storage in S3 with a cost of US$ 0.10 per GB per month which adds up
US$ 0.40 (Amazon S3). Nevertheless, this image was accessed by all the students that
participated in the lab.
The Windows Lab Costs:
Number of Students Number of Instances Estimated Hours
Rate per Instance per Hour
Total per
Instance Total
1 2 4 US$ 0.12 US$ 0.48 US$ 0.96
If we assume that regular laboratory for PUCMM could have ten labs and the labs are
The five Linux Lab Costs: Number of Labs Number of Instances per Lab Estimated Hours per Lab Rate per Instance per Hour Total per Lab Total (Five Labs)
5 2 4 US$ 0.085 US$ 0.68 US$ 3.4
The five Windows Lab Costs:
Number of Labs Number of Instances per Lab Estimated Hours per Lab Rate per Instance per Hour Total per Lab Total (Five Labs)
5 2 4 US$ 0.12 US$ 0.96 US$ 4.8
This means that all ten labs per student could cost an estimate of 8.2 dollars per semester
per student.
These estimates don’t take in consideration the expenses for the VMLogix Instance and
the storage used by the images required for the labs. See Appendix I for details of the
AWS Statements while students were using the labs.
9.
Future Works
While the Cloud environment represent a great advantage for universities in terms of
costs and the computational power available in minutes. Furthermore, there are more
networking applications labs that can be implemented in the cloud like DNS service,
Active Directory, Terminal Services, Email Server, Mixed environments
(Windows/Linux) among others. Moreover, there are other areas that can take advantage
of the Cloud platform provided by AWS like the software development. For example,
students could create complex enterprise environments with all the servers and develop
10.
Conclusions
The AWS Cloud is very responsive and robust providing a great virtualization
environment for almost all needs. Their systems were up 100% of the time while working
in the development of the labs and when the students were doing it. Nevertheless, it
required some time to understand the technology and terminology they used for their
environment. Furthermore, the platform is not oriented for doing labs that’s why the use
of a third party software like VMLogix Lab Manager Cloud Ed which is a lab manager
for the Amazon’s virtual environment was necessary.
VMLogix provided all the tools for use the AWS as a lab for students. Nevertheless,
there were some small issues that students had like a refresh problem when working with
Linux instances or problems for deployment of the labs. However, those small issues
didn’t stop the students for successfully worked in their labs.
The advantage of using this remote system was the flexibility the students had in terms of
the time they needed and the resources for accessing it. Furthermore, students worked
most of their time from their homes and at night. This represented a major improvement
so students didn’t have to reserve a computer resource inside the University for doing the
labs during the day.
The use of the AWS platform with the VMLogix software could improve the labs
experience of the students. Nevertheless, this environment requires the development of
each lab carefully so the images and the student’s guide are thoroughly tested.
Improving the practical experience of students through the use of hands-on labs that
simulates business configurations can led to more prepared professionals in the future.
The use of technologies and the platform provided by AWS seems to be an ideal
environment for students to experiment and acquire the required experience needed in
11.
References
Amazon Web Services. Amazon EC2 API Tools. n.d. 20 March 2010
<http://developer.amazonwebservices.com/connect/entry.jspa?externalID=351&catego ryID=251>.
—. Amazon Elastic Compute Cloud (EC2). n.d. 31 January 2010 <http://aws.amazon.com/ec2/>. —. Amazon Simple Storage Service (S3). n.d. 31 January 2010 <http://aws.amazon.com/s3/>. —. Amazon Web Services. n.d. 31 January 2010 <http://aws.amazon.com/what-is-aws/>. —. AWS in Education. n.d. 20 February 2010 <http://aws.amazon.com/education/>. —. Configuring Windows Components on Amazon EC2. n.d. 31 January 2010
<http://developer.amazonwebservices.com/connect/entry.jspa?externalID=1802>. Armitage, William D. , Alessio Gaspar and Matthew Rideout. "Remotely Accessible Sandboxed
Environment with Application to a Laboratory Course in Networking." Proceedings of the Special Interest Group for Information Technology Education. Destin: ACM, 2007. Border, Charles. "The Development and Deployment of a Multi-User, Remote Access
Virtualization System for Networking, Security, and System Administration Classes." Proceedings of the 38th SIGCSE technical symposium on Computer science education. Covington: ACM, 2007.
CentOS Project. The Community ENTerprise Operating System (CentOS). n.d. 31 January 2010 <http://www.centos.org>.
Create Your Own Web Server With BIND And Apache On CentOS 5 (Simplified). n.d. 03 Octuber 2009 <http://www.howtoforge.com/creating-your-own-webserver-with-bind-and-apache-centos5>.
Diaz, Kenny. "Students’ Satisfaction When Using a Remote Virtual Lab based on Amazon EC2 for Networking Courses at PUCMM." MS Thesis, Unpublished Work. B. Thomas Golisano College of Computing and Information Sciences, RIT, 2010.
Gerdes, John and Scott Tilley. "A Conceptual Overview of the Virtual Networking Laboratory." Proceedings of the Special Interest Group for Information Technology Education. Destin: ACM, 2007.
Lahoud, Hilmi A. and Xin Tang. "Information Security Labs in IDS/IPS for Distance Education." Proceedings of the Special Interest Group for Information Technology Education. Minneapolis: ACM, 2006.
Leitner, Lee J and John W. Cane. "A Virtual Laboratory Environment for Online IT Education." Proceedings of the Special Interest Group for Information Technology Education. Newark: ACM, 2005.
Microsoft Corporation. Installing IIS (IIS 6.0). n.d. 3 Octuber 2009
<http://www.microsoft.com/technet/prodtechnol/WindowsServer2003/Library/IIS/750 d3137-462c-491d-b6c7-5f370d7f26cd.mspx?mfr=true>.
Netcraft. Web Server Survey. n.d. 31 January 2010
<http://news.netcraft.com/archives/web_server_survey.html>.
Stackpole, Bill. "The Evolution of a Virtualized Laboratory Environment." Proceedings of the Special Interest Group for Information Technology Education. Cincinnati: ACM, 2008. VMLogix. VMLogix LabManager Cloud Edition. n.d. 31 January 2010
12.
Appendix A – Instance Types and OS in EC2
Instance Types (Amazon Web Services)
Standard Instances
Instances of this family are well suited for most applications.
• Small Instance (Default) 1.7 GB of memory, 1 EC2 Compute Unit (1 virtual core
with 1 EC2 Compute Unit), 160 GB of local instance storage, 32-bit platform
• Large Instance 7.5 GB of memory, 4 EC2 Compute Units (2 virtual cores with 2
EC2 Compute Units each), 850 GB of local instance storage, 64-bit platform
• Extra Large Instance 15 GB of memory, 8 EC2 Compute Units (4 virtual cores
with 2 EC2 Compute Units each), 1690 GB of local instance storage, 64-bit
platform
High-Memory Instances
Instances of this family offer large memory sizes for high throughput applications,
including database and memory caching applications.
• High-Memory Double