Rochester Institute of Technology
RIT Scholar Works
Theses
5-1-2019
I Am Arbor
Anannya Sengupta
Follow this and additional works at:https://scholarworks.rit.edu/theses
This Thesis is brought to you for free and open access by RIT Scholar Works. It has been accepted for inclusion in Theses by an authorized administrator of RIT Scholar Works. For more information, please [email protected].
Recommended Citation
I Am Arbor
by
Anannya Sengupta
A Thesis Submitted in Partial Fulfilment of the
Requirements for the Degree of Master of Fine
Arts in Film and Animation
School of Film & Animation
College of Art & Design
Rochester Institute of Technology
Rochester, NY
Table of Contents
Committee Approval………...3
Abstract……….………...4
Introduction……….……….6
Review of Research……….8
Process……….9
Pre-Production Stage………..9
Production Stage………...11
The Blocking Phase………..15
The Splining Phase………...16
The Lighting Phase………...17
The Other Scenes………..18
The Render Set-Up Phase……….19
The Rendering Phase………21
Post-Production Stage………22
Sound Design……….24
Audience Feedback
………
26
Conclusion………...…..27
Bibliography………..29
Committee Approval:
Mark Reisch
Date
Thesis Advisor
Thomas Gasek
Date
Thesis Committee Member
David Sluberski
Date
Abstract
I Am Arbor is a film that captures the beauty and tragedy of Trees in our civilization, which are going through tragic transformations due to rapid urbanization. Perhaps for the first time, this short movie has created a narrative that is anchored on the feelings and emotions of Trees, their existence as families, and their collective contribution to human existence. The movie blends live action and Computer Generated Imagery (CGI), to merge real and imaginary worlds; all of which comes together to create a touching story.
The film is a product of a childhood influence coupled with children’s literature. The director’s mother had a dream in which she claimed that she dreamt of a Tree, where the leaves, flowers and branches appeared as real-life characters- as though they were members of a grand family. She could hear them talk, laugh, smile and dance. This prompted research, leading the creator to Shel Silverstein’s The Giving Tree. In this children’s book, there is a
symbiotic relationship between an ever-giving tree and a human boy. Further research, lead to the movie The Lorax by Dr. Seuss, which explains the need for Trees in an imaginary town of plastics and metals.
I Am Arbor portrays an engaging and emotional friendship between a child and a Tree transporting viewers to an imaginary world of happiness, celebration, and joy; only to lead to a very tragic end where the protagonist becomes the antagonist as time passes and modern compulsions of society take over.
compromises and most importantly the experience of a film maker freshly minted out of a graduate program with all its scholastic trainings.
Introduction
I have always been strongly opinionated about the world and its problems, but I
always refrained from debating because I wanted to avoid the conflict that arose between
differing opinions. Furthermore, these debates often end with at least one party ignoring the
other’s points- no matter how valid they are- and cover hard to discuss optics. Instead I
found an alternative way to express my opinions: art. My passion is films.
This idea for this project took root one warm morning when I was sitting at home
drinking my usual cup of tea. My mother woke up and came to me excited because she
wanted to share a very unusual dream with me. She told me how she had dreamt of flowers
and leaves running and dancing around in a tree. She then suggested to me, “Why don’t you
make a film about this?”
At first, I was skeptical; I didn’t know what to make of it, but the idea stuck in my
head. Once it was planted, I thought about all the opinions and ideas I had about
deforestation, the environment, and global warming. Immediately a story began to take shape,
and I started my research on films and cinemas incorporating these topics.
The most I discovered were documentaries and infographic videos, which were
realistic but did not have a lasting impact on the viewer. I came across the book The Giving
Tree by Shel Silverstein (Silverstein), which was published in 1964. The message of the book
had a strong impact on me and mirrored the impact I envisioned. I also researched several
movies that depict the relationship of trees and humans. One movie worth mentioning is Dr
Seuss’ The Lorax, produced by Illumination entertainment and distributed by Universal
plastics and metals. The movie ends with an inspiring comeback of forests in a town that had
corporations selling oxygen and forced people to live in an artificial world devoid of nature.
My focus for the movie is not just on the life giving force of Trees but also on
characterizing the elements of a tree, such as flowers, leaves, and twigs; their interplay of
emotions; and the threat they face due to urbanization. I was motivated to create a world that
goes into the depth of the Trees, where the blossoming of a flower is like a childbirth and
that is celebrated and the Trees are made up of sub characters. This creative choice, I believe,
adds a novelty to the narrative that both fits into the larger canvas of my afforestation theme
and brings in a touching story of the little characters that constitute a tree. It can impact the
audience in several ways and compel them to think about our life force- the one we do not
hesitate to kill.
With this research and a new found vision, a peculiar dream of my mother not only
inspired me but allowed me to embark on a journey that provided a different view of Trees;
Trees that speak out saying, “I am Arbor.”
This was my catapult, my starting point to begin this film. I started sketching
Review of Research
Once I started researching this particular topic, I came across many stories and was
inspired to create not only just a empathic feeling in my viewers , but instill in them a sense
of duty towards afforestation. The vision that I had in my mind was, in a way, quite complex
because it is difficult to show some of the complexities of this issue in animated form;
therefore, I had to include some sort of live action so as to enhance the sense of empathy and
interaction with the audience.
From that point, my research was mainly focussed on technical aspects because I
knew I would need to combine live action and CGI together. Fortunately, this is my main
interest, the area I am most passionate about, and my forte.
Much of my research included watching movies such as Avengers, Iron Man, and a
plethora of Sci-Fi films because each has a mix of live action and CGI, and I wanted to
mimic that style in my film. Combining that style with the concept of ‘The Giving Tree’ was
indeed a difficult task. I wanted to take the concept of give and take between the Flora and
Homo Sapiens to create a feeling within the audience.
From a technical standpoint, I studied tutorials on Pluralsight to strengthen my
software skills; these included NukeX and Nuke Studio, where I learnt deep compositing and
CGI compositing. Since I was including live action within this film, I continued my research
on how to conduct a professional live action shoot, due to the fact that I was lacking
experience in it. I started talking to couple of my classmates within the School of Film &
Animation who were focussing on the production area to get an idea of how the entire
Process
Pre-Production Stage
The sketching period began with regular thumbnails. I wanted to include a lot of
dramatic camera angles and movements to show the feeling of dramatism in this film, so I
decided to include extra camera movements in the first version of thumbnails.
A main goal was to establish a feeling of empathy in the audience towards the life of
Flora, and the only way to evoke those feelings was to anthropomorphize the Tree into a
character. Through that process of imagination, I ended up making small characters within
the tree, in order to create a new and a different world inside.
I started sketching out the characters and different versions came out. I wanted each
character to have their own identity and come across as “cute” in their own way. Eventually,
I was very pleased with my sketches, and I felt they perfectly work in the story. However, I
was then faced with the challenge of giving each character a purpose; I obviously couldn’t
just have them roam around in the film without a reason.
It was at this point that my high school knowledge of photosynthesis came into play.
Humans have a purpose in life of receiving an education, growing, working, providing for
their family, and serving the community, and like us each part of a plant has a purpose. I
needed my characters to have a duty towards the world and themselves. Hence, they became
responsible for providing oxygen to the world- a purpose I now had to show visually. To
achieve this, I played with concept of coloured gases, making carbon dioxide as a red gas and
oxygen as a blue gas. To me the color red denotes danger and alarm- a good choice for
inspired by Dena Pryzbyla’s article on color psychology, in which the author categorizes red
as danger and war, as well as a symbol of passion and energy, while blue depicts empathy
and compassion (Przybyla). The live action visual effects mirrored this concept through
human characters breathing in oxygen and giving out carbon dioxide, and Tree characters
doing the reverse -taking in carbon dioxide and giving out oxygen.
Though most of my challenge for creating purposeful character was dealt with, I
wanted to add more depth to the Tree character, so the concept of ceremony and tradition was
introduced. I wanted show the blooming of a bud into a flower as a ceremony as that
provided a sense of birth within the Tree world and demonstrate how oxygen is a life source
for the world. It is all connected; through the birth of Trees and flowers we humans are born,
remain alive, and continue to exist.
Having this new direction, I started sketching down all of these characters and ideas
in order to compile them into one final story shown through thumbnails.
When it came to the live action aspect, I wanted to create a strong sense of empathy.
The Giving Tree shows the bond between a child and a Tree, so I used this inspiration. I
wanted a child who is swamped with energy to walk. He needs oxygen to continue his antics,
which he eventually gets from the Tree and its characters. The moment he gets the oxygen,
his energy is revived and a bond is born between the two. Originally it is one of joy, but it
turns to melancholy. With the passage of time, the child grows and becomes a part of the
modern world, returning to chop the tree. During this time I wanted to show the perspective
of the characters, to demonstrate their mixed feelings of grief, shock, and disappointment.
The struggle of this entire story was to find a boy who looked like the man. I have to
congratulate my casting director who managed to get a boy and his father as actors for the
While the sketching of the storyboards was going on, I began searching for the rest of
my crew and coordinating with them. This was my first big production, and I knew that
pre-production was an important part of the process. Thus, I began meticulously designing the
call sheets and coordinating with my Director of Photography to gather the equipment and
arrange the space for the shoot. This was one of the biggest challenges I faced. The
pre-production phase finally came to an end, but I knew at that point that this was just the
beginning, and I said to myself “Let the production begin!”
Production Stage
I was very nervous to begin the live action component of my film. I knew I had all the
theoretical knowledge that I needed, but the application of this knowledge , in a practical
environment, was nail biting.
During the production phase, while designing all of the call sheets and proposals for
the equipment rentals, my line producer suddenly dropped out. He was the sole point of
contact for each person on the crew and each activity for filming. This created a huge
problem, as I had delegated many tasks to him and completely devoted my time to the CGI
side of the movie. Now I would have to put on many unknown hats, but this is a struggle that
can occur during many productions. I took on this challenge and successfully coordinated
each activity and communicated with all parties effectively.
Originally, I had planned a two day live action shoot for this movie: one for the man
and one for the boy. This would allow me to space out scenes and focus on directing without
worrying about a time crunch. However, due to the unavailability of studio time and lack of
Foreseeing the need to work quickly, I took my Director of Photography (DOP) and my 1st
and 2nd Assistant Camera Crew the night before to set up at least fifty percent of the things-
to save time the next day. This meant production really only waited on actors to finish with
make-up.
During the time of the shoot, it was very important for me to direct the actors in
specific ways to convey the desired emotion of the scene. For example, in the beginning of
the boy’s scene, I needed the boy to be able to show his struggle of not breathing. The subtext
of not breathing would be wanting to breathe and looking for a place to escape- a place to feel
peace. Transitioning this emotion of loss into a sense of relief when the oxygen is received
from the Tree had to be coupled with the Tree becoming excited to meet the boy and the boy
feeling amazed to meet the new characters within the tree. This was a tough act for a little
kid.
The way I went about directing the child was by giving him situations that he could
relate and react to in order to evoke the feelings I needed him to convey. For example, I asked
him to remember situations when he did something wrong and how his father was
disappointed that he misbehaved. This feeling of guilt and shame needed to be brought out to
make him walk sluggishly in the scene where he needed oxygen. After shooting the scene
multiple times with some successful captures, I told him to remember the moments when he
ate a lot of cake and candies in order to evoke an energetic response. Tapping into that
specific emotion made him very chirpy, and that’s exactly what I needed in the 2nd part of the
scene- the one in which the boy is satisfied and refreshed after receiving the oxygen.
When it came to the man, I gave him the complicated task of thinking of an object
that gave him life but at the same time he had to kill. It was an interesting exercise for him,
sadness- to a point where he had tears in his eyes on set. While I felt sympathy towards his
sad memories, those were the exact emotions I needed him to portray while he was chopping
down the Tree. I saw my vision in this actor, and at that moment I told my DOP to start
recording. Overall, I was very satisfied with the beautiful captures.
The CGI part of the film was rapidly working in my mind. The production of the CGI
elements began a little before the live action shoot. The CGI was also very challenging,
especially visualizing the characters living in the Tree. Creating a whole different world for
them required a lot of thinking and planning.
I had a plan, a sketch, and an idea for the Tree that I needed in 3D. When I started
designing the Tree in 3D, I made sure that I put a lot of branches and twigs in a random
pattern to create a space for the characters to walk around; this also created an ambience
within the Tree, giving it a sense of being a world of its own. This gave me the opportunity
to play around with my camera angles and my composition, which had been developed in
pre-production. When inside the Tree, I didn’t want the outside world to be visible because
that would take the audience away from this imaginary world. Therefore, I filled up the
branches with a lot of leaves. This not only confined the space, but also gave me the ability to
light the scene with the artificial Sun. As a result, I could create very dramatic lights with
only a couple of rays falling on the characters. Once the Tree was done, I started texturing it.
Because there were a lot of close up shots that needed these textures stand out from the
characters in the scenes, the texture’s style had to be realistic. Plus, the realistic element of
this would help to blend the live action and CGI components better.
The modeling and rigging of the characters were outsourced to people who took a
look at the character sketches that I had made and worked closely with me to replicate the
to place, especially during the blooming ceremony. The flowers, however, had to be still;
they had the presence and elegance of being a new member to this community, so their grace
was enough for the other characters and the audience to be awed. Making them move would
somehow remove this sense of grace and lessen their overall impact. I wanted all the other
characters to be attracted to the blooming of a flower and much like a human new-born, they
could gain this attraction simply by being, not by moving.
Speaking of the flower, I wanted to add a special element to it. I didn’t just want to
animate it and keep the regular movements on it. I wanted to add certain dynamics to the
petals, and this was a struggle because there were a lot of things that needed to be
considered: for example, the strength of the petals and how this strength affects the overall
movement. The design of the flower had outer and inner petals, and I had to adjust them
properly so they didn’t overlap with each other. Adding constraints and boundary boxes to
each of them was also important. This wasn’t the end of the flower challenges; I needed to be
able to animate the petals.
To accomplish this, I had to make two versions of the flower: one with dynamics and
the other without. The reason for this was to provide my team and I the ability to animate the
petals during the time when the bud transitions into a flower. During the second blooming
ceremony, where the old flower is present in the background as a new bud blooms, two
different versions of flowers were extremely beneficial.
After all the designs were modeled and rigged, I focussed on the texture for each one
of them. I wanted the feel of the textures for the characters to be completely different from
the Tree, while at the same time maintaining a realistic quality. Since all the textures were of
change the variety of bump maps and normal maps, which achieved my vision of keeping the
characters realistic and unique.
After finishing the textures, I had to prepare the main scene for animation. The Tree
had a lot of branches and leaves, and I quickly found that it was complicated to replicate the
scenes and angles that I needed during the animation stage. This is where I used a feature in
Maya called “scene locators,” which enables the user to pinpoint an exact location in a 3
dimensional space- even in the maze of frames that constituted the Tree. Therefore, I could
animate at precise locations and was able to accomplish my transitions across scenes within
the tree.
As the animation began, I put the main Tree as the main scene file where I would
reference everything else within it from an assets folder- per the project path.
The Blocking Phase
This phase is the first phase of animation, which requires the most creative input from
the animator. I was the sole animator for this project. This animation included activities such
as creating the main poses for every single character and making the first draft of camera
moves. I tried to keep my camera moves final during this phase, and this decision caused this
phase to take the longest time to complete. There were a lot of complications for the blocking
during this stage because there were very many odd glitches, which are typical in Autodesk
Maya. I worked around this problem simply by continuously closing and restarting the
program and clearing the cache. Eventually, this set back was worked through, and I
continued with the blocking stage. The poses that I chose to give my Tree characters were
very happy and enthusiastic. I wanted the bond between the characters to be very tight and
have the ability to create a sense of a good comical timing. During the first blooming of the
jealousy over this bond; as a result, one twig insists a leaf high five with him as well. Little
does he know that his strength will propel the leaf away; twigs are more dense than leaves.
This causes the twig embarrassment, while at the same time providing some comical relief.
When it came to the second blooming of the flower, where the audience is led to the
tragic ending, I wanted to create dramatic camera movements that would give a sense of
tension, suspicion, and anticipation to the audience. To achieve a dramatic scene, I kept a lot
of camera zooms towards the characters to keep the scene dramatic, and to create suspense I
added camera shakes to mimic the effects of the man hitting the tree with the axe. I didn’t
show the man for the first few hits on purpose, as I wanted the audience to get a sense of
discomfort and simultaneous curiosity. During the first few camera shakes, the audience
could be misled into thinking an earthquake has happened. I also embedded camera zooms
focused on the confused flower, and included a shot where the flower looks off-screen with a
sense of disappointment and shock. Immediately, we cut to the man chopping the tree with
his axe; it is the same boy from before all grown-up and part of the modern world. Both the
dramatic camera movement and cuts help the audience make the connection that this is the
same boy who played with the tree earlier and is now cutting it down.
The Splining Phase
This is one of my favorite parts of the entire CGI workflow process. This phase is
where the blocked movements are smoothed out and the movements are refined to make them
look realistic and fluid. Working with the graph editor and all the previously created key
poses was a very exciting time. My first round of splining went smoothly and was a pleasure
to work on, but splining and getting a perfect animation in one round is nearly impossible-
unless you have superpowers. I continuously shared iterations with my thesis advisor and
positive way to make my animation even better. This was especially true with the
movements and the animation principles. Hence, I kept jumping back into iterations for my
splining phase and refining the movements, the jumps, the expressions, and the camera angles
to make the overall product enhanced and engaging. After a couple of iterations, we came to
a ground where the animation was agreed upon, and I was satisfied with the look of the
overall product.
The Lighting Phase
This is another one of my favorite phases. In this stage the scene becomes complete; it
is where everything comes to life. The lighting choice that I chose utilized warm tonalities,
but the light set-up in the beginning scenes were different than that of the end scenes.
The beginning scene is set in the early morning and has bright and happy feel; I chose
to include bright key lights, strong fill lights, and strong rim lights- in order to have them
stand out from the background. I couldn’t use the Sun light as the key light because the leaves
were mostly blocking the pathways, but when the sun is included as partial rays falling on the
branch and on the characters, it creates a nice pleasing look. All the other lights were
artificial, but I replicated that light color and its temperature to be the same as the sun, which
gave it a very natural and intriguing look.
Replicating the same lighting technique across the various scenes was challenging-
not as a concept but from the perspective of labor. I had to keep the values, exposure,
position, intensity, color temperature, and other parameters exactly the same across all the
writing each and every single one of the parameters in my little notebook and replicating
them one-by-one across the scenes that had similar lighting. Towards the end of the film, the
lighting was dim; the scene is set at the end of the day and needed lighting that replicated a
setting sun. The lighting also needed to evoke a realistic melancholy. It should also be noted
there the background includes a cityscape filthy with pollution. This meant that the lights
needed to be a bit dim. I made the Sun a little warm by reducing its color temperature. When
it came to the artificial lights, I still used the basic three-point lighting; however, I made the
fill light very negligible and focused mostly on the key and rim lights. This created a very
dramatic look that made one side of the characters dark and the other side bright. The
cameras were focused mostly on the dark side; this creative choice was inspired from
Hollywood films that are usually shot on the dark side. Overall, it helped to create a very
dramatic look.
Even during the shoot of the live action portion, I made sure I followed the same
lighting style during the two different scenes, and I ensured the camera was recording the log,
which gave me access to a high dynamic range that I could manipulate in post-production: a
bright sun rise for the kid and dark sun set for the man.
In some parts of the scene, there were places that needed to have a background light.
There were scenes where I envisioned rack focusses and the background needed to be lit
properly, so managing that was essential. The background lights however were completely
different in each scene; therefore, they had to be done separately and couldn’t be replicated.
The Other Scenes
There are two scenes in the entire movie that did not include CGI. The scene of the
The process of capturing the growth of the sapling was a bit complicated. I had to
work around this by using a royalty free footage of a sapling growing into a tree. I took that
footage and created a rotoscopy for the entire scene. I took the masking data and re-adjusted
the mask to match it with my tree model. Due to this, I had an alpha matte of the tree
growing. The next work was to fill in the mask with some data and particles. I created
particles within the mask and manipulated them to make it appear as though the leaves were
growing out, and eventually, I replicated it to look like the Tree.
For the time-lapse, I took the model of the Tree and used digital painting in Photoshop
to replicate the same Tree and create a 2D version of it. I used that to animate it and slowly
allow it to grow. For the city background, I wanted to create a speed up effect, where the city
grows. I used Trapcode form within After Effects to create a city and manipulate its
parameters to make it look as if the city jumped out in the background. I then added effects to
make the city slowly generate black smoke, which eventually fills the frame and serves as a
transition to the next scene. This scene was extremely important, as it symbolizes the growth
of humanity and its elements, as nature is simultaneously growing.
The Render Set-up Phase
This is the second most time-consuming phase in the entire CGI workflow. The
render set-up phase involves setting up the scene for rendering and ensuring each frame is
rendered with great quality. At the same time, it must be optimized in order to ensure that it
takes the least amount of time. Finding a balance between both of them, and being able to
compromise on something- either the quality or render time-, was the hardest decision.
This set up not only included optimization of the scenes, but making sure each scene
was ready for post-production. This meant adding Arbitrary Output Values (AOVs) such as,
pass, Z depth, and ID pass. All these were needed for particular scenes, meaning I worked in
render layers and added absolute overrides for each AOV corresponding to their particular
scenes. Some scenes had more indirect light than direct light, so it made sense to remove the
unnecessary AOVs through absolute overrides. This allowed me to have full control for
post-production and compositing- while grading and color correcting.
Apart from regular AOVs, I added different AOVs as lights in their individual
lighting group and added these groups as their own AOV. Therefore, by the end of test
renders I had each and every individual light working as an AOV. This allowed me to
control the light individually in the compositing stage, in order for me to manipulate
brightness or color if it didn’t match. I was able to avoid re-rendering the entire scene,
thereby saving time and resources. I had to be extra cautious because the movie is in 4K. For
each scene using the Arnold Render View, I started checking the renders and tweaking
parameters within the textures, the lights, etc., so that the render shots would be as close to
perfect as possible.
There were problems in many of scenes regarding noise. To fix this, I followed the
noise workflow found in the Arnold website (Arnold Renderer), and eventually -through trial
and error- I got rid of the unwanted noise in the scenes. The process involved testing the
various AOVs that I had applied to the scene until I achieved my desired outcome.
Apart from the AOVs, the other component necessary for the optimization for every
scene was breaking up each scene into render layers. The primary reason for this was to
optimize render resources and money for scenes that had a moving foreground but a still
background. In this phase, I segregated all scenes based on foreground, midground and
of the respective render layers. The still frames that were needed for the background were
later done locally.
Subscribing to the old-school ways again, I noted each and every single frame range
for each render layer and each scene, and I tasked myself with dividing them into batches of
work for the render farm and the local machine. Accordingly, I created a folder structure,
which would be useful during post-production. After my completing my calculations, the
entire movie was composed of 8000 frames that needed to be rendered. The mammoth task
of 4K rendering on 8000 frames began, and I felt anxiety for the job ahead.
The Rendering Phase
This phase is the most expensive and time-consuming phase within the entire CGI
process. I wanted my film to be completely 4k, which meant that the dimensions of each
frame would be 3840 x 2160. To achieve this, an ample amount of render time and powerful
machines are required. I had to enlist the help of industrial quality, high-performance render
farms. Originally, I had planned to do it through our render farm at RIT; unfortunately, that
was taking too much time, and I knew I wouldn’t be able to finish my project on time.
I used a cloud-based render farm called Rendercore, which is based out of
Hollywood, California. After the finishing my render set up, I uploaded my entire project
folder to the servers of Rendercore, and I started performing test renders for every scene. I
chose two to three frames - the beginning, the middle, and the end in order to get an overall
understanding of how the renders were coming out. I put those test renders in Nuke and
tested every single AOV. I faced many problems- as the ground wasn’t rendering properly in
the render farm. This process of troubleshooting took a lot of time and effort; I wasn’t able to
understand why the ground wasn’t rendering. Eventually, I checked the log-view from the
Maya file, but I wasn’t able to figure out where the problem was originating. I tried various
solutions: transferring the entire project to a different folder and setting the project at least
five times. After a long period of searching, I finally realized that the reason it wasn’t
working was due to the file path editor- a simple, silly reason. The editor was referencing the
wrong path, and thus, it wasn’t able to find that particular path for the textures. I ended up
re-pathing all of my reference files. Finally, I performed another round of test renders following
the same procedure, and the frames came back with the proper ground. I was ecstatic to see
the results and was satisfied with them.
After, the test renders were done, I double checked them once more and ensured they
were good to go. I re-checked all my scenes and re-uploaded the entire project to the servers.
I was finally ready for the final render.
Post-Production Stage
The waiting game began for all of the renders; it took roughly three weeks to finish
the entire render, and as soon as each scene completed rendering, the compositing work
began. Arranging each scene and color grading commenced as well. I used every diffuse and
specular AOVs to grade them and give them a more realistic quality. I used the light AOVs to
make the lights a little more dynamic and engaging. The Z depth AOV created a depth of
field for every single scene, and I had to animate the focus plane in some of the scenes where
rack focus was involved. Keying the live action scenes was a part of this process, so I started
compositing individual live action scenes. The compositing software I used was Nuke, as the
node based compositing program was ideal for this part of the work phase.
In order to grade all the scenes and keep the color coordination similar, I used the
keying, grading the actors to make them look as though they are in the CGI environment was
critical. There were many scenes where the foreground, mid-ground, and background were
overlapped, but that was an easy fix using the process of rotoscopy to match the scenes
exactly.
This process was slightly time-consuming because the render view in Nuke took time
due to the 4k display. I managed to render them out as an Apple ProRes 4444 to achieve the
highest render quality. These renders would then go in my final After Effects composition,
where the playblasts were already integrated into my picture locked timeline.
It was now the time for VFX to begin. I have a subscription for a plug-in in After
Effects, called Redgiant, which helps to create effects. Within this plug-in, I used trapcode
particular to help me create the smoke effects of the red gas and the blue gas within the
scenes. Trapcode particular gives the user control to manipulate the gases and particles they
create. I used it to make the smoke and gases travel, as needed, within the scenes. For
example, the carbon dioxide and oxygen move from the boy’s mouth to the tree and from the
tree to the boy. During the budding ceremony, gases travel from the Tree to characters, and
this was also done through this trapcode particular. This plug-in helped create the main
galaxy scene in the first scene; this was done by manipulating the colors, the particles, and
the movements.
The other thing that I needed VFX for was the sky in the background for every scene.
I was sceptical of using a royalty free background, but I ended up slipping it in towards the
end of the process, and I was able to make it look really nice. I tried multiple VFX
techniques- such as trapcode form, which enables the user to create artificial elements in
background, and I ended up using a royalty free background of a sun rise for the first half of
the movie and a sun set for the second half of the movie.
Sound Design
Sound, as I learned during my time at RIT, is fifty percent of the film. My composer
is from Scotland, and he is a very active environment enthusiast- in addition to being a good
composer. Due to this reason, I thought he was a great fit for this film. The music that I had
in the film needed to be very symbolic. The background score that I wanted had to have
elements that could evoke moods of happiness and joy, as well as sadness and
disappointment. The way I wanted it to work was having the same undertone in the score that
could be manipulated to change emotions to fit in with my desired effect. I expressed these
requirements to my composer, and we went back and forth with various versions.
Eventually, we came to mutual understanding. After the picture locked version was shared
with him, he started embedding sound effects and ambiences into the scenes. For example,
he added sounds to mimic the chopping, the jumping, and the ambience. I wanted a couple of
ambient drones and movement sounds for the big camera moves as well: the zoom out from
the tree, the zoom in to the tree, and the big pans within the tree. I wanted this movie to be in
a 5.1 surround sound. The way I envisioned it, it would have various sound FX of ambience,
including birds chirping all around the room. The workflow for the sound began focused on
the stereo then shifted to 5 different channels. Unfortunately, the sound card that my
composer was using started to fail, which disallowed the export to 6 different channels from
the DAW ( Digital Audio Work Station) that he was working with. Therefore, we decided to
keep the final sound in stereo.
Another main area for the focus for sound entailed composing lyrics for a theme
could resonate a particular emotion depending on how it was played. However, after working
on several iterations I decided to just use the lyrics, “Let me be there.” These lyrics were all I
needed, as they could be used with both happiness and sadness. I used it in the beginning to
symbolize happiness and towards the end to symbolize that no matter what happens the trees
will always be there for us keeping us alive. My composer really liked this idea, and he
embedded these lyrics during the main emotional points of the film: the child getting oxygen
from the tree, the bud blooming in the first ceremony, and the ending when the flower
Audience Feedback
Conclusion
The journey of making this movie was filled with thrills, hard work, suspense, and frustrations. While I started out feeling like a fish suddenly thrown into the ocean, I gained a deep understanding.
At the conceptual stage of my discussion with my thesis committee, I knew I was getting into a project that had the potential to overwhelm me. However, I took the plunge, realizing very little of what could go wrong at each stage of the movie making life cycle- from concept design to pre-production to final production and completion.
At times, I felt encouraged and ecstatic at the smooth rides, but there were several junctures I ended up in a complex maze of choices. However, I came out of this process with a deep sense of understanding on how to be an independent film maker, how to navigate through moments of distress, how to manage people, and most importantly how to encounter uncertainties.
With a bias towards precision and maniacal focus on quality and workmanship, I experienced the joy of creation, the joy of making friendships, and the joy of feeling a sense of fulfillment in my ability to apply all my learnings from the Graduate Program.
Bibliography
“Arnold Renderer | Autodesk | Arnold Renderer.” Arnold Renderer | Autodesk | Arnold
Renderer, Solid Angle S.L., 2019, www.arnoldrenderer.com/.
Pryzbyla, Dena. Meaning of Colors in Color Psychology. 2018.
Renaud, Chris and Kyle Baulda, directors. The Lorax. Illumination Entertainment, Universal
Pictures, 2012.
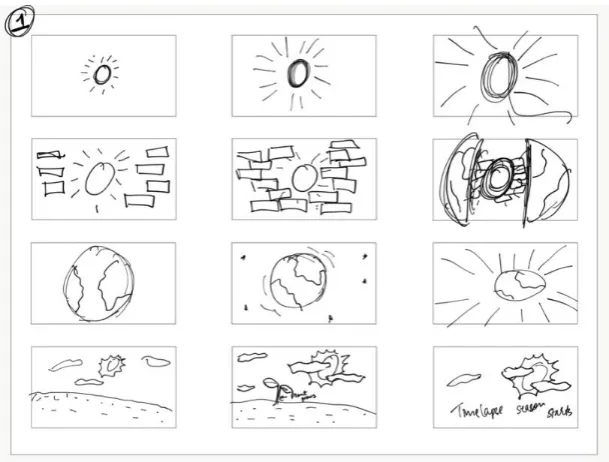
Appendix
[image:31.595.72.377.174.405.2]First Cut of Storyboards