[ Team LiB ]
• Table of Contents
• Index
• Reviews
• Reader Reviews
• Errata
Windows XP Hacks
By Preston Gralla
Publisher: O'Reilly
Pub Date: August 2003
ISBN: 0-596-00511-3
Pages: 412
Now power users can rejoice! Windows XP Hacks offers tips, tools, and know-how to bend Windows XP to your will. The book delves into XP topics such as controlling the control panel, changing unchangeable icons, removing uninstallable XP components, stopping pop-up ads, taking a bite out of cookies, speeding up file downloads, protecting yourself with firewalls and proxy servers, and more. Users of both Windows XP Home Edition and Windows XP Pro Edition will find smart, timesaving, fun, and useful hacks for virtually every feature in their operating system. Even if you're not a power user yet, this book will have you well on your way.
[ Team LiB ]
• Table of Contents
• Index
• Reviews
• Reader Reviews
• Errata
Windows XP Hacks
By Preston Gralla
Publisher: O'Reilly
Pub Date: August 2003
ISBN: 0-596-00511-3
Pages: 412
Copyright
Credits
About the Author
Contributors
Acknowledgments
Preface
How to Use This Book
How This Book Is Organized
Conventions Used in This Book
How to Contact Us
Chapter 1. Startup and Shutdown
Section 1.1. Hacks #1-7
Hack 1. Customize Multiboot Startup Options
Hack 2. Change the Picture that Appears on the XP Startup Screen
Hack 3. Speed Up Boot and Shutdown Times
Hack 4. Halt Startup Programs and Services
Hack 5. Create Multiple Startup Profiles with Advanced Startup Manager
Hack 6. Miscellaneous Startup and Shutdown Hacks
Hack 7. Control User Logins by Hacking the Registry
Chapter 2. The User Interface
Section 2.1. Hacks #8-20
Hack 9. Control the Control Panel
Hack 10. Hack the Start Menu and Taskbar
Hack 11. Clean Up the Most Frequently Used Programs List
Hack 12. Rename and Change "Unchangeable" Desktop Icons and System Objects
Hack 13. Remove "Unremovable" Desktop Icons
Hack 14. Create Your Own XP Themes and Find Thousands Online
Hack 15. Give XP a Makeover with WindowBlinds
Hack 16. Hacking Your Way Through the Interface
Hack 17. Remove "Uninstallable" XP Utilities
Hack 18. Create Transparent Windows
Hack 19. Make Your Own Cursors and Icons
Hack 20. Windows XP to Windows 2000: Retro is Cool
Chapter 3. Windows Explorer
Section 3.1. Hacks #21-32
Hack 21. Generating Folder and File Listingsfor Printing or Editing
Hack 22. Control Windows Explorer with Command-Line Shortcuts
Hack 23. Empower Windows Explorer with PowerDesk
Hack 24. Better File Rename
Hack 25. Find Files Faster by Mastering the Indexing Service's Query Language
Hack 26. Hiding Folders and Files with the Encrypting File System
Hack 27. Forcing Windows Explorer Into True Usefulness
Hack 28. Customize Folder Icons and Balloon Text
Hack 29. A Power User's Hidden Weapon: Improve the Context Menu
Hack 30. Take Your Work on the Go with Offline Files and the Briefcase
Hack 31. Get More Hard Disk Space by Using NTFS Compression
Hack 32. Put a Command-Line Prompt on Your Desktop
Chapter 4. The Web
Section 4.1. Hacks #33-41
Hack 33. Stop Pop Ups, Spyware, and Web Bugs
Hack 34. Take a Bite Out of Cookies
Hack 35. Read Web Pages Offline
Hack 36. Better Internet Searching from Your Desktop
Hack 37. Hack Internet Explorer with the Group Policy Editor
Hack 38. Speed Up File Downloads
Hack 39. Surf Anonymously Without a Trace
Hack 40. Secrets of Web Site Hosting with Internet Information Services (IIS)
Hack 41. Run Java Applets Without Crashes or Problems
Chapter 5. Networking
Section 5.1. Hacks #42-62
Hack 42. War Driving for WiFi Access
Hack 43. Test Your Security with Shields Up!
Hack 44. Tweak DNS Settings for Faster Internet Access
Hack 45. Fix Windows Media Player's Privacy Problems
Hack 46. Protect Your Computer with the Internet Connection Firewall
Hack 47. Use a Proxy Server to Protect Your PC
Hack 48. ZoneAlarm: The World's Best Free Firewall
Hack 49. Optimize Your Residential Gateway
Hack 50. Punch an Escape Hole Through Your Firewall
Hack 51. Close Down Open Ports and Block Protocols
Hack 53. Troubleshooting Network Connections with netsh, netstat, and ipconfig
Hack 54. Speed Up Network Browsing
Hack 55. Extend the Range of Your Wireless Network
Hack 56. Install NetBEUI for Better Peer-to-Peer Networking
Hack 57. Check WiFi Network Performance with QCheck to Help Improve Throughput
Hack 58. Control Another PC with Remote Access
Hack 59. Make Servers Always Available by Mapping a Hostname to a Dynamic IP Address
Hack 60. Renewing Your DHCP-Assigned IP Address
Hack 61. Repair a Broken TCP/IP Connection
Hack 62. Set Up a Virtual Private Network
Chapter 6. Email
Section 6.1. Hacks #63-67
Hack 63. Slam That Spam
Hack 64. Open Blocked File Attachments in Outlook and Outlook Express
Hack 65. Back Up and Restore Outlook and Outlook Express Data Files
Hack 66. Fire Outlook and Outlook Express
Hack 67. Retrieve Web-Based Email with Your Email Software
Chapter 7. The Registry
Section 7.1. Hacks #68-72
Hack 68. Don't Fear the Registry
Hack 69. Hacking Away at the Registry
Hack 70. Safely Edit the Registry Using .reg Files
Hack 71. Better Registry Backups
Hack 72. Track and Restore Registry Changes with RegSpy
Chapter 8. Basic Utilities
Section 8.1. Hacks #73-79
Hack 73. Store Multiple Clips and Boilerplate Text with a Better Clipboard
Hack 74. Speed Up Your Hard Disk by Improving Defragging
Hack 75. Build a Better Backup Strategy
Hack 76. Extending Your Screen Real Estate with Virtual Desktops
Hack 77. Top Screenshot Tips
Hack 78. Going Beyond Messaging with Windows Messenger
Hack 79. Universal Messaging: Trillian Unites AIM, MSN, Yahoo!, and ICQ
Chapter 9. Applications
Section 9.1. Hacks #80-85
Hack 80. Remove Unruly Applications and Uninstall Entries
Hack 81. Force XP-Incompatible Applications to Run
Hack 82. Force Older Programs to Use XP Common Controls
Hack 83. Launch Applications with Command-Line Shortcuts
Hack 84. Open and Create Microsoft Documents without Microsoft Office
Hack 85. Stop Hidden Fields in Word from Stealing Your Files and Information
Chapter 10. Graphics and Multimedia
Section 10.1. Hacks #86-90
Hack 86. Image Conversion in a Pinch
Hack 87. Problem-Free CD Burning
Hack 88. Save Streaming Music to Your PC
Hack 89. File Sharing without the Spyware
Hack 90. Tips for Making Videos with Windows Movie Maker
Chapter 11. System Performance
Hack 91. Track System Performance with the Performance Console
Hack 92. Getting the Most Out of Your RAM
Hack 93. More Power: Registry Hacks to Speed Up XP
Hack 94. Repair and Recovery with the Recovery Console
Chapter 12. Hardware
Section 12.1. Hacks #95-100
Hack 95. Troubleshoot Hardware by Decoding Device Manager Error Messages
Hack 96. Uncover Hidden Hardware with the Device Manager
Hack 97. Check Your PC's Pulse and Tweak It for Better Performance
Hack 98. Remap Your Keyboard
Hack 99. Use ClearType for Better Laptop and LCD Resolution
Hack 100. Networking on the Cheap: Set Up a Direct Cable Connection
Colophon
Index
[ Team LiB ]
Copyright
Copyright © 2003 O'Reilly & Associates, Inc.
Printed in the United States of America.
Published by O'Reilly & Associates, Inc., 1005 Gravenstein Highway North, Sebastopol, CA 95472.
O'Reilly & Associates books may be purchased for educational, business, or sales promotional use. Online editions are also available for most titles (http://safari.oreilly.com). For more information, contact our corporate/institutional sales department: (800) 998-9938 or
Nutshell Handbook, the Nutshell Handbook logo, and the O'Reilly logo are registered trademarks of O'Reilly & Associates, Inc. Many of the designations used by manufacturers and sellers to distinguish their products are claimed as trademarks. Where those designations appear in this book, and O'Reilly & Associates, Inc. was aware of a trademark claim, the designations have been printed in caps or initial caps. The association between the image of an antique fan and the topic of Windows XP is a trademark of O'Reilly & Associates, Inc.
The trademarks "Hacks Books" and "The Hacks Series," and related trade dress, are owned by O'Reilly & Associates, Inc., in the United States and other countries, and may not be used without written permission. All other trademarks are property of their respective owners.
While every precaution has been taken in the preparation of this book, the publisher and authors assume no responsibility for errors or omissions, or for damages resulting from the use of the information contained herein.
[ Team LiB ]
Credits
About the Author
Contributors
Acknowledgments
[ Team LiB ]
About the Author
Preston Gralla is the author of more than 20 books about computers and the Internet, which have been translated into 15 languages. He has been writing about technology since the dawn of the PC age, and has been an editor and columnist for many national newspapers, magazines and web sites. He was the founding editor of PC Week; a founding editor, then editor, then editorial director of PC/Computing; and executive editor for ZDNet/CNet. Preston has written about technology for numerous magazines and newspapers, including PC Magazine, Computerworld, CIO Magazine, Computer Shopper, the Los Angeles Times, USA Today, the Dallas Morning News (where he was a technology columnist), and many others. He has been a columnist for ZDNet/CNet and is currently a columnist for
TechTarget.com. His commentaries about technology have been featured on National Public Radio's All Things Considered, and he has won the award for the Best Feature in a Computer Publication from the Computer Press Association. Under his editorship,
PC/Computing was a finalist for General Excellence from the National Magazine Awards. He lives in Cambridge, MA, with his wife and two children—although his daughter has just fled the nest for college. Between writing books, articles, and columns, he swims, plays tennis, goes to the opera, and contemplates the ram's skull hanging on the wall of his office.
[ Team LiB ]
Contributors
The following people contributed their hacks, writing, and inspiration to this book:
Eric Cloninger was one of the original contributors to the Palm OS, working on tools for software developers. After 15 years in the Real World, Eric decided that living in a small town in Oklahoma wasn't so bad after all. When he's not writing software, Eric enjoys spending time with his family, tinkering with his John Deere tractor, and watching tornadoes roll across the plains. While he doesn't miss the traffic in the Big City, he does occasionally yearn for a Spicy Tuna Roll.
Jim Foley, a.k.a. The Elder Geek (http://www.theeldergeek.com), owns and operates a small consulting and web design firm in Cambridge, NY, that specializes in the integration of Windows XP technology into home and business environments. He is also the creator and owner of The Elder Geek on Windows XP, a web site that strives to provide relevant information related to Windows XP, including a notification service andWindows XP forum to keep readers informed of the latest XP tips, troubleshooting, and update developments.
Scot Finnie (http://www.scotsnewsletter.com) is a noted book and magazine article author who has been writing about computers, technology, and other subjects since 1983. His articles have appeared in PC Magazine, PC World,
Computerworld, Popular Science, Popular Mechanics, and a long list of other magazines. He's the author of the biweekly email newsletter Scot's Newsletter, the editor of TechWeb.com, and one of the founding editors of SecurityPipeline.com and StoragePipeline.com. Catch up with Scot at his web site, ScotsNewsletter.com.
Wei-Meng Lee is an experienced author and developer specializing in .NET technologies. He was awarded the Microsoft .NET Most Valuable Professional (MVP) award in 2003. Besides .NET development, Wei-Meng maintains a keen interest in wireless technologies and has coauthored many books and articles on mobile applications development and XML
technologies. He is the author of Windows XP Unwired (O'Reilly & Associates, Inc.).
Margaret Levine Young has coauthored many books, including The Internet for Dummies, Windows XP: The Complete Reference, UNIX for Dummies, Internet: The Complete Reference, and Poor Richard's Building Online Community. She has a B.A. in Computer Science from Yale and lives in Vermont.
[ Team LiB ]
Acknowledgments
Any book is a cooperative venture, and this one was more so than many. Thanks to Nancy Kotary, who corralled the burgeoning project that always seemed on the verge of escaping from the barn, and managed to whip it into shape and get it into print with good grace and even better humor. Thanks to Rael Dornfest for his laser-like focus on making sure that every hack was exceedingly useful and moved well beyond the obvious. Laurie Petrycki and Dale Dougherty offered valuable advice and feedback in the early stages of writing. Many thanks to Tim O'Reilly, who entrusted me with this project, albeit in a very different form when it was first conceived, and who gave very targeted advice and pointers in the important early phases of writing.
Thanks also to the production team at O'Reilly: Brian Sawyer, Lorrie LeJeune, Darren Kelly, Ellen Troutman-Zaig, Jamie Peppard, Mary Agner, James Quill, Robert Romano, and Jessamyn Read.
As always, thanks to my family. Lydia put up with my usual diet of late-night deadlines, and Mia let me get my work done when we were on her grand audition tour for college ballet programs. As for Gabe, his advice and recommendations on which hacks to cover was an enormous help. We'll get the DivX tip in next time, Gabe!
[ Team LiB ]
Preface
Windows XP marks the biggest change to the Windows OS since the advent of Windows 95. It combines the stability of the NT/2000 operating system with the user-friendliness and hardware support of the consumer Windows line—and it does so literally, because those two operating systems have been combined for the first time in XP. Although there are two versions of XP—Home Edition and
Professional Edition—the differences between them are relatively minor and have to do primarily with security and administrator tools. Under the hood, they're the same OS.
XP marks several other change as well. DOS is no longer a part of the underlying OS, although it's still available as a command prompt. Multimedia and graphics have been built into the operating system more directly than before and are no longer treated as an
afterthought. And, cosmetically, XP has been given a makeover, in both the way it looks (rounded windows and almost cartoonish at times) and the way it works.
All this is good news for would-be operating system hackers. Because of the operating system's greater stability, those who work under the hood of XP can concentrate on actually getting work done and making the OS more effective, rather than trying to fix its
shortcomings. Because of the richer interface and greater support for graphics and multimedia, you can more easily change the way the operating system works and looks. And, because the OS offers a variety of tools for recovering from errors, you can hack to your heart's content without worrying that you'll damage the OS beyond recognition.
This collection is based on the hands-on, real-world experience of those who in many cases have been using PCs well before any version of Windows even existed. They have wrestled with each new version of Windows as it was released, and found ways to take advantage of every nook and cranny of the operating system. When XP came out, they applied that hard-earned knowledge to it as well, and came up with ways to take advantage of the myriad new features of the operating system.
The results is 100 hacks that are useful, frequently entertaining, and will save you countless hours at the keyboard. Whether you want to speed up your PC, customize XP's interface, hack your wired and wireless network, get more out of the Web, make better use of email, use the Registry to bend the operating system to your will, or use XP for countless other useful tasks, you'll find what you're looking for here. And each hack doesn't just show you how to do something; it also teaches why it works. Each hack is a starting point, rather than an ending point, so that you can apply the knowledge you've gained to create new hacks of your own. Try it out—who knows, in the next edition of this book, you may get a hack of your own published.
[ Team LiB ]
How to Use This Book
You can read this book from cover to cover if you like, but each hack stands on its own, so feel free to browse and jump to the different sections that interest you most. If there's a prerequisite you need to know about, a cross-reference will guide you to the right hack. If you're not familiar with the Registry yet, or want a refresher, you might want to spend some time in Chapter 7, to get a good grounding.
[ Team LiB ]
How This Book Is Organized
This book is not a mere tips-and-tricks compendium that tells you where to click, where to drag, and what commands to type. It takes advantage of XP's flexibility and new features, recognizes that there are specific tasks you want to accomplish with the operating system, and offers you bite-sized pieces of functionality that you can put to use in a few minutes. It also shows how you can expand on their usefulness yourself. To give you this kind of help, the book is organized into 12 chapters:
Chapter 1, Startup and Shutdown
With XP, startup and shutdown can mean much more than turning on your PC or selecting "Shut Down" form the start menu. With hacks in this chapter, you can change the picture that appears on the startup screen, speed up the sometimes endless startup and shutdown processes, hack the Registry to control many different aspects of startup and shutdown, customize multiboot options, and much more.
Chapter 2, The User Interface
XP lets you change the way it looks and works more than any other version of Windows, and this chapter shows how to do it. Want a speedy, stripped-down version of the OS? It's in here. Want to build your own themes and find thousands more online? It's in here as well. So are hacks for controlling the Control Panel, Start Menu, and Taskbar; creating transparent windows; and building your own cursors and icons. The hacks don't stop there, so interface hackers may want to head here first.
Chapter 3, Windows Explorer
Windows Explorer provides a basic window into XP and lets you manage files and folders, among other tasks. When hacked, it does much more as well. This chapter shows how to customize folder icons and balloon tips, improve the context menu, find files fast by mastering the indexing service's query language, get more disk space by using NTFS compression, keep your PC secure with encryption, and more.
Chapter 4, The Web
You probably spend a significant portion of your computing life on the Web, so why not make the most of it? Want to find information fast, straight from your browser, without having to head off to sites like Google? This chapter teaches you how to do it. You can also kill popups, stop spyware, surf anonymously without a trace, and speed up file downloads. If you host your own web site, you'll find out secrets of using the built-in Internet Information Services (IIS) web server. There are many more hacks here as well.
Chapter 5, Networking
XP was built for networking, and this chapter shows you how to take full advantage of it. Tweak your DNS settings for faster Internet access, go "war driving" to find WiFi wireless networks to which you want to connect, extend the reach of your own WiFi network, use commandline tools for trouble-free network operations, or build firewalls and punch holes through them. This chapter helps you get the most out of XP's powerful, built-in ability to connect.
Chapter 6, Email
Email is both the greatest productivity-booster and time-waster known to humankind. This chapter ensures that you'll stop wasting time, and get more out of email. Slam spam, open blocked file attachments in Outlook and Outlook Express, get better email software, and retrieve Web-based email using a normal email client. There's all that and more here.
Chapter 7, The Registry
Chapter 8, Basic Utilities
XP comes with a basic suite of built-in utilities, with the emphasis on basic. But you can hack these basic utilities so that they're much more useful powerhouses. Store multiple clips on the Clipboard, extend your real estate with virtual desktops, build a better backup strategy, take better screenshots, or use a universal instant messenger. As you'll see in this chapter, there's a lot more you can do with XP's utilities than you ever thought you could.
Chapter 9, Applications
An operating system needs applications in order to do much of its work. In this chapter, you'll see how to hack XP
applications. Have older Windows applications that have a hard time running under XP? This chapter shows you how to make sure they run. You can also use command-line shortcuts to customize how each application runs, open and create Microsoft documents without Microsoft Office, and more.
Chapter 10, Graphics and Multimedia
In XP, Windows gets serious about multimedia and graphics for the first time. In this chapter, you'll see how to get the most out of them, with hacks for saving streaming audio to your PC, making videos with Movie Maker, sharing music without the spyware, and easy image conversion.
Chapter 11, System Performance
No matter how fast your PC is, it's not fast enough. This chapter show you ways to hack XP to juice up its performance. Get the most out of your RAM, use the Performance Console to speed up system performance, use a variety of Registry hacks to make XP run faster, and more.
Chapter 12, Hardware
By itself, an operating system can't do a thing; it needs hardware to run on. In this chapter, you'll see how to use XP to hack your hardware. Remap your keyboard, set up a direct cable connection between PCs for a quick-and-dirty network, uncover "hidden hardware" with the Device Manager, and get better resolution on your laptop and your LCD screen. And yes, there are more hacks here as well.
[ Team LiB ]
Conventions Used in This Book
I use the following font conventions in this book:
Italic
Used to indicate new terms, URLs, filenames, file extensions, directories, and folders.
Constant width
Used to show code examples, verbatim searches and commands, the contents of files, and the output from commands.
Constant width bold
Used in examples and tables to show commands or other text that should be typed literally.
Constant width italic
Used in examples, tables, and commands to show text that should be replaced with user-supplied values.
Pay special attention to notes set apart from the text with the following icons:
This icon indicates a tip, suggestion, or a general note. It contains useful supplementary information or an observation about the topic at hand.
This icon indicates a warning or note of caution.
The thermometer icons, found next to each hack, indicate the relative complexity of the hack:
beginner moderate expert
[ Team LiB ]
How to Contact Us
We have tested and verified the information in this book to the best of our ability, but you may find that features have changed (or even that we have made mistakes!). Please let us know about any errors you find, as well as your suggestions for future editions (we take these seriously), by writing to:
O'Reilly & Associates, Inc. 1005 Gravenstein Highway North Sebastopol, CA 95472
(800) 998-9938 (in the U.S. or Canada) (707) 829-0515 (international/local) (707) 829-0104 (fax)
You can also send us messages electronically. To be put on the mailing list or request a catalog, send email to:
To ask technical questions or comment on the book, send email to:
The web site for Windows XP Hacks lists examples, errata, and plans for future editions. You can access this page at:
http://www.oreilly.com/catalog/winxphks
For more information about this book and others, see the O'Reilly web site:
http://www.oreilly.com
Got a hack? To explore Hacks books online or to contribute a hack for future titles, visit:
http://hacks.oreilly.com
[ Team LiB ]
Chapter 1. Startup and Shutdown
Section 1.1. Hacks #1-7
Hack 1. Customize Multiboot Startup Options
Hack 2. Change the Picture that Appears on the XP Startup Screen
Hack 3. Speed Up Boot and Shutdown Times
Hack 4. Halt Startup Programs and Services
Hack 5. Create Multiple Startup Profiles with Advanced Startup Manager
Hack 6. Miscellaneous Startup and Shutdown Hacks
Hack 7. Control User Logins by Hacking the Registry
[ Team LiB ]
1.1 Hacks #1-7
Possibly the most overlooked part of XP is the way people start up and shut down their systems. How much do you think about startup and shutdown? Probably not much. Press a button to start your PC, click on a few buttons to shut it down, and that's it.
In fact, there's a lot you can do to get more productive—and to have a little customization fun—when using startup and shutdown. You can create boot menus and choose from customized startup options; you can create your own bootscreen; you can perform automated tasks every time you shut down your PC; you can eliminate unnecessary programs and services from starting to increase the speed of your PC. In this chapter, you'll learn all that, plus other ways to master and customize system startup and shutdown.
[ Team LiB ]
Hack 1 Customize Multiboot Startup Options
Edit or create a startup menu that lets you choose which operating system to boot into in multiboot systems, or create a menu that lets you choose different startup options for your single operating system if you have only XP installed.
If you've installed another operating system (in addition to XP) on your system, your PC starts up with a multiboot menu, which allows you to choose which operating system you want to run. The menu stays live for 30 seconds, and a screen countdown tells you how long you have to make a choice from the menu. After the 30 seconds elapse, it boots into your default operating system, which is generally the last operating system you installed.
You can customize that multiboot menu and how your PC starts by editing the boot.ini file, a hidden system file, to control a variety of startup options, including how long to display the menu, which operating system should be the default, whether to use the XP splash screen when XP starts, and similar features. And as you'll see later in this hack, you can also use the file to create a startup menu that will allow you to choose from different versions of your operating system—for example, one that you'll use for tracking down startup problems, and another for starting in Safe Mode.
The boot.ini file is a plain text file found in your root C:\ folder. You might not be able to see it, because it's a system file, and if you can
see it, you might not be able to edit it, because it's a read-only file. To make it visible, launch Windows Explorer, choose View
Tools Folder Options View and select the radio button "Show Hidden Files and Folders." To make it a file you can edit, right-click on it in Windows Explorer, choose Properties, uncheck the Read-Only box, and click OK.
1.2.1 Editing Files
To edit the file, open it with a text editor such as Notepad. Following is a typical boot.ini file for a PC that has two operating systems installed on it—Windows XP Home Edition and Windows Me:
[boot loader] timeout=30
default=multi(0)disk(0)rdisk(0)partition(1)\WINDOWS [operating systems]
multi(0)disk(0)rdisk(0)partition(1)\WINDOWS="Microsoft Windows XP Home Edition" /fastdetect
multi(0)disk(0)rdisk(0)partition(2)\WINNT="Windows 2000 Professional" / fastdetect
As you can see, there are two sections in the file: [boot loader] and [operating systems]. To customize your menu and startup options,
edit the entries in each section. Before editing boot.ini, make a copy of it and save it under a different name (such as boot.ini.old), so that you can revert to it if you cause problems when you edit the file.
Following are details about how to edit the entries in each section:
[boot loader]
a selection from a boot menu, if a boot menu has been enabled. The timeout value specifies, in seconds, how long to display
the menu and wait for a selection before loading the default operating system. If you want a delay of 15 seconds, for example, enter 15 for the value. Use a value of 0 if you want the default operating system to boot immediately. If you want the menu to
be displayed indefinitely and stay onscreen until a selection is made, use a value of -1. The default value specifies which
entry in the [operating system] section is the default operating system. (The default value is used even if there is only one
operating system in the [operating system] section.) To change the default operating system, edit the setting, in our example,
to default=multi(0)disk(0)rdisk(0)partition(2)\WINNT.
So, in our example, if you change the menu settings so that the screen appears for 10 seconds before loading the default operating system, and the default operating system is Windows 2000 Professional, the section reads:
[boot loader] timeout=10
default=multi(0)disk(0)rdisk(0)partition(2)\WINNT
[operating system]
This section specifies which operating systems are present on the computer, and detailed options for each one. XP uses the Advanced RISC Computing (ARC) path to specify the location of the boot partition. In our example, the ARC path is:
multi(0)disk(0)rdisk(0)partition(1)\WINDOWS
The first parameter, which identifies the disk controller, should be 0. The second parameter, the disk parameter, should also
be 0. The rdisk parameter specifies the disk number on the controller that has the boot partition. The numbers start at 0. So, if
you have three hard disks installed and the second hard disk has the boot partition, the setting is rdisk(1). The partition
parameter identifies the partition number of the boot partition. Partitions start with the number 1. The final section, which in our
example is \WINDOWS, specifies the path to the folder where the operating system is installed.
To the right of the ARC path in the example is ="Microsoft Windows XP Home Edition" /fastdetect. The words within quotes
are what will appear on the boot menu next to the entry. To customize the text on the menu you can change these words to whatever you wish—for example, "My Favorite Operating System." The /fastdetect switch disables the detection of serial and
parallel devices, which allows for faster booting. The detection of these devices isn't normally required in XP, because the functions are performed by plug-and-play drivers, so as a general rule it's a good idea to use the /fastdetect switch. The
/fastdetect switch is only one of many switches that can be used in the boot.ini file to customize how the operating system
loads. Table 1-1 lists others you can use.
Table 1-1. Switches for boot.ini
Switch What it does
/BASEVIDEO Starts XP using the standard VGA driver. It's most useful if you can't boot normally because of a video driver problem.
/BOOTLOG Logs information about the boot process to the ntbtlogl.txt file in the C:\Windows folder.
/CRASHDEBUG Loads the debugger at boot, but the debugger remains inactive unless a crash occurs.
/DEBUG Loads the debugger at boot and runs it.
/FASTDETECT Disables the detection of serial and parallel devices.
MAXMEM:n Specifies the maximum amount of RAM that XP can use.
/NOGUIBOOT Does not allow the XP splash screen to load during boot.
/NODEBUG Stops the debugger from loading.
/SAFEBOOT:switch
Forces XP to boot into the safe mode specified by the switch parameter, which can be minimal, network, or
minimal(alternate shell). In minimal safe mode, only the minimum set of drivers necessary to start XP are
loaded. In network safe mode, networking drivers are loaded in addition to the minimum set of drivers. In
Switch What it does
/SOS
Displays the name of each driver as it loads and gives descriptions of what is occurring during the boot process. It also offers other information, including the XP build number, the service pack number, the number of processors on the system, and the amount of installed memory.
When you've finished editing the boot.ini file, save it. The next time you start your computer, its settings will go into effect.
In our example, if we want the menu to appear for 45 seconds, the default operating system to be Windows 2000, and the XP splash screen to be turned off when we choose to load XP, the boot.ini file should look like this:
[boot loader] timeout=45
default=multi(0)disk(0)rdisk(0)partition(2)\WINNT [operating systems]
multi(0)disk(0)rdisk(0)partition(1)\WINDOWS="Microsoft Windows XP Home Edition" /fastdetect /noguiboot
multi(0)disk(0)rdisk(0)partition(2)\WINNT="Windows 2000 Professional" / fastdetect
1.2.2 Create a Startup Menu Even if You Have Only One Operating System
Even if you have only one operating system, you can create a boot menu that will let you choose to load your operating system with different parameters. For example, for menu choices, you might have your normal operating system; a mode that lets you trace any startup problems; and Safe Mode. To give yourself the option of operating systems with different parameters, create separate entries for each new operating system choice. For example, for the version of the operating system that traces potential startup problems, you could create this entry:
multi(0)disk(0)rdisk(0)partition(1)\WINDOWS="Trace Problems XP Home Edition" /fastdetect /bootlog /sos
This entry creates a startup log and also displays information about the drivers and other operating system information as it loads.
For the version of the operating system that loads in Safe Mode but that still allows networking, you could create this entry:
multi(0)disk(0)rdisk(0)partition(1)\WINDOWS="Safe Start XP Home Edition" / fastdetect /safeboot:network
The boot.ini file would look like this, assuming that you want the menu to display for 30 seconds and you want normal XP startup to be the default:
[boot loader] timeout=30
default=multi(0)disk(0)rdisk(0)partition(1)\WINDOWS [operating systems]
multi(0)disk(0)rdisk(0)partition(1)\WINDOWS="Microsoft Windows XP Home Edition" /fastdetect
multi(0)disk(0)rdisk(0)partition(1)\WINDOWS="Trace Problems XP Home Edition" /fastdetect /bootlog /sos
multi(0)disk(0)rdisk(0)partition(1)\WINDOWS="Safe Start XP Home Edition" / fastdetect /safeboot:network
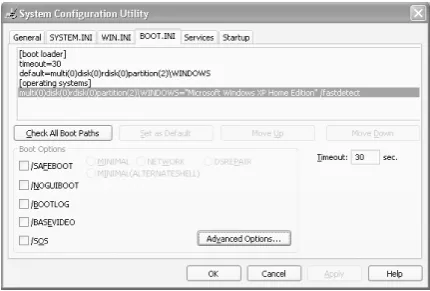
Figure 1-1. The System Configuration Utility
1.2.3 See Also
[Hack #5]
Hack 2 Change the Picture that Appears on the XP Startup Screen
You're not stuck with XP's default splash logo on the startup screen—use any picture or logo of your choosing.
One of the nice things about XP is how malleable it is. Don't like the way it looks? No problem—change it. Take my splash screen, please!
Many people, myself included, would prefer to see a more interesting splash screen (also called the startup screen) than the default gives you on start-up. You can change your splash screen to any of hundreds that have been created, or make one of your own—for example, with your picture or company logo on it.
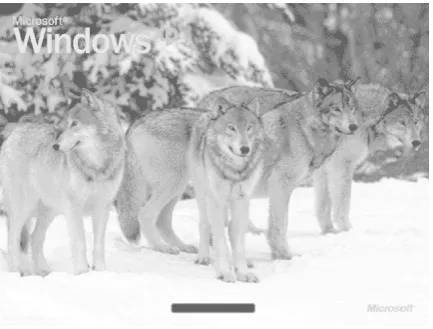
[image:24.595.82.516.364.693.2]To choose from already created splash screens, go to http://www.themexp.org and click on Boot Screens. You'll find over a thousand of them, organized by categories such as Sports, TV/Movies, and so on. Being a fan of Jack London's The Call of the Wild, I use a picture of huskies for my splash screen. You can see it pictured in Figure 1-2. Nice way to greet the new day, don't you think?
Figure 1-2. Every time I start up my PC, I can imagine myself in the wilds of Alaska
Once you've found the image you want to use as your splash screen, download it. It will be downloaded as a .zip file. I create a general folder for all my boot screen files, called C:\Bootscreens, and then for each bootscreen I download I create a new folder—in this instance, C:\Bootscreens\Wild.
create a System Restore point by choosing Control Panel Performance and Maintenance
System Restore and following the instructions. If something goes wrong, you can revert to that restore point.
Unzip the contents of the .zip file into the folder. There will be one or more files, including ReadMe files. The boot screen itself, however, will be named ntoskrnl.exe. If you have XP Service Pack 1 installed, you may have to use a different file, named ntoskrnlSP1.exe, that may also be in the downloaded .zip file. Check the documentation of the file you download to make sure. If you're not sure if you have
Service Pack 1 installed, it's easy to find out. Right-click on My Computer, and choose Properties General. Your version of the operating system will be displayed. If you have Service Pack 1, it will say so on that screen.
The ntoskrnl.exe file is an executable file that contains the XP bootscreen. During the boot process, XP executes this file, found in C:\Windows\System32, which in turn displays the bootscreen graphic. So, to change your bootscreen, replace your existing ntoskrnl.exe file with the one you just downloaded. But wait: there's more.
You might think that all you have to do is copy the new ntoskrnl.exe over the existing one and then restart your computer in order for the changes to take effect. That's not quite the case, though. You first have to get around a feature of Windows XP that protects system files from being overwritten. Windows File Protection automatically replaces certain files with the original XP version of the file if they've been replaced, and ntoskrnl.exe is one of those files. However, if you make the change in Safe Mode, Windows File Protection won't kick in and you can safely copy the file.
Windows File Protection protects many other files, not just ntoskrnl.exe. Also included are .dll, .exe, .fon, .ocx, .sys, .tff files, and, depending on your system, other file types such as .ax, .cpl, .cpx, .dll, .exe, .fon,. inf, .ocx, .rsp, .sys, .tff, and .tlb.
Reboot your PC and press F8 immediately to get into Safe Mode. Now go to the C:\Windows\System32 folder and find the ntoskrnl.exe file. Copy it to another folder or rename it as a backup so that you can revert to it when you no longer want to use your new bootscreen, or if something goes wrong when you install the new screen. Now copy the new ntoskrnl.exe file into C:\Windows\System32. (If you have to use the ntoskrnlSP1.exe file, rename it to ntoskrnl.exe first, and then copy it over.)
Reboot your computer again but don't go into Safe Mode this time. Your new splash screen will now appear every time you start your PC. To revert to your old splash screen, repeat the steps, copying your original ntoskrnl.exe file over your new one.
1.3.1 Choose from Multiple Splash Screens on Startup
Depending on my mood, I might not want to be greeted by huskies every morning. There are times when I want to be greeted by the normal startup screen, and other times when I want to see Andy Warhol's famous painting of Marilyn Monroe, or Al Pacino from the movie Scarface, all available from http://www.themexp.org. So I've made a startup menu that lets me choose which graphic should be my startup screen.
To create a startup menu, first download all the screens you want to use. Then rename the ntoskrnl.exe or ntoskrnlSP1.exe of each so that the filename describes the screen, for example, ntospacino.exe, ntosmonroe.exe, and ntosspongebob.exe. Copy them each into C:\Windows\System32. Don't touch the existing ntoskrnl.exe file there; you'll keep that as one of your options. Because you're not changing that file, you don't have to boot into Safe Mode to make any of these changes.
Following the instructions in [Hack #1], create a multiboot screen by editing your boot.ini file. In the [operating systems] section of the boot.ini file, create a new entry for each of the screens from which you want to choose. Copy the existing primary XP entry and append /kernel=newbootscreenfilename.exe to the end of it, where newbootscreenfilename.exe is the filename of the bootscreen you want to
use for that entry. Also edit the description so that it describes the bootscreen. For example, if the primary entry is:
multi(0)disk(0)rdisk(0)partition(1)\WINDOWS="Microsoft Windows XP Home Edition" /fastdetect
multi(0)disk(0)rdisk(0)partition(1)\WINDOWS="Sponge Bob Startup Screen" / fastdetect /kernel=ntosspongebob.exe
Create as many entries as you want in the [boot loader] section. My boot.ini file looks like this:
[operating systems]
multi(0)disk(0)rdisk(0)partition(1)\WINDOWS="Microsoft Windows XP Home Edition" /fastdetect
multi(0)disk(0)rdisk(0)partition(1)\WINDOWS="Huskies Startup Screen" / fastdetect /kernel=ntosspongebob.exe
multi(0)disk(0)rdisk(0)partition(1)\WINDOWS="Pacino Startup Screen" / fastdetect /kernel=ntospacino.exe
multi(0)disk(0)rdisk(0)partition(1)\WINDOWS="Marilyn Monroe Startup Screen" /fastdetect /kernel=ntosmonroe.exe
Whenever you start up XP now, you'll be able to choose from your normal startup screen or any of the others you've put on the menu. If you have a laptop, for example, you might set up a menu that lets you choose a business-like startup screen at work and a more entertaining one at home.
1.3.2 Build a Startup Screen from Any Graphic
So far this hack has shown you how to use a startup screen that someone else built. But you're not limited to that; you can turn any graphic into a startup screen, using BootXP (downloadable from http://www.bootxp.net). It's shareware and free to try, but it costs $7.95 if you decide to keep using it.
The program will convert graphics from many different formats to a bootscreen graphic, use it as your bootscreen, or build a boot menu for you so that you can choose from multiple bootscreens. That way, you don't have to edit the boot.ini file yourself.
It's a surprisingly simple program to use. Select a graphic that you want to use as a bootscreen, and then click a button to convert it to the 640 x 480-pixel, 16-color bitmap startup screen standard. Preview the graphic, and if it's what you want, tell the program to set it as your bootscreen. The program provides a variety of options, including choosing a different progress bar that alerts you XP is loading, restoring your original startup screen, or randomizing your bootscreen so that it randomly selects one you've created each time you boot. You can also use the program to download already created startup screens from http://www.bootxp.net.
1.3.3 See Also
[Hack #14]
[ Team LiB ]
Hack 3 Speed Up Boot and Shutdown Times
Shorten the time it takes for your desktop to appear when you turn on your PC, and make XP shut down faster as well.
No matter how fast your PC boots, it's not fast enough. Here's a hack to help you get to your desktop more quickly after startup, and to let you walk away faster after shutdown.
The quickest way to speed up boot times is to use the free Microsoft utility BootVis.exe. Although it's intended primarily for developers, anyone can use it to analyze their boot times and see where there are slowdowns. More important, the tool will also automatically make system changes to speed up your boot time, so you don't need to go into a lengthy analysis of where your slowdowns are and how to solve them.
Depending on your system and how it's set up, you may see only a moderately faster startup time, or you may speed up boot time dramatically. I've seen reports of improvements ranging from a little over 3 seconds to more than 35 seconds. The improvements I found on my systems were moderate—7 seconds faster on one, and 10 seconds faster on another. Think of all the things you could
accomplish with another 10 seconds in the day!
The BootVis utility traces boot time metrics and then displays the results in a variety of graphs showing total boot time, CPU usage, disk I/O, driver delays, and disk utilization. Download it from http://www.microsoft.com/hwdev/platform/performance/fastboot/BootVis.asp and extract it into its own folder. Go to the folder and double-click on BootVis.exe. To analyze how your system boots, choose Trace
Next Boot. (Choose Trace Next Boot + Driver Delays if you want to trace delays caused by drivers as well as your normal boot sequences.) Tell the program how many times to reboot and run the test (the more times it runs, the more accurate the results, although the longer the test takes to run). Click OK, and your system will reboot. After you log on after the reboot, you'll see this message:
Please WAIT for Bootvis to launch!
Don't do anything yet; the program is working, even though it doesn't appear to be doing anything. After a while, you will see the screen shown in Figure 1-3. Soon after that the results appear, as shown in Figure 1-4.
Figure 1-3. BootVis alerts you that it is working
A series of graphs outline boot activity and loading time. The Boot Activity graph, shown in Figure 1-4, is the most important and details all aspects of the boot, including how much time each boot activity takes. Hover your mouse over an activity, such as Driver, and a balloon tip will appear, telling how much time that activity takes to load. To see the total boot time, hover your mouse over the rectangle at the top of a solid black line, and your total boot time will be displayed in a balloon tip, as shown in Figure 1-4.
The pictures and graphs are pretty, but the truth is, you don't really need them, because the utility will automatically make changes to
speed up your boot time. To have the utility speed up your boot time, choose Trace Optimize System and click Reboot Now when a prompt appears. Your system will shut down, reboot, give you the same initial prompt as when it's analyzing your system, but then alert you that it's reorganizing your boot files for faster startup. When the alert goes away, you can use your computer as you would normally. If you want to determine your increase in boot speed, run BootVis again and compare the new boot time to your previous boot time.
1.4.1 Enable Quicker Startups with a Boot Defragment
There's another way to speed up XP startup: make your system do a boot defragment, which will put all the boot files next to one another on your hard disk. When boot files are in close proximity to one another, your system will start faster.
On most systems, boot defragment should be enabled by default, but it may not be on yours, or it may have been changed inadvertently. To make sure that boot defragment is enabled on your system, run the Registry Editor [Hack #68], and go to:
HKEY_LOCAL_MACHINE\SOFTWARE\Microsoft\Dfrg\BootOptimizeFunction
Edit the Enable string value to Y if it is not already set to Y. Exit the Registry and reboot. The next time you reboot, you'll do a boot
defragment.
week. Windows uses this directory as a way of speeding up launching applications. It analyzes the files you use during startup and the applications you launch, and creates an index to where those files and applications are located on your hard disk. By using this index, XP can launch files and applications faster. So, by emptying the directory, you are most likely slowing down launching applications. In my tests, I've also found that after emptying the directory, it takes my PC a few seconds longer to get to my desktop after bootup.
1.4.2 Speed Up Shutdown Times
It's not only startup times that you'd like to speed up; you can also make sure that your system shuts down faster. If shutting down XP takes what seems to be an inordinate amount of time, here are a couple of steps you can take to speed up the shutdown process:
Don't have XP clear your paging file at shutdown
For security reasons, you can have XP clear your paging file (pagefile.sys) of its contents whenever you shut down. Your paging file is used to store temporary files and data, but when your system shuts down, information stays in the file. Some people prefer to have the paging file cleared at shutdown, because sensitive information such as unencrypted passwords sometimes ends up in the file. However, clearing the paging file can slow shutdown times significantly, so if extreme security isn't a high priority, you might not want to clear it. To shut down XP without clearing your paging file, run the Registry Editor and go to:
HKEY_LOCAL_MACHINE\SYSTEM\CurrentControlSet\Control\Session Manager\Memory Management
Change the value of ClearPageFileAtShutdown to 0. Close the Registry and restart your computer. Whenever you turn off XP
from now on, the paging file won't be cleared, and you should be able to shut down more quickly.
Turn off unnecessary services
Services take time to shut down, so the fewer you run, the faster you can shut down. For information on how to shut them down, see [Hack #4].
Hack 4 Halt Startup Programs and Services
Increase your PC's performance and speed up startup times by shutting off applications and services that you don't need.
One of the best ways to speed up your PC without having to spend money for extra RAM is to stop unnecessary programs and services from running whenever you start your PC. When too many programs and services run automatically every time you start up your system, startup itself takes a long time, and too many programs and services running simultaneously can bog down your CPU and hog your memory.
Some programs, such as antivirus software, should run automatically at startup and always run on your computer. But many other programs, such as instant messenger software, serve no purpose by being run at startup. And while you need a variety of background services running on your PC in order for XP to function, there are many unnecessary services that run on startup. For example, on many systems, the Wireless Zero Configuration Service runs to automatically configure a WiFi (802.11) network card, even though no such card is present in the system.
1.5.1 Eliminating Programs that Run at Startup
Stopping programs from running at startup is a particularly daunting task, because there is no single place you can go to stop them all. Some run because they're put in the Startup folder, others because they're part of logon scripts, others because of Registry settings and so on. But with a little bit of perseverance, you should be able to stop them from running.
1.5.1.1 Cleaning out the Startup folder
Start by cleaning out your Startup folder. Find it in C:\Documents and Settings\<User Name>\Start Menu\Programs\Startup, where <User Name> is your Windows logon name. Delete the shortcuts of any programs you don't want to run on startup. As with any shortcuts, when you delete them, you're only deleting the shortcut, not the program itself. (You can also clear out the startup items by
going to Start Programs Startup and right-clicking on items you want to remove.) Next, clean out your Scheduled Tasks folder. Go to C:\WINDOWS\Tasks, and delete the shortcuts of any programs that you don't want to run automatically on a schedule.
You can bypass all the programs in your Startup folder on an as-needed basis. To stop XP from loading any programs in the Startup folder, hold down the Shift key during boot-up. No programs in the Startup folder will run, but the items will still remain there, so that they will start up as they would normally the next time you boot.
1.5.1.2 Using the System Configuration Utility
prompt and press Enter. (If that doesn't work, first do a search for msconfig.exe, and then when you find the file, double-click it.)
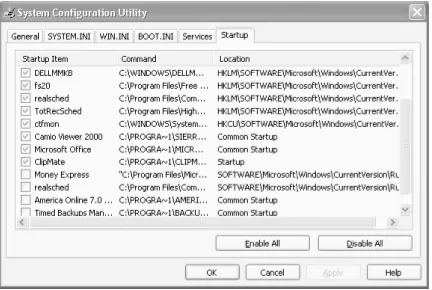
Figure 1-5. The Startup tab of the System Configuration Utility
To stop a program from running at startup, go to the Startup tab in this utility and uncheck the box next to the program. It can sometimes be difficult to understand what programs are listed on the Startup tab. Some, such as America Online, are clearly labeled. But often, you'll see a phrase or collection of letters, such as fs20. That's the name of the running file—in this case, fs20.exe, which is Free Surfer mk II, an excellent free popup killer [Hack #33]. As you can see from the picture, I've chosen to let this useful tool run on startup.
To get more information about a listing, expand the width of the Command column near the top of the Startup tab. Expand it enough and you'll see the startup command that the program issues, including its location, such as C:\Program Files\Free Surfer\fs20.exe. The directory location should be another hint to help you know the name of the program.
When stopping programs from running at startup, it's best to stop them one at a time rather than in groups. You want to make sure that you're not causing any system problems by stopping them. So stop one and restart your PC. If it runs fine, then stop another and restart. Continue doing this until you've cleared all the programs you don't want to run automatically.
Each time you uncheck a box and restart your PC, you'll get a warning, shown in Figure 1-6, that you've used the System Configuration Utility to disable a program from starting automatically. If you don't want to see that warning, disable it by checking the box in the dialog itself.
After you've used the System Configuration Utility to identify programs that run on startup, you may want to try disabling them from with the programs themselves. So run each program that starts automatically, and see if you can find a setting that allow you to halt it from running on startup.
1.5.1.3 Using the Registry to halt programs running on startup
Even the System Configuration Utility won't necessarily let you identify and kill all programs that run on startup. You may also need to hack the Registry to disable them. To do so, run the Registry Editor [Hack #68] and go to
HKEY_CURRENT_USER\Software\Microsoft\Windows\CurrentVersion\Run. The right pane will contain a list of some of the programs
that automatically run at startup. The Data field tells you the path and name of the executable so that you can determine what each program is. Right-click on any program you don't want to run, and choose Delete. That will kill any programs that run specific to your logon. To kill programs that run for every user of the system, go to
HKEY_LOCAL_MACHINE\SOFTWARE\Microsoft\Windows\CurrentVersion\Run and follow the same instructions for deleting other
programs you don't want to run at startup.
1.5.2 Disabling Services that Run at Startup
Constantly running in the background of XP are services—processes that help the operating system run, or that provide support to applications. Many of these services launch automatically at startup. While you need many of them, there are also many that aren't required and that can slow your system down when they run in the background.
You can disable services at startup by using the System Configuration Utility, similar to the way that you halt programs from running at startup, except that you use the Services tab instead of the Startup tab. But the System Configuration Utility doesn't necessarily list every service that launches on startup. A bigger problem is that disabling services is more of shot in the dark than disabling programs. When you disable a program, you can get a sense of what the program does. But when you disable a service through the System Configuration Utility, there's often no way to know what it does.
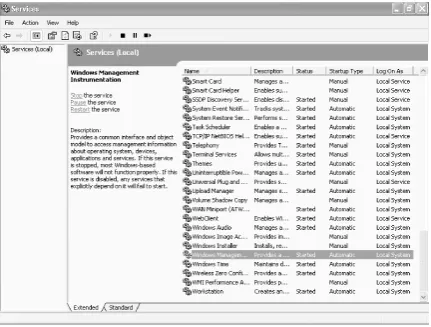
A better way of disabling services at startup is via the Services Computer Management Console, shown in Figure 1-7. Run it by typing services.msc at the command prompt. The Services Computer Management Console includes a description of all services, so that you
can know ahead of time whether a particular service is one you want to turn off. It also lets you pause the service, so that you can test out your machine with the service off to see whether it's needed or not.
After you run the console, click on the Extended tab. This view will show you a description of each service in the left pane when you highlight the service. The Startup Type column shows you which services launch on startup—any services with "Automatic" in that column. Click on that column to sort together all the services that automatically launch on startup. Then highlight each of those services and read the descriptions.
[image:34.595.82.514.46.373.2]When you find a service you want to disable, right-click on it and choose Properties. In the Properties dialog box that appears, choose Manual from the "Startup type" drop-down list. The service won't start automatically from now on, but you can start it manually via the console. If you want the service disabled so that it can't be run, choose Disabled. To test the effects of turning off the service, turn off any services that you don't want to run by clicking "Stop the service" in the left pane, or by right-clicking on the service and choosing Stop.
Table 1-2 lists some common services you might want to halt from running at startup.
Table 1-2. Services you might want to turn off
Service What it does
Portable Media Serial Number Retrieves the serial number of a portable music player attached to your PC.
Task Scheduler Schedules unattended tasks to be run. If you don't schedule any unattended tasks, turn it off.
Uninterruptible Power Supply Manages an Uninterruptible Power Supply (UPS) connected to your PC.
Automatic Updates Automatically checks for Windows updates. (You can check manually by going to
http://windowsupdate.microsoft.com.)
Telnet (service available on XP Pro only)
Allows a remote user to log in to your computer and run programs. (This will not be found on all versions of XP Pro.)
Wireless Zero Configuration Service
Automatically configures a WiFi (802.11) network card. Disable this only if you're not using a WiFi network card.
[ Team LiB ]
Hack 5 Create Multiple Startup Profiles with Advanced Startup Manager
If you need to start different programs on startup, depending on what you need to do on your PC, create different startup profiles with this startup utility.
With the hacks covered in this chapter, you can customize how XP starts up. But there's one thing these hacks won't be able to do for you—create different startup profiles. For that, you need downloadable software.
Let's say, for example, you have a laptop that you sometimes run attached to a keyboard, monitor, and an always-on Internet
connection, and other times you travel with it, so it is not connected to the Internet. When you use it when you travel, you use it primarily in airplanes, airports, and other places where you typically aren't connected to the Internet. You also run a piece of monitoring software that will send a signal to a call center if your laptop is stolen. You don't need to run that software when you're not on the road.
Ideally, you would have one set of programs that run automatically at home and another set of programs that run when you're on the road. At home, you might want instant messenger software and file sharing software to load at startup; on the road, you don't want that software to load automatically, but you do want your monitoring software to load.
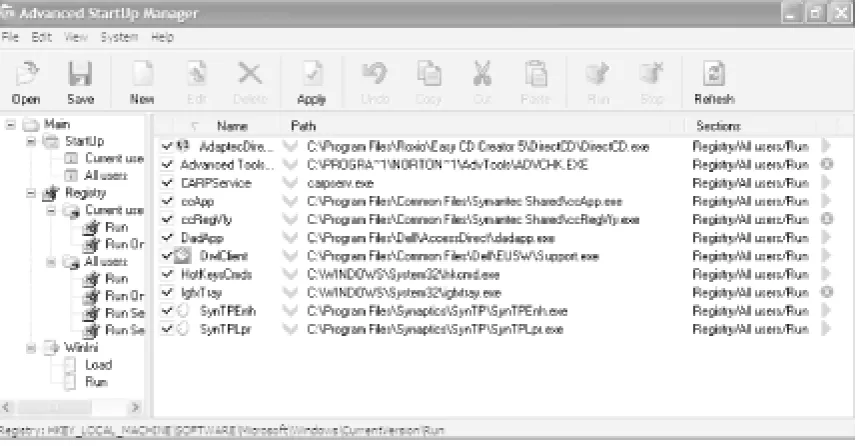
Advanced StartUp Manager—a piece of shareware from Ray's Lab (http://www.rayslab.com), shown in Figure 1-8—lets you create multiple startup profiles so that you can have separate profiles for your laptop at home and the road—or for any other purpose. It's free to try, but it costs $19.95 if you decide to keep it.
Figure 1-8. Create multiple startup profiles with Advanced Startup Manager
In addition to creating a profile for traveling and one for home, you may want to create other profiles. For example, when you want to play games, you'll want to start your system with a minimal number of services and programs running in the background, so you'll create a profile that disables a variety of services, such as the Indexing service, the Task Scheduler, and the Themes service that lets you apply themes to your PC. If you frequently need to troubleshoot your network, you'll want to create a network-troubleshooting profile that automatically starts networking analysis software, such as QCheck. [Hack #57].
Win.ini file. Where you want them to start from is up to you. To add a program, just highlight where you want it to run from, choose File
Add Program, and choose the program's executable file. You can add switches, if you want, in the Flags field of the screen you use to add the program. You can also choose whether the program should run for just one specific user or for all users of the machine. To delete a program from the profile, right-click on it and choose Delete.
When you have built a profile with all the programs you want to run at startup, save it by choosing File Backup Configuration as,
and then choosing a name for the profile. Create as many profiles as you want. To load a profile, choose File Open Backup, and choose the profile you want to load. After you've loaded a profile, the next time you start your computer it will load with that startup software. Be aware that this means you can't choose a profile when you boot your system. You have to run Advanced StartUp Manager before you exit XP, choose the profile you want to run next time you start XP, and then exit.
1.6.1 See Also
OSL 2000 (http://www.osloader.com) lets you boot from up to 100 separate operating systems (including multiple copies of XP or other versions of Windows), lets you boot from a second hard disk, and offers a variety of other features, such as an automatic boot timer. It's shareware and free to try, but it costs $25 if you decide to continue using it.
For software to customize shutdowns, try Shutdown Now! (http://www.dworld.de). It gives you just about every option you can imagine for shutdown. You can specify applications to launch or documents to load automatically before shutdown, schedule shutdowns, perform actions such as ejecting and loading CDs on shutdown, empty directories on shutdown, and the list goes on. It's shareware and free to try, but if you keep using it you're expected to pay $19.50.
For a free shutdown manager, try Switch Off (http://yasoft.km.ru/eng/switchoff), a simple shutdown utility that runs in your system tray. It lets you schedule shutdowns and perform other tasks on shutdown, such as locking your workstation, and it also lets you do any of them quickly from the system tray. It's not nearly as powerful as Shutdown Now!, but it's free.
[ Team LiB ]
Hack 6 Miscellaneous Startup and Shutdown Hacks
A grab bag of ways to customize the way you start up and shut down your system.
There are many small ways that you can control the way you start up and shut down your PC. This grab bag of four hacks shows you the best of them.
1.7.1 Create One-Click Shutdown and Reboot Shortcuts
Turning off or rebooting XP involves a several-step process: click the Start menu, choose Shut Down, and then select Shut Down or Restart. If you want, however, you can exit or reboot much more quickly, by creating a shortcut that enables one-click shutdowns. You can also use the shortcut to customize the shutdown or reboot—for example, by displaying a specific message or automatically shutting down any programs that are running.
First, create a shortcut on your desktop by right-clicking on the desktop, choosing New, and then choosing Shortcut. The Create Shortcut Wizard appears. In the box asking for the location of the shortcut, type shutdown. After you create the shortcut, double-clicking
on it will shut down your PC.
But you can do much more with a shutdown shortcut than merely shut down your PC. You can add any combination of several switches to do extra duty, like this:
shutdown -r -t 01 -c "Rebooting your PC"
Double-clicking on that shortcut will reboot your PC after a one-second delay and display the message "Rebooting your PC." The shutdown command includes a variety of switches you can use to customize it. Table 1-3 lists all of them and describes their use.
I use this technique to create two shutdown shortcuts on my desktop—one for turning off my PC, and one for rebooting. Here are the ones I use:
shutdown -s -t 03 -c "See you later!"
Table 1-3. Switches you can use with shutdown
Switch What it does
-s Shuts down the PC.
-l Logs off the current user.
-t nn Indicates the duration of delay, in seconds, before performing the action.
-c "messagetext" Displays a message in the System Shutdown window. A maximum of 127 characters can be used. The message must be enclosed in quotation marks.
-f Forces any running applications to shut down.
-r Reboots the PC.
1.7.2 Automatically Turn On Num Lock, Scroll Lock, and Caps Lock
When you start your PC, Num Lock, Scroll Lock, and Caps Lock don't automatically toggle on. You can automatically turn each of them on or off whenever your PC starts, for all accounts on the PC. As a practical matter, most people probably want to have only Num Lock automatically turned on, but this Registry hack gives you the power to force any combination of keys on or off. Run the Registry Editor [Hack #68] and go to HKEY_USERS\.Default\Control Panel\Keyboard. Find the String value InitialKeyboardIndicators. By default, it is set to 0, which means that Num Lock, Scroll Lock, and Caps Lock are all turned off. Set it to any of the following values, depending on
the combination of keys you want turned on or off:
0
Turns off Num Lock, Caps Lock, and Scroll Lock
1
Turns on Caps Lock
2
Turns on Num Lock
3
Turns on Caps Lock and Num Lock
4
Turns on Scroll Lock
5
Turns on Caps Lock and Scroll Lock
6
Turns on Num Lock and Scroll Lock
7
Turns on Caps Lock, Num Lock, and Scroll Lock
1.7.3 Stop Error Messages from Displaying on Startup
If you constantly see an error message that you can't get rid of—for example, from a piece of software that didn't uninstall properly and continues to give errors on startup—you can disable it from displaying on startup. Run the Registry Editor and go to HKEY_LOCAL
MACHINE\SYSTEM\CurrentControlSet\Control\Windows. (This key holds a variety of Windows system settings, such as the location of
your system directory.) Create a new DWORD called NoPopupsOnBoot and give it a value of 1. Exit the Registry and reboot for the
setting to take effect. To disable it, either delete the DWORD value or give it a value of 0.
1.7.4 Give More Time for Processes to Close at Shutdown
When you shut down Windows, XP gives each process, service or application 20 seconds to close before the operating system turns off the computer. If the process, service, or application doesn't shut down within 20 seconds, a dialog box appears, prompting you to either wait 20 more seconds, immediately end the process, service, or application, or cancel shutdown.
If this dialog box appears frequently, you may be running an application, service, or process that often takes more than 20 seconds to close. To solve the problem, you can increase the amount of time that XP waits to display the dialog box so that the dialog box will no longer appear. To do so, run the Registry Editor and go to HKEY_CURRENT_USER\Control Panel\Desktop. Look for the String value
WaitToKillAppTimeout. Edit the value by entering the amount of time you want XP to wait before displaying the dialog box, in
milliseconds. The default is 20000, or 20 seconds. If you want XP to wait 25 seconds, enter the value of 25000. Exit the Registry and
reboot.