Windows
®
Server 2003
Pocket Administrator
Nelson Ruest
Danielle Ruest
McGraw-Hill/Osborne
McGraw-Hill/Osborne 2100 Powell Street, 10th
Floor Emeryville, California 94608 U.S.A.
To arrange bulk purchase discounts for sales promotions, premiums, or fund-raisers, please contactMcGraw-Hill/Osborne at the above address. For information on translations or book distributors outside the U.S.A., please see the International Contact Information page immediately following the index of this book.
Windows
®Server 2003 Pocket Administrator
Copyright © 2003 by The McGraw-Hill Companies. All rights reserved. Printed in the United States of America. Except as permitted under the Copyright Act of 1976, no part of this publication may be reproduced or distributed in any form or by any means, or stored in a database or retrieval system, without the prior written permission of publisher, with the exception that the program listings may be entered, stored, and executed in a computer system, but they may not be reproduced for publication.
1234567890 DOC DOC 019876543
ISBN 0-07-222977-2
Publisher Brandon A. Nordin
Vice President & Associate Publisher Scott Rogers
Acquisitions Editor Francis Kelly
Project Editor Elizabeth Seymour
Acquisitions Coordinator Jessica Wilson
Technical Editor Rod Trent
Copy Editors Dennis Weaver
Proofreader Susan Carlson Greene
Indexer Valerie Perry
Composition Carie Abrew
Illustrators Kathleen Edwards, Melinda Lytle, Michael Mueller
Series Design Peter F. Hancik, Lucie Ericksen, Elizabeth Jang
Cover Series Design Jeff Weeks
This book was composed with Corel VENTURA™ Publisher.
We dedicate this book to Marie-Andrée, friend, daughter, partner, and collaborator. Thank you for your valuable help. Every day, you manage to amaze us by going far
About the Authors
Danielle Ruestis a workflow architect and consultant focused on people and organizational issues for large IT deployment projects. During her twenty-two year career, she has led change management processes, developed and delivered training, and managed communications programs during process-implementation projects.
Nelson Ruestis an enterprise architect specializing in change management. During his twenty-two year career, he has served as a computer operator, network
administrator, and director for IT consulting firms. He is a Microsoft Certified Systems Engineer and Microsoft Certified Trainer. Presently, he is a senior enterprise consultant whose purpose is to assist organizations to master the technologies they depend on.
Danielle Ruest and Nelson Ruest are also the authors of Windows Server 2003: Best Practices for Enterprise Deployment (McGraw-Hill/Osborne, 2003;
www.Reso-Net.com/WindowsServer) as well asPreparing for .NET Enterprise Technologies: People, PCs and Processes Interacting in a .NET World (Addison-Wesley, 2001; www.Reso-Net.com/EMF). They are frequent contributors and product reviewers for .NET Magazine (www.thedotnetmag.com) and MCP Magazine
(www.mcpmag.com). Nelson Ruest is a regular speaker at Comdex and other conferences in Canada and the U.S.
About Resolutions Enterprises
CONTENTS
Preface . . . xi
Acknowledgments . . . xi
Introduction. . . xiii
1 General Server Administration . . . . 1
Administrative Activities . . . 1
General Server Administration . . . 4
GS-01: Run As Shortcuts . . . 4
GS-02: General Service Status Verification . . 8
GS-03: System Event Log Verification . . . 10
GS-04: Security Event Log Verification . . . . 12
GS-05: Service and Admin Account Management . . . 14
GS-06: Activity Log Maintenance . . . 16
GS-07: Uptime Report Management . . . 17
GS-08: Script Management . . . 18
GS-09: Script Certification Management . 21 GS-10: Antivirus Definition Update . . . 23
GS-11: Server Reboot . . . 23
GS-12: Security Policy Review/Update . . . 25
GS-13: Security Patch Verification . . . 26
GS-14: Service Pack/Hot Fix Update . . . 29
GS-15: New Software Evaluation . . . 30
GS-16: Inventory Management . . . 31
GS-17: Global MMC Creation . . . 33
GS-18: Automatic Antivirus Signature Reception . . . 35
GS-19: Scheduled Task Generation/ Verification . . . 36
GS-20: Security Template Creation/ Modification . . . 37
GS-21: Reference Help File Management . . 39
GS-22: Server Staging . . . 40
GS-23: Administrative Add-on Tool Setup . 41 GS-24: Default User Profile Update . . . 42
GS-25: Technical Environment Review . . . . 44
GS-26: System and Network Documentation . . . 45
GS-28: Troubleshooting Priority
Management . . . 46
GS-29: Workload Review . . . 46
Hardware Administration . . . 47
HW-01: Network Hardware Checkup . . . . 47
HW-02: Server BIOS Management . . . 48
HW-03: Firmware and Server Management Software Update Management . . . 48
HW-04: Device Management . . . 49
Backup and Restore . . . 50
BR-01: System State Backup Generation . . 51
BR-02: Backup Verification . . . 52
BR-03: Off-site Storage Tape Management . . . 53
BR-04: Disaster Recovery Strategy Testing . 53 BR-05: Restore Procedure Testing . . . 54
BR-06: Backup Strategy Review . . . 55
BR-07: Server Rebuild . . . 56
Remote Administration . . . 56
RA-01: Server RDC Management . . . 57
RA-02: PC RDC Management . . . 59
RA-03: User Support through Remote Assistance . . . 60
RA-04: Remote Desktop Connection Shortcut and Web Access . . . 61
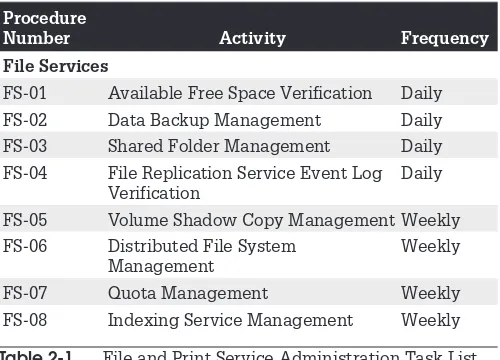
2 Administering File and Print Servers . . . . 63
Administrative Activities . . . 63
File Service Administration . . . 65
FS-01: Available Free Space Verification . . . 65
FS-02: Data Backup Management . . . 67
FS-03: Shared Folder Management . . . 68
FS-04: File Replication Service Event Log Verification . . . 71
FS-05: Volume Shadow Copy Management . . . 72
FS-06: Distributed File System Management . . . 74
FS-07: Quota Management . . . 75
FS-08: Indexing Service Management . . . . 76
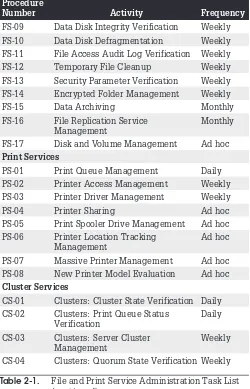
FS-09: Data Disk Integrity Verification . . . 77
FS-10: Data Disk Defragmentation . . . 78
FS-11: File Access Audit Log Verification . . 78
FS-12: Temporary File Cleanup . . . 79
FS-14: Encrypted Folder Management . . . 82
FS-15: Data Archiving . . . 82
FS-16: File Replication Service Management . . . 83
FS-17: Disk and Volume Management . . . . 85
Print Service Administration . . . 86
PS-01: Print Queue Management . . . 87
PS-02: Printer Access Management . . . 88
PS-03: Printer Driver Management . . . 89
PS-04: Printer Sharing . . . 90
PS-05: Print Spooler Drive Management . . 91
PS-06: Printer Location Tracking Management . . . 91
PS-07: Massive Printer Management . . . 93
PS-08: New Printer Model Evaluation . . . 94
Cluster Services Management . . . 95
CS-01: Clusters: Cluster State Verification . 95 CS-02: Clusters: Print Queue Status Verification . . . 96
CS-03: Clusters: Server Cluster Management . . . 96
CS-04: Clusters: Quorum State Verification . . 97
3 Administering Network Infrastructure Servers . . . . 99
Administrative Activities . . . 99
DHCP/WINS Server Administration . . . 101
DW-01: DHCP Server State Verification . . . 101
DW-02: WINS Server State Verification . . . . 105
DW-03: WINS Record Management . . . 108
DW-04: DHCP Attribute Management . . . . 108
DW-05: DHCP Scope Management . . . 111
DW-06: DHCP Reservation Management . . 112
DW-07: DHCP Superscope Management . . 113
DW-08: DHCP Multicast Scope Management . . . 114
DW-09: DHCP Option Class Management . . . 116
DW-10: DHCP/RIS Server Authorization . . . 119
Deployment Servers . . . 120
RI-01: RIS Server State Verification . . . 121
RI-02: RIS Image Management . . . 122
NLB Clusters . . . 124
NC-02: NLB Cluster Member
Management . . . 126
Remote Access/VPNs . . . 127
RV-01: Remote Access Server Status Verification . . . 128
RV-02: RADIUS/IAS Server State Verification . . . 129
RV-03: Wireless Monitoring . . . 130
RV-04: Remote Access Policy Verification . 131 RV-05: NAT Service Management . . . 131
RV-06: VPN Connection Management . . . 132
4 Administering Identity Servers . . . . 135
Administrative Activities . . . 135
Domain Controller Administration . . . 137
DC-01: User Management . . . 139
DC-02: User Password Reset . . . 141
DC-03: Directory Service Log Event Verification . . . 144
DC-04: Account Management . . . 144
DC-05: Security Group Management . . . . 145
DC-06: KCC Service Status Management . 148 DC-07: AD Replication Topology Verification . . . 150
DC-08: Global Catalog Status Verification . . . 152
DC-09: Universal Administration Group Management . . . 154
DC-10: Account Policy Verification . . . 155
DC-11: PKI Service Verification . . . 157
DC-12: AD Service/Admin Account Verification . . . 158
DC-13: Lost And Found Object Management . . . 159
DC-14: Right Delegation Management . . 160
DC-15: Software Installation Management 164 DC-16: GPO Management . . . 166
DC-17: Computer Object Management . . 168
DC-18: Distribution Group Management . . 171
DC-19: AD Forest Management . . . 171
DC-20: AD Information Management . . . . 174
DC-21: Schema Management . . . 175
DC-22: Schema Access Management . . . 177
DC-24: Schema-Modifying Software
Evaluation . . . 181
DC-25: Operations Master Role Management . . . 182
DC-26: Operations Master Role Transfer . . 185
DC-27: Operations Master Disaster Recovery . . . 186
DC-28: Domain Controller Promotion . . . . 187
DC-29: Domain Controller Disaster Recovery . . . 189
DC-30: Trust Management . . . 192
DC-31: Forest/Domain/OU Structure Management . . . 195
DC-32: Active Directory Script Management . . . 197
DC-33: Forest Time Service Management . . 199
DC-34: Access Control List Management . . 202
DC-35: Managing Saved Queries . . . 203
DC-36: Managing Space within AD . . . 205
DC-37: Managing the LDAP Query Policy . . 207
DC-38: Managing the AD Database . . . 208
Namespace Server Management (DNS) . . . 209
DN-01: DNS Event Log Verification . . . 210
DN-02: DNS Configuration Management . . 211
DN-03: DNS Record Management . . . 212
DN-04: DNS Application Partition Management . . . 213
5 Administering Application Servers . . . . 215
Administrative Activities . . . 215
Administration of Dedicated Web Servers . . . 217
WS-01: Application Event Log Verification . . . 217
WS-02: IIS Server Status Verification . . . 218
WS-03: IIS Server Usage Statistic Generation . . . 220
WS-04: Web Server Log Verification . . . 222
WS-05: IIS Security Patch Verification . . . 223
WS-06: Web Server Configuration Management . . . 224
Administration of Application Servers . . . 226
AS-01: Shared Application State Verification . . . 227
AS-02: COM+ Application Administration . . 228
AS-04: Database Server Administration . . . 234
AS-05: Server Application Client Access . . 235
AS-06: User Software Installation . . . 235
Administration of Terminal Services . . . 237
TS-01: Terminal Service Connection Management . . . 239
TS-02: Terminal Service Printer Management . . . 240
TS-03: Session Directory Management . . . . 241
TS-04: TS Licensing Administration . . . 242
TS-05: TS User Access Administration . . . 243
TS-06: TS Application Management . . . 243
Performance and Monitoring Administration . . . 245
PM-01: Router and Firewall Log Verification . . . 245
PM-02: General Disk Space Monitoring . . . 247
PM-03: System Resource Management . . 248
PM-04: Network Traffic Monitoring . . . 249
PM-05: Server Capacity Management . . . 252
PM-06: System Diagnostics . . . 253
PM-07: Corporate Error Reporting Management . . . 255
PM-08: Monitoring Tools Review . . . 256
Final Notes . . . 256
PREFACE
Twenty years ago, when most computers were mainframes or minicomputers, operators and administrators had scheduled, specific tasks they needed to perform on an ongoing basis. Each time a task was performed, they had to make note of the time and write their initials in a logbook to demonstrate when the task was performed and by whom.
Today, networks are made from loosely coupled collections of servers and workstations that may or may not include mainframes or minicomputers. Network or systems administration has become much more complex and covers many more tasks than in the past but, somehow, we’ve lost something in the transition. Most administrators don’t keep logbooks any more. Most don’t have fixed schedules for administrative activities. Many don’t perform even the most basic administrative tasks.
The goal of this book is to help system administrators keep their Windows Server 2003 networks up and running, in the best of health. It outlines over 160 administrative tasks and gives the recommended frequency for each task. It is powered by a companion web site (www.Reso-Net.com/ PocketAdmin), the aim of which is provide further
information about and additional tools for Windows Server administration. Comments can be sent to a special e-mail address: PocketAdmin@Reso-Net.com. Enjoy!
ACKNOWLEDGMENTS
We would like to thank everyone who contributed to this book, especially Marie-Andrée Furlong for researching every task. Your contribution was invaluable.
Thanks also go to the system administrators of Canadian National Railways in Montreal, Canada, for taking the time to review and discuss with us the final task list we collated. Your perceptiveness was extremely useful and made the book more realistic.
Thanks to VMware Corporation for providing us with the tools to create our virtual lab environment and test out every single procedure outlined here.
INTRODUCTION
This Pocket Administrator’s guide strives to be different from other guidebooks by going straight to the heart of the matter. We assume that when you reach for this book, it will not be for a long-winded explanation of how something works but because you are in the middle of a task and need answers, fast. Each task outlined here is focused on the task itself and does not usually include extensive background information.
If possible, each task description covers at least three areas:
• The graphical interface
• The command line, if available
• A recommended script, if applicable
The first area explains how you would approach the task to perform it on one or two servers. In fact, the graphical approach is designed primarily for administrators of small networks that contain less than 25 servers. The second area details how you would approach a task when you have to perform it on a series of servers. Unfortunately, even though Windows Server 2003 includes over 60 new command-line tools, this type of tool is not always
available for every task. The advantage of this approach is that it is easy to insert command lines into command files in either CMD or BAT format to run them automatically. Another advantage of the command file is that it can be piped into a text file for automatic record keeping, making your task even simpler.
As you’ll see, there are several tasks in this book that do not have an accompanying script on the site. This is why you should continue to check Microsoft’s Web site. The Microsoft Script Center team is constantly adding new script examples. In fact, if you have an idea for a script, you can send them a request by writing to the scripting guys at HYPERLINK "mailto:scripter@microsoft.com" scripter@microsoft.com.
Using Server Roles
This book is structured in much the same way you structure your network. Chapter 1 begins with general activities—activities that must be performed on every server no matter what their role in the enterprise. In addition, this chapter covers specific one-time tasks that you need to perform to prepare your administrative environment. This should give you all the tools you need to simplify your administration.
The next chapters are loosely based on the server roles you find in the Manage Your Server interface. Seven server roles are outlined here:
• File and Print Servers These servers focus on the provision of storage and structured document services to the network. These functions form the basis of Information Sharing within the network.
• Network Infrastructure Servers These servers provide core networking functions such as IP addressing or name resolution including support for legacy systems. They also provide Routing and Remote Access services.
• Dedicated Web Servers These servers focus on the provision of Web Services to user communities. This can be with Windows Server 2003, Web Edition, or with another edition running Web services.
• Application Servers These servers provide
application services to the user community. Windows Server 2003 examples would be SQL Server,
Commerce Server, and so on.
• Terminal Servers These servers provide a central application execution environment to users. Users need only have a minimal infrastructure to access these servers because their entire execution environment resides on the server itself.
• Collaboration Servers These servers provide the infrastructure for collaboration within the enterprise. Their services can include SharePoint Services, Streaming Media Services, and Real Time Communications.
TIP
These server roles are drawn from Windows Server 2003: Best Practices for Enterprise Deployments by Ruest and Ruest, from McGraw-Hill Osborne (2003). More information is available at www.Reso-Net.com/ WindowsServer.Chapter 2 covers the first server role, File and Print, because it is the most common server role. It also includes coverage of Server Clusters because these are also often put in place with file or print services in mind.
Chapter 3 covers Network Infrastructure Servers. This includes the Dynamic Host Configuration Protocol (DHCP) and the Windows Internet Naming Service (WINS). It also includes deployment servers or servers used to deploy operating systems such as Windows XP or Windows Server itself. This includes Remote Installation Services. This chapter covers two more services: Network Load Balancing as well as Remote Access and Virtual Private Networking.
Controllers and Domain Naming Servers (DNS). These two services are tied together because Active Directory relies so heavily on DNS to operate properly.
Chapter 5 covers the rest of the server roles. These include Dedicated Web Servers, Application Servers, and Terminal Servers. No Collaboration Servers are covered in this chapter since most collaboration features are add-ons to Windows Server 2003. The final portion of this chapter includes Performance and Monitoring administrative activities. Both are essential in every network.
The features covered in this book are limited by the features of Windows Server 2003 itself. Only core features available with the operating system are covered here. Though it is true that system administrators will often have to perform other administrative tasks that will vary depending on the content of their network, these tasks are beyond the scope of this book.
The Administrative Task List
The core of this book is the administrative task list. The list proposed here has been drawn from a series of different sources including our own experience as well as our clients’ real-life administrative environments. It has been validated through discussion and demonstration with several system administrators. Much discussion and consultation
produced the list you’ll find in this book.
In addition, the task list has been categorized according to recommended task frequency. Frequencies range from a daily, weekly, and monthly, to an ad hoc basis. The latter is a category that includes everything from bi-yearly, yearly, and pretty much any time because while some tasks must be performed, their timing cannot be predicted.
The System Administrator
As a system administrator, you’ll use a variety of tools to perform the activities listed here. Some of the activities will be administrative, some technical. Some will always be manual while others will be automated. Some will use Windows Server 2003’s graphical interface and others, the command line.
To perform this job, you’ll have to be technician, administrator, manager, communicator, operator, user, negotiator, and sometimes, director. You’ll also need a significant understanding of the environment you work in and of the technologies that support it. This is why it is so important for you to gain a sound understanding in Windows Server 2003.You are expected to be already familiar with core Windows Server features before using this book.
System Prerequisites
The prerequisites for the task descriptions in this book are few. You should, however, have standard server builds. In fact, your servers should be designed in two steps. The first should be a general server build. This general build should include every element that is common to all servers no matter what their role. You should also take care to personalize servers and standardize their personalization. Personalization should include elements such as modified folder views to include hidden objects and a status bar, as well as adding commonly-used tools to the Quick Launch Area. Once you’re finished personalizing the server, you should update the Default Profile to make sure the view is the same for each administrator that logs onto a server.
TIP
Task GS-17 in Chapter 1 tells you how to build a comprehensive Microsoft Management Console for system administration. To help save you time, a copy of this console is available from the companion web site at www.Reso-Net.com/PocketAdmin.The second step in your server preparation process should focus on the role the server will play. Once again, you should make sure that each server playing a specific role in your network is built in the same manner at all times. This can only facilitate your work.
Organizing Your Task Schedule
The task frequency should help you organize and define an administrative schedule. You can use the Task
Management feature in Microsoft Outlook to help manage your administration schedule, especially for weekly, monthly, and bi-annual tasks. You should include daily tasks in the schedule at first so that you can become familiar with them. It is a good idea to review all the tasks that are listed as “ad hoc” tasks and determine when you want to perform them.
One objective of this book is to help save you time. You might consider doing all daily tasks in the morning, then spending the afternoons of the first days of the week to perform weekly tasks. Reserve one afternoon of each week for monthly tasks; this way, you can spread them out over the course of the month. This should normally leave two afternoons per week for other, or ad hoc, tasks. Start out with this type of schedule and refine it as you go.
TIP
The Appendix includes a list of all tasks sorted by frequency. It should help you define your administrative schedule.Chapter 1
General Server
Administration
Though most servers will play a particular role within your organization, it is clear that some administrative tasks need to be performed on all servers no matter what their role is. These are the general server administration tasks. They include everything from making sure the server is up and running to verifying that it continues to be configured according to organizational standards. Many of the tasks are technical and several can be automated, but some are also purely administrative and do not require technology to be completed.
Administrative Activities
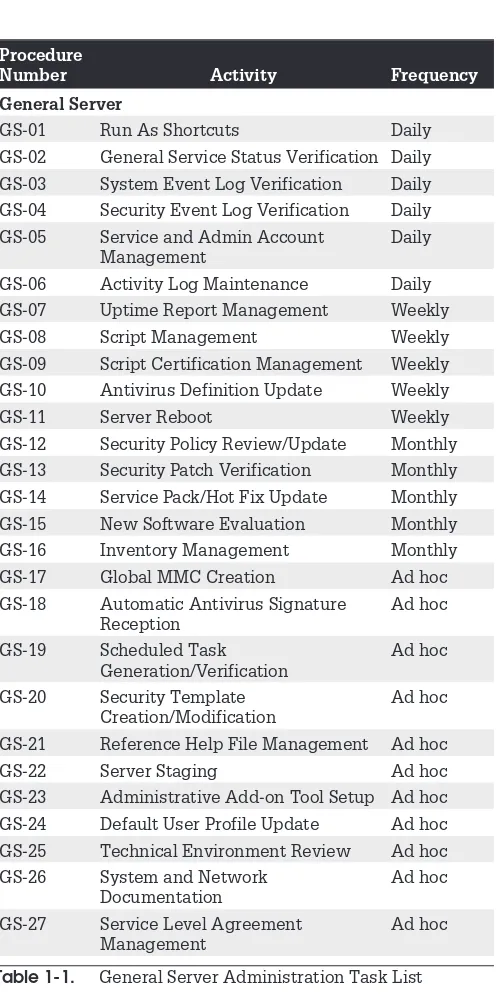
The general administration of Windows servers is divided into four administrative categories. These include general server, hardware, backup and restore, and remote administration. Table 1-1 outlines the administrative activities that you must perform on an ongoing basis to ensure proper operation of the services you deliver to your user community. It also identifies the frequency of each task.
You may or may not agree with the frequency of the activities outlined in Table 1-1. You may not even need to perform all of these activities because you don’t use some of the services mentioned here. This is why you should personalize this book. Use a highlight marker to mark the procedure number for each of the procedures you actually will use. That way, it will be simpler and faster for you to locate the procedures you use the most.
You may also use different schedules than those listed in Table 1-1. The frequency of a task depends on a lot of characteristics such as system reliability, daily system
1
1
1
1
1
1
1
1
1
1
1
1
1
1
1
1
Procedure
Number Activity Frequency
General Server
GS-01 Run As Shortcuts Daily
GS-02 General Service Status Verification Daily
GS-03 System Event Log Verification Daily
GS-04 Security Event Log Verification Daily
GS-05 Service and Admin Account Management
Daily
GS-06 Activity Log Maintenance Daily
GS-07 Uptime Report Management Weekly
GS-08 Script Management Weekly
GS-09 Script Certification Management Weekly
GS-10 Antivirus Definition Update Weekly
GS-11 Server Reboot Weekly
GS-12 Security Policy Review/Update Monthly
GS-13 Security Patch Verification Monthly
GS-14 Service Pack/Hot Fix Update Monthly
GS-15 New Software Evaluation Monthly
GS-16 Inventory Management Monthly
GS-17 Global MMC Creation Ad hoc
GS-18 Automatic Antivirus Signature Reception
Ad hoc
GS-19 Scheduled Task Generation/Verification
Ad hoc
GS-20 Security Template Creation/Modification
Ad hoc
GS-21 Reference Help File Management Ad hoc
GS-22 Server Staging Ad hoc
GS-23 Administrative Add-on Tool Setup Ad hoc
GS-24 Default User Profile Update Ad hoc
GS-25 Technical Environment Review Ad hoc
GS-26 System and Network Documentation
Ad hoc
GS-27 Service Level Agreement Management
[image:21.323.39.287.41.538.2]Ad hoc
1
1
1
1
1
1
1
1
1
1
1
1
1
1
1
1
1
throughput, disk size, disk speed, processor power and so on. If the schedule outlined here doesn’t fit with yours, change it.
TIP
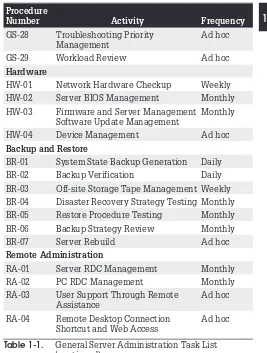
If you do find that the schedule doesn’t fit your needs, send us a note. Let us know what suits you best and we’ll publish updated frequency sheets on the companion web site (www.Reso-Net.com/PocketAdmin/). Write to us at PocketAdmin@Reso-Net.com.Procedure
Number Activity Frequency
GS-28 Troubleshooting Priority Management
Ad hoc
GS-29 Workload Review Ad hoc
Hardware
HW-01 Network Hardware Checkup Weekly
HW-02 Server BIOS Management Monthly
HW-03 Firmware and Server Management Software Update Management
Monthly
HW-04 Device Management Ad hoc
Backup and Restore
BR-01 System State Backup Generation Daily
BR-02 Backup Verification Daily
BR-03 Off-site Storage Tape Management Weekly
BR-04 Disaster Recovery Strategy Testing Monthly
BR-05 Restore Procedure Testing Monthly
BR-06 Backup Strategy Review Monthly
BR-07 Server Rebuild Ad hoc
Remote Administration
RA-01 Server RDC Management Monthly
RA-02 PC RDC Management Monthly
RA-03 User Support Through Remote Assistance
Ad hoc
RA-04 Remote Desktop Connection Shortcut and Web Access
[image:22.323.32.299.58.411.2]Ad hoc
General Server Administration
By their very nature, servers are designed to support multitudes of users in the performance of their daily work. It doesn’t matter if the number of users in the organization is 4 or 4,000, a system administrator’s job will always be to make sure that the systems work, that they are secure and that they offer sufficient capabilities to continue providing a productive operation now and in the future.
Several of the activities required to accomplish this goal apply to all servers. Many are related to the simple continued operation of the machine itself or the way you interact with them.
GS-01: Run As Shortcuts
✔
Activity Frequency: DailyWorking with servers often requires you to have
administrative access rights to them. The access granted to Windows Server 2003 administrators is powerful indeed because it allows for complete control of a machine at the local level, a domain at the domain level, or a forest at the enterprise level. These rights must be used with care and consideration, especially because anything executing within an administrative context will automatically have all rights on a machine.
SECURITY SCAN Because of the risk they pose toyour enterprise, administrative
accounts should both be renamed from the default and should have strong complex passwords, usually of more than 15 characters. Ultimately, they should be linked to smart cards for additional security.
1
1
1
1
1
1
1
1
1
1
1
1
1
1
1
1
1
more sparingly, working normally with a user-level account, but performing administrative activities with just the right amount of access and no more—and protecting corporate assets all the while.
TIP
Any tool can be accessed through Run As. In Windows Server 2003, just right-click on the tool and selectRun As; give the appropriate credentials and click OKto launch the tool. If the Run As command does not appear in the context menu, hold down theSHIFTkey as you right-click.This activity is identified as a daily activity because if you design them properly, you will be using these shortcuts on a daily basis as you perform administrative activities on every server in your organization. Create as many shortcuts as you need. The advantage of Run As Shortcuts is that you choose the administrative account for it to execute under each time you launch the tool. This way you can grant each shortcut only the access it needs. And because they don’t automatically run in a new context (you can’t embed the account and password), they don’t present a security risk in and of themselves.
SECURITY SCAN Using shortcuts in graphical modeis the safest way to use the Run
As command.
The following tools are useful to have as Run As Shortcuts:
• The Global Microsoft Management Console you will be creating inProcedure GS-17
• Windows Explorer
• The Command prompt
• The Backup Console
• Specialized tools such as the Active Directory consoles or the Group Policy Management Console
toolbar for easier access. Then you can delete them from the desktop. To create a Run As shortcut:
1.Move to the desktop. The quickest way is to click theDesktopicon in theQuick Launch Area.
2.Right-click anywhere on the desktop and select New | Shortcut.
3.Either click theBrowsebutton to locate the command or console you want to run or type the command directly. The advantage of typing in the command is that it lets you use environment variables to locate the command or console. For example, you can use %SystemRoot% for Explorer, the Command Prompt, or the Backup Console. ClickNextwhen done.
4.ClickFinishto create the shortcut.
TIP
Alternatively, it may be easier to simply make copies of shortcuts that can be found in the All Programs menu.5.Once the shortcut is created, right-click on it to selectProperties.
6.On theGeneraltab, click theAdvancedbutton.
7.In the Advanced dialog box, selectRun with different credentials. ClickOKto close the dialog box.
8.ClickOKto close the Properties dialog box.
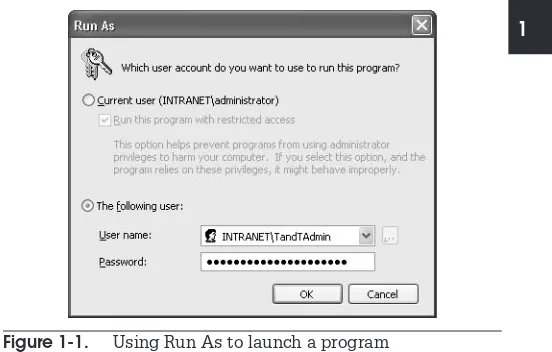
The shortcut is ready. Now you can move it to the Quick Launch Area. When you use the shortcut, it automatically displays the Run As dialog box. You can then choose to run it with your current credentials or selectThe following userand enter administrative credentials (see Figure 1-1).
Alternatively, you can create Run As shortcuts through the command line. Simply put it in a text file with the
tasks. This command file can in turn be made into a shortcut that you can locate in the Quick Launch Area.
Another advantage to this approach is the/savecred
switch. This switch serves two functions: the first is to store credentials for a command, and the second is to use stored credentials. Therefore, if you use the following command structure in a command file, you can automatically start all the tools you need with the appropriate credentials assigned to each:
runas /user:username@domainname /savecred commandname
whereusername@domainname is the user principal name for the administrative account you want to use and commandname is the path and name of the command you want to start. The commands used to start the tools mentioned earlier should be:
runas /user:username@domainname /savecred “mmc C:\Toolkit\globalmmc.msc”
runas /user:username@domainname /savecred %SystemRoot%\explore.exe
runas /user:username@domainname /savecred %SystemRoot%\system32\cmd.exe
runas /user:username@domainname /savecred %SystemRoot%\system32\ntbackup.exe
1
1
1
1
1
1
1
1
1
1
1
1
1
1
1
1
[image:26.323.35.311.62.238.2]You can use the same command structure for the other tools you deem necessary to your job and that require administrative credentials. Store the command file in the C:\Toolkit folder to make it available to all of the administrative credentials that you will be using. This folder is required because, by default, the My Documents folder is set to allow interaction from your own account and requires security modifications to allow other credentials to access its contents. More on this folder is discussed inProcedure GS-17.
SECURITY SCAN Make sure you useFS-13to assign appropriateProcedure
security parameters to the C:\Toolkit folder, especially if you create a command file that includesrunas
commands with stored credentials. Allowing anyone access to this folder is a high security risk. You should consider restricting access to the C:\Toolkit folder to only administrative level accounts and then create a Run As Shortcut to your Toolkit Command File. This way, no one will be able to inadvertently run this file through improper access to your workstation.
Two more command switches are useful in therunas
command. The/smartcardswitch supports the use of smart cards for authentication. This should be used by security-conscious organizations. Smart cards are so easy to use in Windows Server 2003 that it is highly recommended that you assign them to administrative accounts. The/netonlyswitch limits the access rights to the network only and does not allow the new security context to interact with the local machine. Use both settings appropriately when working with Run As Shortcuts.
GS-02: General Service Status
Verification
✔
Activity Frequency: Dailyfully functional state. This is why it is so important for you to properly document not only the specific role of each server in your network infrastructure, but also the actual services it has installed and the general state of each of these services.
TIP
A detailed Server Data Sheet can be found at the companion web site: www.Reso-Net.com/PocketAdmin. Use this sheet as the basis of your server documentation and identify installed services.To verify the status of services on the servers you work with:
1.Launch theComputer Managementconsole (Quick Launch Area | Computer Management).
2.Connect to the appropriate server (Action | Connect to another computer) and either type in the server name (\\servername) or use theBrowse button to locate it. ClickOKwhen done.
3.Move to theServiceswindow (Services and Applications | Services).
4.Sort the services according to status by clicking Statusin the top of the Services window.
5.Verify against your records that all services are in the appropriate running and startup state. If some services use credentials other than Local System account, useProcedure GS-05to make sure these credentials are entered properly. Record and investigate any service that is not in its intended state. Verify all servers.
Alternatively, you can use the Remote Server Information command located in the Resource Kit, run it against each server you need to manage, and pipe the results into a text file:
srvinfo \\computername >filename.txt
wherecomputername references the name of the server you want to investigate. If left blank, it lists information
1
1
1
1
1
1
1
1
1
1
1
1
1
1
1
1
about the local server. Usefilename.txt to identify the name and path of the file you want to send the information into. Once again, you can put a series of these commands in a command file and useProcedure GS-19to automatically generate the output files every day. This helps you quickly identify the state of all services in your network.
Finally, all services can be controlled through thescor thenetcommands. For the latter, typenetat the command prompt to view the list of supported commands. Typenet helpcommandnameat the command prompt to get detailed information on each command. The only drawback of this command is that it cannot be run remotely. You have to open either local or remote sessions on the server you need to manage to use these commands.
Thesccommand, on the other hand, can run on any server you have access to. Its command structure is as follows:
sc \\servername command servicename
where\\servername is the name of the server you want to access,command is the name of thesccommand you want, andservicename is the service you want to affect. Typesc /?for more information.
SCRIPT CENTER
The Microsoft TechNet Script Center includes a series of Windows Scripting Host (WSH) sample scripts that help you perform service administration tasks. These scripts can be found at http://www.microsoft.com/technet/treeview/ default.asp?url=/technet/scriptcenter/services/ default.asp?frame=trueGS-03: System Event Log Verification
✔
Activity Frequency: DailyInformation: An event has occurred and it is significant enough to be recorded. These events usually record normal operation of the server.
Warning: A noncritical error has occurred and warrants a record in the Event Log. Watch these event types carefully because they can quickly become errors.
Error: A critical error has occurred and should be investigated and repaired. All of these events must lead to investigation and repair. Windows Server 2003 will often list detailed information about avenues of investigation.
To verify the System Event Log on the servers you work with:
1.Launch theComputer Managementconsole (Quick Launch Area | Computer Management).
2.Connect to the appropriate server (Action | Connect to another computer) and either type in the server name (\\servername) or use theBrowse button to locate it. ClickOKwhen done.
3.Move to theSystem Event Log(System Tools | Event Viewer | System).
4.Identify any errors or warnings. Take appropriate action if either appears.
Make note of any corrective action you need to take. Use Procedure GS-06to log the different events you investigate each day.
You can also reset the size of each Event Log. To do so, right-click on the log name in the left pane of the MMC and selectProperties. SetMaximum Log Sizeand Maximum Log Size Eventsappropriately for your needs.
SCRIPT CENTER
The Microsoft TechNet Script Center includes a series of WSH sample scripts that help you perform Event Log administration tasks. These scripts can be found at http://www.microsoft.com/ technet/treeview/default.asp?url=/technet/scriptcenter/ logs/default.asp?frame=true.1
1
1
1
1
1
1
1
1
1
1
1
1
1
1
1
GS-04: Security Event Log Verification
✔
Activity Frequency: DailyIf your organization has decided to enable access auditing, it will be important for you to verify the Security Event Log on a daily basis to ensure that there are no untoward events occurring in your network.
Auditing is enabled through Group Policy. The Audit Policy is located in the security settings of Group Policy. Enabling the Audit Policy can have significant impact in your network. Audited objects and events slow down the system, so it is important to audit only those events or objects you deem critical in your network.
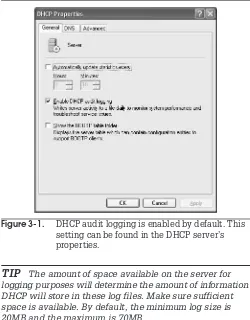
SECURITY SCAN By default, all audit events areturned on in Windows Server
2003; therefore, you only need to further refine and add to the objects you want to verify. In addition, the Security Event Log is defined at 132MB and overwrites as needed once the log is full.
To define or review the Audit Policy:
1.UseProcedure DC-16to edit the appropriate Group Policy Object (GPO). This is usually a GPO that applies to all objects in the domain.
2.In the Group Policy Editor, selectComputer Configuration | Windows Settings | Security Settings | Audit Policy.
3.Double-click on the event you want to audit and modify the policy. You can audit either the success or the failure of an event or both.
4.Document each setting you change.
To audit object access, such as a container in AD or a file on a server, you must then turn on auditing for that object and identify who you want to audit. To do so:
1.Locate the object you want to audit. Try to audit containers such as folders or organizational units rather than individual objects.
2.Right-click on it to selectProperties. Move to the Securitytab.
3.Click theAdvancedbutton. In AD, you must enable Advanced Featuresfrom theViewmenu of the AD consoles to do this.
4.Identify which groups you want to audit. It is usually easier to select all-encompassing groups such as Authenticated Usersthan to use more specific groups. It all depends on who and what you are auditing.
5.From now on, access events will be monitored in the Security Event Log.
Document all the changes you make. To view audit results:
1.Launch theComputer Managementconsole (Quick Launch Area | Computer Management).
2.Connect to the appropriate server (Action | Connect to another computer) and either type in the server name (\\servername) or use theBrowse button to locate it. ClickOKwhen done.
3.Move to theSecurity Event Log(System Tools | Event Viewer | Security).
4.Identify any success or failures. Take appropriate action if you identify inappropriate actions.
Make note of any corrective action you need to take. Use Procedure GS-06to log the different events you investigate each day.
You can also reset the size of the Security Event Log. Follow the last part ofProcedure GS-03to do so.
1
1
1
1
1
1
1
1
1
1
1
1
1
1
1
1
TIP
If you set the log file to lock (Do not overwrite events) once it reaches maximum log size and you fear it hasn’t been backed up, you will automatically shut down the server until the log file is cleared.GS-05: Service and Admin Account
Management
✔
Activity Frequency: DailyAdministrative accounts are high-priced commodities in every network. Gone are the days when they had to be handed out generally to almost anyone who complained loud enough. In today’s Windows Server 2003 network, you can and should define just the right amount of access rights for each and everyone who interacts with your system. Therefore, you should have very few administrative accounts at the domain or forest level and have many more specialty administrative accounts that focus on granting just the right amount of access to do a specific job. These accounts and the accesses they grant should be managed or at least reviewed on a daily basis.
Several procedures support the assignation of appropriate rights and permissions to administrative accounts. Some are assigned through the integration of built-in security groups such as Server or Backup Operators, while others are assigned through the association with User Rights Assignment policies to the accounts, or rather the groups that contain these accounts. Three tools support the assignation of appropriate rights:
• Active Directory Users and Computers to create the accounts and assign them to either built-in or custom administrative groups
• Group Policy Management Console to locate and edit the appropriate GPO
1
1
1
1
1
1
1
1
1
1
1
1
1
1
1
1
1
To modify user rights, useProcedure DC-16to edit the appropriate GPO, usually one that will affect all of the objects you want to modify. Locate theUser Rights Assignmentsetting (Computer Policy | Security
Settings | Local Policies | User Rights Assignment) and assign appropriate settings to administrative accounts. Remember, it is always easier to assign rights to a group than to individual objects, thus it is a good idea to regroup administrative accounts into administrative groups. Use Procedure DC-16again to ensure proper use of these accounts.
In addition, in today’s enterprise network, you must also manage service accounts—accounts that are granted enough administrative privilege to support the operation of specific services in your network. For example, you might use service accounts to run antivirus engines or scheduled tasks (seeProcedure GS-19). The advantage of using a service account to operate a given service or automated task is that you can also use the Security Event Log to review the proper operation of the service. A success event is written in this log each time the service uses its privileged access or logs on.
Service accounts in particular must have specific settings and properties:
• Account must have a complex name
• Account must have a complex password at least 15 characters long
• Password never expires
• User cannot change password
• Act as part of the operating system right
• Log on as a service
SECURITY SCAN The last two settings should beapplied with alacrity, especially
Act as part of the operating system, because they grant extremely high access levels to the service.
Service accounts present the additional operational overhead of requiring regular password changes. This cannot be limited to simply changing the password in Active Directory Users and Computers because when service accounts are assigned to services, you must give them the account’s password for the service to work properly. This means you also need to modify the password in the service Properties dialog box. Use Procedure GS-02to do so.
SCRIPT CENTER
The Microsoft TechNet Script Center includes a WSH sample script that lets you change service account passwords. This script can be found at http://www.microsoft.com/technet/treeview/ default.asp?url=/technet/scriptcenter/services/ scrsvc01.asp?frame=true. It also lets you change administrative user account passwords. A series of scripts affecting user accounts can be found at http:// www.microsoft.com/technet/treeview/default.asp?url=/ technet/scriptcenter/user/default.asp?frame=true.GS-06: Activity Log Maintenance
✔
Activity Frequency: DailyPart of your job is also to record both what you do and what you need to do to maintain or repair the network on an ongoing basis. This is the reason why you should keep a Daily Activity Log. Ideally, this log will be electronic and transportable so that you can make annotations whenever you need to. It can be stored in either a Tablet PC or a Pocket PC that you carry with you at all times. The Tablet PC is more useful because it supports a fully working version of Windows and allows you to run both Windows Server 2003 help files (seeProcedure GS-21) or run virtual machines to simulate problematic situations. In addition, Microsoft OneNote is ideally suited to logging daily activities.
note activities as you perform them than to wait for a specific time of day.
TIP
A sample Daily Activity Log can be found on the companion web site at www.Reso-net.com/PocketAdmin.GS-07: Uptime Report Management
✔
Activity Frequency: WeeklyOnce a week, you’ll need to produce an uptime report for all servers. This helps you track the status of various servers and identify which configurations are best in your environment. There are several tools you can use to produce these reports.
The last line in the report generated by thesrvinfo
command used inProcedure GS-02identifies how long a server has been in operation. A second command,
systeminfo, gives you information on the server you are examining as well as how long it has been running. A third tool,uptime, is designed specifically to report on server uptime. This tool is available as a download only. Search foruptimeat www.microsoft.com/download.
Using the last tool and a little ingenuity, you can produce your uptime reports automatically:
1.Download and installuptime.exeinto the C:\Toolkit folder.
2.Create a command file that contains the following code line, one for each server in your network:
uptime \\servername
3.Save the command file when done.
4.UseProcedure GS-19to assign the command file to a weekly schedule task.
5.In the scheduled task, use the following command to assign output to a text file:
commandfile.cmd >filename.txt
1
1
1
1
1
1
1
1
1
1
1
1
1
1
1
1
Theuptimecommand will thus create the report for you every week. All you have to do is locate the output file and review the results.
SCRIPT CENTER
The Microsoft TechNet Script Center includes two scripts related to system uptime management. The first is Determining System Uptime and the second is Monitoring System Uptime. Both can be found at http://www.microsoft.com/technet/ treeview/ default.asp?url=/technet/scriptcenter/monitor/ default.asp?frame=true.GS-08: Script Management
✔
Activity Frequency: WeeklyScripts running in the Windows Script Host are an essential part of Windows network administration. As you know and begin to realize, scripting in Windows is a world of its own. The scripting language has evolved to the point where a script is a sophisticated program that can be run in either graphic (intended for users) or character mode (administrative scripts). Running a script in either mode is controlled by the command you use to activate it:
wscript scriptname cscript scriptname
wherewscriptruns it in graphical mode andcscript
runs it in character mode.
1
1
1
1
1
1
1
1
1
1
1
1
1
1
1
1
1
SCRIPT CENTER
Signing a script with acertificate is a programmatic activity. Sample
signature addition and management scripts are available at the Microsoft TechNet Script Center at http://
www.microsoft.com/ technet/treeview/default.asp?url=/ technet/scriptcenter/monitor/default.asp?frame=true.
SECURITY SCAN You can also encode scripts toprotect them. You can find the
Microsoft Script Encoder at http://msdn.microsoft.com/ scripting/vbscript/download/x86/sce10en.exe.
Every script you create and sign should be fully documented. This documentation should include all pertinent information on the script and should be reviewed and kept up-to-date on a weekly basis.
TIP
A sample Script Management Log can be found on the companion web site.SCRIPT CENTER
You can use a script todocument the contents of another script. Sample code is available at the Microsoft TechNet Script Center at http:// www.microsoft.com/technet/treeview/ default.asp?url=/technet/scriptcenter/other/ ScrOth03.asp?frame=true.
Writing scripts can be challenging when you aren’t familiar with either the Windows Management Instrumentation (WMI) or the Active Directory Services Interface (ADSI). This is why it is a great idea to use the Microsoft Scriptomatic utility to generate scripts for you. Scriptomatic is available from the Microsoft Download Center. Just search for Scriptomatic at www.microsoft.com/ downloads. In addition, a good scripting primer is available at http://msdn.microsoft.com/library/en-us/dnclinic/ html/scripting06112002.asp.
To write a script with Scriptomatic:
1.Launchscriptomatic.htaor yourRun As shortcut.
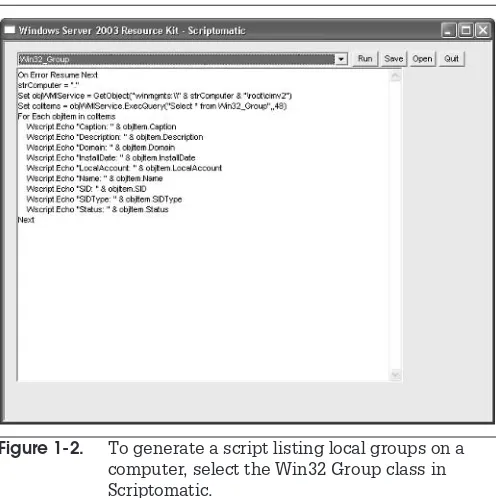
2.In Scriptomatic, select the WMI class you want to work with. Each class is named Win32_. You only need to pay attention to the last part of the class name. For example, to write a script that lets you view the status of every service, select the Win32_Service class. Scriptomatic automatically generates the proper script (see Figure 1-2).
3.ClickRun. Scriptomatic will launch a command console to run the script.
4.ClickSaveto save the script to a file (VBS extention).
You can use these scripts to perform administrative tasks and capture the output. To do so, use the following command:
[image:39.323.38.286.287.536.2]cscript scriptname.vbs >filename.txt
wherescriptname.vbs is the name of the script you want to run andfilename.txt is the name of the output file you want to create. You can useProcedure GS-19to place this command in a scheduled task and run it on a regular basis.
You can use Scriptomatic to help you generate your logon script. You may need to combine portions of a WMI script with portions of an ADSI script to generate a complete logon script. UseProcedure DC-31to do so.
In addition to a logon script, you may also want to display a pre-logon message to your users. This helps make sure users are forewarned of the legal consequences of the misuse of IT equipment and information. Once again, this is done through a GPO. UseProcedure DC-16to edit the appropriate GPO and modify the following settings to display a logon message:
• User Configuration | Windows Settings | Security Settings | Local Policies | Security Options | Interactive Logon: Message title for users attempting to log on
• User Configuration | Windows Settings | Security Settings | Local Policies | Security Options | Interactive Logon: Message text for users attempting to log on
GS-09: Script Certification
Management
✔
Activity Frequency: WeeklyThe best way to make sure only signed scripts can run in your network is to use Software Restriction Policies (SRP). SRP provide script and program verification in one of four ways:
• Hash rules
• Certificate rules
• Path rules
• Internet zone rules
1
1
1
1
1
1
1
1
1
1
1
1
1
1
1
1
The two safest and simplest to use are hash and/or certificate rules. Both can be applied to scripts and programs such as corporate installation packages (usually in the Windows Installer or.msiformat). Here’s how to apply or verify certificate-based SRP rules:
1.UseProcedure DC-16to edit the appropriate GPO. It should apply to all targeted systems.
2.Right-click onSoftware Restriction Policies (Computer Configuration | Windows Settings | Security Settings | Software Restriction Policies) and selectNew Software Restriction Policiesfrom the context menu. This generates the SRP
environment.
3.Make sure thatSoftware Restriction Policiesare expanded in the left pane, then right-click on Additional Rulesand selectNew Certificate Rule.
4.In the New Certificate Rule dialog box, clickBrowse to locate the certificate you use to sign both installation packages and scripts, selectUnrestrictedas the security level, and type a description. ClickOK
when done.
5.Move toSoftware Restriction Policiesand select Designated File Typesfrom the right pane. You will note that both.wshand.msiare already listed as restricted extensions. ClickOKto close the dialog box.
6.SelectTrusted Publishersin the same location. Make sureEnd usersare able to accept certificates and that bothPublisherandTimestampare checked. ClickOKwhen done.
7.SelectEnforcementto review that.dllfiles are not verified and that this setting applies toAll users.
SECURITY SCAN You may decide to remove localadministrators from being
affected by this rule, but do so very carefully.
GS-10: Antivirus Definition Update
✔
Activity Frequency: WeeklySECURITY SCAN Virus protection is a key elementof an integrated defense system.
Thus, it is essential to make sure it is working properly on an ongoing basis.
This is the first placeholder task. It is here because you need to perform this task on servers no matter what, but it isn’t a core Windows Server 2003 task.
Three tasks are required on a weekly basis for virus protection management:
• Check virus management logs to make sure no viruses have been found in the last day.
• Check your Virus Management console to determine that your virus signatures are up-to-date. Reconfigure the update schedule if it is not appropriate or if threats increase.
• Perform random virus scans on file shares, applications, and system drives to make sure they are not infected.
Use the Virus Management console to set the appropriate settings. In some virus engines, most of these tasks can be automated and consoles can alert you if new viruses are found.
TIP
Make sure the antivirus engine you use is compatible with Windows Server 2003. In fact, it would ideally be certified for this platform.GS-11: Server Reboot
✔
Activity Frequency: WeeklySince the delivery of Windows NT by Microsoft, especially NT version 4 in 1996, most systems administrators have found it wise to regularly reboot servers running this operating system to clear out random access memory and to generally refresh the system. Since then, Microsoft has
1
1
1
1
1
1
1
1
1
1
1
1
1
1
1
1
invested significant effort to limit and even completely avoid this procedure.
TIP
It is strongly recommended that you begin by examining how Windows Server 2003 operates within your network before you continue to use this practice. You will find that WS03 servers no longer require regular reboots. In fact, you will be surprised at the level of service you can achieve with this operating system. This will be in evidence in the uptime reports you produce in Procedure GS-07.If you do feel you need to perform this activity on a regular basis, you can use theshutdowncommand from the command line to remotely shut down and reboot servers. The following command shuts down and reboots a remote server:
shutdown –r –f –m \\servername
where-rrequests a reboot,-fforces running applications to close and-mspecifies the machine you want to shut down. As with all character mode commands, you can create a command file that includes a command for each server you want to shut down. If you put the shutdown commands in a command file, you should also use the-c
switch to add a message to the command:
shutdown –r –f –m \\servername –c “Weekly Reboot Time”
UseProcedure GS-19to assign the command file to a schedule task.
TIP
Theshutdowncommand automatically bypasses the Shutdown Event Tracker—a dialog box you must normally complete when shutting down a server running Windows Server 2003. Therefore, be sure to keep a shutdown log to document your automated shutdowns.1
1
1
1
1
1
1
1
1
1
1
1
1
1
1
1
1 • Computer Configuration | Administrative
Templates | System | Display Shutdown Event Tracker
• Computer Configuration | Administrative Templates | System | Activate Shutdown Event Tracker System State Data feature
UseProcedure DC-16to modify the appropriate GPO. This GPO should affect all servers.
SCRIPT CENTER
The Microsoft Technet Script Center includes a sample script for restarting a computer at http://www.microsoft.com/technet/treeview/ default.asp?url=/technet/scriptcenter/compmgmt/ ScrCM38.asp?frame=true.GS-12: Security Policy Review/Update
✔
Activity Frequency: MonthlyThe security policy is the one tool that is at the core of your security program. It determines everything, including how you respond to security breaches and how you protect yourself from them. It serves to identify which common security standards you wish to implement within your organization. These involve both technical and nontechnical policies and procedures. An example of a technical policy would be the security parameters you will set at the staging of each computer in your organization. A nontechnical policy would deal with the habits users should develop to select complex passwords and protect them. Finally, you will need to identify the parameters for each policy you define.
TIP
A sample list of the items found in a security policy can be found on the companion web site atwww.Reso-Net.com/PocketAdmin.
Your monthly verification of the security policy should include a review of all of its items and answer questions such as:
• How effective are your security strategies? Should they be reinforced?
• Is your administrative staff following all security principles?
• Are there potential breaches that have not been identified?
• Is new technology secure? What is its impact on your global security strategy?
Document and communicate all changes you make during this review.
GS-13: Security Patch Verification
✔
Activity Frequency: MonthlySecurity patches are a fact of life in any enterprise computing environment. But if your operating systems are designed properly and your servers run only the services required to support their role, you can most likely limit your available security patch verification to a monthly review.
Windows and Microsoft offer several tools and techniques to perform this activity. Microsoft offers email notification for security bulletins. You can register for this and other Microsoft newsletters at register.microsoft.com/regsys/ pic.asp. You will require a Microsoft Passport to do so. If you don’t have one, follow the instructions on the site to get one. If you don’t want to use a Passport, use the link http://register.microsoft.com/subscription/
subscribeme.asp?ID=135 to sign up. There is also a hot fix and security bulletin that provides useful information. It can be found at hot fix and security bulletin search: http://www.microsoft.com/technet/security/current.asp.
1
1
1
1
1
1
1
1
1
1
1
1
1
1
1
1
1
In addition, Windows Server 2003 includes automated updates. This means it can predownload hot fixes and updates and tell you when they are ready for installation. This feature can be modified to tell all machines in your network to obtain patch information from a central intranet server. Once again, these are GPO settings. They are located inComputer Configuration | Administrative Templates | Windows Components | Windows Update and include:
• Configure Automatic Updates:In a corporate environment, you should use setting 4 to download and install updates according to a fixed monthly schedule.
• Specify intranet Microsoft update service location: Name the server from which updates will be downloaded; use the server’s full DNS name.
• No auto-restart for scheduled Automatic Updates installations:Use this setting to stop servers from restarting after update installation. Servers can be restarted on a more regular basis withProcedure GS-11.
UseProcedure DC-16to edit the appropriate GPO. This GPO should apply to servers only. Another GPO should be set similarly for workstations, but preferably using a different intranet source server. These settings should be used in conjunction withMicrosoft Software Update Services(SUS). Use the SUS server to validate the security fixes and updates you require in your corporate
environment. Document all your changes.
TIP
To download and install SUS, search for Microsoft Software Update Services at www.microsoft.com/download.You can also use the Microsoft Baseline Security Analyzer (MBSA) to analyze the hot fix and service pack status of your systems. MBSA is available at the Microsoft Download web site. Search for MBSA at www.microsoft.com/ downloads.
Since the MBSA setup file is a Windows Installer file, you can install it interactively or you can useProcedure DC-15 to install it to several target systems. MBSA can be used to scan a single system or to scan a complete network. It will even scan network segments based on IP address ranges.
To scan a system:
1.LaunchMBSA(Start Menu | All Programs | Microsoft Baseline Security Analyzer).
2.SelectScan a computer.
3.Use either the computer name or its IP address and select the options you want to use in the scan. Click Start scan.
4.View the report in the MBSA details pane when the scan is complete. The report is automatically saved with the domain name, computer name and date in the \%UserProfile\Security Scans folder directly under Documents and Settings.
SECURITY SCAN Store these reports very carefullybecause they detail sensitive