Portland State University
PDXScholar
Computer Science Faculty Publications and
Presentations
Computer Science
2009
Squeak by Example
Andrew P. Black
Portland State University, [email protected]
Stéphane Ducasse
Oscar Nierstrasz
Damien Pollet
Damien Cassou
See next page for additional authors
Let us know how access to this document benefits you.
Follow this and additional works at:
https://pdxscholar.library.pdx.edu/compsci_fac
Part of the
Programming Languages and Compilers Commons
This Book is brought to you for free and open access. It has been accepted for inclusion in Computer Science Faculty Publications and Presentations by an authorized administrator of PDXScholar. For more information, please [email protected].
Citation Details
Andrew P. Black, Stéphane Ducasse, Oscar Nierstrasz, Damien Pollet, Damien Cassou, and Marcus Denker
Squeak by Example
Andrew P. Black
Stéphane Ducasse
Oscar Nierstrasz
Damien Pollet
with Damien Cassou and Marcus Denker
This book is available as a free download fromSqueakByExample.org, hosted by the Institute of Computer Science and Applied Mathematics of the University of Bern, Switzerland.
Copyright © 2007, 2008, 2009 by Andrew P. Black, Stéphane Ducasse, Oscar Nierstrasz and Damien Pollet.
The contents of this book are protected under Creative Commons Attribution-ShareAlike 3.0 Unported license.
You are free:
to Share — to copy, distribute and transmit the work
to Remix — to adapt the work
Under the following conditions:
Attribution. You must attribute the work in the manner specified by the author or licensor (but not in any way that suggests that they endorse you or your use of the work).
Share Alike. If you alter, transform, or build upon this work, you may distribute the resulting work only under the same, similar or a compatible license.
• For any reuse or distribution, you must make clear to others the license terms of this work. The best way to do this is with a link to this web page: creativecommons.org/ licenses/by-sa/3.0/
• Any of the above conditions can be waived if you get permission from the copyright holder.
• Nothing in this license impairs or restricts the author’s moral rights.
Your fair dealing and other rights are in no way affected by the above. This is a human-readable summary of the Legal Code (the full license): creativecommons.org/licenses/by-sa/3.0/legalcode
Published by Square Bracket Associates, Switzerland.SquareBracketAssociates.org ISBN 978-3-9523341-0-2
Contents
Preface ix
I
Getting Started
1 A quick tour of Squeak 3
1.1 Getting started . . . 3
1.2 The World menu . . . 7
1.3 Saving, quitting and restarting a Squeak session . . . 9
1.4 Workspaces and Transcripts . . . 11
1.5 Keyboard shortcuts . . . 12
1.6 SqueakMap . . . 15
1.7 The System Browser . . . 17
1.8 Finding classes . . . 18
1.9 Finding methods . . . 20
1.10 Defining a new method . . . 21
1.11 Chapter summary. . . 26
2 A first application 29 2.1 The Quinto game . . . 29
2.2 Creating a new class Category . . . 30
2.3 Defining the class SBECell . . . 31
2.4 Adding methods to a class. . . 32
2.5 Inspecting an object . . . 34
2.7 Organizing methods into protocols . . . 39
2.8 Let’s try our code . . . 42
2.9 Saving and sharing Smalltalk code. . . 45
2.10 Chapter summary. . . 49
3 Syntax in a nutshell 51 3.1 Syntactic elements . . . 51
3.2 Pseudo-variables . . . 54
3.3 Message sends . . . 55
3.4 Method syntax . . . 56
3.5 Block syntax . . . 57
3.6 Conditionals and loops in a nutshell . . . 58
3.7 Primitives and pragmas . . . 60
3.8 Chapter summary. . . 61
4 Understanding message syntax 63 4.1 Identifying messages . . . 63
4.2 Three kinds of messages . . . 65
4.3 Message composition . . . 68
4.4 Hints for identifying keyword messages . . . 74
4.5 Expression sequences . . . 76
4.6 Cascaded messages . . . 76
4.7 Chapter summary. . . 76
II
Developing in Squeak
5 The Smalltalk object model 81 5.1 The rules of the model . . . 815.2 Everything is an Object . . . 81
5.3 Every object is an instance of a class . . . 82
5.4 Every class has a superclass . . . 89
5.5 Everything happens by message sending . . . 93
5.6 Method lookup follows the inheritance chain . . . 94
v
5.8 Chapter summary. . . 106
6 The Squeak programming environment 109 6.1 Overview . . . 110
6.2 The System Browser . . . 111
6.3 Monticello . . . 124
6.4 The Inspector and the Explorer . . . 132
6.5 The Debugger . . . 135
6.6 The Process Browser . . . 144
6.7 Finding methods . . . 145
6.8 Change sets and the Change Sorter . . . 146
6.9 The File List Browser . . . 148
6.10 In Smalltalk, you can’t lose code . . . 151
6.11 Chapter summary. . . 152
7 SUnit 155 7.1 Introduction . . . 155
7.2 Why testing is important . . . 156
7.3 What makes a good test? . . . 157
7.4 SUnit by example . . . 158
7.5 The SUnit cook book . . . 162
7.6 The SUnit framework . . . 164
7.7 Advanced features of SUnit . . . 166
7.8 The implementation of SUnit. . . 168
7.9 Some advice on testing . . . 171
7.10 Chapter summary. . . 172
8 Basic Classes 175 8.1 Object . . . 175
8.2 Numbers . . . 184
8.3 Characters . . . 188
8.4 Strings . . . 189
8.5 Booleans . . . 190
9 Collections 193
9.1 Introduction . . . 193
9.2 The varieties of collections. . . 195
9.3 Implementations of collections . . . 198
9.4 Examples of key classes. . . 199
9.5 Collection iterators . . . 209
9.6 Some hints for using collections . . . 213
9.7 Chapter summary. . . 214
10 Streams 217 10.1 Two sequences of elements . . . 217
10.2 Streams vs. collections . . . 218
10.3 Streaming over collections. . . 219
10.4 Using streams for file access . . . 227
10.5 Chapter summary. . . 230
11 Morphic 231 11.1 The history of Morphic . . . 231
11.2 Manipulating morphs . . . 233
11.3 Composing morphs . . . 233
11.4 Creating and drawing your own morphs . . . 235
11.5 Interaction and animation . . . 239
11.6 Interactors . . . 242
11.7 Drag-and-drop . . . 243
11.8 A complete example . . . 245
11.9 More about the canvas . . . 249
11.10 Chapter summary. . . 250
III
Advanced Squeak
12 Classes and metaclasses 255 12.1 Rules for classes and metaclasses . . . 25512.2 Revisiting the Smalltalk object model . . . 256
vii
12.4 The metaclass hierarchy parallels the class hierarchy . . . 259
12.5 Every metaclass Inherits fromClassandBehavior. . . 261
12.6 Every metaclass is an instance ofMetaclass . . . 264
12.7 The metaclass ofMetaclassis an Instance ofMetaclass . . . 265
12.8 Chapter summary. . . 266
IV
Appendices
A Frequently Asked Questions 271 A.1 Getting started . . . 271A.2 Collections . . . 271
A.3 Browsing the system . . . 272
A.4 Using Monticello and SqueakSource . . . 274
A.5 Tools . . . 275
A.6 Regular expressions and parsing . . . 275
Bibliography 277
Preface
What is Squeak?
Squeak is a modern, open source, fully-featured implementation of the Smalltalk programming language and environment.
Squeak is highly portable — even its virtual machine is written en-tirely in Smalltalk, making it easy to debug, analyze, and change. Squeak is the vehicle for a wide range of innovative projects from multimedia applications and educational platforms to commercial web development environments.
Who should read this book?
This book presents the various aspects of Squeak, starting with the basics, and proceeding to more advanced topics.
This book will not teach you how to program. The reader should have some familiarity with programming languages. Some background with object-oriented programming would be helpful.
This book will introduce the Squeak programming environment, the language and the associated tools. You will be exposed to common idioms and practices, but the focus is on the technology, not on object-oriented design. Wherever possible, we will show you lots of examples. (We have been inspired by Alec Sharp’s excellent book on Smalltalk1.)
There are numerous other books on Smalltalk freely available on the web but none of these focuses specifically on Squeak. See for example:
stephane.ducasse.free.fr/FreeBooks.html
1Alec Sharp,Smalltalk by Example. McGraw-Hill, 1997hURL:http://stephane.ducasse.free.fr/
A word of advice
Do not be frustrated by parts of Smalltalk that you do not immediately understand. You do not have to know everything! Alan Knight expresses this principle as follows2:
Try not to care.Beginning Smalltalk programmers often have trouble because they think they need to understand all the details of how a thing works before they can use it. This means it takes quite a while before they can masterTranscript show: 'Hello World'. One of the great leaps in OO is to be able to answer the question “How does this work?” with “I don’t care”.
An open book
This book is an open book in the following senses:
• The content of this book is released under the Creative Commons Attribution-ShareAlike (by-sa) license. In short, you are allowed to freely share and adapt this book, as long as you respect the conditions of the license available at the following URL: creativecommons.org/ licenses/by-sa/3.0/.
• This book just describes the core of Squeak. Ideally we would like to encourage others to contribute chapters on the parts of Squeak that we have not described. If you would like to participate in this effort, please contact us. We would like to see this book grow!
For more details, visit the book’s web site,SqueakByExample.org, hosted by the Institute of Computer Science and Applied Mathematics of the University of Bern, Switzerland.
The Squeak community
The Squeak community is friendly and active. Here is a short list of re-sources that you may find useful:
xi
• www.squeak.orgis the main web site of Squeak. (Do not confuse it with
www.squeakland.orgwhich is dedicated to the eToy environment built on top of Squeak but whose audience is elementary school teachers.)
• www.squeaksource.com is the equivalent of SourceForge for Squeak projects.
• wiki.squeak.org/squeak is a wiki with up-to-date information about Squeak.
About mailing-lists. There are a lot of mailing-lists and sometimes they can be just a little bit too active. If you do not want to get flooded by mail but would still like to participate we suggest you to usenews.gmane.orgor
www.nabble.com/Squeak-f14152.htmlto browse the lists.
You can find the complete list of Squeak mailing-lists at lists. squeakfoundation.org/mailman/listinfo.
• Note thatSqueak-devrefers to the developers’ mailing-list, which can be browsed here:
news.gmane.org/gmane.comp.lang.smalltalk.squeak.general
• Newbiesrefers to a friendly mailing-list for beginners where any
ques-tion can be asked:
news.gmane.org/gmane.comp.lang.smalltalk.squeak.beginners
(There is so much to learn that we are all beginners in some aspect of Squeak!)
IRC. Have a question that you need answered quickly? Would you like to meet with other squeakers around the world? A great place to participate in longer-term discussions is the IRC channel on the “#squeak” channel at
irc.freenode.net. Stop by and say “Hi!”
Other sites. There are several websites supporting the Squeak community today in various ways. Here are some of them:
• people.squeakfoundation.orgis the site of SqueakPeople, which is a kind of “advogato.org” for squeakers. It offers articles, diaries and an inter-esting trust metric system.
• www.frappr.com/squeak is a site that tracks Squeak users around the world.
Examples and exercises
We make use of two special conventions in this book.
We have tried to provide as many examples as possible. In particular, there are many examples that show a fragment of code which can be evaluated. We use the symbol −→ to indicate the result that you obtain when you select an expression and print it:
3 + 4 −→ 7 "if you select 3+4 and 'print it', you will see 7"
In case you want to play in Squeak with these code snippets, you can download a plain text file with all the example code from the book’s web site:SqueakByExample.org.
The second convention that we use is to display the icon to indicate when there is something for you to do:
Go ahead and read the next chapter!
Acknowledgments
We would like to thank Hilaire Fernandes and Serge Stinckwich who al-lowed us to translate parts of their columns on Smalltalk, and Damien Cas-sou for contributing the chapter on streams. We also thank Tim Rowledge for the use of the Squeak logo, and Frederica Nierstrasz for the original cover art.
We especially thank Lukas Renggli and Orla Greevy for their comments on drafts of the first release.
We thank the University of Bern, Switzerland, for graciously supporting this open-source project and for hosting the web site of this book.
Part I
Chapter 1
A quick tour of Squeak
In this chapter we will give you a high-level tour of Squeak to help you get comfortable with the environment. There will be plenty of opportunities to try things out, so it would be a good idea if you have a computer handy when you read this chapter.
We will use this icon: to mark places in the text where you should try something out in Squeak. In particular, you will fire up Squeak, learn about the different ways of interacting with the system, and discover some of the basic tools. You will also learn how to define a new method, create an object and send it messages.
1.1
Getting started
Squeak is available as a free download from www.squeak.org. There are three parts that you will need to download, consisting of four files (see Figure 1.1).
Virtual Machine Shared Sources User specific system files
Figure 1.1: The Squeak download files.
machines are available for all the major computing environments. In Figure 1.1 we see the VM for the Mac is calledSqueak 3.8.15beta1U.app.
2. The sources file contains the source code for all of the parts of Squeak that don’t change very frequently. In Figure 1.1 it is called
SqueakV39.sources. Note that the file SqueakV39.sources is only for
versions 3.9 and later of Squeak. For earlier versions, use a sources file corresponding to the main versione.g.,SqueakV3.sourcesfor versions of Squeak from 3.0 up to 3.8.
3. The currentsystem image is a snapshot of a running Squeak system, frozen in time. It consists of two files: an.imagefile, which contains the state of all of the objects in the system (including classes and methods, since they are objects too), and a.changesfile, which contains a log of all of the changes to the source code of the system. In Figure 1.1, we see that we have grabbed theSqueak3.9-final-7067image and changes files. Actually, we will use a slightly different image in this book.
Download and install Squeak on your computer. We recommend that you
use the image provided on the Squeak by Example web page.1
Most of the introductory material in this book will work with any version, so if you already have one installed, you may as well continue to use it. However, if you notice differences between the appearance or behaviour of your system and what is described here, do not be surprised. On the other hand, if you are about to download Squeak for the first time, you may as well grab theSqueak by Exampleimage.
As you work in Squeak, the image and changes files are modified, so you need to make sure that they are writable. Always keep these two files together. Never edit them directly with a text editor, as Squeak uses them to store the objects you work with and to log the changes you make to the source code. It is a good idea to keep a backup copy of the downloaded image and changes files so you can always start from a fresh image and reload your code.
The sourcesfile and the VM can be read-only — they can be shared
between different users. All of these files can be placed in the same directory, but it is also possible to put the Virtual Machine and sources file in separate directory where everyone has access to them. Do whatever works best for your style of working and your operating system.
Launching. To start Squeak, do whatever your operating system expects: drag the.imagefile onto the icon of the virtual machine, or double-click the
Getting started 5
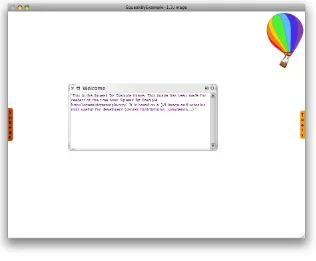
Figure 1.2: A freshSqueakByExample.orgimage.
.imagefile, or at the command line type the name of the virtual machine
followed by the path to the.imagefile. (When you have multiple VMs installed on your machine the operating system may not automatically pick the right one; in this case it is safer to drag and drop the image onto the virtual machine, or to use the command line.)
Once Squeak is running, you should see a single large window, possibly containing some open workspace windows (see Figure 1.2), and it’s not obvious how to proceed! You will notice that there is no menu bar, or at least not a useful one. Instead, Squeak makes heavy use of context-dependent pop-up menus.
Start Squeak. You can dismiss any open workspaces by clicking on theXin
the top left corner of the workspace window. You can collapse the windows (so that
they can be expanded again later) by clicking on the
◦
in the top-right corner.Click with the mouse on the background of the main window to show the
world menu, then choose open . . ..workspace to create a new workspace.
(a) The world menu
(b) The contextual menu
(c) The morphic halo
Figure 1.3: The world menu (brought up by the red mouse button), a contextual menu (yellow mouse button), and a morphic halo (blue mouse button).
Figure 1.4: The author’s mouse. Clicking the scroll wheel activates the blue button. Squeak was originally designed for a computer
with a three button mouse. If your mouse has fewer than three buttons, you will have to press extra keys while clicking the mouse to simulate the extra but-tons. A two-button mouse works quite well with Squeak, but if you have only a single-button mouse, you should seriously consider buying a two-button mouse with a clickable scroll wheel: it will make work-ing with Squeak much more pleasant.
Squeak avoids terms like “left mouse click” be-cause different computers, mice, keyboards and per-sonal configurations mean that different users will need to press different physical buttons to achieve the same effect. Instead, the mouse buttons are labeled with colors. The mouse button that you pressed to get the “World” menu is called thered button; it is most of-ten used for selecting items in lists, selecting text, and selecting menu items. When you start using Squeak, it can be surprisingly helpful to actually label your mouse, as shown in Figure 1.4.2
The World menu 7
Theyellow buttonis the next most used button; it is used to bring up
a contextual menu, that is, a menu that offers different sets of actions depending on where the mouse is pointing; see Figure 1.3 (b).
Type Time now in the workspace. Now click the yellow button in the
workspace. Select print it.
Finally, there is theblue button, which is used to activate the “morphic halo”, an array of handles that are used to perform operations on the on-screen objects themselves, such as rotating them or resizing them; see Figure 1.3 (c). If you let the mouse linger over a handle, a help balloon will explain its function.
Click the blue button on the workspace. Grab the handle near the bottom
left corner and drag it to rotate the workspace.
We recommend that right-handed people configure their mouse to put the red button on the left side of their mouse, the yellow button on the right, and use a clickable scroll wheel, if one is available, for the blue button. If you don’t have a clickable scroll wheel, then you can get the Morphic halo by holding down thealtoroptionkey while clicking the red button. If you are using a Macintosh without a second mouse button, you can simulate one by holding down the⌘ key while clicking the mouse. However, if you are going to be using Squeak at all often, we recommend investing in a mouse with at least two buttons.
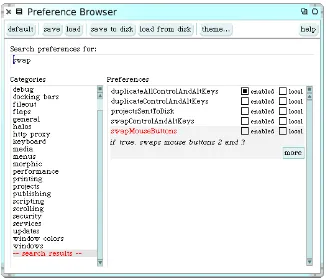
You can configure your mouse to work the way you want by using the preferences of your operating system and mouse driver. Squeak has some preferences for customising the mouse and the meta keys on your keyboard. You can find the preference browser in the open item of the
World menu. In the preference browser, the general category contains an option swapMouseButtons that switches the yellow and blue functions (see Figure 1.5). The keyboard category has options to duplicate the various command keys.
Open the preference browser and find theswapMouseButtons option using
the search box.
1.2
The World menu
Click again on the Squeak background.
Figure 1.5: The Preference Browser.
push pin icon in the top-right corner. Do this. Also, notice that menus appear when you click the mouse, but do not disappear when you release it; they stay visible until you make a selection, or until you click outside of the menu. You can even move the menu around by grabbing its title bar.
The world menu provides you a simple means to access many of the tools that Squeak offers.
Have a closer look at the world.open . . . menu.
Saving, quitting and restarting a Squeak session 9
Figure 1.6: The open . . . dialogue of the world menu.
1.3
Saving, quitting and restarting a Squeak
ses-sion
Bring up the world menu. Now select new morph . . . and navigate to
from alphabetical list.A-C.BlobMorph. You now have a blob “in hand”. Put the blob down (by clicking) somewhere. It will start to move.
Figure 1.7: An instance ofBlobMorph. Figure 1.8: Thesave as . . . dialogue.
Select World.save as . . ., and enter the name “SBE”. Now click on the
Accept(s) button. Now selectWorld.save and quit.
on your operating system) need to also move, copy or link to the virtual machine and the.sourcefile.
Start up Squeak from the newly created “SBE.image” file.
Now you should find yourself in precisely the state you were when you quit Squeak. The blob is there again and it continues to move from where it was when you left it.
When you start Squeak for the first time, the Squeak virtual machine loads the image file that you provide. This file contains a snapshot of a large number of objects, including a vast amount of pre-existing code and a large number of programming tools (all of which are objects). As you work with Squeak, you will send messages to these objects, you will create new objects, and some of these objects will die and their memory will be reclaimed (i.e., garbage-collected).
When you quit Squeak, you will normally save a snapshot that contains all of your objects. If you save normally, you will overwrite your old image file with the new snapshot. Alternatively you may save the image under a new name, as we just did.
In addition to the.imagefile, there is also a.changesfile. This file contains a log of all the changes to the source code that you have made using the standard tools. Most of the time you do not need to worry about this file at all. As we shall see, however, the.changes file can be very useful for recovering from errors, or replaying lost changes. More about this later!
The image that you have been working with is a descendant of the original Smalltalk-80 image created in the late 1970s. Some of these objects have been around for decades!
You might think that the image is the key mechanism for storing and managing software projects, but you would be wrong. As we shall see very soon, there are much better tools for managing code and sharing software developed by teams. Images are very useful, but you should learn to be very cavalier about creating and throwing away images, since tools like Monticello offer much better ways to manage versions and share code amongst developers.
Blue-click on the Blob.
Workspaces and Transcripts 11
Figure 1.9: The SqueakToolsflap.
1.4
Workspaces and Transcripts
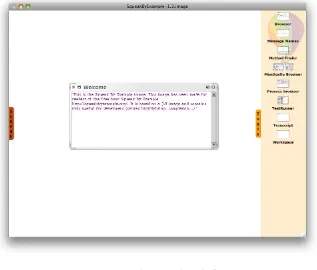
Close all open windows. Click on the Toolstab at the far right of the Squeak
environment to open the Tools flap.
You will see icons for some of the key tools in Squeak (Figure 1.9). Drag out a transcript and a workspace.
Position and resize the transcript and workspace windows so that the workspace just overlaps the transcript.
You can resize windows either by dragging one of the corners, or by blue-clicking the window to bring up the morphic handles, and dragging the yellow, bottom right handle.
The transcript is an object that is often used for logging system messages. It is a kind of “system console”. Note that the transcript is terribly slow, so if you keep it open and write to it certain operations can become 10 times slower. In addition the transcript is not thread-safe so you may experience strange problems if multiple objects write concurrently to the transcript.
Workspaces are useful for typing snippets of Smalltalk code that you would like to experiment with. You can also use workspaces simply for typing arbitrarily text that you would like to remember, such as to-do lists or instructions for anyone who will use your image. Workspaces are often used to hold documentation about a captured image, as is the case with the standard image that we downloaded earlier (see Figure 1.2).
Type the following text into the workspace:
Transcript show: 'hello world'; cr.
Try double-clicking in the workspace at various points in the text you have just typed. Notice how an entire word, entire string, or the whole text is selected, depending on where you click.
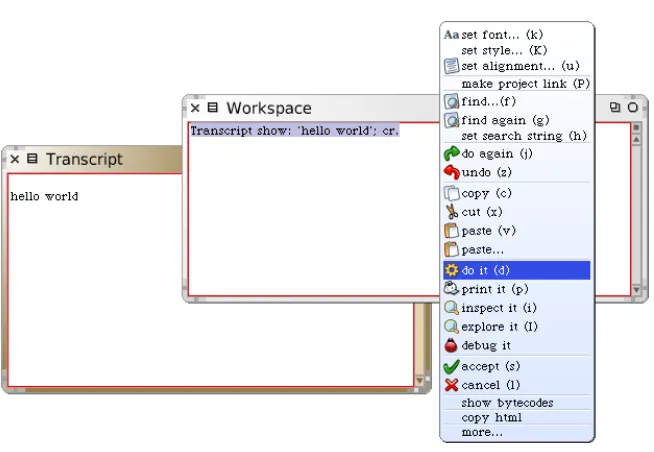
Select the text you have typed and yellow-click. Select do it (d).
Notice how the text “hello world” appears in the transcript window (Figure 1.10). Do it again. (The(d) in the menu itemdo it (d) tells you that the keyboard shortcut todo itisCMD–d. More on this in the next section!) You have just evaluated your first Smalltalk expression! You just sent the messageshow: 'hello world'to theTranscriptobject, followed by the messagecr
(carriage return). TheTranscriptthen decided what to do with this message, that is, it looked up itsmethodsfor handlingshow:andcrmessages and reacted appropriately.
If you talk to Smalltalkers for a while, you will quickly notice that they generally do not use expressions like “call an operation” or “invoke a method”, but instead they will say “send a message”. This reflects the idea that objects are responsible for their own actions. You nevertellan object what to do — instead you politelyaskit to do something by sending it a message. The object, not you, selects the appropriate method for responding to your message.
1.5
Keyboard shortcuts
Keyboard shortcuts 13
Figure 1.10: “Doing” an expression
These are the parenthesized expressions in the menu. Depending on your platform, you may have to press one of the modifier keys (control, alt, command, or meta). (We will indicate these generically asCMD–key.)
Evaluate the expression in the workspace again, but using the keyboard
shortcut:CMD–d.
In addition to do it, you will have noticedprint it, inspect it and explore it. Let’s have a quick look at each of these.
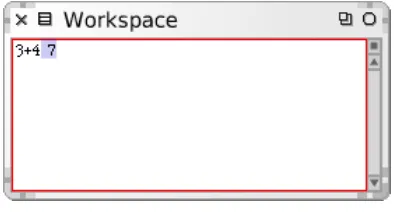
Type the expression3 + 4into the workspace. Now do it with the keyboard
shortcut.
Do not be surprised if you saw nothing happen! What you just did is send the message+with argument4to the number3. Normally the result7
will have been computed and returned to you, but since the workspace did not know what to do with this answer, it simply threw the answer away. If you want to see the result, you should print it instead. print it actually compiles the expression, executes it, sends the messageprintStringto the result, and displays the resulting string.
Select3+4and print it (CMD–p).
Figure 1.11: “Print it” rather than “do it”.
3 + 4 −→ 7
We use the notation −→ as a convention in this book to indicate that a particular Squeak expression yields a given result when you print it.
Delete the highlighted text “7” (Squeak should have selected it for you, so you
can just press the delete key). Select3+4again and this time inspect it (CMD–i).
Now you should see a new window, called aninspector, with the heading
[image:28.441.122.319.70.176.2]SmallInteger: 7(Figure 1.12). The inspector is an extremely useful tool that will allow you to browse and interact with any object in the system. The title tells us that7is an instance of the classSmallInteger. The left panel allows us to browse the instance variables of an object, the values of which are shown in the right panel. The bottom panel can be used to write expressions to send messages to the object.
Figure 1.12: Inspecting an object.
SqueakMap 15
Close the inspector. Type the expressionObjectin a workspace and this time
explore it (CMD–I, uppercased i).
[image:29.441.96.346.138.371.2]This time you should see a window labelledObjectcontaining the text .root: Object. Click on the triangle to open it up (Figure 1.13).
Figure 1.13: Exploring an object.
The explorer is similar to the inspector, but it offers a tree view of a complex object. In this case the object we are looking at is theObjectclass. We can see directly all the information stored in this class, and we can easily navigate to all its parts.
1.6
SqueakMap
SqueakMap is a web-based catalog of “packages” — applications and li-braries — that you can download to your image. The packages are hosted in many different places in the world and maintained by many different people. Some of them may only work with a specific version of Squeak.
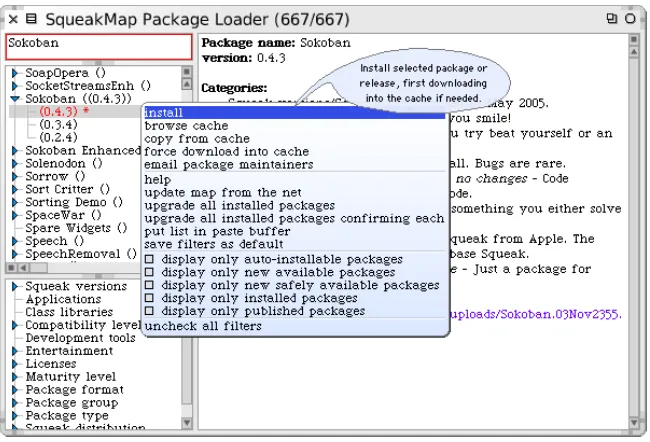
Open World .open... .SqueakMap package loader.
the SqueakMap loader window should appear (Figure 1.14). On the left side is a very long list of packages. The field in the top-left corner is a search pane that can be used to find what you want in the list. Type “Sokoban” in the search pane and hit the return key. Clicking on the right-pointing triangle by the name of a package reveals a list of available versions. When a package or a version is selected, information about it appears in the right-hand pane. Navigate to the latest version ofSokoban. With the mouse in the list pane, use the yellow-button menu to install the selected package. (If Squeak complains that it is not sure this version of the game will work in your image, just say “yes” and go ahead.) Notice that once a package has been installed, it is marked with an asterisk in the list in the SqueakMap package loader.
Figure 1.14: Using SqueakMap to install the Sokoban game.
After installing this package, start upSokobanby evaluatingSokobanMorph
random openInWorldin a workspace.
The System Browser 17
1.7
The System Browser
The system browser is one of the key tools used for programming. As we shall see, there are several interesting browsers available for Squeak, but this is the basic one you will find in any image.
Open a browser by selectingWorld.open . . ..class browser, or by dragging
[image:31.441.58.383.183.402.2]a Browser from the Tools flap.
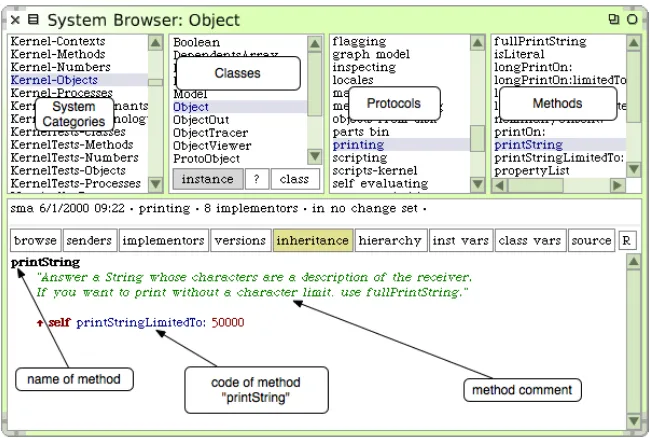
Figure 1.15: The system browser showing theprintStringmethod of class object.
We can see a system browser in Figure 1.15. The title bar indicates that we are browsing the classObject.3
When the browser first opens, all panes are empty but the leftmost one. This first pane lists all knownsystem categories, which are groups of related classes.
Click on the categoryKernel-Objects.
This causes the second pane to show a list of all of the classes in the selected category.
3If the browser you have seems to differ from the one described in this book, you may be
Select the classObject.
Now the remaining two panes will be filled with text. The third pane displays theprotocolsof the currently selected class. These are convenient groupings of related methods. If no protocol is selected you should see all methods in the fourth pane.
Select theprintingprotocol.
You may have to scroll down to find it. Now you will see in the fourth pane only methods related to printing.
Select theprintStringmethod.
Now we see in the bottom pane the source code of theprintStringmethod, shared by all objects in the system (except those that override it).
1.8
Finding classes
There are several ways to find a class in Squeak. The first, as we have just seen above, is to know (or guess) what category it is in, and to navigate to it using the browser.
A second way is to send thebrowsemessage to the class, asking it to open a browser on itself. Suppose we want to browse the classBoolean.
TypeBoolean browseinto a workspace and do it.
A browser will open on the Boolean class (Figure 1.16). There is also a keyboard shortcutCMD–b (browse) that you can use in any tool where you find a class name; select the name and typeCMD–b.
Use the keyboard shortcut to browse the classBoolean.
Notice that when theBooleanclass is selected but no protocol or method is selected, two panes rather than one appear below the four panes at the top (Figure 1.16). The upper one contains theclass definition. This is nothing more than an ordinary Smalltalk message that is sent to the parent class, asking it to create a subclass. Here we see that the classObjectis being asked to create a subclass namedBooleanwith no instance variables, class variables or “pool dictionaries”, and to put the classBooleanin the
Kernel-Objectscategory.
Finding classes 19
Figure 1.16: The system browser showing the definition of class Boolean.
If you would like to explore Squeak’s inheritance hierarchy, thehierarchy
browsercan help you. This can be useful if you are looking for an unknown
subclass or superclass of a known class. The hierarchy browser is like the system browser, except that the list of classes is arranged as an indented tree mirroring the inheritance hierarchy.
Click on hierarchy in the browser while the classBooleanis selected.
This will open a hierarchy browser showing the superclasses and subclasses ofBoolean. Navigate to the immediate superclass and subclasses ofBoolean. Often, the fastest way to find a class is to search for it by name. For exam-ple, suppose that you are looking for some unknown class that represents dates and times.
Put the mouse in the system category pane of the system browser and type
CMD–f, or select find class . . . (f) from the yellow-button menu. Type “time” in the
dialog box and accept it.
Figure 1.17: Searching for a class by name.
Note that if you type the complete (and correctly capitalized) name of a class in the find dialog, the browser will go directly to that class without showing you the list of options.
1.9
Finding methods
Sometimes you can guess the name of a method, or at least part of the name of a method, more easily than the name of a class. For example, if you are interested in the current time, you might expect that there would be a method called “now”, or containing “now” as a substring. But where might it be? Themethod findercan help you.
Drag the method findericon out of the Tools flap. Type “now” in the top left
pane, and accept it (or just press theRETURNkey).
The method finder will display a list of all the method names that contain the substring “now”. To scroll tonowitself, move the cursor to the list and type “n”; this trick works in all scrolling windows. Select “now” and the right-hand pane shows you the three classes that define a method with this name, as shown in Figure 1.18. Selecting any one of them will open a browser on it.
Defining a new method 21
Figure 1.18: The method finder showing three classes that define a method namednow.
Type'eureka' . 'EUREKA'into the method finder and press theRETURNkey, as shown in Figure 1.19.
The method finder will suggest a method that does what you want.
An asterisk at the beginning of a line in the right pane of the method finder indicates that this method is the one that was actually used to obtain the requested result. So, the asterisk in front ofString asUppercaselets us know that the methodasUppercasedefined on the classStringwas executed and returned the result we wanted. The methods that do not have an asterisk are just the other methods that have the same name as the ones that returned the expected result. SoCharacter»asUppercasewas not executed on our example, because'eureka'is not aCharacterobject.
You can also use the method finder for methods with arguments; for example, if you are looking for a method that will find the greatest common factor of two integers, you might try25. 35. 5as an example. You can also give the method finder multiple examples to narrow the search space; the help text in the bottom pane explains more.
1.10
Defining a new method
The advent of Test Driven Development4has changed the way that we write code. The idea behind Test Driven Development, also called TDD
4Kent Beck,Test Driven Development: By Example. Addison-Wesley, 2003, ISBN 0–321–14653–
Figure 1.19: Finding a method by example.
or Behaviour Driven Development, is that we write a test that defines the desired behaviour of our codebeforewe write the code itself. Only then do we write the code that satisfies the test.
Suppose that our assignment is to write a method that “says something loudly and with emphasis”. What exactly could that mean? What would be a good name for such a method? How can we make sure that programmers who may have to maintain our method in the future have an unambiguous description of what it should do? We can answer all of these questions by giving an example:
When we send the messageshoutto the string “Don’t panic” the result should be “DON’T PANIC!”.
To make this example into something that the system can use, we turn it into a test method:
Method 1.1:A test for a shout method
testShout
self assert: ('Don''t panic' shout = 'DON''T PANIC!')
How do we create a new method in Squeak? First, we have to decide which class the method should belong to. In this case, theshoutmethod that we are testing will go in classString, so the corresponding test will, by convention, go in a class calledStringTest.
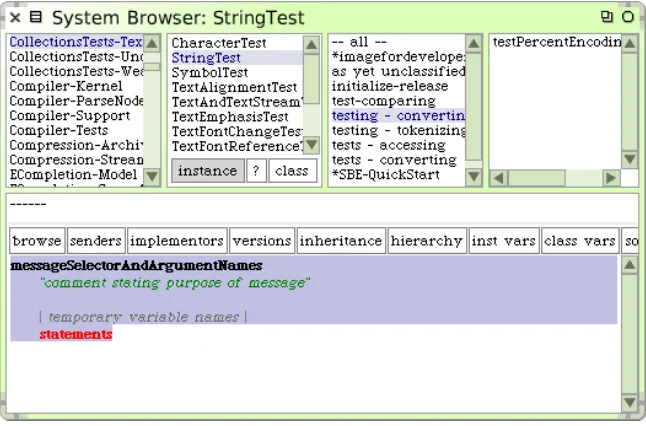
Open a browser on the classStringTest, and select an appropriate protocol for
Defining a new method 23
Figure 1.20: The new method template in classStringTest.
text in the bottom pane is a template that reminds you what a Smalltalk method looks like. Delete this and enter the code from method 1.1.
Once you have typed the text into the browser, notice that the bottom pane is outlined in red. This is a reminder that the pane contains unsaved changes. So select accept (s) from the yellow-button menu in the bottom pane, or just typeCMD–s, to compile and save your method.
Because there is as yet no method calledshout, the browser will ask you to confirm that this is the name that you really want — and it will suggest some other names that you might have intended (Figure 1.21). This can be quite useful if you have merely made a typing mistake, but in this case, we reallydomeanshout, since that is the method we are about to create, so we have to confirm this by selecting the first option from the menu of choices, as shown in Figure 1.21.
Run your newly created test: open the SUnitTestRunner, either by dragging
it from the Tools flap, or by selectingWorld .open... .Test Runner.
The leftmost two panes are a bit like the top panes in the system browser. The left pane contains a list of system categories, but it’s restricted to those categories that contain test classes.
Figure 1.21: Accepting the testShout method classStringTest.
classes in that category, which includes the classStringTest. The names of the
classes are already selected, so click Run Selected to run all these tests.
Figure 1.22: Running the String tests.
Defining a new method 25
The window that opens with the error message is the Smalltalk debug-ger (see Figure 1.23). We will look at the debugdebug-ger and how to use it in Chapter 6.
Figure 1.23: The (pre-)debugger.
The error is, of course, exactly what we expected: running the test generates an error because we haven’t yet written a method that tells strings how toshout. Nevertheless, it’s good practice to make sure that the test fails because this confirms that we have set up the testing machinery correctly and that the new test is actually being run. Once you have seen the error, you can Abandon the running test, which will close the debugger window. Note that often with Smalltalk you can define the missing method using the Create button, edit the newly-created method in the debugger, and then Proceed with the test.
Now let’s define the method that will make the test succeed!
Select classStringin the system browser, select the convertingprotocol, type
the text in method 1.2 over the method creation template, andaccept it. (Note: to
get a↑, type ˆ ).
Method 1.2:The shout method
shout
↑self asUppercase, '!'
The comma is the string concatenation operation, so the body of this method appends an exclamation mark to an upper-case version of whatever
String object theshout message was sent to. The↑ tells Squeak that the expression that follows is the answer to be returned from the method, in this case the new concatenated string.
Does this method work? Let’s run the tests and see.
a green bar and text indicating that all of the tests ran with no failures and no errors.
When you get to a green bar5, it’s a good idea to save your work and take a break. So do that right now!
Figure 1.24: Theshoutmethod defined on classString.
1.11
Chapter summary
This chapter has introduced you to the Squeak environment and shown you how to use some of the major tools, such as the system browser, the method finder, and the test runner. You have also seen a little of Squeak’s syntax, even though you may not understand it all yet.
• A running Squeak system consists of avirtual machine, asourcesfile,
andimageandchangesfiles. Only these last two change, as they record
a snapshot of the running system.
• When you restore a Squeak image, you will find yourself in exactly the same state — with the same running objects — that you had when you last saved that image.
• Squeak is designed to work with a three-button mouse. The buttons are known as thered, theyellowand thebluebuttons. If you don’t have a three-button mouse, you can use modifier keys to obtain the same effect.
5Actually, you might not get a green bar since some images contains tests for bugs that still
Chapter summary 27
• You use the red button on the Squeak background to bring up the
World menuand launch various tools. You can also launch tools from
theToolsflap at the right of the Squeak screen.
• Aworkspaceis a tool for writing and evaluating snippets of code. You
can also use it to store arbitrary text.
• You can use keyboard shortcuts on text in the workspace, or any other tool, to evaluate code. The most important of these are do it
(CMD–d), print it (CMD–p), inspect it (CMD–i), explore it (CMD–I) and
browse it (CMD–b).
• SqueakMap is a tool for loading useful packages from the Internet.
• Thesystem browseris the main tool for browsing Squeak code, and for developing new code.
Chapter 2
A first application
In this chapter, we will develop a simple game: Quinto. Along the way we will demonstrate most of the tools that Squeak programmers use to con-struct and debug their programs, and show how programs are exchanged with other developers. We will see the system browser, the object inspec-tor, the debugger and the Monticello package browser. Development in Smalltalk is efficient: you will find that you spend far more time actually writing code and far less managing the development process. This is partly because the Smalltalk language is very simple, and partly because the tools that make up the programming environment are very well integrated with the language.
2.1
The Quinto game
Figure 2.1: The Quinto game board. The user has just clicked the mouse as shown by the cursor.
consists of rectangular array of light yellowcells. When you click on one of the cells with the mouse, the four surrounding cells turn blue. Click again, and they toggle back to light yellow. The object of the game is to turn blue as many cells as possible.
The Quinto game shown in Figure 2.1 is made up of two kinds of objects: the game board itself, and 100 individual cell objects. The Squeak code to implement the game will contain two classes: one for the game and one for the cells. We will now show you how to define these classes using the Squeak programming tools.
2.2
Creating a new class Category
We have already seen the system browser in Chapter 1, where we learned how to navigate to classes and methods, and saw how to define new methods. Now we will see how to create system categories and classes.
Open a system browser and yellow-click in the category pane. Select
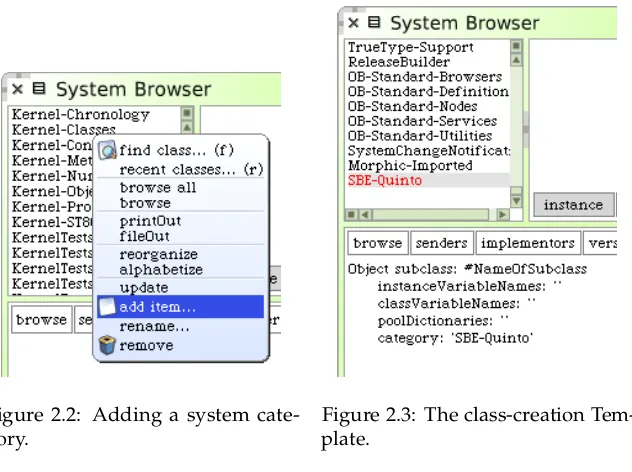
[image:44.441.66.382.322.558.2]add item . . ..
Figure 2.2: Adding a system cate-gory.
Figure 2.3: The class-creation Tem-plate.
ex-Defining the class SBECell 31
isting category first, then the new category will be positioned immediately ahead of the selected one.
2.3
Defining the class SBECell
As yet there are of course no classes in the new category. However, the main editing pane displays a template to make it easy to create a new class (see Figure 2.3).
This template shows us a Smalltalk expression that sends a message to a class calledObject, asking it to create a subclass calledNameOfSubClass. The new class has no variables, and should belong to the categorySBE-Quinto.
We simply modify the template to create the class that we really want.
Modify the class creation template as follows:
• ReplaceObjectbySimpleSwitchMorph.
• ReplaceNameOfSubClassbySBECell.
• AddmouseActionto the list of instance variables.
The result should look like class 2.1.
Class 2.1:Defining the classSBECell SimpleSwitchMorph subclass: #SBECell
instanceVariableNames: 'mouseAction' classVariableNames: ''
poolDictionaries: '' category: 'SBE--Quinto'
This new definition consists of a Smalltalk expression that sends a message to the existing classSimpleSwitchMorph, asking it to create a subclass calledSBECell. (Actually, since SBECelldoes not exist yet, we passed as an argument thesymbol#SBECellwhich stands for the name of the class to create.) We also tell it that instances of the new class should have a
mouseActioninstance variable, which we will use to define what action the cell should take if the mouse should click over it.
At this point you still have not created anything.Note that the border of the
class template pane has changed to red (Figure 2.4). This means that there
areunsaved changes. To actually send this message, you must accept it.
Figure 2.4: The class-creation Template.
Either yellow-click and select accept, or use the shortcutCMD–s (for “save”). The message will be sent toSimpleSwitchMorph, which will cause the
new class to be compiled.
Once the class definition is accepted, the class will be created and appear in the classes pane of the browser (Figure 2.5). The editing pane now shows the class definition, and a small pane below it will remind you to write a few words describing the purpose of the class. This is called aclass comment, and it is quite important to write one that will give other programmers a high-level overview of the purpose of this class. Smalltalkers put a very high value on the readability of their code, and detailed comments in methods are unusual: the philosophy is that the code should speak for itself. (If it doesn’t, you should refactor it until it does!) A class comment need not contain a detailed description of the class, but a few words describing its overall purpose are vital if programmers who come after you are to know whether to spend time looking at this class.
Type a class comment forSBECelland accept it; you can always improve it
later.
2.4
Adding methods to a class
Now let’s add some methods to our class.
Select the protocol--all--in the protocol pane.
Adding methods to a class 33
Figure 2.5: The newly-created classSBECell
Method 2.2:Initializing instances ofSBECell
1 initialize
2 super initialize.
3 self label: ''.
4 self borderWidth: 2.
5 bounds := 0@0 corner: 16@16.
6 offColor := Color paleYellow.
7 onColor := Color paleBlue darker.
8 self useSquareCorners.
9 self turnOff
Note that the characters''on line 3 are two separate single quotes with nothing between them, not a double quote!''denotes the empty string.
Accept this method definition.
What does the above code do? We won’t go into all of the details here (that’s what the rest of the book is for!), but we will give you a quick preview. Let’s take it line by line.
Notice that the method is calledinitialize. The name is very significant! By convention, if a class defines a method namedinitialize, it will be called right after the object is created. So, when we evaluateSBECell new, the message
methods are used to set up the state of objects, typically to set their instance variables; this is exactly what we are doing here.
The first thing that this method does (line 2) is to execute theinitialize
method of its superclass,SimpleSwitchMorph. The idea here is that any inher-ited state will be properly initialized by theinitializemethod of the superclass. It is always a good idea to initialize inherited state by sendingsuper initialize
before doing anything else; we don’t know exactly whatSimpleSwitchMorph’s
initializemethod will do, and we don’t care, but it’s a fair bet that it will set up some instance variables to hold reasonable default values, so we had better call it, or we risk starting in an unclean state.
The rest of the method sets up the state of this object. Sendingself label: '', for example, sets the label of this object to the empty string.
The expression 0@0 corner: 16@16 probably needs some explanation.
0@0represents aPointobject withxandycoordinates both set to 0. In fact,
0@0sends the message@to the number0with argument0. The effect will be that the number0will ask thePointclass to create a new instance with coordinates (0,0). Now we send this newly created point the message
corner: 16@16, which causes it to create aRectanglewith corners0@0and
16@16. This newly created rectangle will be assigned to theboundsvariable, inherited from the superclass.
Note that the origin of the Squeak screen is thetop left, and they coordi-nate increasesdownwards.
The rest of the method should be self-explanatory. Part of the art of writing good Smalltalk code is to pick good method names so that Smalltalk code can be read like a kind of pidgin English. You should be able to imagine the object talking to itself and saying “Self use square corners!”, “Self
turn off!”.
2.5
Inspecting an object
You can test the effect of the code you have written by creating a new
SBECellobject and inspecting it.
Open a workspace. Type the expressionSBECell newand inspect it.
The left-hand pane of the inspector shows a list of instance variables; if you select one (trybounds), the value of the instance variable is shown in the right pane. You can also use the inspector to change the value of an instance variable.
Inspecting an object 35
Figure 2.6: The inspector used to examine a SBECell object.
The bottom pane of the inspector is a mini-workspace. It’s useful be-cause in this workspace the pseudo-variableselfis bound to the object being inspected.
Type the textself openInWorldin the bottom pane and do it.
[image:49.441.131.309.70.213.2]The cell should appear at the top left-hand corner of the screen, indeed, exactly where itsboundssay that it should appear. Blue-click on the cell to bring up the morphic halo. Move the cell with the brown (next to top-right) handle and resize it with the yellow (bottom-right) handle. Notice how the bounds reported by the inspector also change.
Delete the cell by clicking on thexin the pink handle.
2.6
Defining the class SBEGame
Now let’s create the other class that we need for the game, which we will callSBEGame.
Make the class definition template visible in the browser main window.
Do this by clicking twice on the name of the already-selected class category, or by displaying the definition ofSBECellagain (by clicking the
instance button.) Edit the code so that it reads as follows, and accept it.
Class 2.3:Defining theSBEGameclass
BorderedMorph subclass: #SBEGame instanceVariableNames: ''
classVariableNames: '' poolDictionaries: '' category: 'SBE--Quinto'
Here we subclassBorderedMorph; Morph is the superclass of all of the graphical shapes in Squeak, and (surprise!) aBorderedMorphis aMorphwith a border. We could also insert the names of the instance variables between the quotes on the second line, but for now, let’s just leave that list empty.
Now let’s define aninitializemethod forSBEGame.
Type the following into the browser as a method forSBEGameand try to
accept it:
Method 2.4:Initializing the game
1 initialize
2 | sampleCell width height n |
3 super initialize.
4 n := self cellsPerSide.
5 sampleCell := SBECell new.
6 width := sampleCell width.
7 height := sampleCell height.
8 self bounds: (5@5 extent: ((width*n) @(height*n)) + (2 * self borderWidth)).
9 cells := Matrix new: n tabulate: [ :i :j | self newCellAt: i at: j ].
Defining the class SBEGame 37
Figure 2.8: Squeak detect-ing an unknown selector.
Figure 2.9: Declaring a new instance variable.
ButcellsPerSideis not a mistake — it is just a method that we haven’t yet defined — we will do so in a minute or two.
So just select the first item from the menu, which confirms that we really
meantcellsPerSide.
Next, Squeak will complain that it doesn’t know the meaning ofcells. It offers you a number of ways of fixing this.
Choose declare instance because we wantcellsto be an instance variable.
Finally, Squeak will complain about the messagenewCellAt:at:sent on the last line; this is also not a mistake, so confirm that message too.
If you now look at the class definition once again (which you can do by clicking on the instance button), you will see that the browser has modified it to include the instance variablecells.
Let’s look at thisinitializemethod. The line| sampleCell width height n | de-clares 4 temporary variables. They are called temporary variables be-cause their scope and lifetime are limited to this method. Temporary vari-ables with explanatory names are helpful in making code more readable. Smalltalk has no special syntax to distinguish constants and variables, and in fact all four of these “variables” are really constants. Lines 4–7 define these constants.
cellsPerSidemessage before we define a method with that name that Squeak asked us to “confirm, correct, or cancel” when we accepted the method body forinitialize. Don’t be put off by this: it is actually good practice to write in terms of other methods that we haven’t yet defined. Why? Well, it wasn’t until we started writing theinitializemethod that we realized that we needed it, and at that point, we can give it a meaningful name, and move on, without interrupting our flow.
The fourth line uses this method: the Smalltalkself cellsPerSidesends the messagecellsPerSidetoself, i.e., to this very object. The response, which will be the number of cells per side of the game board, is assigned ton.
The next three lines create a newSBECellobject, and assign its width and height to the appropriate temporary variables.
Line 8 sets theboundsof the new object. Without worrying too much about the details just yet, just believe us that the expression in parentheses creates a square with its origin (i.e., its top-left corner) at the point (5,5) and its bottom-right corner far enough away to allow space for the right number of cells.
The last line sets theSBEGameobject’s instance variablecellsto a newly createdMatrixwith the right number of rows and columns. We do this by sending the messagenew:tabulate:to theMatrixclass (classes are objects too, so we can send them messages). We know thatnew:tabulate:takes two arguments because it has two colons (:) in its name. The arguments go right after the colons. If you are used to languages that put all of the arguments together inside parentheses, this may seem weird at first. Don’t panic, it’s only syntax! It turns out to be a very good syntax because the name of the method can be used to explain the roles of the arguments. For example, it is pretty clear thatMatrix rows: 5 columns: 2has 5 rows and 2 columns, and not 2 rows and 5 columns.
Matrix new: n tabulate: [ :i :j | self newCellAt: i at: j ]creates a newn×nmatrix and initializes its elements. The initial value of each element will depend on its coordinates. The(i,j)th element will be initialized to the result of evaluatingself newCellAt: i at: j.
That’sinitialize. When you accept this message body, you might want to take the opportunity to pretty-up the formatting. You don’t have to do this by hand: from the yellow-button menu select more . . ..prettyprint, and the browser will do it for you. You have to accept again after you have pretty-printed a method, or of course you can cancel (CMD–l — that’s a lower-case letterL) if you don’t like the result. Alternatively, you can set up the browser to use the pretty-printer automatically whenever it shows you code: use the the right-most button in the button bar to adjust the view.
Organizing methods into protocols 39
hold down theSHIFTkey when you click to directly bring up the more . . .
menu.
2.7
Organizing methods into protocols
Before we define any more methods, let’s take a quick look at the third pane at the top of the browser. In the same way that the first pane of the browser lets us categorize classes so we are not overwhelmed by a very long list of class names in the second pane, so the third pane lets us categorize methods so that we are not overwhelmed by a very long list of method names in the fourth pane. These categories of methods are called “protocols”.
[image:53.441.127.316.287.438.2]If there are only a few methods in a class, the extra level of hierarchy provided by protocols is not really necessary. This is why the browser also offers us the--all--virtual protocol, which, you will not be surprised to learn, contains all of the methods in the class.
Figure 2.10: Categorize all uncategorized methods.
If you have followed along with this example, the third pane may well contain the protocolas yet unclassified.
Select the yellow button menu item categorize all uncategorized to fix this,
and move theinitializemethods to a new protocol calledinitialization.
You may find that Squeak has already put yourinitializemethod into the
initializationprotocol. If so, it’s probably because you have loaded a package calledAutomaticMethodCategorizerinto your image.
A typographic convention. Smalltalkers frequently use the notation “>>” to identify the class to which a method belongs, so, for example, the
cellsPerSide method in classSBEGame would be referred to as SBEGame >>cellsPerSide. To indicate that this is notSmalltalk syntax, we will use the special symbol» instead, so this method will appear in the text as
SBEGame»cellsPerSide
From now on, when we show a method in this book, we will write the name of the method in this form. Of course, when you actually type the code into the browser, you don’t have to type the class name or the»; instead, you just make sure that the appropriate class is selected in the class pane.
Now let’s define the other two methods that are used by theSBEGame» initializemethod. Both of them can go in theinitializationprotocol.
Method 2.5:A constant method.
SBEGame»cellsPerSide
"The number of cells along each side of the game"
↑10
This method could hardly be simpler: it answers the constant 10. One advantage of representing constants as methods is that if the program evolves so that the constant then depends on some other features, the method can be changed to calculate this value.
Method 2.6:An initialization helper method
SBEGame»newCellAt: i at: j
"Create a cell for position (i,j) and add it to my on--screen
representation at the appropriate screen position. Answer the new cell" | c origin |
c := SBECell new.
origin := self innerBounds origin. self addMorph: c.
c position: ((i -- 1) * c width) @ ((j -- 1) * c height) + origin. c mouseAction: [self toggleNeighboursOfCellAt: i at: j].
Add the methodsSBEGame»cellsPerSideandSBEGame»newCellAt:at:.
Confirm the spelling of the new selectorstoggleNeighboursOfCellAt:at:and
Organizing methods into protocols 41
Method 2.6 answers a new SBECell, specialized to position(i, j)in the
Matrixof cells. The last line defines the new cell’smouseAction to be the
block[self toggleNeighboursOfCellAt: i at: j ]. In effect, this defines the callback
behaviour to perform when the mouse is clicked. The corresponding method also needs to be defined.
Method 2.7:The callback method
SBEGame»toggleNeighboursOfCellAt: i at: j (i > 1) ifTrue: [ (cells at: i -- 1 at: j ) toggleState].
(i < self cellsPerSide) ifTrue: [ (cells at: i + 1 at: j) toggleState]. (j > 1) ifTrue: [ (cells at: i at: j -- 1) toggleState].
(j < self cellsPerSide) ifTrue: [ (cells at: i at: j + 1) toggleState].
Method 2.7 toggles the state of the four cells to the north, south, west and east of cell (i,j). The only complication is that the board is finite, so we have to make sure that a neighboring cell exists before we toggle its state.
Place this method in a new protocol calledgame logic.
To move the method, you can simply click on its name and drag it to the newly-created protocol (Figure 2.11).
Figure 2.11: Drag a method to a protocol.
To complete the Quinto game, we need to define two more methods in classSBECellto handle mouse events.
Method 2.8:A typical setter method
SBECell»mouseAction: aBlock
↑mouseAction := aBlock
Method 2.8 does nothing more than set the cell’smouseActionvariable to the argument, and then answers the new value. Any method thatchanges
method thatanswersthe current value of an instance variable is called a
getter method.
If you are used to getters and setters in other programming lan-guages, you might expect these methods to be calledsetmouseActionand
getmouseAction. The Smalltalk convention is different. A getter always has the same name as the variable it gets, and a setter is named similarly, but with a trailing “:”, hencemouseActionandmouseAction:.
Collectively, setters and getters are called accessor methods, and by convention they should be placed in theaccessingprotocol. In Smalltalk,all
instance variables are private to the object that owns them, so the only way for another object to read or write those variables in the Smalltalk language is through accessor methods like this one1.
Go to the classSBECell, defineSBECell»mouseAction:and put it in the
ac-cessingprotocol.
Finally, we need to define a methodmouseUp:; this will be called auto-matically by the GUI framework if the mouse button is released while the mouse is over this cell on the screen.
Method 2.9:An event handler
SBECell»mouseUp: anEvent mouseAction value
Add the method SBECell»mouseUp: and then categorize all uncategorized
methods.
What this method does is to send the messagevalueto the object stored in the instance variablemouseAction. Recall that inSBEGame»newCellAt: i at: j
we assigned the following code fragment tomouseAction:
[self toggleNeighboursOfCellAt: i at: j ]
Sending thevaluemessage causes this code fragment to be evaluated, and consequently the state of the cells will toggle.
2.8
Let’s try our code
That’s it: the Quinto game is complete!
If you have followed all of the steps, you should be able to play the game, consisting of just 2 classes and 7 methods.
Let’s try our code 43
In a workspace, typeSBEGame new openInWorldand do it.
The game will open, and you should be able to click on the cells and see how it works.
Well, so much for theory. . . When you click on a cell, anotifierwindow called the PreDebugWindowwindow appears with an error message! As depicted in Figure 2.12, it saysMessageNotUnderstood: SBEGame»toggleState.
Figure 2.12: There is a bug in our game when a cell is clicked!
What happened? To find out, let’s use one of Smalltalk’s more powerful tools: the debugger.
Click on thedebug button in the notifer window.
The debugger will appear. In the upper part of the debugger window you can see the execution stack, showing all the active methods; selecting any one of them will show, in the middle pane, the Smalltalk code being executed in that method, with the part that triggered the error highlighted.
Click on the line labelledSBEGame»toggleNeighboursOfCellAt:at:(near the
top).
The debugger will show you the execution context within this method where the error occurred (Figure 2.13).
At the bottom of the debugger are two small inspector windows. On the left, you can inspect the object that is the receiver of the message that caused the selected method to execute, so you can look here to see the values of the instance variables. On the right you can inspect an object that represents the currently executing method itself, so you can look here to see the values of the method’s parameters and temporary variables.
Figure 2.13: The debugger, with the method toggleNeighboursOfCell:at: se-lected.
and, most surprisingly to those used to other debuggers, change the code while it is being debugged! Some Smalltalkers program in the debugger almost all the time, rather than in the browser. The advantage of this is that you see the method that you are writing as it will be executed, with real parameters in the actual execution context.
In this case we can see in the first line of the top panel that thetoggleState
message has been sent to an instance ofSBEGame, while it should clearly have been an instance ofSBECell. The problem is most likely with the initialization of thecells matrix. Browsing the code ofSBEGame»initialize
shows thatcellsis filled with the return values ofnewCellAt:at:, but when we look at that method, we see that there is no return statement there! By default, a method returnsself, which in the case ofnewCellAt:at:is indeed an instance ofSBEGame.
Close the debugger window. Add the expression “↑c” to the end of the
methodSBEGame»newCellAt:at:so that it returnsc. (See method 2.10.)
Method 2.10:Fixing the bug.
SBEGame»newCellAt: i at: j
"Create a cell for position (i,j) and add it to my on--screen
Saving and sharing Smalltalk code 45
c := SBECell new.
origin := self innerBounds origin. self addMorph: c.
c position: ((i -- 1) * c width) @ ((j -- 1) * c height) + origin. c mouseAction: [self toggleNeighboursOfCellAt: i at: j].
↑c
Recall from Chapter 1 that the construct to return a value from a method in Smalltalk is↑, which you obtain by typing^.
Often, you can fix the code directly in the debugger window and click
Proceed to continue running the application. In our case, because the bug was in the initialization of an object, rather than in the method that failed, the easiest thing to do is to close the debugger window, destroy the running instance of the game (with the halo), and create a new one.
Do:SBEGame new openInWorldagain.
Now the game should work properly.
2.9
Saving and sharing Smalltalk code
Now that you have the Quinto game working, you probably want to save it somewhere so that you can share it with your friends. Of course, you can save your whole Squeak image, and show off your first program by running it, but your friends probably have their own code in their images, and don’t want to give that up to use your image. What you need is a way of getting source code out of your Squeak image so that other programmers can bring it into theirs.
The simplest way of doing this is byfiling outthe code. The yellow-butto