$gLEAR!!S
j
CT-10/20/30
User Guide
Package 2
Copyright 0 1994 Fujitsu Business Communication Systems All rights reserved. Fujitsu Business Communication Systems shall not be liable for any commercial losses, loss of revenue or profits, loss of goodwill, inconvenience, or exemplary, special, incidental, indirect, or consequential damages whatsoever, or claims of third
Purpose This user guide has been prepared for personnel who
operate and maintain the equipment manufactured and
sold by Fujitsu Business Communication Systems. The
information in this guide is subject to change and may
not be suitable in all situations. Fujitsu Business
Communication Systems acknowledges that a
customer’s special requirements or practices may take
precedence over those supplied in this document. If a
conflict develops during operation, Fujitsu Business
Communication Systems hereby disclaims any
responsibility or liability for any consequential or
inconsequential damages that may result from the use
of this document.
This document is provided with the understanding that it
shall not be copied or reproduced in whole or in part or disclosed to others without the prior written permission
TABLE
OF CONTENTS
TITLE PAGE
INTRODUCTION ... 1
The Instruments ... 2
THE BASICS ... ... 9
Fixed Feature Buttons ... 9
SPEAKER Button.. ... 9
FLASH Button.. ... 9
TRANSFER Button ... 9
HOLD Button.. ... ... 9
RG TONE Button ... 10
UP Button . . . ... 10
DOWN Button ... 10
Programmable Line and/or Feature Buttons.. ... 10
Visual Indicators ... 12
System Tones ... 13
Distinctive Call Ringing ... 15
Headset Operation ... 16
PLACING A CALL . . . 19
Internal Calls . . . 19
Outside Calls . . . 20
Outside Line Access Codes . . . . 20
ANSWERING A CALL . . . 21
Auto Answer . . . 21
Incoming Line Ringing...When Busy . . . 22
Internal Calls . . . 23
Outside Calls . . . 23
DISCONNECTING FROM A CALL ... 24
MULTI-STATION APPEARANCE ... 25
Answering a Call ... 25
Idle Line Preference ... 26
Intercom Groups ... 27
TITLE
TABLE
OF CONTENTS
(Cont’d)
PAGE
MULTI-STATION APPEARANCE (Cont’d)
Transferring a Call . . . 31
CALL PROCESSING FEATURES ... 33
Call Announce ... 33
Call Forward All Calls ... 35
Call Forward - CO ... 38
Call Forward - Follow Me ... 39
Call Forward Internal/External ... 40
Call Forward On Busy ... 42
Call Forward On Busy No Answer.. ... 43
Call Forward On No Answer.. ... 45
Call Forward - Other Extension ... 47
Calling/Called Party Name Display ... 48
Call Waiting ... 49
Camp-On.. ... 50
Extension Camp-On ... 50
Trunk Camp-On ... 51
Off-Hook CampOn ... 51
On-Hook Camp-On ... 52
Auto LCR Camp-On ... 53
Consultation ... 54
Do Not Disturb ... 55
Do Not Disturb Override.. ... 57
Exclusive Hold.. ... 58
Executive Override ... 59
Extension Pick-Up ... 60
TABLE
OF CONTENTS
(Cont’d)
TITLE PAGE
CALL PROCESSING FEATURES (Cont’d)
Silent Monitor . . . 77
Speakerphone . . . 78
Three-Party Conference . . . 80
Transfer . . . 81
Transfer to Busy Extension . . . 82
AUTOMATIC DIALING FEATURES . . . Automatic Intercom . . . . . Last Number Redial . . . Repertory Dialing . . . Save Number . . . Specialized Common Carrier (SCC) Access . . . Speed Calling - Extension . . . ExtensionSpeed Calling Directory . . . Speed Calling - System . . . System Speed Calling Directory . . . 83 83 84 85 86 87 88 89 90 91 AUTOMATIC CALL DISTRIBUTION ... 93
ACD Agent Instrument ... ... 93
Answering an ACD Call ... 94
Message from a Supervisor ... 95
Placing a Call ... With ACD Assigned ... 96
Auto Answer Disconnect ... 96
Agent Call Waiting Indicator ... 96
Staffing and Unstaffing Your Agent Instrument ... 97
Supervisor Assistance Request ... 98
Use of Standard Features...Wit h ACD Assigned ... 99
ACD Call Overflow (Call Forward on No Answer) ... 99
ACD Consultation ... 99
ACD Exclusive Hold ... 99
ACD Night Arrangement (Call Forw’d All Calls) ... 99
ACD Speakerphone ... 99
TABLE
OF CONTENTS
(Cont’d)
TITLE PAGE
MISCELLANEOUS FEATURES ... 03
Accessing Features in a PBX ... 03
Account Code/Client Billing ... 103
Analog Modem Port ... 105
Authorization Code - Walking COS ... 06
External Paging ... 107
External Paging - Answering ... 108
Forced Account Code.. ... 109
Night Answer ... 110
Night Answer Pick-Up ... 112
Paging ... 113
Paging - Answering.. ... 115
Recorded Voice Announcement.. ... 116
Self Extension Ringing.. ... 120
Terminal Password ... 121
Time Reminder ... 122
DSS FEATURES ... Alternate DSS.. ... Camp-On to an Extension.. ... Direct Trunk Access.. ... Do Not Disturb Override.. ... DSS Alarm ... DSS External Paging ... DSS Night Answer ... DSS Park ... DSS Speed Calling ... Placing a Call to an Extension.. ... Primary Answering Position with Direct Station Selection ...
TABLE
OF CONTENTS
(Cont’d)
LIST OF TABLES
NUMBER TITLE PAGE
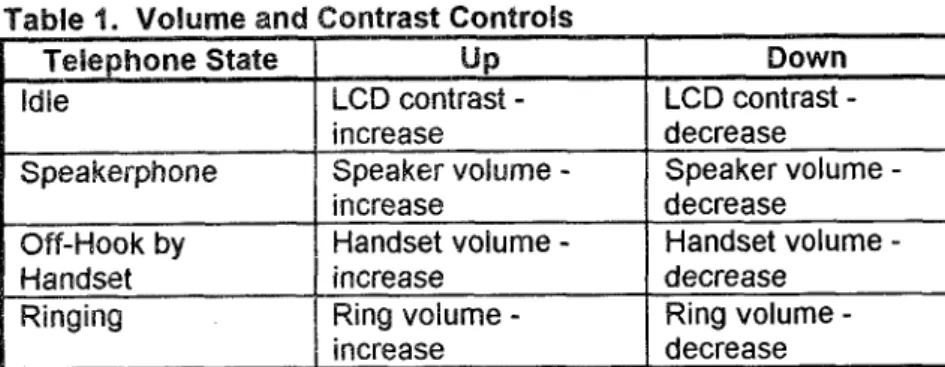
1 Volume and Contrast Controls ... 10
2 Visual Indicators.. ... 11
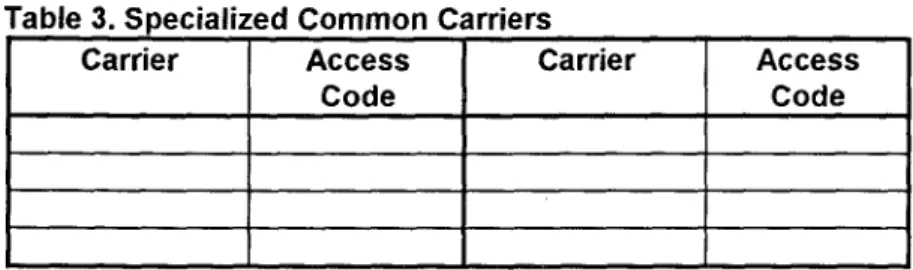
3 Specialized Common Carriers ... 87
4 Programmable Feature Buttons.. ... 149
LIST OF FIGURES
NUMBER TITLE PAGE 1 CT-10 Model ... 32 CT-20 Model ... 5
3 CT-30 Model ... ... 7
4 30-Button DSS ... 126
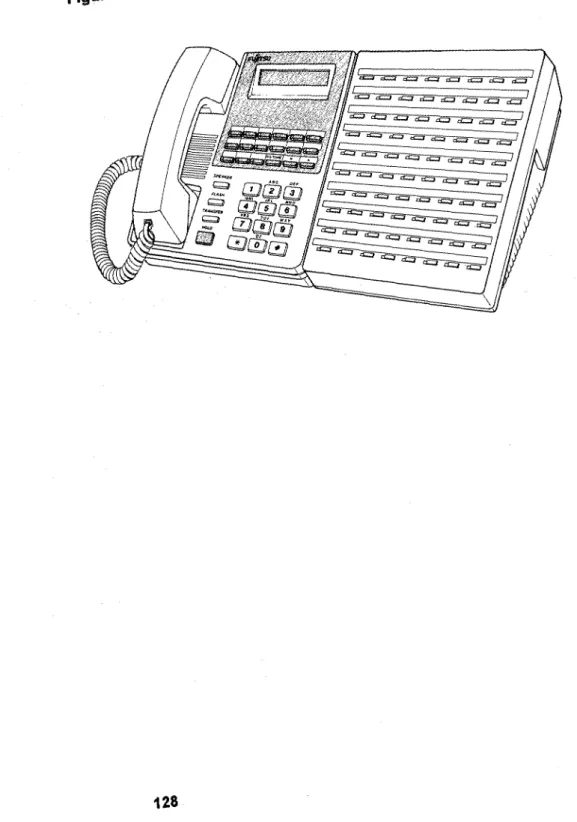
5 40-Button DSS ... 127
INTRODUCTION
Your new system, with its vast array of features, provides you with the
flexibility you need to meet many different calling requirements. Your
telephone can be custom tailored with features designed to meet your
specific communication needs. You may find that some of the features
discussed in this User Guide are not programmed on your telephone.
Complete details on the features that are available with your system are found in the System Description/Features.
Please take the time to look through this guide in order to become
familiar with the your new telephone. The following sections are
included:
The Basics: Describes your telephone’s external features, the type
of lamp patterns, and the system tones. This section also describes the headset adapter operation.
Placing a Call: Explains how to place inside and outside calls.
Answering a Call: Explains how to answer inside and outside calls.
This section also describes the Auto Answer and the Do Not Disturb features.
Disconnecting from a Call: Explains how to disconnect from a
call.
Multi-Station Appearance: Describes how to use the Multi-Station
feature and its various functions.
Call Processing Features: Describes how to use the basic Call
Processing features. Many of these features can be assigned a
programmable feature/line button for single button operation.
Automatic Dialing Features: Describes how to use the Automatic
INTRODUCTION (Cont’d)
l Automatic Call Distribution (ACD): Describes how to use the
available ACD features.
l Miscellaneous Features: Describes how to use the Miscellaneous
features.
e DSS Features: Describes how to use the DSS or Primary
Answering Position features.
NOTE
The phrase lipt the handset is the same as pressing the SPEAKER button if you have a CT-20 or CT-30 model telephone.
THE !NSTRUMENTS
Your system can accommodate a variety of telephone instruments
including the CT-lo, CT-20, and the CT-30 proprietary analog models. All CT model telephones are hearing aid compatible.
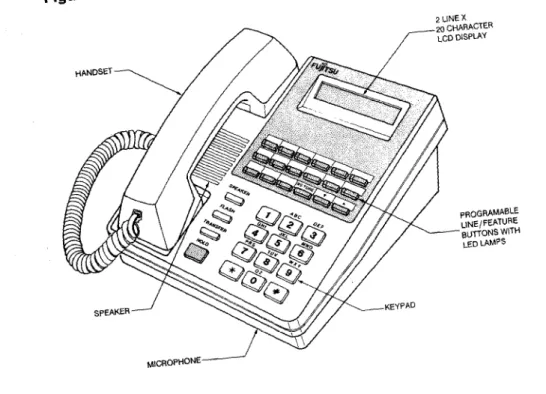
The CT-l 0 model (Figure 1) has the following features:
. 15 programmable line and/or feature buttons.
l Two-color lamp indicators.
l Seven fixed feature buttons:
THE INSTRUMENTS (Cont’d)
l Internal speaker (monitor only).
l Two-pair wiring.
l K-style handset.
Figure 1. CT-10 Model
PROGRAMABLE LINE/FEATURE
-BUTTONS WTH
LED LAMPS
THE INSTRUMENTS (Cont’d)
The CT-20 model (Figure 2) has the following additional features:
B Two-line display.
e Speakerphone for handsfree operation.
o Analog modem port (AMP) that lets you originate a data call from a
PC with a modem.
The display provides you with prompts for:
0 Error free programming.
e Feature implementation.
0 Time and date.
o Elapsed time.
THE INSTRUMENTS (Cont’d)
THE INSTRUMENTS (Cont’d)
The CT-30 model (Figure 3) adds even more features. They include the
following:
l Additional programmable line and/or feature buttons (27).
a Off-hook call announce.
You can dial a specific feature code if you want to use a feature on your
telephone that has not been programmed to a specific button.
Please note that the feature codes used in this guide are the standard system codes. Codes required to implement features in your system
may differ. Consult your Communications Manager for your specific
THE INSTRUMENTS (Cont’d)
Figure 3. CT-30 Model
MICROPHONE
2 LINE X
20 CHARACTER
LCD DISPLAY
PROGRAMABLE LINE/FEATURE
--BUTTONS WITH
THE INSTRUMENTS (Cont’d)
Figure 3. CT-30 Model
2 LINE X
20 CHARACTER
LCD DISPLAY
PROGRAMABLE LlNE,FEAT”RE
-BUTTONS WITH
THE BASICS
FIXED FEATURE BUTTONS
SPEAKERButton On the CT-10 model, the SPEAKER button is a
monitor button only. This means that you can listen to origination and call progress but do not have handsfree speaking capability.
The CT-20 and CT-30 models can use the
SPEAKER button instead of lifting the handset.
To operate the SPEAKER button:
1. Press the SPEAKER button with the
handset in place.
2. Press the SPEAKER button again to
hang up.
FLASH Button The FLASH button is used to activate features
when the system is used with Centrex or another PBX.
To operate the FLASH button:
1. Make a connection to the host PBX or Centrex by dialing the code or by pressing a line button.
2. Press the FLASH button.
3. Dial the code to activate a particular feature.
TRANSFER Button The TRANSFER button lets you transfer a call
to another extension or line.
HOLD Button The HOLD button places an extension or line
The RG (RING) TONE button controls the ringing tone of the telephone. There are three types of patterns that can be set: low, medium (default), and high. This button is valid only in ringing state. In order to change the ringer, adjust the button while a call is ringing at your extension.
UP Button The UP button increases the volume of the
handset, the speaker, and the ringer. It also
increases the LCD contrast. See Table 1 for
more information
The DOWN button decreases the volume of the andset, the speaker, and the ringer. It also decreases the LCD contrast. See Table 1 for more information.
PROGRAMMABLE LINE AND/OR FEATURE BUTTONS (Cont’d)
Table 2. Visual Indicators
‘AT-
‘ERN DISPLAY TYPE LINE BUTTON
FEATURE BU-ITON BASIC BUTTON
ON 1
OFF
Feature is recalling or voice calling. (RECALL)
ZOLOR OF LED
Red
Red
Green
Green
Red
Red
Steady Light A steady, red light indicates that a line or feature
Pattern button is in use. It also indicates a line on hold at
another telephone.
Sbw mshiwg A slowly flashing red tight indicates that a line at
Light Pattern your telephone is ringing.
Interrupted FIash Ah interrupted flashing green light indicates that
Pattern (An you are on this line.
extended flash interrupted by a pause)
Double Interrupted A double interrupted flashing green light indicates
Flash Pattern (An that you have placed this line on hold.
extended flash
interrupted by two
brief pauses)
Fast Flashing A fast flashing red light indicates that a line call
Busy Tone
Call Waiting Tone
Camp-On Tone
Distinctive Busy
Tone
Error Tone
External Dial Tone
SYSTEM TONES
A continuous standard busy signal with tones of equal length.
A single burst of tone heard during conversation indicating that an external call is waiting to be answered.
A single burst of tone heard during conversation indicating that an extension has camped-on to your extension.
A continuous short-long busy signal which sounds when you reach a busy extension or outside line and are allowed to camp-on.
A fast busy tone. If you receive an error tone after requesting a feature, one of the following
conditions may exist:
* Your telephone is not allowed to implement
the feature you requested.
l You dialed an incorrect feature code or
number.
Press TRANSFER to connect with your original party and try again, or proceed with another feature.
This is a continuous tone obtained when you:
l Press an outside line button.
l Lift your handset and press an outside line
button.
o Dial a code (usually 9) to access an outside telephone network.
SYSTEM TONES (Cont’d)
Internal Dial Tone
Key Tone
Override Tone
Recording Tone
Ringback Tone
Success Tone
This is a continuous tone that you hear when you lift your handset. internal dial tone indicates that you may:
0 Place an internal call (Intercom call).
o Request a special feature.
Key tone consists of three short bursts of tone followed by a continuous dial tone. You hear this tone after you press the TRANSFER button or FLASH and before you dial a feature code. Key tone indicates that you have correctly accessed the system and can now proceed to dial an extension number or a feature code.
You will also hear key tone when you place a call if the Call Forward All Calls or Do Not Disturb feature is activated.
Override tone is a series of tone bursts heard when an extension with Executive Override breaks into your call.
Recording tone is an extended burst of tone
indicating that an announcement is being
recorded from your extension.
Ringback tone is a standard ringing tone when calling an idle telephone.
SYSTEM TONES (Cont’d)
Zip Tone Zip tone is three short bursts of tone heard prior
to receiving a call through the Auto Answer feature.
DISTINCTIVE CALL RINGING
Calls from another Slow ringing. A repetitive one-second ring
Extension and Tie followed by a three-second pause.
Line Calls
(Extensidn Ringing)
Incoming Outside
Calls (Outside Ringing)
Slow double ringing. A repetitive double ring
followed by a three-second pause.
Call Forwarded Calls Fast ringing. A repetitive one-second ring
and Callbacks followed by a one-second pause.
Call Announce Calls Two brief bursts of tone immediately followed
HEADSET OPERATION
The headset adapter lets your telephone accept any of the standard
headsets commercially available. Use this feature to make the
programmable headset button act like the hookswitch (the button located
in the cradle of the telephone).
To install a headset:
1. Disconnect: The handset cord. Leave the handset in the
cradle of the telephone.
2. Connect: The free end of the handset cord to the modular
jack on the back of the headset adapter.
3. Connect: The headset to the modular jack on the front of
the headset adapter (jack may be two holed or modular).
4. Connect: The power transformer to the back of the
headset adapter.
5. Plug In: The power transformer to the wall socket.
. To place a call using the headset:
1. Press the headset button.
- The headset /amp lights in fhe steady paftefn.
2. Press the line or ICM (Intercom) button.
- The appropriate dial tone sounds,
HEADSET OPERATION (Cont’d)
To answer a call using the headset:
1. The telephone rings.
2. Press the headset button.
- The headset lamp lights.
3. Press the flashing line or ICM.
- The line or ICM lamp flashes in the interrupted pattern. - You can begin conversation.
To disconnect from a call using the headset:
. Press headset.
- The headset lamp goes dark.
PLACING
A CALL
INTERNAL CALLS
To place a call to another extension:
1. Lift the handset.
- Listen for internal dial tone. 2. Dial the extension number.
NOTE
The name displays on CT-20 and CT-30 models if the name is registered to the extension making the call.
To place a call to the extension on which you are speaking; i.e.,
bosslsecreatary:
1. Press the ringing and flashing line (OSL) on your telephone. - You are connected with the caller.
- The line lamp is flashing.
2. Press the same line button a second time. - The caller is placed on hold.
- The telephone that has the prime line (PSL) on which you are speaking rings.
- When the other extension user (PSL) answers the call, you and that extension user can speak. The calling party is on hold, 3. Hang up.
- The call is transferred to the other extension user. - The lamp goes dark.
NOTE
Refer to Multi-Station Appearance for more information on answering
OUTSIDE CALLS
To place an outside call:
1. Lift the handset.
- Listen for internal dial tone.
2. Press the appropriate outside line button.
-or-
Dial the code for an outside line. - Listen for external dial tone. 3. Dial the desired outside number.
NOTE
After a predetermined call connection time, the duration of the call
displays in minutes and seconds on the far right of the display screen on CT-20 or CT-30 models.
Outside Line Access Codes:
LOCAL LONG DISTANCE WATS -
TIE LINES FX-
ANSWERING
A CALL
AUTO ANSWER
The Auto Answer feature lets you take calls by using the Speakerphone inst<:sd of the handset.
To activate the Auto Answer feature:
l Press the programmable auto answer button.
- The auto answer lamp displays a steady pattem.
To disconnect the Auto Answer feature:
l Press the lighted auto answer button.
- The lamp goes dark.
To use the Auto Answer feature:
1. Answer calls by speaking in the direction of the telephone.
INCOMING LINE RINGING.. . When Busy
if you are on an internal call or a call on a line button, and you receive another call to a different line button, you may receive a flashing light and a muted ring. The flashing light and muted ring indicate that a second call is being received.
If you prefer that your telephone not ring when a second call is
received while you are busy on another line button:
1. Lift the handset (while in idle state).
- Listen for dial tone.
2. Dial 5 7 0.
- Listen for success tone.
- The line button only flashes when a call is received on another line button.
If you want to receive a muted ring when a second call is received
while you are busy on another line button or on the same line
button:
1. Lift the handset (while in idle state).
- Listen for dial tone.
2. Dial571.
- Listen for success tone.
- You now receive a muted ring when a second call is received on another Kline button.
NOTE
If you hear a muted ring while you are engaged in conversation, you
INTERNAL CALLS
To answer a call from another extension:
1. Listen for extension ringing.
2. Lift the handset to answer the call.
3. You connect with the calling party.
OUTSIDE CALLS
To answer an outside call (or transferred outside call):
1. Listen for outside ringing.
2. Lift the handset to answer the call.
- Listen for internal dial tone.
3. Press the flashing line button.
- You connect with the calling party.
NOTE
DISCONNECTING
FROM A CALL
To disconnect from a call:
l Hang up.
-or-
Press the FLASH/NEW CALL button.
- Listen for infernal dial tone.
- You may now p/ace or receive anofher call.
To disconnect from a call to answer an incoming call on another
line button:
o Press the FLASH/NEW CALL button.
- The waifing call automatically connects fo your telephone.
NOTE
Depending on how your system is programmed, the FLASH/NEW
CALL button can produce either flash or new call. If your system is
programmed to use this button as a FLASH button, you should press
MULTI-STATION
APPEARANCE
The Multi-Station Appearance feature allows for the same extension
number to appear on up to sixteen CT-1 0, CT-20, or CT-30 telephones.
Each telephone is assigned a specific extensions number referred to as
a Prime Station Line (PSL). All other extension numbers appearing on that telephone are referred to as Other Station Lines (OSL). Calls may be placed and answered from any of the extension lines (PSLs or OSLs)
that appear on your telephone. To activate a feature from your
extension, you can use the PSL or any OSL.
ANSWERING A CALL
To answer a call using a PSL button:
1. Listen for extension ringing tone.
- Your PSL lamp flashes in the slow pattern.
- Corresponding OSL lamps flash at other extensions.
2. Lift the handset. -or-
Press the flashing red PSL button.
- The PSL lamp t7ashes green in the interrupted patfern. - Conversation begins.
- The corresponding OSL lamps af ofher extensions light red in a
steady pattern.
3. Hang up when the call is completed. - Your PSL lamp goes dark.
- Corresponding OSL lamps go dark.
To answer a call using an OSL button:
1. Listen for extension ringing when a call arrives at your OSL.
- Your ringing OSL /amp tlashes in a slow pattern.
- The corresponding lamps at other extensions flash.
2. Lift the handset.
3. Press the flashing red OSL button.
4. Conversation begins.
- Your OSL lamp flashes in fhe interrupted pattern.
- Coiresponding lamps at other extensions light in the
steady pattern.
IDLE LlNE PREFERENCE
,,, :,..,,I,~ I_ ,,,,, _.,. ._ ;!I . . ,‘: -, > J ,
:t. ,
:
Idle Line Preference lets you automatically access an unused line in
order to place a call. This eliminates the need to press an idle line or ICM group button.
To assign or cancel the Idle Line Preference feature:
1. Lift the handset (when telephone is in an idle state). 2. Press the line button.
- The line lamp flashes in the interrupted pattern. - Listen for internal dial tone.
3. Dial 541.
4. Dial one of the following:
- 0 (to cancel Idle Line Preference) - 1 (for Idle Extension Preference) - 2 (for Idle Outside Line Preference) - 3 (for Idle Intercom Preference) 5. Listen for success tone.
6. Hang up.
INTERCOM GROUPS
An intercom group is a predetermined group of extension users who
have the ability to call each other directly using an assigned intercom
group number. There may be up to sixteen extension users per
intercom group and up to fifty intercom groups per system.
To place an intercom call to an extension in your intercom group:
1. Lift the handset.
2. Press the ICM group button.
- The lamp flashes in the interrupted pattern. - Listen for internal dial tone.
3. Dial the desired intercom group extension number.
- Hang up and try later if you reach a busy extension and receive busy tone.
NOTE
PLACING A CALL
To place an internal call using a line (PSL or OSL) button:
NOTE
Outside calls are placed in the normal manner after pressing a line button or dialing a code for an outside line.
1. 2.
3.
Lift the handset.
Press the idle line button. - Listen for internal dial tone.
- The line lamp flashes in the interrupted pattern.
- Corresponding line lamps at other extensions light in a steady
pattern.
Dial the extension number. - Listen for ringback tone.
- Begin speaking when the called party answers.
If the called party answers by pressing the flashing PSL button:
l Only the called party’s PSL number displays on your telephone.
If another party answers by pressing the flashing OSL button:
l The called party’s PSL number and the answering party’s extension
PRIVACY RELEASE
Privacy Release lets you override the privacy feature inherent in your telephone system. A third party can then enter your two-way
conversation. The third party must have the same extension
appearance on their telephone as the one you are using at the time.
You must have a programmable privacy release button to activate this
feature.
To activate Privacy Release during a two-way conversation:
1. Instruct the third party to prepare to enter conversation.
2. Press the privacy release button.
- The privacy release lamp lights in the steady pattern.
- Your line lamp flashes in the interrupted pattern. - Corresponding line lamps flash in the slow pattern.
3. Conversation can begin when the third party presses the line
button.
- The privacy release lamp goes dark.
- The corresponding /amps at the third
party’s
extension flash in the interrupted pattern.- The corresponding /amps at all extensions, other than the two
connected to the outside
pady,
light in the steady pattern.To cancel Privacy Release:
l Press the privacy release button before the third party enters the
conversation.
- Your line lamp flashes in the interrupted pattern.
- Corresponding lamps at all other extensions light in a steady pattern.
NOTE
RINGING LINE PREFERENCE
Ringing Line Preference lets you program your telephone to
automatically select one of the following ringing call types when you lift the handset:
0 Line
l Extension
l ICM group
To assign or cancel the Ringing Line Preference feature:
1. Lift the handset. 2. Press the line button.
- The line /amp f/ashes in the infefrupfed pattern. - Listen for internal dial tone.
3. Dial 5 4 0.
4. Dial one of the following:
- 0 (to cancel Ringing Line Preference) - 1 (for Ringing Extension Preference)
- 2 (for Ringing Exfension and Outside Line Preference) - 3 (for Ringing Extension and Outside Line and Intercom
Preference). 5. Listen for success tone. 6. Hang up.
- The line lamp goes dark.
NOTE
When there are multiple lines ringing simultaneously, the system
selects the ringing line in the highest priority position. See your
TRANSFERRING A CALL
To transfer an inside or outside call from your extensions to an
extension with a different number using the TRANSFER button:
1. Ask the party to wait.
- Your line lamp flashes in the interrupted pattern.
2. Press the TRANSFER button.
- The TRANSFER lamp lights in the steady pattern. - Listen for dial tone.
3. Dial the desired extension number. - Listen for ringback fone.
- Exfension(s) with corresponding line appearances ring.
- Privately announce the Cal/ when the called extension answers. 4. Hang up.
- The calling party connects with the transferred-to party. - The TRANSFER lamp goes dark.
- The line lamp goes dark.
To transfer a call to another extension with the same extension
appearance using the Common Hold feature:
1. Ask the party to wait. 2. Press any idle line button.
- Listen for internal dial tone.
- Corresponding line lamps display the slow flashing pattern.
- The call is automatically placed on common hold and your line lamp flashes in the double interrupted pattern.
3. Dial the desired extension number. - Listen for ringback tone.
- Announce the call privately.
- Direct your parfy to pick up the held call by pressing the
appropriate slowly ffashing line button when the called party
answers. 4. Hang up.
- Your line lamp goes dark.
TRANSFERRING A CALL (Cont’d)
To transfer a call using the Common Hold feature and the ICM
group button:
1. Ask the party to wait.
- The line lamp flashes in the interrupted pattern. 2. Press the ICM group button.
- Listen for internal dial tone.
- The /CM group lamp flashes in the interrupted pattern. - The party is placed on common hold automatically. 3. Dial the intercom group extension number.
- The dialed number converts to the extension number. - Listen for ringback tone.
- Conversation begins when the called party answers by pressing /CM group button.
- Tel the called party to pick up the held call by pressing the appropriate slowly flashing line lamp.
4. Hang up.
- lCA4 group /amp goes dark.
- Calling and called party can converse.
NOTE
Common Hold is a feature that lets you place a call to your extension on hold while letting anyone possessing a telephone
CALLPROCESSINGFEATURES
CALL ANNOUNCE
Call Announce lets you do the following from one CT telephone to
another:
l Transfer a call.
0 Place a call.
Call Announce also lets you announce the call over the speaker on the called party’s instrument. The called party hears a distinctive call announce tone (zip tone) and can respond without lifting the handset if
the CT telephone is programmed for this feature.
To transfer a call using Call Announce:
1. Ask the party on the line to wait.
2. Press the TRANSFER button.
- The TRANSFER lamp lights in a steady pattern. - Listen for key tone.
3. Dial the extension number.
4. Press the call announce button.
- The call announce lamp lights in a steady pattern. - Listen for success tone.
5. Announce the call.
- The called party receives a zip tone and information displays.
Your voice is then heard over the called patty’s speakerphone. - The called party can respond by lifting the handset or using the
SPEAKER button. 6. Hang up.
CALL ANNOUNCE (Cont’d)
To place a call to another extension using Call Announce:
1. Lift the handset. - Listen for dial tone. 2. Dial the extension number.
3. Press the call announce button.
- Listen for success tone. 4. Announce the call.
- The called party receives a zip tone and information displays. - The called party can respond by lifting the handset or using the
SPEAKER button.
You can disable the Call Announce feature at your extension if you do not want to receive a call announce call.
Ts cancel Call Announce calls to your telephone:
0 Dial # 8 0.
- Listen for success tone.
To reactivate Call Announce calls to your telephone:
l Dial #81.
- Listen for success tone.
system may provide Call Announce automatically on internal
If your system operates in the manner, you must use the call
CALL FORWARD ALL CALLS
This feature lets you temporarily divert all calls directed to your
extension (including those to line buttons) to another extension or to an outside or CO/tie line destination.
To activate Call Forward All Calls if you have a programmable forward all button:
1. Lift the handset. - Listen for dial tone.
2. Press the forward all button.
- The forward all lamp lights steadily. 3. Dial the desired extension number.
- Listen for success tone. 4. Hang up.
- Any calls directed to your telephone divert to the forwarded destination.
To activate Call Forward All Calls if you do not have a forward all
button:
1. Lift the handset. 2. Dial * 3 4.
- Listen for internal dial tone.
To forward to another extension:
l Dial the desired extension number.
To forward to an outside number:
l Dial * 0 and the extension speed code (O-9).
-or-
l Dial # # and the system speed code (00-99 or 000-999).
- Lisfen for success tone. 3. Hang up.
CALL FORWARD ALL CALLS (Cont’d) 1. 2. 3. 4. 5. 6. 7.
Each call can only be forwarded to a maximum of two successive extensions or one outside destination.
The Call Forward All Calls feature overrides Call Forward on Busy/No Answer, Call Forward on No Answer, or Call
Forward on Busy if they are used simultaneously.
When the Call Forward All Calls feature is in effect, you hear key tone whenever you lift the handset. This tone reminds you that your extension cannot receive any calls. When your extension has Call Forward All Calls in effect and another extension calls, there is no display.
When you dial an extension that is using this feature to forward to another extension, your display shows:
e The extension number receiving the call.
l The extension number you dialed.
e RING or TALK.
When you dial an extension that is using this feature to forward to an outside destination, your display shows:
l The CO destination number receiving the call.
e SPD.
If the extension you have forwarded to has a display, the
following information is shown:
o The extension number originating the call.
o The extension number registering CFA.
CALL FORWARD ALL CALLS (Cont’d)
To cancel Call Forward All Calls if you have a forward all button:
1. Lift the handset.
2. Press the forward all button.
- The forward all lamp goes dark.
- Listen for success tone. 3. Hang up.
To cancel Call Forward All Calls if you do not have a forward all
button:
1. Lift the handset. - Listen for key tone. 2. Dial * 3 0.
- Listen for success tone. 3. Hang up.
If your telephone has a display and a forward all button, you can verify the Call Forwarding destination when your instrument is idle.
CALL FORWARD - CO
This feature reroutes incoming outside calls to a specified extension’s intercom line. For example, if you are not at ycur primary extension and you are expecting a call on your private line, you can forward tnat call to the intercom line of your destination extension.
To activate or cancel this feature, refer to the Call Forward feature
you want to use.
NOTES
1. The destination extension must have an intercom line.
CALL FORWARD - FOLLOW ME
This feature operates the same as Call Forward - All Calls. It forwards
all incoming calls to the extension you designate. The difference is that
you can forward your extension calls to another extension from the remote extension you are using. You do not have to return to your primary extension to engage this feature.
To activate Call Forward - Follow Me:
1. Lift the handset at the secondary location, - You hear dial fone.
2. Press the Call Forward Follow Me feature button. - (Cff displays).
-or-
Dial * 3 5. 3. Dial 4.
4. Dial your extension number. 5. Listen for success tone
- (DONE displays).
To cancel Call Forward - Follow Me:
1. 2. : -: 2. 3. 4.
Lift the handset. - You hear dial tone.
Press the Call Forward Follow Me feature button. - (CFF displays)
IL * 3 5. Dial 0.
CALL FORWARD - INTERNAL/EXTERNAL
This feature allows you to register different destinations for incoming calls. One destination for incoming internal calls and one destination for incoming outside calls can be specified per extension.
To activate Call Forward - Internal/External:
1. Lift the handset.
- You hear dial tone.
2. Press the Call Forward feature button (CFA, CFB, CFN, or CFBN). -or-
Dial the feature code for a Call Forward feature. 3. Dial 0 for internal call forwarding.
-or-
Dial 1 for external call forwarding.
4. Dial the extension number where you want to have your calls forwarded.
- Listen for success tone. 5. Hang up.
- All calls directed to your telephone will divert to one of the two designated extensions depending on the type of call received (internaVexternal).
NOTE
1. The following definitions are used for the Call Forward features:
l CFA - Call Forward All Calls
l CFB - Call Forward Busy
0 CFN - Call Forward No Answer 0 CFBN - Call Forward Busy/No Answer
2. This feature must be programmed in the system data base for use
CALL FORWARD - INTERNAUEXTERNAL (Cont’d)
To cancel Call Forward - Internal/External:
1. Lift the handset. - You hear dial tone.
2. Press the lighted Call Forward feature button. -or-
Dial the cancellation code for the Call Forward feature programmed. - Listen for success tone.
CALL FORWARD ON BUSY
This feature lets you temporarily divert all calls directed to your extension to another extension when your line is busy.
To activate Call Forward on Busy:
1. Lift the handset.
- Listen for dial tone. 2. Dial * 3 6.
3. Dial the extension number
- Listen for success tone.
4. Hang up.
- Any call directed to your extension diverts to the forwarded
destination when your line is busy.
NOTES
When your extension has Call Forward on Busy in effect and
another extension calls, this information is shown:
. The extension number receiving ‘the call.
. The extension number registering CFB.
To cancel Call Forward on Busy:
1. Lift the handset.
- You hear dial tone.
2. Dial * 3 8.
- Listen for success tone.
3. Hang up.
CALL FORWARD ON BUSY/NO ANSWER
This feature lets you temporarily divert all calls directed to your extension, including those to line buttons or to another extension when your line is busy or you are unable to answer your telephone.
To activate Call Forward on Busy/No Answer:
1. Lift the handset. 2. Dial * 3 3.
3. Dial the desired number.
- Listen for success tone.
4. Hang up.
- Any calls directed to your telephone divert to the forwarded destination when your line is busy or you do not answer.
NOTES
1. When your extension has Call forward on Busy/No Answer in effect and another extension calls, the following information is shown:
l The extension number receiving the call.
l The extension number registering CFBN.
. RING.
2. If the extension you have forwarded to has a display, the
following information is shown:
l The extension number dialing the call.
l The extension number registering CFBN.
. CFB.
-or-
* The extension number dialing the call.
l The extension number registering CFBN.
CALL FORWARD ON BUSY/NO ANSWER (Cont’d)
To cancel Call Forward on Busy/No Answer:
1. Lift the handset.
2. Dial *31.
- Listen for success tone. 3. Hang up.
NOTES
1. Each call may only be forwarded to a maximum of two successive
extensions.
2. The Call Forward All Calls feature overrides Call Forward on
Busy/No Answer if both are used simultaneously.
3. Call Forward on Busy/No Answer cannot be used simultaneously with Call Forward on No Answer or Call Forward on Busy.
4. Call forwarding may be registered in the system using data base
CALL FORWARD ON NO ANSWER
This feature lets you temporarily divert all calls directed to your extension, including those to line buttons or to another extension when
you are unable to answer your telephone. Calls forward to the alternate
destination after ringing at your extension for a predetermined period of
time.
To activate Call Forward on No Answer:
1. Lift the handset. 2. Dial * 3 2.
3. Dial the desired number. - Lisfen for success fone. 4. Hang up.
- Any calls directed to your extension divert to the forwarded destination if you do not answer.
NOTES
1. When your extension has Call Forward No Answer in effect and another extension calls, this information is shown:
l The extension number receiving the call.
l The extension number registering CFN.
. RING.
2. If the extension you have forwarded to has a display, the following information is shown:
l The extension number dialing the call.
l The extension number registering CFN.
CALL FORWARD ON NO ANSWER (Cont’d)
To cancel Call Forward on No Answer:
1. Lift the handset.
2. Dial “31.
- Listen for success tone. 3. Hang up.
NOTES
1. Each call can only be forwarded to a maximum of two successive extensions.
2. The Call Forward All Calls feature overrides Call Forward on No
Answer if both are simultaneously implemented.
3. Call Forward on No Answer cannot be simultaneously used with Call
Forward on Busy/No Answer or Call Forward on Busy.
CALL FORWARD - OTHER EXTENSION
This feature lets you register and/or cancel the Call Forward All Calls feature to another extension.
To activate Call Forward - Other Extension:
1. Lift the handset, - Listen for dial tone. 2. Dial * 3 7.
3. Dial 1.
4. Dial the source extension number and the destination extension number.
- Listen for success tone. 5. Hang up.
- Call f oMrard All Calls is activated from one extension to another.
To cancel Call Forward - Other Extension:
1. Lift the handset. - You hear dial tone. 2. Dial * 3 7.
3. Dial 0.
4. Dial the source extension number. - You hear success fone.
4. Hang up.
I (
OTE
1. This feature can only be registered by an extension using a feature code.
2. An extension number, attendant, or speed calling number can be used as a forwarding destination number.
3. Call Forwarding - Internal/External cannot be recognized using
this feature.
4. When your extension has Call Forward - Other Extension in effect and another extension calls, the following information is shown:
l The extension number receiving the call.
l The extension number registering CFO.
CALLING/CALLED PARTY NAME DISPLAY
This feature displays the calling or called party’s name and number. If
you are the calling party, it displays the name and extension number of the party you are calling. If you are the called party, it displays the name of the party calling you. The feature is automatic if you have a display. This feature also displays the name of a trunk that you are using. Names are registered by CMC command.
If you receive the call from the extension which registers the name
200 CALL
JOANN NOLEN is displayed
If you receive the outside call to the trunk which registers the name
COT111 SPRINT1
CALL
is displayed
NOTE
Two names can be registered to one extension: long name and short name. Long name is a maximum of nine characters and is displayed as
a normal terminating call. Short name is a maximum of five characters
CALL WAITING
When an incoming call terminates at your extension while you are in conversation with another party, you will be alerted by a brief tone burst that you have a waiting call. You may answer the incoming call while holding your current tail. You then have the option to alternate between parties to talk or releasing one call.
To answer a call waiting:
l When you hear the call waiting tone, press
TRANSFER.
- The first party is placed on ho/d. You are now able to speak to the
new caller.
To alternate between the two calls:
. Press the TRANSFER button.
- You p/ace your current caller on hold and are connected
Extension Camp-On
If you place a call to a busy extension, the Camp-On feature lets you alert the called party that you are waiting. You receive a callback when the called extension becomes idle. You do not need to continue redialing until the called party hangs up.
To initiate Camp-On after calling an extension and receiving a
distinctive busy tone (with programmable camp-on button):
1. Press the camp-on button.
- The camp-on lamp iights in a steady pattern.
- The dialed number and CAMP-ON display on the LCD. - Listen for success tone.
2. Hang up.
- Your telephone rings and the camp-on lamp flashes in the slow
pattern when both telephones are available. 3. Lift the handset.
- The called extension rings.
To initiate Camp-On after calling an extension and receiving a
distinctive busy tone if you do not have a programmable camp-on
button:
1. Dial * *.
- Listen for success tone. 2. Hang up.
- The called party hears a brief burst of tone indicating that another call is waiting to be answered.
Extension Camp-On (Cont’d)
To cancel Camp-On before callback if you have a camp-on button:
1. Lift the handset. - Listen for dial tone.
2. Press the lighted camp-on button. - The camp-on /amp goes dark.
To cancel Camp-On before callback if you do not have a camp-on button:
1. Lift the handset. - Listen for dial tone. 2. Dial # *.
- Listen for success tone. 3. Hang up.
NOTE
If the camp-on originator does not answer the callback within a
predetermined time, the camp-on is automatically canceled.
Trunk Camp-On
To eliminate attempts to access a busy outgoing line, Trunk Camp-On lets you place yourself in a waiting queue for a busy trunk. Follow the same procedures as those used in Extension Camp-On.
Off-Hook Trunk Camp-On
After placing an outside call:
1. Listen for distinctive busy tone. 2. Dial * 7.
- Remain on the line. You are automatic&/y placed in queue for the busy trunk.
- When the trunk becomes available, external dial tone is received. 3. Dial the desired outside number.
On-Hook Trunk Camp-On
After placing an outside call:
1. Listen for distinctive busy tone. 2. Dial * 7.
- Listen for success tone. 3. Hang up.
- Your telephone rings when an outside line is available. 4. Lift the handset.
- Listen for internal dial tone. 5. Dial the desired outside number.
- Do not redial the outside code or press a line button.
NOTES
1. You can camp-on to only one outside line at a time; however, you can still originate and receive calls while waiting.
2. If your extension is busy when the callback is attempted, it is placed back in the queue for a second attempt. If the callback is not
placed within a predetermined time, your camp-on is canceled.
To cancel Trunk Camp-On before callback:
1. Lift the handset. 2. Dial # 7.
Auto LCR Camp-On
When automatic LCR Camp-On is active after dialing the LCR code
and the destination directory number:
1. Listen for the distinctive busy tone. 2. You have the following options:
l Manually camp-on.
l Hang up.
l Remain off-hook and the system automatically activates the LCR
Camp-On after a predetermined time; CAMP-ON displays.
3. Wait on- or off-hook for an available trunk. If no trunk becomes available within specific time, the system expands the COS to allow a wider range of available trunks.
- For an on-hook state, callback to extension occurs when a trunk is available. Lift the handset at the callback and the system will dial the destination directory number.
- For off-hook state, hold tone is received until the hunk is available
(if the system flag is so programmed). When the trunk is
available, the system will dial the destination directory number.
LCR Warning Bursts:
l One of two LCR warning burst tones can be programmed to notify
the caller of routing selection:
- One tone notifies the caller that the most expensive route is being used.
CONSULTATION
This feature lets you privately consult with an internal or an external party while you hold another party on the line.
To consult with another extension or an outside party:
1. Ask the party to wait. 2. Press TRANSFER button.
- The TRANSFER /amp lights in a steady pattern. - Listen for key tone.
3. Dial the extension number. -or-
Dial the code for an outside line and the outside number. 4. Privately consult with the called party when the called party
answers.
To return to the original party after consulting with another
extension:
l Let the party you consulted with hang up.
- You reconnect with your original party automatically.
If you have a dialing error, busy tone, or no answer:
o Press the TRANSFER button.
- The TRANSFER lamp goes dark. - You reconnect with the original parfy.
To return to the original party after consulting with an outside
party:
DO NOT DISTURB
Do Not Disturb lets you do the following:
0 Place outgoing calls.
l Make your telephone appear busy to incoming calls from another
extension.
To implement the Do Not Disturb (DND) feature:
1. Lift the handset. - You hear dial tone.
If you have a DND button:
2.
3.
Press the DND button.
- Your DND lamp displays the steady light pattern.
Enter the Silent Message ID if your extension is registered for DND with Silent Message.
- Listen for success tone.
- Calling extensions receive a busy/Silent Message tone when dialing your extension.
- External calls will hear a fast busy tone.
If you do not have a DND button:
1. Dial * 6.
2. Enter the Silent Message ID if your extension is registered for DND with Silent Message.
3. Listen for success tone.
- Calling internal extensions receive busy/Silent Message tone when
dialing your extension. External extension will receive a fast busy
DO NOT DISTURB (Cont’d)
To cancel Do Not Disturb:
. Lift the handset.
- You hear dial tone.
If you have a DNQ button:
. Press the DND button.
- The DND lamp goes dark.
If you do not have a DND button:
. Dial # 6.
- Listen for success tone.
NOTE
1. The primary answering position where your extension number appears receives the interrupted flash pattern. This indicates that
you have implemented Do Not Disturb. You can override Do Not
Disturb from a primary answering position if necessary. 2. When Do Not Disturb is in effect, you hear the key tone when
you lift the handset. This tone reminds you that your extension cannot receive any calls.
3. If you want the primary answering position to be able to override
Do Not Disturb when it is implemented at your extension, you
DO NOT DISTURB OVERRIDE
If you want the Primary Answering Position to be able to override Do Not Disturb when it is activated on your telephone, you must designate that extension number for Do Not Disturb Override.
To program an extension number to override DND on your
telephone:
1. Lift the handset. - You hear dial fone. 2. Dial * 2.
3. Dial the extension number of the Primary Answering Position allowed to override.
- Listen for success tone.
To cancel Do Not Disturb Override:
1. Lift the handset.
- Listen for the dial tone. 2. Dial # 2.
- Listen for success tone.
If you are the Primary Answering Position and you want to override Do Not Disturb on another extension, use the following instructions.
To Override Do Not Disturb at another extension:
1. LitI the handset. - You hear dial tone.
2. Dial the extension number where DND is registered. - Listen for distinctive busy tone.
- DND ovrd button flashes.
3. Press the DND ovrd button. - Listen for ringback tone.
- When the called party answers, you are connected.
NOTE
EXCLUSIVE HOLD
The ExclusiveHold feature lets you place a call on an outside line
button or place a call to your extension on hold exclusively for yourself. No one else can pick up a call which you have placed on Exclusive Hold.
You must have a HOLD button to activate this feature. To put an Intercom call on hold (if your phone does not have an ICM button), you must also have an ICM hold answer button.
To place a call on hold:
1. Ask the party to wait.
2. Press the HOLD button twice.
- The appropriate line or /CM hold answer /amp flashes.
3. Hang up.
To reconnect to a call held on a line:
1. Lift the handset. - You hear dial tone.
2. Press the appropriate outside line. - The line lamp lights in a steady pattern. - You reconnect to the he/d call.
To reconnect to a call which was on your extension number but is
now holding on the ICM hold answer button:
1. Lift the handset. - You hear dial tone.
2. Press the flashing ICM hold answer button.
EXECUTIVE OVERRIDE
Executive Override allows you to break-in on an existing conversation if
you have system authorization to use this feature. Before you are
admitted to the call, a brief burst of tone is heard by both parties in the existing call.
To break-in to an existing call after placing a call to another
extension and receiving a distinctive busy tone:
If you have a programmable override button:
1. Observe the flashing override button.
2. Press the override button.
- 50th parfies in fhe conversation receive oveffide tone.
- You are now joined in a three-party conference.
If you do not have an override button:
l Dial # 5.
- Both parties in the conversation receive override tone. - You are now joined in a three-party conference.
NOTES
1. You cannot break-in to an existing three-party conference. 2. You cannot break-in to a extension with a held call.
EXTENSION PICK-UP
The Extension Pick-Up feature lets you answer another telephone regardless of your assigned pick-up group.
To answer another ringing telephone:
1. Lift the handset. - Listen for dial tone.
If you have a programmable pick-up button:
2. Press the pick-up button.
3. Dial the ringing extension number. - You connect to the call.
If you do not have a programmable pick-up button:
2. Dial 1 7.
- The display shows PK UP. 3. Dial the ringing extension number.
- You connect to the call.
NOTE
The following types of calls cannot be answered with the Extension Pick-Up feature:
l A callback from a camp-on.
l An incoming outside call ringing on a line.
GROUP PICK-UP
The Group Pick-Up feature lets you answer another ringing telephone within your assigned pick-up group without having to know the extension number. Only members of your pick-up group can intercept calls for other group members.
1. Lift the handset. - You hear dial tone.
If you have a programmable group pick-up button:
2. Press the group pick-up button.
- If picking up a call in a multi-group, press the group pick-up button and dial the group number (01-63) .
3. You connect to the caller.
- If you hear error tone, the call has already been answered.
If you do not have a group pick-up button:
2. Dial * 4.
- If picking up a call in a multi-group, dial 6 0 for group pick-up and dial the group number (01-63).
3. You connect to the caller.
- If you hear an error tone, the call has already been answered.
NOTE
The following types of calls cannot be answered with the Group Pick-
MESSAGE LEAWNG
If you return to your office and find your message pick-up iamp on, you
can have as many as four messages waiting.
To return the calls:
1. Lift the handset. - You hear dial tone.
2. Press the message pick-up button.
- The number of the first extension which left a mesS8ge is
automatically dialed.
- When the extensjon being called answers, the message pick-up lamp goes dark unless another message is waiting.
If additional messages are waiting, repeat the steps above to reiurh those calls.
NOTES _ _ _.
1. If the person who left the message does not answer or the
extension is busy, the message’pick-up lamp remains lit and you
may try again later.
2. If you return a call and reach a forwarded-to destination instead of the actual extension which left the message, the message is still canceled because you returned the call.
3. If you place a call to another extension (not one which left a message for you) and that call is forwarded to an extension which
left a message for you, the message pick-up lamp remains tit
because the call was unintentionally returned. You must call the
other extension directly. Use the message pick-up button to
MESSAGE LEAWING.. . Using Message Pick-Up
This feature lets you turn on the message pick-up lamp or message
waiting lamp at another extension, if the other extension is so equipped.
The telephone numbers of the persons leaving messages can be viewed on the display of a CT-20 or CT-30 telephone.
If your system is equipped with the Silent Message feature, an automatic silent message is sent to any extension with a display when the Message
Leaving feature is being used for that extension. (See the Silent Message feature for details.)
To turn on the message pick-up lamp or message waiting lamp at
another extension after calling the extension and receiving a busy
or no answer:
1.
2 3.
Lift the handset. - You hear dial tone. Dial the extension number.
Press the message pick-up button.
- Dial the Silent Message ID (if system has this feature). - Listen for success tone.
- The message pick-up lamp or message waiting /amp lights steadily at the dialed extension.
NOTE
Your call continues to ring or you receive a busy tone and displays
BUSY if the dialed extension does not have a message pick-up button
ING...Using Message Pick-Up (Cont’d)
If you do not have a message pick-up button or do not need to call
the extension where you want to leave a message:
1. Lift the handset. - You hear dial tone. 2. Dial*l.
3. Dial the number of the extension where you wish to leave a message.
- The dialed extension does not ring.
4. Dial the Silent Message ID (if system has this feature). - Listen for success tone.
- The message pick-up lamp or message waiting lamp lights steadily at the dialed extension.
5. Hang up.
NOTE
If you leave a message at another extension that has any Call Forwarding feature or Do Not Disturb in effect, the message pick-up lamp or message waiting lamp lights at the extension that you dial, not at the forwarded-to extension.
To cancel a message previously left at another extension:
1. Lift the handset. - Listen for dial tone. 2. Dial#l.
3. Dial the extension number where the message was left. - Listen for success tone.
- The message pick-up lamp or message waiting lamp lights steadily at the dialed extension.