For your convenience Apress has placed some of the front
matter material after the index. Please use the Bookmarks
Contents at a Glance
Foreword ��������������������������������������������������������������������������������������������������������������������������
xvii
About the Author ���������������������������������������������������������������������������������������������������������������
xix
About the Technical Reviewer ������������������������������������������������������������������������������������������� xxi
Acknowledgments �����������������������������������������������������������������������������������������������������������
xxiii
Chapter 1: Java Basics
■
������������������������������������������������������������������������������������������������������
1
Chapter 2: Java on a PC
■
��������������������������������������������������������������������������������������������������29
Chapter 3: Graphical User Interfaces
■
������������������������������������������������������������������������������57
Chapter 4: More GUI and the Visual Editor
■
��������������������������������������������������������������������101
Chapter 5: Variables
■
������������������������������������������������������������������������������������������������������139
Chapter 6: Conditional Logic and Checkboxes
■
��������������������������������������������������������������175
Chapter 7: Application Improvements
■
���������������������������������������������������������������������������217
Chapter 8: Servlets
■
��������������������������������������������������������������������������������������������������������255
Chapter 9: Java Server Pages
■
���������������������������������������������������������������������������������������289
Chapter 10: Database Access
■
����������������������������������������������������������������������������������������
339
Chapter 11: Custom Tag
■
������������������������������������������������������������������������������������������������381
Chapter 12: JavaServer Faces
■
���������������������������������������������������������������������������������������
425
Appendix A: Installing a Java Application on a PC
■
��������������������������������������������������������
477
Appendix B: SQL
■
������������������������������������������������������������������������������������������������������������503
Appendix C: Installing a Java Application on WAS
■
��������������������������������������������������������509
Java Basics
After a very short history of Java, we will jump right into Java programming. We will create and use a bare bones program to demonstrate the Java basics and the capabilities of Rational Application Developer.
After finishing this chapter, you should understand:
Basic Java keywords and syntax
Classes, methods, and variables
Constructors and comments
Perspectives and views
Using WebSphere, you will be able to:
Create projects, packages, and classes
Use and customize perspectives and views
Write a basic Java application
Run a Java application
The Java Language
Java shares many of the same characteristics as spoken and written languages such as English, Spanish, and so on. For instance, both Java and spoken languages consist of a unique set of words. In Java, these words are called
keywords. Java also uses symbols (; , {}, (), etc.), just as written languages use punctuation marks. All of the symbols and keywords that comprise the Java language are referred to as tokens. (Another definition of a token is the smallest unit of the Java language.) We mention this right at the beginning of the text because error messages often cite an “incorrect token” or “token expected” as problems—not that we are expecting you to make any errors!
Programming languages also have rules of grammar that must be followed. These grammar rules are called the programming language’s syntax. Just as a written language’s grammar dictates how to combine words and punctuation into sentences and paragraphs, the Java syntax dictates how tokens are combined to create Java statements, methods, and classes.
Who makes the rules? Oracle. Sun Microsystems (acquired by Oracle in 2009) originally developed Java in the early 1990s and modeled it after the very popular C++ programming language. Java shares many of the same syntax rules and keywords as C++ but the major difference with Java is its network orientation. The Java language was designed so that graphical, two-way interactions between computing devices can be easily created.
Java programs can also be stored and run on a client. These types of Java programs are called client-based
applications. Finally, Java programs can be stored and run on a server and the results sent to the PC’s browser for display. There are many different types of Java programs that can run on the server. As a group they are called a server-side (or server-based) application. However, each different type of Java program (Servlet, JSP, Bean, etc.) has advantages and disadvantages and a specific purpose in the application. We will explore this in later chapters.
Oracle/Sun has continued to work with many companies (Microsoft, IBM) and international organizations to insure that Java is compatible with all hardware and operating systems. Of course, there is also competition. Microsoft offers a number of programming languages, specifically J# (pronounced “jay sharp”), that compete with Java and an Integrated Development Environment (IDE) called .Net (pronounced “dot net”) that competes with IBM’s WebSphere.
Classes
Java statements are grouped into a class. A class is comparable to what other programming languages call a program. A class begins with a header. The class header identifies the Java code as a class and defines class attributes. For instance, a class header can include an access modifier (e.g., public, private), the keyword class, and the class name with at least one space between each. For instance, the following class header defines a class called Employee (note we still need to add a body to this class definition):
public class Employee
The words public and class are examples of keywords (also called reserved words). A keyword has a specific purpose in Java and can only be used in the manner dictated by the Java syntax. For example, class identifies the code as a class, and public means that any other class can access Employee. The access modifier public must come before the class keyword, and the keywords public or class cannot be used as the name of the class. There are many other keywords (such as if, else, do, while, return) that also cannot be used as a class name, and there are a couple other rules that must be followed. For instance, class names can consist of letters, numbers, and some special characters, however, it is strongly recommended that class names begin with an uppercase letter. Table 1-1
shows a brief list of the rules and examples.
Notice that the third row in Table 1-1 lists “Class” as a valid name but “class” as invalid. This highlights another feature: Java is case sensitive. This means that classes named Employee, EMployee, and EmployeE are all considered different classes. In addition, if you referred to employee or EMPLOYEE, the system would not find a class with that name. Be aware and careful of your capitalization! It is customary (but not required) to begin class names with a capital letter and capitalize the first letter of each “word” within the class name (e.g., MyFirstClass). This mix of upper- and lowercase letters is called “camel case.”
Table 1-1.
Class name rule
Good
Bad
Begin with a letter Sale1 Sale$
1Sales
No spaces Tax_Calc
TaxCalc
Tax Calc
No keywords MyFirstClass Class
All of the Java code following the class header is called the body of the class and is enclosed in braces, { }. Therefore, a valid class definition would be:
public class Employee {}
However, as there are no Java statements between the braces, this class does not do anything.
Java Statements
The class body is comprised of what we will refer to as class variable definitions and methods. Variables are categorized by their scope. This text will define class variables as those variables that can be accessed by any statement within the class. The official Java definition of class variables is much more specific and has many other variable classifications (such as instance variables). However, the distinctions between the various variable scopes are beyond this introductory discussion of Java.
Class variable definitions traditionally follow the class header. Simply stated, the purpose of a variable is to hold stuff, but we will discuss this in more depth later. Variables are also be classified by the type of “stuff” they hold. For example, the following Java statement declares (defines) a String variable called empName. String variables hold String objects:
String empName = new String();
Let’s explain the various pieces of this statement. The definition begins with the variable type (String), at least one space, and the name of the variable (empName). This creates a String variable called empName. Think of this as telling the computer to reserve some space in memory and calling this space empName. Next, the equal sign assigns a value (or in Java-speak, an object) to this variable. Please note that the Java equal sign is not like a mathematical equal sign. The Java equal sign associates an object or value on its right to a variable on its left. So in this case, new String() creates an empty String object (meaning no text has been assigned), and the equal sign assigns the String object to the variable empName.
Another way to look at the statement is that everything to the right of the equal sign creates the String object and everything to the left creates the String variable empName.
Finally, there is a semicolon (;). Java statements end with a semicolon. This is a requirement. In fact, forgetting the semicolon will be your most common coding mistake. (Try not to get too frustrated the first thousand times you do it.) If you do not specify a semicolon at the end of a line, Java assumes that the statement is not finished and will look to the next line for more of the statement. For example, the empName definition above can also be written as follows:
String empName =
new
String();
Although perfectly valid, this is one ugly looking statement.
As mentioned, strings can be assigned text. When a String object is created, a text value can be assigned at the same time as follows:
String empName = new String("Joe Employee");
Methods are subsections of a class that contain executable statements. An executable statement performs an action (e.g., adding two variables, printing, etc.). Methods can receive and return variables. Methods, like classes, require a header. A method header has an access modifier and the method name. In addition, the header defines what data the method expects (is receiving) and what data the method will return. For instance, the following header defines a method called salaryCalc:
public double salaryCalc(int hoursWorked, double payRate)
The access modifier (public) comes first, is followed by a space, and then the type of variable (double) that the method will return. In this case, salaryCalc will return a variable of type double (more on this type of variable later). There is another space and then the name of the method is next. It is customary to begin method names with a lowercase letter. The method name is followed by parameters for the values that the method is expecting. The parameters must be enclosed in parentheses and separated by a comma. Parameters define method variables that will hold the passed values. Method variables are different from class variables because they have a more limited scope. In other words, class variables are considered global in scope because any method (within the class) can use a class variable. Method variables are local in scope because they can only be used in statements within the method that defines them.
Classes can contain specialized methods. For now, the two specialized methods we will discuss are the main method and a type of method called a constructor.
The main Method
When you run a class as an application, Java looks for and runs the class’s main method. The following is a valid main method:
public static void main(String[] args) { }
There must be at least one space between each keyword (public, static,void) and the method name (main). Also, the tokens must be in the order shown. You are already familiar with the purpose of the access modifier public. The keyword void means that the main method does not return anything. String[] args defines the expected data as an array of String variables called args. One nice feature of Java is that if the person running the class does not specify an array of strings, Java automatically supplies one at runtime. Finally, the method is defined as static. A static method does not need any class variables or other methods to work properly. In other words, a static method can be executed as a “stand alone method.” Usually only one class within an application is coded with a main method. This single main method creates the objects that comprise the application. In other words, the main method “kicks off” the application.
Objects and Instantiation
Most classes are not run as applications; rather, most classes are instantiated. Instantiated is a very intimidating word. Essentially, when a class is instantiated, a copy (also called an instance) of the class is placed in the computer’s main memory. A class instance is also called an object. You can actually have many instances of a class or, to say it another way, many objects of the class type.
For instance, we could instantiate two Employee objects. One object could have a pay rate of ten dollars per hour and an employee name of “Joe Smith.” The other Employee object’s pay rate could be twelve dollars an hour and have an employee name of “Mary Jones.”
You actually have already instantiated a class (i.e., you have already created an object). A String object was created when new String(""Joe Employee"") within the following statement was executed:
If you executed the following statements, you would have two more String objects:
String empAddr = new String("1 Main St"); String empCSZ = new String("Albany, NY 11508");
Therefore, in the example, there are three unique String objects. Since an object is an instance of a class, this means that there is a String class. The String class was created by the Java developers and “comes with Java.”
If you’re a little confused, don’t worry. We will cover instantiation and explain “what comes with Java” in greater detail in later chapters. For now, just remember that there are a number of very useful classes that come with Java and that these classes are used to build sophisticated Java applications quickly.
Constructors
When an object is created, Java runs the instantiated class’s (i.e., the object’s) constructor. A constructor is a method with the same name as the class that does not return any value. For example, the constructor method for the Employee class would be called Employee and could be defined as follows:
public Employee() { }
Notice that a return variable type is not specified. This is a rule for constructors: they cannot return any data. The example is also considered a null (or default) constructor because it does not accept data (i.e., no parameters are specified). However, a constructor can accept information. The following defines a constructor that accepts a String object, creates a String variable called name and assigns the String object to name:
public Employee(String name) { }
As mentioned, when the Employee class is instantiated, the constructor method is automatically run. In the above example, however, the constructor does nothing. Constructors are often used to initialize variables needed by the class methods. For instance, the following constructor assigns the passed String object to the class variable empName:
public Employee(String name) { empName = name;
}
This is similar to the algebraic statements: A=1, B=A. In the Java example: name = String object, empName = name. Therefore, name and empName contain the same value.
WebSphere
WebSphere is a group of IBM software products that includes all of the “development tools” that a programmer would need to write, debug, and install Java applications. “Development tools” is a category of software that usually includes a code editor, syntax checker, debugger, and many other useful programming utilities. In addition, WebSphere includes software that can be installed on any computer to make that computer a Java application server.
There are many “versions” of WebSphere products (Express, Standard, Enterprise, etc.). These different versions simply have different sets of tools. As of this writing, the Enterprise Editions have the most complete and powerful set of Java development tools.
Tutorial: Starting Rational Application Developer
Let’s get started:1. Assuming that WebSphere has already been installed, from the Windows desktop, click the Start button (in the lower left of the screen), then All Programs.
2. Within the program list find and click on the entry for IBM Software Delivery Platform, IBM Rational Application Developer, then Rational Application Developer (see Figure 1-1).
Note
■
if rational application Developer is running for the first time, this may take a little while.
4. Rational Application Developer (RAD) will be started and if this is the first time RAD has been run, the Welcome pane will be displayed (see Figure 1-3). Close the Welcome pane by clicking the X in the pane tab (indicated by the arrow in Figure 1-3).
The Rational Application Developer (RAD) will be started and the default “perspective” will be displayed (see Figure 1-4). RAD provides several different “views” of Java applications. These different views are called perspectives. Each perspective provides a unique set of panes, functions, command options, tool bar buttons, and so on. Initially, the Java EE (Java Enterprise Edition) perspective is displayed. You can tell which perspectives are open by the icons on the upper right of the window. In this case, the arrow in Figure 1-4 is pointing to the Java EE icon.
Tutorial: Perspectives
Let’s examine perspectives:1. Close the perspective by right-clicking the JEE icon and choosing “Close” from the shortcut menu. The result will be Figure 1-5.
2. Click the “Open a Perspective” icon (indicated by the arrow in Figure 1-5). A shortcut menu will be displayed with an option for “”Other.”” A list of available perspectives can be viewed by choosing the “Other” option.
3. Click on the “”Other”” option. The “”Open Perspective”” window will be displayed (see Figure 1-6).
4. For now, simply select “Java” from the “Open Perspective” window and click the OK button. The Java perspective will be displayed (see Figure 1-7)
Figure 1-5.
The initial Java perspective is comprised of four panes. All the panes can be resized by clicking and dragging on their borders and some panes can contain different views. Each view has a tab at the top of the pane that displays the views name and, at least, a close button. You can switch between views by clicking on the tabs. Initially, the Package Explorer view, the editing area, and Outline view display nothing. However, as Java classes are created the views contents will change. Most of the time, these views will display (respectively) a project navigation tree, source code, and a Java class navigation tree. One of the views provided in the task pane (at the bottom of the perspective) keeps track of work (e.g., problems) that needs to be completed.
Tutorial: Creating and Deleting a Project
RAD stores everything in projects. Projects are comprised of packages and packages contain Java classes. This means that a project and package must exist before creating a Java class. (Think of projects and packages as specialized folders. In fact, a project and its packages are implemented as folders when a project is exported from RAD to a Windows environment.)
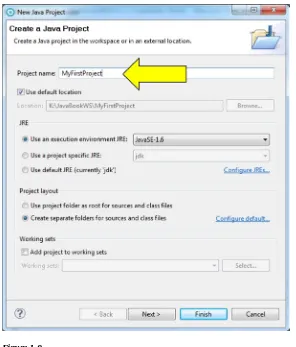
2. The “New Java Project” window will be displayed (see Figure 1-9). At the “New Java Project” window, specify MyFirstProject and click the Finish button.
Note
■
MyFirstproject now appears in the package explorer view.
3. Selecting an item in the project navigation tree results in the item name being enclosed in a rectangle with a pale blue background. Because MyFirstProject was just created, it is automatically selected by RAD. (An item can also be selected by clicking its name or icon.) Any subsequent actions you specify will be performed against the selected item. On the Menu bar, click Edit, then Delete.
4. At the “Delete Resources” window, click the “Delete project contents on disk” checkbox, and then the Yes button. The Java Perspective is redisplayed. Notice that MyFirstProject has been removed from the Package Explorer view. The delete was performed against MyFirstProject because MyFirst-Project was the selected item.
5. Perform steps 1 and 2 again to recreate MyFirstProject. The “Package Explorer” pane should look like Figure 1-10.
Tutorial: Creating a Package
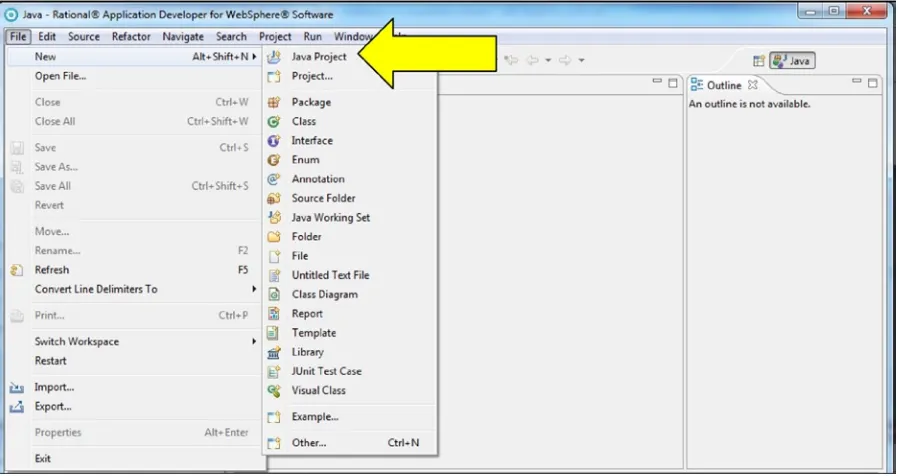
Now let’s create a package:1. On the Menu bar, click File, New, then Package to display the “New Java Package” window.
Note
■
MyFirstproject/src already appears in the source folder field. this is because MyFirstproject was selected in
the “package explorer” view and raD requires that all source code packages be in project subfolder called src (source).
(raD does a lot for the programmer but it also sometimes imposes its own unique standards.) the Browse button to the
right of the source folder field can be used to find and select a different project.
4. Click the Finish button. Notice that myFirstPackage is selected in the “Navigation Tree” within the “Package Explorer” view and appears as a branch or subitem within src (see Figure 1-12).
Figure 1-11.
The project navigation tree allows the programmer to easily navigate and manipulate the Java projects, packages, and their contents. Notice to the left of each item name is an icon that indicates the item type. To the left of some of the item type icons are the symbols ( , ). These are expansion icons. Expansion icons appear next to items that contain other items. These icons indicate if the tree item’s contents are displayed ( ) or are not displayed ( ). In this case, the contents of MyFirstProject and src are displayed, but the JRE (Java Run time Environment) System Library package’s contents (created by RAD when the project was created) are not. myFirstPackage does not have an expansion icon because it was just created and is empty. You can display and close a sub-tree by clicking the item’s expansion icon or double-clicking the item name or item type icon.
5. Click on the MyFirstProject expansion icon. The contents are hidden and the expansion icon is changed.
6. Click on the MyFirstProject expansion icon again. The contents are displayed and the expansion icon is changed back.
7. Double-click the project icon for MyFirstProject to hide the contents and then double-click the project name (MyFirstProject) to redisplay the contents.
Tutorial: Creating a Java Class
Do you remember all the syntax rules for defining a class header? Probably not. Fortunately, RAD will walk you through the process. In other words, just as you created a project and a package, RAD will supply a series of windows to help you easily define a class:
1. If myFirstPackage is not selected, select it by clicking its name.
Note
■
the source folder and package names are already specified. Because myFirstpackage was selected in step 1,
raD assumed that was where the class should be created. a different project and package can be specified by simply
entering their names in the appropriate fields or clicking the Browse buttons next to each field.
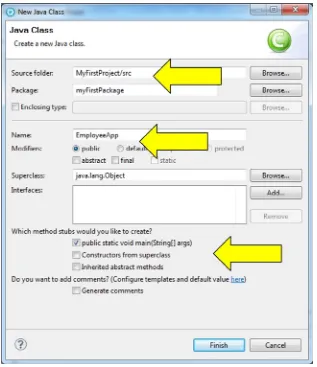
3. Specify EmployeeApp in the Name field. Notice that the access modifier public has already been selected. Other modifiers can be chosen by clicking the other modifier option’s radio button or check boxes.
4. Make sure the main method option is the only method stub option selected. Since EmployeeApp will be run as an application, it needs a main method. By checking the “main method” option, RAD will automatically generate an empty main method (e.g., a stub) relieving you from having to code it.
Notice that the EmployeeApp class was stored in a file called EmployeeApp.java within myFirstPackage and that if myFirstPackage is selected it has an expansion icon. Java source code must be stored in a file that has the same name as the class and the file name extension must be java. RAD generates the correctly named file automatically so there is less chance of error.
Please note the following about the RAD generated Java code.
RAD has included comments in the source code. Comments are nonexecutable statements. This means that comments do not perform any computing function. Characters that appear within /* and */ or /** and */ are treated as comments. These comments can span multiple lines. For a single line of comments use //. Any characters that appear after // on a line are considered comments.
Comments are used to document the Java code. Generally, programmers will include their name, the date the class was created, as well as, brief descriptions about what the class does and how the various methods work. Notice that RAD generated two comment sections: a Methods comment section (in blue, right before the method header) and a Method body comment section (in green, after the method header). Each comment section has default text that will be inserted into every class and method that RAD generates. To change the comment default text, click Window, then Preferences.... At the Preferences window, expand the Java item then the Code Style item and select Code Templates. Two expandable items are displayed: Comments and Code. The Methods comment is within Comments and the Method body comment is within Code. Expand the appropriate item and then select either of comment items to display the default text. To change the text, click the Edit… button, modify the text, and then click the OK button. One would think that the default text has been changed—one would be wrong! You must click the Apply button and then the OK button to make the change permanent.
Changing comments that have already been inserted in a class is much easier. Simply select the comment text and type over it.
When a class is defined within a package, a package statement must be included. The package statement must come before the class header and follows the simple syntax of the package keyword followed by at least one space, the package name, and a semicolon (e.g., package myFirstPackage;). The package name actually becomes part of the file identifier. For example, if the file name is Employee and the package is myFirstPackage, the file is identified as myFirstPackage.Employee.
We’ll prove that the package statement is required by “commenting it out.”
6. Move the cursor before the package keyword and insert two forward slashes (//). Notice that the text changes to green. Green text indicates that Java considers the text a comment and this text will not perform any function.
Note
■
a light bulb icon and a red circle with a white X appears to the left of the very first line. this is an example of
raD’s syntax checking. When raD detects an error, the line raD believes has an error will be flagged with a red circle.
if raD has suggestions on how to fix the error, the light bulb icon will also appear.
7. Move the mouse cursor over the red circle to display the error message text. The text “The declared package” does not match the expected package “myFirstPackage” will be displayed.
8. Click the light bulb icon to display the possible solutions. A box with a list of solutions will be displayed. The first solution option will be selected and a yellow box with more details regarding the selected solution will be displayed. In this case, the Add package declaration ‘myFirstPackage;’ solution should be selected and the exact statement that will be inserted and where within the code it will be placed should appear to the right.
Note
■
if you double-click a solution, raD will make the changes to the code. in this case, the package statement
is there but has been commented out so we don’t want raD to insert the statement. We will simply uncomment the
statement using a raD shortcut.
9. Click anywhere on the commented out package statement line to select it.
10. Press and hold the Ctrl key, then press the forward slash (/) key. (We will use Ctrl-/ to indicate this action).
Notice that the two forward slashes are removed. The package statement is now executable and the error icon on the first line is gone. Statements can also be commented out quickly by selecting the line(s) and pressing Ctrl and forward slash (Ctrl-/). Essentially Ctrl-/ acts as a toggle switch to comment and uncomment statements.
11. Select all the lines of the class.
12. Press Ctrl-/ to change them all to comments. 13. Press Ctrl-/ to uncomment all the statements. 14. On the menu bar, click File and then Save.
Tutorial: Entering and Editing Java Statements
Now let’s do some editing:1. Click to the right of the opening brace ({) in the main method header. The insertion cursor (a blinking vertical line) should appear at the far right of the line.
2. Press the Enter key to insert a blank line. 3. Enter the following statement on the blank line:
This statement will display the text “Howdy.” Why and how this statement works is beyond your understanding right now. Accept the fact that there is a class called System that contains a wonderful object called out. The out
object has a nice method called println that will display anything passed to it. This statement passes the simple text “Howdy” to the println method, and println displays the text.
The code should look like Figure 1-15.
Notice the asterisk, to the left of the text EmployeeApp.java in the tab at the top of the content pane. This means that there are unsaved changes in the code.
4. Save the code by clicking File and then Save. (You can also click the floppy-disk icon on the tool bar.) Notice that the asterisk is no longer there.
Tutorial: Running an Application in RAD
This application simply prints out the text “”Howdy””. Within RAD, the Console view displays text and system messages. The Java perspective does not offer the Console view in any of its panes; however, perspectives can be customized by adding or deleting views.
1. Add the Console view by clicking Window, Show View, and then Console. The Console view will replace the Problem view in the Task pane at the bottom of the Java perspective window. Did you notice all the views that were listed when you clicked Show View? We will explore other views in later chapters and demonstrate many of RAD’s very useful tools offered in these views.
2. On the Menu bar, click Run, and then Run Configurations.... The Run Configurations window will be displayed.
RAD will display a “run configuration” for EmployeeApp in the “Run Configurations” window. In the future, you can simply select this run configuration to execute EmployeeApp.
4. On the “Run Configurations” window, click the Run button.
The first time a Java application is executed it may take a while because RAD must perform one-time
configuration and setup tasks. Remember, the Console view is the default area for printed text to be displayed and, in this case, the text “Howdy” appears. This proves that the main method is executed when a Java class is run as an application.
The last application executed is considered the default application. To rerun EmployeeApp, simply click the Run button ( ) on the Tool bar. (RAD runs the default application when the Run button is clicked.)
5. In the main method, add the following statement before the println statement:
String sample = new String("Howdy from EmployeeApp");
This statement will create a String variable called sample and associate the text “Howdy from EmployeeApp” to it. We will now change the println statement to print the text associated with the variable sample.
7. Save EmployeeApp by clicking on the floppy-disk icon.
8. Click the Run button. The text “Howdy from EmployeeApp” will be displayed in the Console view.
After an application has been run (besides becoming the default application to run), the application is also added to a list of “applications to run.” Instead of re-specifying an application to run, it can be selected from this list.
9. Click the black arrowhead to the right of the Run button to display the “applications to run” list.
EmployeeApp should be displayed at the top of the drop down menu. The application at the top is the default application to run. However, any application can be selected and run from the list by simply clicking it.
Tutorial: Breaking the Code
Many engineering disciplines use destructive testing to understand how a product or design will function. For instance, automobile manufacturers crash cars in walls to improve design and safety features. Programmers can do the same with Java code. Removing pieces of code will help you understand what function the code performs. In addition, producing errors highlights common programming mistakes and their associated error messages. Hopefully, by producing the errors now, you will recognize them sooner and fix them faster when you make them later.
1. In EmployeeApp, change the name of the main method to Main (capital M).
2. Click the Run drop down button and select the EmployeeApp configuration. Notice that RAD prompts you to save the EmployeeApp source code.
3. On the “Save and Launch” window, click the OK button. RAD will display a Java Virtual Machine Launcher window with a Fatal exception message and in the Console view one of the most common Java application error messages will be displayed:
Exception in thread "main" java.lang.NoSuchMethodError: myFirstPackage/ EmployeeApp.main([Ljava/lang/String;)V
The key portions of this message are the text “NoSuchMethodError” and then the identification of the main method—“myFirstPackage/EmployeeApp.main.” Notice that the error message doesn’t tell you exactly what the problem is (i.e., the Main method doesn’t begin with a lowercase m), only that there is no main method. Really, what the message means is that there is no main method coded exactly as it is needs to be. The main method header has to be coded exactly as specified earlier. Any deviation will result in the above error. When you get this error, you will have to figure out which picky Java syntax requirement was violated in the main method and correct it.
4. Close the Java Virtual Machine Launcher window by clicking the OK button. 5. Put the lower case m back in the header by clicking Edit then Undo in the menu bar.
Notice that RAD will undo the change even though the source code was saved. 6. Save the source code, and run the program to verify that code was fixed correctly.
Now, let’s break something else! 7. Select the entire main method.
8. Cut and paste the method after the EmployeeApp class’ ending brace.
Notice that there is now a red squiggly line under the class and main ’method’s closing braces. Like a word processor, this is another way RAD indicates that there is an error. Again, we’ll ignore ’RAD’s warnings and run the application.
9. Run the application by selecting the EmployeeApp run configuration. 10. On the Save and Launch window, click the OK button (to save the changes).
RAD tries to warn us about errors by displaying the Errors in Workspace window. (Please also notice that RAD calls “running an application” a “launch.” Launches will come up later in the book.)
11. Click the Proceed button on the Errors in Workspace window to run the application. The following error message will be displayed in the Console:
Exception in thread "main" java.lang.Error: Unresolved compilation problem: Syntax error, insert "}" to complete ClassBody
at myFirstPackage.EmployeeApp.main(EmployeeApp.java:16)
The first line of the error message simply means there was a fundamental Java language syntax error (i.e., compilation problem). The second line tries to pinpoint the error and offer a solution (i.e., there is a syntax error because the class body was never ended with a closing brace.) The red squiggly line under the first closing brace indicates that RAD thinks that token is incorrect. If you move the cursor over that error icon or the red squiggly line, RAD will display a message saying that the token } should be deleted. However, the real problem is that the main method is outside of the class body. Obviously, RAD is not too good at identifying this particular error. The third line of text explains where the error was found. Notice it contains the package name, class name, and method name where the error was found, as well as, a hyperlink to the suspected line with the error.
The Java statement/line that RAD believes caused the error is highlighted. Every line in the source code is assigned a sequential number, but initially the line numbers are not displayed. However, you can change this (and other appearance aspects of any view).
13. Cut and paste the main method back within the EmployeeApp class body. Notice that the error icons to the left of the source code are removed but there is still an error icon in the tab at the top of the Editor pane.
14. Save the source code. The error icon in the tab is removed.
15. Click Window, then Preferences to display the Preferences window.
16. In the list on the left, expand the General item, the Editors item and then select Text Editors (see Figure 1-18).
The Text Editors pane is displayed on the right of the window. The checkboxes and text fields provide control over various options. Notice that the “Show line numbers” checkbox is not selected.
17. Click the “Show line numbers” checkbox to select it. 18. Click the Apply button and then the OK button.
The line numbers are now displayed to the left of each line (see Figure 1-19).
19. Click to the right of the open brace on line 8.
RAD placed a gray box around the matching brace on line 13. When you click to the right of a paired token (e.g., a bracket, brace or parenthesis), RAD will identify the matching token by enclosing it in a gray rectangle. Being able to match paired tokens is extremely useful as an application’s source code grows in size. The “Highlight matching brackets” option in the Java/Editor category within Preferences controls this feature.
20. On line 10 in EmployeeApp, delete the semicolon at the end of the statement. RAD puts a red squiggly line under the closing parenthesis. Remember, a red squiggly line means RAD thinks there is a problem.
21. Move your mouse pointer over the red squiggly line.
RAD will display a “hover” message saying a semicolon is missing. If you click on or in the space before the red squiggly line, the error message will be displayed in the RAD window bottom border on the left.
Notice that RAD does a good job of identifying the missing semicolon problem.
22. Save the source code. RAD places an error icon to the left of the line.
23. Type the semicolon at the end of line 10. The error icon to the left of the line becomes inactive but is still visible. RAD is reminding you that the fix to the code is not saved. 24. Save the code to remove all error messages and error icons.
A red squiggly line is placed under the text sample in line 9 and if you display the error message, you will see that RAD suggests entering a semicolon. RAD does not do as good a job identifying this error. While technically it is true that placing a semicolon after sample would make a valid statement, this is not the real source of the problem. Rather, this shows that RAD often identifies/highlights the token before or after the real problem and error messages will often suggest incorrect solutions.
Be careful. Because of the widespread use of word processing software, most people assume that whatever text is “red squiggled” is the problem. For instance, a novice programmer might think that the text sample is the problem and try changing it or delete it entirely (since it appears to be the problem).
Avoid compounding a mistake by thoroughly reading the error message and looking for the problem in the statement(s) or token(s) preceding or following the “red squiggled” text.
26. Replace the deleted equal sign on line 9 and run the application to verify it is correct. 27. On line 9, change the “s” in sample to a capital “S.” This changes the variable name to
“Sample.”
Notice that line 10 is flagged as an error. There are two lessons to be learned. First, Java is case sensitive. Line 10 refers to sample but there is no variable sample, however, there is a variable Sample. For beginner programmers, incorrect capitalization is a source of countless errors. Second, sometimes RAD’s first solution is correct. Click on the light bulb icon to display solutions. Notice that RAD suggests changing the variable name to Sample. This is a viable solution to remove the error indicators.
28. Copy the println statement from line 10 and paste it on line 12.
RAD flags the statements on both lines 10 and 12 as errors. If you display the solutions, RAD will once again suggest changing the variables from sample to Sample. In this case, this is not the best solution. Instead, you should change the variable definition on line 9 not the two statements on lines 10 and 12.
29. On line 9, change Sample to sample.
Notice that RAD removes both errors icons. This is an example of a cascading error. A cascading error is a single error that results in many error messages being generated. This is why you shouldn’t panic if many lines of source code are flagged as incorrect. Often solving one error will clean up many error messages. This is also why you should
solve errors within the source code from top to bottom.
30. Delete the println statement from line 12 and save the source code for EmployeeApp. The code should look like Figure 1-19.
Results of the Tutorial
Here’s what we now have:1. A new project called MyFirstProject.
2. In MyFirstProject/src, a new package called myFirstPackage. 3. In myFirstPackage, one file called EmployeeApp.java.
Review Questions
1. What is the minimum Java source code needed to define a class? 2. What is the syntax to define a String variable?
3. Where must the package statement appear in the class? 4. In a method header, where is the keyword void specified?
5. How can you tell if there are unsaved changes in a source code file?
6. When an object is instantiated, which is done first: the constructor is executed or class variables are created?
7. Determine which of the following statements are valid and which are invalid:
String coolStuff
public displayCoolStuff() {} String veryCoolStuff("ice"); string veryCoolStuff;
String extremelyCoolStuff = new String(liquid nitrogen);
8. What is a token?
Review Exercise
Overview
In the exercises, you will create a Java-based application for a company called TNT Salvage. TNT receives unwanted consumables (food, kitchen and laundry products, toiletries, etc.) from large retail organizations, repackages them, and sells them to smaller retail outlets at a significant discount. Throughout the chapter exercises, you will create an application that accepts information about shipments from the large retailers.
Detail
In this first exercise, you will create a Java class called ShipmentApp that creates and uses five variables to store shipment information and displays that information.
1. Start RAD and create a new Java project called ReviewEx. 2. In ReviewEx, create a package called c1.
3. In c1, create a public class called ShipmentApp with a main method.
At this point, the code should consist of:
a package statement
a class header
the opening and closing braces for the class body
a main method header
4. Save the ShipmentApp source code and verify that there are no errors. 5. Define five String variables in the main method called:
shipmentNum
supplierName
rcvDate
rcvTime
employeeNum
And assign the following text:
99
Costco
12/15/2011
10:25 AM
33
6. Save the ShipmentApp source code and verify that there are no errors. 7. Insert five println statements to display each of the String variables. 8. Save the ShipmentApp source code and verify that there are no errors.
Check that the Exercise Was Done Correctly
Finally, let’s check that everything was done correctly:1. Verify that ShipmentApp.java is in c1.
2. Run ShipmentApp and verify that the Console displays the following: 99
Costco
12/15/2011
10:25 AM
Java on a PC
In this chapter, we will expand on your knowledge of Java applications by showing how to instantiate (create) an object and demonstrating how constructors work. We will highlight the key differences between running a Java class as an application and creating an object. We will also provide a more detailed explanation of how Java “works” and “what comes with” Java. This explanation will also cover what really happened when you clicked buttons and chose RAD (Rational Application Developer) options in the previous chapter. In addition, we will explore some online documentation that explains the classes that “come with” Java.
After completing the chapter, you should understand the following:
Instantiation and objects •
The SDK, JVM, and JRE •
Bytecode •
.java and .class files •
Compiling Using WebSphere, you will be able to:
Create Java classes that pass and receive parameters •
Java Applications
In the previous chapter, the Java class EmployeeApp was created to be run as a Java application (i.e., EmployeeApp had a main method). In the real world, very few Java classes are run as applications. Most Java classes are instantiated. In other words, an instance of the class (called an object) is created. When an object is created the class variables are created and the constructor method is run. For example, if there was a class called Employee and an Employee object was created, the Employee class variables would be created and the Employee constructor would be run.
Constructors are primarily used to perform “set up” functions. This may mean initializing variables, creating objects, setting property values, establishing connections to remote resources, etc. Initially the constructor
examples will seem very simple but as we expand the examples in future chapters, the real power and purpose of the constructor will become apparent.
Tutorial: Passing Parameters and Formatting Source Code
Let’s get started:1. Start RAD and in the Package Explorer pane, select myFirstPackage in MyFirstProject/src by clicking on its name.
2. On the menu bar, click File, New, and then Class to display the “New Java Class” window.
Notice that the source folder and package names are already specified. Because myFirstPackage was selected in step 1, RAD assumed that was where the class should be created. A different project and package can be specified by simply entering their names in the appropriate text fields.
3. Specify Employee in the Name field.
Notice that the access modifier public has already been selected. Other modifiers can be chosen by clicking the other modifier’s option radio button or check boxes.
4. Make sure none of the method stub options are selected.
Employee will be instantiated, not run as an application. Therefore, Employee does not need a main method. 5. Click the Finish button to redisplay the Java perspective.
The Employee class should appear in the Navigation tree (along with the already existing EmployeeApp) and the Employee source code generated by RAD will be displayed.
6. Click on the blank line (line number 4) that follows the class header.
7. The insertion cursor (a blinking vertical line) should appear at the far left of the line. 8. Press the Enter key to insert a blank line.
9. Define a String class variable by entering the following statement on the new line:
String empName = new String();
10. Press Enter to insert another blank line.
11. Define a constructor by entering the following 3 lines:
public Employee(String name) { empName = name; }
Did you notice that when the Enter key is hit, RAD automatically indents the insertion cursor and after a token is entered, repositions the token correctly? This is done to make the code easier to understand (e.g., clearly show which statements are in a method, which brace closes a method and the class, etc.) Although RAD tried to format the code as it was entered, the code is not formatted as well as it could be. Badly formatted code can be difficult to read and therefore easier to make mistakes. Fortunately, we can make RAD reformat all the source code and even specify the formatting rules to follow.
12. On the menu bar, click Source and then Format.
RAD will indent any nonindented or incorrectly indented class variable definitions and methods within the class. In addition, any method statements are positioned as if they were indented twice. Notice that the statement on line 7 was moved to the left and the constructor’s closing brace on line 8 was indented. RAD also added a blank line to clearly separate the class variable definition from the constructor. Again, the purpose of the indentation and spacing is to make it clear where methods begin and end and which statements are contained within a method.
13. Enter the following statements after the constructor to define a method called displayName:
public void displayName() { }
This new method is intended to display the employee name that is associated with the variable empName. Because empName is a class variable it does not have to be passed to the displayName method (remember class variables can be accessed by any method within the class). displayName( ) is also defined as public (so other classes, like EmployeeApp, can access it) and void was specified because nothing is returned.
14. Add a blank line after the opening brace ({ ) of the displayName method and then enter the following statement:
System.out.println(empName);
This statement displays the employee name by passing empName to the println method.
15. Click Source (on the Menu bar), and then Format to reformat the source code. The code should look like Figure 2-2 .
16. Save the source code by clicking File and then Save.
Tutorial: Defining a Java Application
We need to change EmployeeApp to create (instantiate) an Employee object and then invoke the Employee object’s displayName method. Figure 2-3 shows the relationship between the user, EmployeeApp, and the Employee object.
1. In the Package Explorer pane, double click EmployeeApp to display the Java source code.
Just as EmployeeApp currently creates (instantiates) a String object, we will change it to instantiate an Employee object.
2. Replace the statement that creates sample with the following:
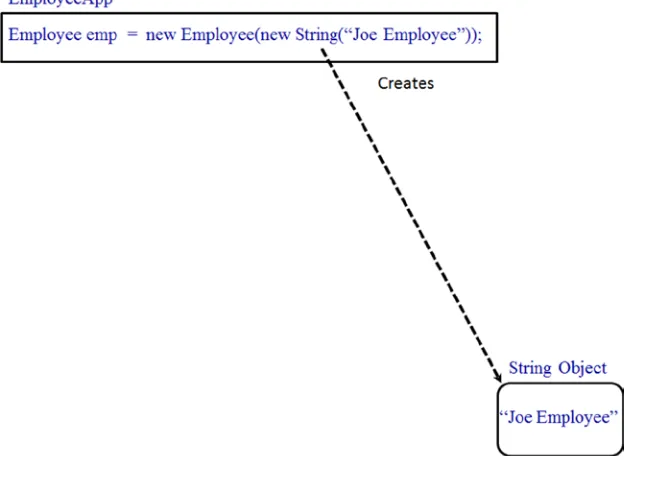
Employee emp = new Employee(new String("Joe Employee"));
Notice that the syntax for creating the Employee object and assigning it to a variable is the same as creating a String
object. First you specify the variable type (the class name Employee) followed by at least one space and the name of the variable (emp). emp is assigned (=) a new Employee object (new Employee). Finally, the new Employee object’s constructor is passed the String object it is expecting (in this case, a String object with the text “Joe Employee”).
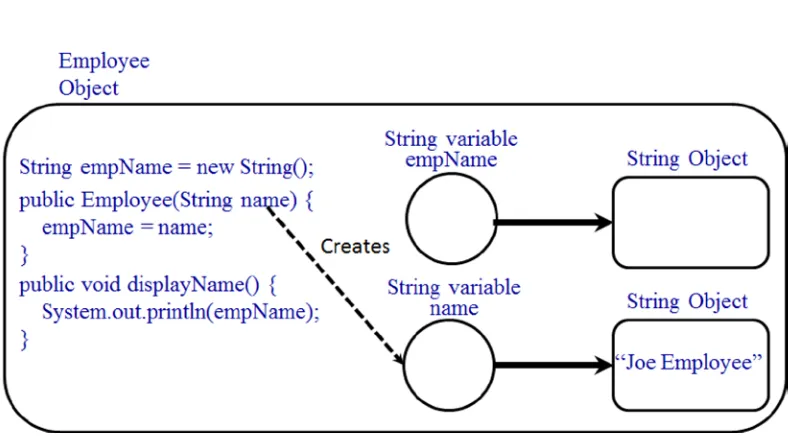
Let’s go into a little more detail about what exactly is happening between the Employee and EmployeeApp classes. Figure 2-2.
A. When you invoke/run EmployeeApp as an application, the computer “knows” to load the statements in EmployeeApp’s main method into main memory and execute them. The square in Figure 2-4 represents the main method in main memory.
The EmployeeApp statement is considered an assignment statement and is doing quite a bit of work. It creates two objects (one String and one Employee) and an Employee variable. It assigns the Employee object to the variable and passes the String object to Employee. Wow! We better look a little closer at each piece of the statement and explain what each does.
First of all, in an assignment statement everything to the right of the equal sign is executed first. Then everything on the left side of the equal sign is executed and lastly the assignment is done. If there are multiple functions within a statement, any statements in parentheses are executed first and then they are executed from right to left. So in this example:
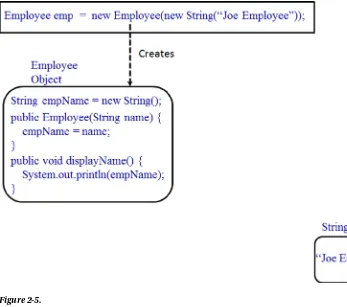
B. The code new String("Joe Employee") is executed first because it is on the right side of the equal sign and in parentheses. The code creates a new String object (represented by the first rounded corner rectangle in Figure 2-4) with the text “Joe Employee”.
C. Then the code new Employee( ) is executed. This creates a new Employee object (represented by the second rounded corner rectangle in Figure 2-5). When an object is created all the executable code from the class is loaded into main memory, the class variable statements are executed, and if there are values being passed to the new object, they are given to the constructor and the constructor is executed.
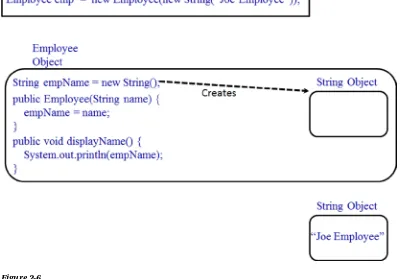
D. In the Employee example, the first Employee statement executed is String empName =newString();. This is another assignment statement so the code on the right of the equal sign (newString()) is executed first. This creates another String object (represented by the third rounded corner rectangle in Figure 2-6) with no text.
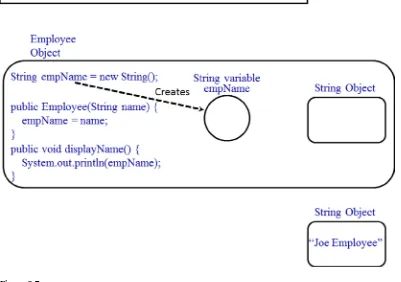
E. Next the code on the left of the equal sign (String empName) is executed and the variable empName is created. (This is represented by the circle in Figure 2-7.)
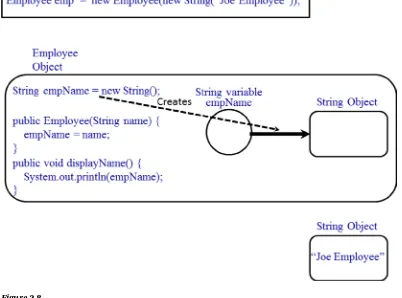
F. Finally the assignment is made (i.e., the equal sign is executed) that ties the variable empName to the newly created empty String object (see Figure 2-8).
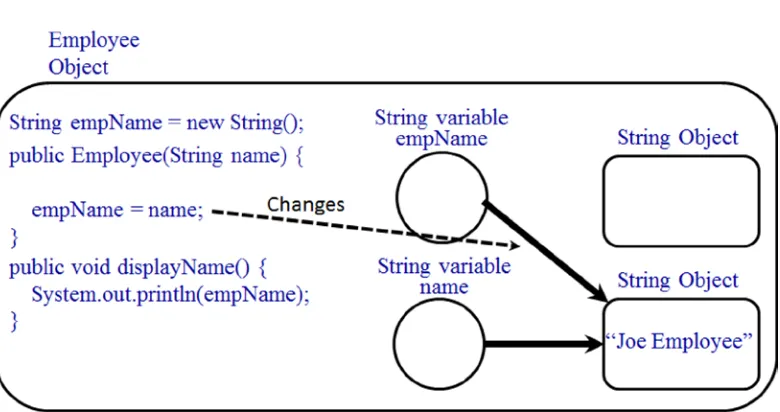
G. Then the Employee constructor (i.e., the Employee method) is executed. The Employee method header creates a new String variable called name. The computer (i.e., the JRE) then assigns the String object with the text “Joe Employee” that was passed by EmployeeApp to this new String variable called name (see Figure 2-9).
H. The Employee constructor then assigns the String object that is assigned to name (i.e., the “Joe Employee”
String object) to empName (empName = name;) See Figure 2-10. Notice that the original empty String object, created and assigned to empName (on line 5), still exists but is no longer assigned to any variable.
So, the result of running EmployeeApp is three objects and three variables. Of course, there is no visible evidence of any of this activity. We need to change EmployeeApp to invoke the Employee method displayName. To invoke an object method, specify the variable name (emp) that the object is assigned to, followed by a period, the method name, parentheses and a semicolon (i.e., emp.displayName();). Notice that the variable name, not the class name is specified. In this example, this means you are specifying emp not Employee. If the method being called required data, that data would be specified within the parentheses.
3. Replace the println statement in EmployeeApp with the following:
emp.displayName();
The executable code should look like the following:
package myFirstPackage;
public class EmployeeApp {
public static void main(String[] args) {
Employee emp = new Employee(new String("Joe Employee")); emp.displayName();
} }
4. Save EmployeeApp, then click Run, Run As, and then Java Application. The text “Joe Employee” will be displayed in the Console pane.
5. In EmployeeApp, change the text “Joe Employee” to “Mary Worker”.
6. Save EmployeeApp and click the Run button (the green circle with a white arrowhead).
The text “Mary Worker” will be displayed in the console pane. This exercise has proven two things: A. When a class is run as an application, the class’s main method is run.
B. When an object is instantiated (i.e., an instance of the class is created), the class constructor method is run. In addition, this exercise showed you how to execute/invoke a method and how to pass information to an object.
Tutorial: Breaking the Code, Public vs. Private Access
Let’s break some code:1. Display the Employee class source code by clicking the Content pane tab for Employee.java.
2. Highlight the keyword public on line 11 as seen in Figure 2-13 and type private.
3. Save the source code.
4. Click the Run drop down button and select EmployeeApp.
5. At the Errors in Workspace window, continue the launch by clicking the Proceed button.
Even though you are editing Employee, RAD runs EmployeeApp because that is the launch that was selected. The following error message will be displayed in the console:
Exception in thread "main" java.lang.Error: Unresolved compilation problem: The method displayName() from the type Employee is not visible at myFirstPackage.EmployeeApp.main(EmployeeApp.java:10)
If the comments have been removed from EmployeeApp, the line number 10 in the third line of the message will be 7. Because displayName’s access modifier is now private, only methods within Employee can access displayName. In other words, EmployeeApp cannot use the private displayName method because EmployeeApp is a different class.
Notice that in the Navigation tree RAD has flagged EmployeeApp, the package, and the project as having an error.
6. Click on the Content pane’s EmployeeApp.java tab to display the source code. Notice that RAD has also flagged line 10 as in error.
We will change EmployeeApp and Employee so that the displayName method is called from within Employee not EmployeeApp.
7. In EmployeeApp, select the entire statement on line 10:
emp.displayName();
8. Click Edit and Cut to remove the line of code.
9. Redisplay the source code for Employee.java (i.e., Click the Content pane Employee tab).
10. Move your cursor to the end of line 8 and press Enter to insert a blank line after empName = name;
11. Click Edit and then Paste to place emp.displayName(); on line 9.
Notice that the line is flagged as an error and emp has a red squiggly line beneath it.
Because we are trying to run displayName from within the Employee class, we can’t refer to the variable emp that was created in EmployeeApp. We must specify that we want to execute the displayName method within this (i.e., the Employee) object/class.
12. On line 9, replace emp with this so that the statement looks like the following:
this.displayName();
The executable code should look like the following:
package myFirstPackage;
public class Employee {
String empName = new String(); public Employee(String name) { empName = name;
this.displayName(); }
private void displayName() { System.out.println(empName); }
}
There is a shorter and simpler syntax for identifying/running a method within the same class: simply specify the method name, parentheses, and a semicolon as in the following:
displayName();
Are you wondering, “How/why does this work?” Well, because an object is not specified (i.e., emp in
13. Run EmployeeApp again.
RAD will display the “Save and Launch” window listing both classes because they both have unsaved changes.
14. Click the OK button to save the changes and run EmployeeApp.
Notice that the classes no longer have errors and the employee name is correctly displayed in the console pane.
Tutorial: Breaking the Code, Parameters, and Signatures
Let’s begin:1. On line 9 in EmployeeApp, remove the text “newString("Mary Worker")” so that the statement looks like the following:
Employee emp = new Employee();
Notice that RAD flags the line as an error and puts a red squiggle under newEmployee().
2. Move your cursor over the red squiggle.
The message “The constructor Employee( ) is undefined” is displayed. This brings up an interesting point. We mentioned earlier that a method has a name (for instance, Employee). However, the name does not fully identify a method. A method is fully identified by its signature. A method signature is comprised of both the method name and the parameters the method is expecting. In our example, we defined a method called Employee that expects one string as a parameter. With the change, we no longer specify a string, therefore, the computer tries to run a constructor method called Employee that expects no parameters. Because Employee does not have a method with this signature, an error is generated.
3. Put the text “newString("Mary Worker")” back in the statement on line 9.
4. In Employee on line 9, add the text “newString("Frank")” so that the statement looks like the following:
this.displayName(new String("Frank"));
Notice that again, RAD indicates there is an error.
5. Move the mouse cursor over the red squiggly line to display the following message: “The method displayName( ) in the type Employee is not applicable for the arguments (String)” Sometimes RAD’s messages leave something to be desired.
Unfortunately, in Java-speak, parameters can be referred to as arguments and classes can be referred to as types (i.e., as in class type). So this message is inferring (in its own way) that there is no method with the correct signature.
Remember, the correct parameters must be passed to a method; otherwise, the statement will result in an error. We will explore parameter passing in more detail in future chapters.
6. Click Edit then Undo until the text is removed.
7. Save the source code for both EmployeeApp and Employee.
The Big Cruel Java World
RAD has hidden a great deal of the complexity of creating and running Java applications. For example, if you used Windows Explorer to display the PC file that contained the Employee class and you double clicked the file name, Windows would not know what to do with the Java statements in the file. In other words, Windows does not “speak” Java. Windows (like all operating systems) speaks machine language. Machine language is a set of instructions that the hardware of the computer understands. When you click on a button, select an option, hit Enter, or select a menu option, Windows interprets the action and issues the appropriate machine language instructions to the computer hardware. Because the Java classes contain Java statements, neither the computer hardware nor the operating system (Windows) can execute those statements. The Java statements need to be converted to machine language.
In Chapter 1, RAD generated the machine language for you. When you run an application in RAD, RAD generates the machine language commands and the commands are sent to the computer’s central processing unit (CPU) for execution. Because there is no Java Run button in Windows, the programmer must explicitly generate the machine language and run the machine language version of the Java class. Doing this isn’t difficult; it’s just easier with RAD.
Java on a PC
As mentioned, Java source statements have to be translated into machine language. This is actually a two-step process comprised of compiling and interpreting. Compiling Java source code creates bytecode. Bytecode is a “language” that is neither machine language nor source code. (However, bytecode is a step closer to machine language than source code.) When a Java application is run or a class is instantiated, the bytecode is translated into machine language. You may be asking, why bother with bytecode? Translating bytecode takes less time than translating source code (because bytecode is closer to machine language). In addition, bytecode is the same regardless of the computer system. In other words, the bytecode generated from the Employee class’s source code is the same on a computer running Windows, Linux, Solaris or any other operating system. This makes the bytecode portable to any computer system. When the bytecode is interpreted, the unique machine language (for the type of computer system you are working on) is generated and executed.
Oracle provides the software to compile and interpret Java (for free). There are two primary groupings of the free software called a JDK and a JRE. The JRE (Java Runtime Environment) has the interpreter (the JVM) not the compiler. As implied from the earlier discussion of converting bytecode to machine language, the JRE therefore must be unique for each computer’s operating system. In other words, there is a different JRE for Windows, Linux, and Solaris.
In addition to a compiler, Oracle provides other free software tools for Java programmers. All of this software—compiler, JRE, programmer tools—is provided in a JDK (Java Development Kit sometimes also abbreviated as SDK). Early releases were simply named JSDK 1.0, JSDK 1.1, and so on. However, there are now different “editions” of Java and associated JDKs. For instance, there is a Java SE (Java Standard Edition), Java FX, and Java EE (Java Enterprise Edition). To explain the difference between them simply: SE is used to create client based applications, FX has functions for a richer client interface and alternative platforms such as mobile phones, and EE supports applications that have both server and client based components.
Each edition has a JDK included. For instance, a recent release of Java SE 6 is formally called: Java (TM) SE Development Kit 1.6 Update 25. However, the acronyms followed by their version and/or release numbers are used for identification. For example, the files for recent EE and SE releases have the acronyms java_ee_sdk-6u1-jdk and jdk-6u25 in their names.
However, users don’t need everything in the JDK/SDK. To run a Java application all that is needed is the JRE for your operating system. The JRE contains all the classes (like String) that make your programming life easier, the machine language instructions that correspond to the bytecode commands, and the Java Virtual Machine (JVM). The J