Portions of this material have been previously copyrighted by: Bell Telephone Laboratories, Incorporated, 1980
Western Electric Company, Incorporated, 1983, Regents of the University of California
Holders of a UNIX and UniPlus+ software license are permitted to copy this docu-ment, or any portion of it, as necessary for licensed use of the software, provided this copyright notice and statement of permission are included.
UNIX is a Trademark of AT&T Bell Laboratories, Inc. \
PREFACE
The UniPlus+* System V User Guide is a description of the features and a general overview of the capabilities of UniPlus+. Instructions on how to use the system are also included. Not all of the capabilities of the operating system are described or illustrated herein, but enough are described so that a new user can become familiar with its use.
This guide contains seven chapters:
• INTRODUCTION
• BASICS FOR BEGINNERS
• TEXT EDITOR - ED
• VISUAL TEXT EDITOR - VI
• THE SHELL - SH
• THE C SHELL - CSH
• GLOSSARY
Chapter 1, INTRODUCTION, gives beginners an overview of UniPlus+. A beginner should read this chapter before attempting to use the information covered in the other chapters of this guide. An experienced user probably does not need to read this introductory chapter.
Chapter 2, BASICS FOR BEGINNERS, discusses aspects of UniPlus+ that helps the beginning user get started on the system. It also contains a brief explanation of document preparation and programming.
Chapter 3, TEXT EDITOR - ED, is designed to help users get started with text editing and discusses the user's day-to-day needs regarding the use of the text editor ed.
Chapter 4, VISUAL TEXT EDITOR - VI, provides the information necessary to use the display-oriented text editor. It is suggested to run the vi program while reading this chapter.
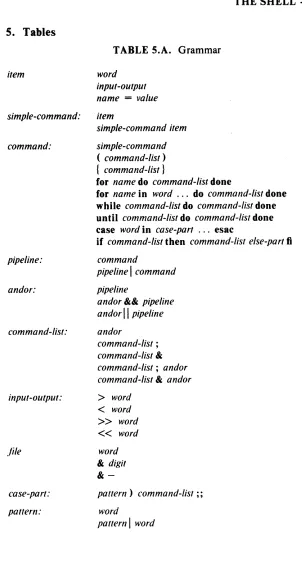
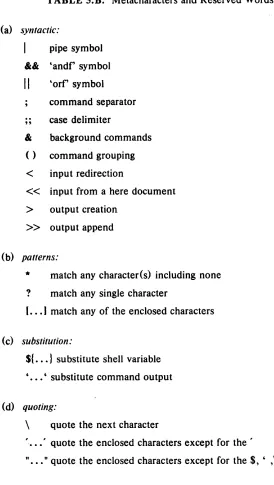
Chapter 5, THE SHELL - SH, covers simple commands and pro-cedures and contains helpful information for writing shell scripts.
Chapter 6, THE C SHELL - CSH, outlines the C shell's unique features, commands, procedures, and also contains helpful information for writing shell scripts.
Chapter 7, GLOSSARY, is an alphabetical list of common UNIXt terms. This is a helpful tool for any user.
Throughout this guide, each reference of the form name(IM), name(7), or name(8) refers to entries in the UniPlus+ System V Administrator's Manual. Other references to entries of the form name( N), where N is a number (1 through 6) possibly followed by a letter, refer to entry name in section N of the UniPlus+ System V User's
Manual.
Chapter 1
Chapter 2
Chapter 3
Chapter 4
Chapter 5
Chapter 6
Chapter 7
CONTENTS
INTRODUCTION
BASICS FOR BEGINNERS
TEXT EDITOR - ED
VISUAL TEXT EDITOR - VI
THE. SHELL - SH
THE C SHELL - CSH
Chapter 1: INTRODUCTION
CONTENTS
1. Overview. . . .
2. Terminal • • • • • . . . 2.1 Strange Terminal Behavior
3. Logging In
4. Current Directory .
5.
Path Names.
6.
Entering Commands6.1
Command Line Syntax6.2
Read-Ahead.
6.3
Correction and Deletion7. Programs. . . . . 7.1 Running a Program . 7.2 Stopping a Program . 7.3 Writing a Program
8. Text Processing . . . .
9. Mail . . . . .
10. W ri ting to Other Users
11. On-line Manual
12. Logging Out. . .
1. Overview
INTRODUCTION
It is not intended for this chapter to be a detailed description, rather to give a beginner an overview of UniPlus+, the high performance UNIX operating system, and general instructions on how to begin working on the system. Many of the subjects described are discussed in detail in other sections of this guide or in the UniPlus+ System V User's Manual.
In this guide, software programs that can be executed by users are referred to as programs. A program that is'in some state of execution is referred to as a process. The request typed by the user is referred to as a command or command line. The following graphic conventions are used in the examples:
RETURN Indicates that the user should press the RETURN (car-riage return) key on the terminal keyboard.
DEL Indicates that the user should press the key marked DEL, DELETE, or RUBOUT (whichever is appropriate for the terminal being used).
Throughout this guide, each reference of the form name(1M), name(7), or name(8) refers to entries in the UniPlus+ System V Administrator's Manual. Other references to entries of the form name(N), where N is a number (1 through 6) possibly followed by a letter, refer to entry name in section N of the UniPlus+ System V User's Manual.
2. Terminal
INTRODUCTION
The terminal will also have a speed switch. Common terminal speeds are 10, 15, 30, and 120 characters per second (110, 150,300, and 1,200 baud); speeds of 240, 480, and 960 characters per second (2,400, 4,800, and 9,600 baud) are also available. Hard-wired terminals are usually set to the correct speed.
If you have a hard-wired terminal, you need only to turn it on and hit the RESET/BREAK or ATTENTION key until the "login:" message appears. However, you may need to get an appropriate telephone number from your system administrator to dial up the system. Depending on the type of terminal and communication link, the user may need to press the RESET/BREAK key a couple of times. This is to synchronize your terminal with the system.
2.1 Strange Terminal Behavior
Sometimes your terminal acts strangely. For example, each letter may be typed twice (terminal may be in the half-duplex mode) or the RETURN may not cause a line feed or a return to the left margin. The user can· often remedy this by logging out and logging back in. If log-ging back in fails to correct the problem, check the following areas:
keyboard
dataphone
switches
Keys such as caps lock, local, block, etc. should not be in depressed position.
For terminals connected via phone lines, the baud rate could be incorrect.
The rear panel of your terminal normally has several switches used to control terminal opera-tions. These switches should be set to be compati-ble with the operating system.
If all else fails, the description of the stty(I) command can be read to determine the appropriate action to take.
3. Logging In
A login name is a unique string of letters (should be all lowercase) and/or numbers that identifies an individual to the system. The login name must begin with a letter. If you type uppercase letters, the sys-tem will assume that your terminal cannot generate lowercase letters and that you intend all subsequent uppercase input to be treated as lowercase. In many cases, a person's login name is their real first name, last name, initials, or nickname. Any string of letters and/or digits can be used as your login name, as long as it is unique (i.e., different from all other login names). Only the first eight characters of a login name are used by the system. Login names are assigned by the system administrator.
The password is a string of up to 13 characters chosen from a 64-character alphabet (., \, 0-9, A-Z, a-z) that serves to control access to a login. The password for a login is the main security feature of UniPlus+. Usually, every login is assigned a password. When a user logs in to the system, the password (if any) assigned to the login being used is requested. Access to the system is not permitted until the correct password is entered. The user can change their password as needed to ensure that others are not accessing their login (and conse-quently their data). Any string of letters, numbers, etc., can be used as a password as long as it is from six to thirteen characters in length and composed of uppercase letters, lowercase letters, numbers, or punctua-tion.
It is recommended that obvious strings such as the user's social security number, birth date, or other data that could be well known about the user not be used as passwords. If the password is something that is well known about the user, someone could gain access to the user's login with little effort. The more unusual your password, the more effective your security.
When communication is established, the system will prompt with:
login:
INTRODUCTION
Password:
The user should then type his/her password followed by a RETURN. The system does not echo (print) your password on the terminal as you type it in. This is an extra security measure. If you entered your login name and password correctly, the system may print one or more "mes-sages of the day". Following the mes"mes-sages, the system will prompt you with the primary prompt string, which is usually the "$" or "%" sym-bol. If a mistake is made while logging in or the system administrator has not set up the user's login on the system, the following error mes-sage is printed:
login incorrect
This error message is followed by the "login:" message. The user should attempt to log in again.
4. Current Directory
The UniPlus+ file system is arranged in a hierarchy of directories. When the system administrator gave you a user name, s/he also created a directory for you (ordinarily with the same name as your user name, and known as your login or home directory). When you log in, that directory becomes your current or working directory, and any file name you create is by default assumed to be in that directory. (When the sys-tem assumes something, this is called a default value.)
The user may, however, create one or more directories under the home directory. Under a directory or a subdirectory, the user may create files as necessary. The user is the owner of the home directory and all sub-directories created under the home directory. As the owner, the user has full permission to create, alter, and remove (destroy) all files and subdirectories of the home directory. Permissions to have your will with others directories and files will have been granted or denied to you by their respective owners, or by the system administrator.
5. Path Names
To refer to files not in the current directory, you must use a path name. Full path names begin with /, which is the name of the root directory of the whole file system. After the slash comes the name of each direc-tory containing the next sub-direcdirec-tory, followed by a /, until the file name is reached For example, "/usr/scr/filex" refers to file "filex" in directory "scr", which is itself a subdirectory of "usr". The "usr" directory springs directly from the root directory. See intro(2) for a formal definition of path name.
If your current directory contains subdirectories, the path names of files therein begin with the name of the corresponding subdirectory (without a prefixed /). With few exceptions, a path name may be used any-where a file name is required.
Important commands that modify the contents of files are: cp, which copies a file (resulting in two identical files); mv, which moves the con-tents of one file into another, removing the first file; and rm, which deletes a file or files. To find out the status of files or contents of directories, use Is. Use mkdir to make directories and rmdir to remove directories. These commands are explained in greater detail in Section 1 of the UniPlus+ System V User's Manual.
6. Entering Commands
The operating system shell (command interpreter) serves as the inter-face between the user and the system. The shell accepts requests from the user in the form of a command line and invokes the appropriate pro-gram to fulfill the request. The shell prompts (i.e., notifies) the user when it is ready to accept another request.
6.1 Command Line Syntax
Commands or requests to the shell are usually in the form of a single line-that is, a string of one or more words followed by a return. This single line request entered following the prompt is referred to as a com-mand line. The command line is divided into two major parts-the pro-gram name and arguments.
INTRODUCTION
are arguments to the command. Arguments are used to provide infor-mation required by the program.
Spaces and tabs serve as the delimiters for words on the command line. That is, all characters on the command line up to the first space or tab are interpreted as the command. All characters between the first space (or tab) and the second space (or tab) are the first argument, etc. Thus, the syntax for the command line is:
command argument argument argument ... RETURN
6.2 Read-Ahead
UniPlus+ has full read-ahead, which means that you can type at any time, even while a program is typing at you. So the user can type several commands one after another without waiting for the first to finish or even begin. Of course, if you type during output, the output will be interspersed with the input characters. However, whatever you type will be saved and interpreted in the correct sequence. There is a limit to the amount of read-ahead, but it is generous and not likely to be exceeded unless the system is in trouble. When the read-ahead limit is exceeded, the system throws away all the saved characters.
6.3 Correction and Deletion
All users are likely to make mistakes, especially when typing. Two features are provided to correct command lines. These features are
only effective for the current line (i.e., you have not ended the line with a return yet).
The first correction feature is the erase character (by default, #).
When inputting a command line, the erase character erases the charac-ter preceding it. Successive uses of # will erase characters back to, but not beyond, the beginning of the line.
The second correction feature is the kill character (by default, @). The kill character deletes the entire current line.
mail ann\ @uam
results in "mail ann@uam".
These default erase and kill characters can be changed; see stty(l).
7. Programs
7.1 Running a Program
Once logged in, you are in direct communication with a program called sh (the shell). The shell reads the lines you type, splits them into a command name and its arguments, and executes the command.
A command is simply an executable program. Normally, the shell looks first in your current directory for a given program, and if none is there, then in system directories. There is nothing special about system-provided commands except that they are kept in directories where the shell can find them. You can also keep commands in your own directories and arrange for the shell to find them there.
The command name is the first word on an input line to the shell; the command and its arguments are separated from one another by space and/or tab characters. The command sequence is followed by typing a RETURN.
When a program terminates, the shell will ordinarily regain control and display a prompt sign to indicate it is ready for another command. The shell has many other capabilities, which are described in detail in shU)
and csh(1) of the UniPlus+ System V User's Manual.
7.2 Stopping a Program
INTRODUCTION
7.3 Writing a Program
To enter the text of a source program into the UniPlus+ file system, use the text editors ed, ex or vi. The principal languages available under UniPlus+ are C [see cc(I)] and assembly language [see as(I)]. After the text has been entered with the editor and written into a file, you can give the name of that file to the language processor as an argu-ment. Normally, the output of the language processor will be left in a file in the current directory named "a. out. " If that output is precious, use mv to give it a less vulnerable name. If the program is written in assembly language, you will probably need to load library subroutines (see Id(I». C language calls the loader automatically.
When you have finally gone through this entire process without provok-ing any diagnostics, the resultprovok-ing program can be run just like you would run any other command.
Your programs can receive arguments from the command line just as system programs do [see exec (2) ] .
8. Text Processing
You can enter text with the editor ed or ex, or with the visual text edi-tor, vi, which is screen oriented and more suitable for writing docu-ments.
Commands often used to write text on a terminal are: cat , pr, and nroff/troff. The cat command dumps text on the terminal with no pro-cessing at all. The pr command paginates the text, supplies headings, and has a facility for multi-column output. Nroff/troff is an elaborate text formatting program requiring careful forethought in entering both text and formatting commands. Troff is very similar to nroff, but can accept instructions to produce its output on a phototypesetter (it was used to typeset this manual). There are several "macro" packages (specifically, the mm package) that significantly ease the effort required to use nroff and troff. The UniPlus+ System V Documentation Processing Guide provides detailed tutorials in the above text processing programs.
9. Mail
You have mail.
UniPlus+ provides a postal system so you can communicate with other users of the system. To read your mail, type the following command:
Your mail will be printed, one message at a time, most recent message first. After each message, mail waits for you to say what to do with it. The two basic responses are d, which deletes the message, and RETURN, which prints the next message but does not delete the previ-ous message. Other responses and features are described in mail (1) in the UniPlus+ System V User's Manual.
To send mail to another user, type the following:
mail user-login-name
one or more lines of message CONTROL-d
The "CONTROL-d" sequence, often called End-Of-File (EOF), is used to mark the end of input from a terminal.
For practice, try sending mail to yourself. (This is not as strange as it might sound - mail to oneself is a handy reminder mechanism.)
10. Writing to Other Users
At some point, out of the blue will come a message like
Message from diane tty07 ...
which is accompanied by a startling beep on terminals that have the capability to beep. It means that Diane (diane) wants to talk to you, but unless you take explicit action, you will not be able to talk back. To respond, type the following command:
write diane
INTRODUCTION
where you are talking to the command interpreter. Normally, whatever program you are running has to terminate or be terminated. If you are editing, you can escape temporarily from the editor by typing a CONTROL-z. This will put the file you are editing in the background so that you can execute the write program. To resume your editing job, type fg which will bring the job to the foreground.
If you are printing and do not want this message in your printout or you simply do not want to be disturbed, enter the following:
mesg n
A protocol is needed to keep what you type from getting garbled up with what diane types. Typically, a sequence like the following is used:
Diane
types "write ralph" and waits
types a message of as many lines as necessary [when she is ready for a reply, she sig-nals it by typing (0) which stands for "over"]
Ralph
types "write diane" and waits
types a reply, also terminated by (0)
This cycle repeats until someone gets tired; s/he then signals her or his intent to quit with (00) for "over and out".
To terminate the conversation, each side must type a CONTROL-d char-acter alone at the beginning of a line (DELETE also works). When the other person types CONTROL-d, you will get the message EOF on your terminal.
If you write to someone who is not logged in or who does not want to be disturbed, you will be told. If the target is logged in but does not answer after a decent interval, simply type a CONTROL-d.
11. On-line Manual
and can not find an expert to assist you, you can print on your terminal some manual section that might help. This is also useful for getting the most up-to-date information on a command. To print a manual sec-tion, type "man command-name". Thus to read up on the wbo(1) command, type
man who
and
man man
tells all about the man(1) command.
12. Logging Out
After completing your work, it is best to log off the system. Before logging off, you should have received the prompt symbol from the sys-tem. That is, all your commands have been completed, and the system is ready for another command.
A common method for logging off is accomplished by typing an Ameri-can Standard Code for Information Interchange (ASCII) End Of Text (EOT) character which is sometimes called the End-Of-File (EOF). On most terminals, the EOT character is generated by holding down the CONTROL key and pressing the lowercase "d" key once. This is also referred to as a CONTROL-d. Regardless of the terminal type, the power to it should be turned off when the terminal is no longer needed. For a terminal connected via a phone line, you should hang up the phone.
Another way to log off the system is by simply typing:
Chapter 2: BASICS FOR BEGINNERS
CONTENTS
1.
Day-to-Day Use1
1.1
Creating Files - The Editor1
1.2
What Files Are Out There?.
.
.
2
1.3
Printing Files3
1.4
Moving Files Around5
1.5
What's in a File Name.
6
1.6
Directories and Pathnames .9
1.7
Using Files for Input and Output .13
1.8
Pipes14
1.9
The Shell15
2.
Document Preparation ..
. .
17
2.1
Formatting Packages17
2.2
Supporting Tools19
2.3
Hints for Preparing Documents20
3.
Programming21
3.1
Shell Programming21
BASICS FOR BEGINNERS
1. Day-to-Day Use
1.1 Creating Files - The Editor
If you have to type a paper, a letter, or a program, how do you get the information into the machine? These tasks can be performed using the UniPlus+ "text editor". See ed(1), vi(l) and Chapters 3 and 4 of this guide for a detailed description.
The UniPlus+ text editor operates on a file. A file is a collection of information stored in the machine. The following describes how to make some flies. For example, to create a file called "junk" with text in it, do the following:
edjunk a
now type in
whatever text you want . ..
(invokes the text editor) (command to "ed" to add text)
(signals the end of text addition)
The "." signals the end of adding text and must be at the beginning of a line by itself. Do not forget it, for until it is typed, no other ed com-mands will be recognized-everything you type will be treated as text to be added. Also note that no system prompt appears while you are appending, inserting, or changing text in the text editor.
After a file exists, the user can edit the text which was typed in-correct spelling mistakes, rearrange paragraphs, etc.
Finally, the user must write the information typed into a file with the editor command:
w
BASICS FOR BEGINNERS
Nothing is stored permanently in the "junk" file until you type w. If you are editing a file and hang up before typing w, the changes are not stored in the working file. Instead, they are saved in a file called "ed.hup" which you can continue working with at the next editing ses-sion. But after typing w, the information is there permanently. You can retrieve it any time by typing:
edjunk
Type q to quit the editor. (If you try to quit without writing, ed prints ? to remind you to save the file. Typing q again exits you from the editor without saving the file, if that's really what you want to do.) Now create a second file called "temp," following the procedures you used to create "junk.~' You should now have two files, "junk" and "temp."
1.2 What Files Are Out There?
The Is command lists the names (not contents) of the files the system knows about. If you type
Is
the response is:
junk temp
which are the two files you just created.
The file names are automatically listed in alphabetical order, but you can change this. For example, typing
Is - t
lists the files in the order in which they were last changed, most recent first. The -I option gives a "long" listing and is used as follows
Is -1
to produce something like
-rw-rw-rw- 1 bwk bsk 41 Jul 22 02:56 junk -rw-rw-rw- 1 bwk bsk 78 Jul 22 12:57 temp
the numbers you got from eel). "bwk" is the owner of the file, i.e., the person who created it. "bsk" identifies the group associated with "bwk". "-rw-rw-rw-" determines who has permission to read, write, or execute the file. In this case the owner, group, and others all have permission to read (r) and write (w). There is no permission for anyone to execute (x). The first character in "-rw-rw-rw-" is a "-" which indi-cates this is a data file. A "d" as the first character indiindi-cates a directory. The remaining nine characters are divided into three sets of permis-sions. Each set consists of three characters. The three sets correspond to the permissions of the owner, group, and all other users.
Options can be combined: Is -It has the same listing as Is -I but is sorted into time order. You can also specify the files you're interested in, and Is will list only the information about them. More details can be found in Is(1).
Optional arguments that begin with a minus sign (like -t and -It) are a common convention for UniPlus+ programs. In general, if a program accepts such optional arguments, they precede any file name. It is also vital that you separate the various arguments with spaces: Is-I is not the same as Is -I since the command Is must be separated from its argument -I by a space.
1.3 Printing Files
Now that you've created a text file, how can you print it? There are several ways to print a file. If you want to print your file on the screen, one simple way is to use the editor. The editor prints as follows:
edjunk 1,$p
Ed will reply with the count of the characters in "junk" and then print all the lines in the file. The user can also select the parts of a file to print as follows:
edjunk 20,35p
BASICS FOR BEGINNERS
There are times when it's not feasible to use the editor for printing. For example, there is a limit on how big a file ed can handle (several thousand lines). Secondly, it will only print one file at a time; and sometimes you want to print several, one after the other. Finally, ed is not designed to print files on a printer. Here are a couple of alterna-tives.
The simplest of all the printing programs is cat. Cat simply prints the contents of all the files named in the order listed. Thus the files are concatenated (joined together) and printed. For example:
cat junk
prints one file, and
cat junk temp
prints two files. The files are simply concatenated onto the terminal.
The more command stops after each page is printed on your screen. This keeps cat from scrolling the text off the screen before you can read it. For example, to use more, type the following
cat junk temp
I
more<I is called a pipe and is described later in this chapter.)
The pr command produces formatted printouts of files. As with cat, pr prints all the files named in a list. The difference is that it produces headings with date, time, page number, and file name at the top of each page. It also will give extra lines to skip over the fold in the paper when you print a file on the printer.
Thus,
pr junk temp
I
lprprints "junk" neatly, then skips to the top of a new page and prints "temp" neatly.
Pr can also produce multicolumn output. Typing
pr -3 junk
number in place of "3," and pr will do its best. The pr command has other capabilities also. See pr(t) for more information.
It should be noted that pr is not a formatting program in the sense of shuffling lines around and justifying margins. The true formatters are nroff and troff, which we will get to in the section on document preparation.
There are other programs that send your files to a hard copy printer. See Ip(t) and Ipr(t) for more information.
1.4 Moving Files Around
You are ready for bigger things after gaining experience in creating and printing files. For example, you can move a file from one place to another (which amounts to giving it a new file name), like this:
mv junk precious
This means that what used to be named "junk" is now named "pre-cious." Typing Is results in the following:
precious temp
The contents of "junk" are now in "precious." Notice that the "junk" file no longer exists. If you move a file to one that already exists, the already existing file contents are lost forever.
If you want to make a copy of a file (i.e., to have two versions), use the cp command as follows:
cp precious tempi
This makes a duplicate copy of "precious" in "templ."
BASICS FOR BEGINNERS
rm temp tempI
This will remove both the "temp" and "tempI" files.
You will get a warning message if one of the named files is not there, but otherwise rm, like most UniPlus+ commands, does its work silently. There is no prompting or response, and error messages are short. This terseness is sometimes disconcerting to newcomers, but experienced users prefer it.
1.5 What's in a File Name
So far we have used file names without ever saying what is a legal name, so it is time for a couple of rules. First, file names are limited to 14 characters. Second, although any character can be used in a file name, common sense dictates sticking to ones that are visible and avoiding characters that could have other meanings. We have already seen, for example, that in the Is command, Is - t lists in time order. So, if a file were named "-t" you would have a tough time listing it by name. In addition to the minus sign, there are other characters which have special meaning. To avoid pitfalls, use only letters, numbers, and the period until you are familiar with the system.
Suppose you are typing a large document, like a book. Logically, this can be divided into many small pieces, like chapters and perhaps sec-tions. Physically, it must be divided too, for eel will not handle really big (over 90,000 characters) files. Thus the document should be typed as many files. One possible method is to have a separate file for each chapter as follows:
chap 1 chap2 etc ....
chap1.l chap1.2 chap 1. 3
chap2.l chap2.2
It can now be determined at a glance where a particular file fits into the whole.
There are advantages to a systematic naming convention which are not obvious to the novice user. To print the whole book, you could type the following:
pr chap1.l chap1.2 chap1.3 ...
Using the pr command like this would be tiring and possibly lead to mistakes. Fortunately, there is a shortcut. You can type:
pr chap·
The
*
means "anything at all," so this translates into "print all files whose names begin with chap listed in numerical and then alphabetical order."This shorthand notation is not a property of the pr command by the way. It is system-wide, a service of the program that interprets commands- the "shell," sh and csh. The files in the book can be listed by using
Is chap·
which produces the following:
chap1.l chap1.2 chapl.3
BASICS FOR BEGINNERS
rm *junk* *temp*
removes all files that contain "junk" or "temp" as any part of their name.
*
by itself matches every file name, sopr * .
prints all your files (in alphabetical order), and
rm *
removes all files. (Before using rm
*,
be sure you want to remove all your files!)The
*
is not the only pattern-matching feature available. To print only chapters 1 through 4 and 9, type the following:pr chap[I2349]*
The [ ... ] means to match any of the characters inside the brackets. A range of consecutive digits can be abbreviated as follows:
pr chap[I-9]*
Letters can also be used within brackets. [a-z] matches any character in the range a through z.
A? matches any single character, so
Is ?
lists all files which have single-character names, and
Is -I chap?1
lists information about the first file of each chapter ("chap1.1," "chap2.1," etc.).
Of these niceties,
*
is the most useful. The others are frills, but worth knowing.Is '?'
Some examples of this are shown in the following paragraphs.
1.6 Directories and Pathnames
When you first create the file called "junk," how does the system know that there is not another "junk" somewhere else, especially since the person in the next office could also be reading this tutorial? The answer is that generally each user has a private directory, which contains only the files that belong to that particular user. When you login, you are in your directory. Unless you take special action when creating a new file, the new file is made in the directory that you are currently in. This is most often your own directory, and thus the file is unrelated to any other file of the same name that might exist in someone else's directory.
The set of all files is organized into a tree with your files located several branches into the tree. It is possible for you to "walk" around this tree and find any file in the system by starting at the root of the tree and walking along the proper set of branches. You can also start at your present location and walk toward the root.
Try the latter first. The basic tool is the command pwd (print working directory) which prints the name of the directory you are currently in.
Although the details vary, pwd prints something like:
lusr/your-name
This indicates that you are currently in the directory "your-name," which is in turn in the directory "usr," which is in turn in the root directory called by convention just "I". (Even if it is not called "/usr" on your system, the message will be something analogous. Recognize any differences between your machine's path name and the standard setup and make the corresponding changes to the following command lines,)
BASICS FOR BEGINNERS
Is lusr/your-name
the results should be exactly the same list of file names as a plain Is. With no arguments, Is lists the contents of the current directory. Given the name of a directory, it lists the contents of that directory.
Next, try the following command:
Is lusr
This should print a long series of names, among which is your own login name "your-name." On many systems, "usr" is a directory that contains the directories of all the normal users of the system.
The next step is to try the following:
Is I
The response should be something like this:
bin dev etc lib tmp usr
This is a collection of the basic directories of files that the system knows about; we are at the root of the tree.
If "junk" is still in your directory, enter the following:
cat lusr/your-name/junk
The name
lusr/your-name/junk
This is not too exciting if all the files of interest are in your own direc-tory; but if you work with someone else or on several projects con-currently, it becomes handy. For example, your friends can print your book by typing the following:
pr /usr/your-name/chap*
Similarly, you can find out what files your neighbor has by entering:
Is lusr/neighbor
The "neighbor" represents the login name of your neighbor. You can copy one of your neighbor's files as follows:
cp /usr/neighbor/their-file your-file
If a file owner does not want someone else to have access to the owner's files, privacy can be arranged. Each file and directory has read-write-execute (rwx) permissions for the owner, a group, and everyone else, which can be set to control access. See Is (I) and chmod(1) for details. Most users find openness of more benefit than privacy (most of the time).
As a final experiment with pathnames, try the following:
Is /bin /usr/bin
Do some of the names look familiar? When a program is run by typing its name after the prompt character, the system simply looks for a file of that name. It normally looks first in your directory (where it typi-cally does not find it), then in "/bin" and finally in "/usr/bin." There is nothing magic about commands like cat or Is, except that they have been collected into places where they are easy to find and administer.
BASICS FOR BEGINNERS
Now you are ready to edit files in this directory.
Another method of working on the same document is to locate the files in your friend's directory and login as your friend. This defeats the accounting purpose of individual logins. If you are already logged in as yourself and want to work in a friend's files, change the current work-ing directory as follows:
cd lusr/your-friend
Now when a file name is used in something like cat or pr, the com-mand refers to the file in your friend's directory. Changing directories does not affect any permissions associated with a file. If you cannot access a file, get the owner to change permissions via chmod. Of course, if you forget what directory you are in, type
pwd
to find out.
It is usually convenient to arrange your own files so that all the files related to one thing are in a directory separate from other projects. For example, when writing your book, you might want to keep all the text in a directory called "book." A directory can be made using the mkdir command. The "book" directory is made as follows:
mkdir book
You can access the "book" directory as follows:
cd book
If you logged in as yourself, the pathname of "book" is:
lusr/your-name/book
or
rm bookl* rmdir book
rm -r book
The "rm book/·" command removes all files in the "book" directory, and then the "rmdir book" command removes the empty directory. The "book" directory must be empty before the rmdir command will work. The "rm -r book" command deletes the entire contents of the "book" directory and then removes the "book" directory itself. WARNING: Be extra careful when using the "rm -r" command.
You can go up one level in the tree of files by typing:
cd ..
The " .. " pattern is the name of the parent of whatever directory you are currently in. "." is an alternate name for the directory you are in.
1.7 Using Files for Input and Output
Most of the commands used so far produce output on the terminal. Other commands, like the editor, take input from the terminal. The terminal can be replaced by a file for input and output.
As an example,
Is
lists files on your terminal. But if you enter
Is > file list
a list of your files is placed in the file "filelist" (which is created if it does not already exist or overwritten if it does). The symbol> means "put the output of this command in the following file rather than displaying it on the terminal." Nothing is produced on the terminal. As another example, you could combine several files into one by cap-turing the output of cat in a file:
BASICS FOR BEGINNERS
Another symbol that operates very much like> does is
». »
means "add to the end of." That is,cat fl f2 f3
»
tempmeans to concatenate "fl," "f2," and "f3" to the end of whatever is already in "temp" instead of overwriting the existing contents. If
"temp" does not exist, you will receive an error message.
In a similar way, the symbol
<
means to take the input for a program from the following file instead of from the terminal. Thus, you could make up a script of commonly used editing commands and put them into a file called "script." The script could then be run on a file by typ-ing:ed file
<
scriptAnother example is preparing a letter in file "let." The letter could then be sent to several people as follows:
mail adam eve mary joe
<
let1.8 Pipes
One of the novel contributions of the UniPlus+ system is the idea of a
pipe. A pipe is simply a way to connect the output of one program to the input of another program, so the two run as a sequence of processes-a pipeline.
For example,
pr f g h
will print the files "f," "g," and "h," beginning each on a new page. Instead of printing the files separately, the files can be printed together as follows:
cat f g h > temp pr
<
temp rm tempcat f g h
I
prThe vertical bar
I
means to take the output from eat, which would nor-mally have gone to the terminal, and put it into proThere are many other examples of pipes. For example,
Is
I
pr -3prints a list of your files in three columns. The program we counts the number of lines, words, and characters in its input; while the who com-mand prints a list of users currently logged on the system.
Thus typing
who
I
wc-ltells how many people are logged on.
Is
I
wc-lcounts your files.
Most programs that read from the terminal can read from a pipe instead. Most programs that write on the terminal can write on a pipe instead. There can be as many commands in a pipeline as desired.
1.9 The Shell
The mysterious shell mentioned previously is actually the sh or csh command interpreter. The shell is the program that translates what you type into commands and arguments. The shell also looks after translating
*,
etc., into lists of file names, and<,
>,
andI
into changes of input and output streams.The shell has other capabilities as well. For example, you can run two programs with one command line by separating the commands with a semicolon. The shell recognizes the semicolon and breaks the line into two commands. Thus
date; who
BASICS FOR BEGINNERS
More than one program can run simultaneously if desired. This is beneficial when doing something time-consuming, like using the editor script. Running programs in the background prevents waiting around for the results before starting something else. When you type:
ed file
<
script &the ampersand (&) at the end of the line means "start running this command, then return a prompt immediately." That is, don't wait for the command to complete. Thus the script begins running in the back-ground, but you can do something else at the same time.
When a command is initiated with &, the system replies with a number called the process number. Programs running in the background can be terminated as follows:
kill process-number
The process number identifies the command to stop. If you forget the process number, the ps command lists the process number for all pro-grams you are running. (Typing kill 0 kills all your processes,) If you are curious about other people, ps -a provides information about all active programs that other users are running.
To start three commands that execute in the order specified in the background, enter the following:
(command-I; command-2; command-3) &
A background pipeline can be started as follows:
command-l
I
command-2 &Just as the editor can get its input from a file instead of from the termi-nal, the shell can read a file to get commands. For example, suppose you want to perform a sequence of actions after every login such as:
• Set the tabs on the terminal • Find out the date
The three commands (tabs, date, and who) could be put in a file called "startup." The "startup" file would then be run as follows:
sh startup
This instruction commands the machine to run the shell with the file "startup" as input. The eifect is the same as typing the contents of "startup" on the terminal.
If this is a regular thing, you can get around typing sh every time by typing the following command only once:
chmod
+
x startupTo run the sequence of commands thereafter, you only needs to type:
startup
The chmod command marks the file as being executable. The shell recognizes this and runs it as a sequence of commands.
If you want "startup" to run automatically every time you login, create a file in your login directory called ". profile" and place in it the line "startup." Upon logging in, the shell gains control and executes the commands found in the ".profile" file. We will get back to the shell in the section on programming.
2. Document Preparation
UniPlus+ is used extensively for document preparation. There are two major formatting programs (programs that produce a text with justified right margins, automatic page numbering and titling, automatic hyphe-nation, etc.). The nroff (pronounced "en-roif") program produces out-put on terminals and line-printers. The troff (pronounced "tee-roif") program produces output on a phototypesetter, which produces very high-quality output on photographic paper. This document was format-ted with troff.
2.1 Formatting Packages
con-BASICS FOR BEGINNERS
formatted text is to look. For example, there may be commands that specify how long lines are, whether to use single or double spacing, and the running titles to use on each page.
Because nroff and troff are relatively hard to learn to use effectively, several packages of canned formatting requests are available to let you specify paragraphs, running titles, footnotes, multicolumn output, etc., with little effort and without having to learn nroff and troff. These packages take a modest effort to learn, but the rewards for using them are so great that it is time well spent.
This section provides a brief description of the "memorandum macros" package known as mm. Formatting requests typically consist of a period and one or two uppercase letters, such as
.TL
which is used to introduce a title or
.P
to begin a new paragraph.
The text of a typical document looks something like this:
.TL title
.AU "author information" .MT "memorandum type"
.P
Enter text
---.P
More text
---.SG "signature"
changed by changing the interpretation of .P, not by retyping the docu-ment.
To actually produce a document in standard format using -mm, use the command
trolf -mm files ...
for the typesetter and
nrolf -mm files ...
for a terminal. The -mm argument tells trolf and nrolf to use the manuscript package of formatting requests. There are several similar packages; check with a local expert to determine which ones are used on your machine. The proper terminal filter for the terminal should be used in the command line. The terminal filter option is indicated by -T followed by the terminal type. The terminal types are known by various UniPlus+ system utility calls found in the UniPlus+ System V
User's Manual.
2.2 Supporting Tools
In addition to the basic formatters, there are supporting programs that help with document preparation. The list in the next few paragraphs is far from complete, so browse through the UniPlus + System V User's Manual and check with other UniPlus+ users for other possibilities.
Both eqn and neqn (see eqn (1) for more information) programs let you integrate mathematics into a document in an easy-to-Iearn language that resembles the way you would speak it aloud.
For example, the eqn input
sum from i=O to n x sub
produces the output
II 7T
LX=-i=O I 2
pi over 2
compli-BASICS FOR BEGINNERS
The spell program detects possible spelling mistakes in a document. The spell program compares the words in your document to a diction-ary (stored in memory) and prints those words that are not in the dic-tionary. It knows enough about English spelling to detect plurals and the like, so it does a good job.
The grep program looks through a set of files for lines that contain a particular text pattern (rather like the editor's context search does, but on a bunch of files). For example,
grep 'ing$' chap*
finds all lines that end with the letters "ing" in the files "chap*." The "$" indicates that the pattern to search for is at the end of the line, whereas """ indicates that the pattern to search for is at the beginning of a line. (It is almost always good practice to put single quotes around the pattern to search for in case it contains characters like
*
or $ that have a special meaning to the shell.) The grep program is often used to locate the misspelled words detected by the spell program.The diff program prints a list of the differences between two files, so that two versions of something can automatically be compared. This is a vast improvement over proofreading by hand.
The we program counts the words, lines, and characters in a set of files. The tr program translates characters into other characters. For exam-ple, this translates uppercase into lowercase:
tr [A-Z] [a-z]
<
input> outputThe sort program sorts files, while exref makes cross-references. The ptx program makes a permuted index (keyword-in-context listing). The sed program is like ed but can be used with long files. These pro-grams are for more advanced users and are not limited to document preparation. Put them on your list of things to learn.
2.3 Hints for Preparing Documents
First, type so that subsequent editing will be easy. Start each sentence on a new line. Make lines short, and break lines at natural places, such as after commas and semicolons, rather than randomly. Since most people change documents by rewriting phrases and adding, deleting, and rearranging sentences, these precautions simplify any editing needed later.
Keep the individual files of a document down to modest size, perhaps 10,000 to 15,000 characters. Larger files edit more slowly. If you make a dumb mistake, it is better to clobber a small file than a big one. Split the files at natural boundaries in the document for the same reasons that you start each sentence on a new line.
The second aspect of making changes to documents easy is not to com-mit to the formatting details too early. One of the advantages of for-matting packages is permitting format decisions to be delayed until the last possible moment. Until a document is printed it is not even decided whether it will be typeset or printed out on a line printer.
As a rule of thumb, a document should be produced in terms of a set of requests or commands (macros) for all but the most trivial jobs. The macros used should then be defined either by using one of the existing macro packages (the recommended way) or by defining your own nroff and/or troff macros. As long as the text is entered in some systematic way, it can always be cleaned up and formatted by a judi-cious combination of editing commands and macro definitions.
3. Programming
We will not teach any of the programming languages available, but a few words of advice are in order. One of the reasons why the UniPlus+ system is a productive programming environment is that there is already a rich set of tools available. Facilities like pipes, input/output redirection, and the capabilities of the shell often make it possible to do a job by pasting together programs that already exist instead of writing a program completely from scratch.
3.1 Shell Programming
BASICS FOR BEGINNERS
cat .. .
I
tr .. .I
tr .. . I sort I uniq Icommcollect the files
put each word on a new line delete punctuation, etc. into dictionary order discard duplicates
print words in text but not in dictionary
More pieces have been added subsequently, but this goes a long way for such a small effort.
The editor can be made to do things that would normally require spe-cial programs on other systems. For example, to list the first and last lines of each of a set of files, such as a book, you could laboriously type:
ed e chap1.1 1p $p e chap1.2 lp $p
etc.
The same job can be performed much more easily. One way is to type
Is chap*
>
tempto get the list of file names into a file called "temp." The "temp" file is then edited using global commands as follows:
1,$ st'.*$/e
&\
1p\ $p/
The results are written into the "script" file (1,$ w script) and then the following command is entered:
ed
<
scriptand over again for a set of arguments as illustrated below:
for i in chap· do
ed Si
<
script doneThis sets the shell variable i to each file name in turn, then does the command. This command can be entered at the terminal or put in a file for later execution. Before the file can be executed, it may be necessary to change the mode by entering the following:
chmod
+
x filenameAn option often overlooked by new users is that the shell is itself a programming language, with variables, control flow if-else, while, for, case, subroutines, and interrupt handling. Since there are many building-block programs, the user can sometimes avoid writing a new program merely by piecing together some of the building blocks with shell command files.
We will not go into any details here; examples and rules can be found in Chapters 5 and 6 in this guide.
3.2 Programming in C
The C language is a reasonable choice of a programming language when undertaking anything substantial. Everything in the UniPlus+ system is based on the C language. The system itself is written in C, as are most of the programs that run on the system. The C language is also an easy language to use once you get started. The C language is intro-duced and fully described in The C Programming Language by B. W. Kernighan and D. M. Ritchie (Prentice-Hall, 1978). Several sections of the manual describe the system interfaces, that is, how to do input/output and similar functions.
BASICS FOR BEGINNERS
There are several supporting programs that go with C. The lint pro-gram checks C propro-grams for potential portability problems and detects errors such as mismatched argument types and uninitialized variables.
For larger programs (anything whose source is on more than one file), the make program allows you to specify the dependencies among the source files and the processing steps needed to make a new version. The program then checks the times that the pieces were last changed and does the minimal amount of recompiling to create a consistent updated version.
CONTENTS
1. Introduction . .
2. General . . . . 2.1 Disclaimer. . . . 3. Getting Started
3.1 Creating Text. . . . 3.2 Error Messages
3.3 Writing a Text File . 3.4 Leaving ed. . . .
3.5 Editing Text Files . . . . 3.6 Reading Text . . .
3.7 Printing Buffer Contents 3.8 Current Line .
3.9 Deleting Lines 3.10 Changing Text 3.11 Context Searching
3.12 Change and Insert Commands 3.13 Moving Text . . . . 4. Global Commands .
5. Special Characters 5.1 Period 5.2 Circumflex 5.3 Dollar Sign 5.4 Asterisk 5.5 Brackets 5.6 Ampersand 5.7 Backslash
6. Summary of Commands
1. Introduction
Chapter 3
TEXT EDITOR - ED
This is a tutorial to help beginners get started with text editing. UniPlus+ has three text editors: ed, ex, and vi. Of these, ed is con-sidered the easiest to learn; however, many users prefer vi. We recom-mend reading this chapter first before going on to vi. The ex program is the root of the text editors and is used mostly by systems program-mers and persons very familiar with ed.
Although this chapter does not cover everything about the text editor ed, it does discuss enough for most day-to-day needs. This includes:
• Printing, appending, changing, deleting, moving, and inserting text.
• Reading from and writing to files. • Searching for text.
• Making substitutions.
• Making changes throughout a file automatically. • Using some special characters for easier editing.
2. General
The ed program is a text editor-an interactive program for creating and modifying text. The text can be a document (like this one), data for a program, instructions for the computer, etc.
Do the exercises. They illustrate techniques discussed in the text. A summary of commands appears at the end of this chapter.
2.1
I>isclainBerWe cover only a few ed commands. (although we include the most common commands). Also, we assume that you know how to log onto UniPlus+ and understand what a file is. For more information about UniPlus+, refer to the Chapters 1 and 2 in this guide.
We refer to this key as RETURN in this chapter.
3. Getting Started
To follow along with the tutorial, you should be logged onto UniPlus+ and see the prompt character, usually a $ or 0/0.
To start the editor, type:
ed
and press RETURN.
3.1 Creating Text
We describe creating text first. Making changes and corrections is described later.
When you start ed, it presents you with an empty file. This is similar to starting to write on a blank piece of paper. To put text in the file, you must type it in or retrieve it from another file. We will begin by the initial typing in of some text and later will describe reading in files.
The text we are working on in ed is kept in a buffer. The buffer is like the piece of paper on which we write things, then change some of them, and finally file the whole thing away for another day.
You direct ed by typing instructions called commands. Most commands consist of one lowercase letter. Each command is typed on a separate line. Ed doesn't print any messages in response to most commands.
Once in the editor (by typing ed and RETURN), to start adding text, type
a
TEXT EDITOR-ED
a
Now is the time for all good men
to come to the aid of their party.
As shown in the last line of this example, we stop appending by typing a period on a line by itself and pressing RETURN. This tells ed that you have finished adding text and want to give a new command. (Even experienced users sometimes forget to type the period when they have finished adding text. If ed seems to be ignoring your commands, type . on a line by itself. You may then find some command lines in your text, which you will have to take out later.)
After you finish appending, the buffer contains these three lines:
Now is the time for all good men
to come to the aid of their party.
The a and the . are not included since they are commands and not text.
To add more text, type a and continue typing.
3.2 Error Messages
If ed doesn't understand something you type, it prints
?
on the screen.
This is pretty cryptic, but with practice, you'll learn to recognize the mistake. For some assistance, type
h
3.3 Writing a Text File
After you have added some text to your file, you will want to save it. The w (write) command writes the contents of the buffer onto a file. For example, type
w filename
with filename as the name of the file you want your text to be saved to. This copies the buffer's contents into the specified file (destroying any previous information in that file). For example, if we wanted to save the text we created in a file called "junk," we would type:
w junk RETURN
Leave a space between wand the file name. In our example, ed responds with:
68
Ed prints the number of characters it wrote into the file. (Blank spaces and end-of-line characters are included in the character count.) Writing a file just makes a copy of the text-the buffer's contents are not dis-turbed. This is similar to making a carbon copy of the piece of paper you're writing on and putting this copy in a file folder-it does not change the original, it simply duplicates it. This is an important point. Ed only works on a copy of a file (by placing it in the buffer), not the file itself. The file doesn't change until you write your changes to it with the w command. (It's a good idea to write your text onto a file at least every hour. If the system crashes or you make some horrible mis-take, you will lose all the text in the buffer, but any text in a file will be safe,)
3.4 Leaving ed
TEXT EDITOR-ED
ed a
N ow is the time for all good men
to come to the aid of their party.
(initialize the command) (append)
(text) (text) (text)
(end append)
(write to file "junk") w junk
68 q
(character count system response) (quit)
The system will respond with the prompt character.
When you leave ed your buffer is destroyed, which is why you write your changes to a file before quitting. Actually, ed will print
?
if you try to quit without writing. If you want to save the additions to a file, type wand press RETURN. If you don't want to save your addi-tions, typing q again gets you out of ed without saving any changes since the last w command.
EXERCISE 1
Enter ed and create some text using the append command, a
ed a
This is Exercise 1
to show how to create a file using the text editor ed.
No prompt appears in the text editor. When you have finished adding text, type "w sometext" and press RETURN to save your text in a file called "sometext." Type q to leave ed. When you are out of ed, you will see the system prompt $. To print the file you just created, type
3.5 Editing Text Files
After you have created and saved a file, you may want to edit it. The e (edit) command retrieves a file you have saved and places it in the buffer. To edit a file, type
e filename RETURN
If you had saved a file called "junk" as described above and wanted to edit it, you would type
ed
e junk RETURN
Ed retrieves "junk," places it in the buffer, and prints the character count:
68
When you use e to edit a file, ed replaces the contents of the buffer with the new file. If you don't save the buffer before using e, ed des-troys the old contents of the buffer.
If you read a file into the buffer with e, ed uses that file name when you type w to write the file. For example, an editing session might look like this:
ed
e filename {editing session]
w q
The file you edited is automatically save in filename when you type w. You can find out which file w will write to using the f (file) command.
3.6 Reading Text
TEXT EDITOR-ED
r filename
adds the contents of filename to the end of the file already in the buffer. For example, if you type
ejunk
68 (system response) r junk
68 (system response)
ed first places "junk" in the buffer to edit it, and then reads in "junk" again and appends it to the end. You now have two copies of the origi-nal text:
Now is the time for all good men