Website Navigation
Y
ou’ve already learned simple ways to send a website visitor from one page to another. For example, you can add HTML links (or HyperLink controls) to your page to let users surf through your site. If you want to perform page navigation in response to another action, you can call the Response.Redirect() method or the Response.Transfer() method in your code. But in professional web applications, the navigation requirements are more intensive. These applications need a system that allows users to surf through a hierarchy of pages, without forcing you to write the same tedious navigation code in every page.Fortunately, ASP.NET includes a navigation model that makes it easy to let users surf through your web applications. Before you can use this model, you need to determine the hierarchy of your website—in other words, how pages are logically organized into groups. You then define that structure in a dedicated file and bind that information to specialized navigation controls. Best of all, these navigation controls include nifty widgets such as the TreeView and Menu.
In this chapter, you’ll learn everything you need to know about the new site map model and the navigation controls that work with it.
Site Maps
If your website has more than a handful of pages, you’ll probably want some sort of navigation system to let users move from one page to the next. Obviously, you can use the ASP.NET toolkit of controls to implement almost any navigation system, but this requires that youperform all the hard work. Fortunately, ASP.NET has a set of navigation features that can simplify the task dramatically.
As with all the best ASP.NET features, ASP.NET navigation is flexible, configurable, and pluggable. It consists of three components:
373
C H A P T E R 1 1
Figure 11-1. ASP.NET navigation with site maps
• A way to define the navigational structure of your website. This part is the XML site map, which is (by default) stored in a file.
• A convenient way to read the information in the site map file and convert it to an object model. The SiteMapDataSource control and the XmlSiteMapProvider perform this part.
• A way to use the site map information to display the user’s current position and give the user the ability to easily move from one place to another. This part takes place through the navigation controls you bind to the SiteMapDataSource control, which can include breadcrumb links, lists, menus, and trees.
You can customize or extend each of these ingredients separately. For example, if you want to change the appearance of your navigation controls, you simply need to bind dif-ferent controls to the SiteMapDataSource. On the other hand, if you want to read site map information from a different type of file or from a different location, you need to change your site map provider.
Figure 11-1 shows how these pieces fit together.
Defining a Site Map
C H A P T E R 1 1 ■ W E B S I T E N AV I G AT I O N 375
The XmlSiteMapProvider looks for a file named Web.sitemap in the root of the virtual directory. Like all site map providers, the task of the XmlSiteMapProvider is to extract the site map data and create the corresponding SiteMap object. This SiteMap object is then made available to the SiteMapDataSource, which you place on every page that uses navi-gation. The SiteMapDataSource provides the site map information to navigation controls, which are the final link in the chain.
You can create a site map using a text editor such as Notepad, or you can create it in Visual Studio by selecting Website ➤Add New Item and then choosing the Site Map option. Either way, it’s up to you to enter all the site map information by hand. The only difference is that if you create it in Visual Studio, the site map will start with a basic struc-ture that consists of three siteMap nodes.
Before you can fill in the content in your site map file, you need to understand the rules that all ASP.NET site maps must follow. The following sections break these rules down piece by piece.
■
Note
Before you begin creating site maps, it helps to have a basic understanding of XML, the format that’s used for the site map file. You should understand what an element is, how to start and end an ele-ment, and why exact capitalization is so important. If you’re new to XML, you may find that it helps to refer to Chapter 17 for a quick introduction before you read this chapter.Rule 1: Site Maps Begin with the <siteMap> Element
Every Web.sitemap file begins by declaring the <siteMap> element and ends by closing that element. You place the actual site map information between the start and end tag (where the three dots are shown):
<siteMap xmlns="http://schemas.microsoft.com/AspNet/SiteMap-File-1.0"> ...
</siteMap>
Rule 2: Each Page Is Represented by a <siteMapNode> Element
So, what does the site map content look like? Essentially, every site map defines an organ-ization of web pages. To insert a page into the site map, you add the <siteMapNode> element with some basic information. Namely, you need to supply the title of the page (which appears in the navigation controls), a description (which you may or may not choose to use), and the URL (the link for the page). You add these three pieces of infor-mation using three attributes. The attributes are named title, description, and url, as shown here:
Notice that this element ends with the characters />. This indicates it’s an empty
elementthat represents a start tag and an end tag in one. Empty elements (an XML concept
described in Chapter 17) never contain other nodes.
Here’s a complete, valid site map file that uses this page to define a website with exactly one page:
<siteMap xmlns="http://schemas.microsoft.com/AspNet/SiteMap-File-1.0"> <siteMapNode title="Home" description="Home" url="~/default.aspx" /> </siteMap>
Notice that the URL for each page begins with the ~/ character sequence. This is quite important. The ~/ characters represent the root folder of your web application. In other words, the URL ~/default.aspx points to the default.aspx file in the root folder. This style of URL isn’t required, but it’s strongly recommended, because it makes sure you always get the right page. If you were to simply enter the URL default.aspx without the ~/ prefix, ASP.NET would look for the default.aspx page in the currentfolder. If you have a web application with pages in more than one folder, you’ll run into a problem.
For example, if the user browses into a subfolder and clicks the default.aspx link, ASP.NET will look for the default.aspx page in that subfolder instead of in the root folder. Because the default.aspx page isn’t in this folder, the navigation attempt will fail with a 404 Not Found error.
Rule 3: A <siteMapNode> Element Can Contain Other <siteMapNode> Elements
Site maps don’t consist of simple lists of pages. Instead, they divide pages into groups. To represent this in a site map file, you place one <siteMapNode> inside another. Instead of using the empty element syntax shown previously, you’ll need to split your <siteMapNode> element into a start tag and an end tag:
<siteMapNode title="Home" description="Home" url="~/default.aspx"> ...
</siteMapNode>
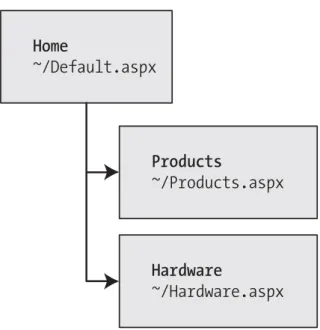
Now you can slip more nodes inside. Here’s an example where a Home group con-tains two more pages:
<siteMapNode title="Home" description="Home" url="~/default.aspx"> <siteMapNode title="Products" description="Our products"
url="~/products.aspx" />
<siteMapNode title="Hardware" description="Hardware choices" url="~/hardware.aspx" />
</siteMapNode>
Figure 11-2. Three nodes in a site map
C H A P T E R 1 1 ■ W E B S I T E N AV I G AT I O N 377
In this case, all three nodes are links. This means the user could surf to one of three pages. However, when you start to create more complex groups and subgroups, you might want to create nodes that serve only to organize other nodes but aren’t links themselves. In this case, just omit the url attribute, as shown here with the Products node:
<siteMapNode title="Products" description="Products">
<siteMapNode title="In Stock" description="Products that are available" url="~/inStock.aspx" />
<siteMapNode title="Not In Stock" description="Products that are on order" url="~/putOfStock.aspx" />
</siteMapNode>
When you show this part of the site map in a web page, the Products node will appear as ordinary text, not a clickable link.
No limit exists to how many layers deep you can nest groups and subgroups. How-ever, it’s a good rule to go just two or three levels deep; otherwise, it may be difficult for users to grasp the hierarchy when they see it in a navigation control. If you find that you need more than two or three levels, you may need to reconsider how you are organizing your pages into groups.
Rule 4: Every Site Map Begins with a Single <siteMapNode>
That means the following isnota valid site map, because it contains two top-level nodes:
<siteMap xmlns="http://schemas.microsoft.com/AspNet/SiteMap-File-1.0"> <siteMapNode title="In Stock" description="Products that are available"
url="~/inStock.aspx" />
<siteMapNode title="Not In Stock" description="Products that are on order" url="~/outOfStock.aspx" />
</siteMap>
The following site map is valid, because it has a single top-level node (Home), which contains two more nodes:
<siteMap xmlns="http://schemas.microsoft.com/AspNet/SiteMap-File-1.0"> <siteMapNode title="Home" description="Home" url="~/default.aspx">
<siteMapNode title="In Stock"
description="Products that are available" url="~/inStock.aspx" /> <siteMapNode title="Not In Stock"
description="Products that are on order" url="~/outOfStock.aspx" /> </siteMapNode>
</siteMap>
As long as you use only one top-level node, you can nest nodes as deep as you want in groups as large or as small as you want.
Rule 5: Duplicate URLs Are Not Allowed
You cannot create two site map nodes with the same URL. This might seem to present a bit of a problem in cases where you want to have the same link in more than one place— and it does. However, it’s a requirement because the default SiteMapProvider included with ASP.NET stores nodes in a collection, with each item indexed by its unique URL.
This limitation doesn’t prevent you from creating more than one URL with minor differences pointing to the same page. For example, the following two nodes are accept-able, even though they lead to the same page (products.aspx), because the two URLs have different query string arguments at the end:
<siteMapNode title="In Stock" description="Products that are available" url="~/products.aspx?stock=1" />
<siteMapNode title="Not In Stock" description="Products that are on order" url="~/products.aspx?stock=0" />
C H A P T E R 1 1 ■ W E B S I T E N AV I G AT I O N 379
Seeing a Simple Site Map in Action
A typical site map can be a little overwhelming at first glance. But if you keep the previous five rules in mind, you’ll be able to sort out exactly what’s taking place.
The following is an example that consists of seven nodes. (Remember, each nodeis either a link to an individual page, or a heading used to organize a group of pages.) The example defines a simple site map for a company named RevoTech.
<siteMap xmlns="http://schemas.microsoft.com/AspNet/SiteMap-File-1.0">
<siteMapNode title="Home" description="Home" url="~/default.aspx">
<siteMapNode title="Information" description="Learn about our company"> <siteMapNode title="About Us"
description="How RevoTech was founded" url="~/aboutus.aspx" />
<siteMapNode title="Investing"
description="Financial reports and investor analysis" url="~/financial.aspx" />
</siteMapNode>
<siteMapNode title="Products" description="Learn about our products"> <siteMapNode title="RevoStock"
description="Investment software for stock charting" url="~/product1.aspx" />
<siteMapNode title="RevoAnalyze"
description="Investment software for yield analysis" url="~/product2.aspx" />
</siteMapNode>
</siteMapNode> </siteMap>
■
Note
The URL in the site map is not case-sensitive.Binding an Ordinary Page to a Site Map
Once you’ve defined the Web.sitemap file, you’re ready to use it in a page. First, it’s a good idea to make sure you’ve created all the pages that are listed in the site map file, even if you leave them blank. Otherwise, you’ll have trouble testing whether the site map navi-gation actually works.
The next step is to add the SiteMapDataSource control to your page. You can drag and drop it from the Data tab of the Toolbox. It creates a tag like this:
<asp:SiteMapDataSource ID="SiteMapDataSource1" runat="server" />
The SiteMapDataSource control appears as a gray box on your page in Visual Studio, but it’s invisible when you run the page.
The last step is to add controls that are linked to the SiteMapDataSource. Although you can use any of the data controls described in Part 3, in practice you’ll find that you’ll get the results you want only with the three controls that are available in the Navigation tab of the Toolbox. That’s because these controls support hierarchical data (data with multiple nested levels), and the site map is an example of hierarchical data. In any other control, you’ll see only a single level of the site map at a time, which is impractical.
These are the three navigation controls:
TreeView: The TreeView displays a “tree” of grouped links that shows your whole site
map at a glance.
Menu: The Menu displays a multilevel menu. By default, you’ll see only the first level, but other levels pop up (thanks to some nifty JavaScript) when you move the mouse over the subheadings.
SiteMapPath: The SiteMapPath is the simplest navigation control—it displays the full
path you need to take through the site map to get to the current page. For example, it might show Home > Products > RevoStock if you’re at the product1.aspx page. Unlike the other navigation controls, the SiteMapPath is useful only for moving up the hierarchy.
To connect a control to the SiteMapDataSource, you simply need to set its DataSourceID property to match the name of the SiteMapDataSource. For example, if you added a TreeView, you should tweak the tag so it looks like this:
<asp:TreeView ID="TreeView1" runat="server" DataSourceID="SiteMapDataSource1" />
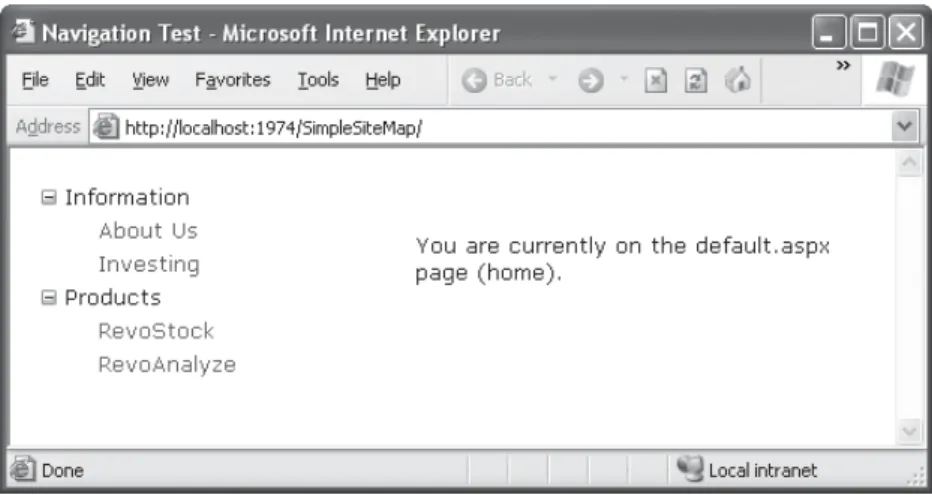
Figure 11-3. A site map in the TreeView
C H A P T E R 1 1 ■ W E B S I T E N AV I G AT I O N 381
Best of all, this tree is created automatically. As long as you link it to the SiteMapDataSource control, you don’t need to write any code.
When you click one of the nodes in the tree, you’ll automatically be taken to the page you defined in the URL. Of course, unless that page also includes a navigation control such as the TreeView, the site map will disappear from sight. The next section shows a better approach.
Binding a Master Page to a Site Map
Website navigation works best when combined with another ASP.NET feature—master pages. That’s because you’ll usually want to show the same navigation controls on every page. The easiest way to do this is to create a master page that includes the SiteMapDataSource and the navigation controls. You can then reuse this template for every other page on your site.
Here’s how you might define a basic structure in your master page that puts navigation controls on the left:
<%@ Master Language="VB" CodeFile="MasterPage.master.vb" Inherits="MasterPage" %>
<html>
<head runat="server">
<title>Navigation Test</title> </head>
<body>
<form id="form1" runat="server"> <table>
<td style="width: 226px;vertical-align: top;"> <asp:TreeView ID="TreeView1" runat="server"
DataSourceID="SiteMapDataSource1" /> </td>
<td style="vertical-align: top;">
<asp:ContentPlaceHolder id="ContentPlaceHolder1" runat="server" /> </td>
</tr> </table>
<asp:SiteMapDataSource ID="SiteMapDataSource1" runat="server" /> </form>
</body> </html>
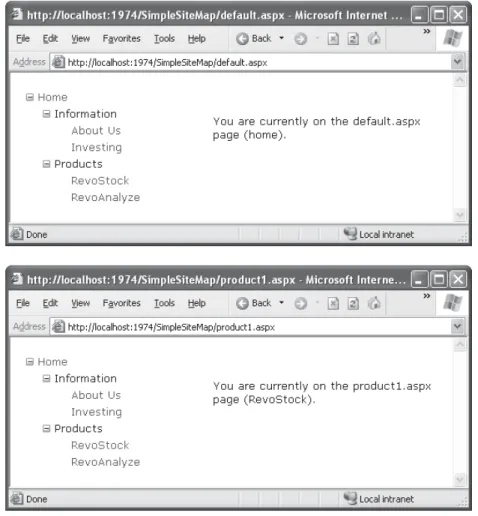
Then, create a child with some simple static content:
<%@ Page Language="VB" MasterPageFile="~/MasterPage.master" AutoEventWireup="False" CodeFile="default.aspx.vb"
Inherits="_default" Title="Home Page" %>
<asp:Content ID="Content1" ContentPlaceHolderID="ContentPlaceHolder1" runat="Server">
<br /> <br />
You are currently on the default.aspx page (Home). </asp:Content>
In fact, while you’re at it, why not create a second page so you can test the navigation between the two pages?
<%@ Page Language="VB" MasterPageFile="~/MasterPage.master" AutoEventWireup="False" CodeFile="product1.aspx.vb" Inherits="product1" Title="RevoStock Page" %>
<asp:Content ID="Content1" ContentPlaceHolderID="ContentPlaceHolder1" runat="Server">
<br /> <br />
You are currently on the product1.aspx page (RevoStock). </asp:Content>
Figure 11-4. Navigating from page to page with the TreeView
C H A P T E R 1 1 ■ W E B S I T E N AV I G AT I O N 383
You can do a lot more to customize the appearance of your pages and navigation controls. You’ll consider these topics in the following sections.
Binding Portions of a SiteMap
In the previous example, the TreeView shows the structure of the site map file exactly. However, this isn’t always what you want. For example, you might not like the way the Home node sticks out because of the XmlSiteMapProvider rule that every site map must begin with a single root.
One way to clean this up is to configure the properties of the SiteMapDataSource. For example, you can set the ShowStartingNode property to False to hide the root node:
<asp:SiteMapDataSource ID="SiteMapDataSource1" runat="server" ShowStartingNode="False" />
This example shows how you can hide the root node. Another option is to show just a portion of the complete site map, starting from the current node. For example, you might use a control such as the TreeView to show everything in the hierarchy starting from the current node. If the user wants to move up a level, they could use another con-trol (such as the SiteMapPath).
Showing Subtrees
By default, the SiteMapDataSource shows a full tree that starts with the root node. How-ever, the SiteMapDataSource has several properties that can help you configure the navigation tree to limit the display to just a specific branch. Typically, this is useful if you have a deeply nested tree. Table 11-1 describes the full set of properties.
Table 11-1. SiteMapDataSource Properties
Property Description
ShowStartingNode Set this property to False to hide the first (top-level) node that would otherwise appear in the navigation tree. The default is True.
StartingNodeUrl Use this property to change the starting node. Set this value to the URL of the node that should be the first node in the navigation tree. This value must match the url attribute in the site map file exactly. For example, if you specify a StartingNodeUrl of "~/home.aspx", then the first node in the tree is the Home node, and you will see nodes only underneath that node.
StartFromCurrentNode Set this property to True to set the current page as the starting node. The navigation tree will show only pages beneath the current page (which allows the user to move down the hierarchy). If the current page doesn’t exist in the site map file, this approach won’t work.
C H A P T E R 1 1 ■ W E B S I T E N AV I G AT I O N 385
Property Description
StartingNodeOffset Use this property to shift the starting node up or down the hierarchy. It takes an integer that instructs the SiteMapDataSource to move from the starting node down the tree (if the number is positive) or up the tree (if the number is negative). The actual effect depends on how you combine this property with other SiteMapDataSource properties. For example, if StartFromCurrentNode is False, you’ll use a positive number to move down the tree from the starting node toward the current node. If StartFromCurrentNode is True, you’ll use a negative number to move up the tree away from the current node and toward the starting node.
Figuring out these properties can take some work, and you might need to do a bit of experimenting to decide the right combination of SiteMapDataSource settings you want to use. To make matters more interesting, you can use more than one SiteMapDataSource on the same page. This means you could use two navigation controls to show different sections of the site map hierarchy.
Before you can see this in practice, you need to modify the site map file used for the previous few examples into something a little more complex. Currently, the site map has three levels, but only the first level (the Home node) and the third level (the individual pages) have URL links. The second-level groupings (Information and Products) are just used as headings, not links. To get a better feel for how the SiteMapDataSource properties work with multiple navigation levels, modify the Information node as shown here:
<siteMapNode title="Information" description="Learn about our company"
url="~/information.aspx">
And change the Products node:
<siteMapNode title="Products" description="Learn about our products"
url="~/products.aspx">
Next, create the products.aspx and information.aspx pages.
The interesting feature of the Products node is that not only is it a navigable page, but it’s a page that has other pages both above it and below it in the navigation hierarchy. This makes it ideal for testing the SiteMapDataSource properties. For example, you can create a SiteMapDataSource that shows only the current page and the pages below it like this:
And you can create one that always shows the Information page and the pages underneath it like this:
<asp:SiteMapDataSource ID="SiteMapDataSource2" runat="server" StartingNodeUrl="~/information.aspx" />
■
Note
For this technique to work, ASP.NET must be able to find a page in the Web.sitemap file that matches the current URL. Otherwise, it won’t know where the current position is, and it won’t provide any navigation information to the bound controls.Now, just bind two navigation controls. In this case, one TreeView is linked to each SiteMapDataSource:
Pages under the current page:
<asp:TreeView ID="TreeView1" runat="server" DataSourceID="SiteMapDataSource1" /> <br />
The Information group of pages:<br /> <asp:TreeView ID="TreeView2" runat="server"
DataSourceID="SiteMapDataSource2" />
Figure 11-6 shows the result as you navigate from default.aspx down the tree to prod-ucts1.aspx. The first TreeView shows the portion of the tree under the current page, and the second TreeView is always fixed on the Information group.
C H A P T E R 1 1 ■ W E B S I T E N AV I G AT I O N 387
To understand how this works, it helps to consider an example. Imagine you’re at this location in a website:
Home > Products > Software > Custom > Contact Us
If the SiteMapDataSource is starting at the Home node (the default) and you apply a StartingNodeOffset of 2, it will move down the tree two levels and bind to the tree of pages that starts at the Software node.
However, you’re only one level deep in the hierarchy. Or, to look at it another way, no node exists between the top node and the current node that’s two levels deep.
Now, what happens if you repeat the same test but set the site map provider to begin on another node? Consider what happens if you set StartFromCurrentNode to True and surf to the Contact Us page. Once again, you won’t see any information, because the site map provider attempts to move two levels down from the current node—Contact Us—and it has nowhere to go. On the other hand, if you set StartFromCurrentNode to True and use a StartingNodeOffset of -2, the SiteMapDataSource will move uptwo levels from Contact Us and bind the subtree starting at Software.
Overall, you won’t often use the StartingNodeOffset property. However, it can be use-ful if you have a deeply nested site map and you want to keep the navigation display simple by showing just a few levels up from the current position.
■
Note
All the examples in this section filtered out higher-level nodes than the starting node. For example, if you’re positioned at the Home > Products > RevoStock page, you’ve seen how to hide the Home and Products levels. You haven’t seen how to filter out lower-level nodes. For example, if you’re positioned at the Home page, you’ll always see the full site map, because you don’t have a way to limit the number of levels you see below the starting node. You have no way to change this behavior with the SiteMapDataSource; but later, in “The TreeView Control” section, you’ll see that the TreeView.MaxDataBindDepth property serves this purpose.Using Different Site Maps in the Same File
Imagine you want to have a dealer section and an employee section on your website. You might split this into two structures and define them both under different branches in the same file, like this:
<siteMap xmlns="http://schemas.microsoft.com/AspNet/SiteMap-File-1.0" > <siteMapNode title="Root" description="Root" url="~/">
<siteMapNode title="Dealer Home" description="Home" url="~/default.aspx"> ...
</siteMapNode>
<siteMapNode title="Employee Home" description="Home" url="~/default_emp.aspx"> ...
C H A P T E R 1 1 ■ W E B S I T E N AV I G AT I O N 389
To bind the menu to the dealer view (which starts at the Dealer Home page), you simply set the StartingNodeUrl property to "~/default.aspx". You can do this program-matically or, more likely, by creating an entirely different master page and implementing it in all your dealer pages. In your employee pages, you set the StartingNodeUrl property to "~/default_emp.aspx". This way, you’ll show only the pages under the Employee Home branch of the site map.
You can even make your life easier by breaking a single site map into separate files using the siteMapFile attribute, like this:
<siteMap xmlns="http://schemas.microsoft.com/AspNet/SiteMap-File-1.0" > <siteMapNode title="Root" description="Root" url="~/">
<siteMapNode siteMapFile="Dealers.sitemap" /> <siteMapNode siteMapFile="Employees.sitemap" /> </siteMapNode>
</siteMap>
Even with this technique, you’re still limited to a single site map tree, and it always starts with the Web.sitemap file. But you can manage your site map more easily because you can factor some of its content into separate files.
However, this seemingly nifty technique is greatly limited because the site map provider doesn’t allow duplicate URLs. This means you have no way to reuse the same page in more than one branch of a site map. Although you can try to work around this problem by creating different URLs that are equivalent (for example, by adding query string parameters on the end), this raises more headaches. Sadly, this problem has no solution with the default site map provider that ASP.NET includes.
Navigating Programmatically
You aren’t limited to no-code data binding in order to display navigation hierarchies. You can interact with the navigation information programmatically. This allows you to retrieve the current node information and use it to configure details such as the page heading and title. All you need to do is interact with the objects that are readily available through the Page class.
■
Note
You can also search for nodes using the methods of the current SiteMapProvider object, which is available through the SiteMap.Provider shared property. For example, the SiteMap.Provider.FindSiteMapNode() method allows you to search for a node by its URL.Table 11-2. SiteMapNode Navigational Properties
Property Description
ParentNode Returns the node one level up in the navigation hierarchy, which contains the current node. On the root node, this returns a null reference.
ChildNodes Provides a collection of all the child nodes. You can check the HasChildNodes property to determine whether child nodes exist.
PreviousSibling Returns the previous node that’s at the same level (or a null reference if no such node exists).
NextSibling Returns the next node that’s at the same level (or a null reference if no such node exists).
To see this in action, consider the following code, which configures two labels on a page to show the heading and description information retrieved from the current node:
Protected Sub Page_Load(ByVal sender As Object, _ ByVal e As EventArgs) Handles Me.Load
lblHead.Text = SiteMap.CurrentNode.Title
lblDescription.Text = SiteMap.CurrentNode.Description End Sub
The next example is a little more ambitious. It implements a Previous/Next set of links, allowing the user to traverse an entire set of subnodes. The code checks for the existence of sibling nodes, and if there aren’t any in the required position, it simply hides the links:
Protected Sub Page_Load(ByVal sender As Object, _ ByVal e As EventArgs) Handles Me.Load
If SiteMap.CurrentNode.NextSibling IsNot Nothing Then
lnkNext.NavigateUrl = SiteMap.CurrentNode.NextSibling.Url lnkNext.Visible = True
Else
lnkNext.Visible = False End If
C H A P T E R 1 1 ■ W E B S I T E N AV I G AT I O N 391
Figure 11-7 shows the result. The first picture shows the Next link on the product1.aspx page. The second picture shows how this link disappears when you navigate to product2.aspx (either by clicking the Next link or the RevoAnalyze link in the TreeView).
Figure 11-7. Creating a Next page link
Mapping URLs
The basic idea behind ASP.NET URL mapping is that you map a request URL to a different URL. The mapping rules are stored in the web.config file, and they’re applied before any other processing takes place. Of course, for ASP.NET to apply the remapping, it must be processing the request, which means the request URL must use a file type extension that’s mapped to ASP.NET. (See Chapter 12 for more information about how to configure ASP.NET to handle file extensions that it wouldn’t ordinarily handle.)
You define URL mapping in the <urlMappings> section of the web.config file. You supply two pieces of information—the request URL (as the attribute url) and the new destination URL (mappedUrl). Here’s an example:
<configuration xmlns="http://schemas.microsoft.com/.NetConfiguration/v2.0"> <system.web>
<urlMappings enabled="true"> <add url="~/category.aspx"
mappedUrl="~/default.aspx?category=default" /> <add url="~/software.aspx"
mappedUrl="~/default.aspx?category=software" /> </urlMappings>
...
</system.web> </configuration>
In order for ASP.NET to make a match, the URL that the browser submits must match the URL specified in the web.config file almost exactly. However, there are two exceptions. First, the matching algorithm isn’t case-sensitive, so the capitalization of the request URL is always ignored. Second, any query string arguments in the URL are disregarded. Unfor-tunately, ASP.NET doesn’t support advanced matching rules, such as wildcards or regular expressions.
When you use URL mapping, the redirection takes place in the same way as the
Server.Transfer() method, which means no round-trip happens and the URL in the browser will still show the original request URL, not the new page. In your code, the Request.Path and Request.QueryString properties reflect the new (mapped) URL. The Request.RawUrl property returns the original, friendly request URL.
C H A P T E R 1 1 ■ W E B S I T E N AV I G AT I O N 393
The SiteMapPath Control
The TreeView shows the available pages, but it doesn’t indicate where you’re currently positioned. To solve this problem, it’s common to use the TreeView in conjunction with the SiteMapPath control. Because the SiteMapPath is always used for displaying naviga-tional information (unlike the TreeView, which can also show other types of data), you don’t even need to explicitly link it to the SiteMapDataSource:
<asp:SiteMapPath ID="SiteMapPath1" runat="server" />
The SiteMapPath provides breadcrumb navigation, which means it shows the user’s current location and allows the user to navigate up the hierarchy to a higher level using links. Figure 11-8 shows an example with a SiteMapPath control when the user is on the product1.aspx page. Using the SiteMapPath control, the user can return to the default.aspx page. (If a URL were defined for the Products node, you would also be able to click that por-tion of the path to move to that page.) Once again, the SiteMapPath has been added to the master page, so it appears on all the content pages in your site.
Figure 11-8. Breadcrumb navigation with SiteMapPath
Customizing the SiteMapPath
The SiteMapPath control is also thoroughly customizable. Table 11-3 lists some of its most commonly configured properties.
Table 11-3. SiteMapPath Appearance-Related Properties
Property Description
ShowToolTips Set this to False if you don’t want the description text to appear when the user hovers over a part of the site map path.
ParentLevelsDisplayed This sets the maximum number of levels above the current page that will be shown at once. By default, this setting is -1, which means all levels will be shown.
RenderCurrentNodeAsLink If True, the portion of the page that indicates the current page is turned into a clickable link. By default, this is False because the user is already at the current page.
PathDirection You have two choices: RootToCurrent (the default) and
CurrentToRoot (which reverses the order of levels in the path). PathSeparator This indicates the characters that will be placed between each level
in the path. The default is the greater-than symbol (>). Another common path separator is the colon (:).
Using SiteMapPath Styles and Templates
For even more control, you can configure the SiteMapPath control with styles or even redefine the controls and HTML with templates. Table 11-4 lists all the styles and tem-plates that are available in the SiteMapPath control; and you’ll see how to use both sets of properties in this section.
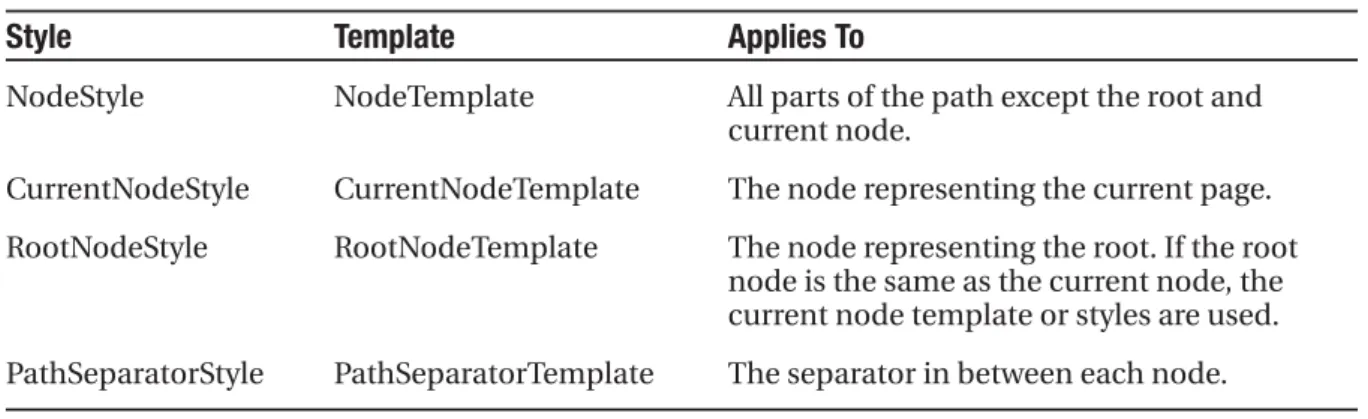
Table 11-4. SiteMapPath Styles and Templates
Style Template Applies To
NodeStyle NodeTemplate All parts of the path except the root and current node.
CurrentNodeStyle CurrentNodeTemplate The node representing the current page. RootNodeStyle RootNodeTemplate The node representing the root. If the root
node is the same as the current node, the current node template or styles are used. PathSeparatorStyle PathSeparatorTemplate The separator in between each node.
C H A P T E R 1 1 ■ W E B S I T E N AV I G AT I O N 395
shown for a specific part of the SiteMapPath control. For example, if you want to configure how the root node displays in a site map, you could create this template:
<asp:SiteMapPath ID="SiteMapPath1" runat="server"> <RootNodeTemplate>
<b>Root</b> </RootNodeTemplate> </asp:SiteMapPath>
This template ignores the information for the root node and simply displays the word Rootin bold.
Usually, you’ll use a data binding expression to retrieve some site map information— chiefly, the description, text, or URL that’s defined for the current node in the site map file. Chapter 14 covers data binding expressions in detail, but this section will present a simple example that shows you all you need to know to use them with the SiteMapPath.
Imagine you want to change how the current node is displayed so that it’s shown in italics. To get the name of the current node, you need to write a data binding expression that retrieves the title. This data binding expression is bracketed between <%# and %> characters and uses a method named Eval(). Here’s what it looks like:
<asp:SiteMapPath ID="SiteMapPath1" runat="server"> <CurrentNodeTemplate>
<i><%# Eval("Title") %></i> </CurrentNodeTemplate>
</asp:SiteMapPath>
Data binding also gives you the ability to retrieve other information from the site map node, such as the description. Consider the following example:
<asp:SiteMapPath ID="SiteMapPath1" runat="server"> <PathSeparatorTemplate>
<asp:Image ID="Image1" ImageUrl="~/arrowright.gif" runat="server" />
</PathSeparatorTemplate> <RootNodeTemplate>
<b>Root</b> </RootNodeTemplate> <CurrentNodeTemplate>
<%# Eval("Title") %> <br />
<small><i><%# Eval("Description") %></i></small> </CurrentNodeTemplate>
This SiteMapPath uses several templates. First, it uses the PathSeparatorTemplate to define a custom arrow image that’s used between each part of the path. This template uses an Image control instead of an ordinary HTML <img> tag because only the Image control understands the ~/ characters in the image URL, which represent the application’s root folder. If you don’t include these characters, the image won’t be retrieved successfully if you place your page in a subfolder.
Next, the SiteMapPath uses the RootNodeTemplate to supply a fixed string of bold text for the root portion of the site map path. Finally, the CurrentNodeTemplate uses two data binding expressions to show two pieces of information—both the title of the node and its description (in smaller text, underneath). Figure 11-9 shows the final result.
Figure 11-9. A SiteMapPath with templates
Adding Custom Site Map Information
In the site maps you’ve seen so far, the only information that’s provided for a node is the title, description, and URL. This is the bare minimum of information you’ll want to use. However, the schema for the XML site map is open, which means you’re free to insert custom attributes with your own data.
You might want to insert additional node data for a number of reasons. This additional information might be descriptive information that you intend to display, or contextual infor-mation that describes how the link should work. For example, you could add attributes that specify a target frame or indicate that a link should open in a pop-up window. The only catch is that it’s up to you to act on the information later. In other words, you need to configure your user interface so it uses this extra information.
C H A P T E R 1 1 ■ W E B S I T E N AV I G AT I O N 397
<siteMapNode title="RevoStock"
description="Investment software for stock charting" url="~/product1.aspx" target="_blank" />
Now in your code, you have several options. If you’re using a template in your navigation control, you can bind directly to the new attribute. Here’s an example with the SiteMapPath from the previous section:
<asp:SiteMapPath ID="SiteMapPath1" runat="server" Width="264px" Font-Size="10pt"> <NodeTemplate>
<a href='<%# Eval("Url") %>'
target='<%# Eval("[target]") %>'><%# Eval("Title") %></a> </NodeTemplate>
</asp:SiteMapPath>
This creates a link that uses the node URL (as usual) but also uses the target informa-tion. There’s a slightly unusual detail in this example—the square brackets around the word [target]. You need to use this syntax to look up any custom attribute you add to the Web.sitemap file. That’s because this file can’t be retrieved directly from a property— instead, it must be looked up through an indexer.
If your navigation control doesn’t support templates (or you don’t want to create one), you’ll need to find another approach. Both the TreeView and Menu classes expose an event that fires when an individual item is bound (TreeNodeDataBound and MenuItemDataBound). You can then customize the current item. To apply the new target, use this code:
Protected Sub TreeView1_TreeNodeDataBound(ByVal sender As Object, _ ByVal e As TreeNodeEventArgs) Handles TreeView1.TreeNodeDataBound
e.Node.Target = CType(e.Node.DataItem, SiteMapNode)("target") End Sub
Notice that you can’t retrieve the custom attribute from a strongly typed property. Instead, you retrieve it by name using the SiteMapNode indexer.
The TreeView Control
You’ve already seen the TreeView at work for displaying navigational information. As you’ve learned, the TreeView can show a portion of the full site map or the entire site map. Each node becomes a link that, when clicked, takes the user to the new page. If you hover over a link, you’ll see the corresponding description information appear in a tooltip.
■
Note
The TreeView is one of the most impressive controls in ASP.NET. Not only does it allow you to show site maps, but it also supports showing information from a database and filling portions of the tree on demand (and without refreshing the entire page). But most important, it supports a wide range of styles that can transform its appearance.TreeView Properties
The TreeView has a slew of properties that let you change how it’s displayed on the page. Table 11-5 describes some of the most useful properties.
Table 11-5. Useful TreeView Properties
Property Description
MaxDataBindDepth Determines how many levels the TreeView will show. By default, MaxDataBindDepth is -1, and you’ll see the entire tree. However, if you use a value such as 2, you’ll see only two levels under the starting node. This can help you pare down the display of long, multileveled site maps. ExpandDepth Lets you specify how many levels of nodes will be visible at first. If you
use 0, the TreeView begins completely closed. If you use 1, only the first level is expanded, and so on. By default, ExpandDepth is set to the constant FullyExpand (-1), which means the tree is fully expanded and all the nodes are visible on the page.
NodeIndent Sets the number of pixels between each level of nodes in the TreeView. Set this to 0 to create a nonindented TreeView, which saves space. A nonindented TreeView allows you to emulate an in-place menu (see, for example, Figure 11-12).
CollapseImageUrl, Sets the pictures that are shown next to nodes for collapsing and ExpandImageUrl, and expanding nodes (which are usually represented by plus and minus NoExpandImageUrl icons). The NoExpandImageUrl is used if the node doesn’t have any
children (in which case no image is shown by default).
NodeWrap Lets a node text wrap over more than one line when set to True. ShowExpandCollapse Hides the expand/collapse boxes when set to False. This isn’t
recom-mended, because the user won’t have a way to expand or collapse a level without clicking it (which causes the browser to navigate to the page). ShowLines Adds lines that connect every node when set to True.
ShowCheckBoxes Shows a check box next to every node when set to True. This isn’t terribly useful for site maps, but it is useful with other types of trees.
C H A P T E R 1 1 ■ W E B S I T E N AV I G AT I O N 399
Figure 11-10. A no-indent TreeView with custom node icons
Properties give you a fair bit of customizing power, but, without a doubt, the most interesting and powerful formatting features come from styles.
TreeView Styles
Styles are represented by the TreeNodeStyle class, which derives from the more conventional Style class. As with other rich controls, the styles give you options to set background and foreground colors, fonts, and borders. Additionally, the TreeNodeStyle class adds the node-specific style properties shown in Table 11-6. These properties deal with the node image and the spacing around a node.
Table 11-6. TreeNodeStyle-Added Properties
Property Description
ImageUrl The URL for the image shown next to the node.
NodeSpacing The space (in pixels) between the current node and the node above and below.
VerticalPadding The space (in pixels) between the top and bottom of the node text and border around the text.
HorizontalPadding The space (in pixels) between the left and right of the node text and border around the text.
Because a TreeView is rendered using an HTML table, you can set the padding of var-ious elements to control the spacing around text, between nodes, and so on. One other property that comes into play is TreeView.NodeIndent, which sets the number of pixels of indentation (from the left) in each subsequent level of the tree hierarchy. Figure 11-11 shows how these settings apply to a single node.
Figure 11-11. Node spacing
Clearly, styles give you a lot of control over how different nodes are displayed. To apply a simple TreeView makeover, and to use the same style settings for each node in the TreeView, you apply style settings through the TreeView.NodeStyle property. You can do this directly in the control tag or by using the Properties window.
C H A P T E R 1 1 ■ W E B S I T E N AV I G AT I O N 401
<asp:TreeView ID="TreeView1" runat="server">
<NodeStyle Font-Names="Tahoma" Font-Size="10pt" ForeColor="Blue" HorizontalPadding="5px" NodeSpacing="0px" VerticalPadding="0px" /> </asp:TreeView>
Usually, this approach doesn’t provide enough fine-tuning. Instead, you’ll want to tweak a specific part of the tree. In this case, you need to find the style object that applies to the appropriate part of the tree, as explained in the following two sections.
Applying Styles to Node Types
The TreeView allows you to individually control the styles for types of nodes—for example, root nodes, nodes that contain other nodes, selected nodes, and so on. Table 11-7 lists different TreeView styles and explains what nodes they affect.
Table 11-7. TreeView Style Properties
Property Description
NodeStyle Applies to all nodes.
RootNodeStyle Applies only to the first-level (root) nodes.
ParentNodeStyle Applies to any node that contains other nodes, except root nodes.
LeafNodeStyle Applies to any node that doesn’t contain child nodes and isn’t a root node. SelectedNodeStyle Applies to the currently selected node.
HoverNodeStyle Applies to the node the user is hovering over with the mouse. These settings are applied only in up-level clients that support the necessary dynamic script.
Here’s a sample TreeView that first defines a few standard style characteristics using the NodeStyle property, and then fine-tunes different sections of the tree using the prop-erties from Table 11-7:
<asp:TreeView ID="TreeView1" runat="server">
<NodeStyle Font-Names="Tahoma" Font-Size="10pt" ForeColor="Blue" HorizontalPadding="5px" NodeSpacing="0px" VerticalPadding="0px" />
<ParentNodeStyle Font-Bold="False" />
<HoverNodeStyle Font-Underline="True" ForeColor="#5555DD" /> <SelectedNodeStyle Font-Underline="True" ForeColor="#5555DD" />
</asp:TreeView>
example. (If you don’t want a node to be selectable, set the TreeNode.SelectAction to None.) However, the RootNodeStyle, ParentNodeStyle, and LeafNodeStyle settings never conflict, because the definitions for root, parent, and leaf nodes are mutually exclusive. You can’t have a node that is simultaneously a parent and a root node, for example—the TreeView simply designates this as a root node.
Applying Styles to Node Levels
Being able to apply styles to different types of nodes is interesting, but often a more useful feature is being able to apply styles based on the node level. That’s because many trees use a rigid hierarchy. (For example, the first level of nodes represents categories, the second level represents products, the third represents orders, and so on.) In this case, it’s not so important to determine whether a node has children. Instead, it’s important to determine the node’s depth.
The only problem is that a TreeView can have a theoretically unlimited number of node levels. Thus, it doesn’t make sense to expose properties such as FirstLevelStyle, SecondLevelStyle, and so on. Instead, the TreeView has a LevelStyles collection that can have as many entries as you want. The level is inferred from the position of the style in the collec-tion, so the first entry is considered the root level, the second entry is the second node level, and so on. For this system to work, you must follow the same order, and you must include an empty style placeholder if you want to skip a level without changing the formatting.
For example, here’s a TreeView that differentiates levels by applying different amounts of spacing and different fonts:
<asp:TreeView runat="server" HoverNodeStyle-Font-Underline="True"
ShowExpandCollapse="False" NodeIndent="3" DataSourceID="SiteMapDataSource1"> <LevelStyles>
<asp:TreeNodeStyle ChildNodesPadding="10" Font-Bold="True" Font-Size="12pt" ForeColor="DarkGreen"/>
<asp:TreeNodeStyle ChildNodesPadding="5" Font-Bold="True" Font-Size="10pt" /> <asp:TreeNodeStyle ChildNodesPadding="5" Font-UnderLine="True"
Font-Size="10pt" /> </LevelStyles>
</asp:TreeView>
C H A P T E R 1 1 ■ W E B S I T E N AV I G AT I O N 403
Using TreeView Themes
Using the right combination of style settings can dramatically transform your TreeView. However, for those less artistically inclined (or those who don’t have the right set of images handy), it’s comforting to know that Microsoft has made many classic designs available in a skin file. This skin file includes formatting settings and links to graphics that allow you to implement many common TreeView designs. Using these themes, you can easily adapt the TreeView to display anything from logged errors to an MSN Messen-ger contact list.
As with any skin file, you can apply these settings to a TreeView simply by attaching the skin file to the page and setting the TreeView.SkinID property to the skin you want to use. (See Chapter 10 for the full details.) Visual Studio makes this even easier—just click the Auto Format link in the smart tag, and you’ll be able to choose from one of several built-in skins. Figure 11-13 shows a page with 12 TreeViews, each of which represents one of the options in the Auto Format window.
The Menu Control
The new ASP.NET 2.0 Menu control is another rich control that supports hierarchical data. Like the TreeView, you can bind the Menu control to a data source, or you can fill it by hand using MenuItem objects.
To try the Menu control, remove the TreeView from your master page, and add the following Menu control tag:
<asp:Menu ID="Menu1" runat="server" DataSourceID="SiteMapDataSource1" />
Notice that this doesn’t configure any properties—it uses the default appearance. The only step you need to perform is setting the DataSourceID property to link the menu to the site map information.
C H A P T E R 1 1 ■ W E B S I T E N AV I G AT I O N 405
Overall, the Menu and TreeView controls expose strikingly similar programming models, even though they render themselves quite differently. They also have a similar style-based formatting model. But a few noteworthy differences exist:
• The Menu displays a single submenu. The TreeView can expand an arbitrary number of node branches at a time.
• The Menu displays a root level of links in the page. All other items are displayed using fly-out menus that appear over any other content on the page. The TreeView shows all its items inline in the page.
• The Menu supports templates. The TreeView does not. (Menu templates are discussed later in this section.)
• The TreeView supports check boxes for any node. The Menu does not.
• The Menu supports horizontal and vertical layouts, depending on the Orientation property. The TreeView supports only vertical layout.
Menu Styles
The Menu control provides an overwhelming number of styles. Like the TreeView, the Menu works with custom style classes—in fact, it uses two (MenuStyle and MenuItemStyle). These styles add spacing properties (ItemSpacing, HorizontalPadding, and VerticalPadding). However, you can’t set menu item images through the style, because it doesn’t have an ImageUrl property.
Much like the TreeView, the Menu supports defining different menu styles for different menu levels. However, the key distinction that the Menu control encourages you to adopt is between staticitems (the root-level items that are displayed in the page when it’s first generated) and dynamicitems (the items in fly-out menus that are added when the user moves the mouse over a portion of the menu). Most websites have a definite difference in the styling of these two elements. To support this, the Menu class defines two parallel sets of styles, one that applies to static items and one that applies to dynamic items, as shown in Table 11-8.
Table 11-8. Menu Styles
Static Style Dynamic Style Description
StaticMenuStyle DynamicMenuStyle Sets the appearance of the overall “box” in which all the menu items appear. In the case of StaticMenuStyle, this box appears on the page, and with DynamicMenuStyle it appears as a pop-up.
StaticMenuItemStyle DynamicMenuItemStyle Sets the appearance of individual menu items. StaticSelectedStyle DynamicSelectedStyle Sets the appearance of the selected item.
Note that the selected item isn’t the item that’s currently being hovered over; it’s the item that was previously clicked (and that triggered the last postback).
StaticHoverStyle DynamicHoverStyle Sets the appearance of the item that the user is hovering over with the mouse.
Along with these styles, you can set level-specific styles so that each level of menu and submenu is different. You do this using three collections: LevelMenuItemStyles, LevelSubMenuStyles, and LevelSelectedStyles. These collections apply to ordinary menus, menus that contain other items, and selected menu items, respectively.
C H A P T E R 1 1 ■ W E B S I T E N AV I G AT I O N 407
Menu.StaticDisplayLevels property to change all that. If you set it to 2, for example, the first two levels of the menu will be rendered in the page using the static styles. (You can control the indentation of each level using the StaticSubMenuIndent property.)
Figure 11-15 shows the menu with StaticDisplayLevels set to 2 (and some styles applied through the Auto Format link). Each menu item will still be highlighted when you hover over it, as in a nonstatic menu, and selection will also work the same way as it does in the nonstatic menu.
■
Tip
The Menu control exposes many more top-level properties for tweaking specific rendering aspects. For example, you can set the delay before a pop-up menu disappears (DisappearAfter), the default images used for expansion icons and separators, the scrolling behavior (which kicks into gear when the browser window is too small to fit a pop-up menu), and much more. Consult MSDN for a full list of properties.Menu Templates
The Menu control also supports templates through the StaticItemTemplate and DynamicItemTemplate properties. These templates determine the HTML that’s ren-dered for each menu item, giving you complete control.
You’ve already seen how to create templates for the TreeView, but the process of creating templates for the Menu is a bit different. Whereas each node in the TreeView is bound directly to a SiteMapNode object, the Menu is bound to something else: a dedicated MenuItem object.
This subtle quirk can complicate life. For one thing, you can’t rely on properties such as Title, Description, and Url, which are provided by the SiteMapNode object. Instead, you need to use the MenuItem.Text property to get the information you need to display, as shown here:
<asp:Menu ID="Menu1" runat="server"> <StaticItemTemplate>
<%# Eval("Text") %> </StaticItemTemplate> </asp:Menu>
One reason you might want to use the template features of the Menu is to show multiple pieces of information in a menu item. For example, you might want to show both the title andthe description from the SiteMapNode for this item (rather than just the title). Unfor-tunately, that’s not as easy as it is with the TreeView. Once again, the problem is that the Menu binds directly to MenuItem objects, not the SiteMapNode objects, and MenuItem objects just don’t provide the information you need.
If you’re really desperate, there is a workaround using an advanced data binding technique. Rather than binding to a property of the MenuItem object, you can bind to a custom method that you create in your page class. This custom method can then include the code that’s needed to get the correct SiteMapNode object (based on the current URL) and provide the extra information you need. In a perfect world, this extra work wouldn’t be necessary, but unfortunately it’s the simplest workaround in this situation.
For example, consider the following template. It uses two types of data binding expres-sions. The first type simply gets the MenuItem text (which is the page title). The second type uses a custom method named GetDescriptionFromTitle(), which you need to create. This method receives the page title as an argument, and then returns the corresponding description:
<asp:Menu ID="Menu1" runat="server" DataSourceID="SiteMapDataSource1"> <StaticItemTemplate>
<%# Eval("Text") %><br /> <small>
<%# GetDescriptionFromTitle(Eval("Text")) %> </small>
</StaticItemTemplate> <DynamicItemTemplate>
<%# Eval("Text") %><br /> <small>
<%# GetDescriptionFromTitle(Eval("Text")) %> </small>
</DynamicItemTemplate> </asp:Menu>
C H A P T E R 1 1 ■ W E B S I T E N AV I G AT I O N 409
In order for this example to work, you need to create a GetDescriptionFromTitle() method in your page class code. This method must have protected (or public) accessibil-ity, so that ASP.NET can call it during the data binding process:
Protected Function GetDescriptionFromTitle(ByVal title As String) _ As String
... End Function
The tricky part is filling in the code you need. In this example, there are actually two custom methods involved. In order to find the node it needs, GetDescriptionFromTitle() calls another method, named SearchNodes(). The SearchNodes() method calls itself several times to perform a recursive search through the whole hierarchy of nodes. It ends its search only when it finds a matching node, which it returns to GetDescriptionFromTitle(). Finally, GetDescriptionFromTitle() extracts the description information (and anything else you’re interested in).
Here’s the complete code that makes this example work:
Protected Function GetDescriptionFromTitle(ByVal title As String) _ As String
Dim startingNode As SiteMapNode = SiteMap.RootNode
Dim matchNode As SiteMapNode = SearchNodes(startingNode, title) If matchNode Is Nothing Then
' No match. Return "" Else
' Get the description of the match. Return matchNode.Description
End If End Function
Private Function SearchNodes(ByVal node As SiteMapNode, ByVal title As String) _ As SiteMapNode
If node.Title = title Then Return node
Else
' Perform recursive search.
For Each child As SiteMapNode In node.ChildNodes ' Was a match found?
' If so, return it.
Dim match As SiteMapNode = SearchNodes(child, title) If match IsNot Nothing Then Return match
Next
' All the nodes were examined, but no match was found. Return Nothing
End If End Function
Once you’ve finished this heavy lifting, you can use the GetDescriptionFromTitle() method in a template to get the additional information you need.