Installation Guide
Progress Database
78-0805A QAD 2009.1 Enterprise Edition September 2009
without the prior written consent of QAD Inc. The information contained in this document is subject to change without notice.
QAD Inc. provides this material as is and makes no warranty of any kind, expressed or implied, including, but not limited to, the implied warranties of merchantability and fitness for a particular purpose. QAD Inc. shall not be liable for errors contained herein or for incidental or consequential damages (including lost profits) in connection with the furnishing, performance, or use of this material whether based on warranty, contract, or other legal theory.
QAD and MFG/PRO are registered trademarks of QAD Inc. The QAD logo is a trademark of QAD Inc.
Designations used by other companies to distinguish their products are often claimed as trademarks. In this document, the product names appear in initial capital or all capital letters. Contact the appropriate companies for more information regarding trademarks and
registration.
Copyright © 2009 by QAD Inc.
QAD Inc.
100 Innovation Place
Santa Barbara, California 93108 Phone (805) 684-6614
Fax (805) 684-1890
About This Guide . . . 1
Other QAD Documentation . . . 2
QAD Web Site . . . 2
Conventions . . . 3
Screen Illustrations . . . 3
Typographic . . . 3
Chapter 1
Installation Overview and System Requirements . . . 5
Installation Process Overview . . . 6
System Overview . . . 7
Sizing and Capacity Planning . . . 7
General Prerequisites . . . 8
Software and Hardware Prerequisites . . . 8
UNIX Considerations . . . 9
Database Server . . . 10
Application Server . . . 12
Web Server . . . 12
Installing the Web Server . . . 13
Telnet Server (Windows Only) . . . 13
Chapter 2
Installing the QAD Deployment Toolkit . . . 15
Overview . . . 16
Installing QDT . . . 16
Starting QDT . . . 19
Configuring QDT . . . 21
Adding Users . . . 22
Next Steps . . . 22
Chapter 3
QAD Enterprise Edition Default Installation . . . 25
Overview . . . 26
Initiating a Default Installation . . . 26
Configuring a Default Installation . . . 28
Next Steps . . . 32
Chapter 4
Installing a Custom QAD Enterprise Edition Configuration
33
Overview . . . 34Multiple Environments and Cloning . . . 34
Custom Installation . . . 35
Configuring a Custom Installation . . . 36
Editing System Details . . . 39
Editing Language Details . . . 39
Configuring Databases . . . 43
Cloning an Environment . . . 46
Next Steps . . . 48
Chapter 5
Upgrading QAD Enterprise Edition . . . 49
Overview . . . 50
Upgrading an Installation . . . 50
Chapter 6
Starting QAD Enterprise Edition . . . 55
Starting QAD Enterprise Edition . . . 56
UNIX and Linux Installations . . . 56
Windows Installations . . . 57
Registering QAD Enterprise Edition . . . 57
Loading Online Help . . . 57
Exiting QAD Enterprise Edition . . . 58
Backing Up the Database . . . 58
Chapter 7
Configure QAD Enterprise Edition . . . 59
Overview . . . 60
Prepare Telnet UI Connection Scripts . . . 60
Specify Telnet Server Settings . . . 60
Define the Login Sequence Script Lines . . . 61
Configure Telnet Connection Settings . . . 63
Verify the Login Sequence . . . 66
Set Up SSH . . . 66
Install QAD .NET UI Client . . . 68
Adding Languages to an Existing Configuration . . . 70
Configure Application Daemons . . . 73
Set Up the Reporting Service . . . 74
Prerequisites . . . 75 Installation . . . 76 Configuration . . . 84 Testing . . . 85 Monitoring . . . 85
Glossary . . . 91
This guide covers the installation of QAD Enterprise
Applications 2009.1 Enterprise Edition. This chapter provides an orientation to this guide and additional QAD resources available to you during the installation process.
Other QAD Documentation 2 QAD Web Site 2
This guide describes how to install, configure, and start QAD Enterprise Applications 2009.1 Enterprise Edition.
QAD 2009.1 Enterprise Edition is a complete enterprise solution that provides manufacturing, distribution, and financials modules. It also includes the data and security management features and integrates with QAD’s many supporting and more specialized products.
This guide assumes you are a database administrator familiar with your enterprise’s requirements and the QAD product line.
Other QAD Documentation
• For an overview of new features and software updates, see the Release Notes.
• For an overview of system features and instructions on navigating the user interface, see User Guide: QAD User Interfaces.
• For detailed information on using system features, refer to the relevant user guide.
• For technical details, refer to Entity Diagrams and Database Definitions.
For a complete list of QAD Documentation, visit the QAD Online Support Center at:
http://support.qad.com/
QAD Web Site
The QAD Web site provides a wide variety of information about the company and its products. You can access the Web site at:
http://www.qad.com
For users with a QAD Web account, product documentation is available for viewing or downloading from the QAD Online Support Center at:
You can register for a QAD Web account by accessing the Web site. Your customer ID number is required. Access to certain areas is dependent on the type of agreement you have with QAD.
Most user documentation is available in two formats:
• Portable document format (PDF) files can be downloaded from the QAD Web site to your computer. You can view and print them with the free Adobe Acrobat Reader.
• HTML files let you view user documentation through your Web browser and use search tools to easily locate topics of interest.
Conventions
Screen Illustrations
System functions are available in a feature-rich .NET-based graphical user interface (UI); a subset of functions can be used in a simplified character interface. Screenshots in the documentation are taken from both the QAD .NET UI and the character interface.
For complete keyboard command summaries for UI navigation, refer to the appropriate chapters of User Guide: QAD User Interfaces.
Typographic
This document uses the text or typographic conventions listed in the following table.
If you see: It means:
monospaced text A command or file name.
italicized monospaced text
A variable name for a value you enter as part of an operating system command; for example, YourCDROMDir.
indented command line
A long command that you enter as one line, although it appears in the text as two lines.
Note Alerts the reader to exceptions or special conditions.
Important Alerts the reader to critical information.
Warning Used in situations where you can overwrite or corrupt data,
Installation Overview
and System
Requirements
This chapter describes the QAD Enterprise Edition installation process and provides system requirements and software prerequisites.
Installation Process Overview 6 System Overview 7
Sizing and Capacity Planning 7 General Prerequisites 8
Installation Process Overview
QAD Enterprise Edition is installed with the QAD Deployment Toolkit (QDT). QDT automates much of the installation process on properly set-up systems. The following figure represents the overall flow of the installation process.
Fig. 1.1
QAD 2009.1 Enterprise Edition Installation Process
The procedure for installing QAD Enterprise Edition is as follows:
1 Set up systems according to the hardware and software requirements defined in this chapter or with the assistance of QAD Global Services.
2 Install and launch QDT.
3 QDT reads the product image on the distribution media and displays a choice of products and components to install.
4 You select the appropriate products and components.
= optional
Install and Configure Prerequisite Software
Install and Configure Prerequisite Software
Install Default QAD Enterprise Edition Configuration
Install Default QAD Enterprise Edition Configuration
Install QAD Deployment Toolkit (QDT)
Install QAD Deployment Toolkit (QDT)
Install Custom QAD Enterprise Edition Configuration
Install Custom QAD Enterprise Edition Configuration
Enter QAD Enterprise Edition License Information
Enter QAD Enterprise Edition License Information
Configure QAD Enterprise Edition
Configure QAD Enterprise Edition
Start QAD Enterprise Edition
Start QAD Enterprise Edition
QAD Enterprise Edition Already Installed?
QAD Enterprise Edition Already Installed?
Upgrade QAD Deployment Toolkit (QAD)
Upgrade QAD Deployment Toolkit (QAD)
Upgrade .NET UI
Upgrade .NET UI
5 QDT automatically discovers system information, such as location of required software, by reading the previously set environment
variables.
6 QDT installs and configures the selected products and components, using default configuration values generated during the auto-discovery process or your customized configuration values.
7 You start up a character-based user interface (CHUI) session to enter license information.
8 You launch your new Enterprise Edition installation and log in.
9 You complete any necessary post-deployment configuration.
System Overview
A QAD 2009.1 Enterprise Edition system is composed of:
• A Progress database server that contains QAD 2009.1 Enterprise Edition software
• A Progress Enterprise application server
• A Tomcat Web server
• Multiple client workstations (with QAD .NET User Interface software), as needed
Additionally, the Georgia Softworks Windows Telnet Server is required for Windows server implementations.
The database server, application server, and Web server are all installed on the same machine in a single-tier environment. The QAD .NET User Interface clients are installed on the machines that will access the QAD Enterprise Edition environment.
Sizing and Capacity Planning
The database server contains QAD Enterprise Edition and Progress server software, as well as your production data. Prior to starting an installation, estimate the eventual size of your production database and the demands placed on different components of the database so that you can lay out your disks appropriately.
QAD Enterprise Edition takes a minimum of 8 GB to install and configure the product as-is for one environment. And that does not include additional space for multiple languages to the databases, Warehousing, sizable changes to the production databases, or cloning environments.
For assistance with hardware sizing and capacity requirements planning, contact QAD Global Services.
General Prerequisites
The following general prerequisites apply:
• If you are a new Enterprise Edition customer, you must have a QAD 2009.1 Enterprise Edition DVD and the latest QDT and application patches from the QAD Download Center.
• You must have a valid QAD product license key for each module you have purchased to use QAD 2009.1 Enterprise Edition.
• The system administrator must be an experienced Progress database administrator who can manage Progress client processes.
• A 100 Mbps Ethernet or faster network is required to run QAD 2009.1 Enterprise Edition.
Software and Hardware Prerequisites
The following sections describe the software and hardware requirements for the prerequisite components of your QAD Enterprise Edition
installation.
Important These components must be installed before beginning the installation of QAD Enterprise Edition.
Note Refer to the Progress documentation for the complete requirements for Progress components. When installing Progress components, always select a Complete installation, not a Typical or Custom installation.
UNIX Considerations
Installation Group and User
UNIX installations require a group called qad and a user called mfg on the database server. All installation and maintenance programs store pertinent information under the mfg user home directory. This enables QAD scripts to find data about installed products automatically and reliably and lets you maintain your system without logging on as root.
1 Create a group called qad with a group ID (gid) of 65535 with your UNIX system administration utility. (65535 is the user ID of the files on the QAD media.)
2 Create a user called mfg with a user ID of 65535.
a Assign the Korn shell to this user. All of the scripts delivered on QAD media use Korn shell (ksh) syntax.
b For the mfg user, set the $HOME environment to a user directory where working and temporary files can be written.
c Assign the standard umask of 022 to set permissions and security.
Environment Variables
Update the mfg user .profile to include the DLC and PATH variables. Set the variables as follows:
• DLC: Progress installation directory
• JAVA_HOME: Java directory location
• CATALINA_HOME: Tomcat installation directory
• PATH: To include $DLC/bin, $JAVA_HOME/bin, $CATALINA_HOME/bin
Depending on your flavor of UNIX, you may also need to set the following variables for the shared library path and ID library path:
• SHLIB_PATH
Expat XML Parser (HP-UX Only)
If you are installing on an HP Platform running HP-UX, you must install a C library for parsing XML. The Expat XML Parser is a free, open-source project that provides this functionality.
The source code can be located on the project’s SourceForge page at:
http://expat.sourceforge.net/
Precompiled depot files for HP are available at:
http://hpux.connect.org.uk/hppd/hpux/Development/Tools/expat-2.0.1/
Because of a limitation of the QAD Deployment Toolkit on HP ia64 (Itanium) platforms, depot files for both the Itanium 2 and PA-RISC 2.0 should be installed before installing QAD software.
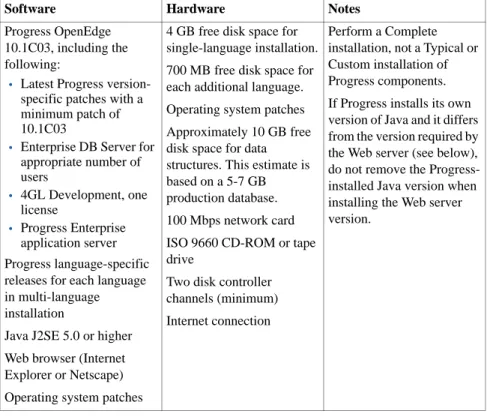
Database Server
The following table lists the software and hardware requirements for the database server.
Table 1.1
Database Server Requirements
Software Hardware Notes
Progress OpenEdge 10.1C03, including the following:
• Latest Progress version-specific patches with a minimum patch of 10.1C03
• Enterprise DB Server for appropriate number of users • 4GL Development, one license • Progress Enterprise application server Progress language-specific releases for each language in multi-language installation
Java J2SE 5.0 or higher Web browser (Internet Explorer or Netscape) Operating system patches
4 GB free disk space for single-language installation. 700 MB free disk space for each additional language. Operating system patches Approximately 10 GB free disk space for data structures. This estimate is based on a 5-7 GB production database. 100 Mbps network card ISO 9660 CD-ROM or tape drive
Two disk controller channels (minimum) Internet connection
Perform a Complete installation, not a Typical or Custom installation of Progress components. If Progress installs its own version of Java and it differs from the version required by the Web server (see below), do not remove the Progress-installed Java version when installing the Web server version.
Application Server
The following table lists the software and hardware requirements for the application server.
Table 1.2
Application Server Requirements
Web Server
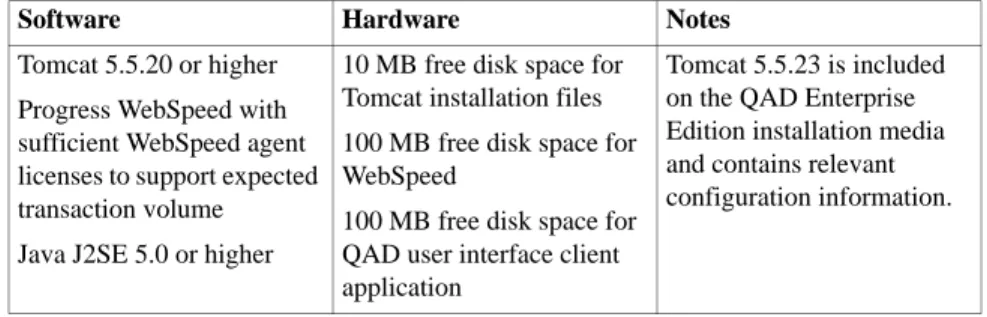
The following table lists the software and hardware requirements for the web server.
Table 1.3
Web Server Requirements
Software Hardware Notes
Progress OpenEdge 10.1C03, including the following:
• Latest Progress version-specific patches with a minimum patch of 10.1C03
• Enterprise DB Server for appropriate number of users
• 4GL Development, one license
• Progress AdminServer. Java J2SE 5.0 or higher Operating system patches
4 GB free disk space for single-language installation 700 MB additional free disk space for each additional language
Perform a Complete installation, not a Typical or Custom installation of Progress components. If Progress installs its own version of Java and it differs from the version required by the Web server (see below), do not remove the Progress-installed Java version when installing the Web server version.
Depending on your Progress release, you may be required to install Java before installing the Progress component. If so, use Java J2SE 5.0 or higher.
Software Hardware Notes
Tomcat 5.5.20 or higher Progress WebSpeed with sufficient WebSpeed agent licenses to support expected transaction volume Java J2SE 5.0 or higher
10 MB free disk space for Tomcat installation files 100 MB free disk space for WebSpeed
100 MB free disk space for QAD user interface client application
Tomcat 5.5.23 is included on the QAD Enterprise Edition installation media and contains relevant configuration information.
Installing the Web Server
Locate the Tomcat distribution contained in the mfgprouitc/zips directory in the media. Using an unzip utility, unpack Tomcat to $CATALINA_HOME (see “Environment Variables” on page 9).
Ensure that the mfg user (see “Installation Group and User” on page 9) has permissions to read all files and folders in $CATALINA_HOME; can create and modify files in the logs, webapps, temp, and work subfolders; and can execute files in the bin subfolder.
QAD recommends that before installing Enterprise Edition, you become familiar with starting and stopping the Tomcat web server as well as connecting to the Tomcat manager.
Telnet Server (Windows Only)
The following table lists the software and hardware requirements for the telnet server.
Note The telnet server is required only for Windows-based QAD Enterprise Edition installations.
Table 1.4
Telnet Server Requirements
Software Hardware Notes
Georgia SoftWorks Telnet Server.
Refer to the Georgia SoftWorks documentation.
This software is provided on the QAD Enterprise Edition installation media.
Installing the QAD
Deployment Toolkit
The QAD Deployment Toolkit (QDT) is a streamlined, comprehensive set of tools for product installation and configuration. This chapter covers QDT installation, startup, and configuration.
Overview 16 Installing QDT 16 Starting QDT 19 Configuring QDT 21 Next Steps 22
Overview
The QAD Deployment Toolkit (QDT) is used to install QAD Enterprise Edition and other QAD products. QDT streamlines the installation process by automatically finding system information (such as component locations) and modifying the QAD 2009.1 Enterprise Edition
configuration profile appropriately without manual input.
With QDT, there are two options for installing QAD Enterprise Edition:
• Default Installation, which other than setting up connection information, uses the default configuration values without modification.
• Custom Installation, where in addition to setting up connection information, one or more of the default configuration values are modified.
QDT must be installed before QAD Enterprise Edition installation. Note Before installing QDT and QAD Enterprise Edition, verify the environment variables for the prerequisite Java and Tomcat installations on your target system are set. See Chapter 1, “Installation Overview and System Requirements,” for more details on software requirements.
Installing QDT
QDT is installed from the application media shipped by QAD. For example, if you are installing QAD Enterprise Edition, you perform the QDT install from the installation media.
Note If you intend to view the QDT graphical user interface on a machine other than the machine on which QDT is installed, you must have a graphical environment with full X-Windows capability installed on that machine.
QAD recommends that you shut down any virus protection programs. This can significantly reduce the time required for installation and implementation.
Note The following conditions must be met or QDT will report errors during installation:
• The Progress OpenEdge Admin and Name Servers must be up and available, even if they are not initially providing app or webspeed servers and brokers.
• The Tomcat Connection Manager must be installed, but not running (this applies to installation and configuration).
To install QDT:
1 Mount the QAD application media and access the install directory.
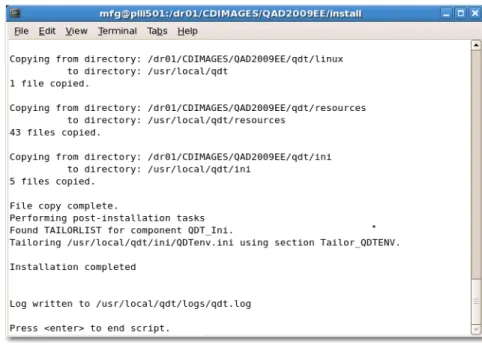
2 Launch the installation using the appropriate file for your operating system. A command window displays informing you that you are installing QDT. Fig. 2.1 Installation Window for a UNIX/Linux Installation
3 The license agreement displays. Press the spacebar to advance through it or press q to continue the installation, skipping the agreement.
4 You are prompted to accept the agreement. Select y to continue, n to exit the installation.
5 You are prompted to enter the location where QDT is to be installed. On Windows, the default is c:\qdt. On Linux and UNIX, the default is /usr/local/qdt. Accept the default location or enter a different directory. Press Enter.
6 You are prompted to enter the location where to create the log directory. On Windows, the default is c:\<target
directory>\logs. On Linux and UNIX, the default is /<target directory>/logs. Accept the default location or enter a different directory. Press Enter.
7 If the logs directory does not exist, you are prompted to create it.
8 You are prompted to enter the location where to install the QDT XML files. On Windows, the default is: c:\<target directory>\xml. On Linux and UNIX the default is /<target directory>/xml. Accept the default location or enter a different directory. Press Enter.
9 If the xml directory does not exist, you are prompted to confirm its creation.
10 On Windows, you are prompted for a folder name for the QDT shortcut. The default is QAD Deployment Toolkit. Accept the default location or enter a different directory. Press Enter.
11 You are prompted to continue with the install. If yes, press Enter.
Fig. 2.2
Installation Summary
13 Press Enter to exit the installation script.
14 You can verify that there were no errors during the installation by reading the log file.
On Windows, the default location of the log file is
c:\qdt\logs\qdt.log. On Linux or UNIX, the default location is /usr/local/qdt/logs/qdt.log.
Look for any lines beginning with five stars (*****) or two stars (**). Five stars indicate QDT errors and two stars indicate Progress errors.
Starting QDT
To start QDT on Windows, select Start|All Programs|QAD Deployment Toolkit|Start QDT.
To start QDT on Linux or UNIX, run the appropriate installation script for your version in the QDTHome directory.
The QDT Deployment Toolkit displays. The toolkit contains information about the current host including the operating system and currently installed versions of Progress, Java, and Tomcat.
Fig. 2.3
QAD Deployment Toolkit Main Screen
QDT has two modules:
• Install
The Install function moves files from the product delivery media onto the target host drive. Within the Install module, you can select a Complete or Custom install. The defaultinstallation uses the default configuration values without modification to automatically install QAD 2009.1 Enterprise Edition. The Custom installation requires manual intervention to modify one or more of the default
• Admin
Admin completes the installation process and provides tools for updating, configuring, and correcting the products installed by QDT. When the install is complete, the Admin function is used to create databases, compile application code, and create server start and stop scripts for the installed products.
Note If you are a user of previous versions of QAD applications, the Admin function is, to a large extent, what was formerly known as MFG/UTIL.
Important Although similar to MFG/UTIL, the process used with MFG/UTIL is not valid for this install. You should continue to read this guide for instructions.
Each of the functions is accessed by clicking a button on the QDT main screen.
To view information about the host machine where QDT is installed, select Edit|Preferences.
Configuring QDT
You may need to perform some additional actions to configure QDT. These include:
• Setting system defaults, including port settings
• Adding additional authorized users
Setting System Defaults
If the environment variables on your host machine have been previously set at the operating-system level, QDT automatically discovers and displays relevant system information on its main screen.
If system information is not displayed on the QDT main screen or incorrect information is displayed, you must set these system defaults through QDT’s Set System Default function.
Important Port settings, such as Tomcat and Progress AdminServer ports, are automatically set to default values within QDT. If you are not using the default values for these ports or are installing multiple environments (which requires multiple environments of Tomcat), use QDT’s Set System Default function to set the correct port values. To set system defaults (including port settings):
1 On the QDT main screen, pull down the Edit menu and select Set System Defaults. The Set System Defaults screen displays.
2 Enter changes to the appropriate settings.
3 Select OK to close the screen and save the changes.
Adding Users
The person who initially installs QDT is the only person able to use it. All others will receive errors and cannot run the toolkit. To specify additional users to run QDT, do the following:
1 Click Admin on the QDT main screen. The QDT Admin screen displays.
2 Pull down the Edit menu and select User Maintenance. The User Maintenance screen displays.
3 Add the additional users.
4 Select OK to close the screen and add the users.
Note Authorized user information is stored in the QDT_root/xml/
users.xml file. If you have many users to add, the file can be edited
directly.
Next Steps
You now have a choice to use QDT to do a default install without modifying the default configuration values or a custom install in which you modify the default configuration values.
If you are performing a complete install, see “QAD Enterprise Edition Default Installation” on page 25 for a description of that process.
If you are performing a custom install, see “Installing a Custom QAD Enterprise Edition Configuration” on page 33 for a description of that process.
QAD Enterprise
Edition Default
Installation
This chapter describes how to install QAD Enterprise Edition using default configuration settings.
Overview 26
Initiating a Default Installation 26 Configuring a Default Installation 28 Next Steps 32
Overview
The QAD Deployment Toolkit (QDT) automatically finds the previously defined system information that is required to configure a QAD
Enterprise Edition installation. In most cases, you can use this default information without modification to perform a default installation. If you need to modify configuration information and perform a custom install, see Chapter 4, “Installing a Custom QAD Enterprise Edition Configuration,” for details on this process. Also, refer to that chapter if you need to install QAD Enterprise Edition in multiple environments or clone a QAD Enterprise Edition environment.
Note The default language setting for a default installation is US English. If you need to install additional languages, see Chapter 4, “Installing a Custom QAD Enterprise Edition Configuration,” for details on this process.
Initiating a Default Installation
Note Installation is performed using QDT. See Chapter 2, “Installing the QAD Deployment Toolkit,” for details on installing and starting QDT. To install QAD Enterprise Edition with default configuration information:
1 Launch QDT.
2 On the QDT main screen, click Install. The install environment selection window displays.
Fig. 3.1
Select Installation Environment Screen
3 Click New to display the Enter Environment Name screen. Use the environment name to segregate multiple environments installed on a single machine (for example, production and test). Accept the default environment name or enter a new name.
4 Click OK to close the screen and save the environment name.
Fig. 3.2
Enter Environment Name Screen
5 Select under Available Environments the appropriate environment name. Click OK to close the screen and select the installation environment.
6 When the screen displays all products are selected. On Linux systems, be sure to select all products.
Note For QAD Enterprise Edition, the Web Applications Server, Database Server, and Applications Server components must all be installed at the same time during the initial installation. If you deselect any of these components now, you cannot select and install them at a later time.
You can customize the installation destination (QAD 2009.1 EE folder) by selecting Edit following this step.
7 Click Install to continue. The installation launches. A window displays the install.log file, which records the installation progress.
8 Review the install.log file to check for errors in the installation process.
9 When the installation completes successfully, click Close to exit. Fig. 3.3
Completed Install Process
Configuring a Default Installation
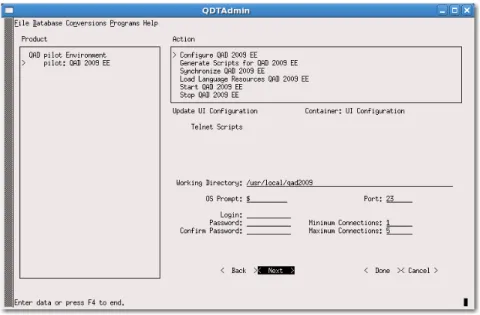
After QDT installs the QAD Enterprise Edition files on your server, you must configure the environment. Only the settings for the Connection Manager telnet user must be defined for a default installation.
To configure the QAD Enterprise Edition environment:
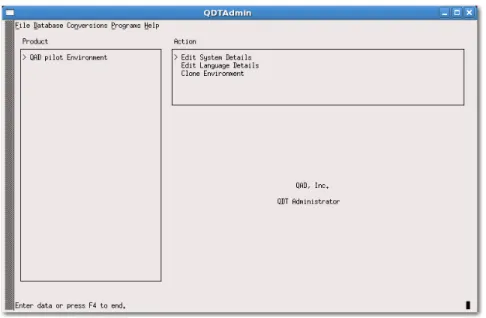
1 Return to the QDT main screen and click Admin. This action takes you to the QDT Administrator window.
2 Select the environment to configure under Product.
Fig. 3.4
QDT Admin
3 Select Configure QAD 2009.1 EE. The configuration steps appear in the Steps in Action Set pane.
Fig. 3.5
Configure QAD EE Screen with Update UI Configuration Action Step
4 Select UI Configuration: Update UI Configuration under Steps in Action Set and press Enter. The Update UI Configuration screen displays.
The UI Configuration is used to create the connection manager telnet login script.
Note The user is an operating system user and must have privileges to run the connmgr.<env> script found under the <qdt-install-dir>/envs/<env-name>/scripts/ folder.
Fig. 3.6
Update UI Configuration Screen
5 Enter a valid login ID and password. Enter the password again to confirm it.
6 Modify or accept the default values for the telnet port and minimum and maximum connections for the UI Connection Manager.
Important All values on this screen must be provided and be valid to proceed with configuration.
7 Select Done to close the screen and save the values.
8 Select Execute to begin the configuration process. The system prompts you to confirm execution of the configuration process.
9 Select Yes. You are prompted to clear the log. Enter yes. The configuration process begins. The installation script launches. A window displays the qdtadmin.log file, which records the configuration progress.
Note A message displays during full synchronization that says a default set of roles was not provided for the installation. Use of this capability is optional. The warning is for information purposes only and will not impact the system.
10 Review the qdtadmin.log file to check for errors in the configuration process.
11 When the configuration completes successfully, select Close to exit.
Next Steps
Proceed to Chapter 6, “Starting QAD Enterprise Edition,” for details on starting your QAD Enterprise Edition installation.
Installing a Custom
QAD Enterprise
Edition Configuration
This chapter describes how to install QAD Enterprise Edition using customized configuration settings, how to install the product in multiple environments, and how to clone an environment.
Overview 34
Multiple Environments and Cloning 34 Custom Installation 35
Configuring a Custom Installation 36 Next Steps 48
Overview
The QAD Deployment Toolkit (QDT) automatically finds previously defined system information that is required to configure a QAD 2009.1 Enterprise Edition installation. In most cases, this default configuration information can be used without modification to perform a complete install, as described in Chapter 3, “QAD Enterprise Edition Default Installation,” in this guide.
Some situations require modification of default configuration data for a customized installation. This chapter describes how to perform a custom install.
All of the steps described in this chapter are optional.
Important When making modifications, be aware that it is possible to create configuration problems. Proceed with care.
Multiple Environments and Cloning
You can install QAD 2009.1 Enterprise Edition in multiple environments (for example, test and production environments). To do so, repeat the installation process described in this chapter for each environment. You need to use separate Tomcat Web server directories and ports for each environment using this option.
You can also clone an existing environment. Cloning an existing environment means creating a copy of it that contains its environment, system, and language details. With the cloning option, you can use the same Tomcat Web server directory and port as the original environment. See “Cloning an Environment” on page 46 for more details.
Note If you install QAD Enterprise Edition in multiple environments or create clones of a QAD Enterprise Edition environment, you must perform the applicable configuration procedures in this chapter for each environment separately. You also must perform the applicable procedures in Chapter 6, “Starting QAD Enterprise Edition,” and Chapter 7,
“Configure QAD Enterprise Edition,” separately for each environment separately.
Custom Installation
Note Installation is performed using QDT. See Chapter 2, “Installing the QAD Deployment Toolkit,” for details on installing and starting QDT. To install QAD Enterprise Edition with default configuration information:
1 Launch QDT.
2 On the QDT main screen, click Install. The Select Installation Environment window displays.
Fig. 4.1
Select Installation Environment
3 Select New to display the Enter Environment Name screen. Accept the default environment name or enter a new name.
Fig. 4.2
Enter Environment Name Screen
5 The list of available product components is read from the installation media and the product component selection tree displays.
Select which components you will deploy on the current host and modify the destination directory if you choose.
You can customize the installation (QAD 2009.1 EE folder) destination by selecting Edit following this step.
6 Click Install to continue. The installation launches. A window displays the install.log file, which provides the installation progress.
7 Review the install.log file to check for errors in the installation process.
8 When the installation completes successfully, click Close. Fig. 4.3
Completed Install Process
Configuring a Custom Installation
After QDT installs the QAD Enterprise Edition files on your server, the environment must be configured.
To configure the QAD Enterprise Edition environment:
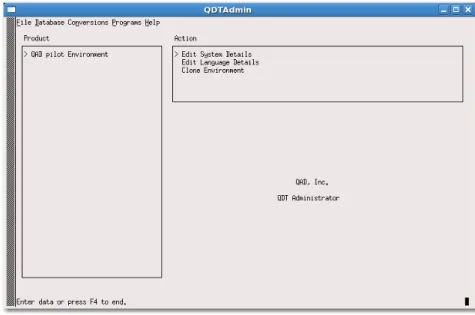
1 Return to the QDT main screen and click Admin. This action takes you to the QDT Administrator window.
You can navigate from pane to pane in this window using the Tab key and within a pane using the up and down arrow keys. Highlighted items are selected by double-clicking on the item or pressing Enter. The screen has multiple panes that contain lists of configuration options. By highlighting and selecting these options, you can vary the level of detail presented in the lists.
2 The Product pane lists the available environments. Select the environment to configure.
Fig. 4.4
QDT Admin
Each selection in the Product pane displays a corresponding list of items in the Action pane.
In the Action pane of the QDT Administrator window, you have the following options:
• Edit System Details
With this option, you can change the overall settings for your environment, including the Host ID, Host Name, Host URL, Log Directory, and Environments Directory. You can also modify settings for your Progress AdminServer, Java Runtime Environment, Progress NameServer, and Tomcat WebServer.
See “Editing System Details” on page 39 for more information about these options.
• Edit Language Details
With this option, you can install and configure the languages your QAD 2009.1 Enterprise Edition uses.
Note The default QAD 2009.1 Enterprise Edition language is US English. If you are using only US English in your installation, you do not need to install it. If you require languages other than US English, you must install them.
See “Editing Language Details” on page 39 for more information.
• Clone Environment
With this option, you can create a copy of the selected environment, including all its settings.
See “Cloning an Environment” on page 46 for more information. Make a selection in the Action pane to display the Steps In Action Set pane. It lists the tasks that will be performed for the current Action pane selection.
Select an item in the Steps in Action pane, click Edit, and press Enter to display a screen that allows you to enter or modify parameters associated with the item.
You can perform a custom configuration by beginning at the top-level item in the Steps In Action list, clicking Edit, and using the Next button to step through each screen in sequence.
Select a second-level item from the list to step through all of the screens under that topic in sequence. Select a third-level indented item and you can only access that item.
Select Execute to configure the installation using the settings from all of the items in the Steps In Action Items list.
Editing System Details
The Editing System Details function allows you to specify the versions of prerequisite third-party software and its location on the system. Under normal circumstances, the system automatically gathers this information and nothing need be changed.
System details can be edited as a whole by highlighting the environment or individual components by highlighting the component. For example selecting QAD 2009.1 EE allows the editing of all system details sequentially. However highlighting <env>:databaseserver will just edit database setting.
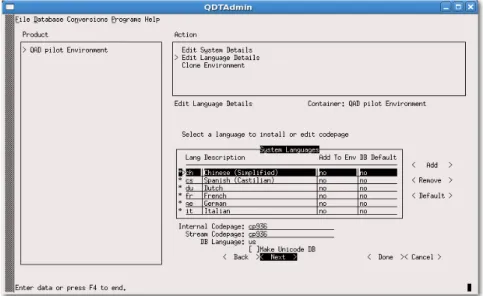
Editing Language Details
This screen allows you to add a language for this environment or change the code page for a language. The languages selected in this step are configured later during the database server creation step.
Note The default QAD Enterprise Edition language is US English. If you are using only US English in your installation, you do not need to install it. You can skip this section.
Note When selecting two or more languages that have conflicting code pages the system is automatically configured to a Unicode installation.
1 Select QAD Environment Name Environment under Product. In the Action pane, select Edit Language Details.
2 In the Steps In Action Set pane, select QAD Pilot Environment: Edit Language Details.
3 The Edit Language Details Screen appears. Select a language you want to add and select Add. The Add to Env and DB Default columns change from No to Yes.
Fig. 4.5
Edit Language Details Screen
4 Modify the code page settings by entering the new information in the Internal Codepage or Stream Codepage fields.
Note Modifications to codepage settings should be limited. Unexpected behavior can result from incorrect modifications.
5 Repeat steps 2 and 3 for each language to add or modify.
6 To define a language as the default language for the QAD Enterprise Edition installation, select it and select Default.
7 Select Done to complete the changes.
Edit System Details Process
To edit the system details, use the following steps:
1 Select QAD Environment Name Environment under Product. In the Action pane, select Edit System Details.
2 Select Edit System Details in the Steps In Action Set pane.
3 For each of the following screens, review the information, make any required entries or changes and select Next:
• Edit Database Properties - Empty Main Database
• Edit Structure File Information - Empty Main Database
• Edit Schema File Information - Empty Main Database
• Edit BI Truncation Parameters - Empty Main Database
• Edit Database Properties - Empty Single R-code Parameters
• Edit Structure File information - Empty Single R-code Database
• Edit Schema File Information - Empty Single R-code Database
• Edit Data Load Options - Empty Single R-code Database
• BI Truncation Parameters - Empty Single R-code Database
• Edit Database Properties - Empty Admin Database
• Edit Structure File Information - Empty Admin Database
• Edit Schema File Information - Empty DB Database
• Edit BI Truncation Parameters - Empty Admin Database
• Edit Database Properties - Empty Help DB
• Edit Structure File Information - Empty Help Database
• Edit Schema File information - Empty Help Database
• Edit BI Truncation Parameters - Empty Help Database
• Edit Database Properties - Live Main Database
• Edit Structure File Information - Live Main Database
• Edit Data Load Options - Live Main Database
• Edit BI Truncation Parameters - Live Main Database
• Edit Database Properties - Live Admin Database
• Edit Structure File Information - Live Admin Database
• Edit Data Load Options - Live Admin Database
• Edit BI Truncation Parameters - Live Admin Database
• Edit Database Properties - Live Help Database
• Edit Structure File Information - Live Help Database
• Edit BI Truncation Parameters - Live Help Database
• Compiler Settings - Character Client Code
• AppServer UBroker Properties - Financials AppServer
• AppServer UBroker Properties - UI AppServer
• WebSpeed UBroker Properties
• Update UI Configuration
Note Update UI Configuration is the only mandatory task.
4 If you have no further configuration changes, select Execute. The system prompts you to confirm execution of the configuration process.
5 Select Yes. The configuration process begins. The installation script launches. A window displays the qdtadmin.log file, which records the configuration progress.
Note A message displays during full synchronization that says a default set of roles was not provided for the installation. Use of this capability is optional. The warning is for information purposes only and will not impact the system.
6 Review the qdtadmin.log file to check for errors in the configuration process.
7 When the configuration completes successfully, select Close to exit.
8 If you have no further configuration changes, select Execute. The system prompts you to confirm execution of the configuration process.
9 Select Yes. The configuration process begins. The installation script launches. A window displays the qdtadmin.log file, which records the configuration progress.
10 Review the qdtadmin.log file to check for errors in the configuration process.
Configuring Databases
There are four QAD Enterprise Edition databases:
• Main • Single R-Code • Admin • Help Fig. 4.6 Configure QAD EE Database Action Steps
If Pause Before Executing Each Action is selected, the system will wait after each action is performed. This is mainly used for creating a restore point for conversion and is covered in more detail in the conversions guide.
Warning When renaming a database, do not exceed the Progress database name size limit of 11 characters. Also, database names must begin with an alphabetic character and can contain only alphanumeric characters.
Editing Structure File Information
The Structure File Record Detail screen lets you edit the Storage Area Path and the Extent Size for fixed-length extents.
• Use the Extent Pathname to distribute your database onto drives to maximize performance and optimize disk access.
• Use the Extent Size on fixed-length extents to control the size of each storage area. (This field does not appear for variable-length extents.) Note Most storage areas consist of two extents—one fixed length, the other variable length to allow for growth. Also, for performance reasons, the goal is to keep all of the data in fixed database extents. QAD Global Services can assist with optimizing the structure file configuration. Warning Do not edit the Comment line in a storage area. This converts the storage area definition to a comment and nullifies the storage area. To add a comment to the file, select a comment line (#) from the Database Storage Area’s selection list and press Enter.
Warning Do not change the storage Area Name. This name matches the Area definition in the data definition files (.df) for the database. When Progress encounters data files without defined storage areas, it creates them in the system storage area, which is also used to maintain the structure of the database.
The first configuration screen is Edit Structure File Information. The structure file defines how the database will be created on disk—the storage areas, their sizes, locations, and whether they are fixed or not.
Fig. 4.7
Edit Structure File Information Screen
This screen allows you to scroll through the Progress structure file line-by-line and make modifications. You can add lines by selecting Add or edit the content of any line by selecting the line so that the line detail displays.
The second screen is the Edit Structure File Detail Screen. It is used to specify additional parameters.
Fig. 4.8
Edit Structure File Detail Screen
Editing Data Load Options
Note Not all databases have data load options. If this is the case, the Edit Data Load Options screen does not display.
The data load options are database-specific. Other databases, such as admin, have different paths and most do not require an object identifier (OID) value.
Cloning an Environment
You can create a copy of a QAD Enterprise Edition environment with its complete configuration information using the cloning function.
To clone an environment, do the following:
1 Select QAD Environment Name Environment under Product.
2 In the Action pane, select Clone Environment.
The environment being cloned can be configured or not configured. The cloning process will not configure the new environment. It will be in a state similar to the default environment immediately after a new install.
3 The Steps In Action Set pane displays. Select Edit.
4 The Clone Environment pane appears. Use this pane to enter the values for the new environment while observing the following rules:
• The destination environment name cannot already exist or be blank.
• The UI configuration cannot already exist or be blank.
• The target environment directory cannot be the same as the source or be blank.
• The target environment directory must not exist or be empty.
• The target database directory cannot be the same as the source or be blank.
• The target database directory must not exist or be empty.
5 When the values are correct, select Next or Done. The values are checked and a dialog appears if any errors are encountered.
6 If you have no further configuration changes, select Execute to clone the environment. The system prompts you to confirm execution of all of the steps for the cloning process.
7 Accept the default (Yes). The system prompts you to clear the log.
8 Enter Yes. The cloning process begins. A window displays the qdtadmin.log file, which records the cloning progress. Please note that the cloning process will take a while.
9 Review the qdtadmin.log file to check for errors in the cloning process.
10 When the cloning completes successfully, select Close to exit.
11 Follow the configuration steps in this chapter or in Chapter 3, “QAD Enterprise Edition Default Installation,” for the cloned environment. Note A custom or default installation is possible from this point.
Next Steps
Proceed to Chapter 6, “Starting QAD Enterprise Edition,” for details on starting your QAD Enterprise Edition installation.
Note If you have installed QAD Enterprise Edition in multiple environments or created clones of a QAD 2009.1 Enterprise Edition environment, you must perform the applicable procedures in Chapter 6, “Starting QAD Enterprise Edition,” and Chapter 7, “Configure QAD Enterprise Edition,” separately for each environment.
Upgrading QAD
Enterprise Edition
This section describes how to upgrade the .NET UI component of an existing Enterprise Edition installation.
Overview 50
Overview
Beginning with the QAD 2009.1 Enterprise Edition, the .NET UI component of previous releases can be easily upgraded using the installer’s upgrade feature.
Upgrading an Installation
Note Installation is performed using QDT. See “Installing the QAD Deployment Toolkit” on page 15 for details on installing and starting QDT.
To upgrade to the .NET UI component, do the following:
1 Shut down the existing environment.
2 Go to the <media install>/qdt/envs/<env>/scripts directory.
3 Run the checkqadfin<env>.*, checkqadui_AS<env>.*, and checkqadui_WS<env>.* scripts to verify the environment has shut down.
4 Go to the media’s install directory and run install.
5 Specify the existing SP4 installation directory as the target directory for the installation.
6 The QDT installer should note that QDT is already present in the directory and validate the version to replace.
7 Accept the default log and XML locations offered. They are the same as the previous installation.
8 Use the default folder name that appears. It should be the same as the previous installation.
9 Review the displayed installation summary and then proceed.
10 After the file copy completes, press Enter to end the script.
11 Go to the QDT installation directory and launch QDT.
13 Choose Edit/Installation Media Location and select the location of the SP5 media just used for the update.
14 Click Install.
15 Select the environment to update and click OK (Figure 5.1).
Fig. 5.1
Select Installation Environment Screen
16 Check the Web Applications Server box followed by the Update button (Figure 5.2).
Fig. 5.2
Selecting Items to Update
17 The installation of the selected components begins. When the file copy finishes (Figure 5.3), click Close.
Fig. 5.3
Completed Upgrade Process
18 Click Admin on the main QDT screen.
19 Select Start QAD 2009 EE in the Action pane.
20 Select Execute to start the databases and AppServers.
21 A prompt asks if you want to execute all steps listed for QAD 2009 EE. Select Yes.
22 A prompt asks if you want to clear the log. Accept the default (No).
23 Select Close.
24 When the operation finishes, click Close to close the log window and return to the Action pane.
25 Select Configure QAD 2009 EE in the Action pane.
26 Select the UI Configuration: Create UI Configuration in the Action Set pane and select Reset.
The Reset feature allows you to reset a step or steps in a previously previously configured Action Set.
27 A prompt asks if you want to reset all operations listed for Create UI Configuration. Click Yes to continue.
29 Note that the Create UI Configuration is no longer marked complete and can be run again. Select Create UI Configuration in the Product pane.
30 Select Create UI Configuration in the Action pane. Again, note that the operations are no longer marked complete.
31 Select Execute to recreate the updated UI configuration.
32 Select Close to close the log pane. Note that the UI Configuration is again marked as complete in the Action pane.
Starting QAD
Enterprise Edition
This chapter describes how to start the product. Starting QAD Enterprise Edition 56 Registering QAD Enterprise Edition 57 Loading Online Help 57
Exiting QAD Enterprise Edition 58 Backing Up the Database 58 Next Steps 58
Starting QAD Enterprise Edition
The applications server build creates launch scripts for UNIX and Linux or icons and Start menu links for Windows.
Test your startup scripts with the following steps. You can use these same steps on a regular basis to start Progress database servers and character clients.
Note Before installing the Warehousing Product, it is imperative that the end user exit completely from the QDT Toolkit. The necessary
prerequisites for the Warehousing product will not be updated in the QDT XML files until the end user exits from QDT. This is a known issue and will be fixed in a later release of the QDT Toolkit.
UNIX and Linux Installations
To start QAD Enterprise Edition:1 Change to the QDT/envs/EnvironmentName/scripts directory and launch the server script:
./start.EnvironmentName
Note If you have just completed the installation and configuration process, the environment is running and you do not need to perform this step.
2 Start a character client session: ./client.EnvironmentName
Note If more than one language is installed you will have a
./client-lang.EnvironmentName script (for example, client-us.pilot).
3 To start only the databases: Start.Environment_Name
To start all database, WebSpeed, and appserver processes: Startenv.Environment_Name
Note You do not need to start any of the processes if you have already completed configuration of QAD Enterprise Edition. They automatically start during the configuration process.
Windows Installations
To start QAD Enterprise Edition, select Enterprise Edition from the Start menu. QAD Enterprise Edition starts.
Registering QAD Enterprise Edition
You must register your QAD Enterprise Edition license the first time you log in. These steps require that you have the license code sheet included with your release media.
Note Registration must be completed with the character-based user interface (CHUI).
To register QAD Enterprise Edition:
1 Launch the character client by pointing to:
<qdt-inst>/<envs>/<environment_name>/scripts /client-lang.EnvironmentName
2 At the Sign On screen, enter MFG and press Enter. Leave the password field blank. You are then logged in to the default system domain.
3 In the License Details screen, select Register.
4 In the Registered Products screen, select Add.
5 In the Add Product screen, complete the License Code fields by entering the codes from the license code sheet included with your release media. Select OK.
6 When the Registered Products screen reappears, select OK. Your license code and details display in the License Detail screen.
7 Select OK at the License Detail screen. You are returned to the operating system. To begin a session, restart QAD 2009.1 Enterprise Edition and log in.
Loading Online Help
To load online help:
1 From the QAD Enterprise Edition Main Menu, open Field Help Load (36.4.13.14).
2 In the Language field, enter the QAD Enterprise Edition language code for the help that you are loading, and press Enter.
3 Skip to Field Help Load File, leaving all other fields blank, and enter the two-letter language code directory followed by the name of the help file, which is always fieldhlp.fhd. For example, for US English, enter db/us/fieldhlp.fhd.
4 Accept the default values in all other fields.
5 Select Go to begin the load process.
As the load proceeds, the number of records that have been read and loaded displays at the bottom of the screen.
6 Load help for any other languages in your environment, using the appropriate language code and help file.
Exiting QAD Enterprise Edition
To exit QAD Enterprise Edition, select End on the QAD Enterprise Edition Main Menu.
Backing Up the Database
At this point you should do a complete backup of the entire database and directory structure.
Next Steps
Proceed to Chapter 7, “Configure QAD Enterprise Edition,” for information regarding completing the installation.
Configure QAD
Enterprise Edition
This section describes activities to perform after completing an installation to ensure that the application is ready for use.
Overview 60
Prepare Telnet UI Connection Scripts 60 Set Up SSH 66
Install QAD .NET UI Client 68
Adding Languages to an Existing Configuration 70 Configure Application Daemons 73
Overview
This chapter describes how to complete the following tasks:
• Prepare Telnet UI Connection Scripts
• Set Up SSH
• Configure Application Daemons
• Set Up the Reporting Service
Prepare Telnet UI Connection Scripts
QDT creates scripts used by Connection Manager for managing the back-end telnet connections that support the QAD .NET UI. However, you must also define telnet scripts within the application for running terminal sessions within the QAD .NET UI. In addition, the QAD .NET UI reads the port value defined in this program to determine which port to use to connect to the server for terminal programs.
Configure these settings in User Option Telnet Maintenance (36.4.14) by completing the following tasks:
• Specify telnet server settings
• Define the login sequence
• Configure the telnet connection settings
• Verify the script login sequence
Specify Telnet Server Settings
Use the following instructions to configure telnet server settings:
1 Log in to your QAD EE application and access User Option Telnet Maintenance, (36.4.14, mgusrtmt.p).
Fig. 7.1
User Option Telnet Maintenance, Telnet Options
3 Use the following descriptions to complete the Telnet Options fields. Host. Enter the fully qualified machine name or IP address of the telnet server. The script uses this information to establish the telnet connection.
Host O/S. Enter UNIX for UNIX systems. Enter NT for Windows systems.
¶See “Set Up SSH” on page 66.
Port. Enter the port number for the telnet server. The default value is 23, the value normally used unless you plan to use SSH. In this case, the port value is 22.
Image. Leave this field blank; it currently has no purpose.
Script Timeout. Enter the number of seconds (1-999) the system waits for the telnet login script to execute. Exceeding this value displays a time-out message and closes the session.
Idle Timeout. Enter the number of seconds (1-999) the system waits after a telnet session begins for a program to execute.
Note Idle timeout is not used in the QAD .NET UI.
4 Select Go to continue.
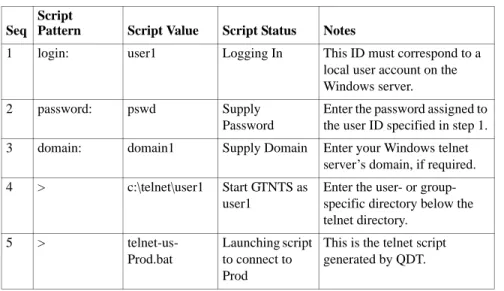
Define the Login Sequence Script Lines
For the system to log in to and begin a session on the telnet server, you must provide the sequence of telnet server login prompts and responses. The last value in the sequence specifies the telnet script created by QDT. The name of the script generated by QDT is
You do not receive telnet-lang.Environment_name scripts if all the languages installed are the same codepage (for example, if you installed us, fr, and ge).
Following the instructions is a set of sample script values for Windows and UNIX systems.
Important In the QAD .NET UI, the login sequence must be specified, but the values are ignored. In terminal mode, the user’s QAD .NET UI user ID and password must exactly match the UNIX user ID and password.
When defining paths for scripts used in the QAD .NET UI, avoid using relative paths since each user’s access may be different.
To define the login sequence script lines:
1 Specify the telnet login sequence number in the Script Lines frame. For each telnet command, enter a sequence number beginning with 1, and select Go.
2 In the next frame, enter the following:
Script Pattern. Enter the prompt generated by the telnet server when a telnet login occurs. The values in this field must be identical to the prompts the telnet server displays when users log in.
Script Value. Enter the response to the telnet login prompt defined in Script Pattern.
Script Status. Optionally enter a description of the prompt and response (for example, Logging In).
If tracing is enabled and the Java console displayed, the description in the Script Status field displays in the Java console on the client when an error occurs during the execution of the prompt and response. You can use these descriptions as an aid in troubleshooting telnet session issues.
Note When you enter a password as a script value, only blanks display. When you select Go at the end of the sequence, you are prompted to confirm the password.
3 Select Go after entering the sequence values. You return to the Sequence field to enter the next sequence number and values.
4 After entering the final sequence, select Go to return to the Sequence field. Then select End to move to the Telnet Connections fields.
Configure Telnet Connection Settings
Once you configure and verify your telnet login sequence, access the Telnet Connections frame and specify telnet connection settings. These settings define the maximum and minimum number of telnet connections available to the associated user.
Note These settings apply to telnet and HTML maintenance programs in QAD .NET UI; they are ignored in the QAD .NET UI. The maximum number of open connections in the QAD .NET UI is determined by the MaximumDesktopsPerWorkspace setting in qaduiConfig.xml, which is located in:
TomcatInstallDir/webapps/qadhome/client/plugins/mfgpro Recommended settings are 10 or more for Maximum; 1 for Minimum.
Fig. 7.2
Telnet Connections
Maximum. This value specifies:
• The maximum number of concurrent embedded telnet screen connections this user can have open per session.
• The maximum number of detached windows running HTML programs allowed for the user. If a specific record does not exist for a user with this setting defined, that user can continue opening detached windows until the maximum number of sessions allowed for the entire pool is reached.
This setting applies separately to HTML telnet sessions and standard telnet sessions in the QAD .NET UI. For example, if Maximum Telnet Settings is 5, a user can have five HTML maintenance
programs running and five telnet programs running in one QAD .NET UI session before an error displays.