Creating your SChool’S WebSite
uSing SCoilnet blogS
Published by
The National Centre for Technology in Education.
Creating your SChool’S WebSite
uSing SCoilnet blogS
Published by:
The National Centre for Technology in Education
National Centre for Technology in Education Dublin City university
Glasnevin Dublin 9
Tel: +353 1 700 8200 Email: info@ncte.ie
Web: www.ncte.ie / www.scoilnet.ie
Copyright © National Centre for Technology in Education 2009
Permission granted to reproduce for educational use providing the source is acknowledged. Copying for any other purposes prohibited without the prior written permission of the publisher.
Please note
• Screenshots used in this manual may appear different to those on computer screens used by partici-pants; variations in versions of the software and differing operating systems may be in use.
• The World Wide Web is constantly evolving and content and urLs (universal resource Locators – website addresses) change over time. it is possible that the content located at some of the urLs listed throughout this manual may change over time.
• Screenshots and software titles used throughout the manual are from a PC using Microsoft Windows XP©.
• Participants using other operating systems may encounter some differences in screen presentation and layout.
Creating your SChool’S WebSite
uSing SCoilnet blogS
Duration:
5 hourS
aimS anD objeCtiveS:
This module aims to enable the participant to:
• understand the concept using your Scoilnet blog as your school website • Learn how to create, administer and use the website
• Learn how to add other users • understand plugins and widgets
table of ContentS:
Creating your School’s Website or blog using Scoilnet blogs ...7
Static v Dynamic Websites – an introduction ...7
Static Website ...7
Dynamic Website ...7
Conclusion ...8
Further research ...8
Websites and the acceptable use Policy (auP) ...9
Websites and Copyright ...10
Digital and video images of pupils on school websites ... 11
Sample auP Guidelines for the School Website ... 11
accessibility ...12
Setting up your Scoilnet blog ...14
Enabling your Website ...14
adding a Domain alias ...17
adding users ...17
Selecting this website as your main site ...21
Logging into your website ...22
using the dashboard ...23
using Plugins and Widgets ...31
activating Plugins ...31
adding Widgets ...32
adding a new Links Category ...34
adding a new Link ...35
Setting up your school’s home Page ...36
removing the second home Page Tab ...37
adding Content to a Page ...39
Editing a Page ...39
using the formatting toolbar ...40
Linking text to a webpage ...41
adding content ...42
using imagebank From Scoilnet ...43
how to Search for images ...43
inserting an image ...45
inserting other multimedia ...48
Embedding a video ...49
Embedding an audio file (podcast) ...51
Further information ...53
appendix: ...55
Graphic of Wordpress user Levels ...56
Creating your SChool’S WebSite or blog uSing
SCoilnet blogS
Please note that, for ease of access for participants, all of the links referenced in this document are available at: http://www.ncte.ie/websitecreation/
StatiC v DynamiC WebSiteS – an introDuCtion
STaTic WebSiTea static website is a collection of hTML pages designed to display pre-determined information every time it is visited, i.e. loaded into a browser. The site encourages little or no visitor interaction despite the inclusion of DhTML (Dynamic hTML), Flash animation, embedded audio and video, interactive menus and animated navigation. regardless of all the gimmicks, content on a static website remains the same unless changes are manually applied by the owner (webmaster) and the modified page uploaded again to the server.
Many schools and colleges still have only a token web presence. its sole function is to provide standard infor-mation that requires periodic updating. The visitor’s interaction is limited to an e-mail hyperlink or a contact or comment form on a static page. in many instances the website is just an online prospectus with enrolment contacts. The maintenance of the site usually falls to the member of staff with web design expertise.
Dynamic WebSiTe
Dynamic websites are information based, content managed systems. The constantly evolving content is stored in a database which can be accessed and manipulated by the visitor.
Dynamic sites have a degree of static content in the form of templates, and easily updated pages and sidebars. in the case of a blog operating on WordPress, the content and the program elements reside in separate compartments. Once the program’s structure is in place a theme can be chosen to suit the site’s purpose and then it is ready for use.
The site’s dynamic content is stored in its own database and remains there until specific data is requested by the visitor. The retrieved data is then integrated into the webpage for that specific query. Typical commercial applications are shopping and comparison websites. Education applications could include blogging and
concluSion
The advantages of deploying a dynamic website in an education environment are as follows: • Speed of access – only the required information is loaded each time.
• Ease of maintenance – basic skill set required, entire staff can get involved.
• Frequent updates – student involvement is optimised - every class has an access level. • interaction is encouraged – published comments and approved contributors.
The main difference between a static and a dynamic website is that the visitor is in control of the information he/she views or receives on a dynamic website. On a static website the owner makes the decision for them.
FurTher reSearch
aCTiviTy Searching for static v dynamic websites
The static v dynamic website debate features regularly in discussions on the internet.
1. Enter the keywords “static v dynamic websites” into any search engine. The search returns over 190, 000 hits. Click on a few to sample the mood of the education and commercial sectors.
2. Bear in mind that many of the links which are of a commercial nature may be blocked by the School Broadband Network’s filtering system
LiNkS
Static Website v Dynamic Website
University of Salford, EDinteractive, Manchester, England http://www.edinteractive.co.uk/article/?id=4
Business and Blogging
http://www.businessandblogging.com/why-business-blogs-are-better-than-static-websites/
Scoilnet Replies to Filtering query
http://www.scoilnet.ie/YourQuestions_BroadbandPages.shtm
WebSiTeS anD The accePTable uSe Policy (auP)
Devising and using a policy covering the acceptable use of the internet is an important step in addressing the issue of internet safety at school level.
an auP is a document which addresses all rights, privileges, responsibilities and sanctions associated with the internet. ideally it will be drawn up by school staff, students, parents and the board of Management. For it to be effective it needs to be reviewed and updated on a yearly basis to take into account changing use practices and technologies.
Full details and examples can be found on the NCTE website:
LiNkS Further reading
Department of Education and Science, AUP –
http://www.education.ie/home/home.jsp?pcategory=33791&ecategory=33819&language=EN Webwise Internet Safety, AUP – http://www.webwise.ie/article.aspx?id=4527
HEAnet, AUP – http://www.heanet.ie/about/aup
School AUP 2.0 – http://landmark-project.com/aup20/pmwiki.php What is an AUP –
http://schools.becta.org.uk/index.php?section=is&catcode=ss_to_es_pp_aup_03&rid=11087
WebSiTeS anD coPyrighT
Please note that before adding any content to your website, that is not your own, you must pay particular attention to any copyright restrictions that may apply to the content. Look out for Creative Commons Licences (cc), which generally allow for the content to be reused, under certain conditions.
Full details and examples can be found on the NCTE website:
http://www.ncte.ie/wpc/plan_copyright_resources.htm
Nb: all the photos in ImageBank are freely available for non-commercial use under a Creative Commons Licence. ImageBank has been developed by the National Centre for Technology in Education (NCTE) and Scoilnet, the portal for irish education – http://www.imagebank.ie
LiNkS Further reading
Copyright Basics – http://www.benedict.com/Info/Info.aspx
Digital anD viDeo imageS of pupilS on SChool
WebSiteS
Publishing images of pupils on the school’s website can be very motivating and encouraging for the pupils. it can help celebrate their work and help create a community spirit within the school while bringing their work to a wider audience.
There are, however, data protection issues to be considered when publishing the image of a minor on the internet. any image published online may easily be edited inappropriately or misused. Pupils may also be personally identified and attract unwanted attention through a photograph posted on the school website. The school must comply with the requirements of:
• Data Protection (amendment) act 2003 • The Data Protection act 1988
• video recordings act 1989
To manage these risks the school should consider developing its own guidelines for the protection of both pupils and staff. The notes included below are a starting point:
SamPle auP guiDelineS For The School WebSiTe
Students will be given the opportunity to publish projects, artwork or school work on the World Wide Web in accordance with clear policies and approval processes regarding the content that can be loaded to the school’s website.
a school website using facilities such as a guestbook, noticeboard or weblog will be checked frequently to ensure that no personal details are contained or posted.
The publication of student work will be co-ordinated by a teacher.
Students’ work will appear in an educational context on Web pages with copyright notice prohibiting the copying of such work without express written permission.
The school will endeavour to use digital photographs, audio or video clips focusing on group activities. Con-tent focusing on individual students will not be published on the school website without parental permission. video clips may be password protected.
The school website will avoid publishing the first name and last name of individuals in a photograph. a naming convention for teacher and student use will be documented and implemented.
The school will ensure that the image files are appropriately named and will not use students’ names in image file names or aLT tags if published on the web.
Students will continue to own the copyright of any work published.
The sample School Website statements below are part of the Webwise internet auP Template. auP advice available:
http://www.webwise.ie/article.aspx?id=4527
The internet Safety Education Pack containing the auP Template is available for download: www.webwise.ie
acceSSibiliTy
The term accessibility in an iCT context refers not only to computer operating systems that have built-in options to support students with special needs, but with regard to this course, as to how a school’s website can be made more user-friendly to people with special educational needs or learning difficulties. accessibility options allow the user to adjust the keyboard response, mouse functionality, screen appearance, screen magnification and other features such as text to speech and speech to text.
Scoilnet blogs is based on the WordPress platform which is an open source and standards based platform. however, the Themes in WordPress, have been designed by individuals and may not apply standards which allow them to be accessible to all. This may also apply to the Plugins and Widgets which are available for use.
For more information on accessibility relating to WordPress:
Schools will need to discuss the types of accessibility issues needed to be addressed and why: • access to the content for those with physical and sensory disabilities
• Ease of navigation of the content, for all with disabilities including learning disabilities
• Suitability of design, for specific and general learning disabilities, in particular ease of understanding of the content, for learning disabilities
The area of learning disabilities is sometimes overlooked during the design phase. however, many accessibil-ity solutions benefit non-disabled people as well as people with disabilities.
a consistent layout, the use of colour, and the font type and font size can not only create a consistent look on a website, but can make the website easier to view and navigate. For example, one simple way of making a website more accessible is in the detailed description that appears during 'mouseover' on an image. This is easily created by adding “aLT Text” to the image.
Setting up your SCoilnet blog
enabling your WebSiTe1. Enter the following address in your web browser: https://admin.scoilnet.ie/ and log in to the site by entering your username and password.
2. Select the Web Hosting tab
3. Select the Enable Scoilnet Blog link.
5. Once the blog has been created, the status message will change and you will then be able to access your website.
6. you can now view your website/blog at http://schoolblog.scoilnet.ie/blog
Nb: you should replace schoolblog with your school’s Online Name (see http://support.scoilnet.ie/wiki/Online_Name)
aDDing a Domain aliaS
From within your Scoilnet Web hosting area you can add additional domain names that you already own so that when users type your other domain into their browser, your scoilnet website will appear. More informa-tion on Domain aliases is available on the Scoilnet support wiki at: http://support.scoilnet.ie/wiki/Main_Page
To use this feature, you must already own the other domain name, i.e. if you wish your domain,
www.school1.ie to point to your school1.scoilnet.ie website, you must already own www.school1.ie. you must have registered your other domain, i.e. www.school1.ie with a Domain Name registrar.
you should then contact your Domain Name registrar and ask them to create a CNaME record for your domain, pointing at your scoilnet domain name.
Example: your Scoilnet webhosting domain is school1.scoilnet.ie and you wish to point www.school1.ie at this website. you would request a CNaME for www.school1.ie to point at school1.scoilnet.ie from your Domain Name registrar (the company you bought the domain from).
Once you have your CNaME pointing at your Scoilnet domain, you can add the domain as a domain alias. you do not need to put www in front of your domain. This will be added automatically. you can add further domain names and delete ones already setup on this page.
aDDing uSerS
adding users to your school’s website is a two step process involving firstly adding new users through your Scoilnet Webhosting account to allow them to log in to the school website. Secondly, using the administration tools of the website itself, you will assign each user different roles, which have different access rights, depend-ing on how much control you wish to allow them to have in the website.
Step 1:
you can easily add extra users to your school’s website. This first step enables other members of staff and/or students to gain access to the website.
you must, as the administrator of your school’s Scoilnet website, first create your user accounts using Scoilnet Webhosting.
1. Enter the following address in your web browser: https://admin.scoilnet.ie/ and log in to the site by entering your username and password.
2. Select the Web Hosting tab.
3. Select the Add another Webmaster link.
4. Select My Webmaster does not have an account.
5. Enter the required information (First Name, Last Name and E-mail address are the only required fields).
6. Select Add Person.
Step 2:
in this second step you will assign each user different roles, which have different access rights, depending on how much control you wish to allow them to have in the website. This enables other members of staff and/or students to access and make changes to the website. remember, before you can add a user to your Scoilnet website you must first create their user information using Scoilnet Webhosting.
These roles are more fully explained in the appendix, but briefly, are:
• administrator - someone who has access to all the administration features
• Editor - someone who can publish posts, manage posts as well as manage other people's posts, etc. • author - someone who can publish and manage their own posts
• Contributor - someone who can write and manage their posts but not publish posts • Subscriber - someone who can read comments/comment/receive newsletters, etc.
1. Log in to the Dashboard of your school’s website/blog. 2. Select Add User from the Users Menu.
3. Enter the new Username. 4. Select the required Role. 5. Select Add user.
6. you will see the text, “User added” appear on the screen
Once you have added your users and if changes to their access levels are required at any time, you can use the following method to manage those users’ access levels to the website:
7. Select Authors & Users from the Users Menu. 8. Select the checkbox of the newly added user.
9. Select the required role from the Change role to drop down menu. 10. Select Apply.
N.b. it is recommended that you add no more than three users at the top level of Administrator. This is to prevent too many users having access to high level areas of your school’s website and implementing changes on an ad hoc basis, without discussion. See the appendix for full details of these rights at the end of this module.
SeleCting thiS WebSite aS your main Site
you can choose the static website (default) or your dynamic website as the site which users will see when they type your domain name into their browser: i.e. http://schoolblog.scoilnet.ie.
Nb: you can link from one website to the other by using the following addresses, which will always be avail-able, no matter which site is set as the main site:
your static website: http://schoolblog.scoilnet.ie/static
your blog/website: http://schoolblog.scoilnet.ie/blog
remember to replace schoolblog with your school’s Online Name (see http://support.scoilnet.ie/wiki/Online_Name)
Carry out the following steps to set your blog/website as the main site:
1. Enter the following address in your web browser: https://admin.scoilnet.ie/ and log in to the site by entering your username and password.
2. Select the Web Hosting tab
3. Select the Select your main site link.
4. Select Blog from the Main Website drop down menu. 5. Select Update.
logging inTo your WebSiTe
1. Select the Log in link (under the Meta heading on the right) and then enter your username and password. Nb: you can also access the login page by entering the following address:
http://schoolblog.scoilnet.ie/blog/wp-login.php (replace schoolblog with your school’s Online Name).
uSing the DaShboarD
The dashboard is the working area of your website and provides links to all the features that you can use. The dashboard is used to determine exactly what your website contains and how it will appear to viewers.
1. Select Visit Site to see what your website looks like. The website’s overall appearance will depend on the theme that you choose.
2. Posts Menu – this section is used mainly for blogging
here you can add new posts, edit existing ones and manage your tags and categories. Tags are keywords used to identify posts. Posts with the same tags are all linked together and will all be accessed when the tag is selected by a user. Categories refer to general topics under which posts may be classified. usually a blog would have 7-10 categories. all posts with the same category are linked together.
3. Media Menu
From the media menu you can view and manage all your uploaded media including video content added with wordTube. you can also add new media.
4. Links Menu
a link is a static hyperlink to another website. From this menu, you can add new links, edit existing ones and categorise them.
5. Pages Menu
Pages are used for static content that rarely needs to be changed. here you can add new pages and edit existing ones.
6. Comments Menu – this section is used mainly for blogging
here you can manage all the incoming comments to your blog posts including approving, not allowing and deleting.
7. Appearance Menu
here you can change your website theme, which determines exactly how the website will appear to visitors, including your website image header. you can also add widgets and enabled plugins using this menu.
8. Plugins Menu
Plugins extend and expand the functionality of your website. here you can activate and deactivate any of the plugins that have been supplied by Scoilnet.
9. Users Menu
here you can change your profile and add new users to the website. This includes setting the user’s role ranging from subscriber to administrator.
10. Tools Menu – this section is used mainly for blogging
use this menu to import posts or comments from another blog. you can also export your own blog as an XML file, which contains your posts, pages, comments, custom fields, categories, and tags.
11. Settings Menu
General
Controls the most basic configuration settings for your website: website title and tagline (brief descrip-tion), timezone, and how dates and times are calculated and displayed.
Writing– this section is used mainly for blogging
Controls the size of the post editing page, how formatting is applied, default settings for the post and link categories, and the option to include remote publishing (post to your blog from a remote client).
Reading – this section is used mainly for blogging
Controls whether posts or a ‘static’ page is displayed as your blog’s main page, how many posts are displayed on that main page, how many posts and how much information is included in your rSS feed, and the character encoding for your choice of languages (use the default).
Discussion – this section is used mainly for blogging
Controls the options concerning comments (also called discussion). This includes the default comment settings, additional settings, e-mail notification options and pre-approval options. Comment modera-tion may also be set and a comment blacklist created. Opmodera-tions regarding the display of avatars are also set here. Nb: an avatar is an image that follows you from blog to blog appearing beside your name when you comment on avatar enabled sites.
Media
Controls the various size settings related to images that are used in pages.
Privacy
Controls your website’s visibility to search engines, such as Google and Technorati. you can also choose to block the search engines but allow normal visitors to see your site.
Permalinks– this section is used mainly for blogging
Controls the urL structure for your permalinks allowing you to choose from different settings or create your own custom setting. This can improve the aesthetics, usability, and forward-compatibility of your links. a permalink is the urL address for each individual blog post.
The default setting produces an ‘ugly’ urL such as http://schoolblog.scoilnet.ie/blog/?p=123
Changing the general SettingS
1. Select General from the Settings Menu.
2. Enter a new Blog Title. This will be the title of your website 3. Enter a new Tagline explaining what your website is about. 4. Enter a new E-mail address (if necessary)
5. Select your preferred Timezone, Date Format,Time Format and Week Starts On. 6. Select Save Changes.
SeleCting a theme
here you will decide on the overall layout of your website, whether it will have a single column, two columns or three columns. Depending on the theme you choose, you may also be able to customise the header. This will be indicated clearly in the theme description.
Nb: Some themes will have an impact on the widgets/plugins you choose. Some functionality may be restricted by certain themes, whilst others will require the use of a widget/plugin to create functionality. also, some themes have been designed with a small number of pages in mind and may not be able to handle multiple pages.
1. Select Themes from the Appearance Menu.
2. Select a new theme to preview it by clicking on the picture or text of the new theme. For this course we are using the “Seashore” theme
changing The heaDer
1. Select Custom Image Header from the Appearance Menu (Nb: this option will only appear if your theme allows you to change the header). Take note of the exact size your new header image will need to be. using the “Seashore” theme, it will be 900 pixels wide by 180 pixels in height.
2. Select Browse to choose the new image from your computer. 3. Select Upload.
4. Select the part of the image that you want to keep if the image you are using is larger than the size recommended.
5. Select Crop Header.
Nb: you can also use the free, online banner Creator service at http://www.bannersketch.com to customise an image you would like to use.
aDDing PageS
1. Select Add New from the Pages Menu. 2. Enter the page Title.
3. Enter the required content (this can be added later on).
4. De-select Allow Comments and Allow Pings in the Discussion options, 5. Select Save Draft.
6. Select Publish.
Nb: Once published, a new tab will appear on your blog linking to the new page.
Pages are, depending on the theme, normally listed alphabetically, but with the “home” page being listed first. it is possible to change the order that you wish to list your pages.
1. Click Edit on the page you wish to re-order
2. Click on Attributes (if this is not showing, click on the “Screen options” tab and tick the
Attributes box).
3. in the Order box, type in the number you want to associate with the page. This number represents the position the page will take in the listings. The lower the number, the nearer it will be positioned to the
“Home” page
Nb: if you see the message ‘comments are closed’ appearing at the bottom of your pages you will have to change your theme (e.g. SeaShore 1.0 by Sadish bala shows this message).
Nb: With some themes the Date and Published by information appears on your static pages. if you do not want this information appearing, you will have to change your theme (e.g. SeaShore 1.0 by Sadish bala shows this information).
aCTiviTy
Adding Pages
Add the following pages: Home, Private, Mission Statement, Current Events, News
NB: Depending on the theme you have chosen, adding too many pages can distort how it appears on the screen.
uSing pluginS anD WiDgetS
acTivaTing PluginSin order to embed audio and video into your website you must first activate the wordTube plugin.
The wordTube plugin manages the built in JW FLv Media Player. With wordTube, you can easily add music, videos and flash movies to your pages and posts. The plugin allows you to upload media from your computer or link directly to media files on the internet. you can also create video playlists as well as manage all of your uploaded media.
1. Select Installed from the Plugins Menu.
2. Select Activate under Action for the wordTube plugin.
aCTiviTy activating Plugins
Activate three of the following plugins: Event Calendar, Google Maps, Podcasting, WassUp, WP-Polls, WP-Polls Widget, WP Authors.
aDDing WiDgeTS
Widgets add functionality to your website and are placed in the sidebar area. 1. Select Widgets from the Appearance Menu.
2. Select the correct Sidebar (if you have more than one available). 3. Select Add for each widget to be included.
4. Select Save Changes.
Nb: you may change the settings of some widgets by selecting Edit once the widget has been added. To remove the widget, select Edit, select Remove.
Nb: you may want to remove the Meta widget so that the administration information is not visible on your website. you will still be able to login by using the following address:
http://schoolblog.scoilnet.ie/blog/wp-login.php (replace schoolblog with your school’s Online Name). Nb: you may also make changes to some widgets from the Settings Menu. Select the name of the widget to access the options.
aCTiviTy adding Widgets
1. Add the Links Widget and two others of your choice from the following list of available widgets: Polls, Pages, Links, Search, Text, RSS, Wassup Widget, WordTube, Authors.
2. Select Edit for each widget to see what changes can be made.
aDDing a neW linkS Category
use the Links widget if you want to provide links to external websites. you must add a new Links category and remove any links from the blogroll category.
1. Select Link Categories from the Links Menu. 2. Enter the new Category name.
3. Enter a Description (if required). 4. Select Add Category.
aDDing a neW link
1. Select Add New from the Links Menu. 2. Enter the Name for the link.
3. Enter the Web Address of the link. 4. Enter a brief Description.
5. Select the correct Category.
6. Select the Target page ( _blank_ = opens in a new window, _top_ = opens in the current win-dow (useful when using frames), _none_ = opens in the current window).
Setting up your SChool’S home page
1. Select Reading from the Settings Menu.
2. Select A static page for the Front page displays.
3. Select the Front page from the dropdown list (choose hOME here).
4. Select the Posts page from the dropdown list (Choose NEWS here – only if you wish to include a blog within your website, otherwise leave as – Select ).
removing The SeconD home Page Tab
Nb: This step may only be required for some themes, where two tabs link to your static home page. 1. Select Edit from the Pages Menu.
2. Select the new home page Title (choose hOME here).
3. Select a page from the Parent dropdown menu found under Attributes (choose PrivaTE here). 4. Select Update Page.
5. Select Edit from the Pages Menu
7. Set the Visibility to Private (in the Publish section). 8. Select Update Page.
aDDing Content to a page
eDiTing a Page1. Select Edit from the Pages Menu. 2. Select the Page that you want to edit. 3. Select Edit.
4. For the purpose of this course we will add the text to the “Current Events” page that was created earlier.
5. Enter your the text below in the section underneath the formatting toolbar. you can copy and paste this from the demonstration blog (http://tutors.scoilnet.ie/blog/ ) or use the text below:
as a key initiative of the NCTE, Scoilnet is responsible for the promotion and use of the internet in education under the Government’s iCT in Schools Programme. Scoilnet is the Department of Education and Science’s official portal for irish education. Currently, it contains a database of over 11,000 digital resources including themepages, reviewed websites, quizzes, lesson plans, crosswords and other multimedia. it acts as a support to teachers, students, parents and school managers at both primary and post primary levels. resources, which are constantly being reviewed, developed and updated by a team of over 30 curriculum experts, are accessed primarily via the “resource Finder”. 6. Then select Update Page.
Nb: The Quick Edit allows you to change the Title, Slug (the page urL), Date Published, Parent Page, Template and Status of the page without changing the actual content.
Nb: To Delete a page, select the page, hover over the page’s title and then select Delete from the submenu which appears. (To delete several pages, select the pages’ checkboxes and then select Delete from the
Bulk Actions Menu).
uSing The FormaTTing Toolbar
a formatting toolbar appears at the top of the Page box where you enter your text.
Nb: standard formatting includes: bold, italics, bullets, quotes, alignment, adding a link, image insertion and spellchecking.
a full description of all the formatting toolbar buttons can be accessed at the Scoilnet support wiki:
http://support.scoilnet.ie/wiki/What_Do_The_Buttons_Mean
linking TexT To a WebPage
1. With the text you have just added to the “Current Events” page, select the word “NCTE”. 2. Select the Link icon (the chain icon on the toolbar).
3. Enter or paste the required Link URL address, which is http://www.ncte.ie
4. Select the Target (open the link in the same window or a new window).
5. Enter the Title for the link. This will appear as the alternate text when the mouse pointer hovers over it.
6. Select the Class (leave as ‘not set’).
Nb: This only needs to be set when using an image as the link. The class determines the alignment of the image in relation to the text on the page. (Left, centred, right). The wp-caption can be used for images that include a caption.
7. Select Insert.
8. repeat these steps for the second instance of the word “Scoilnet”, using the link urL address,
aDDing Content
Please note that before adding any content to your blog, that is not your own, you must pay particular attention to any copyright restrictions that may apply to the con-tent. Look out for Creative Commons Licences (cc) notes or links, which generally allow for the content to be reused, under certain conditions which are consistent with the license. These links are sometimes found at the bottom of the page and are associated with legal or terms of use notices.
Nb: all the photos in ImageBank are freely available for non-commercial use under a Creative Commons Licence. ImageBank has been developed by the National Centre for Technology in Education (NCTE) and Scoilnet, the portal for irish education – http://www.imagebank.ie
here are the terms of use for imagebank – http://www.imagebank.ie/moreinfo.aspx?id=terms
LiNkS Further reading
Copyright Basics – http://www.benedict.com/Info/Info.aspx
Creative Commons FAQ – http://wiki.creativecommons.org/Frequently_Asked_Questions Creative Commons Licences – http://creativecommons.org/about/licenses/meet-the-licenses ImageBank Creative Commons – http://www.imagebank.ie/moreinfo.aspx?id=creativecommons
uSing imagebank from SCoilnet
imagebank is a photo library web site where people can search for and share photos for educational use. imagebank focuses on providing photos of irish places and spaces but other subjects are also included, such as animals, sport and flowers.
imagebank is intended as a supportive resource for students and teachers in irish education. More impor-tantly, it is a growing resource and you are encouraged to share any relevant photos you may have in it. Creative Commons licensing is used to allow you share your photos and specify how others may use them.
hoW To Search For imageS
• Open your web browser and type in the address: http://www.imagebank.ie
• in the box under “Find Photo of..” enter the name ‘yeats’ and click Search!
• When the image results appear, select the first photo.
• Click on Save Image.
• When the File Download dialogue box appears, click ‘Save’. • Choose the folder where you want to save the image and press ‘OK’.
NOTE: The photos in imagebank are made available under Creative Commons licences. Just click on the
CC button under a photo to see how you can use it. Creative Commons is a non-profit organisation that has written flexible copyright licences for people who want to share their creative works with others. These licences are used for the photos in imagebank as they facilitate and promote the sharing of images for use
inSerTing an image
1. Place the cursor below the text you added to your original post where you will now insert the image. 2. Select the Add an Image button (beside Add media).
option a
From Computer
3. Select From Computer and then select Browser uploader.
5. Enter a Title (this is the only required field). For this course the title to enter is “WBYeatsStatue”.
6. Enter a Caption. To increase the accessibility of your website, it would be best practise to add a caption with every image.
7. Enter a Description.
8. Select the type of Link required. 9. Select the Alignment.
10. Select the Size. This is a large image, so for this course choose “Thumbnail” to set it at a small size below your text,
option b From URL
if the image is already online then copy the urL of the image. 1. Select From URL.
2. Paste the urL into Image URL. 3. Enter an Image Title.
4. Enter a Caption. To increase the accessibility of your website, it would be best practise to add a caption with every image.
5. Select the required Alignment (position of the image in relation to surrounding text). 6. Enter a Link Image To urL (if required).
Nb: you may make changes to your image formatting after it has been inserted. Select the image and then select the Edit image icon which appears with the picture. Change any required features including those in
the Advanced Settings. Select Update when you are finished.
inSerTing oTher mulTimeDia
you can also insert audio, video and some document files into your post. a link to the media file will be displayed in your post.
embeDDing a viDeo
1. Select wordTube from the Media Menu. 2. Select Insert new media file.
3. Enter the Title as “Intro to Web 2”, Creator (use your initials here) and Description (can be left blank).
4. you can upload a file from your computer using the Browse button, but for this course enter the following URL:http://www.youtube.com/watch?v=6gmP4nk0EOE
6. Once added to wordTube, you need to click on Edit beneath the title of your video.
7. in the Settings box, copy the media file tag, including the brackets. The media file tag will look like this, [media id=2]. The number written within it represents the order in which the video file was added to
wordTube.
8. Select the “Current Events”Page where you want to insert the video (select Edit in the Pages Menu). 9. Place the cursor where you want to embed the video.
10. Paste in the media file tag that you copied (for example, [media id=2]). 11. Select Publish.
embeDDing an auDio file (poDCaSt)
The steps for adding an audio file are exactly the same. The only difference is that you will upload, or link to, an audio file (mp3 file) and not a video file. Nb: Change the height of the wordTube player to 20 to remove the blank screen.
if you are adding an audio file, which you wish to use as a podcast, then you must insert it into a blogpost and not a static page. The reason for this is that a blogpost will generate an rSS Feed which can then be subscribed to by using an aggregator such as iTunes, Juice or Netvibes. Creating podcasts is covered in the
NCTE - Web 2.0 for Learning course.
aCTiviTy adding content
Create a new post and enter the following information:
A blog (a contraction of the term “Web log”) is a Web site, usually maintained by an individual with regular entries of commentary, descriptions of events, or other material such as graphics or video. Entries are commonly displayed in reverse-chronological order.
Full details at: Wikipedia*
* link to http://en.wikipedia.org/wiki/Blog
Add the following content, available in the Resources section, at the demonstration blog (http://tutors.scoilnet.ie/blog) to your post, just below the text:
Audio file - blogs.mp3 (right click and save to your PC and then upload to your blog). Please note, that when you add an audio file you must choose the setting “File URL” under the “Link URL” heading in order for it to appear as a playable sound file in your blog.
LiNkS Further reading
WordPress Help Documentation – http://codex.wordpress.org/Main_Page WordPress.tv – http://wordpress.tv/
aCTiviTy Examples
To see examples of websites created using the technology behind Scoilnet Blogs to manage them, use the links listed below:
http://portmarnockcommunityschool.scoilnet.ie/blog/ http://scoileoin.scoilnet.ie/blog/
http://scoilsanphroinsias.scoilnet.ie/blog/ http://stoliverscarlingford.scoilnet.ie/blog/ http://drimns.scoilnet.ie/blog/
further information
For up-to-date information regarding your school’s Scoilnet website, check out the Scoilnet Wiki at
http://support.scoilnet.ie/wiki/Main_Page
For information about Scoilnet blogs go to http://blog.scoilnet.ie/blog
The Service Desk can be contacted by phone on 1800 33 44 66, by e-mail to servicedesk@ncte.ie and through a contact form on the NCTE website at http://www.ncte.ie/servicedesk/
The local Education Centre, in collaboration with your school principal, can be contacted to arrange Whole School Training. Please complete the Whole School Training request form (available through the NCTE website at the link below) and return it to the iCT Course administrator in your local Education Centre.
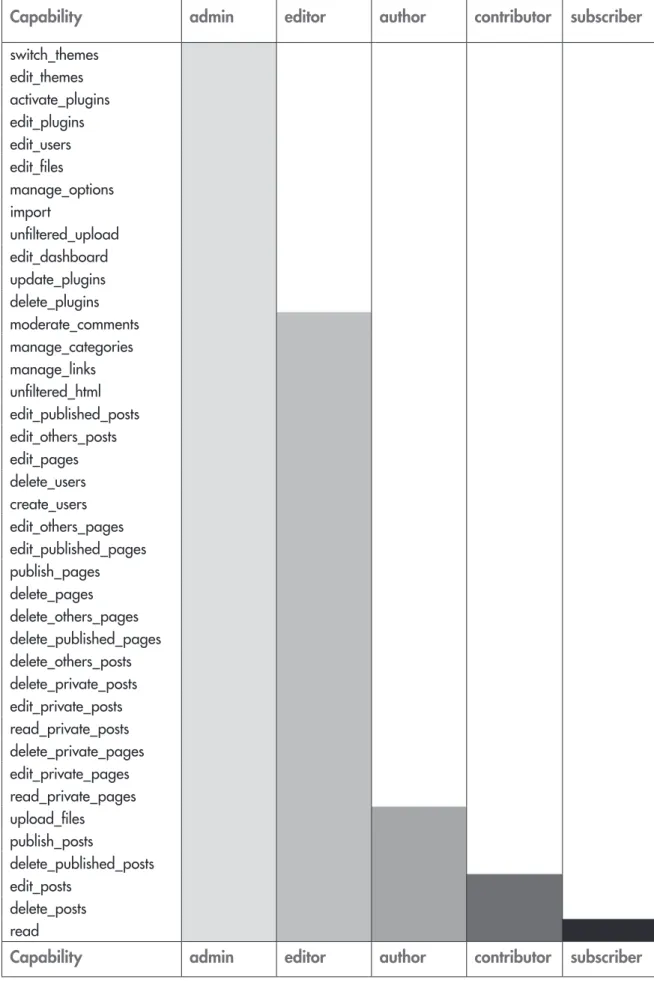
graphiC of WorDpreSS uSer levelS
capability admin editor author contributor subscriber
switch_themes edit_themes activate_plugins edit_plugins edit_users edit_files manage_options import unfiltered_upload edit_dashboard update_plugins delete_plugins
moderate_comments
manage_categories
manage_links
unfiltered_html
edit_published_posts
edit_others_posts
edit_pages
delete_users
create_users
edit_others_pages
edit_published_pages
publish_pages
delete_pages
delete_others_pages
delete_published_pages
delete_others_posts
delete_private_posts
edit_private_posts
read_private_posts
delete_private_pages
edit_private_pages
read_private_pages
admin editor author contributor Subscriber
all Editor rights plus
all author rights plus all Contributer rights plus basic write access no write access
posts edit files publish & delete all posts
publish posts, delete published
posts
Edit & delete posts
upload files all upload rights manage links upload Files users edit users delete & create
users
Pages edit, publish &
delete all pages
comments Moderate
Comments
Plugins activate, update, edit & delete
plugins
Themes Switch and edit
themes
additional edit dashboard
manage options
uSing iframe to aDD Content
you can add different types of content from the internet using the <iframe> hTML tag. For example: Google calendars, Flickr sideshows, online forms (Google docs).
1. Select Edit from the Pages Menu.
2. Select the “Current Events”Page that you want to edit. 3. Select the HTML tab from the formatting toolbar.
4. Enter the <iframe> code (usually you will be able to copy and paste this code from another website).
5. Select Update Page.
Nb: you must always leave the page in the HTML view. Changing back to the Visual view will break the code and the content will no longer be visible.
aCTiviTy using <iframe>
Add a Google calendar to the HOME page:
<iframe src=”http://www.google.com/calendar/embed?src=all%40edubloggerdir.
org&ctz=Europe/Dublin” width=”400” height=”600” frameborder=”0” scrolling=”no”></iframe> Add a Flickr slideshow to the HOME page:
<iframe src=”http://www.flickr.com/slideShow/index.gne?group_id=60777145@N00&user_ id=&set_id=&tags=ireland” frameBorder=”0” width=”400” height=”400” scrolling=”no”></ iframe>