202-10101-01 May 2005
NETGEAR, Inc.
4500 Great America Parkway Santa Clara, CA 95054 USA
NETGEAR RangeMax™
Wireless Access Point
WPN802
NETGEAR is a trademark of Netgear, Inc.
Microsoft, Windows, and Windows NT are registered trademarks of Microsoft Corporation. Other brand and product names are registered trademarks or trademarks of their respective holders.
Statement of Conditions
In the interest of improving internal design, operational function, and/or reliability, NETGEAR reserves the right to make changes to the products described in this document without notice.
NETGEAR does not assume any liability that may occur due to the use or application of the product(s) or circuit layout(s) described herein.
Federal Communications Commission (FCC) Compliance Notice: Radio Frequency Notice
This equipment has been tested and found to comply with the limits for a Class B digital device, pursuant to part 15 of the FCC Rules. These limits are designed to provide reasonable protection against harmful interference in a residential installation. This equipment generates, uses, and can radiate radio frequency energy and, if not installed and used in accordance with the instructions, may cause harmful interference to radio communications. However, there is no guarantee that interference will not occur in a particular installation. If this equipment does cause harmful interference to radio or television reception, which can be determined by turning the equipment off and on, the user is encouraged to try to correct the interference by one or more of the following measures:
• Reorient or relocate the receiving antenna.
• Increase the separation between the equipment and receiver.
• Connect the equipment into an outlet on a circuit different from that to which the receiver is connected. • Consult the dealer or an experienced radio/TV technician for help.
EN 55 022 Declaration of Conformance
This is to certify that the NETGEAR RangeMax™ Wireless Access Point WPN802 is shielded against the generation of radio interference in accordance with the application of Council Directive 89/336/EEC, Article 4a. Conformity is declared by the application of EN 55 022 Class B (CISPR 22).
Bestätigung des Herstellers/Importeurs
Es wird hiermit bestätigt, daß das NETGEAR RangeMax™ Wireless Access Point WPN802 gemäß der im
BMPT-AmtsblVfg 243/1991 und Vfg 46/1992 aufgeführten Bestimmungen entstört ist. Das vorschriftsmäßige Betreiben einiger Geräte (z.B. Testsender) kann jedoch gewissen Beschränkungen unterliegen. Lesen Sie dazu bitte die
Anmerkungen in der Betriebsanleitung.
Das Bundesamt für Zulassungen in der Telekommunikation wurde davon unterrichtet, daß dieses Gerät auf den Markt gebracht wurde und es ist berechtigt, die Serie auf die Erfüllung der Vorschriften hin zu überprüfen.
Certificate of the Manufacturer/Importer
It is hereby certified that the NETGEAR RangeMax™ Wireless Access Point WPN802 has been suppressed
in accordance with the conditions set out in the BMPT-AmtsblVfg 243/1991 and Vfg 46/1992. The operation of some equipment (for example, test transmitters) in accordance with the regulations may, however, be subject to certain restrictions. Please refer to the notes in the operating instructions.
Federal Office for Telecommunications Approvals has been notified of the placing of this equipment on the market and has been granted the right to test the series for compliance with the regulations.
thereto) and conforms to the standards set by the Voluntary Control Council for Interference by Data Processing Equipment and Electronic Office Machines aimed at preventing radio interference in such residential areas. When used near a radio or TV receiver, it may become the cause of radio interference.
Read instructions for correct handling. Customer Support
Refer to the Support Information Card that shipped with your NETGEAR RangeMax™ Wireless Access Point WPN802.
World Wide Web
NETGEAR maintains a World Wide Web home page that you can access at the universal resource locator (URL)
http://www.netgear.com. A direct connection to the Internet and a Web browser such as Internet Explorer
or Netscape are required.
Product and Publication Details
Model Number: WPN802
Publication Date: May 2005
Product Family: Wireless Access Point
Product Name: NETGEAR RangeMax™ Wireless Access Point WPN802 Home or Business Product: Business
Language: English
Chapter 1
About This Manual
Audience, Scope, Conventions, and Formats ...1-1 How to Use This Manual ...1-2 How to Print this Manual ...1-2
Chapter 2 Introduction
Key Features ...2-1 RangeMax™ Multi-In, Multi-Out (MIMO) Technology ...2-1 802.11g Wireless Networking ...2-2 Autosensing Ethernet Connections with Auto Uplink ...2-2 Compatible and Related NETGEAR Products ...2-3 Package Contents ...2-3 The Front Panel Status Lights ...2-4 The Rear Panel ...2-4
Chapter 3
Basic Installation and Configuration
Default Factory Settings ...3-1 System Requirements ...3-2 Prepare to Install Your Wireless Access Point ...3-2 First, Connect the Wireless Access Point to Your Computer ...3-2 Then, Configure the Basic Settings ...3-4 Next, Configure the Wireless Settings ...3-6 Deploy the WPN802 and Verify Wireless Connectivity ...3-7 How to Log In to the WPN802 Using Its Default IP Address ...3-8
Chapter 4
Wireless Configuration
Observe Performance, Placement, and Range Guidelines ...4-1 Understanding Wireless Settings ...4-2
Information to Gather Before Changing Basic Wireless Settings ...4-7 How to Set Up and Test Basic Wireless Connectivity ...4-8 How to Configure WEP or WPA ...4-9 Configuring Advanced Wireless Settings ... 4-11 Wireless Card Access (Restricting by MAC Address) ...4-12 Turning Access Control On ...4-13 Setting up the Access Control List ...4-13
Chapter 5
Management and Information
Changing the Password ...5-1 Upgrading the Wireless Access Point Firmware ...5-2 First, Prepare for the Firmware Upgrade ...5-2 Then, Upgrade the Firmware ...5-2 Backing up Settings or Restoring Settings ...5-3 Backing up Settings ...5-4 Restoring Settings from a Backup File ...5-4 Restoring Factory Default Settings ...5-4 Rebooting the WPN802 Access Point ...5-5 Viewing a List of Available Wireless Stations ...5-5 Viewing Statistics ...5-6
Chapter 6 Troubleshooting
Troubleshooting Tips ...6-1 No lights are lit on the access point. ...6-1 The Ethernet light is not lit. ...6-1 The WLAN light is not lit. ...6-1 I cannot configure the access point from a browser. ...6-2 I cannot access the Internet or the LAN with a wireless capable computer. ...6-2 When I enter a URL or IP address I get a timeout error. ...6-2 Using the Reset Button to Restore Factory Default Settings ...6-3 To clear all data and restore the factory default values: ...6-3
Appendix B
Wireless Networking Basics
Wireless Networking Overview ... B-1 Infrastructure Mode ... B-1 Ad Hoc Mode (Peer-to-Peer Workgroup) ... B-2 Network Name: Extended Service Set Identification (ESSID) ... B-2 Authentication and WEP Data Encryption ... B-2 802.11 Authentication ... B-3 Open System Authentication ... B-3 Shared Key Authentication ... B-4 Overview of WEP Parameters ... B-5 Key Size ... B-6 WEP Configuration Options ... B-7 Wireless Channels ... B-7 WPA and WPA2 Wireless Security ... B-8 How Does WPA Compare to WEP? ... B-9 How Does WPA Compare to WPA2 (IEEE 802.11i)? ... B-10 What are the Key Features of WPA and WPA2 Security? ... B-10
WPA/WPA2 Authentication: Enterprise-level User
Authentication via 802.1x/EAP and RADIUS ... B-12 WPA/WPA2 Data Encryption Key Management ... B-14 Is WPA/WPA2 Perfect? ... B-16 Product Support for WPA/WPA2 ... B-16
Supporting a Mixture of WPA, WPA2, and WEP
Wireless Clients is Discouraged ... B-16 Changes to Wireless Access Points ... B-17 Changes to Wireless Network Adapters ... B-17 Changes to Wireless Client Programs ... B-18
About This Manual
This chapter describes the intended audience, scope, conventions, and formats of this manual.
Audience, Scope, Conventions, and Formats
This reference manual assumes that the reader has basic to intermediate computer and Internet skills. However, basic computer network, Internet, firewall, and VPN technologies tutorial information is provided in the Appendices and on the Netgear website.
This guide uses the following typographical conventions:
This guide uses the following formats to highlight special messages:
This manual is written for the WPN802 Access Point according to these specifications: Table 1-1. Typographical Conventions
italics Emphasis, books, CDs, URL names
bold User input
fixed Screen text, file and server names, extensions, commands, IP addresses
Note: This format is used to highlight information of importance or special interest.
Table 1-2. Manual Scope
Product Version NETGEAR RangeMax™ Wireless Access Point WPN802 Manual Publication Date May 2005
Note: Product updates are available on the NETGEAR, Inc. Web site at
How to Use This Manual
The HTML version of this manual includes the following:
• Buttons, and , for browsing forwards or backwards through the manual one page at a time
• A button that displays the table of contents and an button. Double-click on a link in the table of contents or index to navigate directly to where the topic is described in the manual.
• A button to access the full NETGEAR, Inc. online knowledge base for the product model.
• Links to PDF versions of the full manual and individual chapters.
How to Print this Manual
To print this manual you can choose one of the following several options, according to your needs. • Printing a Page in the HTML View.
Each page in the HTML version of the manual is dedicated to a major topic. Use the Print button on the browser toolbar to print the page contents.
• Printing a Chapter.
Use the PDF of This Chapter link at the top left of any page.
– Click the PDF of This Chapter link at the top right of any page in the chapter you want to print. The PDF version of the chapter you were viewing opens in a browser window. Note: Your computer must have the free Adobe Acrobat reader installed in order to view and print PDF files. The Acrobat reader is available on the Adobe Web site at
http://www.adobe.com.
– Click the print icon in the upper left of the window.
Tip: If your printer supports printing two pages on a single sheet of paper, you can save paper and printer ink by selecting this feature.
• Printing the Full Manual.
Use the Complete PDF Manual link at the top left of any page.
– Click the Complete PDF Manual link at the top left of any page in the manual. The PDF version of the complete manual opens in a browser window.
– Click the print icon in the upper left of the window.
Tip: If your printer supports printing two pages on a single sheet of paper, you can save paper and printer ink by selecting this feature.
Introduction
The NETGEAR RangeMax™ Wireless Access Point WPN802 provides connectivity between Ethernet wired networks and radio-equipped wireless notebook systems, desktop systems, print servers, and other devices.This chapter describes the features of the NETGEAR RangeMax™ Wireless Access Point WPN802.
Key Features
The WPN802 Access Point is easy-to-use and provides the following features: • RangeMax™ Multi-In, Multi-Out (MIMO) technology
• 802.11g wireless networking, with the ability to operate in 802.11g-only, 802.11b only, or 802.11b+g modes.
• Easy, Web-based setup for installation and management. • Login capability.
• Front panel LEDs for easy monitoring of status and activity. • Flash memory for firmware upgrades.
RangeMax™ Multi-In, Multi-Out (MIMO) Technology
Netgear’s RangeMax Multi-In, Multi-Out (MIMO) technology provides ten times more coverage than standard 802.11g alone by eliminating “dead spots” in your area of coverage where you use your wireless computers. Your whole house or office suite now becomes a “hot spot” without requiring any range extenders, repeaters, or external antennas. RangeMax maintains your high speed throughout your home, not just when you are close to your wireless access point.
Note: This manual provides information on the complete features as of the date of publication. Earlier versions of this product may not have all the features presented in this manual. Go to http://kbserver.netgear.com/products/WPN802.asp where you will find product firmware updates for your WPN802.
RangeMax is an advanced Smart MIMO (Multi-In, Multi-Out) technology that uses seven internal antennas. RangeMax constantly surveys your home environment for physical barriers and
interference and adjusts the wireless signal to compensate for these performance blockers. For example, if you carry your laptop from the family room to the bedroom, RangeMax automatically senses the change and selects from over 100 possible antenna configurations to deliver you the fastest, clearest connection so that everyone can enjoy consistently high-speed connections, everywhere in your house with no drop-outs and no dead spots.
RangeMax is also 100% compatible with your existing 802.11b/g products (i.e., 802.11b, 802.11g, Centrino, and SuperG™ wireless clients) and boosts their range and speed by up to 50%.
802.11g Wireless Networking
The WPN802 Access Point includes an 802.11g wireless access point, providing continuous, high-speed 108 Mbps access between your wireless and Ethernet devices. The access point provides:
• 802.11g wireless networking at up to 108 Mbps.
• 802.11g wireless networking, with the ability to operate in 802.11g-only, 802.11b-only, or 802.11g and b modes, providing backwards compatibility with 802.11b devices or dedicating the wireless network to the higher bandwidth 802.11g devices.
• 64-bit and 128-bit WEP encryption security.
• WEP keys can be generated manually or by passphrase.
• WPA-PSK support. Support for Wi-Fi Protected Access (WPA) data encryption which provides strong data encryption and authentication based on a pre-shared key.
• Wireless access can be restricted by MAC address.
• Wireless network name broadcast can be turned off so that only devices that have the network name (SSID) can connect.
Autosensing Ethernet Connections with Auto Uplink
The WPN802 can connect to a standard Ethernet network. The LAN interface is autosensing and capable of full-duplex or half-duplex operation.
The wireless access point incorporates Auto UplinkTM technology. The Ethernet port automatically
senses whether the Ethernet cable plugged into the port should have a ‘normal’ connection such as to a computer or an ‘uplink’ connection such as to a switch or hub. That port will then configure itself to the correct configuration. This feature also eliminates the need to worry about crossover cables, as Auto Uplink will accommodate either type of cable to make the right connection.
Compatible and Related NETGEAR Products
NETGEAR products related to the NETGEAR RangeMax™ Wireless Access Point WPN802 are as follows:
• RangeMax Wireless USB 2.0 Adapter (WPN111) • RangeMax Wireless PCI Adapter (WPN311) • RangeMax Wireless PC Card (WPN511)
Package Contents
The product package should contain the following items: • NETGEAR RangeMax™ Wireless Access Point WPN802. • AC power adapter.
• Vertical stand.
• Straight through Category 5 (CAT5) Ethernet cable.
• Resource CD for the NETGEAR WPN802 RangeMax™ Wireless Access Point (240-10213-01), including:
— This manual.
— Application Notes and other helpful information. • WPN802 Quick Installation Guide.
• Warranty and Support Information Card.
If any of the parts are incorrect, missing, or damaged, contact your NETGEAR dealer. Keep the carton, including the original packing materials, in case you need to return the WPN802 for repair.
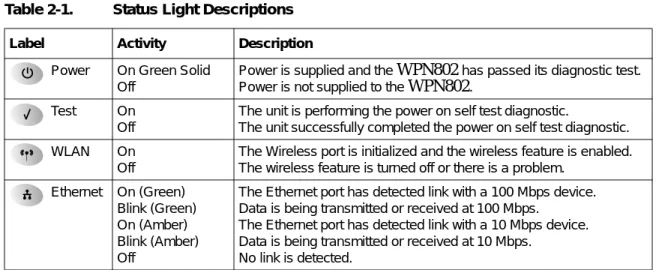
The Front Panel Status Lights
You can use the status lights on the front panel of the WPN802 to verify connections. The table below describes the lights on the front panel.
The Rear Panel
The rear panel of the WPN802 contains the items listed below.
Figure 2-1: WPN802 Rear Panel
Table 2-1. Status Light Descriptions
Label Activity Description
Power On Green Solid Off
Power is supplied and the WPN802 has passed its diagnostic test. Power is not supplied to the WPN802.
Test On Off
The unit is performing the power on self test diagnostic.
The unit successfully completed the power on self test diagnostic.
WLAN On
Off
The Wireless port is initialized and the wireless feature is enabled. The wireless feature is turned off or there is a problem.
Ethernet On (Green) Blink (Green) On (Amber) Blink (Amber) Off
The Ethernet port has detected link with a 100 Mbps device. Data is being transmitted or received at 100 Mbps.
The Ethernet port has detected link with a 10 Mbps device. Data is being transmitted or received at 10 Mbps.
No link is detected.
4
Power Ethernet Port Reset Button
Seven integrated antennas inside LEDs show which antenna is on.
Viewed from left to right, the rear panel contains the following features: • AC power adapter outlet.
• Ethernet 10/100 Mbps port for connecting the access point to the network.
• Factory Default Reset push button for Using the Reset Button to Restore Factory Default Settings.
Basic Installation and Configuration
This chapter explains how to install and configure and the WPN802 Access Point on your network. The first time you configure the WPN802 Access Point it must be connected with an Ethernet cable to a computer with a broadband Internet connection.
Default Factory Settings
The WPN802 default factory settings are shown below. After you install the WPN802 Access Point, customize any of the settings to better meet your networking needs.
FEATURE DEFAULT FACTORY SETTINGS
User Name (case sensitive) admin Password (case sensitive) password
Operating Mode Access Point
Access Point Name netgearxxxxxx where xxxxxx are the last six digits of the wireless access point’s MAC address
Built-in DHCP client DHCP client disabled SIP Configuration
(if DHCP server is unavailable)
IP Address: 192.168.0.231 Subnet Mask: 255.255.255.0 Gateway: 0.0.0.0
Network Name (SSID) NETGEAR Broadcast Network Name (SSID) Enabled
802.11b/g RF Channel 6 Mode Auto 108 AutoCell Enhanced RF Security ‘stealth’ mode Disabled WEP/WPA Disabled Restricting connectivity based on MAC Access
Control List
System Requirements
Before installing the WPN802, make sure your system meets these requirements. • A 10/100 Mbps Local Area Network device such as a hub, router, or switch.
• The Category 5 UTP straight through Ethernet cable with RJ-45 connector included in the package, or one like it.
• A 100-240 V, 50-60 HZ AC power source.
• A Web browser for configuration such as Microsoft Internet Explorer 6.0 or above, or Netscape Navigator 4.78 or above.
• At least one computer with the TCP/IP protocol installed.
• 802.11b or 802.11b-compliant devices, such as the NETGEAR RangeMax Wireless PCI Adapter (WPN311).
Prepare to Install Your Wireless Access Point
• Observe the wireless placement and range guidelines in “Observe Performance, Placement,
and Range Guidelines” on page 4-1.
• For Cable Modem Service: When you perform the wireless access point setup steps be sure to use the computer you first registered with your cable ISP.
• For DSL Service: You may need information such as the DSL login name/e-mail address and password in order to complete the wireless access point setup.
• Familiarize yourself with the contents of the Resource CD for the NETGEAR WPN802 RangeMax™ Wireless Access Point (240-10213-01), especially this manual and the animated tutorials for configuring networking on PCs.
First, Connect the Wireless Access Point to Your Computer
Before installing the wireless access point, make sure that your Ethernet network is up and working.1. Prepare a computer with Internet access and an Ethernet adapter. If this computer is already part of your network, record its TCP/IP configuration settings.
2. Configure the computer with a static IP address of 192.168.0.210 and 255.255.255.0 as the Subnet Mask.
3. Connect an Ethernet cable from the WPN802 to the computer.
Figure 3-1: WPN802 connected to a computer during configuration
4. Turn on your computer, and connect the power adapter to the WPN802. Then check the lights on the front:
• Power: The power light should be lit. If the power light is not lit, check the connections and check to see if the power outlet is controlled by a wall switch that is turned off.
• Test: The test light blinks when the WPN802 is first turned on. • WLAN: The wireless light should be lit.
• Ethernet: The Ethernet (LAN) light should be lit (amber for a 10 Mbps connection and green for a 100 Mbps connection). If not, make sure the Ethernet cable is securely attached at both ends.
Then, Configure the Basic Settings
1. Connect to the WPN802 by opening your browser and entering http://192.168.0.231 in the address field.
2. When prompted, enter admin for the user name and password for the password, both in lower case letters. The Settings page opens.
3. Click the Basic Settings link to configure the IP Settings for your network. The Basic Settings menu appears:
Figure 3-3: Basic Settings menu
4. Configure the Basic Settings for your network.
• Access Point Name: The unique NetBIOS name. The default Access Point Name is located on the bottom label of the WPN802. You may modify the default name with a unique name up to 15 characters long.
• IP Address: By default, the Access Point is set to be a DHCP (Dynamic Host Configuration Protocol) client disabled. The default IP address is 192.168.0.231. • DHCP Client: You may enable the DHCP client to let the Access Point get its TCP/IP
configuration from the DHCP server on your network.
• IP Address: Type the IP address of your Access Point (factory default: 192.168.0.231). • IP Subnet Mask: The Access Point automatically calculates the subnet mask based on the
IP address that you assign. Otherwise, you can use 255.255.255.0 as the subnet mask. • Default Gateway Address: The Access Point will use this IP address default gateway for
any traffic beyond the local network.
• Primary DNS Server: The Access Point will use this IP address as the primary Domain Name Server used by stations on your LAN.
• Secondary DNS Server: The Access Point will use this IP address as the secondary Domain Name Server used by stations on your LAN.
• Time Zone: Select the appropriate local time zone for your Access Point from a list of all available time zones. The default is GMT.
Next, Configure the Wireless Settings
After you configure the Basic Settings for the WPN802, then you need to configure the Wireless Settings.
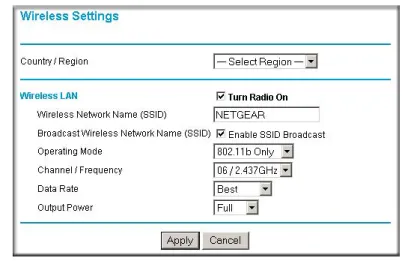
1. On the Settings page, click Wireless Settings. The Wireless Settings menu appears:
Figure 3-4: Wireless Settings menu
2. Enter the wireless settings. For more information, see “Understanding Wireless Settings” on page 4-2.
3. Test the wireless connectivity. To do this, use a computer with a wireless adapter that is configured according to the wireless settings you just set in the WPN802. With this computer, establish a wireless connection to the WPN802.
Now that you have finished the setup steps, you are ready to deploy the WPN802 in your network. If needed, you can now reconfigure the PC you used in step 1 back to its original TCP/IP settings.
Deploy the WPN802 and Verify Wireless Connectivity
When you have configured the Basic Settings and the Wireless Settings, then you can deploy the WPN802.
1. Disconnect the WPN802 and position it where you will deploy it.
The best location is elevated, such as wall mounted or on the top of a cubicle, at the center of your wireless coverage area, and within line of sight of all the mobile devices.
Use the plastic clips provided to place the WPN802 vertically if it is on a metal surface.
Figure 3-5: WPN802 placed in a vertical orientation
2. Connect an Ethernet cable from your WPN802 Access Point to a LAN port on your router, switch, or hub.
Figure 3-6: WPN802 connected to a router
Note: By default, the WPN802 is set with the DHCP client disabled. If your network uses dynamic IP addresses, you will need to change this setting.
WPN802
3. Connect the power adapter to the wireless access point and plug the power adapter in to a power outlet. The Power, WLAN and Ethernet lights should light up. 4. Using a computer with an 802.11g or 802.11b wireless adapter with the correct wireless
settings, verify connectivity by using a browser such as Netscape® or Internet Explorer to connect to the Internet, or check for file and printer access on your network.
Note: If you are unable to connect, see Chapter 3.
5. Configure the wireless settings for each computer that will use the wireless access point. 6. Implement wireless security according to the instructions in “Understanding Wireless
Settings” on page 4-2.
How to Log In to the WPN802 Using Its Default IP Address
The WPN802 has DHCP client disabled, and the default IP address is 192.168.0.231.Note: The computer that you use to connect to the WPN802 should be configured with an IP address that starts with 102.168.0.x and a Subnet Mask of 255.255.255.0.
1. Connect to the WPN802 by typing http://192.168.0.231 in the address field of your browser, and clicking Enter.
For security reasons, the access point has its own user name and password. A login window like the one below opens:
Figure 3-7: Login window
2. Enter admin for the user name and password for the password, both in lower case letters. To change the password, see “This page displays both wired and wireless interface network traffic. Click Refresh to update the current statistics.” on page 5-6.
Note: The user name and password for the access point are not the same as any user name or password you may use to log in to your Internet connection.
The browser display the WPN802 settings home page.
Figure 3-8: WPN802 home page
When the wireless access point is connected to the Internet, click the Knowledge Base or the Documentation link under the Web Support menu to view support information or the
documentation for the wireless access point.
If you do not click Logout, the wireless access point waits five minutes after there is no activity before it automatically logs you out.
Wireless Configuration
This chapter describes how to configure the wireless features of your WPN802 Access Point. In planning your wireless network, you should consider the level of security required. You should also select the physical placement of your wireless access point in order to maximize the network speed. For further information on wireless networking, refer to Appendix B, “Wireless
Networking Basics.
Observe Performance, Placement, and Range Guidelines
The operating distance or range of your wireless connection can vary significantly based on the physical placement of the wireless wireless access point. The latency, data throughputperformance, and notebook power consumption of wireless adapters also vary depending on your configuration choices.
For best results, place your wireless access point:
• Near the center of the area in which your computers will operate.
• In an elevated location such as a high shelf where the wirelessly connected computers have line-of-sight access (even if through walls).
• Away from sources of interference, such as computers, microwaves, and 2.4 GHz cordless phones.
• Away from large metal surfaces.
The time it takes to establish a wireless connection can vary depending on both your security settings and placement. WEP connections can take slightly longer to establish. Also, WEP and WPA-PSK \encryption can consume more battery power on a notebook computer.
When used on a metallic surface, MIMO units must be oriented vertically to ensure proper operation:
Note: Failure to follow these guidelines can result in significant performance
degradation or inability to wirelessly connect to the wireless access point. For complete range/performance specifications, please see Appendix A, “Technical Specifications.”
Figure 4-1: Vertical orientation required on metallic surfaces
Understanding Wireless Settings
To configure the Wireless settings of your wireless access point, click the Wireless link in the main menu of the browser interface. The Wireless Settings menu appears, as shown below.
• Country/Region: It may not be legal to operate the access point in a country/region other than the country/region shown here. See online help for more details. To change the Country/ Region, select from the drop-down list. The region selection feature may not be available in all countries.
• Wireless Network Name (SSID): The default is NETGEAR. Enter a 32-character (maximum). The characters are case sensitive.
Note: You will not get a wireless network connection unless the network SSID matches exactly what is configured in the access point.
• Broadcast Wireless Network Name (SSID): If enabled, the Wireless Access Point will broadcast its SSID. If set to disable, the SSID is not broadcast.
• Operating Mode: Select the desired wireless operating mode. The default is Auto (11g/11b). You can change this to 11g Only, or 11b Only.
• Channel/Frequency: Select the channel for your wireless LAN. This feature is disabled if AutoCell is enabled. It should not be necessary to change the wireless channel unless you notice interference problems with another nearby access point. For more information on the wireless channel frequencies please refer to “Wireless Channels” on page B-7.
• Data Rate: The available transmit data rate of the wireless network. Note that 108 Mbps option is available when the Channel/Frequency is set to channel 6 and the operating mode is set to 11g Only.
• Output Power: Shows the available transmit power of the access point. The possible Tx power options are: Full, 50%, 25%, 12.5%, and minimum. The transmit power may varies depends on the local regulatory regulations. Note that this feature will be disabled if AutoCell is enabled.
Understanding Advanced Wireless Settings
To configure the advanced wireless settings of your wireless access point, click the Wireless Setup link in the Advanced section of the main menu of the browser interface. The Wireless Settings menu appears, as shown below.
Figure 4-3: Advanced Wireless Settings menu
• Enable SuperG Mode: SuperG Mode may increase the overall wireless performance. The default setting is Yes.
• RTS Threshold: Request to Send Threshold. The packet size that is used to determine if it should use the CSMA/CD (Carrier Sense Multiple Access with Collision Detection) mechanism or the CSMA/CA mechanism for packet transmission. With the CSMA/CD transmission mechanism, the transmitting station sends out the actual packet as soon as it has waited for the silence period. With the CSMA/CA transmission mechanism, the transmitting station sends out an RTS packet to the receiving station, and waits for the receiving station to send back a CTS (Clear to Send) packet before sending the actual packet data. The default is 2346.
• Fragmentation Length: The maximum packet size used for fragmentation. Packets larger than the size programmed in this field will be fragmented. The Fragment Threshold value must be larger than the RTS Threshold value. The default is 2346
• Beacon Interval: The interval time between 20ms and 1000ms for each beacon transmission. The default is 100.
• DTIM Interval: The Delivery Traffic Indication Message. Specifies the data beacon rate between 1 and 255. The default is 1.
• Preamble Type: A long transmit preamble may provide a more reliable connection or slightly longer range. A short transmit preamble gives better performance. Auto will automatically handle both long and short preamble. The default is Auto.
Implementing Appropriate Wireless Security
Unlike wired network data, your wireless data transmissions can be received well beyond your walls by anyone with a compatible adapter. For this reason, use the security features of your wireless equipment. The WPN802 Access Point provides highly effective security features which are covered in detail in this chapter. Deploy the security features appropriate to your needs.
Figure 4-4: WPN802 wireless data security options
There are several ways you can enhance the security of your wireless network.
• Restrict Access Based on MAC address. You can restrict access to only trusted computers so that unknown computers cannot wirelessly connect to the WPN802. MAC address filtering adds an obstacle against unwanted access to your network, but the data broadcast over the wireless link is fully exposed.
• Turn Off the Broadcast of the Wireless Network Name SSID. If you disable broadcast of the SSID, only devices that have the correct SSID can connect. This nullifies the wireless network ‘discovery’ feature of some products such as Windows XP, but the data is still fully exposed to a determined snoop using specialized test equipment like wireless sniffers. • WEP. Wired Equivalent Privacy (WEP) data encryption provides data security. WEP Shared
Key authentication and WEP data encryption will block all but the most determined eavesdropper.
Note: Indoors, computers can connect over 802.11b/g wireless networks at ranges of up to 300 feet. Such distances can allow for others outside of your immediate area to access your network.
Wireless Data
Security Options
Range: Up to 300 Foot Radius
/PEN%ASYBUTNOSECURITY -!#!CCESS,IST.ODATASECURITY 7%03ECURITYBUTVULNERABLE
70!OR70!03+6ERYSTRONGSECURITY !UTO#ELL2&hSTEALTHvMODE
• WPA-PSK. Wi-Fi Protected Access, Pre-Shared Key (WPA-PSK) data encryption provides strong data security. WPA-PSK will block eavesdropping. Because this is a new standard, wireless device driver and software availability may be limited.
• AutoCell Enhanced RF Security. In addition to standard encryption and security
mechanisms such as WEP and WPA, the WG302 AutoCell Feature provides self-organizing micro cells for an additional level of privacy for enterprises. In this mode, AutoCell shrinks the size of coverage to the minimum to reach clients but also shrinks the size of the beacons that access points use to announce their presence. This mode makes an enterprise wireless LAN nearly invisible to users outside an office building. AutoCell clients such as the NETGEAR WAG511 are highly recommended for Enhanced RF Security.
Information to Gather Before Changing Basic Wireless Settings
Before customizing your wireless settings, print this form and record the following information. If you are working with an existing wireless network, the person who set up or is responsible for the network will be able to provide this information. Otherwise, you will choose the settings for your wireless network. Either way, record the settings for your wireless network in the spaces below. • Wireless Network Name (SSID): ______________________________ The SSID, identifiesthe wireless network. You can use up to 32 alphanumeric characters. The SSID is case sensitive. The SSID in the wireless adapter card must match the SSID of the wireless access point. In some configuration utilities (such as in Windows XP), the term “wireless network name” is used instead of SSID.
• If WEP Authentication is Used. Circle one: Open System, Shared Key, or Auto.
Note: If you select Shared Key, the other devices in the network will not connect unless they are set to Shared Key as well and are configured with the correct key.
– WEP Encryption key size. Choose one: 64-bit or 128-bit. Again, the encryption key size must be the same for the wireless adapters and the wireless access point.
– Data Encryption (WEP) Keys. There are two methods for creating WEP data encryption keys. Whichever method you use, record the key values in the spaces below.
• Passphrase method. ______________________________ These characters are case sensitive. Enter a word or group of printable characters and click the Generate Keys button. Not all wireless devices support the passphrase method.
• Manual method. These values are not case sensitive. For 64-bit WEP, enter 10 hex digits (any combination of 0-9 or a-f). For 128-bit WEP, enter 26 hex digits.
Key 1: ___________________________________ Key 2: ___________________________________ Key 3: ___________________________________ Key 4: ___________________________________ • If WPA-PSK Authentication is Used.
– Passphrase: ______________________________ These characters are case sensitive. Enter a word or group of printable characters. When you use WPA-PSK, the other devices in the network will not connect unless they are set to WPA-PSK as well and are configured with the correct Passphrase.
Use the procedures described in the following sections to configure the WPN802. Store this information in a safe place.
How to Set Up and Test Basic Wireless Connectivity
Follow the instructions below to set up and test basic wireless connectivity. Once you have established basic wireless connectivity, you can enable security settings appropriate to your needs. 1. Log in to the WPN802 at its default LAN address of http://192.168.0.231 with its default user
name of admin and default password of password, or using whatever LAN address and password you have set up.
2. Click Wireless Settings in the main menu of the WPN802.
Figure 4-5: Wireless Settings menu
3. Choose a suitable descriptive name for the wireless network name (SSID). In the SSID box, enter a value of up to 32 alphanumeric characters. The default SSID is NETGEAR.
Note: The SSID is case sensitive; NETGEAR is not the same as nETgear. Also, the SSID of any wireless access adapters must match the SSID you configure in the NETGEAR
RangeMax™ Wireless Access Point WPN802. If they do not match, you will not get a wireless connection to the WPN802.
4. Set the Region. Select the region in which the wireless interface will operate.
Note: If you use a wireless computer to configure WPA settings, you will be
disconnected when you click Apply. Reconfigure your wireless adapter to match the new settings or access the wireless access point from a wired computer to make any further changes.
5. Set the Channel. The default channel is 11.
This field determines which operating frequency will be used. It should not be necessary to change the wireless channel unless you notice interference problems with another nearby wireless router or access point. Select a channel that is not being used by any other wireless networks within several hundred feet of your wireless access point. For more information on the wireless channel frequencies please refer to “Wireless Channels” on page B-7.
6. For initial configuration and test, leave the Wireless Card Access List set to “Everyone” and the Encryption Strength set to “Disabled.”
7. Click Apply to save your changes.
8. Configure and test your computers for wireless connectivity.
Program the wireless adapter of your computers to have the same SSID and channel that you configured in the WPN802. Check that they have a wireless link and are able to obtain an IP address by DHCP from the WPN802.
Warning: The Network Name (SSID) is case sensitive. If NETGEAR is the Network Name (SSID) in your wireless access point, you must enter NETGEAR in your computer's wireless settings. Typing nETgear will not work.
Once your computers have basic wireless connectivity, you can configure the advanced wireless security functions.
How to Configure WEP or WPA
Not all wireless adapters support WPA. Furthermore, client software is also required. Windows XP and Windows 2000 with service pack 3 do include WPA support. Nevertheless, the wireless adapter hardware and driver must also support WPA. For instructions on configuring wireless computers or PDAs for WPA-PSK security, consult the documentation for the product you are using.
To configure WEP or WPA data encryption, follow these steps:
Note: If you are configuring the WPN802 from a wireless computer and you change the WPN802’s SSID, channel, or security settings, you will lose your wireless connection when you click on Apply. You must then change the wireless settings of your computer to match the WPN802’s new settings.
1. Log in to the WPN802 at its default LAN address of http://192.168.0.231 with its default user name of admin and default password of password, or using whatever LAN address and password you have set up.
2. Click Wireless Settings in the main menu of the WPN802.
3. From the Security Options menu, select WEP/WPA. The WEP/WPA Settings page opens.
Figure 4-6: Wireless Settings encryption menu
4. Select the Network Authentication and Data Encryption from the drop-down lists.
Please refer to “Authentication and WEP Data Encryption” on page B-2 for a full explanation of each of these options, as defined by the IEEE 802.11 wireless communication standard. 5. Either enter a Passphrase and click Generate Keys, or manually enter the keys. The keys must
be identical on all computers and access points in your network.
• Passphrase - The passphrase is case sensitive; NETGEAR is not the same as nETgear. The four key boxes will be automatically populated with key values.
• Manual - Enter ten hexadecimal digits (any combination of 0-9, a-f, or A-F). These entries are not case sensitive; AA is the same as aa.
Note: If you use a wireless computer configure WEP settings, you will be disconnected when you click Apply. You must then either configure your wireless adapter to match the wireless access point WEP settings or access the wireless access point from a wired computer to make any further changes.
Select which of the four keys will be active.
6. Enable Wireless Client Security Separator: The associated wireless clients will not be able to communicate with each other if this feature is enabled. The default setting is Disable. 7. Click Apply to save your settings.
Configuring Advanced Wireless Settings
Click on Wireless Settings under the Advanced Heading in the Main Menu to go to the Advanced Wireless Settings page:
Figure 4-7: Advanced Wireless Settings page
Warning: The wireless access point is already configured with the optimum settings. Do not alter these settings unless directed by NETGEAR support. Incorrect settings may disable the wireless access point unexpectedly.
The advanced wireless settings are explained below:
• Enable SuperG Mode: Enable SuperG mode may increase the overall wireless performance. Default: Disabled.
• RTS Threshold: Request to Send Threshold. The packet size that is used to determine if it should use the CSMA/CD (Carrier Sense Multiple Access with Collision Detection) mechanism or the CSMA/CA mechanism for packet transmission. With the CSMA/CD transmission mechanism, the transmitting station sends out the actual packet as soon as it has waited for the silence period. With the CSMA/CA transmission mechanism, the transmitting station sends out an RTS packet to the receiving station, and waits for the receiving station to send back a CTS (Clear to Send) packet before sending the actual packet data. Default: 2346.
• Fragmentation Length: This is the maximum packet size used for fragmentation. Packets larger than the size programmed in this field will be fragmented. The Fragment Threshold value must be larger than the RTS Threshold value. Default: 2346
• Beacon Interval: The interval time between 20ms and 1000ms for each beacon transmission. Default: 100
• DTIM Interval: The Delivery Traffic Indication Message. Specifies the data beacon rate between 1 and 255. Default: 1
• Preamble Type: A long transmit preamble may provide a more reliable connection or slightly longer range. A short transmit preamble gives better performance. Auto will automatically handle both long and short preamble. Default: Auto.
Wireless Card Access (Restricting by MAC Address)
The Wireless Card Access Setup page displays a list of wireless computers that are allowed to connect to the wireless access point based on their MAC addresses. These wireless computers must also have the correct SSID and WEP settings configured on the Wireless Settings page to access the wireless network.
From the Wireless Settings menu, click the Setup Access List button to display the Wireless Access List screen:
Figure 4-8: Wireless Access Control List screen
By default, any wireless computer that is configured with the correct SSID will be allowed access to your wireless network. For increased security, you can restrict access to the wireless network to only allow specific computers based on their MAC addresses.
Turning Access Control On
1. Click the Turn Access Control On check box to restrict wireless computers by their MAC addresses.
2. Click Apply to save changes and return to the Wireless Settings page.
Note: If Turn Access Control On is enabled and the Access Control List is blank; then no wireless computers can connect to your wireless network.
Setting up the Access Control List
1. On the Access Control List screen, click the Add button to go to the Access Setup menu. This menu displays a list of currently active wireless cards and their Ethernet MAC addresses. 2. If the desired computer is in the list, click the radio button of that computer to capture its MAC
address. Or you can manually enter the MAC address of the authorized computer.
Note: The MAC address can usually be found on the bottom of the wireless device. If no Device Name appears, you can type a descriptive name for the computer that you are adding. 3. Click the Add button.
4. Repeat these steps for each wireless computer. 5. You can use the Edit and Delete buttons as needed.
Management and Information
This chapter describes how to use the management and information features of your NETGEAR RangeMax™ Wireless Access Point WPN802. These features can be found under the
Management heading and Information heading in the main menu of the browser interface.
Changing the Password
The default password for the WPN802 is password. NETGEAR recommends that you change this password to a more secure password.
To change this, click the Change Password link. The Change Password dialog box opens.
Figure 5-1: Change Password dialog box
To change the password, first enter the old password, then enter the new password twice. You can also restore the default password. Click Apply to save your changes.
Note: Before changing the WPN802 password, use the backup utility to save your configuration settings. If after changing the password, you forget the new password you assigned, you will have to reset the WPN802 back to the factory defaults to be able to log in using the default password of password. This means you will have to restore all the WPN802 configuration settings. If you ever have to reset the WPN802 back to the factory defaults, you can restore your settings from the backup.
Upgrading the Wireless Access Point Firmware
First, Prepare for the Firmware Upgrade
You cannot perform the firmware upgrade from a workstation connected to the WPN802 via a wireless link. The firmware upgrade must be preformed via a workstation connected to the WPN802 the Ethernet LAN interface.
The software of the WPN802 Access Point is stored in FLASH memory, and can be upgraded as new software is released by NETGEAR. Upgrade files can be downloaded from the NETGEAR Web site. If the upgrade file is compressed (.ZIP file), you must first extract the image (.RMG) file before sending it to the wireless access point. The upgrade file can be sent using your browser.
Note: The Web browser used to upload new firmware into the WPN802 Access Point must support HTTP uploads, such as Microsoft Internet Explorer 6.0 or above, or Netscape Navigator 4.78 or above.
Then, Upgrade the Firmware
1. Go to the NETGEAR Web site http://www.NETGEAR.com Customer Service downloads section to get new versions of the Access Point software.
2. Download and unzip (if the download file is a .zip file) the new software file.
3. From the main menu of the browser interface, click the Upgrade Firmware link under the Management heading.
Note: When uploading firmware to the wireless access point, it is important not to interrupt the Web browser by closing the window, clicking a link, or loading a new page. If the browser is interrupted, the upload may fail, corrupt the software, and render the WPN802 completely inoperable.
The Upgrade Firmware dialog box opens:
Figure 5-2: Upgrade Firmware dialog box
4. Click the Browse button and browse to the location of the upgrade file 5. Click Upload.
In some cases, you may need to reconfigure the wireless access point after upgrading.
Backing up Settings or Restoring Settings
This page lets you back up the Access Point’s current settings and restore the factory default settings. Once you have the Access Point working properly, you should back up the information to have it available if something goes wrong. When you backup the settings, they are saved as a file on your computer. You can restore the Access Point’s settings from this file.
From the main menu of the browser interface, click the Backup/Restore Settings link under the Management heading. The Backup/Restore Settings dialog box opens:
Backing up Settings
1. On the Backup/Restore Settings dialog box, click Backup.
• If you don’t have your browser set up to save downloaded files automatically, locate where you want to save the file, rename it if you like, and click Backup.
• If you have your browser set up to save downloaded files automatically, the file is saved to the your browser’s download location on the hard disk.
2. Retrieve backed up settings from a file
Restoring Settings from a Backup File
You can restore the wireless access point’s settings from a backup file. 1. On the Backup/Restore Settings dialog box, click Browse.
2. Locate and select the previously saved backup file (by default, netgear.cfg). 3. Click Retrieve.
A window appears letting you know that the Access Point has been successfully restored to previous settings. The Access Point will restart. This will take about one minute.
4. Close the message window.
Restoring Factory Default Settings
You can use the Restore feature to erase the current settings and reset the Access Point to the original factory default settings. These settings are listed in “Default Factory Settings” on page 3-1. On the Backup/Restore Settings dialog box, click Restore.
IMPORTANT! Do not try to go online, turn off the Access Point, shut down the computer or do anything else to the Access Point until it finishes restarting. When the Test light turns off, wait a few more seconds before doing anything with the Access Point
IMPORTANT! Do not try to go online, turn off the Access Point, shut down the computer or do anything else to the Access Point until it finishes restarting. When the Test light turns off, wait a few more seconds before doing anything with the Access Point
Rebooting the WPN802 Access Point
You can reboot the wireless access point from the browser interface or by using the reset button on the rear panel.
1. From the main menu of the browser interface, click the Reboot AP link under the Management heading.
The Reboot AP dialog box appears:
Figure 5-4: Reboot AP dialog box
2. Select Yes, and then click Apply.
Viewing a List of Available Wireless Stations
The Available Wireless Station List contains a table of all IP devices associated with the wireless access point in the wireless network defined by the Wireless Network Name (SSID).
From the main menu of the browser interface, click the Available Wireless Stations List link under the Information Heading. The following screen opens:
Figure 5-5: Available Wireless Station List
For each device, the table shows the Station ID, MAC address, IP Address, and Status (whether the device is allowed to communicate with the wireless access point or not).
Note that if the wireless access point is rebooted, the table data is lost until the wireless access point rediscovers the devices. To force the wireless access point to look for associated devices, click the Refresh button.
Note: A wireless network can include multiple wireless access points, all using the same network name (SSID). This enables extending the reach of the wireless network and lets users roam from one access point to another, providing seamless network connectivity. Under these circumstances, be aware that only the stations associated with this access point will be presented in the Available Station List.
Viewing Statistics
Click on the Statistics link to display usage statistics, as shown below.
Figure 5-6: Statistics screen
This page displays both wired and wireless interface network traffic. Click Refresh to update the current statistics.
Troubleshooting
This chapter gives information about troubleshooting your NETGEAR RangeMax™ Wireless Access Point WPN802. After each problem description, instructions are provided to help you diagnose and solve the problem.
Troubleshooting Tips
Here are some tips for correcting simple problems you may have.
No lights are lit on the access point.
The access point has no power.• Make sure the power cord is connected to the access point and plugged in to a working power outlet or power strip.
• Make sure you are using the correct NETGEAR power adapter supplied with your access point.
The Ethernet light is not lit.
There is a hardware connection problem.• Make sure the cable connectors are securely plugged in at the access point and the network device (hub, switch, or router).
• Make sure the connected device is turned on.
The WLAN light is not lit.
The access point’s antennas are not working.
• If the Wireless LAN activity light stays off, disconnect the adapter from its power source and then plug it in again.
I cannot configure the access point from a browser.
Check these items:• The WPN802 is properly installed, LAN connections are OK, and it is powered on. Check that the LAN port LED is green to verify that the Ethernet connection is OK.
• If you are using the NetBIOS name of the WPN802 to connect, ensure that your PC and the WPN802 are on the same network segment or that there is a WINS server on your network. • If your computer uses a Fixed (Static) IP address, ensure that it is using an IP Address in the
range of the WPN802. The WPN802 default IP Address is 192.168.0.231 and the default Subnet Mask is 255.255.255.0. The WPN802 default setting is for a static IP address. If the network where you are connecting it is using DHCP, configure it accordingly. See the CROSS REF for more details.
I cannot access the Internet or the LAN with a wireless capable
computer.
There is a configuration problem. Check these items:
• You may not have restarted the computer with the wireless adapter to have TCP/IP changes take effect. Restart the computer.
• The computer with the wireless adapter may not have the correct TCP/IP settings to
communicate with the network. Restart the computer and check that TCP/IP is set up properly for that network. The usual setting for Windows on the Network Properties is set to “Obtain an IP address automatically.”
• The access point’s default values may not work with your network. Check the access point default configuration against the configuration of other devices in your network.
• For full instructions on changing the access point’s default values, see CROSS REF.
When I enter a URL or IP address I get a timeout error.
A number of things could be causing this. Try the following troubleshooting steps.• Check whether other computers work. If they do, ensure that your computer’s TCP/IP settings are correct. If using a fixed (Static) IP Address, check the Subnet Mask, Default Gateway, DNS, and IP Addresses.
• If the computers are configured correctly, but still not working, ensure that the WPN802 is connected and turned on. Connect to it and check its settings. If you cannot connect to it, check the LAN and power connections.
• If the WPN802 is configured correctly, check your Internet connection (DSL/Cable modem, etc.) to make sure that it is working.
• Try again.
• When entering configuration settings, be sure to click the Apply button before moving to another menu or tab, or your changes are lost.
• Click the Refresh or Reload button in the Web browser. The changes may have occurred, but the Web browser may be caching the old configuration.
Using the Reset Button to Restore Factory Default Settings
The reset button on the rear panel of the WPN802 has two functions:• Reboot: When pressed and released quickly, the WPN802 will reboot (restart).
• Reset to Factory Defaults: This button can also be used to clear ALL data and restore ALL settings to the factory default values. These settings are shown in “Default Factory Settings” on page 3-1.
To clear all data and restore the factory default values:
1. Power off the WPN802 and power it back on.
2. Use something with a small point, such as a pen, to press the reset button in and hold it in for at least five seconds.
3. Release the reset button.
Technical Specifications
This appendix provides technical specifications for the NETGEAR RangeMax™ Wireless Access Point WPN802.
Network Protocol and Standards Compatibility
Data and Routing Protocols: TCP/IP, RIP-1, RIP-2, DHCP PPP over Ethernet (PPPoE) Power Adapter
North America: 120V, 60 Hz, input
United Kingdom, Australia: 240V, 50 Hz, input
Europe: 230V, 50 Hz, input
Japan: 100V, 50/60 Hz, input
All regions (output): 12 V DC @ 1A output Physical Specifications
Dimensions: 28 x 175 x 119 mm (1.1 x 6.89 x 4.68 in.)
Weight: 0.3 kg (0.66 lb)
Environmental Specifications
Operating temperature: 0° to 40° C (32º to 104º F)
Operating humidity: 90% maximum relative humidity, noncondensing Electromagnetic Emissions
Meets requirements of: FCC Part 15 Class B VCCI Class B
EN 55 022 (CISPR 22), Class B C-Tick N10947
Interface Specifications
WAN: 10BASE-T or 100BASE-Tx, RJ-45
Wireless
Radio Data Rates 1, 2, 5.5, 6, 9, 12, 18, 24, 36, 48, 54, and 108 Mbps Auto Rate Sensing
Frequency 2.4-2.5Ghz
Data Encoding: 802.11b: Direct Sequence Spread Spectrum (DSSS)
802.11g: Orthogonal Frequency Division Multiplexing (OFDM) Maximum Computers Per Wireless
Network:
Limited by the amount of wireless network traffic generated by each node. Typically 30-70 nodes.
Operating Frequency Ranges: 2.412~2.462 GHz (US) 2.457~2.462 GHz (Spain) 2.412~2.484 GHz (Japan)2.457~2.472 GHz (France) 2.412~2.472 GHz (Europe ETSI)
Wireless Networking Basics
This chapter provides an overview of Wireless networking.
Wireless Networking Overview
The WPN802 Access Point conforms to the Institute of Electrical and Electronics Engineers (IEEE) 802.11b and 802.11g standards for wireless LANs (WLANs). On an 802.11b or g wireless link, data is encoded using direct-sequence spread-spectrum (DSSS) technology and is transmitted in the unlicensed radio spectrum at 2.5GHz. The maximum data rate for the 802.11b wireless link is 11 Mbps, but it will automatically back down from 11 Mbps to 5.5, 2, and 1 Mbps when the radio signal is weak or when interference is detected. The 802.11g auto rate sensing rates are 1, 2, 5.5, 6, 9, 12, 18, 24, 36, 48, 54, and 108 Mbps.
The 802.11 standard is also called Wireless Ethernet or Wi-Fi by the Wireless Ethernet
Compatibility Alliance (WECA, see http://www.wi-fi.net), an industry standard group promoting interoperability among 802.11 devices. The 802.11 standard offers two methods for configuring a wireless network - ad hoc and infrastructure.
Infrastructure Mode
With a wireless Access Point, you can operate the wireless LAN in the infrastructure mode. This mode provides wireless connectivity to multiple wireless network devices within a fixed range or area of coverage, interacting with wireless nodes via an antenna.
In the infrastructure mode, the wireless access point converts airwave data into wired Ethernet data, acting as a bridge between the wired LAN and wireless clients. Connecting multiple Access Points via a wired Ethernet backbone can further extend the wireless network coverage. As a mobile computing device moves out of the range of one access point, it moves into the range of another. As a result, wireless clients can freely roam from one Access Point domain to another and still maintain seamless network connection.
Ad Hoc Mode (Peer-to-Peer Workgroup)
In an ad hoc network, computers are brought together as needed; thus, there is no structure or fixed points to the network - each node can generally communicate with any other node. There is no Access Point involved in this configuration. This mode enables you to quickly set up a small wireless workgroup and allows workgroup members to exchange data or share printers as
supported by Microsoft networking in the various Windows operating systems. Some vendors also refer to ad hoc networking as peer-to-peer group networking.
In this configuration, network packets are directly sent and received by the intended transmitting and receiving stations. As long as the stations are within range of one another, this is the easiest and least expensive way to set up a wireless network.
Network Name: Extended Service Set Identification (ESSID)
The Extended Service Set Identification (ESSID) is one of two types of Service Set Identification (SSID). In an ad hoc wireless network with no access points, the Basic Service Set Identification (BSSID) is used. In an infrastructure wireless network that includes an access point, the ESSID is used, but may still be referred to as SSID.
An SSID is a thirty-two character (maximum) alphanumeric key identifying the name of the wireless local area network. Some vendors refer to the SSID as network name. For the wireless devices in a network to communicate with each other, all devices must be configured with the same SSID.
The ESSID is usually broadcast in the air from an access point. The wireless station sometimes can be configured with the ESSID ANY. This means the wireless station will try to associate with whichever access point has the stronger radio frequency (RF) signal, providing that both the access point and wireless station use Open System authentication.
Authentication and WEP Data Encryption
The absence of a physical connection between nodes makes the wireless links vulnerable to eavesdropping and information theft. To provide a certain level of security, the IEEE 802.11 standard has defined these two types of authentication methods:
• Open System. With Open System authentication, a wireless computer can join any network and receive any messages that are not encrypted.
• Shared Key. With Shared Key authentication, only those PCs that possess the correct authentication key can join the network. By default, IEEE 802.11 wireless devices operate in an Open System network.
Wired Equivalent Privacy (WEP) data encryption is used when the wireless devices are configured to operate in Shared Key authentication mode.
802.11 Authentication
The 802.11 standard defines several services that govern how two 802.11 devices communicate. The following events must occur before an 802.11 Station can communicate with an Ethernet network through an access point, such as the one built in to the WPN802:
1. Turn on the wireless station.
2. The station listens for messages from any access points that are in range.
3. The station finds a message from an access point that has a matching SSID.
4. The station sends an authentication request to the access point.
5. The access point authenticates the station.
6. The station sends an association request to the access point.
7. The access point associates with the station.
8. The station can now communicate with the Ethernet network through the access point.
An access point must authenticate a station before the station can associate with the access point or communicate with the network. The IEEE 802.11 standard defines two types of authentication: Open System and Shared Key.
• Open System Authenticationallows any device to join the network, assuming that the device SSID matches the access point SSID. Alternatively, the device can use the “ANY” SSID option to associate with any available Access Point within range, regardless of its SSID. • Shared Key Authenticationrequires that the station and the access point have the same WEP
Key to authenticate. These two authentication procedures are described below.
Open System Authentication
The following steps occur when two devices use Open System Authentication:
2. The access point authenticates the station.
3. The station associates with the access point and joins the network.
This process is illustrated below.
Figure B-1: Open system authentication
Shared Key Authentication
The following steps occur when two devices use Shared Key Authentication:
1. The station sends an authentication request to the access point.
2. The access point sends challenge text to the station.
3. The station uses its configured 64-bit or 128-bit default key to encrypt the challenge text, and sends the encrypted text to the access point.
4. The access point decrypts the encrypted text using its configured WEP Key that corresponds to the station’s default key. The access point compares the decrypted text with the original challenge text. If the decrypted text matches the original challenge text, then the access point and the station share the same WEP Key and the access point authenticates the station.
5. The station connects to the network.
If the decrypted text does not match the original challenge text (the access point and station do not share the same WEP Key), then the access point will refuse to authenticate the station and the station will be unable to communicate with either the 802.11 network or Ethernet network.
I N TER N ET LO C A L ACT
12 345 67 8 LNK
LNK/ACT 100 Cable/DSLProSafe Wireless VPN Security Firewall
MODELFVM318
PWRTEST W LA N Enable
Access Point 1) Authentication request sent to AP
2) AP authenticates 3) Client connects to network
802.11b Authentication Open System Steps
Cable or DLS modem
Client attempting to connect