Introduction
Designing an RQ Experiment
Preparing Samples and Reaction Plates
Creating RQ Plate Documents and Generating Data
Analyzing and Viewing RQ Study Data
Applied Biosystems 7900HT Fast
Real-Time PCR System
Relative Quantitation
Using Comparative C
T
Getting Started Guide
N© Copyright 2007, 2010 Applied Biosystems. All rights reserved. For Research Use Only. Not for use in diagnostic procedures.
Notice to Purchaser
The Applied Biosystems 7900HT Fast Real-Time PCR System is a real-time thermal cycler covered by US patents and corresponding claims in their non-US counterparts, owned by Applied Biosystems. No right is conveyed expressly, by implication or by estoppel under any other patent claim, such as claims to apparatus, reagents, kits, or methods such as 5’ nuclease methods. Further information on purchasing licenses may be obtained by contacting the Director of Licensing, Applied Biosystems, 850 Lincoln Centre Drive, Foster City, California 94404, USA.
Trademarks
Applied Biosystems, MicroAmp, Primer Express, ABI Prism, and VIC are registered trademarks and AB (Design), Applera, Tempus, FAM, ROX, iScience, iScience (Design), and MultiScribe are trademarks of Applied Biosystems or its subsidiaries in the US and/or certain other countries.
AmpErase, AmpliTaq Gold, and TaqMan are registered trademarks of Roche Molecular Systems, Inc. SYBR Green is a registered trademark of Molecular Probes, Inc.
Microsoft and Windows are registered trademarks of Microsoft Corporation. All other trademarks are the sole property of their respective owners.
Part Number 4364016 Rev. D 06/2010
Contents
Preface
v
How to Use This Guide . . . v
How to Obtain More Information . . . vi
How to Obtain Support . . . vii
Chapter 1
Introduction
1
About the 7900HT Fast System . . . 2About Relative Quantitation Assays . . . 3
About RQ Experiments . . . 4
Before You Begin . . . 8
Chapter 2
Designing an RQ Experiment
9
Overview . . . 10Specifying the Components of an RQ Experiment . . . 10
Selecting the PCR Method . . . 12
Selecting the Chemistry . . . 13
Selecting One- or Two-Step RT-PCR . . . 14
Selecting the Probes and Primers . . . 16
Chapter 3
Preparing the Samples
and Reaction Plate
17
Preparing RNA . . . 18Converting Total RNA to cDNA . . . 19
Preparing the PCR Master Mix . . . 21
Preparing the Reaction Plate . . . 23
Post-Analysis Options . . . 45
Chapter 5
Analyzing and Viewing RQ Study Data
in RQ Manager 1.2
49
Creating an RQ Study Document . . . 50Analyzing RQ Study Data . . . 54
Analyzing and Viewing the Results of the RQ Study . . . 60
Reanalyzing an RQ Study . . . 64
Post-Analysis Options . . . 65
Appendix A
Sample Experiment
67
Sample RQ Experiment . . . 67Appendix B
SDS Automation Controller Software
73
Overview . . . 73Using the Automation Controller Software . . . 73
Appendix C
Flags and Filtering for Relative Quantitation Using
Comparative C
TPlate Documents
81
Overview . . . 81Viewing Flags . . . 82
References
85
Preface
How to Use This Guide
Purpose of This
Guide
This guide provides procedures for conducting Relative Quantitation using Comparative
CT for gene expression assays using the Applied Biosystems 7900HT Fast Real-Time
PCR System (7900HT Fast System).
Audience
This guide is written for principal investigators and laboratory staff who conduct relative quantitation for gene expression assays using the 7900HT Fast System.Assumptions
This guide assumes that you have:• Familiarity with Microsoft® Windows® XP operating system.
• Knowledge of general techniques for handling DNA and RNA samples and preparing them for PCR.
• A general understanding of the theory of relative quantitation using Comparative CT.
• A general understanding of hard drives and data storage, file transfers, and copying and pasting.
If you want to integrate the 7900HT Fast System into your existing laboratory data flow system, you need networking experience.
Text Conventions
This guide uses the following conventions:• Boldindicates user action. For example:
Type 0, then press Enter for each of the remaining fields.
• Italic text indicates new or important words and is also used for emphasis. For example:
Before analyzing, always prepare fresh matrix.
• A right arrow bracket (>) separates successive commands you select from a drop-down or shortcut menu. For example:
Select File > Open.
User Attention
Words
The following user attention words appear in Applied Biosystems user documentation. Each word implies a particular level of observation or action as described below:
Preface
How to Obtain More Information
Indicates a potentially hazardous situation that, if not avoided, may result in minor or moderate injury. It may also be used to alert against unsafe practices.
Indicates a potentially hazardous situation that, if not avoided, could result in death or serious injury.
Safety
Follow specific safety practices when using this instrument. For safety guidelines, refer to the "Safety and EMC Compliance" section in the Applied Biosystems 7900HT Fast Real-Time PCR System Site Preparation Guide (PN 4351923).You can obtain from Applied Biosystems the MSDS for any chemical supplied by Applied Biosystems. This service is available free 24 hours a day. To obtain MSDSs:
1.
Go to www.appliedbiosystems.com, click Support, then click MSDS Search.2.
In the Keyword Search field, enter the chemical name, product name, MSDS partnumber, or other information that appears in the MSDS of interest. Select the language of your choice, then click Search.
3.
Find the document of interest, right-click the document title, then select any of the following:• Open – To view the document
• Print Target – To print the document
• Save Target As – To download a PDF version of the document to a destination that you choose
For the MSDSs of chemicals not distributed by Applied Biosystems, contact the chemical manufacturer.
4.
To have a copy of the document sent by fax or e-mail, select Fax or Email to theleft of the document title in the Search Results page, then click RETRIEVE
DOCUMENTS at the end of the document list.
5.
After you enter the required information, click View/Deliver Selected DocumentsPreface How to Obtain Support
• Applied Biosystems 7900HT Real-Time PCR System Plus/Minus Getting Started Guide (PN 4364017)
• Sequence Detection Systems Software version 2.3 Online Help (SDS Online Help) • Applied Biosystems 7900HT Fast Real-Time PCR System Maintenance and
Troubleshooting Guide (PN 4365542)
• Applied Biosystems 7900HT Fast Real-Time PCR System Site Preparation Guide
(PN 4351923)
• ABI PRISM® 6100 Nucleic Acid PrepStation Users Guide (PN 4326242)
• DNA Isolation from Fresh and Frozen Blood, Tissue Culture Cells, and Buccal Swabs Protocol (using BloodPrep™ Chemistry, PN 4343586)
• High Capacity cDNA Archive Kit Protocol (PN 4312169)
• Isolation of Total RNA from Whole Blood and from Cells Isolated from Whole Blood Protocol (4332809)
• NucPrep® Chemistry Protocol: Isolation of Genomic DNA from Animal and Plant
Tissue (PN 4333959)
• PrepMan™ Ultra Sample Preparation Reagent Protocol (PN 4318925) • Primer Express® Software v3.0 Getting Started Guide (PN 4362460) • Real-Time PCR Systems Chemistry Guide (PN 4363978)
• TaqMan® Gene Expression Assays Protocol (PN 4364226) • TaqMan® Low Density Array Getting Started Guide (PN4319399) • TaqMan® Universal PCR Master Mix Protocol (PN 4351891)
• Tempus™ Blood RNA Tube and Large Volume Consumables Protocol (4345218) • Tissue RNA Isolation: Isolation of Total RNA from Plant and Animal Tissue
Protocol (4330252)
• TransPrep Chemistry Protocol: Purification of gDNA from Filtrates Obtained After the Isolation of RNA from Homogenized Animal or Plant Tissue Samples
(PN 4326965)
Send Us Your
Comments
Applied Biosystems welcomes your comments and suggestions for improving its user documents. You can e-mail your comments to:
How to Obtain Support
To contact Applied Biosystems Technical Support from North America by telephone, call 1.800.762.4001.
For the latest services and support information for all locations, go to
Preface
How to Obtain Support
• Order Applied Biosystems user documents, MSDSs, certificates of analysis, and other related documents
• Download PDF documents
• Obtain information about customer training • Download software updates and patches
1
Chapter 1
Introduction
Introduction
About the 7900HT Fast System
About Relative Quantitation Assays
Before You Begin About RQ Experiments Designing
an RQ Experiment
Preparing the Samples and Reaction Plate
Analyzing and Viewing RQ Study Data in RQ Manager 1.2 Creating RQ Plates and Generating Data
See page 3
See page 8 See page 2
Chapter 1 Introduction About the 7900HT Fast System
About the 7900HT Fast System
System
Description
The Applied Biosystems 7900HT Fast Real-Time PCR system (7900HT Fast System) uses fluorescence-based PCR chemistries to provide:
• Quantitative detection of nucleic acid sequences using real-time analysis • Qualitative detection of nucleic acid sequences using end-point and
dissociation-curve analysis
For more information on the 7900HT Fast System, refer to 7900HT Fast Real-Time PCR
System Online Help.
Note: To access the online help, select Help > SDS Online Help from the SDS software, RQ Manager software, or Automation Controller software menu bars.
Supported
Assays and
Consumables
You can perform several assay types on the 7900HT Fast System using reaction plates in
the 96-well, 384-well, and TaqMan® Low Density Array formats. This guide describes
the relative quantitation (RQ) using comparative CT assay type.
Relative
Quantitation (RQ)
Using
Comparative C
TAssay
Configuration
RQ assays are supported on the 7900HT Fast System using reaction plates in the
standard 96-well, Fast 96-well, standard 384-well, and TaqMan® Low Density Array
formats.
IMPORTANT! A Fast block, Fast reaction plates, and Fast PCR Master Mix are all required for running Fast PCR reactions.
Reaction Plate and System Block Options
Assay Type Fast
96-well
Standard 96-well
Standard 384-well
TaqMan® Low
Density Array
Standard curve (AQ) Yes Yes Yes No
Comparative CT (RQ) Yes Yes Yes Yes
Allelic discrimination No Yes Yes No
Chapter 1 Introduction About Relative Quantitation Assays
1
About Relative Quantitation Assays
Relative Quantitation (RQ) using Comparative CT determines the change in expression
of a nucleic acid sequence (target) in a test sample relative to the same sequence in a calibrator sample. The calibrator sample can be an untreated control or a sample at time zero in a time-course study (Livak and Schmittgen, 2001). For example, RQ is
commonly used to compare expression levels of wild-type alleles with mutated alleles or the expression levels of a gene in different tissues.
RQ provides accurate comparison between the initial level of template in each sample, without requiring the exact copy number of the template. Also, the relative levels of templates in samples can be determined without the use of standard curves.
Real-Time PCR
Assays
RQ assays are performed using Real-Time PCR where you monitor the progress of the PCR as it occurs (Kwok and Higuchi, 1989). Data are collected throughout the PCR process rather than at the end of the PCR process (end-point PCR).
In Real-Time PCR, reactions are characterized by the point in time during cycling when amplification of a target is first detected rather than by the amount of target accumulated at the end of PCR (Saiki et al., 1985).
There are two types of quantitative real-time PCR: absolute and relative.
Terms Used in
Quantitation
Analysis
Term Definition
Baseline The initial cycles of PCR in which there is little change in fluorescence signal.
Threshold A level of ∆Rn—automatically determined (or manually set) by the SDS software—used for CT determination in real-time assays. The level is set to be above the baseline and sufficiently low to be within the exponential growth region of the amplification curve. The threshold is the line whose intersection with the Amplification plot defines the CT.
Threshold cycle (CT) The fractional cycle number at which the fluorescence passes the threshold.
Passive reference A dye that provides an internal fluorescence reference to which the reporter dye signal can be normalized during data analysis. Normalization is necessary to correct for fluorescence fluctuations caused by changes in concentration or in volume.
Reporter dye The dye attached to the 5′ end of a TaqMan® probe. The dye
provides a fluorescent signal that indicates specific amplification. Normalized reporter
(Rn)
The ratio of the fluorescence emission intensity of the reporter dye to the fluorescence emission intensity of the passive reference dye. Delta Rn (∆Rn) The magnitude of the signal generated by the specified set of PCR
Chapter 1 Introduction About RQ Experiments
The figure below shows a representative amplification plot that includes some of the terms defined above.
About RQ Experiments
RQ Experiment
Workflow
In this document, the term “RQ experiment” refers to the entire process of relative
quantitation using comparative CT experiment, beginning with generating cDNA from
RNA (reverse transcription) through analyzing RQ data. The general workflow of an RQ experiment is shown below.
Sample RQ
Experiment
A sample experiment, representing a typical relative quantitation experiment, is
provided in Appendix A, “Sample Experiment,” on page 67. Excerpts of the sample
Rn
CT Sample
Threshold
Baseline
Cycle Number
No Template Control
0 5 10 15 20 25 30 35 40
Rn
Perform and Analyze an RQ Study Perform an
RQ Plate Run Prepare
Chapter 1 Introduction About RQ Experiments
1
The data analysis part of a single or multiple RQ assay is called an RQ Study. You can analyze up to ten RQ plates in a study. RQ study documents do not control the
instrument, nor do they provide tools for setting up or modifying plates. When adding plate results to a study, ensure that you do not combine results from different plate formats, different thermal cycling conditions, or different reaction volumes in the same RQ study.
Note: The 7900HT Fast System software uses the comparative CT method (∆∆CT) to calculate relative quantities of a nucleic acid sequence. If you want to perform
comparative CT using the relative standard curve method, you should use an AQ assay
type and refer to the Real-Time PCR Systems Chemistry Guide (PN 4363978).
Required
User-Supplied
Materials
Chemistry/Reagents
Item Source
Any of the following DNA isolation and purification chemistry systems: • ABI PRISM® 6100 Nucleic Acid PrepStation
• BloodPrep™ Chemistry (genomic DNA from
fresh or frozen blood or cells)
• NucPrep™ Chemistry (DNA from animal and
plant tissue)
• PrepMan® Ultra Sample Preparation Reagent
Kit
• High Capacity cDNA Archive Kit
• ABI PRISM® TransPrep System (purification of gDNA after the isolation of RNA from animal and plant tissue)
Applied Biosystems (PN 6100-01) Applied Biosystems (PN 4346860)
Applied Biosystems (PN 4330274)
Applied Biosystems (PN 4322547
Applied Biosystems (PN 4322171) Applied Biosystems web site
TaqMan® reagents appropriate for your probes and primers:
• TaqMan® Fast Universal PCR Master Mix (2✕),
No AmpErase UNG
• TaqMan® Universal PCR Master Mix (2✕)
• TaqMan® Universal PCR Master Mix (2✕), No
AmpErase UNG
• SYBR® Green Master Mix, 200 reactions (not for
use with TaqMan® Low Density Arrays)
• SYBR® Green RT-PCR Reagents
Applied Biosystems (PN 4352042)
Applied Biosystems (PN 4304437) Applied Biosystems (PN 4324018)
Applied Biosystems (PN 4309155) Applied Biosystems (PN 4310179)
Labeled primers and probes from one of the following sources: • TaqMan® Gene Expression Assays
(predesigned primers and probes)
• Custom TaqMan® Gene Expression Assays
service (predesigned primers and probes) • Primer Express ® Software (custom-designed
Applied Biosystems Web site (www.appliedbiosystems.com) Applied Biosystems Web site (www.appliedbiosystems.com) Contact your Applied Biosystems
Chapter 1 Introduction About RQ Experiments
Reaction Plates and Covers
IMPORTANT! Do not use MicroAmp® caps (domed) or Optical Tubes with the 7900HT
Fast System. You can use Optical Caps (PN 4323032) only on the standard 96-well
plates with the 7900HT Fast System.
Item Source
Standard 96-well reaction plates
• MicroAmp® 96-Well Optical Reaction Plate with
Barcode (code 128), 20 plates
• MicroAmp® 96-Well Optical Reaction Plate with
Barcode (code 128), 25-Pack, 500 plates Includes 25 of PN 4306737, MicroAmp® 96-Well
Optical Reaction Plates with Barcode
• MicroAmp® 96-Well Optical Reaction Plate with
Barcode (code 128) and ABI PRISM® Optical Adhesive Cover, 100 plates/100 covers Includes 100 ABI PRISM® Optical Adhesive Covers (PN 4311971) and 5 of PN 4306737, MicroAmp® 96-Well Optical Reaction Plates
with Barcode
• MicroAmp® Splash Free Support Base for
96-Well Reaction Plates, 10 bases
Applied Biosystems (PN 4306737)
Applied Biosystems (PN 4326659)
Applied Biosystems (PN 4314320)
Applied Biosystems (PN 4312063)
Optical 96-well fast plates
• Optical 96-Well Fast Thermal Cycling Plate with Barcode (code 128)
• MicroAmp® Splash Free Support Base for
96-Well Reaction Plates, 10 bases
Applied Biosystems (PN 4346906)
Applied Biosystems (PN 4312063
Standard 384-well reaction plates
• 384-Well Clear Optical Reaction Plate with Barcode (code 128), 50 plates
Applied Biosystems (PN 4309849)
• 384-Well Clear Optical Reaction Plate with Barcode (code 128), 10-Pack,
500 plates
Includes 10 of PN 4309849, 384-Well Clear Optical Reaction Plates with Barcode
Chapter 1 Introduction About RQ Experiments
1
Other Consumables and Equipment Optical adhesive covers
• ABI PRISM® Optical Adhesive Cover Starter Kit, 20 covers
Includes 20 ABI PRISM® Optical Adhesive Covers, an Applicator, and an ABI PRISM®
Optical Cover Compression Pad
• ABI PRISM® Optical Adhesive Covers, 100 covers
• ABI PRISM® Optical Adhesive Covers, 25 covers • Optical Caps, 8 Caps/Strip, 2400 Caps/300
Strips
Applied Biosystems (PN 4313663)
Applied Biosystems (PN 4311971)
Applied Biosystems (PN 4360954) Applied Biosystems (PN 4323032)
Item Source
Centrifuge with adapter for 96-well plates Centrifuge with adapter for 384-well plates Centrifuge with adapter for TaqMan® Low Density
Arrays
Major laboratory supplier (MLS) Major laboratory supplier (MLS) Major laboratory supplier (MLS)
Gloves MLS
Microcentrifuge MLS
Microcentrifuge tubes, sterile 1.5-mL MLS
Nuclease-free water MLS
Pipette tips, with filter plugs MLS
Pipettors, positive-displacement MLS
Safety goggles MLS
Chapter 1 Introduction Before You Begin
Before You Begin
Background and
Pure Dye
Calibrations
Check that background and pure-dye calibrations have been performed regularly to ensure optimal performance of the 7900HT Fast System. For more information about
background and pure dye calibrations, refer to the SDS Online Help and the Applied
Biosystems 7900HT Fast Real-Time PCR System Maintenance and Troubleshooting Guide (PN 4365542).
Accessing the
Online Help
Some steps in this chapter refer you to the SDS Online Help for more information. To
access the online help, select Help > SDS Online Help from the SDS software menu
bar.
Automation
Options
The 7900HT Fast System can run prepared reaction plates individually or in groups using the Automation Accessory with the Zymark Twister Microplate Handler. If you are not using the Automation Accessory, you must run reaction plates individually.
For clarity, this chapter only illustrates running an individual reaction plate. For
information on running multiple reaction plates, refer to Appendix B, “SDS Automation
Controller Software,” on page 73.
For information on automated operation of the 7900HT Fast System using the
Chapter 2
2
Designing an RQ Experiment
Designing an RQ Experiment
Overview
Selecting the Chemistry Selecting the PCR Method
Selecting One- or Two-Step
RT-PCR Specifying the Components of an
RQ Experiment
Selecting the Probes and Primers Preparing the
Samples and Reaction Plate
Analyzing and Viewing RQ Study Data in RQ Manager 1.2 Creating RQ Plates and Generating Data Introduction
See page 10
See page 14 See page 12 See page 10
See page 13
Chapter 2 Designing an RQ Experiment Overview
Overview
Typical RQ experiments are designed for traditional (singleplex) PCR, where a primer
pair plus a TaqMan probe or a primer pair plus a SYBR® Green binding dye are present
in a reaction. The following sections describe design decisions required for RQ experiments.
Specifying the Components of an RQ Experiment
For every sample in an RQ experiment, you must specify: • A target – The nucleic acid sequence that you are studying.
• A calibrator – The sample used as the basis for comparative results.
• An endogenous control – A gene present at a consistent expression level in all experimental sample sets. By using an endogenous control as an active reference, you can normalize quantitation of a cDNA target for differences in the amount of cDNA added to each reaction. Note that:
– Each sample type (for example, each tissue in a study comparing multiple tissues) requires an endogenous control.
– If samples are spread across multiple plates, each plate must have an endogenous control. Additionally, every plate must include an endogenous control for every sample type on the plate.
Typically, housekeeping genes such as β-actin, glyceraldehyde-3-phosphate
(GAPDH), and ribosomal RNA (rRNA), are used as endogenous controls because their expression levels tend to be relatively stable (Mullis and Faloona, 1987). • Replicate wells – For Comparative CT studies, Applied Biosystems recommends
using three or more replicate reactions per sample and endogenous control to ensure statistical significance.
For more information about these requirements, refer to the Real-Time PCR Systems
Chapter 2 Designing an RQ Experiment Specifying the Components of an RQ Experiment
2
Sample ExperimentIn the sample experiment, the objective is to compare the expression levels of seven genes in the adipose, kidney, and muscle tissue of an individual. The 7 genes of interest, including CCKAR, GH, LEPR, CLPIN1, and TGFb, PCSK1, and HL are the targets and the adipose sample serves as the calibrator.
The SDS software sets gene expression levels for the calibrator sample to 1 (log of zero). Consequently, if more gene transcript is in the target sample (kidney or muscle) than in the calibrator sample (adipose), the gene expression level of the target sample is greater than 1. Similarly, if less gene transcript is in the target sample than in the calibrator, the gene expression level in the target sample is less than 1.
Because RQ is based on PCR, the more template in a reaction, the more the PCR product and the greater the fluorescence. To adjust for possible differences in the amount of template added to the reaction, GAPDH serves as an endogenous control. Thus, expression levels of the endogenous control are subtracted from expression levels of target genes. An endogenous control is required for each tissue sample.
The experiment includes three sets of endogenous controls—one for each tissue. Also, the endogenous control for each tissue must be amplified on the same plate as the target sequences for that tissue. Finally, note that the experiment uses the singleplex PCR format, and therefore, the endogenous controls are amplified in wells different from the target wells. Four replicates of each target gene and the endogenous control gene are performed to ensure statistical significance (see below).
Note: The sample RQ experiment utilized a single plate for the entire experiment. You can also design experiments so that several samples are amplified on the same plate, as shown in the following table.
Sample Single Plate RQ Study Optional Multi-plate RQ Study
In the sample RQ experiment, multiple sample types were run on a single plate. An endogenous control for each sample type must also be included on the same plate, as shown here.
A multiple RQ plate setup example where each plate contains a single sample type (tissue). The endogenous control for each tissue should be on the same plate as the targets for that tissue.
A B C D E F G H I J K L M N O P
123456789 10 11 12 13 14 15 16 17 18 19 20 21 22 23 24
Endogenous controls (GAPDH) Target Genes Adipose Kidney Muscle GR2323 Regulus Liver_96Plate.eps GR2323 Endogenous controls (GAPDH) Target Genes Adipose GR2324 Regulus Kidney_96Plate.eps GR2324 Endogenous controls (GAPDH) Target Genes Kidney GR2325 Regulus Bladder_96Plate.eps Target Genes Muscle
Chapter 2 Designing an RQ Experiment Selecting the PCR Method
Selecting the PCR Method
Types of PCR
Methods
You can perform PCR using either of the following:
• A singleplex reaction, where a single primer pair is present in the reaction tube or well. Only one target sequence or endogenous control can be amplified per reaction. • A multiplex reaction, where two or more primer pairs are present in the reaction.
Each primer pair amplifies either a target sequence or an endogenous control.
Selection Criteria
Both methods give equivalent results for RQ experiments. To select a method for your needs, consider the following:1.
The type of chemistry you use to detect PCR products – Singleplex PCR can useeither SYBR® Green or TaqMan reagent-based chemistry. Multiplex PCR can use
only TaqMan reagent based chemistry.
Note: TaqMan Low Density Arrays are designed for singleplex PCR reactions
only. For more information on TaqMan Low Density Arrays, refer to the TaqMan
Low Density Array Getting Started Guide (PN4319399).
2.
The amount of time you want to spend optimizing and validating your experiment –Amplifying target sequences and endogenous controls in separate reactions (singleplex PCR) requires less optimization and validation than multiplex PCR.
3.
For multiplex PCR methods: the primer limitations, the relative abundance of thetarget and reference sequences (the endogenous control must be more abundant than the targets), and the number of targets in the study.
IMPORTANT! As the number of gene targets increases, the singleplex format is typically more effective than the multiplex format because less optimization is required. However,
GR2331
Target Primer Set Endogenous Control Primer Set
cDNA Singleplex PCR Multiplex PCR
Chapter 2 Designing an RQ Experiment Selecting the Chemistry
2
Selecting the Chemistry
About
Chemistries
Applied Biosystems offers two types of chemistries that you can use to detect PCR products on Real-Time instruments, as explained in the following table. Both TaqMan probe-based and SYBR Green I dye chemistries can be used for either one- or two-step
RT-PCR. For more information about these chemistries, refer to the Real-Time PCR
Systems Chemistry Guide.
Chemistry Process
TaqMan® reagents or kits
Description
TaqMan reagent-based chemistry uses a
fluorogenic probe to enable detection of a specific PCR product as it accumulates during PCR cycles.
Advantages
• Increases specificity with a probe. Specific hybridization between probe and target generates fluorescence signal.
• Provides multiplex capability. • Optimized assays available.
• Allows 5′-nuclease assay to be carried out during PCR.
• Improves detection of low-copy target gene in relation to SYBR Green I dye.
SYBR® Green I reagents
Description
Uses SYBR Green I dye, a double-stranded DNA binding dye, to detect PCR products as they accumulate during PCR cycles.
Advantages
• Economical (no probe needed) • Amplifies all double-stranded DNA
• Yields a melting profile of distinct PCR runs • Increases signal fluorescence as amplification
product length increases.
• Improves detection of low-copy target genes.
Limitations
Binds nonspecifically to all double-stranded DNA sequences. To avoid false positive signals, check for nonspecific product formation using dissociation
3′ 5′
5′
5′ 3′
3′
FORWARD
PRIMER PROBE
R = REPORTER
Q = QUENCHER
REVERSE PRIMER Q R 3′ 5′ 5′
5′ 3′
3′
5′ Q
R
Step 1: Polymerization
A reporter (R) and a quencher (Q) are attached to the 5' and 3' ends of a TaqMan probe.
Step 2: Strand Displacement
When both dyes are attached to the probe, reporter dye emission is quenched.
3′ 5′
5′
5′ 3′
3′ 5′ Q R 3′ 5′ 5′
5′ 3′
3′
5′ Q R
Step 3: Cleavage
During each extension cycle, the Applied Biosystems hot-start DNA polymerase system cleaves the reporter dye from the probe.
Step 4: Polymerization Completed
After being separated from the quencher, the reporter dye emits its characteristic fluorescence.
5′
FORWARD PRIMER
REVERSE PRIMER
Step 1: Reaction setup
The SYBR® Green I dye fluoresces when bound to double-stranded DNA.
Step 2: Denaturation
When the DNA is denatured, the SYBR® Green I dye is released and the fluorescence is drastically reduced.
Step 3: Polymerization
During extension, primers anneal and PCR product is generated.
Step 4: Polymerization completed
SYBR® Green I dye binds to the double-stranded product, resulting in a net increase in fluorescence detected by the
Chapter 2 Designing an RQ Experiment Selecting One- or Two-Step RT-PCR
Two Types of
TaqMan Probes
Applied Biosystems offers two types of TaqMan probes: • TaqMan probes with TAMRA dye as a quencher
• TaqMan MGB (minor groove binder) probes with non-fluorescent quencher (NFQ)
For more information about TaqMan probe-based chemistry, refer to the Real-Time PCR
Systems Chemistry Guide.
Selecting One- or Two-Step RT-PCR
You can perform Real-Time PCR with either reverse transcription (RT) and PCR in a single reaction (one-step) or in separate reactions (two-step).The reagent configuration you use depends on which method you select:
• In one-step RT-PCR, RT and PCR take place in one buffer system, which provides the convenience of a single-tube preparation for RT and PCR amplification.
However, Fast PCR Master Mix or the carryover prevention enzyme, AmpErase®
UNG cannot be used to perform one-step RT-PCR. For more information about
UNG, refer to the Real-Time PCR Systems Chemistry Guide.
• Two-step RT-PCR is performed in two separate reactions: First, total RNA is reverse transcribed into cDNA, then the cDNA is amplified by PCR. This method is useful for detecting multiple transcripts from a single cDNA template or for storing
cDNA aliquots for later use. AmpErase® UNG (uracil-N-glycosylase) can be used
to prevent carryover contamination.
Note: TaqMan (2✕) Universal PCR Master Mix is available with or without
AmpErase UNG. If you are using TaqMan Fast Universal PCR Master Mix (2✕),
No Amperase UNG, you must purchase AmpErase UNG separately.
IMPORTANT! This guide provides an RQ experiment which is designed using
two-step RT-PCR with TaqMan Universal PCR Master Mix (2✕). For additional
Chapter 2 Designing an RQ Experiment Selecting One- or Two-Step RT-PCR
2
Two-Step RT-PCR One-Step RT-PCR
RT Master Mix Sample RNA
Fast PCR Master Mix Archive
Results ~ 35 minutes
GR2332
RT Incubation
PCR Amplification and Detection Standard PCR Master Mix OR
Results 2 hours PCR Amplification and Detection Aliquot DNA RT Master Mix Sample RNA Standard PCR Master Mix Results 2 hours 30 minutes
GR2333
RT incubation and PCR amplification
Recommended Kits for Two-Step RT-PCR
Chemistry Step Reagent Part Number
TaqMan reagents or kits RT High Capacity cDNA Archive Kit 4322171
PCR TaqMan Universal PCR Master Mix (2✕)
TaqMan Fast Universal PCR Master Mix
(2✕), No AmpErase UNG
4304437 4352042
SYBR Green I reagents or kits RT High Capacity cDNA Archive Kit 4322171
PCR SYBR Green Master Mix 4309155
RT and PCR SYBR Green RT-PCR Reagents 4310179
Sample Experiment
Pre-made probes and primers for all the genes of interest are obtained from the TaqMan® Gene Expression Assays product
line, which uses TaqMan reagent-based chemistry. Two-step RT-PCR is performed using the reagents recommended for TaqMan reagent- or kit-based chemistry shown in the table above.
Chapter 2 Designing an RQ Experiment Selecting the Probes and Primers
Selecting the Probes and Primers
You must select primer/probe sets for your target and endogenous control sequences. Applied Biosystems provides three options for choosing primers and probes:
• TaqMan® Gene Expression Assays– Optimized, ready-to-use TaqMan
reagent-based 5′ nuclease assays for human, mouse, or rat transcripts. These assays are available as inventoried and non-inventoried assays. Note that TaqMan Low Density Arrays use inventoried assays only. For information on available primer/probe sets or to place an order, go to http://www.allgenes.com.
• Custom TaqMan® Gene Expression Assays – Design, synthesize, formulate, and
deliver quality-controlled primer and probe sets. Use this service if the assay you need is not currently available. To place an order, go to http://www.allgenes.com. • Primer Express® Software – Helps you design primers and probes for your
quantitation experiment. For information about using this software, refer to the
Primer Express® Software Version 3.0 Getting Started Guide (PN 4362460). Applied Biosystems provides quantitation assay design guidelines that provide a reliable system for assay design and optimization. For information about the assay
design guidelines, refer to the Real-Time PCR Systems Chemistry Guide.
If you ordered TaqMan® Gene Expression Assays or Custom TaqMan® Gene Expression
Assays, probes are already labeled with FAM™ as a reporter dye. If you design your own
assays, you need to specify a reporter dye for your custom probe(s). For singleplex experiments, you can use the same dye for targets and endogenous control(s). For multiplex experiments, the probe for the target is typically labeled with FAM dye and the
endogenous control with VIC® dye.
Sample Experiment
Primers and probes for all genes being studied are obtained from Applied Biosystems TaqMan® Gene Expression Assays.
Each assay consists of two unlabeled PCR primers and a FAM™ dye-labeled TaqMan® MGB probe, provided as a 20✕
assay mix. All target probes are labeled withFAM™ dye; the endogenous control is also labeled with FAM™ dye.
The following table provides the gene symbol, gene name, and Applied Biosystems Assay ID number (provided on the Web site) for the genes studied and the endogenous control.
Gene Symbol Gene Name Assay ID #
Chapter 3
3
Preparing the Samples
and Reaction Plate
Preparing the Samples and Reaction Plate
Preparing RNA
Converting Total RNA to cDNA
Preparing the Reaction Plate
Preparing the PCR Master Mix
Analyzing and Viewing RQ Study Data in RQ Manager 1.2 Creating RQ Plates and Generating Data Designing an RQ Experiment Introduction
See page 19
See page 21 See page 18
Chapter 3 Preparing the Samples and Reaction Plate Preparing RNA
Preparing RNA
Isolating RNA
Applied Biosystems supplies an instrument system and proprietary chemistries for isolating RNA from a variety of starting materials, such as blood, tissue, cell cultures, and plant material.Quality of RNA
The total RNA you use for RQ experiments should: • Have an A260/280 greater than 1.9• Be intact when visualized by gel electrophoresis • Be free of RT or PCR inhibitors
Refer to the High Capacity cDNA Archive Kit Protocol (4322169) for additional
guidelines on preparing the RNA template.
System Part Number
ABI PRISM® 6100 Nucleic Acid PrepStation 6100-01
Total RNA Chemistry Reagents:
Nucleic Acid Purification Elution Solution Nucleic Acid Purification Lysis Solution Nucleic Acid Purification Wash Solution I Nucleic Acid Purification Wash Solution II AbsoluteRNA Wash Solution (DNase treatment)
4305893 4305895 4305891 4305890 4305545 Tempus™ Blood RNA Tubes
(For collection, stabilization, and isolation of total RNA in whole blood for gene expression analysis using the 6100 PrepStation)
4342972
Isolation of Total RNA from Whole Blood and from Cells Isolated from Whole Blood Protocol
4332809
Tempus™ Blood RNA Tube and Large Volume Consumables Protocol 4345218
Tissue RNA Isolation: Isolation of Total RNA from Plant and Animal Tissue Protocol
Chapter 3 Preparing the Samples and Reaction Plate Converting Total RNA to cDNA
3
Converting Total RNA to cDNA
Using the High
Capacity cDNA
Archive Kit
Use the High Capacity cDNA Archive Kit (PN 4322171) to perform the first step (RT) in the two-step RT-PCR method. Perform the manual method for converting total RNA
to cDNA, as described in the High Capacity cDNA Archive Kit Protocol (PN 4322169).
Adjusting the Starting Concentration of Total RNA
The High Capacity cDNA Archive Kit is set up to convert 0.1 to 10 µg of total RNA to
cDNA. Make sure you convert enough total RNA so that the final concentration of total
RNA converted to cDNA is 10 to 100 ng in 5 µL for each 50-µL PCR reaction.
IMPORTANT! The protocol is not shipped with the High Capacity cDNA Archive Kit.
To access the protocol, go to http://docs.appliedbiosystems.com/search.taf.Select
ABI PRISM®6100 Nucleic Acid PrepStation in the Product list box, then click Search
at the bottom of the page. The protocol is listed under the Protocol heading.
Thermal Profile
Parameters for RT
The High Capacity cDNA Archive Kit uses the following thermal profile parameters for the RT step.
Note: Thermal cycling conditions for one-step RT-PCR are described on page 35.
Storing cDNA
After RT is complete, store all cDNA samples at − 15°C to − 25°C. To minimize repeated freeze-thaw cycles of cDNA, store cDNA samples in aliquots.CHEMICAL HAZARD. 10×RT Buffer may cause eye, skin, and respiratory tract irritation. Read the MSDS, and follow the handling instructions. Wear appropriate protective eyewear, clothing, and gloves.
Step Type Time (min) Temperature (°C)
HOLD 10 25°C
Chapter 3 Preparing the Samples and Reaction Plate Converting Total RNA to cDNA
Sample Experiment
For the example experiment, RNA is extracted from the adipose, muscle, and kidney tissues of an individual. RNA concentration is determined spectrophotometrically (using A260), and the RNA is diluted to a final concentration of 50 ng/µL. The RT reaction mix is prepared as described in the High Capacity cDNA Archive Kit Protocol.
The cDNA archive plate is then prepared by pipetting into each well: • 50 µL of the RT master mix
• 30 µL of nuclease-free water
• 20 µL of RNA sample (bringing the total starting amount of RNA to 1 µg per 100 µL reaction)
The RNA is then converted to cDNA using the thermal cycling parameters for two-step RT-PCR, as described in “Thermal Profile Parameters for RT” on page 19.
The cDNA is stored at − 20°C until use.
Component µL/Reaction µL/21 Reactions†
† Each RT reaction is 100 µL (see below). If you need 5 µL cDNA for each of 104 PCR reactions (see “Preparing the Reaction Plate” on page 23), you will need 6 RT reactions. Extra volume (enough for one additional RT reaction) is included to account for pipetting losses, as well as extra cDNA for archiving.
10✕ Reverse Transcription Buffer 10 210
25✕ dNTPs 4 84
10✕ random primers 10 210
MultiScribe™ Reverse Transcriptase, 50
U/µL
5 105
Nuclease-free water 21 441
Total 50 1050
A
B
C
D
E
F
G
H
1 2 3 4 5 6 7 8 9 10 11 12
Adipose Kidney Muscle
Chapter 3 Preparing the Samples and Reaction Plate Preparing the PCR Master Mix
3
Preparing the PCR Master Mix
The second step (PCR) in the two-step RT-PCR procedure is amplifying the cDNA. You
can use the TaqMan® Universal PCR Master Mix (2✕) reagents for a run time of
approximately 2 hours, or the TaqMan® Fast Universal PCR Master Mix (2✕), No
AmpErase UNG for a run time of approximately 35 minutes.
If you design primers and probes using Primer Express software, you must adjust their concentrations for optimal performance, with the universal assay conditions, as specified
in the applicable protocols or using the volumes listed in the tables below. All TaqMan®
Gene Expression Assays and Custom TaqMan® Gene Expression Assays are formulated
so that the final concentration of the primers and probes are within the recommended values.
Note: The reaction volumes for TaqMan® Gene Expression Assays and Custom
TaqMan® Gene Expression Assays are included on the CD which accompanies these
products.
Standard 96-Well
or 384-Well Plates
Using TaqMan
Universal PCR
Master Mix (2
✕)
The following table lists the universal assay conditions (volume and final concentration)
for using the TaqMan Universal PCR Master Mix (2✕).
CHEMICAL HAZARD. TaqMan Universal PCR Master Mix (2✕)may cause eye and skin irritation. Exposure may cause discomfort if swallowed or inhaled. Read the MSDS, and follow the handling instructions. Wear appropriate protective eyewear, clothing, and gloves.
Reaction Component µL/ Sample
96-Well Plate µ
L/ Sample
384-Well Plate Final Concentration
TaqMan Universal PCR Master Mix (2✕)
25.0 10.0 1✕
Forward primer 5.0 2.0 50 to 900 nM
Reverse primer 5.0 2.0 50 to 900 nM
TaqMan probe 5.0 2.0 50 to 250 nM
cDNA sample 5.0 2.0 10 to 100 ng
Nuclease-free water 5.0 2.0 —
Chapter 3 Preparing the Samples and Reaction Plate Preparing the PCR Master Mix
Fast 96-Well
Plates Using
TaqMan Fast
Universal PCR
Master Mix (2
✕),
no AmpErase
UNG
The following table lists the universal assay conditions (volume and final concentration)
for using the TaqMan Fast Universal PCR Master Mix (2✕).
CHEMICAL HAZARD. TaqMan Fast Universal PCR Master Mix (2✕), No AmpErase UNG may cause eye and skin irritation. Exposure may cause discomfort if swallowed or inhaled. Read the MSDS, and follow the handling
instructions. Wear appropriate protective eyewear, clothing, and glove.
Reaction Component µL/ Sample
Fast 96-Well Plates Final Concentration
TaqMan Fast Universal PCR Master Mix (2✕), No AmpErase UNG
10.0 1✕
Forward primer 2.0 50 to 900 nM
Reverse primer 2.0 50 to 900 nM
TaqMan probe 2.0 50 to 250 nM
cDNA sample 2.0 10 to 100 ng
Nuclease-free water 2.0 —
Chapter 3 Preparing the Samples and Reaction Plate Preparing the Reaction Plate
3
Preparing the Reaction Plate
Standard and
Fast Plates
IMPORTANT! Make sure that the correct block, for the plate being run, is installed in the 7900HT Fast System. Fast plates do not fit into standard blocks and standard plates do fit into fast blocks. Using a plate with the wrong block will result in damage to the plate, loss of data, or both.
To Prepare the Reaction Plate:
1.
Ensure that you have an endogenous control for each sample type (for example,each tissue in a study comparing multiple tissues) on a plate. If samples are spread across multiple plates, each plate must have an endogenous control.
2.
Into each well of a:• Standard reaction plate, add 50 µL (96-well) or 20 µL (384-well) of the appropriate PCR reaction mix
• Fast reaction plate, add 20 µL of the appropriate PCR reaction mix
3.
Seal the reaction plate with an ABI PRISM® Optical Adhesive Cover.4.
Centrifuge the plate briefly. GR2386 7900HS96 well plate comparison
For 96-well plate: 100-µL maximum reaction volume For 384-well plate: 20-µL maximum reaction volume
Fast Plates Standard Plates
Notch at top-right corner by A12
30-µL maximum reaction volume Notch at top-left corner by A1
Chapter 3 Preparing the Samples and Reaction Plate Preparing the Reaction Plate
5.
Verify that each reaction mix is positioned at the bottom of the well, as shownbelow.
IMPORTANT! If you are using TaqManFastUniversal PCR Master Mix (2✕), No
AmpErase UNG, you must start the run within 2 hours of preparing the reaction plate. The plate can be refrigerated or stored frozen if a run is not started within 2 hours of plate setup.
6.
Keep the reaction plates on ice until you are ready to load them into the Zymark®Twister Microplate Handler.
Correct Position Incorrect Positions
The reaction mix is at the bottom of the well.
The reaction mix lies on the side wall; the plate was not centrifuged.
An air bubble is at the bottom of the well because the plate was not centrifuged with sufficient force or for sufficient time.
Chapter 3 Preparing the Samples and Reaction Plate Preparing the Reaction Plate
3
CHEMICAL HAZARD. TaqMan Universal PCR Master Mix(2✕) may cause eye and skin irritation. Exposure may cause discomfort if swallowed or
inhaled. Read the MSDS, and follow the handling instructions. Wear appropriate protective eyewear, clothing, and gloves.
Sample Experiment
Primers and probes for the example RQ experiment are obtained from the TaqMan Gene Expression Assays product line and are provided as a 20✕ Gene Expression Assay Mix. The PCR reaction mix is prepared as follows:
Samples and endogenous controls are arranged on one plate as shown below. 20 µL of PCR master mix containing cDNA are added to each well.
The reactions are kept on ice until the plates are loaded onto the 7900HT Fast System.
PCR Reaction Component µL/
Sample µL/ 5 Reactions
‡
‡ 24 master mixes are prepared, one for each of the 7 target genes (and each of the 3 samples) plus the endogenous control. Volume for five reactions (4 replicates plus extra) to account for pipetting losses.
Final Concentration
TaqMan Universal PCR Master Mix (2✕) 10.0 50.0 1✕
20✕ Gene Expression Assay Mix†
† Contains forward and reverse primers and labeled probe.
1.0 5.0 1✕
cDNA sample 2.0 10.0 50 ng (for the 50-µL reaction)
Nuclease-free water 7.0 35.0 —
Total 20.0 100.0 —
A B C D E F G H I J K L M N O P
1 23 4 5 67 8 9 10 11 12 13 14 15 16 17 18 19 20 21 22 23 24
Endogenous controls (GAPDH) Target Genes Adipose Kidney Muscle
Chapter 3 Preparing the Samples and Reaction Plate Preparing the Reaction Plate
Chapter 4
4
Creating RQ Plates
and Generating Data
Creating RQ Plates and Generating Data
About RQ Plate Documents
Performing an RQ Run
Analyzing and Viewing the RQ Data
Post-Analysis Options Reanalyzing Data
Analyzing and Viewing RQ Study Data in RQ Manager 1.2 Designing an RQ Experiment Introduction
Preparing the Samples and Reaction Plate
See page 40
See page 45 See page 28
See page 35
Chapter 4 Creating RQ Plates and Generating Data About RQ Plate Documents
About RQ Plate Documents
Creating Plate
Documents
Every RQ reaction plate must have a corresponding RQ Plate document. An RQ Plate document stores data collected from an RQ run (for a single reaction plate) including sample names and detectors.
This chapter describes how to create a new plate document using the New Plate Wizard.
Refer to Help > SDS Online Help for other methods of creating new plate documents.
Reaction Plate
Options
The RQ assay can be run on standard 96-well, fast 96-well, standard 384-well, and TaqMan Low Density Array reaction plates. For clarity, this chapter only illustrates the running of a standard 384-well reaction plate.
Run Setup
Requirements
For each RQ plate document that you create, specify detectors, endogenous controls, and detector tasks:
• A detector is a virtual representation of a gene-specific nucleic acid primer and probe combination used in assays. You specify which detector to use for each target sequence.
IMPORTANT! To compare data from multiple reaction plates in a study, all the plates in the study must contain a common set of detectors.
• An endogenous control(s) is defined in “Selecting the Chemistry” on page 13. If
your experiment consists of multiple plates, each plate must have at least one endogenous control with at least three replicates. If your experiment consists of a single plate with multiple samples, you must have an endogenous control for each sample. All plates in an RQ experiment must use the same endogenous control (for example, GAPDH).
• A detector task specifies how the software analyzes the data collected from a well during analysis. You apply one of two tasks to each detector in each well of an RQ plate document.
Detector Task Symbol Apply to well that contain...
Target Target sequences.
Chapter 4 Creating RQ Plates and Generating Data About RQ Plate Documents
4
Creating an RQ Plate Document
You can enter sample information into a new plate document, import sample information from existing plate documents, or use a template document to set up new plate documents. This section describes setting up new plate documents using the plate wizard to
manually enter sample information. Refer to the SDS
Online Help for information about importing sample information or using template documents.
To create a new plate document:
1.
Double-click .2.
If your System Administrator has enabled thelogin option, the Login dialog box appears. Enter
your User Name and Password, then click OK.
Note: If the login option is not enabled, no Login dialog box appears. Skip to step 3 below.
3.
Click or select File > NewPlate Wizard toopen the Create Plate Document Wizard.
4.
Select the assay type:a. Select ∆∆Ct (RQ). Note that you can choose to add the document to the automation queue.
b. Click Next >.
4a 4
Chapter 4 Creating RQ Plates and Generating Data About RQ Plate Documents
5.
Enter the plate information:a. Select your Plate Type.
IMPORTANT! You cannot use RQ Plate documents for AQ assays and vice versa. The information stored in AQ and RQ Plate documents is not interchangeable.
b. Optional. In the barcode field, scan or (or manually enter) the plate barcode. If you are
using the Zymark® Twister Microplate
Handler and are running more than one
plate, click the checkbox box next to Add
document to automation queue. The Automation Controller software will automatically pull up the plate document information.
Note: A barcode is also required if you are adding the plate document to the automation queue.
c. Select to Create Document From your
preferred source.
Note: You can create a blank plate
document or use existing information from a template or setup file. For more
information on other methods of creating
plate documents, refer to the SDS Online
Help.
d. Click Next >.
6.
Enter the samples to use in the plate:Note: Samples can be added from an Existing
5a
Chapter 4 Creating RQ Plates and Generating Data About RQ Plate Documents
4
Note: To remove a sample, select the sample by clicking on it, then click Clear Selected.
7.
Enter detectors to use in the plate document.Note: Detectors can be added from an Existing Plate document, the Detector Manager, or an Assay Information File. To add detectors using
these options, see SDS Online Help.
a. Click Create Detectors to open the Add
Detector dialog box.
b. In the Add Detector dialog box, enter a
name for the detector (for example CCKAR).
IMPORTANT! The name of the detector must be unique and should reflect the target locus of the assay (such as GADPH). Do not use the same name for multiple assays. c. Optional. Click in the Group field, then
assign a group name to the detector. d. Optional. Click in the Description field,
then enter a brief description of the detector. e. Optional. Leave the AIF Assay ID field
blank. For more information on Assay Information Files (AIF), refer to SDS Online Help.
7a
7b
7f 7g
Chapter 4 Creating RQ Plates and Generating Data About RQ Plate Documents
f. Select the appropriate dyes for the detector in the Reporter and Quencher
drop-downlists. Select TAMRA as the quencher
for TaqMan probes and None for TaqMan
MGB probes.
Note: If the dye you want to use does not appear in the list, from the menu bar select
Tools > Dye Manager to add the dye. Note that your instrument must also be calibrated for that dye. For more information on using
the Dye Manager, refer to SDS Online Help
for more information.
g. Click the Color box to open the Select Detector Color dialog box, then select a color to represent the detector. Click OK to return to the Add Detector dialog box. h. Optional. Enter any comments for the
detector in the Notes field.
i. Click OK. The SDS software saves the new
detector and displays it in the Detectors to Use in Plate pane of the wizard.
j. To create additional detectors, repeat steps a
throughstep h.
Note: To remove a detector from the Detectors to Use in Plate pane, select the detector, then click Clear Selected. k. Click Next >.
8.
Specify the samples, detectors, and tasks for each well.Chapter 4 Creating RQ Plates and Generating Data About RQ Plate Documents
4
a. From the Plate Layout drop-down list,
select Individual Wells. Refer to the SDS Online Help for more information on plate layout options.
IMPORTANT! If you change the plate layout after assigning samples or detectors to the wells, all assignment are cleared from the plate grid.
b. Select the Add Samples and Detectors tab.
c. Click on a well (or group of wells, for replicates) to select it. To select all wells, click in top left corner of the grid.
d. Check the appropriate detector name(s), for
the selected well(s), in the Detectors in Selected Wells pane. Note that a “d” appears in the selected well(s).
e. Check the appropriate sample name for the
selected well(s) in the Samples in Selected Wells pane. Note that an “s” appears in the selected well(s).
f. Click into the Task field (next to each detector) to assign the detector task.
g. Assign samples and detectors for the
remaining wells (repeat steps 8c through
8f).
h. Optional. Click on the Well Inspector tab to review your plate setup.
Note: You can change the sample setup information (sample name, detector, task) after a run is complete.
9.
Click Finish. The Create Plate DocumentWizard closes and a new RQ plate document appears in the main SDS software window. If your experiment does not use all the wells on a
8c 8a 8b
Chapter 4 Creating RQ Plates and Generating Data About RQ Plate Documents
plate, do not omit the wells from use at this point. You can omit unused wells after the run. For information about omitting unused wells, refer to the SDS Online Help.
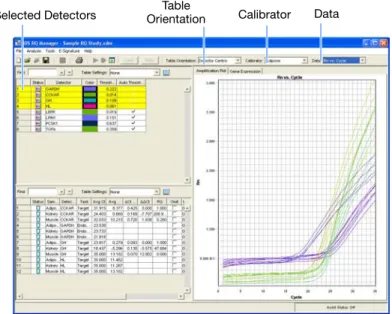
Sample Experiment
In the example RQ experiment, the samples for each of the three tissues (adipose, kidney, and muscle) are loaded on one plate.
Because the experiment is singleplex, the reaction in each well detects only one sequence—either a target sequence or endogenous control—in each well. Each well is associated with a detector (indicated by the colored squares). Additionally, each well is assigned a detector task Target or Endogenous Control.
The figure below shows the example RQ Plate document after sample names, detectors, and detector tasks are assigned for each well in the plate.
Sample Name
Detector Name, Detector Color, and Task Well Color
Chapter 4 Creating RQ Plates and Generating Data Performing an RQ Run
4
Performing an RQ Run
Verifying Default
Thermal Cycling
Conditions for
PCR
If you selected the two-step RT-PCR method for your RQ experiment (recommended), you have already completed the RT step. At this point in the workflow, you are ready to PCR amplify cDNA.
The default thermal cycling conditions for the PCR step of the procedure, shown in the following table, should appear in the Instrument > Thermal Profile tab.
Note: For information on thermal cycling conditions and parameters for TaqMan Low
Density Arrays, refer to TaqMan® Low Density Array Getting Started Guide (PN
4319399).
Standard 96-Well Standard 384-Well Fast 96-Well
Sample Volume (µL): 50 Sample Volume (µL): 20 Sample Volume (µL): 20
Standard Default Times and Temperatures (Two-step RT-PCR)
1) RT Step
HOLD HOLD * For reference only.
RT is complete at this point. 10 min @ 25°C 120 min @ 37°C
Standard Thermal Cycling Conditions
2) PCR Step
Initial Steps PCR (Each of 40 cycles)
AmpErase® UNG
Activation
AmpliTaq Gold® DNA
Polymerase Activation
Melt Anneal/
Extend
HOLD HOLD CYCLE
Chapter 4 Creating RQ Plates and Generating Data Performing an RQ Run
Thermal Cycling
Conditions for
One-Step RT-PCR
(Standard 96-Well
Plates)
If you select the one-step RT-PCR method, cDNA generation and amplification take place simultaneously at this point in the workflow.
The following table shows the thermal cycling conditions for one-step RT-PCR experiments.
Note: Refer to the SDS Online Help for instructions on modifying thermal cycling parameters.
Fast Default Times and Temperatures (Two-step RT-PCR)
1) RT Step
HOLD HOLD * For reference only.
RT is complete at this point. 10 min @ 25°C 120 min @ 37°C
Fast Thermal Cycling Conditions
2) PCR Step
Fast Conditions
Enzyme Activation Melt Anneal/Extend
HOLD CYCLE
20 sec @ 95°C 1 sec @ 95°C 20 sec @ 60°C
Times and Temperatures (One-step RT-PCR)
Initial Steps PCR (Each of 40 Cycles)
Reverse Transcription AmpliTaq® Gold DNA
Polymerase Activation
Melt Anneal/Extend
HOLD HOLD CYCLE
Chapter 4 Creating RQ Plates and Generating Data Performing an RQ Run
4
Modifying
Settings for
TaqMan
®Universal PCR
Master Mix, No
AmpErase
®UNG
In the Thermal Profile tab, delete the default Stage 1 by clicking inside the stage to select it (the ramp line turns red), then click Delete Step.
Saving the Plate
Document
To save the new plate document.
1.
Select File > Save As to open the Save As dialog box.2.
In the Save In field, navigate to and select a directory to save the plate document.3.
In the File name field, enter a file name for the plate document.4.
From the Files of type drop-down list, select SDS 7900HT Document (*.sds), thenclick Save.
5.
Optional. If you want to use this plate setup again, you can save it as a template. Select File > Save As, type a File name, then select Files of type: (*.sdt).Chapter 4 Creating RQ Plates and Generating Data Performing an RQ Run
Starting the Run
Before starting the run:1.
Verify that:• For two-step RT-PCR – The default PCR thermal cycling conditions are set. • For one-step RT-PCR, you set the thermal cycling parameters as shown in
“Thermal Cycling Conditions for One-Step RT-PCR (Standard 96-Well Plates)” on page 36.
• Sample volume is correct.
• Correct run mode is selected: Standard, Fast, or 9600 Emulation. Note: When Standard mode is selected, the SDS software uses the 9700 thermal cylcer ramp rate in the 7900HT Fast System for standard PCR reactions. When Fast mode is selected, the SDS software uses the fastest available ramp rate of the 7900HT Fast System for fast PCR reactions. When the 9600 Emulation mode is selected, the SDS software reduces the 7900HT Fast System ramp rate to match that of the 9600 thermal cycler in the
ABI PRISM® 7700 Sequence Detection System.
Note: If you are using SYBR Green I reagent chemistry and you want to determine if there is contamination or if you want to determine the dissociation temperature, create a separate Dissociation assay or template. Refer to the SDS Online Help for more information.
2.
To run an individual plate:a. Select the Instrument > Real-Time tab.
b. Click Connect to Instrument to connect the plate document to the instrument.
Chapter 4 Creating RQ Plates and Generating Data Performing an RQ Run
4
f. Optional. View the data generated in real-time during the amplification run:
3.
To run multiple plates, using the Automation Accessory, see Appendix B, “SDSAutomation Controller Software,” on page 73.
After the run, the status values and buttons are grayed-out, the Analysis button ( ) is
enabled (turns green).
All data generated during the run are saved to the RQ Plate document that you specified in step 2 on page 37.