ImageServer
Technical Note
Operating Environment: Windows 2000/2003 Server Software Version: 6.1
Contents
1 Introducing ImageServer 5
1.1 Overview . . . 6
1.2 Installing ImageServer . . . 6
1.3 Starting ImageServer . . . 7
1.4 User Guide Conventions. . . 7
2 Using ImageServer 9 2.1 About ImageServer. . . 10
2.2 Configuring ImageServer . . . 10
2.2.1 Configuration Options . . . 11
2.3 Managing ImageServer. . . 12
2.3.1 Activating . . . 12
2.3.2 View Log . . . 13
2.3.3 Windows Service . . . 13
A Image Formats 15 A.1 Image Formats . . . 16
1
Introducing
ImageServer
This chapter provides an overview on installing and using ImageServer. The following topics are covered:
!
Overview!
Installing ImageServer!
Starting ImageServer!
User Guide ConventionsChapter 1: Introducing ImageServer
6 ImageServer
1.1
Overview
ImageServer is a component of the Create!form® Distributed Output Management (DOM) system. The ImageServer utility converts image file into Encapsulated PostScript format (.eps), which can be used as subforms by other Create!form components. ImageServer can be configured to produce additional output formats required to support earlier releases of Create!form products.
ImageServer works by watching a specified directory and converting the files in that directory according to the current configuration settings. Multiple ImageServer configurations can be defined, each with different input and output settings to cater for the requirements of each of the Create!form components that handle image files.
1.2
Installing ImageServer
The Create!form installation CD contains the ImageServer application which is installed on the Windows e-forms server.
Requirements
The following is required to install ImageServer: • Create!form installation CD.
• Microsoft Windows 2000/2003 Server. • Approximately 10 Mb free disk space.
• It is recommended you install ImageServer on the same machine as Create!form Server.
Installation
To install ImageServer:
1. Log on as a user with administrator rights. 2. Insert the CD.
The installation screen should be displayed automatically.
If it is not started automatically, run the CForm.exe program located in the root directory of the CD.
3. Click Install Products, then choose Utilities, and then ImageServer. The ImageServer installation program will be started.
1.3 Starting ImageServer
4. Continue through the installation program by pressing Next, and follow the on— screen instructions. Once installation is complete, you will return to the Install Products screen.
5. Continue installing additional products if required, or click Main Menu to finish.
6. From the Main menu, click Exit to close the Create!form install program.
1.3
Starting ImageServer
To start ImageServer:
• From the Windows Start menu, select
Programs!Create!form!Utilities!ImageServer.
1.4
User Guide Conventions
Section headings are listed at the front of each chapter to assist you in finding the relevant information. In the electronic version of this document, clicking on these and other cross references will take you to the appropriate section. The following typographical conventions are used:
Convention Convention Usage
Bold Screen items, dialog options and buttons.
"
Short-cut reference to a chapter or section within this document.Click on the shortcut to go to the reference.
Italic References to other online manuals and technical notes.
Screen text Commands entered by a user.
\Folder Path names, directories and file names, e.g. C:\Program Files
KEY
Keyboard keys. Two or more keys separated by the + symbol indicates that the first key or keys should be held down while pressing the last key, e.g. SHIFT+F1 means hold down the SHIFT
key while pressing the F1 key.
Additional information relating to the topic.
Chapter 1: Introducing ImageServer
8 ImageServer
Item!Sub-Item Menu selection; i.e. select the menu Item and then select the Sub-Item from the drop-down list, e.g. File!New.
Numbering (1.) Step-by-step procedures. To perform an action, follow these instructions in the sequential order given.
2
Using ImageServer
This chapter describes how to configure and manage ImageServer. The following topics are covered:
!
About ImageServer!
Configuring ImageServer!
Managing ImageServerChapter 2: Using ImageServer
10 ImageServer
2.1
About ImageServer
ImageServer is used by Create!form components to convert image files to Create!form subform files of the type:
• .eps subforms (Create!form version 6)
• .frm subforms preview files (Create!form version 2.7 and 3.1) • .hst subforms (Create!form version 2.7 and 3.1)
The conversion works by Create!form components writing image files to ImageServer watch directories, from where they are converted according to specified configuration settings.
2.2
Configuring ImageServer
Multiple configurations can be used to perform different image conversions. For example, you can add a configuration that will only convert JPEG files from a watch directory, and another to convert TIFF files from the same or a different watch directory, with each configuration writing the subforms to different directories.
To add a configuration
1. Click Add.
The Add New Configuration dialog will be displayed. 2. Select the configuration options (
"
Section 2.2.1). 3. Click Save.To delete a configuration
1. Select the configuration you want to delete. 1. Click Delete.
To edit a configuration
1. Select the configuration you want to edit. 2. Click Edit.
The Edit Configuration dialog will be displayed. 3. Select the configuration options (
"
Section 2.2.1). 4. Click Save.2.2 Configuring ImageServer
2.2.1
Configuration Options
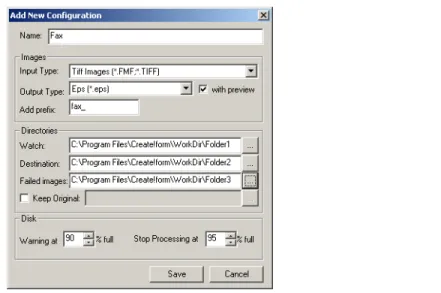
The image, directory and disk options for a configuration are displayed in either the Add New Configuration and Edit Configuration dialogs (
"
Section 2.2); the options on both dialogs are identical:Figure 2-1: Add New Configuration dialog
The configuration dialog options are detailed below:
Name
The name of the configuration.
Images
• Input Type
Select the type of image file to be converted. • Output Type
Select the type of subform file (EPS or HST) to be created. • with preview (HST output type only)
Determines if the preview portion of the image (.frm) is created with the (.hst) subform image. If selected, HST output type will produce both .hst and .frm files. The .hst_ps file is used in production, and the .frm file is used when viewing the subform in the form project. If cleared, only the .hst file is created.
Chapter 2: Using ImageServer
12 ImageServer
• Add prefix
Adds a prefix to the filename of the converted image to cater for invalid PostScript filenames. The prefix will be added to all converted files, including the .eps files.
Directories
• WatchClick the Browse button to select the watch directory for this configuration. • Destination
Click the Browse button to select the directory where the converted subform files will be saved.
• Failed images
Click the Browse button to select the directory where image files that fail to be converted will be saved.
• Keep Original
If cleared, the input image file will be deleted. To keep the original, select the checkbox and click the Browse button to select the directory where the original files will be stored.
Disk
• Warning at ... % full
The disk space limit at which warning messages will be sent to the log file. • Stop processing at ... % full
The disk space limit at which processing input files will be terminated. If reached, processing will terminate after the current image has been converted.
2.3
Managing ImageServer
2.3.1
Activating
Each configuration is activated by selecting the check box beside the configuration name. When conversion is currently in progress, clearing the configuration will stop the processing after the current image has been completed.
If these images are being called through the variable subform object, then a user variable will be required to concatenate the same prefix to the data variable.
2.3 Managing ImageServer
2.3.2
View Log
A log file is created for each configuration: Log filename: ImgServer_<configuration name>.log Log file directory: <Create!form install directory>\Temp
To view the log file:
1. Select the configuration in the ImageServer window. 2. Click View Log.
The log file will be displayed in the Create!form Log Viewer utility program.
2.3.3
Windows Service
ImageServer uses a Windows service program, CfService, that manages the conversion process. Initially, this service is set to a Local System account.
As CfService is used by other Create!form modules, such as Create!archive, Create!email, Create!fax, a different profile is passed by each module to CfService. CfService will then use this profile when processing various documents.
Chapter 2: Using ImageServer
14 ImageServer
To start CfService:
• From the Windows Start menu, select
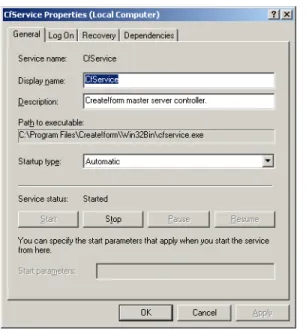
Control Panel!Administrative Tools!Services. The CfService Properties dialog will be displayed.
Figure 2-2: CfService Properties dialog
If you need to access a remote server for both the watch and destination locations of the images, a different profile is required. When specifying a different profile, you must supply the Windows System logon details. If not defined, then CfService will either use the Local System account, or the profile that was set to start the service. When defined, the Windows System account is used for all configurations.
To use a different profile:
1. Click the Windows ID button.
The Windows System Logon Details dialog will be displayed.
2. Type the system logon details in the Logon as user, Domain and Password. 3. Click OK.
A
Image Formats
This appendix provides a reference to the image formats supported by ImageServer. The following topics are covered:
Appendix A: Image Formats
16 ImageServer
A.1 Image Formats
The following image formats are supported by Create!send:
Format Extension
Windows Bitmap BMP PC Paintbrush (multi-page) DCX CAD Data Exchange File DXF Encapsulated PostScript EPS FlashPix Eastman Kodak FPX FMF Faxman Group3 TIFF TIF CompuServe GIF GIF GEM raster image IMG
JPEG JPG
JPEG 2000 JP2 Kodak PhotoCD PCD PC Paintbrush PCX Portable Network Graphics PNG TrueVision Targa TGA Tagged Image File Format TIFF Windows Metafile Format WMF WordPerfect Graphic WPG
Index
.eps, 10
.eps subforms, 10 .frm, 10, 11
.frm subform preview files, 10 .hst, 10, 11
.hst_ps subform preview files, 10
A
about ImageServer, 10 activating, 12
add a configuration, 10
B
BMP, 16
C
CAD Data Exchange File, 16 CForm.exe, 6
CfService, 13 CompuServe GIF, 16 configuration options, 11 configurations, 10
configuring ImageServer, 10 conventions for user guide, 7 Create!form Log Viewer, 13 Create!form subform files, 10
D
DCX, 16
delete a configuration, 10 delete input file, 12 destination directory, 12 different profile, 14 disk space limit, 12 DXF, 16
E
edit a configuration, 10 Encapsulated PostScript, 16 EPS, 16
F
failed images, 12
FlashPix Eastman Kodak, 16 FMF Faxman Group3 TIFF, 16 FPX, 16
G
GEM raster image, 16 GIF, 16
I
IMG, 16 Input Type, 11 installing, 6
invalid PostScript filenames, 12
J
JP2, 16 JPEG, 16 JPEG 2000, 16 JPG, 16
K
keep original, 12 Kodak PhotoCD, 16
18 ImageServer Index
L
Local System account, 13, 14 log file, 13
log file directory, 13 log filename, 13
O
Output Type, 11 overview, 6
P
PC Paintbrush, 16 PCD, 16
PCX, 16 PNG, 16
Portable Network Graphics, 16 prefix, 12
preview file, 11
R
remote server, 14 requirements, 6
S
stop processing input files, 12 subforms, 11
T
Tagged Image File Format, 16 TGA, 16
TIF, 16 TIFF, 16
TrueVision Targa, 16
U
user guide shortcuts, 7
V
variable subform, 12 View Log, 13
W
warning messages, 12 watch directory, 6, 10, 12 Windows Bitmap, 16 Windows ID, 14
Windows Metafile Format, 16 Windows service, 13
Windows System logon details, 14 WMF, 16
WordPerfect Graphic, 16 WPG, 16