Standard V6/V7
Administrator's Guide
Version 20.19.0.23
MyPBX Standard V6/V7 Administrator's Guide
Table of Contents
1. Introduction ... 5 1.1 Features ... 5 1.2 Hardware Specifications ... 6 1.2.1 Exterior Appearance ... 6 2. System Setup ... 7 2.1 Connection Drawing ... 72.2 Connecting Ethernet Line ... 8
2.3 Supplying Power ... 8 3 Administrator Login ... 9 4 Status ... 12 4.1 Line Status... 12 4.1.1 Extension Status ... 12 4.1.2 Trunk Status ... 13 4.2 System Status ... 14 4.2.1 System Info ... 14 4.2.2 Network Status ... 15 5 System... 16 5.1 Network Preferences ... 16 5.1.1 LAN Settings ... 16 5.1.2 WAN Settings ... 18 5.1.3 DHCP Server ... 19 5.1.4 VLAN Settings ... 20 5.1.5 VPN Settings ... 22 5.1.6 DDNS Settings... 23 5.1.7 Static Route ... 24 5.2 Security Settings ... 25 5.2.1 Security Center... 25 5.2.2 Firewall Rules ... 26 5.2.3 IP Blacklist ... 29 5.2.4 AMI Settings ... 30 5.2.5 Database Grant ... 30 5.2.6 Alert Settings ... 31 5.3 LDAP Server ... 34 5.3.1 LDAP Server ... 34 5.4 Storage Management ... 35 5.4.1 External Storage ... 35 5.5 System Preferences... 38 5.5.1 Password Settings ... 38
5.5.2 Date and Time ... 40
5.5.3 Firmware Update ... 40
5.5.4 Backup and Restore ... 41
5.5.6 Hot Standby ... 42 6 PBX ... 45 6.1 Extensions ... 45 6.1.1 FXS/VoIP Extensions... 45 6.1.2 Phone Provisioning ... 56 6.2 Trunks ... 65 6.2.1 Physical Trunk ... 65 6.2.2 VoIP Trunk ... 73
6.3 Outbound Call Control ... 82
6.3.1 Outbound Routes ... 82
6.3.2 Speed Dial Settings ... 85
6.4 Inbound Call Control ... 86
6.4.1 IVR ... 86 6.4.2 Ring Groups ... 89 6.4.3 Queues ... 91 6.4.4 Conferences ... 95 6.4.5 Inbound Routes ... 96 6.5 Audio Settings ...102 6.5.1 Custom Prompts ... 102
6.5.2 Music on Hold Prompts ... 104
6.5.3 System Prompts Settings ... 105
6.6 Basic Settings ...106 6.6.1 General Preferences ... 106 6.6.2 Business Hours ... 109 6.6.3 Feature Codes ... 110 6.6.4 Voicemail Settings ... 114 6.7 Advanced Settings ...117 6.7.1 SIP Settings ... 117 6.7.2 IAX Settings ... 124 6.7.3 Blacklist ... 125 6.7.4 Callback Settings ... 126 6.7.5 DNIS Settings ... 128 6.7.6 DISA ... 128
6.7.5 PIN User Settings ... 129
6.7.8 PIN Settings ... 131 6.7.9 Paging Groups ... 131 6.7.10 SMS Settings ... 133 6.7.11 Certificates ... 135 7 Reports ...136 7.1 Call Logs ...136 7.2 System Logs ...136 8 Logout ...137 9. Use MyPBX ...138
9.1.1 Sample Routing via VoIP Trunk ... 139
9.2 Incoming call ...142
9.2.1 Sample Routing to an IVR ... 142
APPENDIX A FAQ ...144
APPENDIX B MyPBX Security Configuration Guide ...145
0. Security Center*...145
1. Ports and password enhancement ...146
1.1 Web GUI (HTTP) ... 147
1.2 Extension ... 148
2. Firewall configuration ...151
3. Service security ...160
3.1 Disable Guest Call ... 160
3.2 SSH access enhancement ... 161
3.3 AMI settings* ... 163
3.4 TFTP* ... 165
3.5 Database Grant* ... 165
3.6 Alert settings ... 167
4. International call limit ...169
4.1 Limit call credit at provider side... 169
4.2 Set password for international call ... 169
4.3 Disable international call in MyPBX... 171
APPENDIX C How to Configure External Storage ...174
APPENDIX D How to Configure NAT Setting ...176
APPENDIX E How to Use Auto Provision ...178
APPENDIX F How Do I Configure Distinctive Ring Tones...182
APPENDIX G How to Use Email to SMS ...184
APPENDIX H How to Use DID ...186
APPENDIX I How to Use BLF Key to Choose the PSTN line ...190
APPENDIX J How to Use TLS in MyPBX ...191
J.1 How to register IP phones to MyPBX via TLS ...191
J.2 How to register SIP trunk to VoIP provider via TLS ...214
1. Introduction
MyPBX
—IP-PBX for Medium Businesses/Home Office
MyPBX is a standalone embedded hybrid PBX for small businesses and remote branch offices of larger organizations (1-100 users per site). MyPBX also offers a hybrid solution (a combination of VoIP applications using legacy telecom equipment) alternative for enterprises who are not yet ready to migrate to a complete VoIP solution.
Note: This guide applies to MyPBX Standard V6/V7; the hardware pictures in this document are for MyPBX Standard V7.
1.1 Features
● Alert ● HTTPS
● Auto-provision ● Integrated built-in packet capture tools ● Blacklist ● Interactive Voice Response (IVR)
● BLF Support ● Intercom/Zone Intercom
● Blind Transfer ● L2TP
● Call Back ● LDAP
● Call Detail Records(CDR) ● Mobility Extension ● Call Forward ● Multiple administrators
● Call Parking ● Music On Hold
● Call Pickup ● Music On Transfer
● Call Recording ● Open VPN
● Call Routing ● Paging/Zone Paging
● Call transfer ● PIN Users
● Call Transfer ● PPPoE
● Call Waiting ● QoS
● Caller ID ● Queue
● Conference ● Ring Group
● Database Grant ● Route by Caller ID
● DDNS ● Security Center
● Define Office Time ● Skype Integration (Skype Connect)
● Dial by Name ● Speed Dial
● DIDs ● Spy functions
● Direct Inward System Access (DISA) ● Static Route ● Distinctive Ringtone ● T.38
● Do Not Disturb(DND) ● Three-way Calling
● Follow me ● WAN
For more info, please click: http://www.yeastar.com/Products/MyPBX.asp
1.2 Hardware Specifications
1.2.1 Exterior Appearance
Front PanelFigure 1-1 MyPBX Standard V7 Front Panel
No. Identification
① Green LED indicates correct power is being supplied to the unit ② Green LED indicates the MyPBX is fully functional.
③ Green LED indicates stable WAN Port connection ④ Green LED indicates stable LAN Port connection ⑤ Red LED indicates presence of an FXO/GSM port.
Orange LED indicates presence of a BRI port. Green LED indicates presence of an FXS port.
LED Blinking- Red blinking: No connection between FXO port and PSTN
Alternately blinks Red and Green: FXO port has an incoming call. Alternately blinks Red and Green fast: FXO port is in a call. Alternately blinks Green and Red: FXS port is ringing. Alternately blinks Green and Red fast: FXS port is in a call.
2. System Setup
2.1 Connection Drawing
2.2 Connecting Ethernet Line
MyPBX provides two 10/100M Ethernet ports with RJ45 interface and LED indicator. Plug Ethernet line into MyPBX‘s Ethernet port, and then connect the other end of the Ethernet line with a hub, switch, router, LAN or WAN. Once connected, check the status of the LED indicator. A yellow LED indicates the port is in the connection process, and a green LED indicates the port is properly connected.
2.3 Supplying Power
MyPBX utilizes the high-performance switch power supply, which supplies the required power for the unit.
AC Input: 100~240V DC Output: 12V, 5A
Please follow the steps below to connect MyPBX unit to a power outlet:
1. Connect the small end of the power cable to the power input port on the MyPBX back panel, and plug the other end of the cable into a 100V AC power outlet.
2. Check the Power LED on the front panel. A solid green LED indicates that power is being supplied correctly.
3 Administrator Login
From your web browser, input the IP address of the MyPBX server.
If this is the first time you are configuring MyPBX, please use the default settings as below (your PC should be in the same local network with MyPBX):
IP Address: http://192.168.5.150
Note: MyPBX supports multiple administrators in hierarchical mode (Administrator, General Manager, CDR Manager)
·Administrator Has all the authority.
Username: admin, Password: password ·General Manager
Has basic authority; without the advanced authority to create VoIP trunks, reset, update, backup and restore MyPBX.
Username: user, Password: password
You should enable this account before you use it. ·CDR Manager
Only has the authority to check the call recordings. Username: cdr, Password: password
In this example, the IP address is 192.168.5.148.
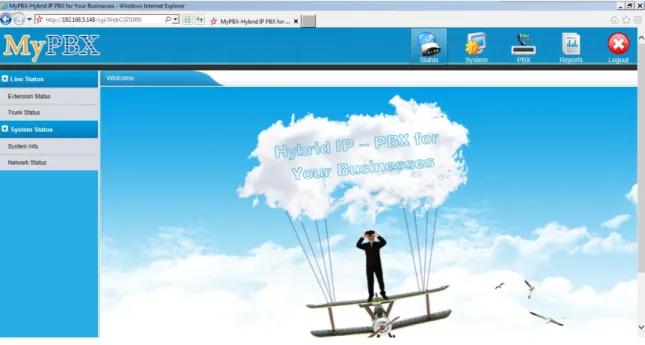
This is the welcome page of MyPBX Standard V7 after successful login.
Figure 3-2 Welcome Page
You can also login via HTTPS protocol
Like https://192.168.5.147 , you will see a prompt that is a certificate problem. Click ―Continue to …‖, then you can login after enter user and password .HTTPS is HTTP over SSL, and it is safer than HTTP.
Note:
MyPBX firmware upgrade follow-up
·Reboot the device twice to make the new firmware take effect ·Clean the cache and cookies of the browser before login.
·There is a compatibility issue with IE11. Configure IE11 browser "Compatibility View Settings", add MyPBX IP address, and check "Display Intranet sites in Compatibility View" and "Use Microsoft compatibility lists".
See the following picture. MyPBX IP is 192.168.5.147 in this example.
4 Status
Click to start to check the status of MyPBX Standard V7. We can check the status of extensions, trunks, and network and system information.
4.1 Line Status
In this page, we can check the status of extensions and trunks
4.1.1 Extension Status
Figure 4-1 Extension Status Page
MyPBX Status Description: Extensions: 1) : Extension is unavailable 2) :Extension is idle 3) :Extension is ringing 4) :Extension is busy 5) : Extension is on hold
4.1.2 Trunk Status
Figure 4-2 Trunk Status Page
VoIP Trunk: Status
Rejected: Trunk registration failed.
Registered: Successful registration, trunk is ready for use. Request Send: Registering.
Waiting: Waiting for authentication. Service Provider:
Status
OK: Successful registration, trunk is ready for use. Unreachable: The trunk is unreachable.
Failed: Trunk registration failed. FXO Trunk:
Status
Idle: The port is idle. Busy: The port is in use.
Disconnected: The port hasn‘t connected to the PSTN line.
For more detailed info, please refer to the LED indication of front panel. GSM Trunk:
Status
Idle: The port is idle. Busy: The port is in use. Signal : No signal. : Poor. : Average. : Good. : Excellent. BRI Trunk: Status
Ok: The ports connect correctly.
4.2 System Status
In this page, we can check the status of MyPBX system, including the hardware, firmware version and the network status of LAN and WAN ports.
4.2.1 System Info
In this page, we can check the hardware/firmware version, and the disk usage of MyPBX.
4.2.2 Network Status
In this page, the IP address of LAN and WAN port will appear. If OpenVPN is configured well, the information will be displayed here, too.
5 System
Click to access.In this page, we can configure the network settings, firewall settings, storage management and some other settings like firmware update and hot standby.
5.1 Network Preferences
5.1.1 LAN Settings
Figure 5-1 LAN Settings
·DHCP
If this option is set, MyPBX will use DHCP to get an available IP address from your local network. Not recommended as without the right IP address you cannot access MyPBX.
·Enable SSH
This is the advanced way to access the device. You can use the software ―putty‖ to access the device. In the SSH access, you can do more advanced settings and debug. Disabled by default.
·Port: the default is 8022; you can change it. ·Enable FTP
Users will be able to log in MyPBX via FTP if FTP is enabled. You can access FTP resource on MyPBX via Windows explorer or Web browser.
FTP default user: root, password: ys123456
·Port: the default is 21; you change it to another one. ·Hostname
Set the host name for MyPBX. ·IP Address
Set the IP Address for MyPBX.
A static IP address for MyPBX is recommended. ·Subnet Mask
Set the subnet mask for MyPBX. ·Gateway
Set the gateway for MyPBX. ·Primary DNS
Set the primary DNS for MyPBX. ·Secondary DNS
Set the secondary DNS for MyPBX. ·IP Address2
Set the second IP Address for MyPBX. ·Subnet Mask2
5.1.2 WAN Settings
Figure 5-2 WAN Settings
It supports three connection types: DHCP (obtain an IP automatically), PPPoE, Static IP Address.
Notes:
1. WAN port is disabled by default.
2. WAN port cannot be used as a router to route the Internet packages from WAN port to LAN port.
·DHCP
If your ISP says that you are connecting through DHCP or a dynamic IP address, perform these steps:
Step1: Select DHCP as the WAN Connection Type. Step2: Click Save button to save the settings. Step3: Reboot the device.
Step4: Check the WAN Status (Status Network status). ·Static IP Address
If your ISP says that you are connecting through a static or fixed IP address, perform these steps:
Step1: Select Static IP Address as the WAN Connection Type. Step2: Enter the IP Address.
Step3: Enter the Subnet Mask. Step4: Enter the Gateway Address.
Step5: Enter the Primary DNS and Secondary DNS. Step6: Click the Save button to save the settings. Step7: Reboot the device.
·PPPoE
If your DSL provider says that you are connecting through PPPoE or if you normally enter a user name and password to access the Internet, perform these steps:
Step1: Select PPPoE as the WAN Connection Type. Step2: Enter the User Name.
Step3: Enter the Password.
Step4: Click the Save button to save the settings. Step5: Reboot the device.
Step6: Check the WAN Status (Status Network status)
5.1.3 DHCP Server
Dynamic Host Configuration Protocol (DHCP) is a network protocol that enables a server to automatically assign an IP address to a computer from a defined range of numbers (i.e., a scope) configured for a given network. You can also set a local network NTP server for MyPBX here.
Note1: When using ―Phone Provisioning‖ for Grandstream IP phone, enter the IP address of the server directly, e.g. 192.168.5.150; for other phones using the default configuration.
Note2: MyPBX Standard V7 can work as a DHCP server, but cannot be regarded as a router.
5.1.4 VLAN Settings
A VLAN (Virtual LAN) is a logical local area network (or LAN) that extends beyond a single traditional LAN to a group of LAN segments, given specific configurations.
Note: MyPBX Standard V7 is not the VLAN server, a 3-layer switch is still needed, please configure the VLAN information there first, then input the details in MyPBX, so that the packages via MyPBX will be added the VLAN label before sending to that switch.
Figure 5-4 VLAN Settings
1) VLAN Over LAN ·NO.1
Click the NO.1 you can edit the first VLAN over LAN. ·VLAN Number
.The VLAN Number is a unique value you assign to each VLAN on a single device. ·VLAN IP Address
Set the IP Address for MyPBX VLAN over LAN. ·VLAN Subnet Mask
Set the Subnet Mask for MyPBX VLAN over LAN. ·Default Gateway
Set the Default Gateway for MyPBX VLAN over LAN ·NO.2
Click the NO.2 you can edit the first VLAN over LAN. ·VLAN Number
.The VLAN Number is a unique value you assign to each VLAN on a single device. ·VLAN IP Address
Set the IP Address for MyPBX VLAN over LAN. ·VLAN Subnet Mask
Set the Subnet Mask for MyPBX VLAN over LAN. ·Default Gateway
Set the Default Gateway for MyPBX VLAN over LAN. 2) VLAN Over Wan
·NO.1
Click the NO.1 you can edit the first VLAN over Wan. ·VLAN Number
.The VLAN Number is a unique value you assign to each VLAN on a single device. ·VLAN IP Address
Set the IP Address for MyPBX VLAN over Wan. ·VLAN Subnet Mask
Set the Subnet Mask for MyPBX VLAN over Wan. ·Default Gateway
Set the Default Gateway for MyPBX VLAN over Wan. ·NO.2
Click the NO.2 you can edit the first VLAN over Wan. ·VLAN Number
.The VLAN Number is a unique value you assign to each VLAN on a single device. ·VLAN IP Address
Set the IP Address for MyPBX VLAN over Wan. ·VLAN Subnet Mask
Set the Subnet Mask for MyPBX VLAN over Wan. ·Default Gateway
5.1.5 VPN Settings
A virtual private network (VPN) is a method of computer networking—typically using the public internet—that allows users to privately share information between remote locations, or between a remote location and a business' home network. A VPN can provide secure information transport by authenticating users, and encrypting data to prevent unauthorized persons from reading the information transmitted. The VPN can be used to send any kind of network traffic securely. MyPBX supports OpenVPN, IPSec and L2TP.
Figure 5-5 OpenVPN Settings
·Enable OpenVPN ·Import VPN Profile
Import configuration file of OpenVPN. Don't configure "user" and "group" in the "config" file.
·Enable IPSec
·Import VPN Profile
Import configuration file of IPSec. There can be only one ―lan‖ in the ―conf‖ file. ·Enable L2TP
·Import VPN Profile
Import configuration file of L2TP. There can be only one ―conn‖ in the ―conf‖ file. Note: for more details about the above VPN settings, please contact our technical support.
5.1.6 DDNS Settings
DDNS(Dynamic DNS) is a method/protocol/network service that provides the capability for a networked device, such as a router or computer system using the Internet Protocol Suite, to notify a Domain Name System (DNS) name server to change, in real time, the active DNS configuration of its configured hostnames, addresses or other information.
Figure 5-6 DDNS Settings
·Enable DDNS ·DDNS Server
Select the DDNS server you sign up for service. ·User Name
User name the DDNS server provided. ·Password
User account‘s password. ·Host Name
Note: DDNS allows you to access your network using domain names instead of IP address. The service manages changing IP address and updates your domain information dynamically. You must sign up for service through dyndns.org, freedns.afraid.org, www.no-ip.com, www.zoneedit.com
5.1.7 Static Route
MyPBX will have more than one Internet connection in some situations but it has only one default gateway. You will need to set some Static Route for MyPBX to force it to go out through different gateway when accessing different Internet. The default gateway priority of MyPBX from high to low is OpenVPN, WAN port, LAN port.
Figure 5-7 Static Route Settings Page
1) Route table
The current route rules of MyPBX. ·Destination
The destination network to be accessed by MyPBX. ·Subnet Mask
Specify the destination network portion. ·Gateway
Define MyPBX will go through which gateway when accessing the destination network.
·Metric
The cost of a route is calculated by using what are called routing metric. Routing metrics are assigned to routes by routing protocols to provide measurable statistic which can be used to judge how useful (how low cost) a route is. ·Interface
Define which Internet port to go through. 2) Static Route Rules
5.2 Security Settings
Firewalls are used to prevent unauthorized Internet users from accessing private networks connected to the Internet, especially intranets. All messages entering or leaving the intranet pass through the firewall, which examines each message and blocks those that do not meet the specified security criteria.
5.2.1 Security Center
You can check MyPBX security configuration in ―Security Center‖ page. And also, you can enter the relevant security settings page rapidly.
Firewall:
Figure 5-8 Security Center-Firewall
In the ―Firewall‖ tab, you can check firewall configuration and alert settings. By clicking the relevant button, you can enter the configuration page directly. Service:
Figure 5-9 Security Center-Service
In ―Service‖ tab, you can check AMI/SSH/TFTP status. For AMI/SSH, you can enter the according page by clicking the button in ―Setting‖ column. For TFTP, you can directly disable or enable it.
Figure 5-10 Security Center-Port
In ―Port‖ tab, you can check SIP port and HTTP port. You can also enter the relevant page by clicking the button in ―Setting‖ column.
5.2.2 Firewall Rules
Figure 5-11 Firewall Settings
1) General Settings ·Enable Firewall
Enable the firewall to protect the device. ·Disable Ping
Enable this item, net ping from remote hosts will be dropped. ·Drop All
When you enable ―Drop All‖ feature, system will drop all packets or connection from other hosts if there are no other rules defined. To avoid locking the devices, at least one ―TCP‖ accept common rule must be created for port used for SSH access, port used for HTTP access and port sued for CGI access.
2) Common Rules
There is no default rule; you can create them as required.
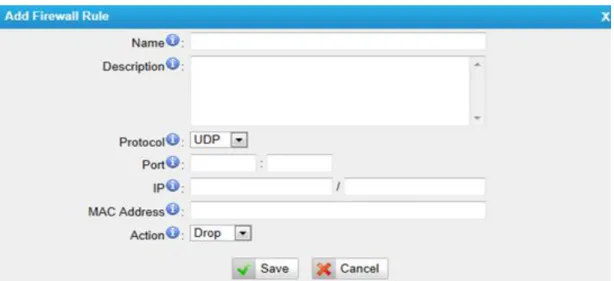
Figure 5-12 Add Common Rules
·Name
A name for this rule, e.g. ―HTTP‖. ·Description
Simple description for this rule. E.g. Accept the specific host to access the web interface for configuration.
·Protocol
The protocols for this rule. ·Port
Initial port should be on the left and end port should be on the right. The end port must be equal to or greater than start port.
·IP
The IP address for this rule. The format of IP address is: IP/mask E.g. 192.168.5.100/255.255.255.255 for IP 192.168.5.100 E.g. 216.207.245.47/255.255.255.255 for IP 216.207.245.47
E.g. 192.168.5.0/255.255.255.0 for IP from 192.168.5.0 to 192.168.5.255 . ·MAC Address
The format of MAC Address is XX:XX:XX:XX:XX:XX, X means 0~9 or A~F in hex, the A~F are not case sensitive.
Note: The MAC address will be changed when it‘s a remote device, so it will not be working to filter using MAC for remote devices.
Accept: Accept the access from remote hosts. Drop: Drop the access from remote hosts. Ignore: Ignore the access.
3) Auto Defense
By default, there is no rule.
Figure 5-13 Add Auto Defense Rule
Port
The port you want to auto defense, for example, 8022. Protocol:
Select the protocol. You can select UDP or TCP. Rate:
The maximum packets or connections can be handled per unit time. For example, if you configure it as below:
Port: 8022 Protocol: TCP Rate: 10/min
Then, it means maximum 10 TCP connections can be handled in 1 minute. The 11th connection will be dropped.
5.2.3 IP Blacklist
You can set some packets accept speed rules here. When a IP address which hasn‘t been accepted in common rules sends packets faster than the allowed speed, it will be set as black IP address and blocked automatically.
Figure 5-14 IP Blacklist Settings Page
1) Blacklist rules
You can add the rules for IP blacklist rate as you wish.
Figure 5-15 Add Blacklist Rule
·Port
Auto defense port ·Protocol
Auto defense protocol. TCP or UDP. ·IP Packets
Allowed IP packets number in the specific time interval. ·Time interval
The time interval to receive IP packets. For example, IP packets 90, time interval 60 means 90 IP packets are allowed in 60 seconds.
2) IP blacklist
5.2.4 AMI Settings
The Asterisk Manager Interface (AMI) is a system monitoring and management interface provided by Asterisk. It allows live monitoring of events that occur in the system, as well enabling you to request that Asterisk perform some action. The actions that are available are wide-ranging and include things such as returning status information and originating new calls. Many interesting applications have been developed on top of Asterisk that take advantage of the AMI as their primary interface to Asterisk.
There are two main types of messages on the Asterisk Manager Interface: manager events and manager actions.
The 3rd party software can work with MyPBX using AMI interface. It is disabled by default. If necessary, you can enable it.
Figure 5-16 AMI Settings
Username & password: after enabling AMI, you can use this username and password to log in MyPBX AMI
IP Restriction: you can set which IP can log in MyPBX AMI interface
5.2.5 Database Grant
Standard V7 are using MySQL database from 14.18.0.22. The 3rd party software can access MySQL via internet. Before that, you need to grant the authority to the database user.
After entering ―Database Grant‖ page, clicking ―Add‖, you can add a database user, set user password and grant authority.
Username/password: The 3rd party can use this username and password to access the MySQL.
Database: there are 2 options, CDR and Record. If you choose CDR, then this user has authority to check CDR database; if you choose Record, then the user has authority to check which call has been recorded automatically.
5.2.6 Alert Settings
If the device is attacked, the system will notify users the alert via call or E-mail. The attack modes include IP attack and Web Login.
For more details on the system security configuration, please refer to APPENDIX B MyPBX Security Configuration Guide.
Figure 5-18 Alert Settings
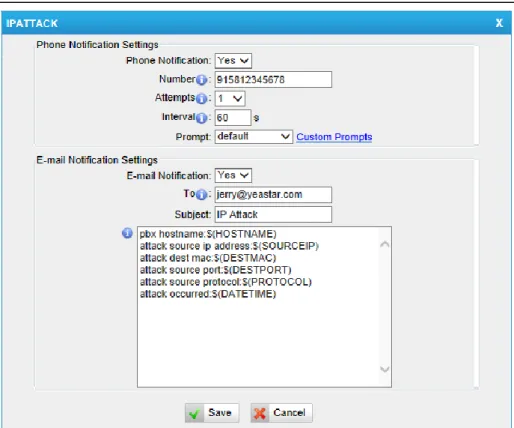
1. IPATTACK
When the system is attacked by IP address, the firewall will add the IP to auto IP Blacklist and notify the user if it match the protection rule.
1) Phone Notification Settings ·PHONE Notification
Whether enable phone notification. ·Number
The numbers could be set for alert notification; users can setup multiple extension and outbound phone numbers. Please separate them by ―;‖.
Example: ―500;9911‖, if the extension has configured Follow Me Settings, the call would go to the forwarded number directly.
·Attempts
The attempts to dial a phone number when there is no answer. ·Interval
The interval between each attempt to dial the phone number. Must be greater than 3 seconds, the default value is 10 seconds.
2) E-mail Notification Settings
Note: Please ensure that all voicemail settings are properly configured on the System Settings -> Voicemail Settings page before using this feature.
·E-mail Notification
Whether to enable E-mail Notification or not ·Recipient‟s Name
The recipients for the alert notification, and multiple email addresses are allowed, please separate them by ―;‖.
Example: [email protected]; [email protected], [email protected] . ·Subject
The subject of the alert email. ·Email Content
Text content supports predefined variables. Variable names and corresponding instructions are as follows:
$(HOSTNAME) Host name $(LOCALIP) Local IP address
$(SOURCEIP) Attack source IP address $(DATETIME) Occurred
$(USERNAME) User name (WEBLOGIN effective)
$(DESTMAC) Attacks destination MAC (IPATTACK effective)
$(DESTPORT) Attacks destination Port number (IPATTACK effective) $(PROTOCOL) Protocol type (IPATTACK effective)
Figure 5-19 IP Attack Configuration
2. WEBLOGIN
Web Login Alert Notification: Enter the password incorrectly five times to login MyPBX Web interface will be considered as an attack, the system will limit the IP login within 10 minutes and notify the user.
5.3 LDAP Server
5.3.1 LDAP Server
LDAP is used as a phone book on MyPBX so that you can search a key word from your IP phone. The key word can be a name, a mobile number, an email or other key words in the phonebook.
Note:
It requires that the IP phone should support LDAP feature. 1) LDAP Settings
Figure 5-21 LDAP Server page
·Enable LDAP
Enable LDAP to use LDAP on your IP phone. ·Root Node
A root node for this LDAP, e.g. dc=pbx, dc=com. ·PBX Node
A pbx node for this LDAP, e.g. ou=pbx, dc=pbx, dc=com. ·User Name
A user for this LDAP, e.g. cn=admin, dc=pbx, dc=com ·Password
A password used to access LDAP. 2) Add Contact
In Add Contact you can create them as required.
Figure 5-22 Add Contact
If you want to know how to use LDAP, please refer to Appendix J
5.4 Storage Management
5.4.1 External Storage
The External Storage feature is used to extend storage space. Once configured, the files (voicemail, call recording files) created before the configured days will be moved to the Net-Disk.
Note: The shared folder must be based on Windows Operation System. Andif it's windows Vista/2008/7, please add ―Everyone‖ into the shared account list.
Figure 5-23 File Sharing
Before external storage can be properly configured, an SMB share folder accessible from MyPBX must be set up on a Windows based machine. Once that has been set up, please follow the steps below.
Step 1: Choose a window-based computer that is always in service Step 2: Create a folder
Step 3: Create a text file named "status.txt" in the folder Step 4: Share this folder
Then we need input the Net-Disk information in step2 page.
Figure 5-25 Enter the Net-disk information
Net-Disk Host/IP: Change this to the IP address of the computer where backup files will be stored.
Net-Disk Share Name: Change this to the name of the shared folder where backups will be stored.
Net-Disk Share Username: The user name used to log into the network share. Leave this blank if it is not required
Net-Disk Share Password: The password used to log into the network share. Leave this blank if it is not required
If the configuration is correct, open the Windows share folder you will see the MyPBX backup files and folders has been created. If the contents of the backup folder look similar to step3 page, then you have successfully configured external storage on the MyPBX unit.
5.5 System Preferences
In this page, we can set other system preference, like the password for admin account, system date and time, firmware update, hot standby, backup and restore, reset and reboot.
5.5.1 Password Settings
MyPBX has 3 accounts: admin, user, and cdr. User and cdr account is disabled by default.
Admin account:
The default password for account ―admin‖ is ―password‖. To change the password, select ―admin‖ in ―User‖, enter the old password and new password, and click ―Save‖. The system will then prompt you to re-login using your new password.
After you enter the new password, MyPBX will prompt the password strength. It is recommended that you use numbers, upper-case letters, and lower-case letters to increase the security.
When you log in MyPBX using ―admin‖ account, you can enable ―user‖ and ―cdr‖ account; also, you can change their passwords.
Figure 5-27 Modify admin‘s Password
User account:
User account is disabled by default and its default password is ―password‖. When enabling ―user‖ account for the first time, MyPBX will ask you to change ―user‖ password. If you don‘t change it, you can‘t enable ―user‖ account. To change the password, select ―user‖ in ―User‖, enter the old password and new password, and click ―Save‖. The system will then prompt you to re-login using your new password.
After you enter the new password, MyPBX will prompt the password strength. It is recommended that you use numbers, upper-case letters, and lower-case letters to increase the security.
Figure 5-28 Modify user‘s Password
After enabling ―user‖ account, you can log in MyPBX using ―user‖. ―user‖ account can change its own password.
CDR account:
―cdr‖ account is disabled by default and its default password is ―password‖. You can enable it after you log in MyPBX using ―admin‖ account.
To change the password, select ―cdr‖ in ―User‖, enter the old password and new password, and click ―Save‖. The system will then prompt you to re-login using your new password.
After you enter the new password, MyPBX will prompt the password strength. It is recommended that you use numbers, upper-case letters, and lower-case letters to increase the security.
Figure 5-29 Modify cdr‘s Password
After enabling ―cdr‖ account, you can log in MyPBX using ―cdr‖. ―cdr‖ account can change its own password.
5.5.2 Date and Time
Set the date and time for MyPBX.Figure 5-30 Configuring Date & Time
·Time Zone
You can choose your time zone here. ·Daylight Saving Time
Set the mode to Automatic or disabled
·Automatically Synchronize With an Internet Time Server
Input the NTP server so that MyPBX will update the time automatically ·Set Date & Time Manually
You can set the time to your local right time manually here
5.5.3 Firmware Update
Upgrading of the firmware is possible through the Administrator web interface using a TFTP Server or an HTTP URL.
Enter your TFTP Server IP address and firmware file name, then click start to update the firmware
Notes:
1. If ―Reset configuration to Factory Defaults‖ is enabled, the system will restore to factory default settings.
2. When updating the firmware, please don‘t turn off the power. Or the system will get damaged.
3. For more information on the steps of updating the firmware, please refer to this link:
grade_en.pdf
Figure 5-31 Firmware Update Page
5.5.4 Backup and Restore
We can back up the configurations before resetting MyPBX SOHO to factory defaults, and then restore it using this package. The backup created on MyPBX is encrypted with file format ".bak".
Notes:
1. Only configurations, custom prompts will be backed up, the voicemail and recording files are not included.
2. When you have updated the firmware version, it‘s not recommended to restore using old package.
Figure 5-32 Backup and Restore Page
·Create a New Backup
Users are able to create a new backup for ―All‖ or for separate backup extensions.
·Upload a Backup
Users are able to create a new backup for ―All‖ or for separate backup extensions.
Figure 5-34 Upload a Backup
5.5.5 Reset and Reboot
We can reset or reboot MyPBX Standard V7 via web directly in this page.
Figure 5-35 Reset and Reboot Options
·Reboot System
Warning: Rebooting the system will terminate all active calls! ·Reset to Factory Defaults
Warning: A factory reset will erase all configuration data on the system. Please do not turn off the system until the RUN light begins blinking. Any power interruption during this time could cause damage to the system.
5.5.6 Hot Standby
Redundancy is achieved by using duplicate hardware and software installations and synchronizing data and operating state. Redundancy assures smooth operation even if a system goes down. Essentially a duplicate backup system
takes over with virtually no loss of service. This technique assures absolute reliability no matter what failure occurs. In mission critical installations, redundancy is a way to address possibility of any failure.
Note 1: Before enabling the Hot Standby feature, please make sure that the two servers in the failover pair are the same model, own the same modules installed in the same slots, the same hardware configurations and firmware version.
Note 2: Please configure the primary server first and configure the secondary server only after the running status of primary server becomes ―active‖.
Note 3: The virtual IP address inputted in this page will be the one used for registering in each IP phone.
Note 4: Before configuring the Email list in this page, please configure the ―voicemail settings‖ in ―PBXBasic settings‖, and make sure the SMTP test successfully.
Note 5: Before configuring the SMS list; please make sure the SIM and GSM/UMTS modules are installed well.
Figure 5-36 Hot Standby Configuration
Mode: Primary means the main unit; Secondary means the standby unit; Secondary/Primary Hostname: If this unit mode is primary, then you need to input the hostname of standby unit; vice versa, if this unit is selected as secondary, then the hostname of primary unit is required. In brief, you need to input each other‘s host name on this field.
number must be the same to both units.
Virtual IP address: To fill in a virtual IP address includes mask, which is always points to the currently activated unit. Customer can register IP phones through this virtual IP address. Please make sure the virtual IP address netmask is the same on both units but different from their former IP address.
Network Connection Detection: Generally it requires the IP address of the router or gateway that connects both units. MyPBX will connect another unit through this IP address.
Down Notification: The way of informing customer that the system down. Keep Alive: Every 2 seconds, a package will be sent from one unit to another, which can test whether they are working properly.
Dead Time: The default setting is 120 seconds. If there‘s no response within 120s after one receiving a package from the other, then the normal working unit will figure the other unit is dead and send an email or SMS to report the failure.
6 PBX
Click to access.
In this page, we can configure the settings of extension, trunk, inbound call control, outbound call control, audio settings and the others. When configured well, we can make calls as scheduled.
6.1 Extensions
In this page, we can configure the extensions‘ details and provision the supported models automatically.
6.1.1 FXS/VoIP Extensions
There are three types of extensions supported in MyPBX Standard V7: SIP, IAX and analog extension.
FXS Extensions
Figure 6-2 FXS Extension List
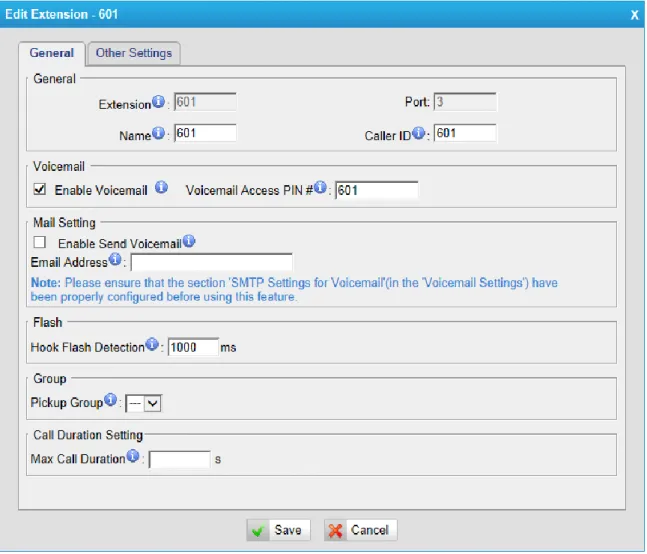
There are two analog extensions in MyPBX Standard V7 if S2 module is installed, to modify the extension number, please delete it first, and then recreate it again. 1) General
Figure 6-3 Edit FXS Extension
·Extension
The numbered extension, e.g. 1234, that will be associated with this particular User/Phone.
The extension correspond port. ·Name
A character-based name for this user, e.g. ―Bob Jones‖. ·Caller ID
The Caller ID (CID) string will be used when this user calls another internal user. 2) Voicemail
·Enable Voicemail
Check this box if the user should have a voicemail account. ·Voicemail Access PIN #
Voicemail Password for this extension, e.g. ―1234‖. 3) Mail Setting
·Enable Send Voicemail
Once enabled, the voicemail will be sent to the email address below as an attachment.
·Send Voicemail to Email Address
This option defines whether or not voicemails/Fax is sent to the Email address as an attachment.
Note: Please ensure that all voicemail settings are properly configured on the System Settings -> Voicemail Settings page before using this feature.
4) Flash
·Hook Flash Detection
Sets the amount of time, in milliseconds, that must pass since the last hook-flash event received by MyPBX before it will recognize a second event. If a second event occurs in less time than defined by Hook Flash Detection, then MyPBX will ignore the event. The default value of Flash is 1000ms, and it can be configured in 1ms increments.
5) Group ·Pickup Group
If this extension belongs to a pickup group, any calls that ring this extension can be picked up by other extensions in the same pickup group by dialing the Call Pickup feature code (the default is *4).
Note: *4 is the default setting, it can be changed under Feature Codes -> General -> Call Pickup.
Setup the max cull duration for every call of this extension, but it‘s only valid for outbound calls. Enter ―0‖ or leave this blank empty, the value would be equal to the max call duration configured in the Option Settings page.
Note: this setting will not be valid for internal calls. Other Settings
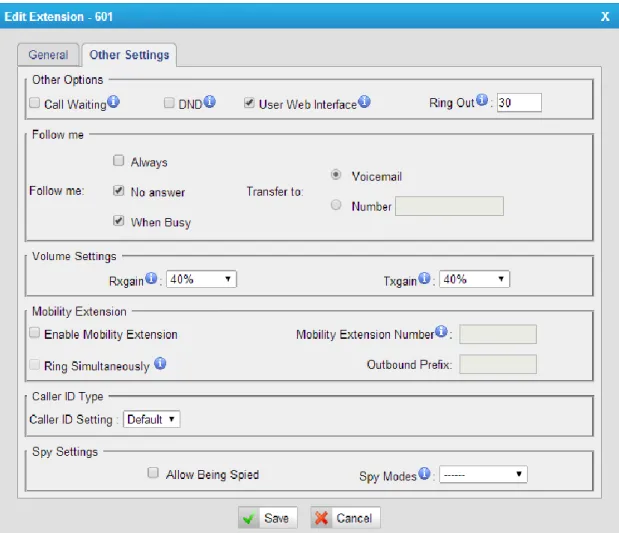
Figure 6-4 FXS Extension Other Settings
7) Other options ·Call Waiting
Check this option if the extension should have Call Waiting capability. If this option is checked, the ―When busy‖ follow me options will not be available. ·DND
Don‘t Disturb.
·User Web Interface
Check this option to allow the user to log in to the MyPBX User Web interface, which can be used to access voicemail and extension recordings. Users may log in the MyPBX User Web interface by using their extension number and voicemail PIN as the user name and password respectively.
·Ring Out
Check this option if you want to custom the ring time. Tone will stop over the time defined.
8) Follow me (Call Forwarding)
This function sets inbound call forwarding on an extension. An administrator can configure Follow Me for this extension.
9) Volume Settings
Rxgain: The Volume sent to FXS extension.
Txgain: The Volume sent out by the FXS extension 10)Mobility Extension
MyPBX allows you to use your mobile phone as an extension. If you set your mobile phone as a mobility extension and then you call MyPBX with this mobile phone, you will hear a dial tone. MyPBX will recognize your call as a call from an extension. You can dial the number of other extensions (your caller ID will be the number of your extension) or dial out via outbound routes just like dialing from your extension.
Note: If callback is enabled in the inbound route, the mobility extension function of this inbound route will be disabled.
Enable Mobility Extension Enable this feature.
·Mobility Extension Number
When you dial the server with this number, the mobile phone gets the
permission of the extension. For example: dialing the other extensions, playing the voicemail.
·Ring Simultaneously
When the extension has an incoming call, it rings its mobility extension simultaneously.
·Outbound Prefix
Fill in proper prefix of mobile number so that it can match an outbound route to dial the mobility extension. For example, if you set the prefix 9, it will send ―9+ mobility extension number‖ to the outbound route.
11)Call ID type ·Call ID Setting
which case you should choose ―Japan‖. 12)Spy Settings
MyPBX allows extension to monitor/barge in other conversation. Once this feature is enabled, the extension has the ability to monitor/barge in other calls using the feature codes for each spy mode. Refer to ―Feature Codes‖ section for more information.
·spy modes
There are 4 spy modes available:
General spy: you have the permission to use the following 3 modes. Normal spy: you can only hear the call, but can't talk.
Whisper spy: you can hear the call, and can talk with the monitored extension. Barge spy: you can hear the call and talk with them both.
Note: for example, if 500 want to monitor extension 501, we need to enable the ―allow being spied‖ for 501, and choose the spy mode for extension 500. Then pick up 500 and dial ―feature codes + 501‖ to start monitoring when 501 is in a call
If 500 choose ―normal spy‖, it should dial ―*90501‖ to start monitoring. If 500 choose ―whisper spy‖, it should dial ―*91501‖ to start monitoring. If 500 choose ―barge spy‖, it should dial ―*92501‖ to start monitoring.
If 500 choose ―general spy‖, it can dial ―*90501‖, ―*91501‖ or ―*92501‖ to start monitoring.
VoIP Extensions
A VoIP extension is a SIP/IAX Account that allows an IP Phone or an IP soft phone client to register on MyPBX.
Figure 6-5 VoIP Extension List
Figure 6-6 Add/Edit VoIP Extension
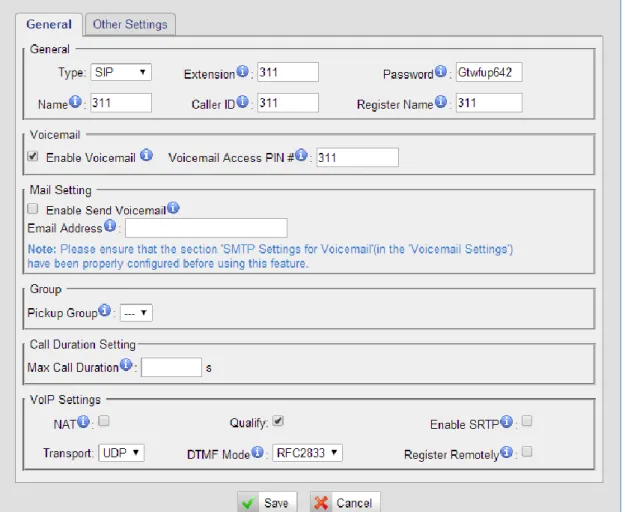
1) General ·Type
Extension type: SIP, IAX or SIP/IAX.
SIP—The extension sends and receives calls using the VoIP protocol SIP. IAX—The extension sends and receives calls using the VoIP protocol IAX. ·Extension
The numbered extension, e.g. 1234, that will be associated with this particular User/Phone.
·Password
The password for this extension, but it is not a fixed one. When you add new extension, a random and robust password will be generated like ―Gtwfup642‖.
·Name
·Caller ID
The Caller ID will be used when this user calls another internal extension. ·Register Name
It is for extension registration validation. Users will not be able register the extension if the authorization name is incorrect even though the username and password are correct.
2) Voicemail ·Enable Voicemail
Check this box if the user should have a voicemail account. ·Voicemail Access PIN
The voicemail password for this extension, e.g. ―1234‖. 3) Mail Setting
This option defines whether or not voicemails or faxes are sent to an Email Address as an attachment.
·Enable Send Voicemail
Once enabled, the voicemail will be sent to email as an attachment. ·Email Address
Email address used to receive the voicemail or Fax.
Note: Please ensure that the section ―SMTP Settings For Voicemail‖ (in the ―Voicemail Settings‖) has been properly configured before using this feature. 4) Group
·Pickup Group
If this extension belongs to a pickup group, any calls that ring this extension can be picked up by other extensions in the same pickup group by dialing the Call Pickup feature code (the default is *4).
Note: *4 is the default setting, it can be changed under Feature Codes -> General -> Call Pickup.
5) Call Duration Settings
Set up the max cull duration for every call of this extension, but it‘s only valid for outbound calls. Enter ―0‖ or leave this blank empty, the value would be equal to the max call duration configured in the Option Settings page.
6) VoIP Settings ·NAT
This setting should be used when the system is using a public IP address to communicate with devices hidden behind a NAT device (such as a broadband router). If you have one-way audio problems, you usually have problems with your NAT configuration or your firewall's support of SIP and/or RTP ports. ·Qualify
Send check alive packets to IP phones. ·Enable SRTP
Enable extension for SRTP (RTP Encryption). ·Transport
This will be the transport method used by the extension. The options are UDP (default) or TCP or TLS.
·DTMF Mode—RFC2833, Info, Inband, Auto. ·Remote Register
Allow to register remote extensions.
If you enable ―Remote Register‖, the extension password must include uppercase letters, lowercase letters, and digits.
This option is used to enhance the system security, it‘s disabled by default. More details for the system security configuration, please refer to APPENDIX B MyPBX Security Configuration Guide
Figure 6-7 VoIP Extension Other Settings
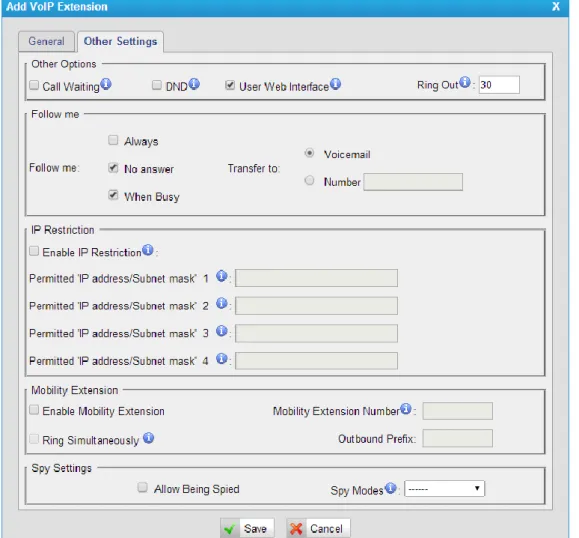
7) Other Options .Call Waiting
Check this option if the extension should have Call Waiting capability. If this option is checked, the ―When busy‖ follow me options will not be available. The call waiting function of IP phone has higher priority than MyPBX‘s call waiting function.
.DND
Don Not Disturb. When DND is enabled for an extension, the extension will not be available.
.User Web Interface
Check this option to allow the user to login to the MyPBX User Web interface, which can be used to check voicemail and extension recordings. Users may log in MyPBX User Web interface by using their extension number and voicemail PIN as the user name and password respectively.
Check this option if you want to customize the ring time. Ring tone will stop over the time defined.
8) Follow me (Call Forwarding)
Call forwarding for an extension can be configured here. The administrator can configure Follow Me option for this extension. If you want to transfer the call to an outbound number, please follow the dial pattern of outbound route filled in the outbound number.
For example: forwarding a call to your mobile phone number 123456789, and the dial pattern of outbound route is ―9.‖, you should fill in 9123456789 here. 9) IP Restriction
·Enable IP Restriction
Check this option to enhance the VoIP security for MyPBX. If this option is enabled, only the permitted IP/Subnet mask will be able to register this extension number. In this way, the VoIP security will be enhanced.
For more details on the system security configuration, please refer to APPENDIX B MyPBX Security Configuration Guide.
·Permitted “IP address/Subnet mask”
The input format should be ―IP address‖ + ―/‖ + ―Subnet mask‖.
E.g."192.168.5.100/255.255.255.255" means only the device whose IP address is 192.168.5.100 is allowed to register this extension number.
E.g."192.168.5.0/255.255.255.0" means only the device whose IP address is 192.168.5.XXX is allowed to register this extension number.
10)Mobility Extension
MyPBX allows you to use your mobile phone as an extension. If you set your mobile phone as a mobility extension and then you call MyPBX with this mobile phone, you will hear a dial tone. MyPBX will recognize your call as a call from an extension. You can dial the number of other extensions (your caller ID will be the number of your extension) or dial out via outbound routes just like dialing from your extension.
Note: If callback is enabled in the inbound route, the mobility extension function of this inbound route will be disabled.
·Enable Mobility Extension Enable this feature.
·Mobility Extension Number
When you dial the server with this number, the mobile phone gets the
·Ring Simultaneously
When the extension has an incoming call, it rings mobile simultaneously. ·Outbound Prefix
Fill in proper prefix of mobile number so that it can match an outbound route to dial the mobility extension. For example, if you set the prefix 9, it will send ―9+ mobility extension number‖ to the outbound route.
11)Spy Settings
MyPBX allows extension to monitor/barge in other conversation. Once this feature is enabled, the extension has the ability to monitor/barge in other calls using the feature codes for each spy mode. Refer to ―Feature Codes‖ section for more information.
·spy modes
There are 4 spy modes available:
General spy: you have the permission to use the following 3 modes. Normal spy: you can only hear the call, but can't talk.
Whisper spy: you can hear the call, and can talk with the monitored extension. Barge spy: you can hear the call and talk with them both.
Note: for example, if 500 want to monitor extension 501, we need to enable the ―allow being spied‖ for 501, and choose the spy mode for extension 500. Then pick up 500 and dial ―feature codes + 501‖ to start monitoring when 501 is in a call.
If 500 choose ―normal spy‖, it should dial ―*90501‖ to start monitoring. If 500 choose ―whisper spy‖, it should dial ―*91501‖ to start monitoring. If 500 choose ―barge spy‖, it should dial ―*92501‖ to start monitoring.
If 500 choose ―general spy‖, it can dial ―*90501‖, ―*91501‖ or ―*92501‖ to start monitoring.
6.1.2 Phone Provisioning
The Auto Provision sub menu provides users a method to Auto Provision IP Phone after the Express Setup process.
Note: Auto Provision functions fully test with these models:
Yealink (T12, T18, T19, T20, T21, T22, T26, T28, T32, T38, T41, T42, T46, W52P, VP530, VP-2009)
Snom (300, 320, 360, 370)
Polycom (IP 6000, IP 7000, IP 32X, IP33X, IP430, IP450, IP550, IP560, VVX1500)
Aastra (9480i, 9480i-CT, 6730i, 6731i, 6737i, 6753i, 6755i, 6757i, 6757i CT) GrandStream (GXP1450, GXP2100, GXP2110, GXP2120)
Escene (ES220, ES320, ES330, ES410, ES620) Fanvil (C56, C58, C60, C62)
Panasonic (UT113, UT123, UT133, UT136, UT248, UT670, TGP500, TGP550) News:
When provisioning Yealink, Grandstream, Fanvil, Snom IP phone, MyPBX is not needed to be set as the only DHCP server any more.
Figure 6-8 Phone Provisioning Page
6.1.2.1 General Settings for Yealink
In this page, you can configure the general settings before provisioning Yealink IP phones, including the items like general preferences, codecs, remote phone book and firmware upgrade.
Note: if firmware download server is enabled, IP phone will update the firmware automatically according to the version and server you have configured during the provision process.
Figure 6-9 General Settings for Yealink
6.1.2.2 Aastra General Settings
In this page, you can configure the general settings before provisioning Aastra IP phones, including the items like general preferences, program keys configuration, soft keys configuration.
Figure 6-10 General Setting for Aastra
6.1.2.3 Phone book
You can add your contacts here and when you use phone provisioning; IP phone will download the phone book.
Figure 6-11 Phone Book
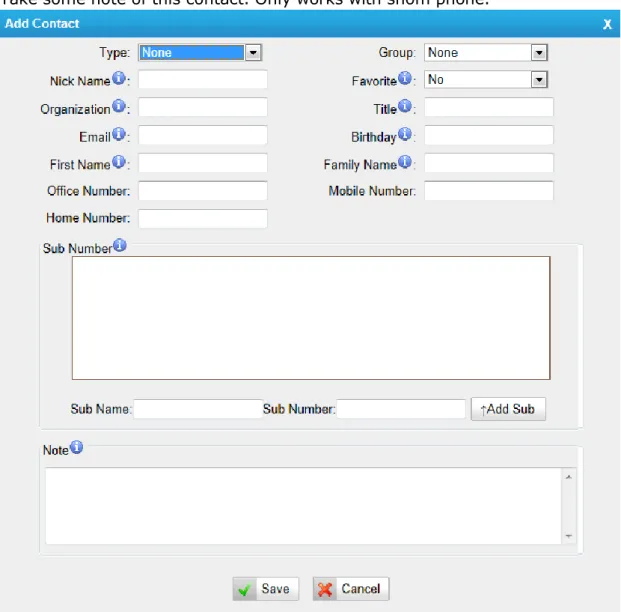
1) Add Contact ·Type
There are three types: None, VIP and Deny list (Blacklist). ·Group
There are 5 groups: None, Friends, Family, Work, Colleagues list. ·Nick Name
You can set a nick name for this number. ·Favorite
Only works with snom phone. ·Organization
Input the organization of this contact. Only works with snom phone. ·Title
Input the title of this contact. Only works with snom phone. ·Email
Input the email of this contact. Only works with snom phone. ·Birthday
Input the birthday of this contact. Only works with snom phone. ·First Name
Input the first name of this contact. Only works with snom phone. ·Family Name
·Office Number
Input the office number here ·Mobile Number
Input the mobile number here ·Home Number
Input the home number here ·Sub Number
Add sub number of this contact. Only works with snom phone. ·Note
Take some note of this contact. Only works with snom phone.
Figure 6-12 Add a Contact
2) Upload Phonebook
You can upload a phonebook before auto provision, which will be provisioned to the IP phone when using auto provision feature to configure your IP phones. The
format of phonebook should be *.xml.
Note: All the existing phonebooks of the IP phone will be replaced automatically if the phonebooks are configured in this way.
6.1.2.4 Configure phone
Let's take provisioning Yealink phone as an example.
There are two modes to create new phones: create new phones in webpage and upload the IP Phone‘s configuration file.
Add new phone via webpage
Click ―Add Phone‖ and fill in the corresponding information in the pop-up window.
Figure 6-13 Configure Yealink T28
1) General ·Enabled
Choose yes or no to enable or disable this extension. ·New Config
Or else, it should be ―No‖. · MAC address
Input the MAC address of the IP phone. ·Name
Put the name of this Phone here. ·Manufacturer
You can choose the Manufacturer of the IP phone. ·Phone Type
Choose the model of your phone. Only for snom phone. ·Call Waiting
This call feature allows your phone to accept other incoming calls to an extension already in an active call.
·Key as Send
Configure a key as the send key, you choose #, * or disable this feature ·Auto redial
Enable or disable the auto redial for the IP Phone. ·Auto answer
Enable or disable auto answer for the IP phone. ·Phone book
Enable or disable the feature of phone book for the IP phone. ·Line
You can set each line of IP phone for the account you want, active or not. Extension: Select the extension number for IP Phone.
Label: It is shown on the LCD for users to identify the account.
Line Active: You can choose on/off to enable/disable the account respectively.
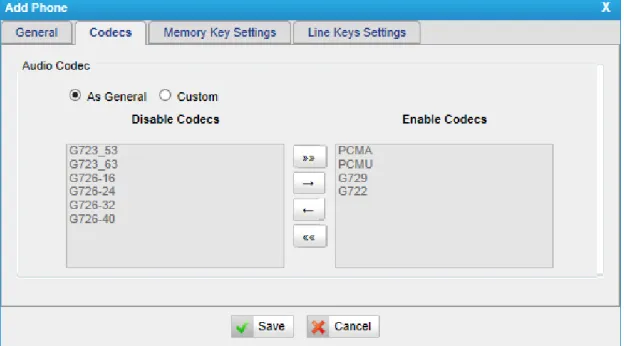
2) Codecs
Figure 6-14 Select the Codec
3) Memory key settings
In this page, we can configure the DSS keys of the IP phone one by one.
4) Line keys settings
We can configure the line key settings for this IP phone.
Figure 6-16 Configure Line Key
6.1.2.4 Not configured phone
In this section, MyPBX will scan all the supported IP phones and display them here. We can click the ―MAC address‖ of an IP phone and input the corresponding information in the pop-up window, like figure 6-13.
Figure 6-17 Not Configured Phone List
6.1.2.5 Upload a file
Click ―Upload a file‖ and choose the configuration file of IP phone in the popup window.
Note: the file format must be Yealink: .cfg file
Snom: .htm file
Grandstream: .xml file
Please edit the configuration files in advance before uploading.
6.2 Trunks
6.2.1 Physical Trunk
Multiple physical trunks are supported in MyPBX Standard V7, like BRI, PSTN, GSM/UMTS. Please make sure you have installed the modules inside before you use the relevant physical trunk. BRI trunk requires B2 module, PSTN trunk requires the O2, while GSM/UMTS trunk needs to install the GSM/UMTS modules inside.
Figure 6-19 Physical Trunk List
BRI Trunk
Basic Rate Interface (BRI, 2B+D, 2B1D) is an Integrated Services Digital Network (ISDN) configuration intended primarily for use in subscriber lines similar to those that have long been used for plain old telephone service. The BRI configuration provides 2 bearer channels (B channels) at 64 kbit/s each and 1 data channel (D channel) at 16 kbit/s. The B channels are used for voice or user data, and the D channel is used for any combination of data, control/signalling, and X.25 packet networking.
Figure 6-21 Edit BRI Trunk
·Trunk Name
A unique label used to identify this trunk when listed in outbound rules, incoming rules, etc. E.g. ―BriTrunk1‖
·Signaling
Signaling method
BRI-CPE: ISDN BRI in TE mode and Point to Point.
BRI-CPE-PTMP: ISDN BRI in TE mode and Point to multi Point. BRI-NET: ISDN BRI in NET mode and Point to Point.
BRI-NET-PTMP: ISDN BRI in NET mode and Point to multi Point. ·Switch Type
National: National ISDN type2 (common in the US) ni1: National ISDN type 1
4ess: AT&T 4ESS 5ess: Lucent 5ESS euroisdn: EuroISDN
qsig: D-channel signaling protocol at Q reference point for PBX networking. ·Over Lap Dial
Define whether MyPBX can dial this switch using overlap digits or not. If you need Direct Dial-in (DDI; in German "Durchwahl") you should change this to yes, then MyPBX will wait after the last digit it receives.
·Reset interval
Set the time in seconds between restart of unused channels. Some PBXs don't like channel restarts. So set the interval to a very long interval e.g. 100000000 or ―never‖ to disable entirely. If you are in Israel, the following is important: As Bezeq in Israel doesn't like the B-Channel resets happening on the lines, it is best to set the reset interval to ―never‖ when installing a box in Israel. Our past experience also shows that this parameter may also cause issues on local switches in the UK and China.
·PRI Indication
Tells how Device should indicate Busy() and Congestion() to the switch/user. Accepted values are:
inband: Device plays indication tones without answering; not available on all PRI/BRI subscription lines .
outofband: Device disconnects with busy/congestion information code so the switch will play the indication tones to the caller. Busy() will now do same as setting PRI_CAUSE=17 and Hangup().
·Enable Facility
To enable transmission of facility-based ISDN supplementary services (such as caller name from CPE over facility).
·NSF
Used with AT&T PRIs. If outbound calls are being rejected due to "Mandatory information element missing" and the missing IE is 0x20, then you need this setting.
·Echo Cancellation
Disable or enable echo cancellation; it is recommended not to turn this off. ·Hide Caller ID
You can choose alaw or ulaw. 1) Caller ID Prefix
·ISDN Dialplan
These settings are set to make the caller ID prefix work according to information sent from the E1 provider. ISDN telephony numbering plan Recommendation E.164.
·International Prefix
When there are international calls coming in via this BRI trunk, the International Prefix you have set here will be added before the CID. So you can know this is an international call before you answer it.
·National Prefix
When there are national calls coming in via this BRI trunk, the National Prefix you have set here will be added before the CID. So you can know this is a national call before you answer it.
·Local Prefix
When there are Local calls coming in via this BRI trunk, the Local Prefix you have set here will be added before the CID. So you can know this is a local call before you answer it.
·Private Prefix
When there are Private calls coming in via this BRI trunk, the Private Prefix you have set here will be added before the CID. So you can know this is a Private call before you answer it.
·Unknown Prefix
When there are calls with unknown number coming via this BRI trunk, the Unknown Prefix you set here will be shown as the caller ID.
2) Dialplan
·Remote Dialplan Calling number type ·Remote Number Type Calling number identification ·Location Dialplan
·Location Number Type Called number identification 3) DOD Setting
·Global DOD
Global Direct Outward Dialing Number ·DOD
Direct Outward Dialing Number. ·Associated Extension
The extension making call out via BRI Trunk will display the associated DOD. ·Add DOD
Add DOD for one associated extension. ·Add Bulk DOD
Figure 6-22 Add Bulk DOD
Add bulk DOD for bulk extensions in ascending sequencewith the ―Begin DOD‖ you fill in. For example, if the Associated Extensions are 100, 101, 102, 103, 104, 105 with ―Begin DOD‖ as 5500100, the corresponding DOD will be 5500100, 5500101, 5500102, 5500103, 5500104, and 5500105.
PSTN trunk
The public switched telephone network (PSTN) is the network of the world's public circuit-switched telephone networks.
Figure 6-23 PSTN Trunk
Click edit to configure more details.
Figure 6-24 Edit PSTN Trunk
·Trunk Name
A unique label used to identify this trunk when listed in outbound rules, incoming rules, etc. E.g. ―pstn5‖.
·Volume Setting
need to be changed. 1) Hangup Detection ·Busy Detection
Busy Detection is used to detect far end hang-up or for detecting a busy signal. Select ―Yes‖ to turn this feature on.
·Busy Count
If Busy Detection is enabled, it is also possible to specify how many busy tones to wait for before disconnecting the call. The default is 4, but better results can be achieved if set to 6 or even 8. Remember, the higher the number, the more time will be required to release a channel. A higher setting lowers the probability that you will encounter random hang-ups.
·Busy Interval
The busy detection interval ·Busy Pattern
If Busy Detection is enabled, it is also possible to specify the cadence of your busy signal. In many Countries, it is 500 msec on, 500 msec off. Without Busy Pattern specified, MyPBX will accept any regular sound-silence pattern that repeats <Busy Count> times as a busy signal. If you specify Busy Pattern, then MyPBX will further check the length of the tone and silence, which will further reduce the chance of a false positive disconnection.
·Frequency Detection
Used for Frequency Detection (Enable detecting the busy signal frequency or not).
·Busy Frequency
If the Frequency Detection is enabled, you must specify the local frequency. ·Hangup Polarity Reversal Detection
The call will be considered as ―hang up‖ on a polarity reversal. 2) Answer Detection
·Answer Detection
Answer Detection settings are configured for accurate billing. If the PSTN trunk sends polarity after answering the call, users can choose "Polarity Detection"; or else choose "Ring Detection", and configure the detailed settings according to the PSTN line ring tone.
This option allows you to define the start of a Caller ID signal:
Ring: Start when a ring is received (Caller ID Signaling: Bell_USA, DTMF). Polarity: Start when a polarity reversal is started (Caller ID Signaling: V23_UK, V23_JP, DTMF).
Before Ring: Start before a ring is received (Caller ID Signaling: DTMF). ·Caller ID Signaling
This option defines the type of Caller ID signaling to use. It can be set to one of the following:
Bell: bell202 as used in the United States v23_UK: suitable in the UK
v23_Japan: suitable in Japan v23-Japan pure: suitable in Japan
DTMF: suitable in Denmark, Sweden, and Holland .Caller ID Detection
For FXO trunks, this option forces MyPBX to clarify Caller ID incoming calls.
GSM/UMTS Trunk
GSM/UMTS trunks are supported in MyPBX Standard V7 if you have got the GSM/UMTS module and SIM cards installed. One GSM/UMTS trunk supports only one SIM card for one concurrent call.
Figure 6-25 GSM/UMTS Trunk
Click edit to configure more details.
Figure 6-26 Edit GSM/UMTS Trunk
Trunk Name