Automating Administration with SQL Agent
Automating
Administration
with SQL Agent
Objectives
• Configure SQL Server Agent. • Set SQL Server Agent properties. • Configure a fail-safe operator. • Create operators.
• Create jobs. • Create alerts.
17-2 Microsoft SQL Server 2000 Professional Skills Development
Copyright © by Application Developers Training Company and AppDev Products Company, LLC All rights reserved. Reproduction is strictly prohibited.
Configuring SQL Server Agent
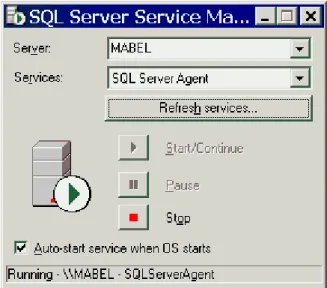
SQL Server Agent is well-namedit’s responsible for automating all SQL Server administrative tasks. In order for SQL Server Agent to execute jobs and fire alerts, it must be running at all times. Its login account must be mapped to the sysadmin fixed server role, and its domain user account login must be a member of the Windows NT/Windows 2000 Administrators group. You should configure Agent to start automatically whenever Windows
NT/Windows 2000 is started. You can do this by using the SQL Server Service Manager applet, as shown in Figure 1.
Figure 1. Configuring SQL Server Agent to start when Windows starts up.
You can also set SQL Server Agent to autostart from the Enterprise Manager by right-clicking on your server and choosing Properties from the menu. Make sure the Autostart SQL Server Agent option is checked.
There are three components to the SQL Server Agent:
• Jobs are objects consisting of one or more operations, or steps, to be performed. Steps are defined as Transact-SQL statements and can be scheduled.
• Alerts are actions to be taken when specific events occur. Alerts can be set to react to errors or to other conditions. Alerts can be configured to send e-mail, to page an operator, or to run a job.
• Operators are people who are designated through their network account or e-mail ID to receive alerts through e-mail, a pager, or a net send network command.
In addition, the SQL Server Agent can also be configured to work hand-in-hand with the Windows Performance Monitor. You can set up jobs, alerts, and
Configuring SQL Server Agent
operators through Transact-SQL, but it’s easier to use the Enterprise Manager. To view SQL Server Agent jobs, operators, and alerts expand the
Mangement|SQL Server Agent node in the Enterprise Manager, as shown in Figure 2.
Figure 2. Viewing alerts, operators, and jobs in the Enterprise Manager.
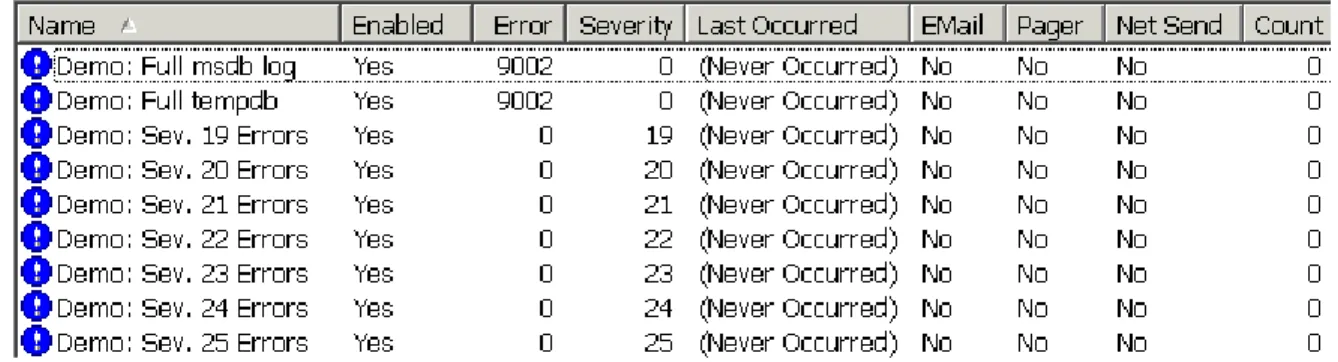
When you first install SQL Server, you won’t have any jobs or operators, so those folders will be empty. However, SQL Server does ship with some predefined alerts, as shown in Figure 3. You can use these existing alerts and also add to them by creating your own custom alerts.
17-4 Microsoft SQL Server 2000 Professional Skills Development
Copyright © by Application Developers Training Company and AppDev Products Company, LLC All rights reserved. Reproduction is strictly prohibited.
Setting SQL Server Agent Properties
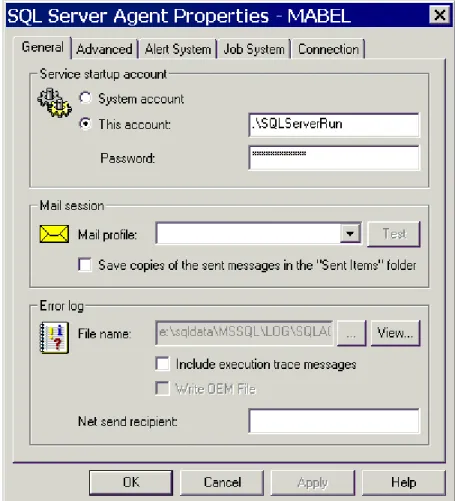
To set or revise properties for SQL Server Agent, right-click on the SQL Server Agent node and choose Properties from the menu. This will load the SQL Server Agent Properties dialog box shown in Figure 4. Use the General tab to designate the account that Agent runs under, and a MAPI mail profile for configuring SQL Mail.
Configuring SQL Server Agent
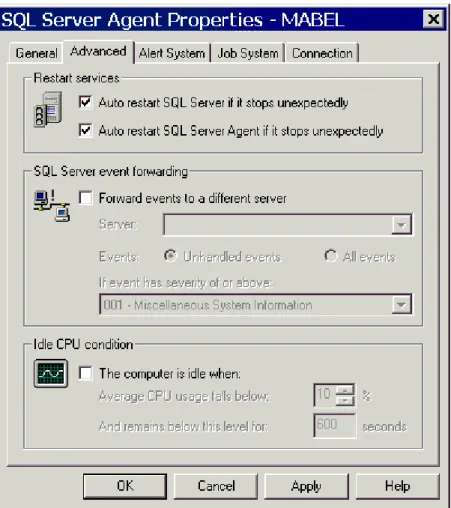
Click the Advanced tab to configure Agent to auto restart if it stops
unexpectedly. You can also use settings here to forward events to a different server and detect when the CPU is idle so that jobs can be executed during idle times (see Figure 5).
Figure 5. Setting options for SQL Server Agent to restart, forward events to a different server, or perform operations during idle time.
17-6 Microsoft SQL Server 2000 Professional Skills Development
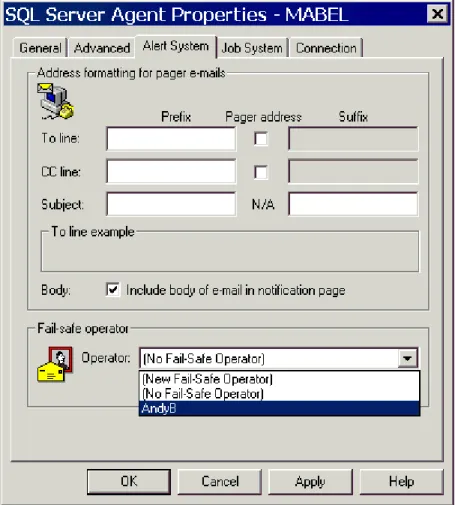
Copyright © by Application Developers Training Company and AppDev Products Company, LLC All rights reserved. Reproduction is strictly prohibited. Click the Alert System tab to format pager e-mails and set up a fail-safe operator (see Figure 6). It’s recommended that you always set up a fail-safe operator. If an operator defined for a particular alert can’t be reached, then the fail-safe operator will be notified. That way alerts don’t fall through the cracks because someone is unavailable or offline.
Configuring SQL Server Agent
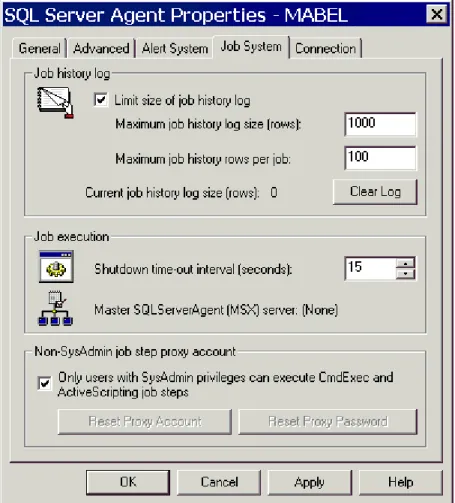
The Job System tab lets you configure the job history log and set the shutdown timeout interval (see Figure 7). By default only members of the sysadmin fixed server role can execute CmdExec and active scripting tasks. This option is important for security reasons because the SQL Server Agent service itself must run with administrative privileges. A user with these permissions could create a job and have it executed, in effect granting them access to all the resources on the server.
17-8 Microsoft SQL Server 2000 Professional Skills Development
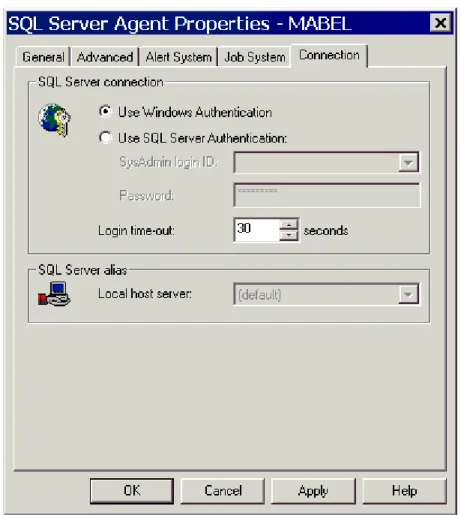
Copyright © by Application Developers Training Company and AppDev Products Company, LLC All rights reserved. Reproduction is strictly prohibited. The Connection tab is where you set up which authentication mode SQL Server Agent uses (see Figure 8). The default is the account that was selected for the services to run under when you installed SQL Server. If you choose SQL Server authentication, you’ll need to use a SQL Server login that is a member of sysadmin.
Figure 8. SQL Server Agent uses NT authentication by default.
The remaining sections in this chapter will show you how to set up jobs, create operators, and generate alerts.
Operators
Operators
Creating operators is important because you’ll need to have someone to send notifications to when you set up jobs.
Try It Out!
Follow these steps to create a new operator:
1. Expand the Management|SQL ServerAgent node and right-click on Operators. Choose New Operator from the menu.
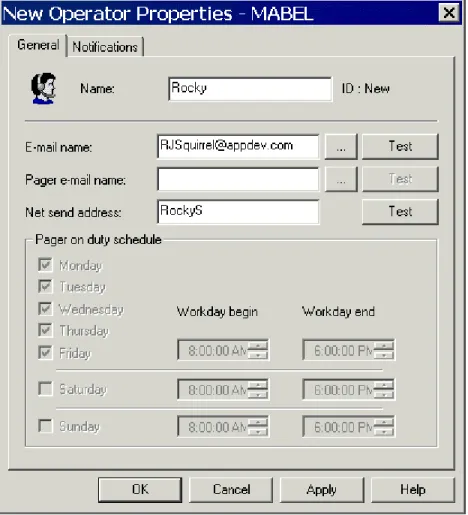
2. This will load the New Operator Properties dialog box, as shown in Figure 9. Fill in appropriate settings for the new operator. Click the Test button to verify that the operator receives the test message.
17-10 Microsoft SQL Server 2000 Professional Skills Development
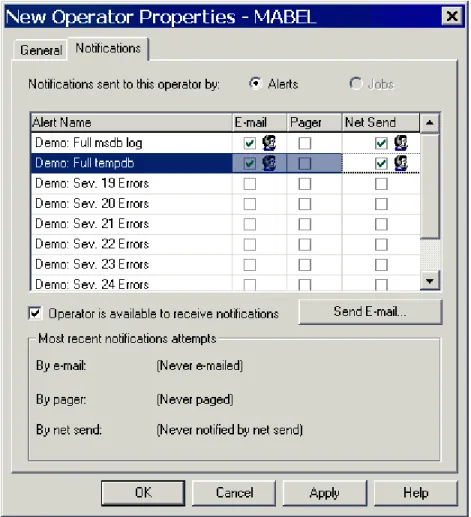
Copyright © by Application Developers Training Company and AppDev Products Company, LLC All rights reserved. Reproduction is strictly prohibited. 3. Click the Notifications tab (see Figure 10). This allows you to
designate this operator to receive notification on any of the predefined alerts. You’ll learn how to add your own alerts to this list later in the chapter.
Figure 10. Setting up notifications.
Jobs
Jobs
Jobs consist of one or more tasks that SQL Server Agent runs as a unit. These tasks can be Transact-SQL commands, backup and replication tasks, or programs that the SQL Server agent executes.
Jobs can be scheduled, and notifications sent to operators on the success or failure of the tasks in the job.
There are two ways to create a new job:
• Right-click on the SQL Server Agent node in the Management folder and choose New Job from the menu.
• Run the Create Job Wizard.
When you’re first getting started, the easiest way to create a job is with the wizard. Once you’re familiar with the different options, you can bypass the wizard and create new jobs manually.
Try It Out!
Follow these steps to create a job to check the consistency of the Shark database using the Create Job Wizard:
1. Select Tools|Wizards|Management|Create Job Wizard from the menu in the Enterprise Manager main console.
17-12 Microsoft SQL Server 2000 Professional Skills Development
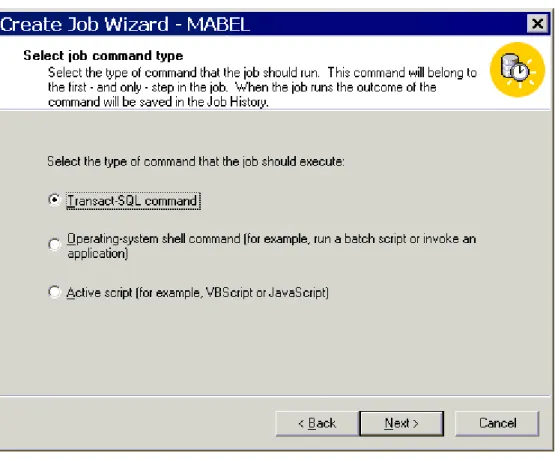
Copyright © by Application Developers Training Company and AppDev Products Company, LLC All rights reserved. Reproduction is strictly prohibited. 2. Click Next on the introductory screen to move to the second wizard
dialog box. Select the job type Transact-SQL command, as shown in Figure 11. The job in this case is Transact-SQL statement. Click Next to continue.
Jobs
3. In the next wizard dialog box, type in the Transact-SQL statement DBCC CHECKDB, as shown in Figure 12. Click the Parse button to check your syntax. Note that you could open a script file if you had a saved script defining the job by clicking the Open button. Click Next.
17-14 Microsoft SQL Server 2000 Professional Skills Development
Copyright © by Application Developers Training Company and AppDev Products Company, LLC All rights reserved. Reproduction is strictly prohibited. 4. The next wizard dialog box lets you set up a schedule for when you
want the new job to run, as shown in Figure 13. Click the Schedule button to set up a schedule. Click OK and then Next when finished.
Jobs
5. Figure 14 shows selecting an operator to be notified about the status of the job. Click Next when finished.
Figure 14. Notifying an operator.
6. The final dialog box summarizes the choices you’ve made and asks you to name the new job. Name it SharkConsistencyCheck and click the Finish button to create the job.
Once you’ve created the job, it will show up in the SQL Server Agent|Jobs folder. You can modify the existing job by adding tasks or redefining existing ones.
Try It Out!
Follow these steps to modify the SharkConsistencyCheck job by adding a task to shrink the Shark database:
1. Right-click on the SharkConsistencyCheck job in the SQL Server Agent|Jobs folder and choose Properties from the menu.
2. Click the Steps tab and click the New button to create a new task. This loads the New Job Step dialog box.
17-16 Microsoft SQL Server 2000 Professional Skills Development
Copyright © by Application Developers Training Company and AppDev Products Company, LLC All rights reserved. Reproduction is strictly prohibited. 3. Type ‘Shrink Database’ for the job step and type the following
Transact-SQL statement in the Command text box, as shown in Figure 15.
DBCC SHRINKDATABASE (Shark, 10)
Jobs
4. This command will shrink the Shark database, leaving 10% free space. Click the Advanced tab and choose Quit the job reporting success from the On success action drop-down list box, as shown in Figure 16. Fill in a location for a text file so you can view the output. Select dbo in the Run as user drop-down listbox.
17-18 Microsoft SQL Server 2000 Professional Skills Development
Copyright © by Application Developers Training Company and AppDev Products Company, LLC All rights reserved. Reproduction is strictly prohibited. 5. Click OK when finished. This will drop you back to the main
Properties dialog box, as shown in Figure 17. You now need to modify Step 1, or the Shrink Database step will never happen because the Quit with success option is selected. Click on Step 1 and choose Edit from the menu.
Figure 17. Both steps show “Quit with success.”
6. Click the Advanced tab and choose Go to next step from the On success action drop-down list box. Click OK and then click Apply or OK to save changes to the job.
7. To execute the job, right-click on SharkConsistencyCheck and choose Start Job from the menu. Once the job has completed, you can check the output by opening the SharkConsistencyCheck.txt file in Notepad.
Alerts
Alerts
An alert is a reaction to a SQL Server event such as transaction logs becoming full or triggering an error of a certain severity. SQL Server ships with some predefined alerts, as shown earlier in this chapter in Figure 3. However, there are no responses associated with these alertsoperators aren’t being e-mailed or paged.
Try It Out!
Follow these steps to associate an alert with the Demo: Full tempdb alert: 1. Expand the Alerts node in the SQL Server Agent folder and
double-click on Demo: Full tempdb. This opens the Properties dialog box for the alert.
17-20 Microsoft SQL Server 2000 Professional Skills Development
Copyright © by Application Developers Training Company and AppDev Products Company, LLC All rights reserved. Reproduction is strictly prohibited. 2. Click the Response tab. Check the operators you want to be notified
and type in any additional messages in the bottom pane, as shown in Figure 18. Note that you can also execute a job in response to the alert occurring. Click Apply or OK when finished.
Figure 18. Setting up a response to an existing alert.
Setting up a response “activates” the alert and causes something to be done about the condition that caused the alert. Alerts can also be generated by a Windows NT/Windows 2000 Performance Monitor threshold being reached. In short, alerts are a powerful tool for letting someone know when things are happening.
Try It Out!
Follow these steps to create a new alert using the Create Alert Wizard. 1. Select Tools|Wizards|Management|Create Alert Wizard from the
menu in the Enterprise Manager main console. Click Next to bypass the introductory dialog box.
Alerts
2. Choose 017 – Insufficient Resources from the drop-down list box, as shown in Figure 19. Click Next.
17-22 Microsoft SQL Server 2000 Professional Skills Development
Copyright © by Application Developers Training Company and AppDev Products Company, LLC All rights reserved. Reproduction is strictly prohibited. 3. The next dialog box allows you to narrow down your selection to a
single database, or choose to fire the alert for all databases. Type in the error message, as shown in Figure 20, and click Next.
Alerts
4. You can then designate a job to execute, or operators to receive the error message, as shown in Figure 21.
17-24 Microsoft SQL Server 2000 Professional Skills Development
Copyright © by Application Developers Training Company and AppDev Products Company, LLC All rights reserved. Reproduction is strictly prohibited. 5. You can then specify an additional message to be sent to the operator
in addition to the message previously defined, as shown in Figure 22.
Alerts
6. The final wizard dialog box will summarize your choices, as shown in Figure 23. Click Finish to complete the alert.
Figure 23. The final dialog box in the wizard summarizes your choices.
Once the alert is created, it will show up in the Alerts folder. You can double-click it to change any of the settings as needed.
17-26 Microsoft SQL Server 2000 Professional Skills Development
Copyright © by Application Developers Training Company and AppDev Products Company, LLC All rights reserved. Reproduction is strictly prohibited.
Summary
• SQL Server Agent is responsible for automating all SQL Server administrative tasks.
• SQL Server Agent requires a Windows NT/Windows 2000 administrative domain account to run.
• SQL Server Agent consists of jobs, alerts, and operators.
• Jobs consist of tasks to be performed and can consist of one or more steps.
• Operators are people who can be notified about jobs and alerts. • Alerts are responses to events and can include notifications or execute
scripts.
• Jobs, alerts, and operators can be created from the Enterprise Manager or from the wizards.
Alerts
Questions
1. Where can you configure SQL Server Agent to start when the operating system starts?
2. What kind of domain account does SQL Server Agent require to run under Windows NT/Windows 2000?
3. Why is a fail-safe operator useful?
4. What is the easiest way to create a job, alert, or operator?
17-28 Microsoft SQL Server 2000 Professional Skills Development
Copyright © by Application Developers Training Company and AppDev Products Company, LLC All rights reserved. Reproduction is strictly prohibited.
Answers
1. Where can you configure SQL Server Agent to start when the operating system starts?
From the SQL Server Service Manager applet or from the Server Properties dialog box in the Enterprise Manager.
2. What kind of domain account does SQL Server Agent require to run under Windows NT/Windows 2000?
An Administrative account 3. Why is a fail-safe operator useful?
If an operator defined for a particular alert can't be reached, then the fail-safe operator will be notified.
4. What is the easiest way to create a job, alert, or operator? By using one of the wizards in the Enterprise Manager. 5. How can you edit a job, alert or operator once it has been created?
By right-clicking or double-clicking on it in the Enterprise Manager to bring up its Properties dialog box.
Alerts
Lab 17:
Automating
Administration
with SQL Agent
17-30 Microsoft SQL Server 2000 Professional Skills Development
Copyright © by Application Developers Training Company and AppDev Products Company, LLC All rights reserved. Reproduction is strictly prohibited.
Lab 17 Overview
In this lab you’ll learn how to create operators, jobs, and alerts. To complete this lab, you’ll need to work through three exercises:
• Create an Operator • Create a Job • Create an Alert
Each exercise includes an “Objective” section that describes the purpose of the exercise. You are encouraged to try to complete the exercise from the
information given in the Objective section. If you require more information to complete the exercise, the Objective section is followed by detailed step-by-step instructions.
Create an Operator
Create an Operator
Objective
In this exercise, you’ll create an operator and assign them to receive notification when the msdb log is full and when tempdb is full.
Things to Consider
• How do you create an operator? • How do you contact the operator?
• How do you assign an alert to an operator?
Step-by-Step Instructions
1. Right-click on the Operators node in the SQL Server Agent|Operators folder and select New Operator from the menu. This loads the New Operator Properties dialog box.
2. Fill in the appropriate settings for the new operator. Click the Test button to verify that the operator receives the test message.
17-32 Microsoft SQL Server 2000 Professional Skills Development
Copyright © by Application Developers Training Company and AppDev Products Company, LLC All rights reserved. Reproduction is strictly prohibited. 3. Click the Notifications tab. Select the Demo: Full msdb log and Demo:
Full tempdb and click the Net Send checkboxes, as shown in Figure 24.
Figure 24. Configuring a new operator.
Create a Job
Create a Job
Objective
In this exercise, you’ll create a job to run the DBCC CHECKCATALOG on the Shark database to check the consistency of the systems tables in Shark.
Things to Consider
• How do you create a job?
• How do you execute DBCC commands in a job?
Step-by-Step Instructions
1. Right-click on Jobs in the SQL Server Agent|Jobs node and select New Job from the menu. This loads the New Job Properties dialog box. 2. Type the name Shark System Check and click the Steps tab.
3. Click the New button to load the New Job Step dialog box. For the step name, type in Check System Tables and choose the Shark database from the drop-down list. Type the following Transact-SQL statement in the Command box:
DBCC CHECKCATALOG ('Shark')
17-34 Microsoft SQL Server 2000 Professional Skills Development
Copyright © by Application Developers Training Company and AppDev Products Company, LLC All rights reserved. Reproduction is strictly prohibited. 5. Fill in the options shown in Figure 25 to quit on success, and create an
output file named AgentLab.txt in a folder on your hard drive. Select dbo in the Run as user drop-down listbox. Click OK when finished.
Figure 25. Configure the job to create an output file.
6. Click OK. This saves the job. To execute the job, right-click and choose Start Job from the menu. Click Start to run the job.
7. After the job has completed running, open AgentLab.txt in Notepad. The contents should look like the following:
Job 'Shark System Check' : Step 1, 'Check System Tables' : Began Executing 2000-10-20 18:15:33
DBCC results for 'Shark'. [SQLSTATE 01000]
DBCC execution completed. If DBCC printed error messages, contact your system administrator. [SQLSTATE 01000]
Create an Alert
Create an Alert
Objective
In this exercise, you’ll create an alert for a fatal hardware error. If a fatal hardware error triggers the alert, the operator you created in the first exercise will be notified.
Things to Consider
• How do you create an alert? • How do you notify an operator?
Step-by-Step Instructions
1. Right-click the Alerts node in the SQL Server Agent|Alerts folder and choose New Alert from the menu. This loads the New Alert Properties dialog box.
17-36 Microsoft SQL Server 2000 Professional Skills Development
Copyright © by Application Developers Training Company and AppDev Products Company, LLC All rights reserved. Reproduction is strictly prohibited. 2. Fill in Hardware Error for the name and select 024 – Fatal Error:
Hardware Error from the Severity drop-down listbox. Type A fatal hardware error has occurred. for the error message text, as shown in Figure 26.
Figure 26. Defining the alert.
3. Click the Response tab. Select the operator you created in the first exercise and click the Net-Send checkbox. Click Apply or OK.