Extreme Networks, Inc. 3585 Monroe Street
Santa Clara, California 95051 (888) 257-3000
(408) 579-2800
http://www.extremenetworks.com
EPICenter Concepts and Solutions Guide
Version 5.1
Published: October, 2005 Part number: 100203-00 Rev. 02
©2005 Extreme Networks, Inc. All rights reserved. Extreme Networks and BlackDiamond are registered trademarks of Extreme Networks, Inc. in the United States and certain other jurisdictions. EPICenter, ExtremeWare,
ExtremeWare Vista, ExtremeWorks, ExtremeAssist, ExtremeAssist1, ExtremeAssist2, PartnerAssist, Extreme Standby Router Protocol, ESRP, SmartTraps, Alpine, Summit, Summit1, Summit4, Summit4/FX, Summit7i, Summit24, Summit48, Summit Virtual Chassis, SummitLink, SummitGbX, SummitRPS and the Extreme Networks logo are trademarks of Extreme Networks, Inc., which may be registered or pending registration in certain jurisdictions. The Extreme Turbodrive logo is a service mark of Extreme Networks, which may be registered or pending registration in certain jurisdictions. Specifications are subject to change without notice.
Solaris is a trademark of Sun Microsystems, Inc.
This product includes software developed by the Apache Software Foundation (http://www.apache.org).
This product contains copyright material licensed from AdventNet, Inc. (http://www.adventnet.com). All rights to such copyright material rest with AdventNet.
Contents
Preface... 9
Introduction ...9
Terminology...9
Conventions...9
Related Publications ...11
Chapter 1: EPICenter Overview... 13
Introduction ...13
EPICenter Features ...13
Inventory Management...15
The Alarm System ...15
The Configuration Manager and the Firmware Manager ...16
The Grouping Manager...16
The IP/MAC Address Finder...16
The Telnet Feature ...16
Real-Time Statistics ...17
Topology Views ...17
Enterprise-wide VLAN Management ...18
The ESRP Manager ...18
The STP Monitor ...18
EPICenter Reports...18
Role-based Access Management ...19
The EPICenter Policy Manager Upgrade...19
Distributed Server Mode (EPICenter Gold Upgrade) ...19
EPICenter Software Architecture...20
Extreme Networks Switch Management ...21
SNMP and MIBs ...21
Traps and Smart Traps...21
Device Status Polling...22
Extreme Networks Device Support...23
Third-Party Device Support ...23
Chapter 2: Getting Started with EPICenter ... 25
Starting EPICenter ...25
Starting the EPICenter Server ...25
Starting the EPICenter Client ...26
The EPICenter Client Login Window ...28
Getting Help ...30
Working with the EPICenter Features ...31
Device Selection Persistence ...31
Running Features in Separate Windows ...32
EPICenter User Roles ...32
Creating the Device Inventory ...32
Adding Devices Individually...34
Setting up Default Device Contact Information ...35
Creating and Using Device Groups ...35
Managing Device Configurations and Firmware...37
Saving Baseline Configuration Files in the Configuration Manager ...37
Scheduling Configuration File Archiving ...39
Checking for Software Updates ...40
Using the EPICenter Alarm System ...41
Predefined Alarms...41
The Alarm Log Browser ...42
Filtering the Alarm Log Display ...43
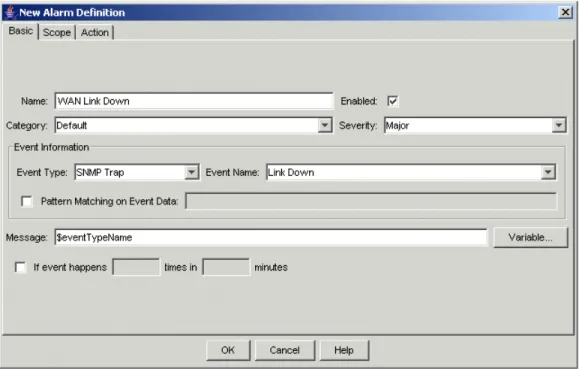
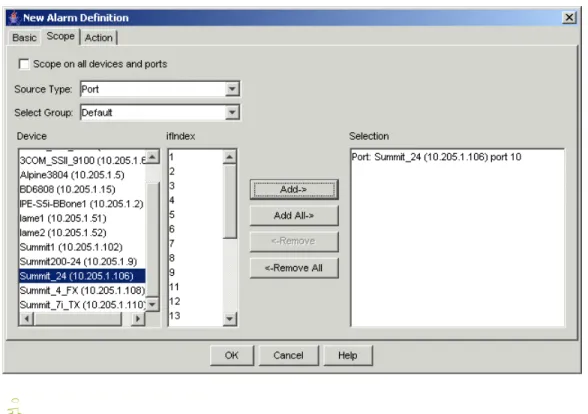
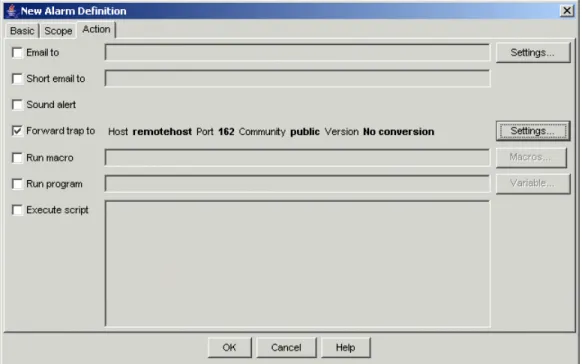
Creating or Modifying an Alarm Definition...46
Threshold Configuration for RMON and CPU Utilization Alarms ...53
Configuring a CPU Utilization Rule ...56
Using Topology Views ...58
Automated Map Creation vs. Manual Map Creation ...60
Customizing the Look of Your Maps...61
Using Basic EPICenter Reports...61
Chapter 3: Managing your Network Assets... 65
Creating a Network Component Inventory...65
Using Discovery to Find Network Devices...65
Adding Devices Individually...68
Importing Devices Using the DevCLI Utility...69
Making Device Contact Information Changes...69
Organizing Your Inventory with Device Groups ...71
Monitoring Critical Links with Port Groups ...72
Inventory Reports ...75
Uploading Inventory Information to Extreme ...76
Chapter 4: Configuring and Monitoring Your Network ... 77
Scalable, Concurrent Multidevice Configuration ...77
User-Defined Telnet Macros ...77
Creating Telnet Macros for Re-Use ...78
Creating Macros to be Run From a Menu ...80
Role-based Telnet Macro Execution...81
Network-wide VLAN Configuration...82
Graphical and HTML-based Configuration Monitoring ...83
Chapter 5: Managing VLANs... 85
Graphical Configuration and Monitoring of VLANs ...85
Network-wide VLAN Membership Visibility...86
Network-wide Multidevice VLAN Configuration ...87
Baseline Configurations ...94
Identifying Changes in Configuration Files ...95
Automatic Differences Detection...95
Device Configuration Management Log ...96
Managing Firmware Upgrades...97
Automated Retrieval of Firmware Updates from Extreme ...97
Detection of Firmware Obsolescence for Network Components ...97
Multi-Step Upgrade Management...97
Chapter 7: Managing Network Security... 99
Security Overview...99
Management Access Security ...99
Using RADIUS for EPICenter User Authentication ...100
Securing Management Traffic ...102
Securing EPICenter Client-Server Traffic ...107
Monitoring Switch Configuration Changes ...107
Using the MAC Address Finder ...108
Using Alarms to Monitor Potential Security Issues ...108
Device Syslog History ...109
Network Access Security 110 Using VLANs ...110
Using IP Access Lists ...112
Chapter 8: Managing Wireless Networks ... 115
Wireless Networking Overview...115
Inventory Management Using Wireless Reports...115
Security Monitoring with Reports ...116
Client MAC spoofing report...117
Monitoring Unauthenticated Clients ...117
Detecting Rogue Access Points...118
Enabling Rogue Access Point Detection...118
Detecting Clients with Weak or No Encryption...119
Wireless Network Status with Reports ...120
Performance Visibility with Reports ...120
Debugging Access Issues with Syslog Reports ...121
Fault Isolation with Reports...121
Chapter 9: Tuning and Debugging EPICenter ... 123
Monitoring and Tuning EPICenter Performance ...123
Polling Types and Frequencies ...124
Performance of the EPICenter Server ...125
Tuning the Alarm System ...125
Disabling Unnecessary Alarms ...126
Limiting the Scope of Alarms ...127
The Alarm and Event Log Archives ...128
Using the MIB Poller Tools...129
Defining a MIB Collection ...129
The MIB Query Tool...135
Reconfiguring EPICenter Ports ...136
Using the EPICenter Debugging Tools ...137
Chapter 10: VoIP and EPICenter-Avaya Integrated Management ... 139
Overview ...139
Installation Considerations ...140
TFTP Server Coordination...141
Discovering Avaya Devices ...141
Avaya Devices in EPICenter...142
Launching the Avaya Device Manager from the Devices Sub-Menu ...143
Tools Menu Commands...143
Launching the Avaya Integrated Management Console from EPICenter ...145
Monitoring IP Phones on Extreme Devices ...145
Importing IP Phones...145
Syncing IP Phones ...146
The IP Phones Properties Display...147
IP Phones Reports...148
EPICenter System Properties for Avaya Integration ...149
Launching EPICenter from the Avaya Integrated Management Console ...151
Chapter 11: Policy Manager Overview ... 153
Overview of the Policy Manager ...153
Basic EPICenter Policy Definition ...154
Policy Types ...154
Access-based Security Policies ...155
IP-Based Policies (Access List Policies)...157
Source Port Policies ...160
VLAN Policies ...161
Policy Named Components...162
Policy Access Domain and Scope...164
Using Groups in Policy Definitions ...166
Precedence Relationships within the Policy Manager ...167
Policy Configuration ...167
EPICenter Policy Limitations ...168
Appendix A: Troubleshooting ... 171
Troubleshooting Aids ...171
Using the Stand-alone Client Application...171
Using the Browser-based Client (Windows Only) ...172
EPICenter Client ...173
EPICenter Database ...174
Printing...183
Topology ...184
STP Monitor ...184
Reports ...184
Appendix B: Configuring Devices for Use With EPICenter ... 187
Configuring EPICenter as a Syslog Receiver ...187
Setting EPICenter as a Trap Receiver ...188
Appendix C: Using SSH for Secure Communication ... 189
Overview of Tunneling Setup ...189
Step 1: Install PuTTY on the EPICenter Client ...189
Step 2: Configure the PuTTY Client...190
Step 3: Installing OpenSSH Server ...192
Step 4: Configure Microsoft Firewall to Allow SSH Connects ...197
Step 5: Initiate EPICenter Server/Client Communication ...199
Appendix D: Configuring RADIUS for EPICenter Authentication ... 201
Step 1. Create an Active Directory User Group for EPICenter Users ...201
Step 2. Associate Users with the EPICenter Group ...202
Step 3. Enable EPICenter as a RADIUS Client ...204
Step 4. Create a Remote Access Policy for EPICenter Users ...205
Step 5. Edit the Remote Access Policy to add a VSA ...210
Step 6. Configure EPICenter as a RADIUS Client ...216
Appendix E: EPICenter Utilities ... 217
The DevCLI Utility...217
Using the DevCLI Commands ...217
DevCLI Examples ...220
Inventory Export Scripts...221
Using the Inventory Export Scripts ...221
Inventory Export Examples ...222
The SNMPCLI Utility ...223
Using the SNMPCLI Utility...223
SNMPCLI Examples ...224
Port Configuration Utility ...225
The AlarmMgr Utility ...226
Using the AlarmMgr Command ...226
AlarmMgr Output ...228
AlarmMgr Examples...228
The FindAddr Utility ...229
Using the FindAddr Command ...229
FindAddr Output ...231
FindAddr Examples ...231
The TransferMgr Utility ...231
Using the TransferMgr Command ...231
The VlanMgr Utility ...234
Using the VlanMgr Command ...234
VlanMgr Output...237
VlanMgr Examples...237
The ImportResources Utility ...238
Using the ImportResources Command ...238
ImportResources Examples ...239
Preface
This preface provides an overview of this guide, describes guide conventions, and lists other useful publications.
Introduction
This guide provides the required information to use the EPICenter software. It is intended for use by network managers who are responsible for monitoring and managing Local Area Networks, and assumes a basic working knowledge of:
● Local Area Networks (LANs)
● Ethernet concepts
● Ethernet switching and bridging concepts
● Routing concepts
● The Simple Network Management Protocol (SNMP)
NOTE
If the information in the Release Notes shipped with your software differs from the information in this guide, follow the Release Note.
Terminology
When features, functionality, or operation is specific to the Summit, Alpine, or BlackDiamond switch family, the family name is used. Explanations about features and operations that are the same across all Extreme switch product families simply refer to the product as the “Extreme device” or “Extreme switch.” Explanations about features that are the same for all devices managed by EPICenter (both Extreme devices and others) are simply refer to “devices.”
Conventions
Table 1 and Table 2 list conventions that are used throughout this guide.
Table 1: Notice Icons
Icon Notice Type Alerts you to...
Note Important features or instructions.
Caution Risk of unintended consequences or loss of data. Warning Risk of permanent loss of data.
Preface
.
Table 2: Text Conventions
Convention Description
Screen displays This typeface represents information as it appears on the screen. Screen displays bold This typeface indicates how you would type a particular command. The words “enter”
and “type”
When you see the word “enter” in this guide, you must type something, and then press the Return or Enter key. Do not press the Return or Enter key when an instruction simply says “type.”
[Key] names Key names appear in text in one of two ways. They may be
• referred to by their labels, such as “the Return key” or “the Escape key.” • written with brackets, such as [Return] or [Esc].
If you must press two or more keys simultaneously, the key names are linked with a plus sign (+). For example:
Press [Ctrl]+[Alt]+[Del].
Words in bold type Bold text indicates a button or field name.
Words in italicized type Italics emphasize a point or denote new terms at the place where they are defined in the text.
Related Publications
Related Publications
The EPICenter documentation set includes the following:
● EPICenter Reference Guide
● EPICenter Concepts and Solutions Guide (this guide)
● EPICenter Installation and Upgrade Note
● EPICenter Release Notes
● EPICenter License Agreement
Both the EPICenter Reference Guide and the EPICenter Concepts and Solutions Guide can be found online in Adobe Acrobat PDF format in the docs subdirectory of the EPICenter installation directory. They are also available in a Microsoft Windows environment from the EPICenter Start menu.
You must have Adobe Acrobat Reader version 4.0 or later (available from http://www.adobe.com free of charge) to view these manuals.
The EPICenter software also includes context-sensitive online Help, available from the Help menu in each EPICenter applet, as well as through Help buttons in most windows and dialogs throughout the software.
Other manuals that you will find useful are:
● ExtremeWare Software User Guide
● ExtremeWare Command Reference Guide
● ExtremeWare XOS Concepts Guide
● ExtremeWare XOS Command Reference Guide
For documentation on Extreme Networks products, and for general information about Extreme Networks, see the Extreme Networks home page:
● http://www.extremenetworks.com
Customers with a support contract can access the Technical Support pages at:
● http://www.extremenetworks.com/services/eSupport.asp
The technical support pages provide the latest information on Extreme Networks software products, including the latest Release Notes, information on known problems, downloadable updates or patches as appropriate, and other useful information and resources.
Customers without contracts can access manuals at:
1
EPICenter Overview
This chapter describes:
● The features of the EPICenter™ software application
● The EPICenter software architecture and components
● Overview of EPICenter switch management
Introduction
Today's corporate networks commonly encompass hundreds or thousands of systems, including individual end user systems, servers, network devices such as printers, and internetworking systems. Extreme Networks™ recognizes that network managers have different needs, and delivers a suite of
ExtremeWare™ management tools to meet those needs.
EPICenter is a powerful yet easy-to-use application suite that facilitates the management of a network of Summit™, BlackDiamond™, and Alpine™ switches, as well as selected third-party switches.
EPICenter makes it easier to perform configuration and status monitoring, create virtual LANs (VLANs), and implement policy-based networking in enterprise LANs with Extreme Networks
switches. EPICenter offers a comprehensive set of network management tools that are easy to use from a client workstation running EPICenter client software, or from a workstation configured with a web browser and the Java plug-in.
EPICenter leverages the three-tier client/server architecture framework represented by Java applets, and can be accessed using Microsoft Internet Explorer or with Sun’s Java Plug-in. The EPICenter application and database support two of the most popular operating environments in the marketplace, Microsoft Windows 2000/XP and Sun Microsystems’ Solaris.
EPICenter Features
In large corporate networks, network managers need to manage systems “end to end.” The EPICenter software is a powerful, flexible and easy-to-use application for centralizing the management of a network of Extreme switches and selected third-party devices, regardless of the network size. The EPICenter software provides the vital SNMP, HTML, and CLI-based tools you need for network-wide management of Extreme Networks Summit, Black Diamond, and Alpine switches.
● Network Control. The EPICenter software provides configuration and monitoring of Extreme Networks' switches and selected third-party devices anywhere on the network simultaneously.
● Intelligent Management. Extreme SmartTraps™ (patent pending) automatically gather switch
configuration changes and forward them to the EPICenter server, thereby minimizing network management traffic. EPICenter separates its SNMP status polling, used to asses a device’s connectivity, from its less frequent and more data-intensive detailed polling.
● Hierarchical Displays. Most information, including that found in EPICenter topology maps, VLAN management, configuration management, and real-time statistics, is dynamically presented in an easy-to-navigate hierarchical tree.
EPICenter Overview
● Multi-platform capability. The EPICenter server supports Sun SPARC/Solaris and Intel, Windows 2000, and Windows XP. Client applications on either of these platforms can connect to servers on either platform.
● Support for multiple users with security. Users must log in to the application, and can be granted different levels of access to the application features based on their assigned role. Three basic predefined roles are provided, and additional user roles can be created. Telnet and SSH access to Extreme switches can also be controlled based on the user identity.
● Installed or web-based clients. The EPICenter software gives you a choice of installing full-function client software, or connecting to the EPICenter server through a web-browser-based client, available on Windows client machines. The browser-based client provides slightly limited functionality due to the constraints of the browser environment.
● Monitor wireless Access Points and wireless clients. Through EPICenter’s dynamic reports you can monitor the status of the Altitude 300 APs connected to your network and monitor wireless client activity connected through those APs. You can also detect rogue APs connected to the network, and add them to a “safe” list, or disable their access if necessary.
● Manage large numbers of devices. The EPICenter Gold Upgrade enables the EPICenter server to manage up to 2000 devices with a single installation of the EPICenter software. For even larger networks you can split the management task among several EPICenter servers in a distributed server mode that lets you monitor the status of those servers from a single client.
● Policy-based Management. The EPICenter Policy Manager Upgrade is an optional, separately-licensed component of the EPICentersoftware that lets you work with high-level policy components (users, desktop systems, groups of users, devices, or applications) in defining network policies used to protect and guarantee delivery of mission-critical traffic. The policy system translates these into the specific information needed for QoS configuration of network devices. It also detects overlaps and conflicts in policies, with precedence rules for resolving conflicting QoS rules.
Extreme Networks switches and many other MIB-2 compatible devices can be monitored and controlled from a central interface, without exiting EPICenter to run a separate program or telnet session. Features such as SmartTraps (for Extreme devices) and the EPICenter alarm system further maximize network monitoring capability while maintaining network usage efficiency.
All devices in the EPICenter inventory database—both Extreme devices and third-party devices—can also appear on a topology map. The EPICenter alarm system can handle SNMP traps from any device in the inventory database, including RMON traps from devices with RMON enabled. The Real-Time Statistics module can display statistics for any device with RMON enabled, and the IP/MAC Finder applet supports all devices running MIB-2 and the Bridge MIB, with the exception of user mapping, which is specific to Extreme devices.
You can organize your network resources into multiple, overlapping groups (including groups made up of selected ports from multiple switches) that you can manage as a single entity. Device groupings can be based on a variety of factors, such as physical location, logical grouping, devices that support SSH2, and so on. Using device groups, you can search for individual IP addresses and identify their
connections into the network. You can monitor the status of your network devices visually through the Inventory Manager or via a Topology map, or by setting alarms that will notify you about conditions or events on your network devices. You can display an overview of the status of your network devices as a hierarchical topology map.
EPICenter Features
The EPICenter features are described in somewhat more detail in the following sections. The rest of this manual describes how to best use these features to manage various aspects of your network. For detailed instructions on using specific features of EPICenter see the context-sensitive online Help available via the Help menu at the top of every feature, as well as via Help buttons throughout the user interface of the product. The EPICenter Reference Guide also provides a detailed description of the functionality of each EPICenter feature.
Inventory Management
EPICenter’s Inventory Manager feature keeps a database of all the devices managed by the EPICenter software. Any EPICenter user with read-only access to this feature can view status information about the switches currently known to the EPICenter database.
The EPICenter Inventory Management provides a discovery function to discover the components of your network. Users with the appropriate access (roles with read/write access) can use this feature to discover Extreme devices as well as any third-party devices running a MIB-2 compatible SNMP agent. Devices may be discovered by specific IP address or within a range of IP addresses. Third-party devices that support SNMP version 3 (SNMPv3) are discovered as SNMP version 1 (SNMPv1) and are added to the EPICenter database as SNMPv1 devices.
Network devices can also be added to the EPICenter database manually, using the Inventory Manager Add function. Once a network device is known to the EPICenter database, you can assign it to a specific device group, and configure it using the VLAN Manager, the Configuration Manager, Telnet macros, or the embedded Device Manager (ExtremeWare Vista for Extreme devices). The Inventory Manger also allows you to set a device to offline status so that EPICenter will not poll and can ignore traps when a device is scheduled for maintenance.
EPICenter also provides a command-line utility that lets you create device groups and import large numbers of devices into the inventory database through scripts, to streamline the process of adding and organizing devices for management purposes. These utilities are described in the Appendix E
“EPICenter Utilities”.
The Inventory Manager displays detailed information about individual devices through a front panel image that provides a visual device representation, with associated detailed configuration and status information. Any EPICenter user can view status information about the network devices known to the EPICenter database. Users with the appropriate access permissions can also view and modify
configuration information for those switches.
The Alarm System
The EPICenter Alarm System provides fault detection and alarm handling for the network devices monitored by the EPICenter software. This includes Extreme devices and some third-party devices— those that the EPICenter software can include in its Inventory database. The Alarm System also lets you define your own alarms that will report errors under conditions you specify, such as repeated
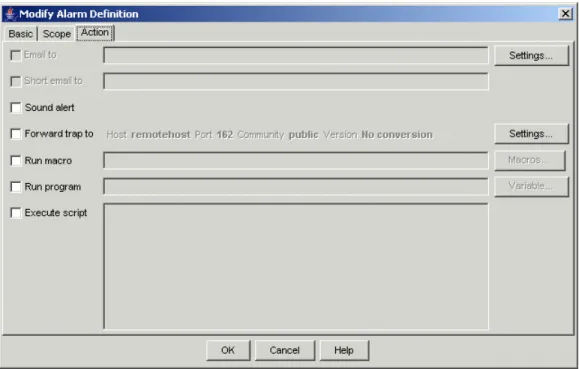
occurrences or exceeding threshold values. You can specify the actions that should be taken when an alarm occurs, and you can enable and disable individual alarms.
Fault detection is based on SNMP traps, RMON traps, Syslog messages, and some limited polling. The Alarm System supports SNMP MIB-2 and the Extreme Networks private MIB. You can also configure alarms based on certain event thresholds, or on the content of Syslog messages. When an alarm occurs you can specify actions such as sending e-mail, forwarding a trap, running a program, running a script, or a Telnet macro, sending a page, or sounding an audible alert.
EPICenter Overview
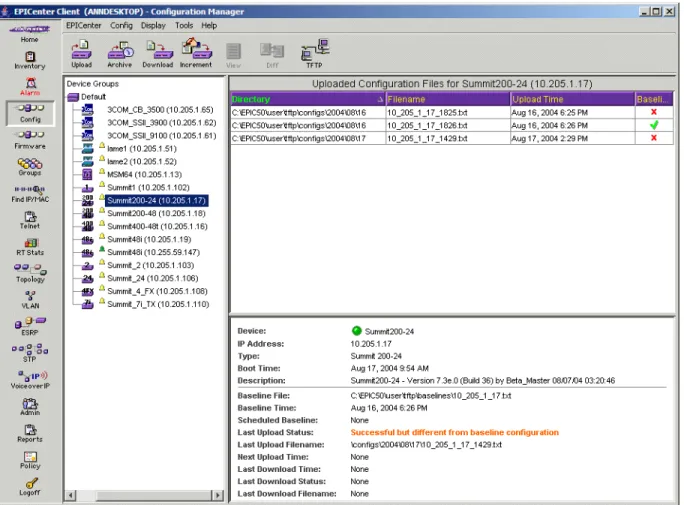
The Configuration Manager and the Firmware Manager
The EPICenter Configuration Manager provides a mechanism and a graphical interface for uploading and downloading configuration files to and from managed devices. The EPICenter Firmware Manager can download ExtremeWare software images and BootROM images to Extreme Networks devices, or to Extreme modules that include software.
The Configuration Manager provides a framework for storing the configuration files, to allow tracking of multiple versions. Configuration file uploads can be performed on demand, or can be scheduled to occur at regular times—once a day, once a week, or at whatever interval is appropriate.
The Firmware Manger can be configured to automatically track the firmware versions in Extreme devices, will indicate whether newer versions are available, and can automatically retrieve those versions from Extreme if desired.
The Grouping Manager
One of the powerful features of the EPICenter software is its ability to take actions on multiple devices or resources with a single user action. The Grouping Manager facilitates this by letting you organize various resources into hierarchical groups, which can then be referenced in other applets. You can then take actions on a group, rather than having to specify the individual devices or ports that you want to affect.
You can also create or import named resources such as users and workstations, which can be mapped through the Grouping Manager to IP addresses and ports. This capability is especially important in relationship to the optional Policy Manager applet, which takes advantage of these types of resources to simplify the creation of QoS and Access List policies.
The IP/MAC Address Finder
The IP/MAC Address Finder applet lets you search for specific network addresses (MAC or IP addresses) and identify the Extreme Networks switch and port on which the address resides. You can also use the IP/MAC Finder applet to find all addresses on a specific port or set of ports. If you have enabled EPICenter’s periodic MAC Address polling, which does polls for edge port address
information, you can perform a fast address search by just searching the EPICenter database for this information. ALternatively you can direct EPICenter to search the FDBs of specific Extreme switches. You can export the results of your search to a file, either on the server or on your local (client) system.
The Telnet Feature
The Telnet feature provides two ways to interact with devices via Telnet: either by running an
interactive Telnet session on a selected device, or by creating Telnet macros (scripts of CLI commands) that can be executed on multiple devices in one operation, and can be executed repeatedly. Results of the most recent macro run on each device are saved into log files, and can be viewed from within the Telnet applet. Telnet macros can be exported and imported through the Macro Editor.
EPICenter Features
You can use the interactive Telnet capability (but not Telnet macros) to view and modify configuration information for some Cisco and 3COM devices as well as for Extreme Networks devices. Telnet macros are supported on Extreme Networks and Avaya devices.
Real-Time Statistics
The Real-Time Statistics feature of the EPICenter software provides a graphical presentation of utilization and error statistics for Extreme switches in real time. The data is taken from Management Information Base (MIB) objects in the etherHistory table of the Remote Monitoring (RMON) MIB. You can choose from a variety of styles of charts and graphs as well as a tabular display.
You can view data for multiple ports on a device, device slot, or within a port group, optionally limiting the display to the “top N” ports (where N is a number you can configure). You can also view limited historical statistics for an individual port. If you choose to view a single port, the display shows the value of the selected variable(s) over time, and can show utilization history, total errors history, or a breakdown of individual errors.
In addition, the Real-Time Statistics applet lets you “snapshot” a graph or table as a separate browser page. You can then save, print, or e-mail the page.
Topology Views
The EPICenter software’s Topology feature allows you to view your network (EPICenter-managed devices and the links between Extreme devices) as a set of maps. These maps can be organized as a tree of submaps that allow you to represent your network as a hierarchical system of campuses, buildings, floors, closets, or whatever logical groupings you want.
EPICenter can add device nodes to your topology map automatically as devices are added to EPICenter software’s device inventory. The EPICenter software automatically detects and adds links that exist between Extreme devices, and organizes the device nodes into submaps as appropriate. The links between devices provide information about the configuration and status of the links.
You can customize the resulting maps by creating submaps, moving map elements within or between submaps, adding new elements, such as links, “decorative” (non-managed) nodes, and text, and customizing the look and labeling of the discovered nodes themselves. In addition, options are available to organize and optimize the map layout to display very large numbers of devices with the minimum of device and link overlap. You can place a background image behind your map—either one of the images available with EPICenter, or one you provide yourself, such as a building or campus layout.
The Topology applet shows alarm status for individual devices, and propagates that information up the map hierarchy so that from a higher-level map you can tell the what level of alarms have occurred for devices in a submap. The Topology applet also provides information about the VLANs configured on devices in a topology view. Using the Display VLANs feature, you can visually see which links and devices are configured for a selected VLAN, or select a specific device or link to see what VLANs are configured on that device. You can also configure a VLAN in a topology by adding ports or trunk links. Finally, from a managed device node on the map, you can invoke other EPICenter functions such as the alarm browser, telnet, real-time statistics, a front panel view, the VLAN Manager, or ExtremeWare Vista for the selected device.
EPICenter Overview
Enterprise-wide VLAN Management
A virtual LAN (VLAN) is a group of location- and topology-independent devices that communicate as if they were on the same physical local area network (LAN).
The EPICenter VLAN Manager is an enterprise-wide application that manages many aspects of VLANs on Extreme Network’s Summit, BlackDiamond, and Alpine switches. Any EPICenter user can view status information about the VLANs known to EPICenter across the network. Users with the appropriate access can create and delete VLANs, add and remove ports from existing VLANs, and create and modify the protocol filters used to filter VLAN traffic. When creating or modifying a VLAN, you can get EPICenter to determine whether there is connectivity between the devices you have included in the VLAN, and if not, it can recommend what ports and devices you should add to achieve connectivity.
The ESRP Manager
The Extreme Standby Router Protocol (ESRP) is a feature of ExtremeWare that allows multiple switches to provide redundant layer 3 routing services, as well as layer 2 redundancy, to users. The ESRP Manager displays the status of ESRP-enabled VLANs and the ESRP-enabled switches in those VLANs. You can view a summary status for all the ESRP-enabled VLANs being monitored by the EPICenter software. You can also view detailed information for an individual ESRP-enabled VLAN and the switches in those VLANs.
The STP Monitor
The EPICenter Spanning Tree Protocol (STP) Monitor module displays information about STP domains network-wide at the domain, VLAN, device, and port levels. The STP Monitor can monitor STP domains configured on devices running ExtremeWare 6.2.2 or later. Earlier versions of ExtremeWare supported the Spanning Tree protocol, but STP information via SNMP (required for EPICenter) is available only with ExtremeWare version 6.2.2 or later.
EPICenter Reports
EPICenter Reports are HTML pages that can be accessed separately from the main EPICenter user interface, without logging in to the full EPICenter client. EPICenter reports do not require Java, so reports can be loaded quickly, even over a dial-up connection, and can be viewed on systems that cannot run the browser-based or installed EPICenter clients. Reports can be printed using the browser print function.
The Reports capability provides a large number of predefined HTML reports that present a variety of types of information from the EPICenter database. You can also create your own reports by writing Tcl scripts. Further, within the Reports Module are several useful tools such as a MIB Browser and other tools that can provide EPICenter system information.
The Reports module can also be accessed from the Navigation toolbar within the EPICenter client application. A Summary report is displayed on the EPICenter Home page that provides basic
EPICenter Features
Role-based Access Management
All EPICenter users must log in with a user name and password in order to access EPICenter features. EPICenter initially provides four user roles:
● Monitor role—users who can view status information only.
● Manager role—users who can modify device parameters as well as view status information.
● Administrator role—users who can create, modify and delete EPICenter user accounts as well as perform all the functions of a user with Manager access.
● Disabled role—users whose account information is maintained, but who have no access to any features of the product.
An Administrator user can create additional roles, can modify the capabilities available under each role, and can add and delete EPICenter users, as well as enable or disable access for individual users. By default, EPICenter provides its own authentication and authorization for EPICenter users. However, through the EPICenter Admin applet, EPICenter can be configured to act as a Remote Authentication Dial In User Service (RADIUS) client, allowing it to use an external RADIUS server to authenticate EPICenter users. As an option, the external RADIUS server can be configured to return user role information as well as the user authentication.
As an alternative, EPICenter can be configured to act as a RADIUS server, providing authentication for EPICenter users as well as for other devices such as Extreme switches. However, the RADIUS server built into EPICenter should only be used for demonstration or testing purposes, and should not be used to provide primary authentication services in a production environment. The EPICenter RADIUS server is not sufficiently robust to perform as the authentication server in a production environment.
The EPICenter Policy Manager Upgrade
The EPICenter Policy Manager is a separately-licensed component of the EPICenter product family. When a Policy Manager license is installed on the EPICenter server, the Policy and Voice over IP icons icon appears in the Navigation Toolbar at the left of your browser window. When you purchase the optional Policy Manager, you will receive a separate license key for that feature.
The Policy Manager includes three modules:
● The Policies View, where you can create, view, and modify EPICenter policy definitions for Extreme devices.
● The ACL Viewer, where you can view the access list and QoS rules generated by the Policy Manager for the devices in your network.
● The Voice over IP Manager module, where you can configure quality of service parameters for VLANs that are used to carry Voice over IP traffic. (This is a separate feature unrelated to the features available for IP phone management available through EPICenter integration with the Avaya Integrated Management software.
Distributed Server Mode (EPICenter Gold Upgrade)
To manage very large numbers of network devices, or devices that are geographically distributed, the management task can be divided up between multiple EPICenter servers. Each server in the server group is updated at regular intervals with network summary and status information from the other servers in the group. From the EPICenter home page, a client attached to any one of the servers in the server group can view summary status information from the other servers in the group in addition to
EPICenter Overview
the standard Network Summary report. The EPICenter client also lets the user easily navigate between the different servers in the group to see detailed management information about the devices managed by those servers.
EPICenter Software Architecture
The EPICenter software is made up of three major functional components:
● The EPICenter Server, which is based on the Tomcat Java server. The server is responsible for downloading applets, running servlets, managing security, and communicating with the database.
● A Relational Database Management System (RDBMS), Sybase Adaptive Server Anywhere, which is used as both a persistent data store and a data cache.
● EPICenter client applications. This can be an installed client application that runs on a Windows 2000, Windows XP, Windows 2003 Server, or a Solaris system.
On Windows systems, the client can also be a set of Java applets downloaded on demand from the server into the Microsoft Internet Explorer 6.0 browser running the Java plug-in (version 1.4.2_05).
Figure 1 illustrates the architecture of the EPICenter software.
Figure 1: EPICenter software architecture
Relational database
Extreme Extreme Third-party
Browser with Java plug-in Windows client system
Server system EPICenter applets
Installed client
Windows or Solaris client system
EPICenter applets
Browser HTML reports
EPICenter server TCP sockets
SNMP Telnet Application objects
Extreme Networks Switch Management
Extreme Networks Switch Management
The EPICenter software primarily uses the Simple Network Management Protocol (SNMP) to monitor and manage the devices in the network. The EPICenter server does an status poll, by default every five minutes, of all the devices it is managing to determine if the devices are still accessible. It also does a full detailed poll of each device at longer intervals. This interval for this less frequent detailed polling can be adjusted on each individual device. The EPICenter software also gives you the ability to gather device status at any time using the Sync feature in the Inventory Manager applet.
To avoid the overhead of frequent device polling, the EPICenter software also uses a mechanism called SmartTraps to identify changes in Extreme device configuration. In addition, standard SNMP MIB-2 traps can be used to define alarms for a large variety of other conditions.
SNMP and MIBs
EPICenter uses SNMP whenever possible to obtain information about the devices it is managing, and to implement the configuration changes made through EPICenter features.
The Remote Monitoring (RMON) MIB
EPICenter can use statistics gathered from the Remote Monitoring (RMON) MIB to provide utilization statistics on a port-by-port basis, if RMON is supported and enabled on the Extreme devices EPICenter is managing. Utilization and error statistics can be displayed within the Real-Time Statistics applet, which provides a number of chart, graph, and tabular display formats. RMON utilization statistics can also be displayed as end-point annotations on the links between devices on a Topology map. The EPICenter Alarm Manager also provides the ability to define threshold-based RMON rules for generating trap events that can be used in EPICenter alarm definitions.
Traps and Smart Traps
Fault detection is based on Simple Network Management Protocol (SNMP) traps, syslog messages, and some limited polling. The Alarm System supports SNMP Management Information Base-2 (MIB-2), the Extreme Networks private MIB, Remote Monitoring (RMON) traps, and selected traps from other MIBs. The EPICenter software uses a mechanism called SmartTraps to identify changes in Extreme device configuration.
When an Extreme switch is added to the EPICenter database, the EPICenter software creates a set of SmartTraps rules that define the configuration change events that the EPICenter server needs to know about. These rules are downloaded into the Extreme switch, and the EPICenter server is automatically registered as a trap receiver on the switch. Subsequently, whenever a status or configuration change takes place, the ExtremeWare software in the switch uses the SmartTraps rules to determine if the EPICenter server should be notified. These changes can be changes in device status, such as fan failure or overheating, or configuration changes made on the switch through the ExtremeWare CLI or
ExtremeWare Vista.
For non-Extreme devices, EPICenter does not automatically register itself as a trap receiver; you must manually configure those devices to send traps to EPICenter. See Appendix B in the EPICenter Reference Guide for information on configuring devices to send traps to EPICenter.
EPICenter Overview
Device Status Polling
EPICenter uses several types of polling to monitor the status of the devices it manages. Since device polling adds a certain amount of traffic load to the network, EPICenter tries to minimize the amount of polling that it does, and many aspects of its polling algorithms are configurable.
EPICenter polls for basic device status approximately every five minutes using SNMP. This poll interval can be changed in the Administration applet under the Server Properties for SNMP. EPICenter also polls periodically for detailed device status information. By default, this interval is 30 minutes for Extreme modular chassis switches, and 90 minutes for Extreme stackable chassis switches. The detailed polling interval can be set for individual devices through the Inventory Manager feature. The detailed polling gets more complete information, still only polls for information that has changed; a manual sync is required to retrieve all information about the device. A sync is performed automatically whenever the EPICenter client is started.
Telnet Polling
When it is not possible to use SNMP to obtain information from Extreme devices, EPICenter will use Telnet polling instead. EPICenter uses Telnet polling to obtain MAC address information for edge ports from a device Forwarding Database (FDB) and to obtain netlogin information. For some old versions of ExtremeWare, ESRP information must be obtained via Telnet rather than SNMP. Telnet polling is also used to obtain power supply IDs for Alpine devices.
Optionally, you can use SSH2 instead of Telnet to communicate with Extreme Networks devices. This requires that you run a version of ExtremeWare that supports SSH.
You can disable Telnet polling if necessary through the Server Properties for Devices in the Admin applet. However, you will lose the ability to collect edge port information via FDB polling, as well as netlogin information.
Edge Port Polling Using the MAC Address Poller
EPICenter can maintain information about the MAC and IP addresses detected on Extreme switch edge ports by polling the FDB tables of the Extreme switches it is managing. If MAC address polling is enabled, EPICenter uses Telnet polling to retrieve FDB information at regular intervals based on the settings of server properties in the Administration applet.
MAC address polling can be enabled or disabled globally. If enabled, it can then be disabled for individual devices or for specific ports on devices.
EPICenter distinguishes edge ports from trunk ports based on whether the port is running the Extreme Discovery Protocol (EDP) or the Link layer Discovery Protocol (LLDP). EPICenter assumes that ports that run EDP or LLDP are trunk ports, and ports that do not run EDP or LLDP are edge ports. However, trunk ports on non-Extreme devices that do not support EDP or LLDP may be identified incorrectly as edge ports. You can disable MAC address polling on individual ports to prevent EPICenter from polling these trunk ports for MAC addresses.
Extreme Networks Switch Management
applets. Sync causes EPICenter to poll the switch and update all configuration and status information except for uploaded configuration files. During a Sync operation the SmartTraps rules are also reset in case the user has accidentally deleted the trap receiver or any SmartTrap rules.
Extreme Networks Device Support
Extreme Networks devices running the ExtremeWare software version 6.2 or later, are supported by most features in the EPICenter system, including the VLAN Manager and the graphical display features of the Inventory Manager applet. Some features, such as ESRP, or the Policy Manager, require more recent versions of the ExtremeWare software. See the EPICenter Release Note for specific information about the hardware and software versions supported by this release of the EPICenter software.
Third-Party Device Support
Any device running a MIB-2 compatible SNMP agent can be discovered by the EPICenter Inventory manager, and saved in the Inventory database. All devices in the database can also appear on a topology map. The EPICenter alarm system can handle SNMP traps from any device in the inventory database, including RMON traps from devices with RMON enabled. The Real-Time Statistics module can display statistics for any device with RMON enabled,
In the Telnet applet, you can use the Telnet feature with any device that supports a Telnet interface. In the Inventory Manager, all Extreme devices and selected third-party devices (including Avaya devices and certain Cisco and 3COM devices) can display a device-specific front panel view, and a rear panel view if appropriate. In addition, vendor-specific generic images are available for additional devices, such as Sun and Nortel, and a standard generic image can be displayed for all other “unknown” MIB-2 compatible devices. New device images and configuration description files may be added over time— check the Extreme Networks web site for information on new device support.
EPICenter also provides support for Avaya Voice Network devices through an integration between EPICenter and Avaya Integrated Management software that co-reside on the same system.
2
Getting Started with EPICenter
This chapter covers how to use some of the basic features of the EPICenter system:
● Starting EPICenter.
● How to get Help.
● EPICenter User Roles.
● Creating the Device Inventory.
● Organizing your network elements using groups.
● Using the Alarm System.
● Organizing views of your network using the Topology function.
● Using Basic Reports.
Starting EPICenter
The EPICenter software consists of a server component that runs on a Windows or Solaris server, and a client component, that can be installed and run on separate Windows or Solaris systems.
Once the EPICenter server is running, multiple clients can connect to it. The EPICenter software supports multiple administrator users, with different roles that determine the EPICenter functions each user can perform.
This chapter assumes you have successfully installed (or upgraded to) the current EPICenter software version—version 5.1 or later, and that the EPICenter server is running.
If you have not yet installed version 5.1, see the EPICenter Installation and Upgrade Note for instructions. The Installation and Upgrade Note is included in the EPICenter product package along with the EPICenter software CD, and is also available in Adobe PDF format on the CD, and from the Extreme web site.
Starting the EPICenter Server
The EPICenter Server consists of two components:
● The EPICenter Database Server
● The EPICenter Server
Both components must be running in order to run the EPICenter client applets.
In a Windows environment (Windows 2000, XP, or 2003 Server), the recommended (and default) method of installing the EPICenter server components is as services. If you have installed the EPICenter components as services, the two EPICenter Server components will start automatically when you boot the server.
If you have not installed EPICenter as services, or if you have installed EPICenter in a Solaris environment, you will need to start the EPICenter server manually.
Getting Started with EPICenter
Starting the EPICenter Server in a Windows Environment
If you installed EPICenter as a regular application rather than as services, you must start the server from the Start menu:
1 From the Start menu, highlight Programs, then Extreme Networks, followed by EPICenter 5.1 to display the EPICenter menu.
2 Click Start EPICenter 5.1 Server. This runs runserv.exe, a program that starts the two components in the required order.
An MS-DOS window may very briefly appear as these processes are started.
Starting the EPICenter Server in a Solaris Environment
To start the EPICenter server as a daemon (recommended):
/etc/init.d/EPICenter start
To run the EPICenter Server as an application:
1 Set the current directory to the EPICenter install directory:
cd <install_dir>
<install_dir> is the directory (path) where you installed the EPICenter components. If you installed in the default directory, the path is /opt/extreme/epc5_0.
2 Execute runserv to start the two EPICenter components in the required order. runserv &
Starting the EPICenter Client
On Windows 2000, Windows XP, or Windows 2003 Server systems, the EPICenter software provides two options for connecting to an EPICenter server from a client system:
● A stand-alone client application. This is the recommended client option.
● A browser-based client you can run from Microsoft Internet Explorer. This client provides slightly limited functionality due to the constraints of the browser environment (for example, you cannot use cut and paste, you cannot save Telnet macros you create, and you cannot use the configuration file viewer or difference viewer).
On Solaris-based systems, only the stand-alone client is supported.
The stand-alone client is installed along with the EPICenter server on the system where the server resides. The stand-alone client can also be installed by itself on any system you want to use as an EPICenter client. See the EPICenter Installation and Upgrade Note for instructions on installing the client on a system without the EPICenter server.
For Windows 2000, Windows XP, or Windows 2003 Server, the browser-based client is a Java applet that is downloaded from the EPICenter server when you run it, and requires the following software on the client:
Starting EPICenter
Starting the EPICenter Client in a Windows Environment
To start the EPICenter stand-alone client:
1 From the Start menu, highlight Programs, then Extreme Networks.
2 If you are running the client on the system where the EPICenter server is installed, select EPICenter 5.1, then select EPICenter 5.1 Client
If you are running the client on a system different from where the EPICenter server is installed, select EPICenter 5.1 Client, then select Client Application.
The EPICenter Client Login window appears, as shown in Figure 3on page 28. To start the EPICenter client in a browser window:
1 Launch your web browser. 2 Enter the following URL:
http://<host>:<port>/
In the URL, replace <host> with the name of the system where the EPICenter server is running. Replace <port> with the TCP port number that you assigned to the EPICenter Web Server during installation.
NOTE
If you configured your EPICenter server uses the default web server port, 80, you do not need to include the port number.
The EPICenter browser-based client first presents a start-up page, as shown in Figure 2.
Figure 2: EPICenter Start-up page
Getting Started with EPICenter
3 In the left-hand column, click the Launch EPICenter link to display the EPICenter login page.
Starting the EPICenter Client in a Solaris Environment
To start the EPICenter client in a Solaris environment: 1 Set the current directory:
cd <install_dir>
<install_dir> is the directory (path) where you installed the EPICenter components. If you installed in the default directory, the path is /opt/extreme/epc5_0.
2 Execute the command runclient runclient &
Only the stand-alone client is supported in a Solaris environment.
The EPICenter Client Login Window
The EPICenter installed client starts by opening a Client Login window, as shown in Figure 3.
Figure 3: EPICenter client Login window
The browser-based client also presents a login page, but as you have already provided the server host name in the URL, the browser login window does not ask again for that information.
1 In the installed client login window, type or select in the Server Hostname field the name or IP address of the EPICenter server you want to connect to. If you are running the client on a system
Starting EPICenter
3 For either the installed client or a browser-based client, type your EPICenter user name in the User field.
● If you are the network administrator logging in to the EPICenter server for the first time since it has been installed, use the name “admin.”
Once you have logged in you will be able to change the administrator password (strongly recommended) and create additional user accounts.
● If you are a new user without your own account on the EPICenter server, type “user” as the User Name. You will be able to view information in the various modules, but will not be able to change any configurations.
4 Type your password in the Password field.
The default names (“user” and “admin”) initially have no password, so you can leave the password field blank.
5 Click Login.
If you are using an evaluation copy of the EPICenter, a dialog box appears informing you that you are using a limited-time license. Click OK to acknowledge this.
If you installed EPICenter in non-intrusive mode (so that EPICenter will not automatically be registered as a trap receiver on Extreme devices) a message appears reminding you that you are running in non-intrusive mode. Click OK to dismiss this message. See the EPICenter Installation and Upgrade Note for more information about non-intrusive mode.
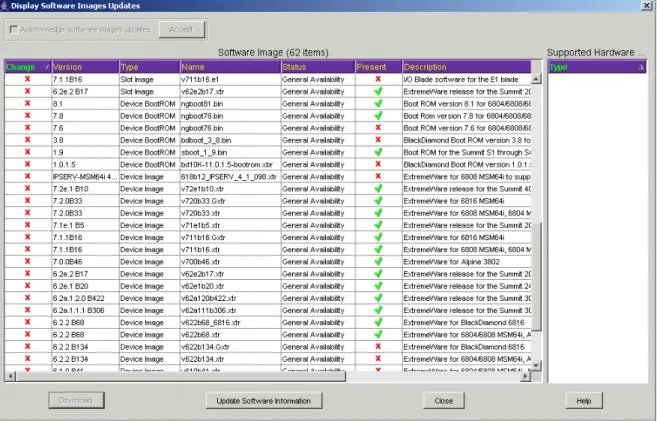
If you enabled Automatic Information Updates when you installed EPICenter, you may be presented with a message indicating that software updates are available. You can click Update Now (which opens the Display Software Images Updates window) or Remind Me Later, which closes the window.
Getting Started with EPICenter
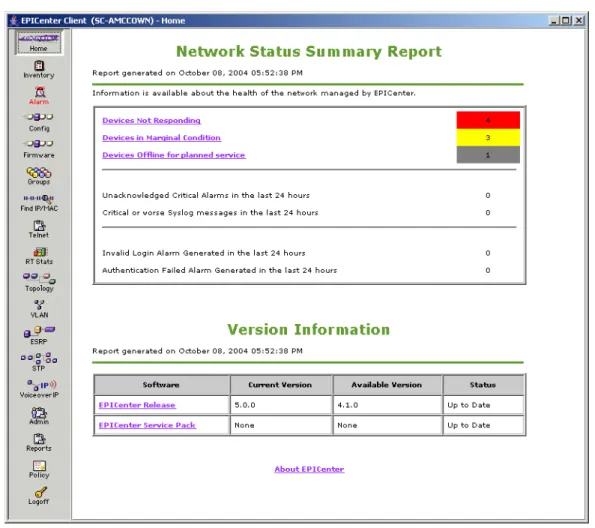
Figure 4: The EPICenter Home page.
See “The Network Status Summary Report Page” in Chapter 16 of the EPICenter Reference Guide for an explanation of this report.
Getting Help
This guide provides an overview of the EPICenter software features with the goal of showing how you can use EPICenter to simplify your network management tasks and help you solve problems with your network or its devices. It does not provide a detailed explanation of how to use the features of the software.
For detailed help on specific features or applets, EPICenter provides context-sensitive online Help, accessible through Help buttons in most EPICenter applets, and through the Help menu located in the menu bar at the top of the main window in the EPICenter applets. From the Help menu or Help buttons you can view HTML-based help on the feature you are using, presented in a browser window.
Working with the EPICenter Features
EPICenter also provides the EPICenter Reference Guide which also describes how to use the EPICenter features.
● On Windows-based systems, the EPICenter Reference Guide is available in PDF format from the EPICenter 5.1 menu accessed from the Windows Start menu.
● On both Windows and Solaris systems, it can be accessed from the doc subdirectory under the EPICenter installation directory. In the Windows environment this is \Program Files\Extreme Networks\EPICenter 5.1\doc. In a Solaris environment this is /opt/extreme/epc5_1/doc.
● It can be downloaded from the Extreme web site at http://www.extremenetworks.com, under the Support area.
You must have a version of Adobe Acrobat Reader installed (version 4 or later) to view the PDF file. (Acrobat Reader is available for download from Adobe Systems at http://www.adobe.com.
Working with the EPICenter Features
EPICenter is structured as a set of independent Java-based applets that operate on device configuration and status information stored in the EPICenter database. The devices being managed are the common thread between these applets or features, and most applets provide a list of devices managed by EPICenter from which you can choose devices of interest.
EPICenter also supports the grouping of devices into Device Groups. A device group is a set of network devices that have something in common, and that can be managed as a group. Device groups are user-defined, and can be based on any criteria that make sense in your network environment, such as all the devices of a certain type (for example, all wireless switches) or in a certain location. Some functions within EPICenter can be performed on Device Groups, making it easier to perform specific tasks across multiple devices.
Within an applet, the actual functions or operations are initiated by either function buttons, menu items, or both. EPICenter provides several standard menus for functions that are common to all the product features, such as logging off or accessing online Help. In addition, many features provide pop-up menus, accessed by selecting an element such as a device, device group, slot or port, and then clicking the right mouse button to display a pop-up menu. These pop-up menu provide a quick way to view the properties of the selected element, or to perform specific functions for the selected item. The online Help provided in the EPICenter product describes the commands that are available in the various EPICenter features.
Device Selection Persistence
Navigating between EPICenter features is normally done by clicking a button in the Navigation Toolbar, which exits the feature you are currently in (typically abandoning any pending actions) and opens the new feature in the Main window of the EPICenter product. If a device was selected in the previous feature, that same device will be preselected in the newly-opened feature.
For example, if you select a device in the Inventory Manager, and then run the Alarm Manager, the Alarm Log browser will automatically filter the alarm log to display just the alarms for the device that was selected in the Inventory Manager. If you select a specific alarm entry in the Alarm Log Browser and then run the Topology applet, EPICenter will display the map or sub-map that shows the device on which the selected alarm occurred, with the device selected on the map. (If the device appears on more than one map, EPICenter will let you select which instance you want to see).
Getting Started with EPICenter
Running Features in Separate Windows
In addition to running EPICenter applets from the Navigation Toolbar, certain applets (the Alarm Log Browser, Inventory Manager, Interactive Telnet, VLAN Manager, and Real-Time Statistics) can be run in a separate window to show information about a selected device without leaving the feature you are currently using. This allows you to view status or configuration information about a selected device without losing your place in the feature you are currently working in. The functionality of the applet when it runs in a separate window is somewhat more limited than the features available when the feature is run in its normal mode.
EPICenter User Roles
EPICenter provides four pre-defined roles for levels of user access to the features of the product:
● The Administrator role provided full read/write access to all features of the product, including to the Administration applet where the features of EPICenter itself can be configured, and where users can be added or deleted, and their roles modified.
● The Manager role provided full read/write access to all features of the product except for the Administration applet.
● The Monitor role provided read-only access to the features of the product—a user with a Monitor role could view status and configuration information, but could not do any configuration tasks.
● The Disabled role provides no access to any features of the product.
Every user created in EPICenter is assigned a role which determines the access that user has to the features of the product.
In EPICenter 5.1, the administrator can also create additional roles with any combination of read-only, read-write, or disabled access to different EPICenter product features. In addition, for the
Administrator, Manager, and Monitor roles, access can be disabled on a feature-by-feature basis (except that access to the Administration feature is never disabled for the Administrator role).
A user’s role determines which features the user can access (if access is disabled, the button for the feature removed from the Navigation Toolbar, with the exception of Telnet, which is greyed out) and what the user can do within the applets to which he has access. A user who’s role provides read-write access to a feature can perform all the functions within that feature -- both those that show status information, and those that perform configuration operations, for example. A user who’s role provides read-only access will be able to view status and configuration information, but will not be able to perform configuration operations or store information in the EPICenter database.
Roles also used to determine whether a particular user can execute Telnet macros from the Tools menu or from right-click pop-up menu. When a telnet macro is created, one of its attributes is the selection of roles which can execute the macro. This allows you to create predefined configuration scripts for devices or groups and devices, and control which users can execute those scripts.
Creating the Device Inventory
and retrieve information about the devices on your network. You can also add devices individually. Both of these functions are performed through the Inventory Manager applet.
Using Discovery
When you first run EPICenter, the device inventory is empty. The easiest way to populate the inventory database is to use Discovery to automatically detect the devices on your network. With Discovery you can:
● Search for devices by specific IP addresses or ranges of IP address, including using wildcard search parameters to specify the IP address sets you want to query.
● Limit your search to Extreme devices only, or include all discovered MIB-2 devices regardless of manufacturer
● Specify a subnet mask to use for limiting device ranges
● Enable the discovery to use SNMPv3 in its search
Figure 5 shows an example of a discovery specification. You can add multiple address range specifications to be executed in a single discovery operation.
Figure 5: Discovering devices to add to the EPICenter inventory database
Note that you must provide the SNMP read community string to enable EPICenter to get information from the devices it finds. If your devices do not all use the same read community string, you will need to add each set of devices as a separate specification, as shown in the example.
When you run the discovery, EPICenter returns a list of all the devices it has found within the parameters you provided, as shown in Figure 6.
It does not automatically add these devices to the EPICenter inventory; you must select and add the devices either individually or in groups.
Getting Started with EPICenter
Figure 6: Results of a discovery
To add devices to the database, select the set of devices you want to add and click the Add button. For each device or set of devices you add to the inventory database, EPICenter first asks you to provide contact information for those devices:
● The device login name and password
● The EPICenter Device Group in which the device should be place
● The SNMP write community string (for SNMP v1 devices)
● The User Name, Privacy and Authentication protocols and passwords for SNMP V3 devices EPICenter pops up a dialog box where you can provide this information. It pre-fills the fields with a default set of communication information that you can change as appropriate to the specific devices you are adding.
The information you provide in the pop-up dialog is used for all the devices in the set you have selected to add. Therefore, if you have devices that use different passwords, protocols, or community strings, you must add them to the database in separate Add operations.
Adding Devices Individually
Creating the Device Inventory
You must input the IP address of the device you want to add, as well as the communication information for the device. EPICenter pre-fills the fields in the Add dialog with the default communication information—you can change it as appropriate.
Setting up Default Device Contact Information
For simplicity in managing multiple devices in large networks, administrators typically use the same logins, passwords, community strings and so on, for multiple devices. Therefore, to save time when adding new devices, EPICenter provides default values for these communication parameters.
To save time when you add your own network devices to the EPICenter inventory, you can configure the default values to those used in your own network.
To change the default communication values, click the Default button at the top of the Inventory Manager main page.
EPICenter uses the Extreme default values for its switches as the defaults in EPICenter:
● Login as admin with no password
● SSH2 disabled
● For Cisco devices only, the default Cisco enable password (none)
● Default SNMP v1 community strings public (for read) and private (for write)
● SNMP V3 user initialmd5
● SNMP V3 privacy set to No Privacy, with no password
● SNMP V3 authentication set to MD5 Authentication, with password initialmd5
You can change any of these as appropriate for your network installation. You can also override the defaults for any individual device or set of devices when you initially add the devices to the EPICenter inventory database, or by using the Modify Devices and Device Groups function at a later time.
Creating and Using Device Groups
EPICenter uses the concept of Device Groups to allow you to group devices with common features or functions. This allows you to work with multiple devices as a unit for a number of purposes within EPICenter.
For example, you might create Device Groups that represent devices by physical location, such as buildings, floors, or closets. You could create logical groupings such as device groups for your core devices, your edge devices, or all devices belonging to departments (engineering, sales, etc.). You could also create Device Groups for devices with common maintenance or management features, such as passwords or community strings in common.
A single device can belong to multiple device groups, so you can use Device Groups in many different ways. For example, you can scope alarms to specific device groups, so you can set up different levels of fault detection for different classes of devices. Functional device groups allow you to perform functions such as upgrading software versions or changing passwords on devices as a group, rather than one-by-one. Later chapters in this guide will provide examples of how device groups can be used for specific purposes in EPICenter.