Adminware™ for ISP — Agents
Introduction
Index
Introduction . . . 1
Procedure . . . 2
Buttons . . . 3
Jump/find . . . 4
Fields . . . 5
Employees . . . 7
Contacts . . . 7
Notes . . . 8
Commission . . . 8
Report . . . 9
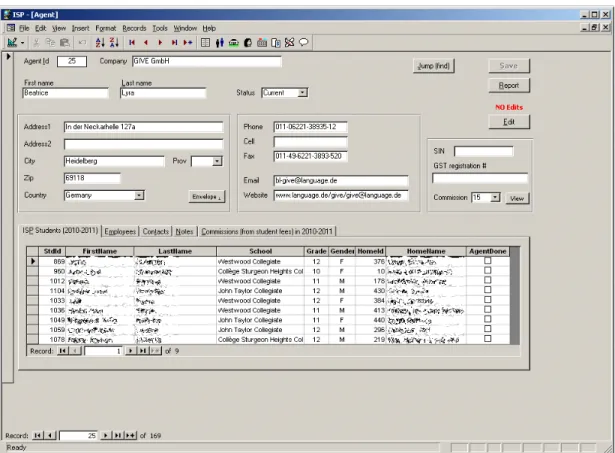
The Agents module is used to record detailed information about each agent that you have contact with.
In order to assign an agent to a student (on the Student screen), the agent must first exist in the agent module.
Figure 5
Agents screen
Procedure
Adding a new agent to Adminware™ is straightforward:â open the Agents module. This can be either from the Main Switchboard of via the Toolbar. * Agents module button from Main Switchboard:
* Agents icon on Toolbar:
ã add a new record. There are three options:
* click the New record button at the bottom left of the screen: * click the New record icon on the Toolbar:
* select Insert | New Record from the pull-down menu.
ä fill in the appropriate data in the desired fields. See page 5 for a list of fields and relevant data.
The list of students shown in the Student list on the bottom part of the screen is based on the current school year only and is based on “up-to-the-minute” data. It cannot be modified on this screen; you must move to the student module to add or edit this information.
Buttons
The various buttons found on the Agents form.The Save button becomes “enabled” when the current entry has being modified. That is, as soon as a change is made to any of the specific Agent fields, the Save button will enable and be clickable. Clicking the Save button will Save any changes.
If you move from one agent entry to another, the data is automatically saved, regardless of whether you have clicked the Save button.
The Report button will open the Agents Report form. See page 9 for full details.
Any data for the current agent is automatically saved when the Report button is selected.
When you first open the Agents module, the default setting for making changes to the data is “No editing”, for safety purposes. That is, you must click the Edit button in order to make modifications to the current entry.
Once the Edit button has been clicked, the Editing mode remains ‘on’ until you stop editing. When adding a new agent record, this button has no effect.
The Envelope . button is used to generate a standard size 10 envelope for the current agent. This will preview the address on the screen.
Jump/Find
In order to modify a specific agent’s data, the agent must be displayed on the screen. Use the Jump (find) button to select and move to the desired agent.Click on the company to select it, then press the Go To ... button to move to the selected company.
Filter:
Enter sample data that you wish to find in either the Company, Last name, First name or Country criteria fields and Filter. A selected list of agents matching the criteria will be displayed.
Company name filter:
Click on the first letter of the company name you wish to find along the bottom of the dialog box. Only those agents starting with the selected letter will be displayed.
Agent Fields
The fields are listed in the order they appear as you Tab through the screen. Agent Id The Agent Id is automatically assigned by Adminware™, in numericalsequential order. This number cannot be modified.
This number is used by Adminware to relate data from the various other tables.
Company The full company name of the agent.
First name Enter the agent’s first name.
Last name Enter the agent’s last name.
Status Define the current status of this agent. This is useful to group and organize your agents.
You are limited to selecting an item from this list. The three choices are: Current
Active Past
Current and Active are essentially the same thing; you can decide which word best describes your needs.
Address
Address1 Enter the address for this agent.
Address2 Enter a second line of an address, if required.
City Enter the city for this agent.
Prov This is a user-defined field that displays a list of allowable values in a drop-down list. You are limited to selecting an item from this list.
If you require a new province/state that is not showing in the current list of allowable values, you will need to add a new province/state to the list via the Look-up Tables module.
field. In addition, if exactly 6 characters are entered, a space is automatically inserted into the middle.
Country The country for this agent.
This is a user-defined field that displays a list of allowable
values in a drop-down list. You are limited to selecting an item from this list.
If you require a new country that is not showing in the current list of allowable values, you will need to add a new country to the list via the Look-up Tables module.
Phone The phone number for this agent. If exactly 7 digits are entered into the phone number, a dash will automatically be inserted when you leave the field.
Cell The cell number for this agent. If exactly 7 digits are entered into the fax number, a dash will automatically be inserted when you leave the field.
Fax The fax number for this agent.
If exactly 7 digits are entered into the fax number, a dash will automatically be inserted when you leave the field.
Email The general contact e-mail address for this agent.
As you exit this field, a check is made to ensure the validity of the information that was entered. For example, every e-mail address must have the @ symbol.
Website The website for this agent.
Invoicing
SIN The agent’s Social Insurance Number.
GST registration # The GST registration # for this agent.
Commission The default value for commission. Four default values are provided in the drop-down list but you can enter any value you require.
Figure 31
Agent | Employees
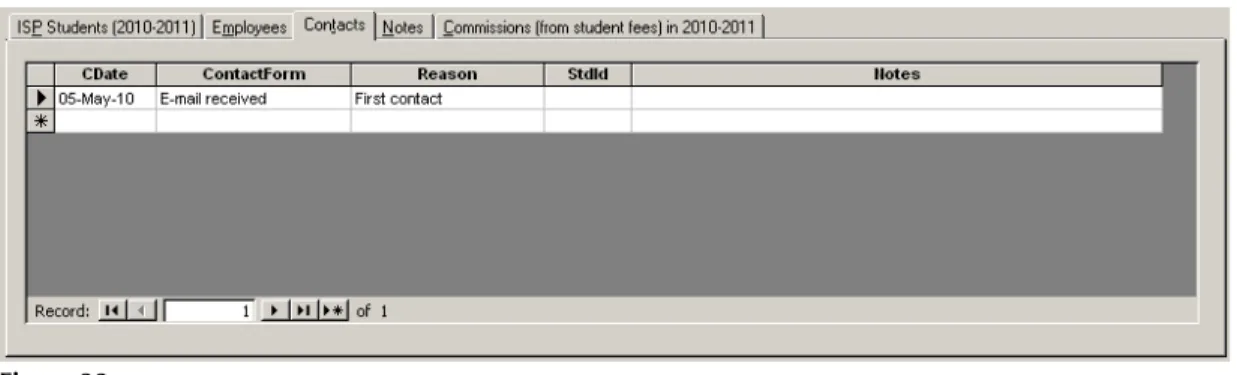
Figure 32
Agent | Contacts
Employees
List the individual employees working at this agency.As you add a new entry, you must assign the EmpNo. A sequential value is suggested, but you can skip numbers if desired. Each EmpNo must be unique for this agency.
(You can have an EmpNo = 1 for this agency and a number 1 for another agency, but you cannot have two number 1's for the same agency)
Contacts
If desired you can make a notation of each contact you had with this agency. This would be useful to provide a history of contacts, particularly in a multi-person office where several of your staff may be dealing with the same agency.The ContactForm and Reason fields are user-defined field that displays a list of allowable values in a drop-down list. You are limited to selecting an item from this list.
If you require a new entry that is not showing in the current list of allowable values, you will need to add the new entry to the list via the Look-up Tables module.
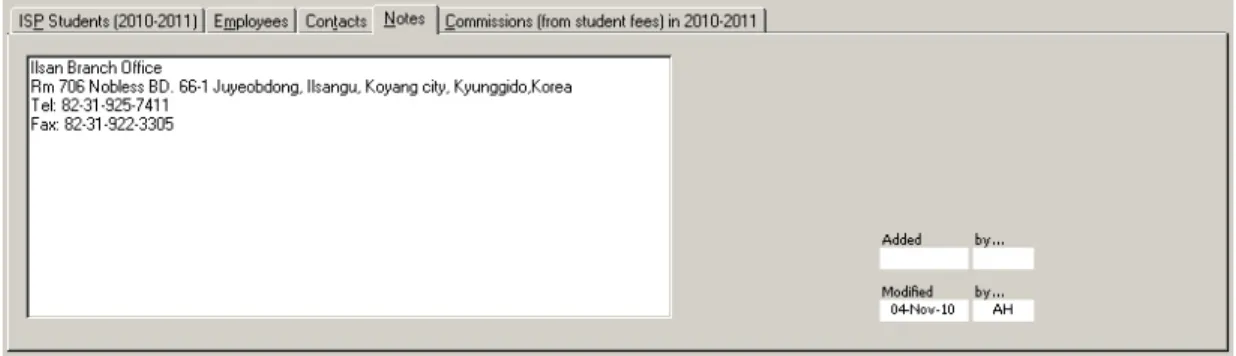
Figure 33
Agent | Notes
Figure 34
Agent | Commissions
Notes
A single, “memo”-type field allows you to enter as much free-form information as you desire about this agency.The Added/by... and Modified/by... fields in the lower right corner record the date and staff member who made the initial addition of this agency and last modification.
Commissions (from
student fees)
This tab lists the commission data found for any student from the current year where specific accounting fee data has been recorded. The data cannot be modified on this screen.
Figure 35
Agents report screen