Bitrix Site Manager
VMBitrix Virtual Machine.
Quick Start And Usage Guide
Contents
Introduction... 3
Chapter 1. Starting The VMBitrix Virtual Machine ... 4
Minimum Requirements For VMWare Player / VMBitrix ... 5
Running The VMBitrix Virtual Machine ...5
Chapter 2. Deploying A Bitrix Based Web Project ... 10
Creating A New Website ... 10
Using Manually Downloaded Installation Packages...12
Bitrix Site Manager Installation...12
Restoring A Web Project From A Backup Copy... 13
Preparing To Transfer ...13
Restoring The Website...15
Step 1. Preparing To Restore...15
Step 2. Unpacking The Archive...15
Step 3. Restoring The Database ...16
Chapter 3. Configuring The SMTP Mail Server ... 18
Final Notes ... 20
Introduction
A Bitrix Virtual Machine is a virtual server fully configured to support and run Bitrix software ready for immediate use.
The virtual machine will save your time and effort you might need for proper deployment and administration of your Bitrix based website or intranet portal.
This manual is for users and developers of web systems who are installing Bitrix software (Bitrix Site Manager or Bitrix Intranet Portal) for evaluation or migrating to VMBitrix virtual machine.
The technique described in this manual can be used to move web projects from a remote website to a virtual machine or between multiple virtual machines, etc. This document presumes that the readers are well acquainted with the vocabulary and notions used in Bitrix software, and has basic knowledge of database theory and practice.
This paper does not describe the VMWare Player installation procedure. Please refer to VMWare documentation for detailed information.
Note: this documents assumes that the notions “website” and “portal” are synonyms.
Should you have any questions installing or using Bitrix Intranet Portal or videoconferencing services, contact the Bitrix Helpdesk Service.
Chapter 1.
Starting The VMBitrix Virtual Machine
The VMBitrix virtual machine is designed using VMWare Studio 1.0 in VMWare Virtual Appliance format. The virtual machine is compatible with the following
VMWare software:
VMWare Server 1.0 and higher; VMWare ESX 3.0 and higher; VMWare ESXi 3.5 and higher; VMWare Workstation 6.0 and higher; VMWare Player 2.0 and higher; VMWare Fusion 1.1 and higher.
The machine hosts a Linux based virtual server optimized for common web server hosting service.
The virtual server includes:
OS: Ubuntu 8.04 with autoupdate feature;
two-tier configuration: NGINX + Zend Server CE;
MySQL 5 with InnoDB support;
HTTPS support;
additional software: mc;
additional packages: geoip, catdoc, xpdf;
properly configured firewall and secure configuration; DHCP based or manual IP address;
configurable mail server;
configurable mail client (msmtp) ; minimum memory requirement: 256 MB; maximum disk space required: 60 GB;
automatic performance optimization to current memory limit; MRU action toolbar for remote control;
remote control via HTTP and HTTPS;
exhaustive settings to control system robustness, performance and security. The default password for the root superuser and for the bitrix user is bitrix.
Attention!
The virtual machine comes preconfigured for the best performance of Bitrix software.
Minimum Requirements For VMWare Player / VMBitrix
A computer to run VMBitrix under VMWare Player shall meet the following minimum requirements.
Windows XP / Vista / 7 / Server 2003 / Server 2008 bit; Linux 32/64-bit;
VMWare Player;
Minimum free disk space: 2 GB; Minimum RAM: 160 MB;
Recommended RAM: 256 MB or more.
Running The VMBitrix Virtual Machine
Download and install VMWare Player.
It is completely free and supports Windows and Linux. The VMWare Player installation procedure falls beyond this manual; please refer to VMWare
documentation for detailed information.
Download the VMBitrix virtual machine package here.
Extract files from the downloaded archive to any folder, for example: С:\VMBitrix\BitrixVirtualAppliance16\.
Run VMWare Player.
Click Open a Virtual Machine and select the
BitrixVirtualAppliance.vmx file.
After the file is loaded, click Play virtual machine.
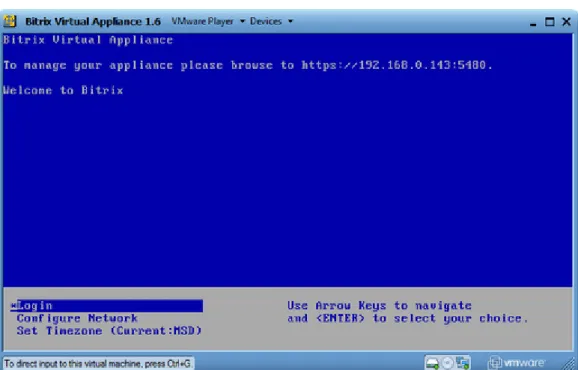
VMWare Player will load and run the OS installed in the virtual machine file (fig. 1.1):
Fig. 1.1 VMWare Player running Bitrix Virtual Appliance Now you can:
log in the system;
change the network configuration (Configure Network); change time zone (Set Timezone).
Select the Login command.
You will log in the system using the root user and bitrix password. This is the default password so you must change it immediately.
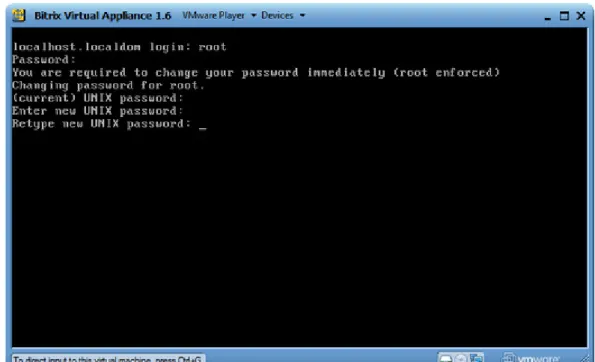
In localhost.localdom login and Password prompts (fig. 1.2), type the current login and password (root and bitrix, respectively). Hit Enter. When prompter for (current) UNIX password, type the current password (bitrix) and press Enter.
Type the new password in Enter new UNIX password; press Enter. Retype the new password in Retype new UNIX password; press Enter
Fig. 1.2 Changing the root password
Note: you can also change the password using the Change root password
command (fig. 1.3).
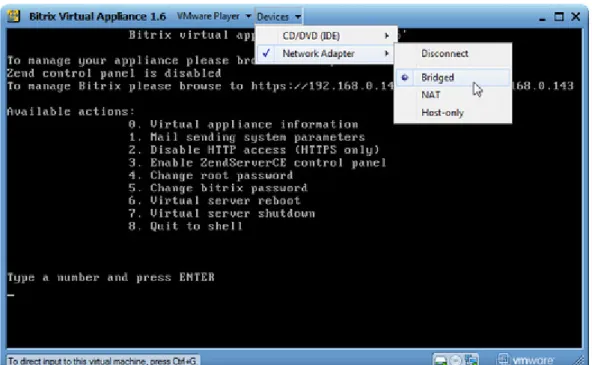
Fig. 1.3 The virtual server is working; the Change root password command highlighted If you encounter problems with the network adapter, try changing the adapter mode (Bridged, NAT or Host-only) (fig. 1.4).
Fig. 1.4 Network adapter modes
Then, restart the server by selecting the command 6 and pressing Enter. Now your virtual server is running and ready for use.
Note
The Available actions list enumerates possible administration options. To execute any command, type the command number and press Enter. For example, to disable the virtual server type 7 (Virtual server shutdown) and press Enter.
To direct control back to operating system, press Ctrl + Alt.
Now that the server is running, type the address suggested by the appliance (it varies from system to system; the screenshot above shows the address
http://192.168.0.143) in the web browser. You will see the following welcome screen (fig. 1.5):
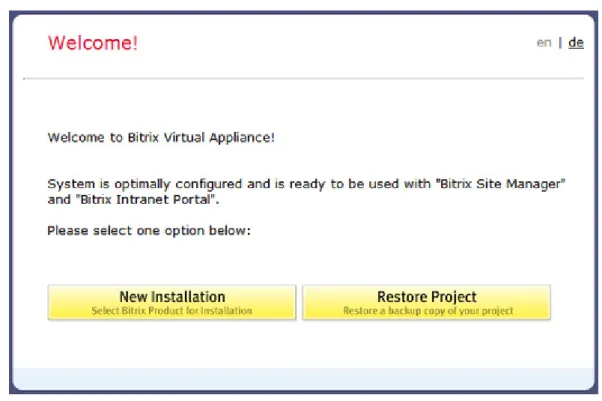
Fig. 1.5 Bitrix Virtual Appliance welcome screen Choose one of the options to continue:
New Installation – runs the installation wizard which will download, unpack and install a new website.
Restore Project – runs a restoration wizard to create a backup copy of your website or restore it from an existing backup.
Chapter 2.
Deploying A Bitrix Based Web Project
As previously noted, you can deploy a project by creating a new site or by restoring a site from backup.
Creating A New Website
Click New Installation in the welcome screen (fig. 1.5). This will run the Bitrix web project installation wizard.
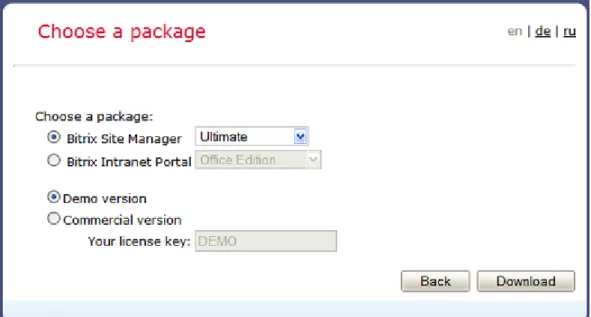
The browser will show a new screen suggesting to select the software product to install (fig. 2.1):
Fig. 2.1 Selecting a product
In the Choose a package group, select the product to install – Bitrix Site Manager to create a site on the Web or Bitrix Intranet Portal to create a corporate web portal.
Choose the version type:
Demo version – can be installed with a trial key or without any key at all.
Commercial version – this option will require that you provide an existing valid license key.
The wizard is now downloading the system files from the Bitrix server (fig. 2.2):
Fig. 2.2 Downloading a distribution package
The selected software product will be downloaded to the site root directory.
You can always click Back to revert to selecting the software product if you want to change your choice.
When download is complete, the wizard will immediately unpack it (fig. 2.3):
Fig. 2.3 Extracting files from the downloaded package
As soon as all the files are extracted, the first installation stage finishes and the wizard of the selected software product is started.
Attention!
After the installation, don’t forget to delete the /bitrixsetup.php script from the root directory. This file, if accessed, may damage your site or compromise its security.
Using Manually Downloaded Installation Packages
If your virtual machine is unable to access Internet for some reason, you can download the distribution package manually and upload it to the virtual machine. To upload the package to the virtual machine, establish a secure SFTP connection with it using the parameters obtained previously (in this example, the IP address is
192.168.0.143; login: root; password: bitrix). The distribution package must be a .tar.gz archive and reside in the /var/www/ folder.
If the system detects an archive file in this folder, the Choose A Package dialog box will show the archive file name:
Click the file name to select this package and start the installation.
Bitrix Site Manager Installation
The Bitrix Site Manager installation is rather straightforward and includes three simple steps. If required, you can find the detailed description of the installation procedure in the Installation Guide which can be obtained here:
Restoring A Web Project From A Backup Copy
This chapter shows how to use the backup and restoration tool by the example of transferring a Bitrix Intranet Portal project.
Preparing To Transfer
In order to transfer a site, you can use the built-in backup creation tool. This function allows you to:
create an archive with all files of your site (in tar.gz format); exclude the system kernel from the archive;
exclude files whose size exceeds the specified limit; create the database dump (in tar.gz format);
exclude statistics and search index from the database dump.
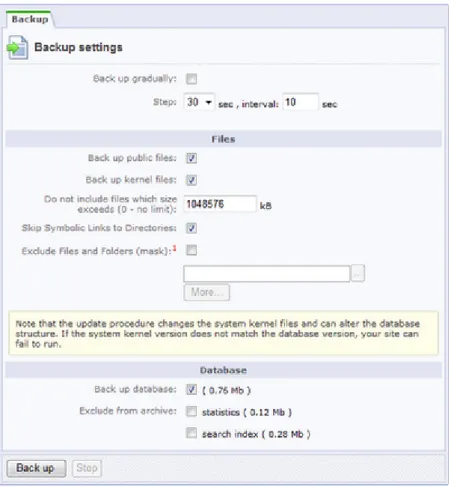
You can create the backup copy of the site using the back-up creation form: Control Panel > Settings > Tools > Backup.
Fig. 2.4 Backup creation form
Note: the recommended step duration is 30 sec., the maximum duration is 55 sec.
Select the archival objects in the Files group. Note that you can omit adding the kernel files only if the local and remote system versions are absolutely identical.
Use the file size restriction field to exclude unwanted large files from the archive. Furthermore, you can exclude any files of your choice by specifying the filepath wildcard mask.
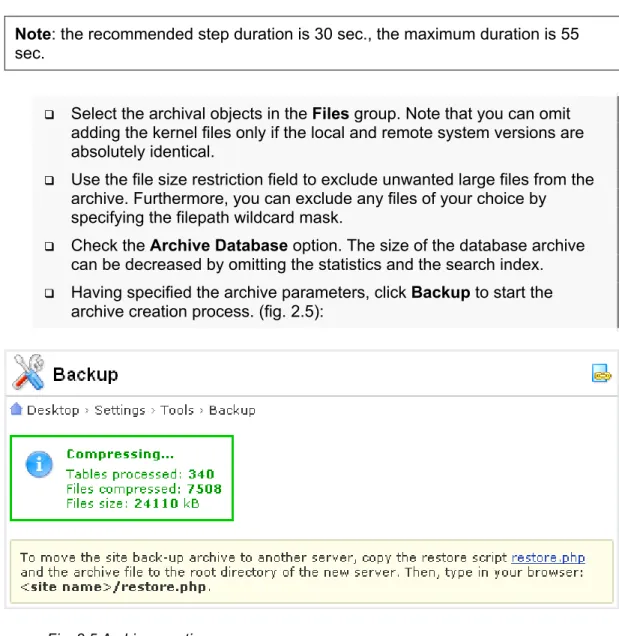
Check the Archive Database option. The size of the database archive can be decreased by omitting the statistics and the search index. Having specified the archive parameters, click Backup to start the archive creation process. (fig. 2.5):
Fig. 2.5 Archive creation process
After the archive file has been created, the file link will show under the form. The archive is now available for download.
Click on the action menu icon and select Download in the menu (fig. 2.6).
Restoring The Website
Step 1. Preparing To Restore
To recreate a website from a backup copy, in the welcome screen appearing right after the appliance installation (fig. 1.5), click Restore Project instead of the new installation. This will show a new screen with the brief instructions on backing up the site.
Click Continue to proceed.
Step 2. Unpacking The Archive
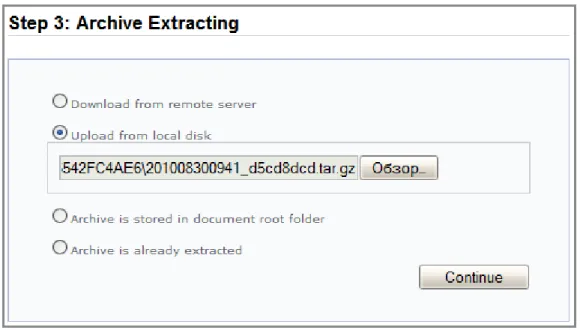
Here you will specify the path to the existing website archive (fig. 2.7):
Fig. 2.7 Specifying the archive file
The most common scenario is creating the website archive copy and downloading it to a local machine. In this case, select to upload the file from the local disk.
Otherwise, you might leave the archive file at the remote server. In this case, you can download it directly from the remote location (select Download from remote server).
The last two options apply if you have already uploaded the archive file to your new website manually.
Click Continue to proceed.
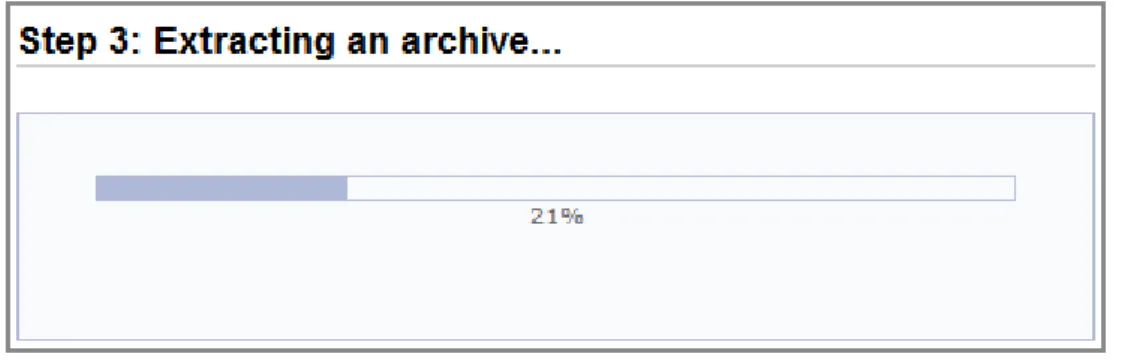
If you selected any of the first three options (fig. 2.7), the archive file would be loaded and unpacked (fig. 2.8):
Fig. 2.8 Unpacking the archive
Step 3. Restoring The Database
On this screen, select default values for dedicated server… (fig. 2.9).
Fig. 2.9 Database restoration options
If you select to restore the database data to Bitrix Environment, the wizard will connect to the database on port 31006, which is default for non-VM environments.
Click Restore.
Fig. 2.10 Completing the restoration
Click Delete here to prevent any malicious action against your website.
Chapter 3.
Configuring The SMTP Mail Server
You can configure the mail server in the Bitrix virtual appliance menu.
Select Mail sending system parameters by typing 1 and pressing
Enter (fig. 3.1):
Fig. 3.1 Selecting the mail server configuration screen
The Bitrix appliance will show the SMTP configuration prompt (fig. 3.2):
Specify here the following parameters:
SMTP server name – the address of the SMTP server used for outgoing messages.
SMTP port – the mail server port: 25 for insecure connection and 465 for secure SSL connection.
Default sender address – specifies the address that will be substituted in the e-mail message.
SMTP authorization required – type Yes if you require more security (for example, to avoid unauthorized spamming).
Having acquired the options, the configuration screen will show them for review (fig. 3.3):
Fig. 3.3 The parameters review Select Yes to save changes.
Alternatively, you can use sendmail instead of msmtp.
Quit to command line by typing the command 8 (Quit to shell). Press
Enter.
Execute # apt-get install sendmail to install sendmail. Additional changes to PHP environment are also needed.
Open /etc/php.ini for editing. Find and comment the line
sendmail_path = msmtp -t -i. Save changes.
Now, PHP will use sendmail by default.
Final Notes
This document has touched upon main steps required to install and run Bitrix software using VMBitrix virtual machine.
You can ask your questions at the Bitrix corporate forum:
http://dev.bitrixsoft.com/community/forums/
Should you have any difficulty using Bitrix software, do not hesitate to send a request to the technical support service: