Turbo Pascal®
User's Guide
Version 5.0
14
This manual was produced with
Sprin~
The Professional Word Processor
All Borland products are trademarks or registered trademarks of Borland International, Inc. Other brand and product names are trademarks
or registered trademarks of their respective holders. CopyrightG 1983, 1989 Borland International
Table of Contents
Introduction 1
Understanding 5.0 . . . .. 2
Integrated Environment and Command-Line Compilers. . . .. 2
Stand-Alone Debugging Support . .. . .. . . . .. .. .. . . .. . .. . . . .. .. . . .. 3
Separate Compilation ... 3
Programs and Units ... 3
Compile, Make, and Build ... . . .. 3
Pick File list . . . .. 4
File Extensions ... ~ . . . .. 4
About This Manual . . . .. 5
Using Turbo Pascal . . . .. 5
Appendixes ... 6
Hardware and Software Requirements ... 7
Typography ... 7
How to Contact Borland ... 8
Part 1 Using Turbo Pascal Chapter 1 Getting Started 11 Before You Begin . . . .. 11
What's On Your Disks ... 12
Installing Turbo Pascal On Your System ... 15
Hard Disk Installation ... 15
Installation on a Floppy-Drive System. . . .. 18
Special Notes ... 20
Choosing Between Two Compilers ... 20
Using This Manual ... 21
Chapter 2 Beginning Turbo Pascal 23 Using the Integrated Environment. . . .. 23
Online Help ... 23
UsingTHELP ... 24
Windows and Menus ... 25
Using Hot Keys ... 27
Loading Turbo Pascal. . . .. 31
CreatingYourFirstProgram ... 31
Analyzing Your First Program ... 32
Saving Your First Program. . . .. 32
Running Your First Program ... . . . .. 34
Checking the Files You've Created ... 35
Stepping Up: Your Second'Program . . . .. 35
Debugging Your Program ... 36
Using the Watch Window ... 37
Fixing Your Second Program . . . .. 38
Programming Pizazz: Your Third Program. . . .. 39
The Turbo Pascal Compiler .. . . .. 41
So, What's a Compiler Anyway? ... 41
What Gets Compiled? . . . .. 42
Where's the Code? ... 42
Compile, Make, and Build .. . . .. 43
Chapter 3 Programming in Turbo Pascal 45 The Seven Basic Elements of Programming ... 46
Data ... 47
Data Types ... 47
Integer Data Types ... 47
Real Data Types . . . .. 48
Character and String Data Types ... 49
Boolean Data Type ... 51
Pointer Data Type ... 52
Identifiers ... 53
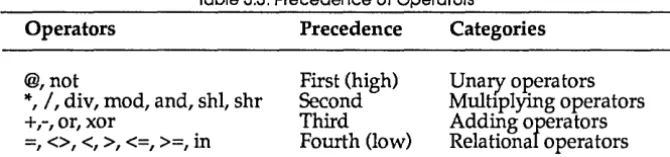
Opera tors ... 53
Assignment Operators ... 54
Unary and Binary Arithmetic Operators . . . .. 54
Bitwise Operators ... 55
Relational Operators ... 55
LogicalOperators ... 56
Address Operators ... 57
Set Operators ... 57
String Operators ... 57
Output ... 57
The Writeln Procedure ... 57
Input ... 59
Conditional Statements ... 59
The If Statement. . . .. 59
The Case Statement. . . .. 60
Loops ... 61
The While Loop . . . .. 61
The Repeat .. Until Loop ... 62
The For Loop ... '... 63
Procedures and Functions ... 64
Program Structure. . . .. 65
Sample Program ... 66
Program Comments ... 67
Chapter 4 Units and Related Mysteries 69 What's a Unit, Anyway? ... 69
A Unit's Struchlre ... . . . .. 70
Interface Section ... 71
Implementation Section ... 71
Initializa tion Section . . . .. 72
How Are Units Used? ... 73
Referencing Unit Declarations ... 74
Implementation Section Uses Clause ... 76
Circular Unit References ... 77
Sharing Other Declarations ... 78
TURBO.TPL . . . .. 79
Writing Your Own Units ... 81
Compiling a Unit. . . .. 82
An Example ... 82
Units and Large Programs . . . .. 83
Units as Overlays ... 84
1PUMOVER . . . .. 84
Chapter 5 Project Management 87 Program Organization ... 87
Initialization ... 88
The Build and Make Options ... 89
The Make Option ... 90
The Build Option. . . .. 90
The Stand-Alone Make Utility ... 91
A Quick Example ... 91
Creating a Makefile ... 92
Using MAKE ... 93
Conditional Compilation . . . .. . .. . . .. . . . .. . . .. . . .. . . .. . .. 93
The DEFINE and UNDEF Directives ... 94
Defining at the Command Line. . . .. . . .. . . .. .. . . .. . .. 95
Defining in the Integrated Environment ... 95
Predefined Symbols ... 95
The VERSO Symbol ... 95
The MSDOS and CPU86 Symbols. . . .. 96
The CPU87 Symbol . . . .. 96
The IFxxx, ELSE, and ENDIF Symbols. . . .. 96
The IFDEF and IFNDEF Directives. . . .. 97
The IFOPT Directive ... 98
Chapter 6 Debugging Your Turbo Pascal Programs 101
Compile-Time Errors ... 102
Run-Time Errors ... 102
Logic Errors ... 103
Turbo Pascal's Integrated Debugger ... 103
A Quick Debugging Example ... 107
Why Use the Debugger? . . . .. 109
Tracing ... 110
Go to Cursor. . . .. 110
Breaking ... 110
Watching ... 110
Evaluating ... 111
Modifying . . . .. 111
Navigating ... 111
Preparing to Use the Debugger ... 111
Your Display ... ',' ... 112
Starting a Debugging Session ... 114
Restarting a Debugging Session ... 114
Ending a Debugging Session . . . .. 115
Stepping Through Your Program ... 115
Using Breakpoints ... 119
Using Ctrl-Break ... 120
Watching Values ... 121
Scope and Qualification ... 123
Types of Watch Expressions ... 126
Format Specifiers . . . .. 127
Typecasting ... 130
Expressions ... 131
Editing the Watch Window ... 133
Evaluating and Modifying.. . .. .. .. .. .. .. . .. .. .. .. .. .. . .. .. .. .. 134
Modification Issues ... 136
Navigation ... 137
The Call Stack ... 137
Finding Procedures and Functions ... 139
General Issues ... 140
How to Write Programs for Debugging ... 141 IvIemory Issues ... . Recursive Routines ... . Where Debugging Won't Go ... . Common Pitfalls ... . Error-Handling ... . Input/Output Error-Checking ... . Range-Checking ... . Other Error-Handling Abilities ... .
Turbo Debugger 0 0 0 0 0 0 0 0 0 0 0 0 0 0 0 0 0 0 0 0 0 0 0 0 0 0 0 0 0 0 0 0 0 0 0 0 0 0 0 0 0 0 0 0 0 0 0 150
Chapter 7 All About the Integrated Environment 153
Turbo Pascal Command-Line Switches 0 0 0 0 0 0 0 0 0 0 0 0 0 0 0 0 0 0 0 • • • • . . • • • 153
Menu Structure ... 0 • • • 155 The Bottom Line ... 0 • • • • 0 0 0 0 0 . 0 0 0 0 0 0 0 . 0 0 0 0 0 0 0 0 0 0 0 0 0 0 0 0 0 0 159
The Edit Window . 0 0 0 0 0 0 0 • 0 0 0 0 0 0 0 0 0 0 0 0 0 0 0 0 0 0 0 0 0 0 0 0 0 0 • • 0 0 0 0 0 • 0 159
Working with Source Files 0 0 0 0 • • 0 0 0 0 0 0 0 0 • 0 0 0 • 0 0 0 0 0 0 0 • • • 0 0 0 0 • 0 161
Creating a New Source File 0 0 0 0 0 0 0 0 0 0 0 0 0 0 0 0 0 0 0 0 0 0 0 0 0 0 0 0 0 0 0 0 161
Loading an Existing Source File 0 0 0 • 0 • 0 0 0 0 . . 0 0 0 0 0 . . . . 0 . . 0 • 0 0 162
Sa ving a Source File 0 0 0 0 0 0 0 0 0 0 0 0 0 0 0 0 0 0 0 0 0 0 0 0 0 0 0 0 0 0 0 0 0 0 0 0 0 0 162
Writing an Output File ... 0 . . 0 . . . 0 . . . 0 162
The Watch Window. 0 0 0 0 0 0 0 0 0 • 0 0 0 0 0 0 • 0 0 0 0 0 0 0 0 • 0 0 0 0 0 • 0 0 • 0 0 0 0 • • • 163
The Output Window o. 0 • 0 0 0 0 0 0 0 0 0 0 0 0 0 0 0 • 0 0 0 0 0 0 0 0 0 0 0 0 0 0 0 0 0 0 0 0 0 163
The Integrated Debugger. 0 . 0 0 0 0 0 0 • • 0 0 0 0 0 . 0 " 0 0 0 0 • • 0 0 0 0 0 . 0 • • " 0 164
The Debugger Screen Display 0 • • 0 0 0 0 0 0 0 • • 0 0 0 0 • • • 0 0 0 0 • 0 0 • 0 • 0 • 0 164
The File Menu 0 • • • 0 0 0 0 • 0 • • • 0 • 0 0 0 • • • • 0 • • 0 0 • 0 • • • • • 0 0 0 0 • 0 • 0 0 0 • • • o. 165
Load (F3) 0 0 0 • • 0 • 0 0 0 0 0 . 0 0 0 0 0 0 0 0 0 0 0 • • 0 0 0 0 • • • 0 0 0 0 0 . 0 0 0 0 0 0 • • • 0 . 165
Pick (Alt-F3) 0 0 0 0 0 0 0 0 0 0 0 0 0 0 0 0 • • 0 0 0 0 0 0 • 0 0 0 0 0 0 0 0 • 0 0 0 0 0 • ; • 0 0 0 0 0 166
New 0 • • • • 0 0 0 0 0 0 . 0 0 0 0 • • • • 0 0 0 0 0 0 0 • • • • • 0 0 0 0 0 . 0 0 0 0 0 0 0 0 . 0 • • 0 • • 0 166
Save (F2) . 0 0 0 0 • • 0 • ~ 0 • 0 0 • • • • 0 0 0 • 0 • 0 • 0 0 0 0 • • • 0 • • 0 0 0 0 • • • 0 0 0 0 • • • 167
Write To 0 0 • 0 0 • • 0 0 0 0 0 • • • • 0 • 0 • 0 0 • • • • 0 0 0 0 0 • • 0 0 0 0 0 • • • 0 0 • 0 0 • 0 • • 167
Directory 0 0 0 0 0 0 0 • • • • • • • • • • • 0 • • • • • • • • • • • • • • • • • • • • • • • • • • • • • • • 167
Change Dir .. 0 . 0 • • • • • • • • • • • • • • • 0 0 . 0 0 • • • • • 0 • • • • • • • • • • • • 0 • • • • 167
as
Shell ... 0 • • • • • • • • • • • • • • • • • • • o • • • • 167 Quit (Alt-X) ... 0 • • • • • • • • • • • • • • • • • • • • • • 0 • 0 • • • • • • • 0 0 • • • 168The Edit Command ... 0 • • • • • • • • 0 • • • • • • • • • • 0 • 0 • • • • • 0 • • • 168
The Run Menu .. 0 • • • • • • • • • • • • • • • • • • • • • • • • 0 • • 0 • • • • • • • 0 • • • • • • 0 • • • 168
Run (Ctrl-F9) ... 0 • • • • • • • • • • • • • • • • • • 0 • • • • • • 0 0 • 0 • • • 169
Program Reset (Ctrl-F2) . 0 • • • • • • • • • • • • • • • • • • • • • • • • 0 0 • • • • • • • • • 169
Go to Cursor (F4) ... 0 • 0 0 • • • • 0 • • • • • • • • • • • • • • • 0 • 0 • • • 170
Trace Into (F7) ... 0 • • • • • • 0 0 • • • • • • • • 0 • • • • • • 0 0 0 • • • • • • • • • • • 170
Step Over (F8) ... 0 0 • • • • • 0 • • • • • • • • • • 170
User Screen (Alt-F5) ... 0 • • • • • • • 0 • • 0 0 • • • • • 0 0 • • • • • • • 0 • • • • • • • • • 171
The Compile Menu ... 0 • • • • • • • • • • 0 • • • • • • 0 • • • • • • • • • • • • • • • • • • • • • 171
Compile (Alt-F9) ... 0 • • 0 • • • • • • • • • 171
Make (F9) ... 0 • • • • • • • • • • • • • 0 • • • 0 • 0 • • • • • • • 0 • • • • • • • 0 • • • 172
Build ... 0 • • • 0 0 • • • • • · • • • • • • • • • • 0 • • • • • • • • • • • • • • • • • • 0 • • • • • 0 . 0 . 172
Destination (Memory)
o.
0 . . . . 0 • • • • • 0 . . . 0 • • • • 0 0 . . . ~. 172Find Error 0 • 0 • • • • • • • • • • • • • • • • 0 • • • • • • • • • • • • • • • • • • 0 • • • • • • • • • • 173
Primary File 0 • • • • • • • • 0 • 0 0 • • 0 • 0 • 0 • • • • • 0 0 • • 0 • • • 0 • • 0 • • • 0 • • • • • • 173
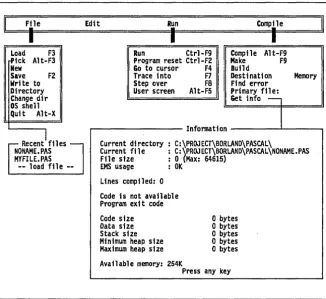
Get Info 0 0 0 • • • 0 • • • • • • • 0 • • • • 0 • o • • • 0 • • • • • • 0 • • • 0 • • • • • • • • • • 0 0 0 . 174
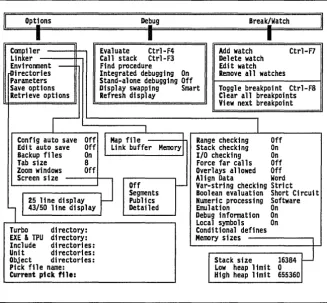
The Options Menu .. 0 • • 0 • • • • • • • 0 0 0 0 0 • • 0 • 0 0 0 • • 0 0 0 0 0 • 0 0 0 0 0 0 0 0 0 • • 0 174
Compiler. 0 0 0 • • • • • 0 0 0 0 • • • 0 0 0 0 0 0 • 0 • 0 • • 0 0 0 0 • • 0 • • 0 0 0 0 0 • • • • 0 0 0 0 174
Stack-Checking (On) ... ~ . . . .. 175
I/O-Checking (On) ... 176
Force Far Calls (Off) ... 176
Overlays Allowed (Off) ... 176
Align Data (Word) . . . .. 176
Var-String Checking (Strict) . . . .. 177
Boolean Evaluation (Short Circuit) ... 177
Numeric Processing (Software) . . . .. 177
Emulation (On) ... 177
Debug Information (On) ... 178
Local Symbols (On) . . . .. 178
Conditional Defines ... 179
Memory Sizes. . . .. 179
Linker ... 180
Map File (Off) . . . .. 180·
Link Buffer (Memory) .. . .. .. . .. . . .. . . .. . .. . . .. . . ... 181
Environment ... 181
Con fig Auto Save (Off) . . . .. 182
Edit Auto Save (Off) ... 182
Backup Files (On) ... 182
Tab Size (8) ... ) . . . .. 183
Zoom Windows (Off) ... 183
Screen Size (25-line) ... 183
Directories ... 183
Turbo Directory ... 183
EXE & TPU Directory . . .. .. .. .. . .. . .. . . .. .. .. . .. . .. . . . .. .. 183
Include Directories ... 184
Unit Directories ... 184
Object Directories ... 184
Pick File Name ... 185
Current Pick File ... 185
Parameters ... 185
Save Options ... 185
Retrieve Options ... 185
The Debug Menu. . . .. 186
Evaluate (Ctrl-F4) ... 186
Call Slack (Clrl-F3) ... 187
Find Procedure ... 187
Integrated Debugging (On) .•... . .. 187
Stand-Alone Debugging (Off) ... 188
Display Swapping (Smart) . . . .. 188
Refresh Display ... . . . .. 189
The Break/Watch Menu . . . .. 189
Delete Watch ... 190
Edit Watch ... 190
Remove All Watches ... 190
Toggle Breakpoint (Ctrl-F8) . . .. .. .. . .. .. . . . .. . . . .. . . . .. .. .... 190
Clear All Breakpoints ... 190
View Next Breakpoint ... 190
About the Pick List and Pick File ... 191
The Pick List (Alt-F3) ... 191
The Pick File . . . .. 191
Loading a Pick File ... 192
Sa ving Pick Files ... 192
Configuration Files and the Pick File ... 192
Chapter 8 Command-Line Reference 193 Using the Compiler ... 193
Compiler Options ... 194
Compiler Directive Options ... 195
The Switch Directive (/$) Option ... 196
The Conditional Defines (/D) Option ... 197
Compiler Mode Options ... 197
The Make (/M) Option. . .. .. .. . .. . .. . .. . .. . . .. . .. . .. . .. 197
The Build All (/B) Option ... 198
The Find Error (IF) Option ... 198
The Link Buffer (/L) Option ... 199
The Quiet (/Q) Option . . . .. 200
Directory Options ... 200
The Turbo Directory (IT) Option ... 200
The EXE & TPU Directory (IE) Option ... 200
The Include Directories (/I) Option ... 201
The Unit Directories (/U) Option ... 201
The Object Directories (/0) Option ... 201
Debug Options ... 202
The Map File (/G) Option ... 202
The Stand-Alone Debugging (/V) Option. . . .. 203
The TPC.CFG File ... 203
Part 2 Appendixes Appendix A Differences Between Turbo Pascal 3.0, 4.0, and 5.0 207 How 4.0 and 5.0 Differ ... 208
How 3.0 and 5.0 Differ ... 212
Programming Changes. . . .. 213
Program Declarations . . . .. 213
Compiler Directives ... 213
Data Types ... 217
Expression Evaluation Order ... 218
Predeclared Identifiers ... 218
Other Additions and Improvements ... 220
Using Assembly Language ... 226
Converting from Turbo Pascal 3.0 ... 227
Using UPGRADE ... 228
/3 Activate Turbo3 Unit. . . .. 230
/J Activate Journal File. . . .. 231
/N No Source Markup . . . .. 231
/0 [d:][path] Output Destination. . . .. 232
/U Unitize ... 232
What UPGRADE Can Detect. . . .. . . .. . . .. . . .. 234
What UPGRADE Cannot Detect. . . .. . . .. 235
An UPGRADE Checklist ... 236
Appendix B Using the Editor 239 Quick In, Quick Out ... 239
The Edit Window Status Line ... 240
Editor Commands . . . .. 240
Basic Movement Commands . . . .. 242
Extended Movement Commands . . . .. 243
Insert and Delete Commands ... 244
Block Commands ... 245
Miscellaneous Editing Commands . . . .. 247
The Turbo Pascal Editor versus WordStar ... 251
Appendix C Turbo Pascal Utilities 253 Using TPUMOVER, the Unit Mover ... 253
A Review of Unit Files ... 253
Using TPUMOVER . . . .. 254
TPUMOVER Commands . . . .. 255
Moving Units into TURBO.TPL ... 256
Deleting Units ~om TURBO. TPL ... 257
Moving Units Between .TPL Files. . . .. . . .. . . .. 257
Command-Line Shortcuts ... 258
The Stand-Alone MAKE Utility ... 258
Creating Makefiles ... 258
Comments ... 259
Explicit Rilles ... . . .. 259
Implicit Rilles ... 261
Command Lists ... 264
Macros ... 266
Defined Test Macro ($d) . . . .. 268
Full File Name Macro ($<) . . . .. . . .. 269
File Name Path Macro ($:) ... 269
File Name and Extension Macro ($.) ..•.•.•..••••.•••..•.•.• 269
File Name Only Macro ($&) . .. . .. . . .. . .. . . ... 269
Directives ... 270
Using MAKE ... ;... 273
The BUlL TINS.MAl< File . . . .. 274
How MAKE Searches for Files ... 275
MAKE Command-Line Options . . . .. 275
MAKE Error Messages . . . .. 276
Fatal Errors ... '. . . .. 276
Errors ... 277
THELP: The Online Help Utility. . . .. 278
Installing THELP on Your System ... 279
Loading and Invoking THELP ... 279
The THELP Cursor Keys ... 279
Summary of THELP Command-line Options. . . .. 281
The /B Option (Use BIOS for Video) ... 282
The /C#xx Option (Select Color) ... 282
The /Dname Option (Full Path for Disk Swapping) ... 283
The /Fname Option (Fill Path and File Name for Help File) ... 284
The /H, /?, and? Options (Display Help Screen) ... 284
The /Kxxyy Option (Reassign Hot Key) ... 284
The /Lxx Option (Force Number of Rows Onscreen) ... . .. 285
The /M+ and /M- Options (Display Help Text) ... 285
The /Px Option (Pasting Speed) . . . .. 286
The /R Option (Send Options to Resident THELP) . . . .. 286
The /Sx Option (Default Swapping Mode) . . . .. 286
The /U Option (Remove THELP from Memory) . . . .. 287
The /W Option (Write Options to THELP.COM and Exit) ... 287
The TOUCH Utility. . . .. 287
The GREP Utility. . . .. 287
The GREP Switches. . . .. 288
How to Search Using GREP . . . .. 290
Examples Using GREP ... . . . .. 291
The BINOBJ Utility .... . . .. 294
Appendix D Customizing Turbo Pascal 297 What Is TINST? ... 297
Keeping Your Turbo Pascal 4.0 TINST Settings (TINSTXFR) ... 298
How to Use TWS1XFR ... 299
Running TINST ... . . .. 299
The Compile Menu . . . .. 301
The Options Menu ... 301
Range-Checking (Off) . . . .. 301
Stack-Checking (On) . .. .. . .. .. .. .. . .. . .. .. .. .. .. .. . . .... 301
I/O-Checking (On) ... 301
Force Far Calls (Off) ... 301
Overlays Allowed (Off) ... 302
Align Data (Word) . .. .. .. . .. .. . . .. . . .. .. .. . .. .. . . .. .. ... 302
Var-String Checking (Strict) . . . .. 302
Boolean Evaluation (Short Circuit) ... 302
Numeric Processing (Software) . . . .. 302
Emulation (On) ... 302
Debug Information (On) ... 302
Local Symbols (On) . . . .. 302
Conditional Defines ... 302
Memory Sizes (16384,0,655360) ... 303
The Linker Menu . . . .. 303
Ma p File (Off) . . . .. 303
Link Buffer (Memory) .. . .. . .. .. .. .. .. .. .. . .. .. .. .. .. . .. ... 303
The Environment Menu ... 303
Config Auto Save (Off) . . .. . . .. . . .. . . .. . . .. 303
Edit Auto Save (Off) ... 304
Backup Files (On) ... 304
Zoom Windows (Off) ... 304
Full Graphics Save (On) ... 304
Screen Size (25) ... 304
Options for Editor . . . .. 304
Insert Mode (On) ... 305
Autoindent Mode (On) .. .. . .. .. .. . .. . .. .. .. . .. . . .. . .. ... 305
Use Tabs (Off) ... 305
Optimal Fill (On) . . . .. 305
Backspace Unindents (On) . . . .. 305
Tab Size (8) ... 305
Editor Buffer Size (65,534) ... 305
Make Use of EMS Memory (On) . .. . .. . . .. . . . .. . . . .. 306
The Directories Menu . . . .. 306
Turbo Directory . . . .. 306
EXE & TPU Directory . . . .. 307
Include Directories, Unit Directories, and Object Directories .... 307
Pick File Name. . . .. 307
The Parameters Setting . . . .. 307
The Debug Menu ... " . .. 308
Integrated Debugging (On) ... 308
Stand-Alone Debugging (Off) ... 308
Display Swapping (Smart) . . . .. 308
WordStar-Like Selection ... 310
Ignore Case Selection ... 311
Verbatim Selection ... 312
Allowed Keystrokes ... 312
Global Rules ... 312
Turbo Pascal Editor Keystrokes ... 313
The Mode for Display Menu ... 314
Default ... 315
Color ... 315
Black and White ... : . . . . .. 316
LCD or Composite ... 316
Monochrome ... 316
The Set Colors Menu ... 316
The Resize Windows Menu ... 317
Quitting the Program ... 318
Appendix E A DOS Primer 319 What Is DOS? ... 319
How to Load a Program. . . .. 320
Directories ... 321
Subdirectories ... 322
Where Am I? The $p $g Prompt ... . .. 322
The AUTOEXEC.BAT File ... 323
Changing Directories ... 324
Appendix F Glossary 327
List of Figures
Figure 2.1: The Turbo Pascal Main Menu Screen ... 26
Figure 2.2: A Sample Use of Hot Keys ... 29
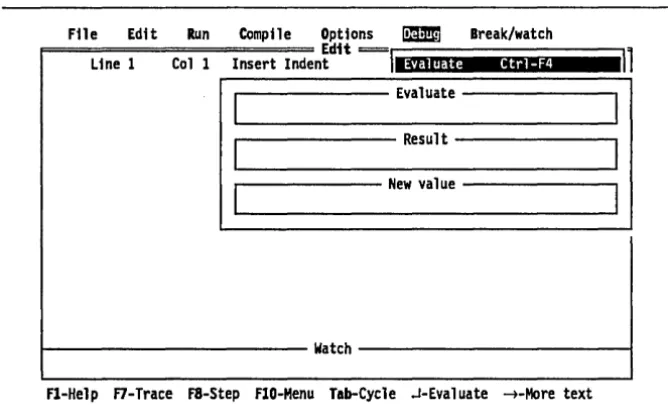
Figure 6.1: The Evaluate Window ... 135
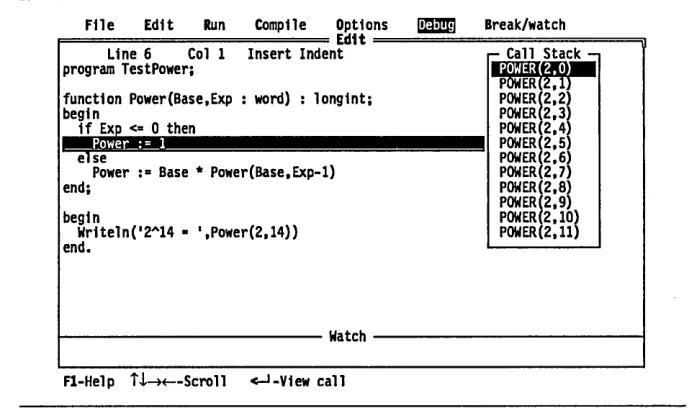
Figure 6.2: The Call Stack Window ... 139
Figure 7.1: Turbo Pascal's Menu Structure ... 156
Figure 7.2: The File Menu ... 165
Figure 7.3: The Run Menu ... 169
Figure 7.4: The Compile Menu ... 171
Figure 7.5: The Options Menu ... 174
Figure 7.6: The Options/Compiler Menu ... 175
Figure 7.7: The Options/Linker Menu ... 180
Figure 7.8: The Map File Menu ... 181
Figure 7.9: The Options/Environment Menu ... 182
Figure 7.10: The Options/Directories Menu ... 184
Figure 7.11: The Debug Menu ... 186
Figure 7.12: The Break/Watch Menu ... 189
List of Tables
Table 2.1: Turbo Pascal's Hot Keys ... 30
Table 3.1: Integer Data Types ... .48
Table 3.2: Real Data Types ... 49
Table 3.3: Precedence of Operators ... 54
Table 5.1: Summary of Compiler Directives ... 94
Table 5.2: Predefined Conditional Symbols ... 95
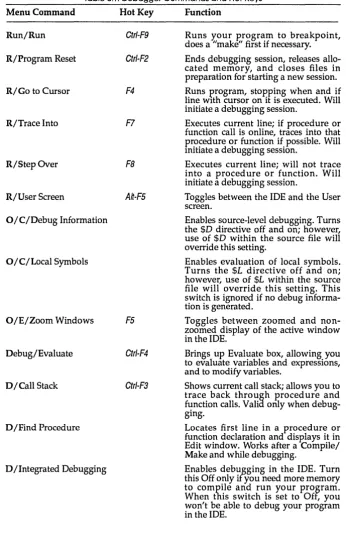
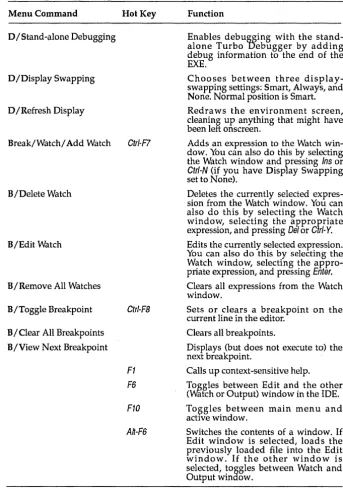
Table 6.1: Debugger Commands and Hot Keys ... 104
Table 6.2: Debug Expression Format Characters ... 129
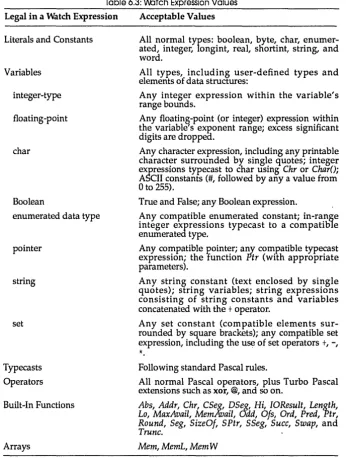
Table 6.3: Watch Expression Values ... 132
Table 8.1: Command-Line Options ... 195
Table A.1: New and Modified Procedures and Functions ... 209
Table B.1: Summary of Editor Commands ... 241
Table B.2: Control Cursor Sequences ... 243
Table B.3: Quick Movement Commands ... 243
Table Col: THELP Command Keys ... 280
Table C.2: THELP Command-Line Options ... 281
Table C.3: Color Values for a Standard Color Display ... 283
Table Dol: Editor Screen Keystrokes ... 309
N T R
o
Du
c
T o NWelcome to version 5.0 of Turbo Pascal! Turbo Pascal is designed to meet the needs of all types of users of IBM PS/2s, pes, and compatibles. It's a structured, high-level language you can use to write programs for any type or size application.
This version of Turbo Pascal is the latest generation of Borland's flagship language product. Here's a quick look at what you get with 5.0:
• integrated source-level debugging, complete with single-stepping, break-points, exanunation of variables, data structures and expressions, and the option of assigning new values to variables and data structures while debugging
• complete 8087 point emulation, allowing use of IEEE floating-point types even if you don't have an 8087 math coprocessor
• unit-based overlays, and a state-of-the-art overlay manager
• compatibility with Borland's Turbo Debugger, permitting stand-alone debugging of your 5.0 programs
• expanded memory support on systems running EMS (3.2 or later), including the ability to load overlays into EMS memory, and use of EMS memory by the built-in editor
• two to three times faster compilation speed (lines per minute) than version 3.0
• improved code generation, resulting in faster execution
• a smart built-in linker that removes unused code and data at link time, producing smaller programs
• .EXE files, which can be larger than 64K • separate compilation of individual units
• built-in project management that performs automatic recompilation of dependent source files (including units)
• a more powerful assembly language interface, as well as inline assembly options
• the ability to nest Include files up to 15 levels deep
• several new data types, including longint, shortint, word, and IEEE floating-point types (single, double, extended, and comp)
• several new built-in procedures and functions, including IncO and DecO
• built-in 8087/80287/80387 coprocessor support • short-circuit Boolean expression evaluation • conditional compilation directives
• a high degree of compatibility with versions 3.0 and 4.0, and a utility and units to aid in converting 3.0 programs to 5.0
• both command-line and integrated environment versions of the compiler
Understanding
5.0
As you're reading through this manual, several major concepts will be introduced. To help clarify these ideas, here's a summary of some of 5.0's features.
Integrated Environment and Command-Line
Compilers
The Turbo Pascal compiler is actually two compilers: an integrated devel-opment environment and a command-line version. The Borland-style integrated environment combines a text editor and compiler; it provides pull-down menus, windows, input boxes, configuration control, and context-sensitive help. The integrated debugger makes it easy to step through your program line-by-line, examine or modify variables and memory locations, set breakpoints, and stop your program at any time using elf/-Break. This compiler is the TURBO.EXE file on your disk.
Stand-Alone Debugging Support
Both the command-line compiler and the integrated development environment provide full support for debugging using Borland's stand-alone debugger, Turbo Debugger.
Separate Compiiation
Separate compilation lets you break programs into parts and compile them. That way you can test each part to make sure it works. You can then link all the parts together to build a program. This is useful, since you don't have to recompile everything that makes up a program each time you use it. In addition, this feature lets you build up a toolbox of precompiled, tested code tha t you can use in all your programs.
Programs and Units
A program is the main module of Pascal source code that you write and execute. In order to provide for separate compilation and still maintain Pascal's strict checking among program parts, units are used. A unit is a piece of source code that can be compiled as a stand-alone entity. You can think of units as a library of data and program code. They provide a description of the interface between the unit's code and data and other programs that will use that unit. Programs and other units can use units; units don't use programs.
Compile, Make, and Build
It's probable that you may change the source code of several of the units you're using without recompiling them; however, you'll definitely want your main program to use the absolute latest units. We've provided two ways for you to make sure the unit files are brought up to date.
The Make option tells the compiler to go and look at the date and time of any source and compiled unit file used by your main program (or by another unit, since units can use units). If the source file was modified since the unit was compiled, the compiler will recompile the unit to bring it up to date.
Use this option if you want to make absolutely sure you have all the latest compiled units.
Pick File List
The pick file contains the state of the integrated environment, so that when you leave TURBO.EXE and return to it later, you are placed at the spot in the file where you left off previously. The pick file list also offers you easy access to files when you are editing multiple files. The last eight file names and the state of each respective file that you've edited are kept in the pick list. When you select a file from the pick list, the file is loaded and the cursor is placed at the point in the file where you were when you left it. You can enable or disable pick file (TURBO.PCK) generation.
File Extensions
All kinds of file name extensions are used in the DOS world; most are application- or program-specific. (Remember that a file name consists of up to eight characters with an optional three-character extension.) Turbo Pascal uses several different file name extensions:
• .EXE: An executable file. The two compilers themselves are .EXE files. The compiled programs you'll build with the compilers will be .EXE files. (Turbo Pascal 3.0 created .COM files that were also executable files.) • .P AS: Use this for your Pascal source code files. You can use other file
name extensions, but traditionally .P AS is used.
• .TPU: A precompiled unit file. When you compile a Pascal unit, the compiler generates a .TPU file with the same first eight characters of the source file. A .TPU file contains the symbol information and compiled code for the unit.
• .TPL: A Turbo Pascal library file. You can use only one of these at a time. The standard library file on the disk is called TURBO.TPL. You can modify TURBO. TPL to suit your needs .
.. . Tr and .CFG: Configuratiun files for the two compilers. Tnese files allow you to override default settings in the compilers and customize compiler default values to your own needs.
A .TP file is a binary file containing the options you set for the integrated environment. You can have multiple.TP files for different settings.
• .PCK: The Turbo Pascal pick file extension. The pick file contains the state of the integrated environment so that, when you leave TURBO.EXE and return later on, you are placed at the spot in the file where you were last working. You can enable or disable pick file generation.
• .MAP: This file is generated if you set the Options/Linker/Map File menu command to On in the integrated environment or use the /G command-line compiler option. It contains information about your program that can be used with most standard symbolic debuggers. • .BAK: Backup source file extension. The editor in the integrated
environ-ment renames the existing file on disk to a .BAK file when you save a modified version of the file. You can enable or disable .BAK file generation with TINST (refer to Appendix D, "Customizing Turbo Pascal," for details).
About This Manual
This manual walks you through writing, compiling, and saving Turbo Pascal programs. It explains in detail the many new features and how to use them. It also teaches you how to take existing version 3.0 and 4.0 programs and convert them to run under Turbo Pascal version 5.0.
Sample programs are provided on the distribution disks for you to study. You can also tailor these sample exercises to your particular needs.
Before you get started, you should be somewhat familiar with the basics of operating an IBM PC (or compatible) under MS-DOS (or PC-DOS). You'll need to know how to run programs, copy and delete files, and how to use other basic DOS commands. If you're not sure about how to do these things, spend some time playing with your PC and reviewing the MS-DOS user's manual that came with it; you can also look at Appendix E, "A DOS Primer," to learn some basics. Appendix F lists many of the terms introduced in this manual.
This volume can be considered the tutorial part of the Turbo Pascal documentation; it's divided into two main sections: "Using Turbo Pascal" and "The Appendixes." The second volume, the Turbo Pascal Reference Guide gives you a complete technical description of Turbo PascaIS.a.
Using Turbo Pascal
• Chapter 1: Getting Started explains how to make backup copies of your Turbo Pascal disks, describes the different files on the disks, and tells you how to use INSTALL to set up Turbo Pascal for your particular system. • Chapter 2: Beginning Turbo Pascal leads you directly from loading
Turbo Pascal into writing simple programs, and then on to compiling and running them. A discussion of a few common programming errors and how to use the debugger is also presented. You'llleam some basics about getting around in the integrated environment.
• Chapter 3: Programming in Turbo Pascal introduces you to the Pascal programming language.
• Chapter 4: Units and Related Mysteries tells you what a unit is, how it's used, what predefined units (libraries) Turbo Pascal provides, and how to write your own. It also describes the general structure of a unit and its interface and implementation portions, as well as how to initialize and compile a unit.
• Chapter 5: Project Management tells how to develop large programs using multiple source files and libraries, and discusses conditional compilation.
• Chapter 6: Debugging Your Turbo Pascal Programs tells how to use the integrated debugger and gives suggestions on how to track down and eliminate errors in your programs.
• Chapter 7: All About the Integrated Environment is a complete guide to the menu commands in Turbo Pascal's integrated environment.
• Chapter 8: Command-Line Reference is a complete guide to the command-line version (TPC.EXE) of Turbo Pascal.
Appendixes
Part 2 of this manual contains six appendixes that deal with the following topics:
• Appendix A: Differences Between Turbo Pascal 3.0, 4.0, and 5.0 lists the differences between the three versions that affect backward compati-bility.
• Appendix B: Using the Editor explains how to use the built-in editor to open, edit, change, save a file, and more.
• Appendix D: Customizing Turbo Pascal shows how to use TINST to customize your copy of Turbo Pascal 5.0, as well as transfer your 4.0 TINST customizations intact.
• Appendix E: A DOS Primer talks about MS-DOS, telling you all you need to know in order to use Turbo Pascal 5.0.
• Appendix F: Glossary lists commonly used terms in this manual and explains what they mean.
Hardware and Software Requirements
Turbo Pascal runs on the IBM PC family of computers, including the XT, AT, and the PS/2 series, as well as true IBM compatibles. Turbo Pascal requires DOS 2.0 or higher and at least 448K of RAM to run the integrated environment (256K to run the command-:line compiler).
Turbo Pascal includes floating-point routines that let your programs make use of an 8087, 80287, or 80387 numeric coprocessor if you have one. An 8087/80287/80387 coprocessor can significantly enhance performance of your programs, but Turbo Pascal does not require one. In fact, Turbo Pascal can link to a run-time library that will emulate the numeric coprocessor if
you don't have one.
Turbo Pascal supports expanded memory on systems running EMS drivers conforming to the 3.2 (or later) Lotus/Intel/Microsoft Expanded Memory Specification (EMS).
Typography
This manual was produced by Borland's Sprint: The Professional Word Processor on a PostScript printer. The different typefaces displayed are used for the following purposes:
Italics
Boldface
Monospace
In text, this typeface represents constant identifiers, field identifiers, and formal parameter identifiers, as well as unit names, labels, user-defined types, variables, procedures, and functions.
Turbo Pascal's reserved words are set in this typeface.
Keycaps This typeface indica tes a key on your keyboard. It is often used when describing a key you have to press to perform a particular function; for example, "Press Esc to exit from a menu."
How to Contact Borland
If, after reading this manual and using Turbo Pascal, you would like to contact Borland with comments or suggestions, we suggest the following procedures:
• The best way is to log on to Borland's forum on CompuServe: Type GO BPROGA at the main CompuServe menu and follow the menus to section 2. Leave your questions or comments here for the support staff to process.
• If you prefer, write a letter detailing your problem and send it to Technical Support Department
Borland International P.O. Box 660001 1800 Green Hills Road Scotts Valley, CA 95066-0001
Please note: If you include a program example in your message, it must be limited to 100 lines or less. We request that you submit it on disk, include all the necessary support files on that disk, and provide step-by-step instructions on how to reproduce the problem. Before you decide to get technical support, try to replicate the problem with the code con-tained on a floppy disk, just to be sure we can duplicate the problem using the disk you provide us.
• You can also telephone our Technical Support department at (408) 438-5300. To help us handle your problem as quickly as possible, have these items handy before you call:
• product name and version number • product serial number
• computer make and model number • operating system and version number
p A R T
1
c
H A p T E R1
Getting Started
In this chapter, we'll get you started using Turbo Pascal by showing how to use INSTALL to load it on your floppy disk or hard disk system. We'll also offer some guidance on how to go about reading this manual, based on your programming experience.
Before You Begin
The three distribution disks that accompany this manual are formatted for standard 5-1/4 inch disks, 360K disk drives, and can be read by IBM pes and compatibles (those with 3-1/2 inch disk, 720K disk drives will receive two distribution disks). Now, before you do anything else, we want you to make backup copies of these three disks; then, after you run the Turbo Pascal installation program (see page 15), put the originals away. Since there's a replacement charge if you erase or damage the original disks, take heed and use your originals only to install Turbo Pascal or make backup copies. Here's how:
• Get three new (or unused) floppy disks. • Boot up your computer.
• At the system prop1pt, type diskcopy A: B: and press Enter. The message
Insert source diskette in drive A: will be displayed on your screen. Remove your system disk from Drive A and put distribution disk 1 into DriveA.
• If your system has two floppy disk drives, your screen will also say
only has one floppy drive, then you'll be swapping disks in Drive A. Just remember that the distribution disk is the source disk, the blank disk is the destination disk.
• If you haven't done it already, press Enter. The computer will start reading from the source disk in Drive A.
• If you have a two-drive system, it will then write out to the destination disk in Drive B and continue reading from A and writing to B until copying is complete. If you have a one-drive system, you'll be asked to put the destination disk in A, then the source disk, then the destination disk, and so on and so forth until it's finished.
• When copying is completed, remove the distribution (source) disk from Drive A, and put it away. Remove the copy (destination) disk from Drive B and label it Install/Compiler.
• Repeat the preceding process with the second and third distribution disks and the other blank floppies.
Now that you've made your backup copies, we can get on to the meat of this chapter.
What's On Your Disks
The distribution disks that come with this manual include two different versions of the Pascal compiler: an integrated environment version and a stand-alone, command-line version.
You might not need all the files that come on your distribution disks. Use the INSTALL program and then delete the files you don't need from your working disks. The README file contains a complete file list. For your reference, here's a summary of most of the files on disks and how to determine which ones to retain:
README To see any last-minute notes and corrections, type README
at the system prompt. (If you have a printer, you can print it out.) Once you review this material, keep it around for future reference.
HELPME!.DOC Contains answers to many common questions about Turbo Pascal S.D.
TURBO.TPL
TURBO.HLP
THELP.COM
TPC.EXE
GRAPH.TPU
*.ARC files
*.BGI files
*.CHRfiles
*.DOC files
*.PAS files
INSTALL.EXE
This contains the units (program libraries) that come with Turbo Pascal, including System, Crt, Dos, Overlay,
and Printer-this is a must! See Chapter 12 of the Reference Guide, "Standard Units," for more information
on these units.
This contains the online, context-sensitive help text used by the integrated environment and the THELP utility. See page 23 for information on online help, and Appendix C, "Turbo Pascal Utilities," for details on the THELP utility.
This is the memory-resident utility that provides access to Turbo Pascal's context-sensitive help system from any program. See Appendix C, "Turbo Pascal Utilities."
This is the command-line version of Turbo Pascal. If you use a separate editor, make heavy use of batch files, and so on, you'll probably want to use this. Refer to Chapter 8, "Command-Line Reference," for information on how to use the command-line compiler.
This contains the Graph unit (the Borland Graphics
Interface unit). See the section "The Graph Unit" in Chapter 12 of the Reference Guide for more infonnation.
Packed files that contain documentation files, example programs, graphics device drivers, fonts, interface section listings for Turbo Pascal's units, and more. INSTALL with walk you through the dearchiving of these files (see page 15).
BGI graphics device drivers.
BGI graphics stroked character fonts.
These include the interface section listings for all the standard units.
These include an overlay example and the MicroCa1c source files, as well as other sample programs.
Installs Turbo Pascal on your system (see page 15 for instructions).
TINST.EXE This utility allows you to customize certain features of TURBO.EXE. See Appendix D, "Customizing Turbo Pascal," for more information.
TINSTXFR.EXE This utility transfers the customized settings you created with TINST in 4.0 to 5.0. See Appendix D, "Customizing Turbo Pascal/'
MAKE.EXE This is an intelligent project manager that allows you to keep your programs up-to-date and is especially useful when you are mixing assembler and Pascal and using the command-line compiler (TPC.EXE). See Appendix C, "Turbo Pascal Utilities," for more information on using MAKE.
GREP.COM This is a fast, powerful, text search utility. See Appendix C, "Turbo Pascal Utilities," for more information on usingGREP.
TOUCH.COM This utility changes the date and time of one or more files to the current date and time, making it "newer" than the files that depend on it. It's generally used in conjunction with MAKE.EXE.
BINOBJ.EXE Use this utility to convert a binary data file to an .OBJ file.
TPCONFIG.EXE This utility takes your integrated environment configur-ation file and converts it to work with the command-line compiler (as TPC.CFG). It's helpful if you want to use the integrated environment to set all your options, but want to compile with the command-line version. This utility will also convert a 1PC.CFG file to a .TP file. UPGRADE.DTA This utility does a quick upgrade of Turbo Pascal ver-UPGRADE.EXE sion 3.0 source files, modifying them for compatibility
with Turbo Pascal version 5.0. See the section on UPGRADE in Appendix A for more information.
GRAPH3.TPU These are version 3.0 compatibility units. Refer to TURB03.TPU Appendix A, "Differences bet"vcen Turbo Pascal 3.0, 4.0
and 5.0."
Installing Turbo Pascal On Your System
The first thing you'll want to do is install Turbo Pascal on your system. Your Turbo Pascal package includes all the files and programs necessary to run both the integrated environment and command-line versions of the compiler. A new program, INSTALL.EXE, sets up Turbo Pascal on your system. INSTALL works on both hard disk and floppy-based systems. The next section descibes hard disk installation; for floppy installation, skip to the section "Installation on a Floppy-Drive System" on page 18.
Hard Disk Installation
For the sake of simplicity, let's say you're installing Turbo Pascal on your hard disk, which is Drive C. During installation, you will place the Turbo Pascal source disks in Drive A. (You will have three source disks if you ordered 5-1/4 inch, 360K disks, two if you ordered 3-1/2 inch, 720K disks.) Put the Install/Compiler Disk in Drive A (or the Install/Compiler/Help/ Utilities Disk, if you have 3-1/2 inch, 720K disks). Now type
A: INSTALL
at the C:\> prompt. When you see the installation opening screen, press
Enter. INSTALL will ask you to specify a source drive. The source drive refers to the drive containing the Turbo Pascal program and utilities, in this case Drive A. If your source disks are in a drive other than Drive A, enter the appropriate drive by typing the drive letter followed by Enter.
Now you are asked whether you want to
1. Install Turbo Pascal on a Hard Drive.
2. Update Turbo Pascal 4.0 to Turbo Pascal 5.0 on a Hard Drive. 3. Install Turbo Pascal on a Floppy Drive.
Use the arrow keys to move the highlight bar to the appropriate choice (1 or 2) and press Enter. At any time during the installation, you may ask for help by pressing F1. If you choose ''Install Turbo Pascal on a Hard Drive," the INSTALL program will display a window listing the default directories.
• Turbo Pascal Directory: C: \ TP
• Graphics Subdirectory: C: \ TP
• Documentation Subdirectory: C: \ TP\DOC
• Example Subdirectory: C: \ TP
By default, INSTALL creates separate subdirectories for the documentation files (*.DOC and HELPME!.DOC) and the Turb03 compatibility files (UPGRADE.EXE, TURB03.TPU, GRAPH3.TPU, TURB03.DOC, and so on).
It will place all other files from the distribution disks in the Turbo Pascal Directory. If you would rather separate graphics and example programs into their own subdirectories as well, edit the default paths for those files by moving the highlight bar to the directory you want to change, pressing
Enter, and then entering the full MS-DOS path name of the directory you want (the INSTALL program will create a new one for you).
INSTALL has an "Unpack Archives" command; it toggles between Yes and No. Archive files (*.ARC) are condensed files that contain example programs and documentation and help files. INSTALL gives you a choice of copying the .ARC files intact (''No'') or dearchiving them ("Yes") and copying all the individual, unpacked files onto your hard disk.
Note: If you don't have much space on your hard disk, you might want to switch "Unpack Archives" to No. To do this, use the arrow keys to move the highlight bar to "Unpack Archives" and press Enter.
The BGI/Demos/Doc/Turb03 Disk contains several files with an .ARC file extension: BGI.ARC, DEMOS.ARC, DOC.ARC, MCALC.ARC, and TURB03.ARC. If you set "Unpack Archives" to No, you can still dearchive them yourself later by using the UNP ACK.COM utility. For example, typing
UNPACK DEMOS
unpacks all the files stored in the DEMOS.ARC archive into the current directory.
Note that INSTALL does not unpack the file stored in BGI.ARC. BGIEXAMP.ARC contains all the BGI (Borland Graphics Interface) program examples from the "Turbo Pascal Reference Lookup" chapter in the Reference Guide. If you want to unpack the examples from this file, go to the directory that contains both UNPACK.COM and BGIEXAMP.ARC and type
UNPACK BGIEXAMP
This will unpack ail 69 examples from BGIEXAMP.Al<C.
When you are satisfied with your installation settings, move the highlight bar down to "Start Installation" and press Enter (or press the INSTALL hot
key F9). A window will pop open and list the file names as the INSTALL
Note: If you ordered 3-1/2 inch, 720K disks, your first disk combines the Install/Compiler files and the Help/Utilities files; therefore, there's no need for you to switch disks until you are prompted for the "packed files" disk (BGI/Demos/Doc/Turbo3).
Finally, INSTALL prompts you to insert the BGI/Demos/Doc/Turbo3 Disk in the source drive. Do this and press any key. If you have left "Unpack Archives" set to Yes, INSTALL will spend a little bit longer on this disk than on the first two as it uncompresses the archive files.
When it has finished, the INSTALL program reminds you to read the latest about Turbo Pascal in the README file, which contains important, last-minute information about Turbo Pascal 5.0. The HELPMELDOC file also answers many common technical support questions. Installation is now complete.
At this point, INSTALL reminds you to create a CONFIG.SYS file, if you don't already have one. Be sure to include the line
FILES = 20
This tells DOS that you want to reserve the maximum space possible for simultaneously open files. By default, DOS allows eight open files at a time, which is usually not enough. Twenty open files may sound like a lot, but every time you run a program, DOS automatically opens three to five files. When you realize that Turbo Pascal itself opens several files, that any files you edit are open files, and that running your program from the integrated environment opens another few open files, you'll see how quickly you could wind up with twelve open files. If you use a lot of include directives in your Pascal source code, you'll add even more.
You should also add C: \ TP to the DOS PATH command in your AUTOEXEC.BAT file by including a line like
PATH=C:\DOS;C:\TP
At some point, you may want to run TINST to configure Turbo Pascal to your own unique quirks (see Appendix D, "Customizing Turbo Pascal," for more information). Note that INSTALL's upgrade option automatically runs TINSTXFR.EXE, a new utility that copies your Turbo Pascal 4.0 TINST configuration settings to the new compiler. If you don't use INSTALL to upgrade, you might still want to run TINSTXFR to transfer your settings (see Appendix D, "Customizing Turbo Pascal").
Installation on a Floppy-Drive System
To create a working disk, you need to set up a floppy disk that has at least two files on it: TURBO.EXE and TURBO.TPL. In addition, you'll probably want to copy TURBO.HLP from the Help/Utilities Disk. The INSTALL . program will automatically copy the appropriate files. You must first fonnat a blank floppy disk. If you want to make a bootable floppy disk (a disk with DOS system files on it), you will not have room for the help file on a standard 360K floppy. If you do not make a bootable floppy disk, you will have to boot your computer from another system disk and swap in your Turbo Pascal working disk when you want to run Turbo Pascal.
To fonnat a bootable floppy, put your DOS system disk in Drive A and type
FORMAT B:/S
If you have only one drive, your computer will ask you to insert a DOS disk into Drive A; just insert your regular system boot disk. If you have a two-drive system, place a blank disk into Drive B and press Enter when prompted. On a one-drive system, place your blank disk into the drive whenever you are asked to insert a blank disk into Drive B, and place your original boot disk into the drive whenever you are asked to insert a DOS disk in Drive A. If you want to save room for the help file, you can omit the /S option in the FORMAT command, but you won't be able to boot from your working disk.
Now you're ready to transfer files from the distribution disks to your working disk. Make sure you are logged on to Drive A (you should see the A> prompt on the DOS command line). Insert the Install/Compiler Disk and type
INSTALL
The Turbo Pascal Installation screen greets you. Press Enter to continue; keep in mind that you can press F1 at any time to get help. INSTALL will
prompt you to enter a source drive. The source drive refers to the drive containing the Turbo Pascal program and utilities. The INSTALL program uses Drive A as the default source drive, so just press Enter.
~JO";"'T INST.l\.LL asks whether you \vant to:
1. Install Turbo Pascal on a Hard Drive.
2. Update Turbo Pascal 4.0 to Turbo Pascal 5.0 on a Hard Drive. 3. Install Turbo Pascal on a Floppy Drive.
you if you want to install the integrated environment or the command-line version of Turbo Pascal; the "Version of Turbo Pascal to Copy" command toggles between Integrated Environment and Command Line when you press Enter. If you don't know which to one to pick, choose Integrated Environment. If you don't want INSTALL to copy the help file, either because you don't need it or because you don't have room on your disk, move the highlight bar down to "Copy Help File" and press Enter to toggle it to No.
Now, to start the installation, move the highlight bar down to UStart Installation" and press Enter. The INSTALL program asks you to insert your working disk in Drive B. This is the disk you just finished formatting. If you only have a one-floppy system, you will have to keep swapping disks during installation. In this case, put your working disk in Drive A. INSTALL will tell you when you need to swap disks, so keep your eyes on the screen. For two-floppy systems, you will only have to swap disks if you set UCopy Help File" to Yes.
INSTALL informs you that it is working by listing the files it is transferring, like this:
Reading files:
A:\TURBO.EXE, A:\TURBO.TPL Writing files:
B:\TURBO.EXE, B:\TURBO.TPL
If you chose Yes for "Copy Help File," you will eventually be prompted to insert the Help/Utilities Disk in Drive A. Do this and press Enter. From this disk, INSTALL will copy TURBO.HLP (the help file) to your working disk. When this file is copied, installation is complete. The installation utility reminds you that you should create a file on your working disk called CONFIG.SYS (if you don't already have one). You can do this with the Turbo Pascal editor if you like. There should be a line in CONFIG.SYS that says
FILES = 20
This tells DOS that you want to reserve the maximum space possible for simultaneously open files. This may sound like a lot; see the explanation of FILES = 20 on page 17 under "Hard Disk Installation" if you're curious about why you need that much space for open files.
Special Notes
• If you use INSTALL's Upgrade option, 5.0 files will overwrite any version 4.0 files that have the same names. If you let INSTALL copy 5.0 files into your 4.0 subdirectory, some 4.0 files might still be left on disk and not be overwritten. In this case, you should delete any obsolete 4.0 files after running INSTALL. This is especially important if you have INSTALL build separate subdirectories for 5.0 file groups (DOC, BGI, TURB03, and so on).
• If you install the graphics files into a separate subdirectory (C:\ TP\BGI, for example), remember to specify the full path to the driver and font files when calling InitGraph, for example:
InitGraph(Driver, Mode, 'C:\TP\BGI');
• If GRAPH.TPU is not in the current directory, you'll need to add its location to the unit directories with the Options/Directories/Unit Directories command (or with the /U option in the command-line compiler) in order to compile a BGI program.
• If you have difficulty reading the text displayed by the INSTALL or TINST programs, they will both accept an optional command-line parameter that forces them to use black-and-white colors:
• A:INSTALL /B Forces INSTALL into BW80 mode • A:TINST /B Forces TINST into BW80 mode
Specifying the /B parameter may be necessary if you are using an LCD screen or a system that has a color graphics adapter and a monochrome or composite monitor. To find out how to permanently force the integrated environment to use black-and-white colors with your LCD screen (or CGA and monochome/composite monitor combination), see the note on page 26.
Choosing Between Two Compilers
You've bought two complete versions of the Turbo Pascal compiler. The first, TURllO.EXE, i~ known as the integrated environment. It provides a pull-down menu- and keystroke-driven multiwindow environment. You can load, edit, save, compile, and run your programs without ever leaving it. Most of the chapters that follow this one are devoted to using the integrated environment.
The second version, TPC.EXE, is known as the command-line compiler. It
run it from the MS-DOS system prompt; for example, if your program is in a file named MYFIRST.P AS, you would type at the prompt
TPC MYFIRST
and then press Enter. TPC.EXE compiles and links your program, producing an .EXE file (just like TURBO.EXE). Command-line options allow you to specify a number of things, such as where the system library (TURBO.TPL) resides and whether to recompile any files upon which MYFIRST.PAS depends.
Which version should you use? Chances are you'll find the integrated environment best suits your needs. It provides a complete development system in which you can quickly build and debug programs. On the other hand, if you are currently using a command-line compiler, if you have another editor that you prefer, or if you are making heavy use of an assem-bler (for external subroutines), you may want to use the command-line compiler in conjunction with a batch file or Make utility.
Using This Manual
Now that you've loaded the Turbo Pascal files and libraries onto the appropriate floppy disks or hard disk directories, you can start digesting this manual and using Turbo Pascal. But, since this user's guide is written for three different types of users, certain chapters are written with your particular Turbo Pascal programming needs in mind. Take a few moments to read the following, then take off programming .
• Programmers Learning Pascal: If you're a beginning Pascal programmer, you will want to read Chapters 2 through 5. These are written in tutorial fashion and take you through creating and compiling your first Pascal programs. Along the way, they teach you how to use the integrated environment. (You may also want to look at the Turbo Pascal Tutor
manual.)
III Experienced Pascal Programmers: If you're an experienced Pascal
prog-rammer, you should have little difficulty porting your programs to this implementation. You'll want to skim Chapter 7, "All About the Inte-grated Environment," and Appendix B, "Using the Editor," to get familiar with the integrated environment. Chapters 4, 5, and 6 will introduce you to most features unique to Turbo Pascal 5.0. You'll also want to skim through the Turbo Pascal Reference Guide, noting the
differences between Turbo Pascal 5.0 and your Pascal compiler .
version 5.0. It also highlights the differences between 3.0, 4.0, and 5.0. You'll definitely want to read Chapter 6 in this manual to acquaint yourself with the integrated debugger.
c
H A p T E R2
Beginning Turbo Pascal
Turbo Pascal is more than just a fast Pascal compiler; it is an efficient Pascal compiler with an easy-to-learn and easy-to-use integrated development environment. With Turbo Pascal, you don't need to use a separate editor, compiler, linker, and debugger in order to create, debug, and run your Pascal programs (although you can use the command-line version). All these features are built into Turbo Pascal, and they are all accessible from the Turbo Pascal integrated development environment (IDE).
You can begin writing your first Turbo Pascal program using the IDE compiler. By the end of this chapter, you'll have learned the basics of this development environment, written and saved three small programs, and learned a few basic programming skills.
Using the Integrated Environment
In this section, we describe the components of the Turbo Pascal main screen, and explain briefly how to move around in the environment. For greater detail, refer to Chapter 7, II All About the Integrated Environment."
For more on the editor, refer to Appendix B, "Using the Editor."
Online Help
on which you're currently positioned. Any help screen can contain one or more keywords (highlighted items) on which you can get more information.
Use the arrow keys to move to any keyword, and press Enter to get more detailed help on the chosen item. Use the Home and End keys to go to the first and last keywords on a screen, respectively. You can think of the organization of the help system as a tree or an outline structure with some additional links that make it easy to move between screens which cover associated topicS.
To get to the help index, which lists keywords for 18 general topicS, press
F1 again once you're in the help system. The help index lets you access both language and environment help. While you're in the editor, you can also get help on any standard Pascal unit, function, variable, constant, or type by positioning the cursor on the item and pressing Clr/-F1. (Note: Ctrl-F1 is an editor command that can be redefined using TINST, as described in Appendix D, "Customizing Turbo Pascal.")
If you want to return to a previous help screen from inside the Help system, or even from outside, press A/t-F1. (You can back up through 20 previous help screens.) Within a help group (a series of related help screens), AIt-F1 remembers the group as one screen viewed rather than remembering each screen individually. In a help group, wherever PgUp and
PgDn occur, PgUp takes you back a screen, and PgDn takes you forward. To exit from help and return to your menu choice, press Esc (or any of the hot keys described later in this chapter).
UsingTHELP
THELP is a memory-resident help utility you can use with the line version of Turbo Pascal, TPC.EXE. You might be using the command-line compiler instead of the integrated environment because you use a stand-alone editor like Sprint, MicroStar or Brief. With these editors, THELP works like the online help system in the integrated environment, with one major difference: To invoke THELP, you press the THELP hot key (5 on the numeric keypad) instead of F1, as you would in the IDE. THELP is ideal for use with Turbo Debugger, Borland's stand-alone debugger that works on Turbo Pascal, Turbo C, and Turbo Assembler .EXE files. Since THELP is memory-resident, you must load it in memory before you invoke your editor. To load THELP, type
THELP
index screen as in the IDE. Move your cursor to any keyword and press
Enter.
You can always get back to the THELP index screen from inside the help system by pressing F1. Also you can cycle back through the last 20 screens you've viewed by pressing Aft-F1. Each time you press AIt-F1, you go back one more screen until you wrap around again to the most recently accessed screen.
More than likely, the help you'll want will be on a particular function, procedure, or other element of Turbo Pascal. Place your cursor over the word in your editor and press 5. If THELP knows about the word, you'll get help associated with it; otherwise, you'll get the THELP index screen. For example, type the word Chr into your editor. Leaving the cursor on the same line as Chr, press the THELP hot key, 5. THELP displays the help screen for the function Chr, along with a highlighted link to Ord, the inverse function of Chr.
Place the cursor on a plus or equal sign before invoking THELP to get help on expressions, operators and operands. Place the cursor on begin for information on the structure of compound statements in Turbo Pascal. You'll find language help available for most reserved words: program, var, type, const, procedure, function, and so on. You can get help on Turbo Pascal Libraries (TPL's) and units by moving to the reserved word uses and pressing 5.
If you don't want to type a keyword into your editor, you can simply press the K key while THELP is active. THELP will prompt you to enter any keyword you need help on. You can also jump to any help screen you know by page number (press J), or paste a highlighted word or an entire help screen into your editor (press lor P, respectively).
Alternatively, you can save the current help screen to a file called THELP.SAV-simply press S. If the file already exists, the screen will be appended to the end of THELP.SAV, making it easy to create custom help documents.
For more details about THELP, its command keys, and its command-line options, see Appendix C, "Turbo Pascal Utilities."
Windows and Menus
infor-mation). When you press any key, the version infonnation disappears, but the windowed environment remains.
Note: If you are using a laptop computer and have difficulty reading text displayed in the integrated development environment, use the TINST utility to change the Mode for Display setting on the TINST main menu to LCD or Composite. This setting will force the integrated environment to use black and white colors. Using the TINST Mode for Display command to customize your system display is also recommended if you have a color graphics adapter and a monochrome or composite monitor. (Refer to page 316 for more infonnation about the Mode for Display command.)
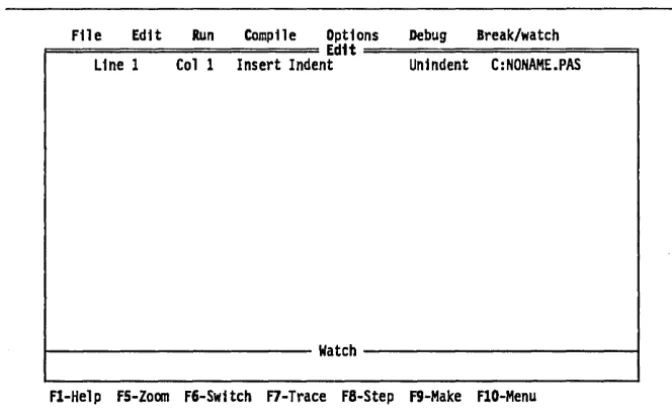
File Edit Run Compile Options Debug Break/watch
F======================
Ed1t=====================9
Line 1 Col 1 Insert Indent Unindent C:NONAME.PAS
1 - - - -
Watch- - - i
[image:43.492.68.404.208.415.2]FI-He1p FS-Zoom F6-Switch F7-Trace F8-Step F9-Make FlO-Menu
Figure 2.1 : The Turbo Pascal Main Menu Screen
Look closely at the screen; it consists of four parts:
• the main menu, from which pull-down menus of commands can be invoked
• the Edit window • the Watch window
• the bottom line (the line at the bottom of the screen that indicates which hot keys are currently active)
• Type the highlighted capital letter to choose a menu command or use the arrow keys to move to the command and press Enter.
• Press Esc to leave a menu.
• Press F10 to toggle between the menu system and the active window.
• If you are in the main menu or a pull-down menu, press Esc to go to the previously active window. (When a window is active, it will have a double bar at its top, and its name will be highlighted.)
• Use the Right and Left arrow keys to move from one pull-down menu to another. <