15.1 Introduction: Pulling it all
together
In this tutorial, you will bring together several of the skills you have learned in previous tutorials to imple-ment some sophisticated triggers.
15.2 Learning objectives
How do I run VBA code using a macro?
How do I use the value in one field to
automatically suggest a value for a different field?
How do I change the table or query a form is bound to once the form is already created?
What is the After Update event? How is it used?
How do I provide a search capability for my forms?
How do I create an unbound combo box?
Can I implement the search capability using Visual Basic?
15.3 Tutorial exercises
15.3.1 Using a macro to run VBA code
There a some things that cannot be done using the Access macro language. If the feature you wish to implement is critical to your application, then you must implement it using VBA. However, since it is possible to call a VBA function from within a macro, you do not have to abandon the macro language completely.In this section, you are going to execute the Param-eterTest subroutine you created in Section 12.3.6 from within a macro. Since the RunCode action of the Access macro language can only be used to
exe-cute functions (not subroutines) you must do one of two things before you create the macro:
1. Convert ParameterTest to a function — you do this simply by changing the Sub at the start of the procedure to Function.
2. Create a new function that executes Parame-terTest and call the function from the macro.
15.3.1.1 Creating a wrapper
Since the second alternative is slightly more interest-ing, it is the one we will use.
• Open your basTesting module from Tutorial 12.
• Create a new function called ParameterTest-Wrapper defined as follows:
Function
ParameterTestWrapper(intStart As Integer, intStop As Integer) As Integer
'this function calls the ParameterTest subroutine
ParameterTest intStart, intStop ParameterTestWrapper = True
'return a value End Function
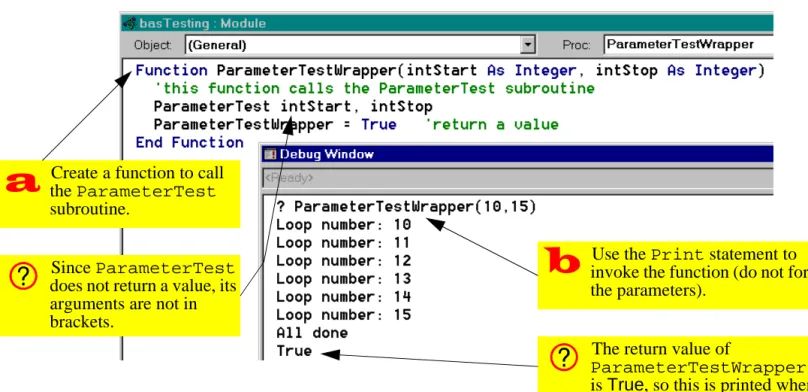
• Call the function, as shown in Figure 15.1. Note that the return value of the function is declared as an integer, but the actual assign-ment stateassign-ment is ParameterTestWrap-per = True. This is because in Access/ VBA, the constants True and False are defined as integers (-1 and 0 respectively).
15.3.1.2 Using the RunCode action
• Leave the module open (you may have to resize and/or move the debug window) and create a new macro called mcrRunCodeTest.
FIGURE 15.1: Create a function that calls the ParameterTest subroutine.
Create a function to call the ParameterTest subroutine.
Since ParameterTest does not return a value, its arguments are not in brackets.
Use the Print statement to invoke the function (do not forget the parameters).
The return value of
ParameterTestWrapper() is True, so this is printed when the function ends.
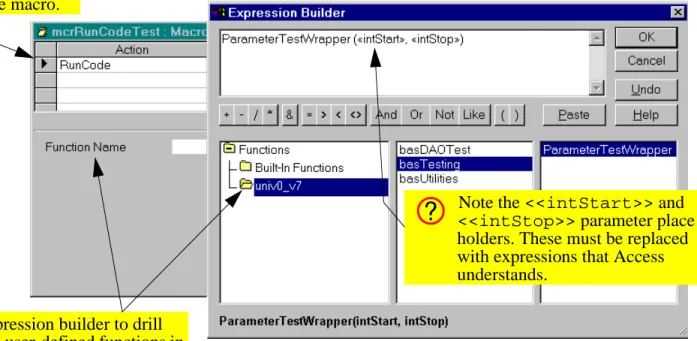
• Add the RunCode action and use the expression builder to select the correct function to execute, as shown in Figure 15.2.
The expression builder includes two parame-ter place holders (<<intStart>> and <<intStop>>) in the function name. These are to remind you that you must pass two parameters to the ParameterTestWrap-per() function. If you leave the place holders where they are, the macro will fail because Access has not idea what <<intStart>> and <<intStop>> refer to.
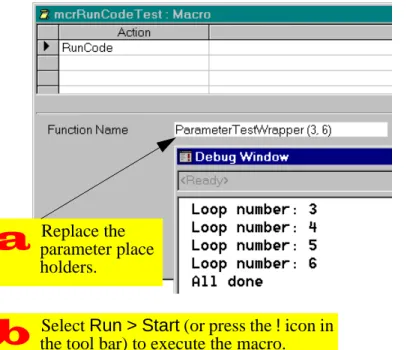
• Replace the parameter place holders with two numeric parameters (e.g. 3 and 6). Note that in general, the parameters could be field names or any other references to Access objects contain-ing (in this case) integers.
• Select Run > Start to execute the macro as shown in Figure 15.3.
15.3.2 Using activity information to
determine the number of credits
In this section, you will create triggers attached to the After Update event of bound controls.15.3.2.1 Scenario
Assume that each type of course activity is generally associated with a specific number of credits, as shown below: Activity Credits lecture 3.0 lab 3.0 tutorial 1.0 seminar 6.0
FIGURE 15.2: Use the expression builder to select the function to execute.
Add a RunCode action to the macro.
Use the expression builder to drill down to the user-defined functions in your database file.
Note the <<intStart>> and <<intStop>> parameter place holders. These must be replaced with expressions that Access understands.
Assume as well that the number of credits for a par-ticular type of course is not cast in stone. As such, the numbers given above are merely “default” val-ues.
You want to use the default credit values when you create a new course or modify an existing course. However, the user may override this default if neces-sary for a particular course. The basic requirement is illustrated in Figure 15.4.
15.3.2.2 Designing the trigger
Based on the foregoing, the answer to the “what” question is the following:
1. Look up the default number of credits associated with the course activity showing in the form’s Activity field.
2. Copy this number into the Courses.Credits field.
FIGURE 15.3: Execute the RunCode macro.
Replace the parameter place holders.
Select Run > Start (or press the ! icon in the tool bar) to execute the macro.
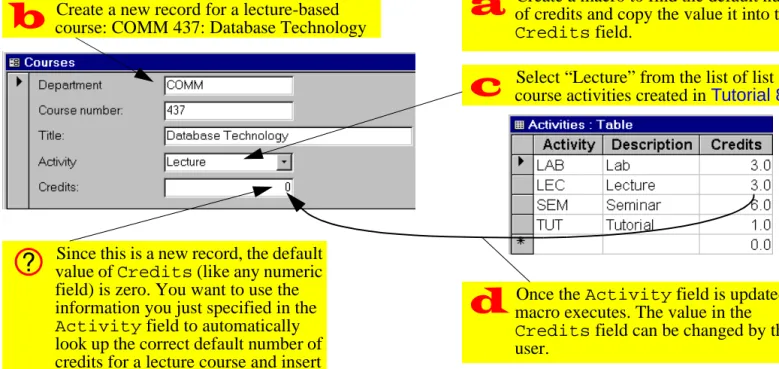
FIGURE 15.4: Inserting a default value into a new record.
Create a new record for a lecture-based course: COMM 437: Database Technology
Select “Lecture” from the list of list of course activities created in Tutorial 8.
Since this is a new record, the default value of Credits (like any numeric field) is zero. You want to use the information you just specified in the Activity field to automatically look up the correct default number of credits for a lecture course and insert it in the Credits field.
Create a macro to find the default number of credits and copy the value it into the Credits field.
Once the Activity field is updated, the macro executes. The value in the
Credits field can be changed by the user.
There are several possible answers to the “when” question (although some are better than others). For example:
1. When the user enters the Credits field (the On Enter event for Credits) — The problem with this choice is that the user could modify the course’s activity without moving the focus to the Activity field. In such a case, the trigger would not execute.
2. When the user changes the Activity field (the After Update event for Activity) — This choice guarantees that whenever the value of Activ-ity is changed, the default value will be copied into the Credits field. As such, it is a better choice.
15.3.2.3 Preliminary activities
• Modify the Activities table to include a single-precision numeric field called Credits. Add the values shown in the table in Section 15.3.2.1.
• Ensure that you have a courses form (e.g., frm-Courses) and that the form has a combo box for the Activity field. You may wish to order the fields such that Activity precedes Credits in the tab order (as shown in Figure 15.4).
If your move fields around, remember to adjust the tab order accordingly (recall Section 8.3.4).
15.3.2.4 Looking up the default value
As you discovered in Section 14.3.5, Access has a DLookUp() function that allows you to go to the Activities table and find the value of Credits for a particular value of Activity. A different approach is to join the Activities table with the Courses table in a query so that the default value of credits is always available in the form. This is the approach we will use here.
• Ensure you have a relationship (in the main rela-tionship window) between Courses.Activity and Activities.Activity.
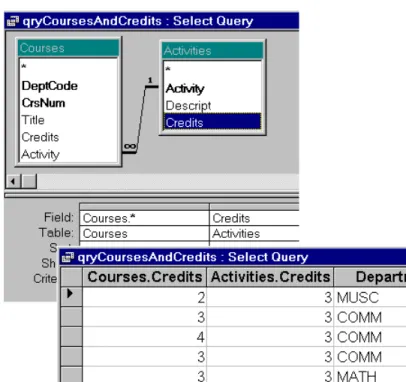
• Create a new query called qryCoursesAnd-Credits based on the Courses and Activi-ties tables (see Figure 15.5).
Notice that you have two credits fields: Courses.Credits (the actual number of credits for the course) and
Activi-ties.Credits (the “default” or “suggested” number of credits based on the value of Activity). Access uses the <table
name>.<field name> notation whenever a query contains more than one field with the same name.
Since you already have forms based on the Courses table that expect a field called Credits (rather than one called Courses.Credits), it is a
FIGURE 15.5: Use a join to make the default value available.
good idea to rename the Activities.Credits field in the query. You do this by creating a calculated field.
• Rename Activities.Credits to Default-Credits as shown in Figure 15.6. Note that this eliminates the need for the <table
name>.<field name> notation.
15.3.2.5 Changing the Record Source of the
form
Rather than create a new form based on the qry-CoursesAndCredits query, you can modify the Record Source property of the existing frmCourses form so it is bound to the query rather than the Courses table.
• Bring up the property sheet for the frmCourses form and change the Record Source property to qryCoursesAndCredits as shown in
Figure 15.7.
FIGURE 15.6: Rename one of the Credits fields.
Rename Credits form the Activities table to DefaultCredits.
The advantage of using a join query in this manner is that DefaultCredits is now available for use within the form and within any macros or VBA mod-ules that run when the form is open.
15.3.2.6 Creating the SetValue macro
The SetValue macro you require here is extremely simple once you have DefaultCredits available within the scope of the form.
• Create the mcrCourses.SetCredits macro as shown in Figure 15.8.
15.3.2.7 Attaching a procedure to the After Update event
The On Click event of a button is fairly simple to understand: the event occurs when the button is clicked. The events associated with non-button objects operate in exactly the same way. For exam-ple, the After Update event for controls (text box, combo box, check box, etc.) occurs when the value
FIGURE 15.7: Change the Record Source
property of an existing form.
Bring up the form’s property list and change its Record Source property.
The field list now contains all the fields in the new query.
of the control is changed by the user. As a result, the After Update event is often used to trigger data verifi-cation procedures and “auto-fill” procedures like the one you are creating here.
• Attach the mcrCourses.SetCredits macro to the After Update event of the Activity field. • Verify that the trigger works properly.
15.3.3 Use an unbound combo box to
automate search
As mentioned in Tutorial 8, a combo box has no intrinsic search capability. However, the idea of scan-ning a short list of key values, selecting a value, and having all the information associated with that record pop on to the screen is so basic that in Access ver-sion 7.0 and above, this capability is included in the combo box wizard. In this tutorial, we will look at a couple of different means of creating a combo boxes for search from scratch.
15.3.3.1 Manual search in Access
To see how Access searches for records, do the fol-lowing:
• Open your frmDepartments form.
FIGURE 15.8: Create the SetValue macro.
Create a macro group called mcrCourses and a named macro called SetCredits.
You can use the builder to set the arguments or simply type in the names of the fields.
• Move to the field on which you want to search (e.g., DeptCode);
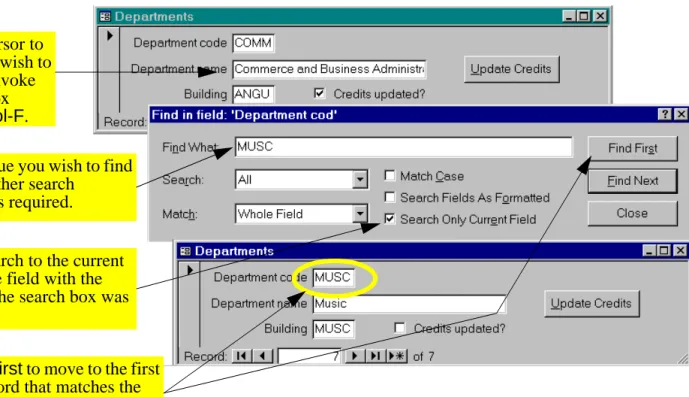
• Select Edit > Find (or press Control-F); • Fill out the search dialog box as shown in
Figure 15.9.
In the dialog box, you specify what to search for (usually a key value) and specify how Access should conduct its search. When you press Find First, Access finds the first record that matches your search value and makes it the current record (note that if you are searching on a key field, the first matching record is also the only matching record).
15.3.3.2 Preliminaries
To make this more interesting, assume that the frm-Departments form is for viewing editing existing departmental information (rather than adding new departments). To enforce this limitation, do the fol-lowing:
• Set the form’s Allow Additions property to No.
• Set the Enabled property of DeptCode to No (the user should never be able to change the key val-ues of existing records).
15.3.3.3 Creating the unbound combo box
The key thing to remember about the combo box used to specify the search criterion is that it has nothing to do with the other fields or the underlying table. As such, it should be unbound.
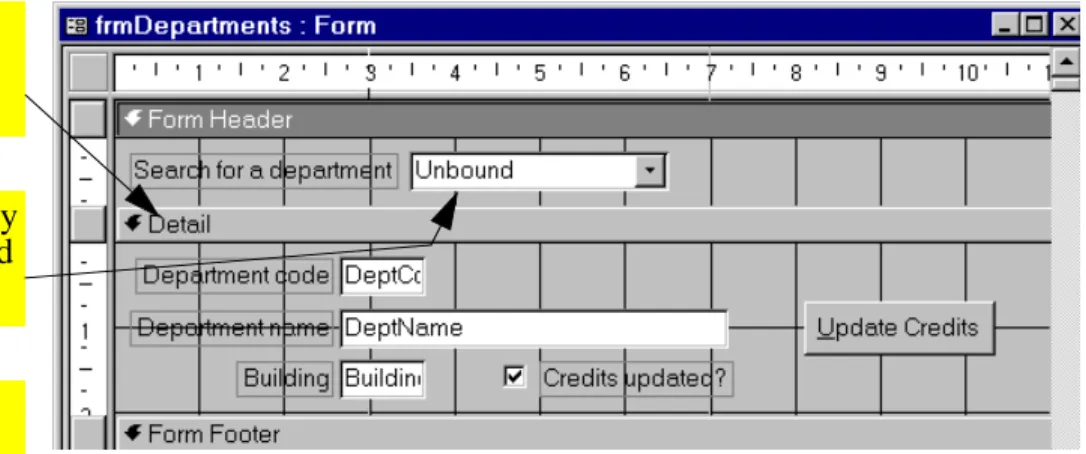
• Create an unbound combo box in the form header, as shown in Figure 15.10.
• Change the Name property of the combo box to cboDeptCode.
• The resulting combo box should resemble that shown in Figure 15.11.
When you create an unbound combo box, Access gives it a default name (e.g., Combo5). You should do is change this to something more descriptive (e.g.,
cboDept-FIGURE 15.9: Search for a record using the “find” dialog box.
Move the cursor to the field you wish to search and invoke the search box using Control-F.
Enter the value you wish to find and set the other search
parameters as required.
Press Find First to move to the first (or only) record that matches the search condition.
Limit the search to the current field (i.e., the field with the focus when the search box was opened).
FIGURE 15.10: Create an unbound combo box.
Drag the separator for the detail down to make room in the form header
Create an unbound combo box by selecting the combo box tool and clicking in the header area.
Use the wizard in the usual way to get a list of valid DeptCode values and descriptions. The bound column for the combo box should be DeptCode.
Since the combo box is unbound, its value has to be stored for later use rather than stored in a field.
Code). The advantage of the prefix cbo is that it allows you to differentiate between the bound field DeptCode and the unbound combo box.
15.3.3.4 Automating the search procedure using a macro
When we implement search functionality with a combo box, only two things are different from the manual search in Figure 15.9:
1. the search dialog box does not show up, and 2. the user selects the search value from the combo
box rather than typing it in.
The basic sequence of actions, however, remains the same. As a result, the answer to the “what” ques-tion is the following:
1. Move the cursor to the DeptCode field (this allows the “Search Only Current Field” option to be used, thereby drastically cutting the search time).
2. Invoke the search feature using the current value of cboDeptCode as the search value.
FIGURE 15.11: An unbound combo box.
Although the DeptCode column has been hidden, it is the “bound” column. As a result, the value of the combo box as it appears here is “COMM”, not “Commerce and ...”
3. Move the cursor back to cboDeptCode or some other field.
The only problem with this procedure is that the DeptCode text box is disabled. As a result, you must include an extra step at the beginning of the macro to set its Enabled property to Yes and another at the end of the macro to return it to its original state.
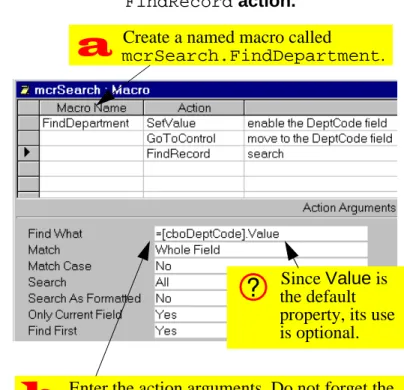
• Create a new macro called mcrSearch.Find-Department.
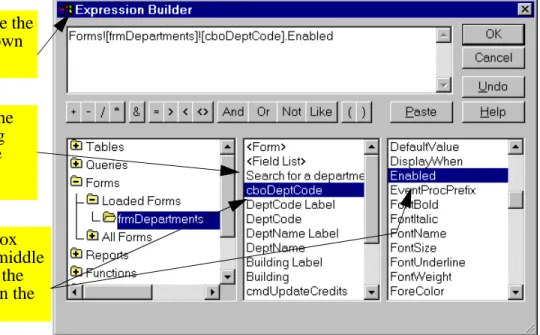
• Use the SetValue action to set the Dept-Code.Enabled property to Yes. This can be done using the expression builder, as shown in Figure 15.12.
• Use the GotoControl action to move the cursor to the DeptCode text box. Note that this action will fail if the destination control is disabled. • Use the FindRecord action to implement the
search as shown in Figure 15.13.
FIGURE 15.13: Fill in the arguments for the
FindRecord action.
Create a named macro called mcrSearch.FindDepartment.
Enter the action arguments. Do not forget the equals sign before the name of the combo box.
Since Value is the default property, its use is optional.
FIGURE 15.12: Use the builder to specify the name of the property to set.
To set the Item argument, use the expression builder to drill down to the correct form.
Select the unbound combo box (cboDeptCode) from the middle pane. A list of properties for the selected object is displayed in the pane on the right.
The middle pane shows all the objects on the form including labels and buttons (hence the need for a good naming convention).
Access interprets any text in the Find What argument as a literal string (i.e., quotation marks would not be required to find COMM). To use an expression (including the contents of a control) in the Find What argument, you must precede it with an equals sign (e.g.,
=[cboDeptCode].
• You cannot disable a control if it has the focus. Therefore, include another GotoControl action to move the cursor to cboDeptCode before set-ting DeptCode.Enabled = No.
• Attach the macro mcrSearch.FindDepart-ment to the After Update event of the cboDept-Code combo box.
• Test the search feature.
15.3.4 Using Visual Basic code instead of
a macro
Instead of attaching a macro to the After Update event, you can attach a VBA procedure. The VBA procedure is much shorter than its macro counter-part:
1. a copy (clone) of the recordset underlying the form is created,
2. the FindFirst method of this recordset is used to find the record of interest.
3. the “bookmark” property of the clone is used to move to the corresponding bookmark for the form.
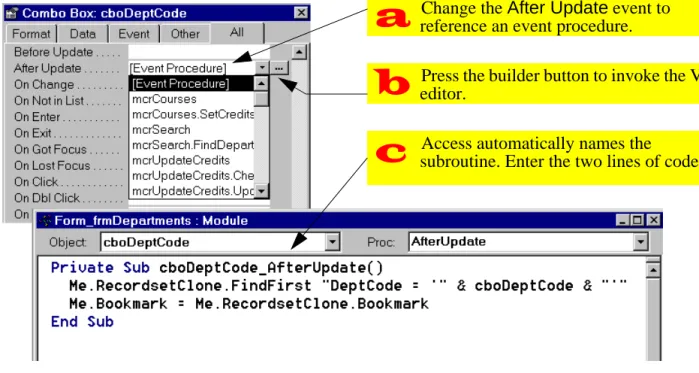
To create a VBA search procedure, do the following: • Change the After Update event of cboDeptCode
to “Event Procedure”.
• Press the builder ( ) to create a VBA subrou-tine.
• Enter the two lines of code below, as shown in Figure 15.14.
Me.RecordsetClone.FindFirst
“DeptCode = ‘” & cboDeptCode & “'” Me.Bookmark =
Me.RecordsetClone.Bookmark
This program consists of a number of interesting ele-ments:
• The property Me refers to the current form. You can use the form's actual name, but Me is much faster to type.
• A form’s RecordsetClone property provides a means of referencing a copy of the form's under-lying recordset.
• The FindFirst method is straightforward. It acts, in this case, on the clone.
• Every recordset has a bookmark property that uniquely identifies each record. A bookmark is like a “record number”, except that it is stored as
a non-human-readable data type and therefore is not of much use unless it is used in the manner shown here. Setting the Bookmark property of a record makes the record with that bookmark the current record. In the example above, the book-mark of the records underlying the form is set to equal the bookmark of the clone. Since the clone had its bookmark set by the search procedure, this is equivalent to searching the recordset underlying the form.
15.4 Application to the assignment
15.4.1 Triggers to help the user
• Create a trigger on your order form that sets the actual selling price of a product to its default price. This allows the user to accept the default price or enter a new price for that particular trans-action (e.g., the item could be damaged). You will
FIGURE 15.14: Implement the search feature using a short VBA procedure.
Change the After Update event to reference an event procedure.
Press the builder button to invoke the VBA editor.
Access automatically names the subroutine. Enter the two lines of code.
have to think carefully about which event to attach this macro to.
• Create a trigger on your order form that calcu-lates a suggested quantity to ship and copies this value into the quantity to ship field. The sug-gested value must take into account the amount ordered by the customer, any outstanding backo-rders for that item by that customer, and the cur-rent quantity on hand (you cannot ship what you do not have). The user should be able to override this suggested value. (Hint: use the MinValue() function you created in Section 12.5.)
• Provide you customer and products forms with search capability.
15.4.2 Updating the BackOrders table
Once a sales order is entered into the order form, it is a simple matter to calculate the amount of each product that should be backordered (you did this inSection 10.4). The problem is updating the Back-Orders table itself because two different situations have to be considered:
1. A record for the particular customer-product
combination exists in the BackOrders table --
If a backorder record exists for a particular cus-tomer and a particular product, the quantity field of the record can be added-to or subtracted-from as backorders are created and filled.
2. A customer-product record does not exist in
the BackOrders table -- If the particular
cus-tomer has never had a backorder for the product in question, then there is no record in the Back-Orders table to update. If you attempt to update a nonexistent record, you will get an error.
What is required, therefore, is a means of determin-ing whether a record already exists for a particular customer-product combination. If a record does exist, then it has to be updated; if a record does not
exist, then one has to be created. This is simple enough to talk about, but more difficult to implement in VBA. As a result, you are being provided with a shortcut function called UpdateBackOrders() that implements this logic.
The requirements for using the UpdateBackO-rders() function are outlined in the following sec-tions:
15.4.2.1 Create the pqryItemsToBackOrder
query
If you have not already done so, create the pqry-ItemsToBackOrder query described in
Section 10.4. The UpdateBackOrders() proce-dure sets the parameter for the query and then cre-ates a recordset based on the results.
If you did not use the field names OrderID, and ProductID in your tables, you must use the calculated field syntax to rename them
(see Section 15.3.2.4 to review renaming fields in queries).
Note that if the backordered quantity is positive, items are backordered. If the backordered quantity is negative, backorders are being filled. If the backor-dered quantity is zero, no change is required and these records should no be included in the results of the query.
15.4.2.2 Import the shortcut function
Import the Visual Basic for Applications (VBA) mod-ule containing the code for the
UpdateBackOrders() function. This module is contained in an Access database called
BOSC_Vx.mdb that you can download from the course home page.
• BOSC_V2.mdb is for those running Access ver-sion 2.0. To import the module, select File >
Import, choose BOSC_V2.mdb, and select Mod-ule as the object type to import.
• BOSC_V7.mdb is for those running Access ver-sion 7.0 or higher. To import the module, select File > Get External Data > Import, choose BOSC_V7.mdb, and select Module as the object type to import.
15.4.2.3 Use the function in your application
The general syntax of the function call is:
UpdateBackOrders(OrderID, CustomerID). The OrderID and CustomerID are arguments and they both must be of the type Long Integer. If this function is called properly, it will update all the backo-rdered items returned by the parameter query.
15.4.2.4 Modifying the UpdateBackOrders()
function
The UpdateBackOrders() function looks for spe-cific fields in three tables: BackOrders,
Custom-ers, and Products. If any of your tables or fields are named differently, an error occurs. To eliminate these errors, you can do one of two of things: 1. Edit the VBA code. Use the search-and-replace
feature of the module editor to replace all instances of field names in the supplied proce-dures with your own field names. This is the rec-ommended approach, although you need an adequate understanding of how the code works in order to know which names to change.
2. Change the field names in your tables (and all queries and forms that reference these field names). This approach is not recommended.
15.4.3 Understanding the
UpdateBackOrders()
function
The flowchart for the UpdateBackOrders() func-tion is shown in Figure 15.15. This funcfunc-tion repeat-edly calls a subroutine, BackOrderItem, whichupdates or adds the individual items to the BackO-rders table. The flowchart for the BackOrderItem subroutine is shown in Figure 15.16.
There are easier and more efficient ways of imple-menting routines to update the BackOrders table. Although some amount of VBA code is virtually inev-itable, a great deal of programming can be elimi-nated by using parameter queries and action queries. Since queries run faster than code in
Access, the more code you replace with queries, the better.
To get full marks for the backorders aspect of the assignment, you have to create a more elegant alternative to the shortcut supplied here.
start
is the list
empty? error message
run pqryItemsToBackOrder
to get list of items to backorder
do until end of list
call BackOrderItems stop (CustID,ProductID,Qty) yes no stop
FIGURE 15.15: Flowchart for
start
update Qty
stop stop
search BackOrders table for matching CustID & ProductID
found?
check Customer table to ensure valid CustID
error message stop valid?
check Products table to ensure valid ProductID
error message stop valid?
add new record with
CustID, ProductID & Qty
yes no yes yes no no
15.4.4 Annotated source code for the
backorders shortcut module.
In the following sections, the two procedures in the shortcut module are examined. In each case, the code for the procedure is presented followed by comments on specific lines of code.15.4.4.1 The UpdateBackOrders() function
Function UpdateBackOrders(ByVal
lngOrdID As Long, ByVal lngCustID As Long)
Set dbCurr = CurrentDb Dim rsBOItems As Recordset
dbCurr.QueryDefs!pqryItemsToBackOrder. Parameters!pOrderID = lngOrdID Set rsBOItems = dbCurr.QueryDefs!pqryItemsToBackOrder .OpenRecordset() If rsBOItems.RecordCount = 0 Then
MsgBox “Back order cannot be processed: order contains no items”
Exit Sub End If Do Until rsBOItems.EOF Call BackOrderItem(lngCustID, rsBOItems!ProductID, rsBOItems!Qty) rsBOItems.MoveNext Loop rsBOItems.Close End Function 15.4.4.2 Explanation of the UpdateBackOrders() function
Function UpdateBackOrders(ByVal lngOr-dID As Long, ByVal lngCustID As Long) — This statement declares the function and its parame-ters. Each item in the parameter list contains three elements: ByVal or ByRef (optional), the variable's name, and the variable's type (optional). The ByVal
keyword simply means that a copy of the variables value is passed the subroutine, not the variable itself. As a result, variables passed by value cannot be changed by the sub-procedure. In contrast, if a variable is passed by reference (the default), its value can be changed by the sub-procedure. Set dbCurr = CurrentDb — Declaring a vari-able and setting it to be equal to something are dis-tinct activities. In this case, the variable dbCurr (which is declared in the declarations section) is set to point to a database object. Note that the database object is not created, it already exists.
CurrentDb is a function supported in Access ver-sion 7.0 and higher that returns a reference to the current database. In Access version 2.0, this function does not exist and thus the current database must be found by starting at the top level object in the Access DAO hierarchy, as discussed in
Section 14.3.1.
Dim rsBOItems As Recordset — In this decla-ration statement, a pointer to a Recordset object is declared. This recordset contains a list of all the items to add to the BackOrders table.
dbCurr.QueryDefs!pqryItemsToBackOrder .Parameters!pOrderID = lngOrdID — This one is a bit tricky: the current database (dbCurr) contains a collection of objects called QueryDefs (these are what you create when you use the QBE query designer). Within the collection of QueryDefs, there is one called pqryItemsToBackOrder (which you created in Section 15.4.2.1).
Within every QueryDef, there is a collection of zero or more Parameters. In this case, there is one called pOrderID and this sets the value of the parameter to the value of the variable lngOrderID (which was passed to the function as a parameter).
Set rsBOItems = dbCurr.QueryDefs!pqry-ItemsToBackOrder.OpenRecordset() — Here
is another set statement. In this one, the variable rsBOItems is set to point at a recordset object. Unlike the current database object above, however, this recordset does not yet exist and must be created by running the pqryItemsToBackOrder parame-ter query.
OpenRecordset is a method that is defined for objects of type TableDef or QueryDef that creates an image of the data in the table or query. Since the query in question is a parameter query, and since the parameter query is set in the previous statement, the resulting recordset consists of a list of backordered items with an order number equal to the value of pOrderID.
If rsBOItems.RecordCount = 0 Then — The only thing you need to know at this point about the RecordCount property of a recordset is that it returns zero if the recordset is empty.
MsgBox “Back order cannot be processed: order contains no items” — The MsgBox statement pops up a standard message box with an Okay button in the middle.
Exit Sub — If this line is reached, the list contains no items. As such, there is no need to go any further in this subroutine.
End If — The syntax for If… Then… Else… state-ments requires an End If statement at the end of the conditional code. That is, everything between the If and the End If executes if the condition is true; otherwise, the whole block of code is ignored. Do Until rsBOItems.EOF — The EOF property of a recordset is set to true when the “end of file” is encountered.
Call BackOrderItem(lngCustID, rsBOI-tems!ProductID, rsBOItems!Qty) — A sub-routine is used to increase the modularity and
readability of this function. Note the way in which the current values of ProductID and Qty from the rsBOItems Recordset are accessed.
rsBOItems.MoveNext — MoveNext is a method defined for recordset objects. If this is forgotten, the EOF condition will never be reached and an infinite loop will be created. In VBA, the Escape key is usu-ally sufficient to stop an infinite loop.
Loop — All Do While/Do Until loops must end with the Loop statement.
rsBOItems.Close — When you create a new object (such as a Recordset using the
Open-Recordset method), you should close it before exit-ing the procedure. Note that you do not close
dbCurr because you did not open it.
End Function — All functions/subroutines need an End Function/End Sub statement.
15.4.4.3 The BackOrderItem() subroutine
Sub BackOrderItem(ByVal lngCustID As Long, ByVal strProdID As String, ByVal intQty As Integer)
Set dbCurr = CurrentDb Dim strSearch As String
Dim rsBackOrders As Recordset Set rsBackOrders =
dbCurr.OpenRecordset(“BackOrders”, dbOpenDynaset)
strSearch = “CustID = “ & lngCustID & “ AND ProductID = '" & strProdID & “'” rsBackOrders.FindFirst strSearch
If rsBackOrders.NoMatch Then Dim rsCustomers As Recordset Set rsCustomers =
dbCurr.OpenRecordset(“Customers”, dbOpenDynaset)
strSearch = “CustID = “ & lngCustID rsCustomers.FindFirst strSearch
If rsCustomers.NoMatch Then
MsgBox “An invalid Customer ID number has been passed to BackOrderItem” Exit Sub
End If
Dim rsProducts As Recordset Set rsProducts =
dbCurr.OpenRecordset(“Products”, dbOpenDynaset)
strSearch = “ProductID = '" & strProdID & “'”
rsProducts.FindFirst strSearch If rsProducts.NoMatch Then
MsgBox “An invalid Product ID number has been passed to BackOrderItem” Exit Sub End If rsBackOrders.AddNew rsBackOrders!CustID = lngCustID rsBackOrders!ProductID = strProdID rsBackOrders!Qty = intQty rsBackOrders.Update Else rsBackOrders.Edit rsBackOrders!Qty = rsBackOrders!Qty + intQty rsBackOrders.Update End If End Sub
15.4.4.4 Explanation of the BackOrderItem()
subroutine
Since many aspects of the language are covered in the previous subroutine, only those that are unique to this subroutine are explained.
Set rsBackOrders = dbCurr.OpenRecord-set(“BackOrders”, dbOpenDynaset) — The OpenRecordset method used here is the one defined for a Database object. The most important argument is the source of the records, which can be
a table name, a query name, or an SQL statement. The dbOpenDynaset argument is a predefined con-stant that tells Access to open the recordset as a dynaset. You don't need to know much about this except that the format of these predefined constants is different between Access version 2.0 and version 7.0 and higher. In version 2.0, constants are of the form: DB_OPEN_DYNASET.
strSearch = “CustID = ”& lngCustID & “ AND ProductID = ’” & strProdID & “'” — A string variable has been used to break the search process into two steps. First, the search string is constructed; then the string is used as the parameter for the FindFirst method. The only tricky part here is that lngCustID is a long integer and strProdID is a string. The difference is that the value of str-ProdID has to be enclosed in quotation marks when the parameter is passed to the FindFirst method. To
do this, single quotes are used within the search string.
rsBackOrders.FindFirst strSearch — FindFirst is a method defined for Recordset objects that finds the first record that meets the crite-ria specified in the method's argument. Its argument is the text string stored in strSearch.
If rsBackOrders.NoMatch Then — The NoMatch property should always be checked after searching a record set. Since it is a Boolean variable (True / False) it can be used without an comparison operator.
rsBackOrders.AddNew — Before information can be added to a table, a new blank record must be cre-ated. The AddNew method creates a new empty record, makes it the active record, and enables it for editing.
rsBackOrders!CustID = lngCustID — Note the syntax for changing a variable’s value. In this case, the null value of the new empty record is replaced with the value of a variable passed to the subroutine.
rsBackOrders.Update — After any changes are made to a record, the Update method must be invoked to “commit” the changes. The AddNew / Edit and Update methods are like bookends around changes made to records.
rsBackOrders.Edit — The Edit method allows the values in a record to be changed. Note that these changes are not saved to the underlying table until the Update method is used.